
Supporting LDAP
Configure an LDAP integration profile.
To configure an LDAP type of integration profile, you must have the following role:
- General System Administrator
Alma Lightweight Directory Access Protocol (LDAP) support shares similar characteristics with other Ex Libris LDAP-supported products while providing user name mapping specific to Alma.
For a detailed overview of Alma LDAP support, see https://developers.exlibrisgroup.com/alma/integrations/user-management/authentication/inst_idp/ldap
Ex Libris recommends that you use the same LDAP profile for both the production server and the sandbox. In this case, no additional configuration of LDAP is required on the sandbox after a refresh. For more information, see Recommended Configuration to Account for Sandbox Refresh.
To configure an LDAP type of integration profile:
- On the Integration Profile List page (Configuration > General > External Systems > Integration Profiles), select Add Integration Profile. The first page of the integration profile wizard opens.
- Perform the following actions on this page:
- Enter a name and code for the LDAP profile you are defining.
- From the Integration type drop-down list, select LDAP.
- Indicate the type of LDAP system with which you are integrating (for Ex Libris' informational purposes). Note that this is mandatory.
- If you select Other from the list of systems, the System Description field appears for further system details.
- Optionally, enter a description of the integration you are configuring.
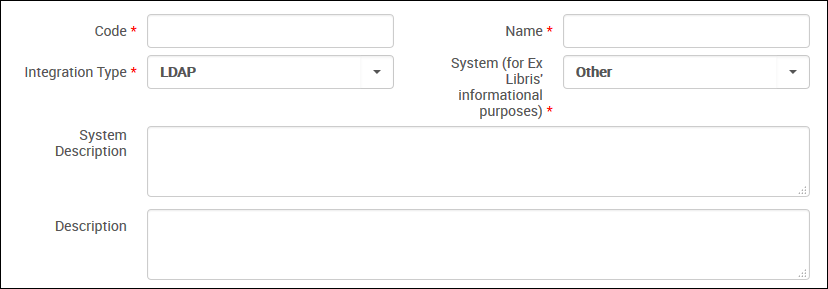
LDAP Profile – Page 1
- Select Next. The second page of the wizard opens.
- Select Actions to indicate that LDAP is active and available for use.
- Under LDAP Definitions, enter the LDAP authentication configuration parameters specific to your institution for the LDAP server interaction, as described in the following table.You can define up to five LDAP definitions.
LDAP Integration Profile Configuration Parameters Field Description Host Enter the host name of the remote LDAP server through which LDAP is accessible. Port Enter the port for the remote LDAP server. Use secure connection Select this check box to use the SSL protocol to communicate with the LDAP server. This is the only supported option.Use TLS Select the check box to convert the existing connection to use Transport Layer Security (TLS) 1.2, which provides an encrypted connection. This requires LDAP version 3 or later.Connection timeout Specify your preference for the timeout value in milliseconds. The default value is 60000 – one minute for the connection timeout. Initial bind DN Enter the full DN (distinguished name) for the initial bind. Initial bind password Enter the DN password for the initial bind. DN for binding before each search Use this parameter to specify the DN when you want to use dynamic password binding instead of a hard-coded password for the initial bind. Convert password from UTF to charset Leave this field empty. Response encoding Enter UTF8 if response encoding is required. This setting is used to encode the LDAP response before sending it back to the calling application. The only possible value is UTF8. Search base 1 (through Search base 5) Enter the full path search in the LDAP directory tree to the user. The system searches the LDAP tree to locate the user's record based on the Search base and Search filter. The Search base and Search filter parameters can be repeated to search in more than one tree. If the results of the Search base/Search filter are not unique (or a zero-size result), the search step is repeated for the next provided Search base/Search filter.Search filter 1 (through Search filter 5) Enter the parameter by which you want to filter the results to return only one object. The system searches the LDAP tree to locate the user's record based on the Search base and Search filter. (See the note above.) Map Primary Identifier Enter the name of an LDAP attribute, such as CN. This attribute is mapped by Alma to serve as the user identifier. The Alma user name must match one of the LDAP identifiers, such as CN. If it does not, the authentication succeeds but the user is not allocated any permissions/roles. - Select Save. The profile you configured appears in the Integration Profile List.
Page tags: article:topicLDAPproduct:almacontent:Documentationlang:englishLDAP integration profile
