
Set Direct to Printer Option for Receipts and Labels
The Direct to Printer is an optional feature that enables you to send the receipt or label print job directly to the configured printer instead of using the browser. After the organization implements the Direct to Printer feature, as a library administrator, you can configure the receipt and label printing settings for a workstation in Polaris System Administration (web-based). Settings are stored in the database, and stay with the workstation and organization (not the user).
To change the workstation printer configurations in Leap you need the Leap printers: Modify permission, but even the users without this permission can still view the settings and help with troubleshooting.
Important:
Using the Direct to Printer feature is optional. Libraries can use this feature for a more seamless printing experience, but it is not required. If you prefer, you can still use your browser’s built-in print functionality instead to print receipts and labels.
Note:
Once Direct to Printer is enabled for a user, that user cannot print receipts and labels using the browser. To enable browser printing for receipts and labels, you must deselect Direct to Printer in Leap.
The Direct to Printer feature is available at the System, Library, and Branch levels.
Setting up the Direct to Printer feature involves the following:
-
Installing Printing Software and Importing the Certificate on the Workstation
-
Configuring Printing in Polaris System Administration (web-based)
Creating a Printer Certificate on the Server
Before installing and configuring the receipt printer software, you must create a printer certificate. Certificates are valid for three years. You can use the same printer certificate for Leap and ExpressCheck. If you've already created a printer certificate for ExpressCheck, you can skip to Installing Printing Software and Importing the Certificate on the Workstation.
Note:
If you are a hosted library, contact your Polaris Site Manager to complete this procedure.
To create a printer certificate
-
Connect to the desktop of the Windows server that is running Leap.
-
Open a PowerShell window, and run it with administrator privileges.
-
Navigate to the following folder:
C:\Program Files\Polaris\7.8\Polaris.ApplicationServices
-
Run the createPrinterCertificate.ps1 script by entering:
.\createPrinterCertificate.ps1 -dnsName "<certificate_name>"Replace <certificate_name> with the DNS name your library wants to use for the certificate. For example:
.\createPrinterCertificate.ps1 -dnsName "printer.polarislibrary.com"When run, this script creates two new files in the root of the \Polaris.ApplicationServices folder:
-
printer-cert.pem
-
printer-key.pem
-
-
Copy the printer-cert.pem file to the App_Data\Certificates folder.
-
Copy the printer-key.pem file to the App_Data\Keys folder.
-
Make a second copy of these files to a backup location. The backup is needed if the Leap API is re-installed or upgraded.
-
Delete the files from the root of the \Polaris.ApplicationServices folder.
Installing Printing Software and Importing the Certificate on the Workstation
Leap uses third-party software called QZ Tray to manage access to your library's printers. After creating a printer certificate, install QZ Tray and import the certificate.
Important:
If you encounter problems setting up QZ Tray, contact our Polaris support team for assistance. We can help identify whether the issue is related to Leap or QZ Tray and provide guidance accordingly.
To install and configure QZ Tray
-
On the workstation running Leap, navigate to the following URL:
https://qz.io/download/
-
Download QZ Tray v2.2.4.
-
Once the download is complete, run the .exe file.
-
In the QZ Tray Setup dialog, select your installation options, and select Install.
The QZ Tray application installs on the workstation.
-
When the installation is complete, select Close.
The QZ Tray application is running in the Windows system tray.
-
Open the Windows system tray, and right-click the QZ Tray icon.
-
Select Advanced > Site Manager.
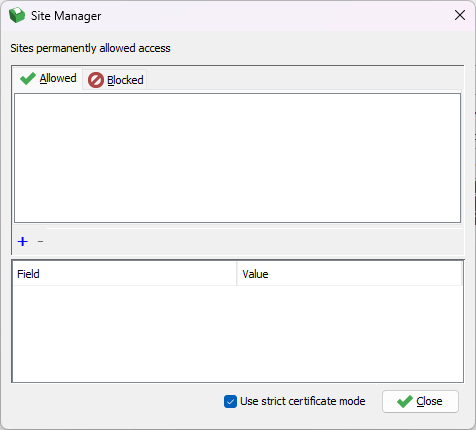
The Site Manager window opens.
-
On the Allowed tab, select the plus (+) icon, and select Browse.
A file explorer window opens.
-
Locate the printer-cert.pem file, select it, and select Open.
-
If the Unrecognized Certificate window appears, select Yes to continue.
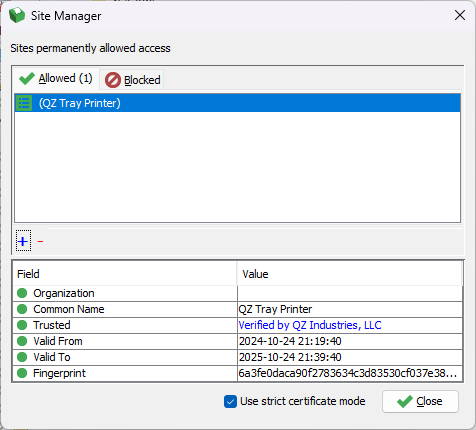
The Site Manager window displays a message similar to the following:
-
Select Close.
Configuring Printing in Polaris System Administration (web-based)
You can set Leap to use QZ Tray printing using the the Web App: Direct to printer defaults setting, which is available at the System, Library, and Branch levels to give you flexibility in configuring printing options. You can set it for the whole system and let the system set the default for child levels. Alternatively, you can control printing at the branch level, so each branch can choose their own printing options.
Important:
QZ Tray is a third-party tool used by Polaris Leap to enable the Direct to Printer feature for receipt and label printing. If you encounter problems configuring Leap to use QZ Tray, contact our Polaris support team for assistance. We can help identify whether the issue is related to Leap or QZ Tray and provide guidance accordingly.
Note:
You must install the printing software and import the certification on the workstation before you can configure printing in Polaris System Administration (web-based).
To set Leap to use QZ Tray printing on the branch level
-
Use the Web App: Direct to printer defaults dialog to configure the printer.
-
Select Settings and Tables.
-
At the Branch level, select Settings.
-
From the Module list, select Staff Client.
-
In the list, search for Print and select Web App: Direct to printer defaults > Configure.
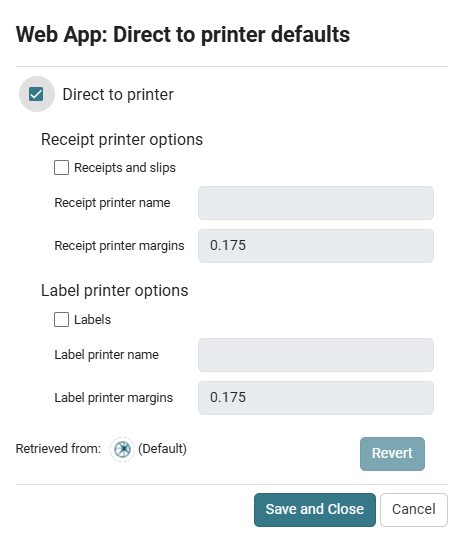
The Web App: Direct to printer defaults dialog opens.
-
Select Direct to printer.
-
To enable a receipt printer, select Receipts and slips.
-
Enter a Receipt printer name.
-
(Optional) Change Receipt printer margins to a value in inches.
-
-
To enable a label printer, select Labels.
-
Enter a Label printer name.
-
(Optional) Change Labels printer margins to a value in inches.
-
-
Select Save and Close.
The receipt printer name and label printer name are available in Leap.
-
Configuring Printing in Leap
The Leap user must enable the Direct to printer setting in Leap and choose a printer to use this functionality.
Important:
Using the Direct to Printer feature is optional. Libraries can use this feature for a more seamless printing experience, but it is not required. If you prefer, you can still use your browser’s built-in print functionality instead to print receipts and labels.
Note:
Once Direct to Printer is enabled for a user, that user cannot print receipts and labels using the browser. To enable browser printing, you must deselect Direct to Printer in Leap.
To enable the Direct to printer setting and choose a printer in Leap
-
Sign in to Leap.
-
Select your user profile (the avatar in the top right) > Settings.
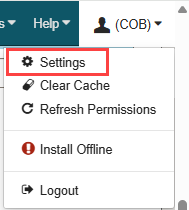
The Settings workform opens.
-
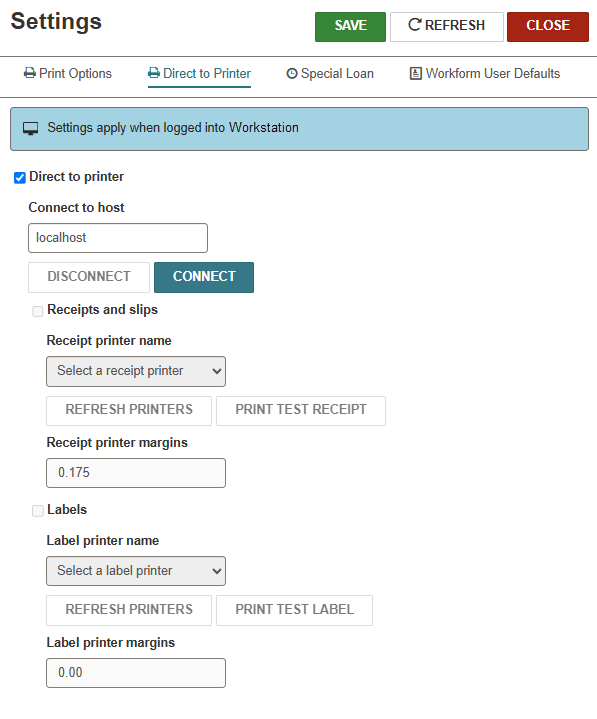
Select the Direct to Printer view > Direct to Printer checkbox.
The Direct to Printer view with Connect to host fields opens.
-
Select CONNECT to test your connection to the QZ Tray Printer.
Note:
This troubleshooting step doesn't require the Leap printers: Modify permission. -
To connect to a receipt printer, select Receipts and slips.
-
Select a Receipt printer name from the list.
-
(Optional) Change Receipt printer margins to a value in inches.
-
-
To enable a label printer, select Labels.
-
Select a Label printer name from the list.
-
(Optional) Change Labels printer margins to a value in inches.
-
-
(Optional) Select PRINT TEST RECEIPT or PRINT TEST LABEL to print a sample receipt or label to the QZ Tray Printer. Each sample is preconfigured and doesn't recognize your library's system settings. These buttons verify that the workstation, the connection, and the printer are working together properly, do not use these samples to test receipt or label formatting.
Note:
This troubleshooting step doesn't require the Leap printers: Modify permission.
