
Configuring Data Sources
The Data Sources Wizard allows you to manage and configure the data sources. You can define new data sources for your institution, or edit or remove existing data sources.
Data sources are stored at the institution level only.
You can perform the following actions on the Data Sources page:
Creating Data Sources
The Data Sources page allows you to define your institution's data sources and their format.
-
On the Pipes Configuration Wizard page, click Data Sources Configuration.
The Data Sources page opens. Data Sources PageIf you want to view the data source templates, select the Display Template Data Sources check box that appears above the list of data sources on the Data Sources page and then click View next to the template you want to see.
 -
In the Add a New Data Source area, enter the information in the appropriate fields according to Add Data Source Fields.
Add Data Source Fields Field Name Description Owner
Select the name of the institution from the drop-down list. For institution-level staff users, your institution will already be selected.
For installation-level users, you must select an institution before the associated values appear in the drop-down lists that display the Select Institution value.Source name
The name of the data source.
Source code
The data source code, used as a prefix in the Primo Record ID.
Source format
The format of the source data.
To harvest bibliographic records using MARC exchange (ISO 2709) format, select MARC Exchange and select the appropriate character set. Primo will add the OAI header as long as the Record does not include OAI header field is not checked. If the records status in LDR/05 is d, the OAI header will include the deleted status and the record will be deleted.
Source system
The source's data system, such as an ILS.
Institution
The institution to which the data source belongs.
Version
The version of the source system.
Input Record Path
This field contains the path of the record in the harvested records and enables you to harvest XML files of any format.
The default setting is dependent upon the source specified in the Source Format field. The following defaults are used:
-
record– MARC21, MAB, DANMARC2, UNIMARC, Digital Entity, XML, MARC Exchange, and KORMARC
-
dc:dc_oai– DC
-
knowledge_unit– MetaLib
File Splitter
The file splitter plug-in used to parse the harvested files. Primo supports the following file splitter plug-ins:
-
OAI splitter– This file splitter is used for pipes that harvest OAI XML files.
-
Static OAI splitter– This file splitter is used for pipes that harvest static OAI XML files. This option replaces the Static OAI Repository field.
-
MARC Exchange splitter– This file splitter is used for pipes that harvest MARC exchange files. It supports all encodings defined in the Character Sets code table.
-
SFX XML splitter– This file splitter is used for pipes that harvest SFX XML files. In previous releases of Primo, this field required the SFXOAI.xsl transformation program to include the OAI header.
-
WARC splitter– This file splitter is used for pipes that harvest WARC files. It parses WARC files, splitting the components (HTML, PDF, MS Word, MS Excel, and MS Powerpoint, and other) of the file, and then generates XML output for normalization.
Character Set
This field indicates the character set of the data. The valid values are UTF-8(default) and MARC-8.
If you want to enable additional character sets, use the Character Set code table under the Publishing subsystem.File needs transformation
Allows you to specify an XSL transformation routine to include an OAI header or other changes to the source records.
Transformation file name
When the previous check box is selected, you must indicate which XSL transformation file should be used. For more information, refer to the Primo Interoperability Guide.
With the addition of file splitters in Primo Version 3, you should mainly use file splitters to handle the transformation of harvested files. This option should be used on rare occasions only and should be done with care. It is recommended to avoid using transformation programs for the following reasons:
-
Performance
-
Memory – transformation programs must load the complete file into memory before performing the transformation. This may cause the Back Office to fail due to insufficient memory allocation if the harvested file is very large.
Because transformation programs are run before the file is passed to the file splitter, the file splitter should know how to process the outcome of the transformation program. This means that when you test your file splitter, the input file for the test should be the output of the transformation program.
Original Source Code
The code of the data source in the system, and can be used to link back to the original system.
Description
A description of the data source.
XREF Keys
Select one or more of the following keys to build the P_PNX_XREF table during the execution of the pipe: ISBN, ISSN, LCCN, and OCLC.
For more information, see The Create XREF Tool.
-
-
Click Add.
The Data Source information appears in the data source list. -
Click Cancel & Go back to return to the Pipe Configuration Wizard page.
Editing Data Sources
The Data Sources Attributes page allows you to modify the details for a data source.
-
On the Pipe Configuration Wizard page, click Data Sources Configuration.
The Data Sources page opens (see Data Sources Page). -
In the Data Source list, click Edit next to the data source that you want to edit.
The Data Sources Attributes page opens.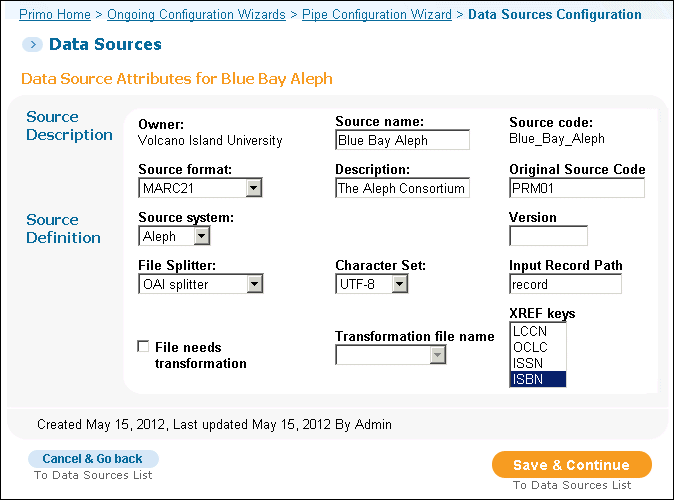 Data Sources Attributes Page
 -
In the Data Source Attributes area, edit the Source Description and Source Definition fields according to Add Data Source Fields.
-
Click Save & Continue.
The Data Sources page opens (see Data Sources Page). -
Click Cancel & Go back to return to the Pipe Configuration Wizard page.
Deleting Data Sources
The Data Source List page allows you to delete data sources if they are no longer needed.
-
On the Pipe Configuration Wizard page, click Data Sources Configuration.
The Data Sources page opens (see Data Sources Page). -
In the Data Source list, click Delete next to the data source that you want to delete.
A confirmation dialog box opens. -
Click OK.
The data source is deleted from the Data Source list. -
Click Cancel & Go back to return to the Pipe Configuration Wizard page.
Page tags: article:topicProd:Primocontype:documBack Office GuidePipe Configuration Wizardproduct:primocontent:Documentationlang:english
