
Managing Certificates and Metadata for SAML Authentication
If you are working with Primo VE and not Primo, see SAML-Based Single Sign-On/Sign-Off.
Introduction
The Certificate Manager allows you to create (see Creating a New Certificate) or replace (see Replacing a Certificate) a certificate for SAML authentication. A certificate may need to be replaced for security measures or when a certificate is near expiration. The replacement of a certificate is recommended every two to three years.
-
After you have installed the metadata on the IDP, users will not be able to log on to the Front End UI until the new certificate has been activated in the Primo login profile.
-
When activating a new certificate, all SAML profiles associated with your institution are affected. This means that the metadata file must be installed on all IDPs associated with those SAML profiles before the new certificate is activated.
Creating a New Certificate
Use this procedure to create a new certificate.
-
On the User Authentication Wizard page (Primo Home > Ongoing Configuration Wizards > User Authentication Wizard), make sure that your institution appears in the Owner field.
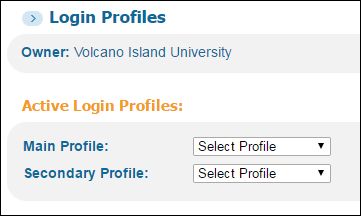 Verify Owner Field on Login Profiles Page
 -
In the list of profiles, click Certificate next to the SAML profile.
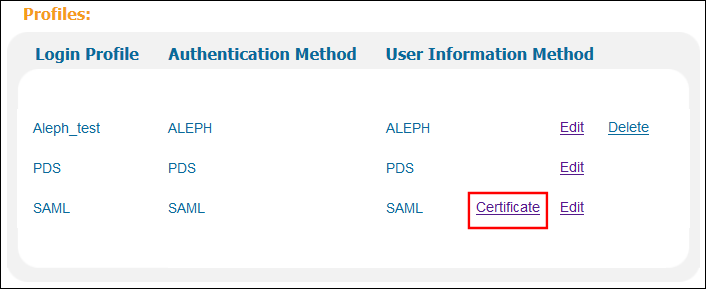 Login Profiles List
 -
From the Certificate drop-down list, select a certificate. You can choose a certificate based on its expiration date and whether it is self-signed.
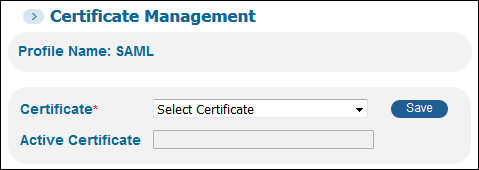 Select Certificate
 -
Click Save.
-
Create a file that contains information about Primo as the service provider:
-
Click Download Metadata to get a local copy of the metadata file. If you have configured additional SAML profiles to support additional IDPs, you must perform this operation for each of the profiles..
 Download Metadata Button
 -
Depending the browser you are using, a dialog box may appear. Save the file to your machine.
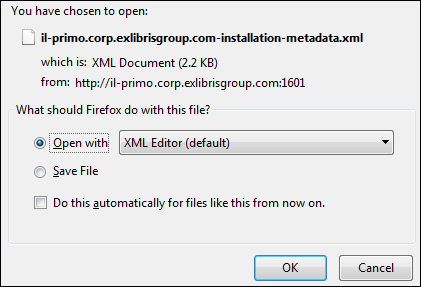 Save File Dialog Box
 -
Send the file to your Authentication Manager.
-
-
On the IDP, create a backup file for the old metadata file. If you support multiple IDPs for SAML, perform this operation on each of them.
-
On the IDP, upload and install the new metadata file. If you support multiple IDPs for SAML, make sure that you install the appropriate metadata file on each IDP.
After the metadata file has been replaced, end users will not be able to log on to the Front End UI until the new metadata file has been activated in the Primo Back Office.
-
Repeat steps 1 through 2 to re-edit the certificate for your login profile.
If you decide not to activate the new metadata file, click Delete New Metadata and re-install the backup copy of the old metadata file on the IDP.
-
Click Activate Metadata to activate the new certificate. If you have configured more than one SAML profile, it is only necessary to perform this operation on one of the profiles.
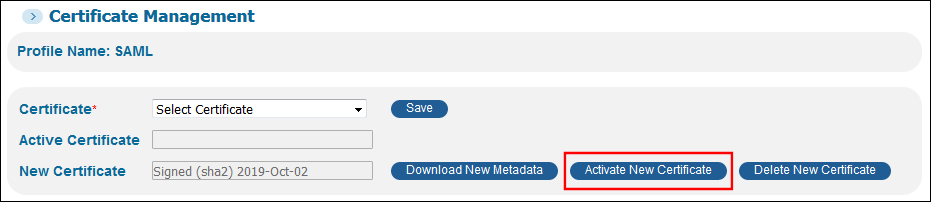 Activate Metadata Button
 -
Click OK to continue with the activation.
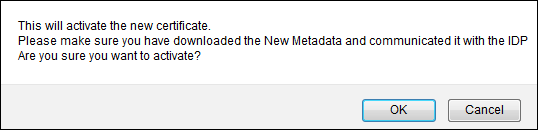 Continue Activation Prompt
 -
Verify that users can log on to the Front End UI.
Replacing a Certificate
Use this procedure to replace an existing or expired SAML certificate.
-
On the User Authentication Wizard page (Primo Home > Ongoing Configuration Wizards > User Authentication Wizard), make sure that your institution appears in the Owner field.
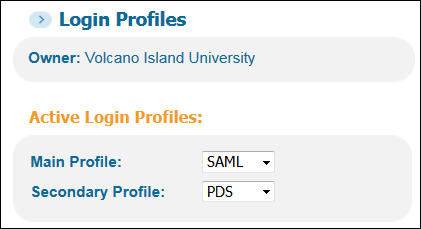 Verify Owner Field on Login Profiles Page
 -
In the list of profiles, click Certificate next to the SAML profile.
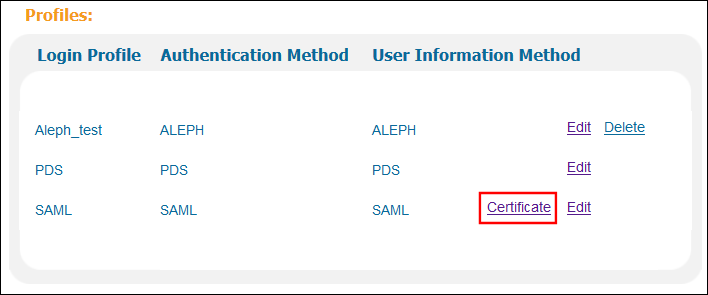 Login Profiles List
 -
Click OK to continue.
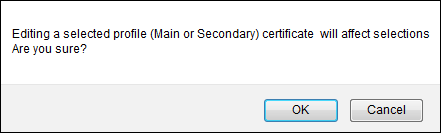 Continue to Certificate Manager
 -
From the Certificate drop-down list, select a certificate. You can choose a certificate based on its expiration date and whether it is self-signed.
 Select Certificate
 -
Click Save.
-
Create a file that contains information about Primo as the service provider:
-
Click Download Metadata next to the New Certificate field to get a local copy of the metadata file. If you have configured additional SAML profiles to support additional IDPs, you must perform this operation for each of the profiles..
 Download Metadata Button
 -
Depending the browser you are using, a dialog box may appear. Save the file to your machine.
Save File Dialog Box -
If you have configured the AUTH_BASE_URL field in your login profile, edit the file and replace the URLs shown in bold below with the contents of the AUTH_BASE_URL field.
<?xml version="1.0" encoding="UTF-8"?> <md:EntityDescriptor xmlns:md="urn:oasis:names:tc:SAML:2.0:metadata" ID="787e867e7d6b404f842faf5bbf5006aa" entityID="https://s.com/primo_library/libweb/VOLCANO"> <md:SPSSODescriptor AuthnRequestsSigned="false" WantAssertionsSigned="true" protocolSupportEnumeration="urn:oasis:names:tc:SAML:2.0:protocol"> <md:KeyDescriptor> <ds:KeyInfo xmlns:ds="http://www.w3.org/2000/09/xmldsig#"> <ds:X509Data> <ds:X509Certificate>MIIFKDCCBBCgAwIBAgIQDNKHcxHQe79LJSYe7bWJZzANBgkqhkiG9w0BAQsFADBNMQswCQYDVQQG EwJVUzEVMBMGA1UEChMMRGlnaUNlcnQgSW5jMScwJQYDVQQDEx5EaWdpQ2VydCBTSEEyIFNlY3Vy ZSBTZXJ2ZXIgQ0EwHhcNMTYwNzI1MDAwMDAwWhcNMTkxMDAyMTIwMDAwWjByMQswCQYDVQQGEwJV UzERMA8GA1UECBMISWxsaW5vaXMxEDAOBgNVBAcTB0NoaWNhZ28xHTAbBgNVBAoTFEVYIExJQlJJ UyAoVVNBKSBJTkMuMR8wHQYDVQQDExZzYW1sLmV4bGlicmlzZ3JvdXAuY29tMIIBIjANBgkqhkiG 9w0BAQEFAAOCAQ8AMIIBCgKCAQEArdprVYNVUndGUkf3HvrQQl58Xom46MNKnPKH0xzJz9f6VF0x md/cZ+Kq3COOKbabKEKwfVvFwCrbQjbkr3JuvRcu7g4QBqizgRv+rbovR5xDZIcJKTX+truHJp6h PYInf5uJFwDaHUZDktO7rI4MJIsdrOTAy2TWpDNOfYmTHI2pc4W84P31uiZtyx7nkzKou4fDBn40 uW1XBb3f9NKq1TClYFCeh7CigLW3m+7HZbDpb+7Q5DMqNx8i/6yzxUBeB387i7PV3hCBFei3KPrG PPqyHTxgejYZrbKI4hIdbaITCAKykOplRmMlbzs/vCWHYlOHLt9AJGVqR2hmYV7xvwIDAQABo4IB 3TCCAdkwHwYDVR0jBBgwFoAUD4BhHIIxYdUvKOeNRji0LOHG2eIwHQYDVR0OBBYEFM5UM4K1H5P8 2L2qrnZsBH2Ttny4MCEGA1UdEQQaMBiCFnNhbWwuZXhsaWJyaXNncm91cC5jb20wDgYDVR0PAQH/ BAQDAgWgMB0GA1UdJQQWMBQGCCsGAQUFBwMBBggrBgEFBQcDAjBrBgNVHR8EZDBiMC+gLaArhilo dHRwOi8vY3JsMy5kaWdpY2VydC5jb20vc3NjYS1zaGEyLWc1LmNybDAvoC2gK4YpaHR0cDovL2Ny bDQuZGlnaWNlcnQuY29tL3NzY2Etc2hhMi1nNS5jcmwwTAYDVR0gBEUwQzA3BglghkgBhv1sAQEw KjAoBggrBgEFBQcCARYcaHR0cHM6Ly93d3cuZGlnaWNlcnQuY29tL0NQUzAIBgZngQwBAgIwfAYI KwYBBQUHAQEEcDBuMCQGCCsGAQUFBzABhhhodHRwOi8vb2NzcC5kaWdpY2VydC5jb20wRgYIKwYB BQUHMAKGOmh0dHA6Ly9jYWNlcnRzLmRpZ2ljZXJ0LmNvbS9EaWdpQ2VydFNIQTJTZWN1cmVTZXJ2 ZXJDQS5jcnQwDAYDVR0TAQH/BAIwADANBgkqhkiG9w0BAQsFAAOCAQEADHHA7rOMK4kgzm89gElB tVTYN4VYdNOpMc0DBG9eWTeVV85l4DShUD2rgbvoDjsMCLryuvxXnxcWk5gKRNHtDfHH8S3McGwN vIuLJhHzb5K2VvyZbDs53Gep3b7k805Gx9VsbdgU5zTZlDD+PexrsHCwjyW2I/YlhnRC5avvV+AT gv5WQZKnV7l7xNWS2UqckorYdEGecbvohCkUFlfid5t5QBBN1QpuY2oge5Oxc8HncnY7DMk3Bx0j Dg41TLzXFX4SEYx6G7MlhvoJIfl0k0o8TTO8w+SowpvVpbkx1iGXR9h0RuO+BhDrOjcj5iwQ1/U7 WvHKUsSzDOVAB0dDSw==</ds:X509Certificate> </ds:X509Data> </ds:KeyInfo> </md:KeyDescriptor> <md:SingleLogoutService Binding="urn:oasis:names:tc:SAML:2.0:bindings:HTTP-Redirect" Location="https://s.com/primo_library/libweb/samlLogout"/> <md:NameIDFormat>urn:oasis:names:tc:SAML:2.0:nameid-format:transient</md:NameIDFormat> <md:AssertionConsumerService Binding="urn:oasis:names:tc:SAML:2.0:bindings:HTTP-POST" Location="https://s.com/primo_library/libweb/samlLogin" index="0" isDefault="true"/> </md:SPSSODescriptor> </md:EntityDescriptor>Example Primo Metadata File -
Send the file to your Authentication Manager.
-
-
On the IDP, create a backup file for the old metadata file. If you support multiple IDPs for SAML, perform this operation on each of them.
-
On the IDP, upload and install the new metadata file. If you support multiple IDPs for SAML, make sure that you install the appropriate metadata file on each IDP.
After the metadata file has been replaced, end users will not be able to log on to the Front End UI until the new metadata file has been activated in the Primo Back Office.
-
Repeat steps 1 through 2 to re-edit the certificate for your login profile.
If you decide not to activate the new metadata file, click Delete New Metadata and re-install the backup copy of the old metadata file on the IDP.
-
Click Activate Metadata next to the New Certificate field to activate the new certificate. If you have configured more than one SAML profile, it is only necessary to perform this operation on one of the profiles.
 Activate Metadata Button
 -
Click OK to continue with the activation.
Continue Activation Prompt -
Verify that users can log on to the Front End UI.
Page tags: article:topicproduct:primocontent:Documentationlang:english
