
Migration File Validation Tool
Ex Libris can migrate data from many Integrated Library Systems (ILS). Each different ILS exports files differently, and even within the same ILS there can be some variation. Field names may be slightly different, or customers may have used fields in a special way, different from other customers.
The Migration File Validation Tool (MFVT) provides a means to validate your exported data (bib records, items, patrons, etc) to verify that is in an acceptable format. This validation must be done prior to delivering your data to Ex Libris. Validating the files early saves time because if the files are returned after processing has begun, processing may be delayed.
This tool will assist you in:
- Verifying the file structure and format. In order for the migration programs to successfully load your data, the exported files must be in the correct format.
- Allow you to map your incoming fields to the Ex Libris expected fields. This includes mapping fields to notes, and providing other information about fields such as date structure or type - call number type, or address type, or user identifier type, for example.
- Assist you in submitting the files to the MFT server to deliver to Ex Libris.
This tool does not do any substantial validation of the data inside the files. For example if you have a loan file for a patron who is not present in the patron file, these two files may still be considered 'valid' but the loan record will be rejected when the files are processed due to the lack of a linked patron record. Also, if a data field is supposed be of a certain type, for example the course faculty member should have a patron identifier, but you provided a patron name, this will be considered 'valid' but the field may be rejected during migration processing.
The migration file validation tool currently validates data from the following incoming library systems:
- Millennium/Sierra (III/Clarivate)
- Horizon (Sirsi/Dynix)
- Symphony (Sirsi/Dynix)
- Talis (Alto Capita)
- Virtua (III/VTLS/Clarivate)
- Generic (bibs, items, and patrons only)
Other library systems not listed should use the legacy Field mapping form method for their specific ILS.
Recommendations for Using this Guide
This guide is intended to be used as a reference when using the Migration File Validation Tool.
This document is intended to complement the Data Delivery Specification for your individual ILS. It provides further information regarding the files required for migration.
Prerequisites: Basic knowledge of Alma and your Local ILS key concepts and architecture, and the requirements (including the migration-related approach) described in Getting Ready for Alma and Discovery Implementation, as well as in Electronic Resource Handling in Alma Migration.
System Requirements
The data validation tool is intended to be run on your local PC. The following are the minimum requirements for the machine:
- 1.7 GHz or higher processor
- 8 GB RAM (64-bit)
- 25 GB available hard disk space, depending on size of files being validated
- The tool is currently supported on the Windows operation system only.
Disk space requirements may vary because of the amount of data in the customer extract. For example, a customer with 3 million bibliographic records needs more space than one with 100K bibliographic records.
Java requirements, use one or the other of the following:
- Java 8, 11, or 17 SE Runtime Environment for 64-bit Windows (Windows x64). 32-bit Java will fail.
- OpenJDK 8, 11, or 17. If using OpenJDK, please set the full path to your OpenJDK's java.exe in DataValidator\exec\resources\dist\startupOpenJDK.properties as described below.
Virtual machines: the data validating tool has not been officially tested on virtual machines, but in our experience it does not work well, and is not recommended.
OpenJDK configuration
If you would like to run the tool with OpenJDK, please add the path to your OpenJDK to the Data Validator's startupOpenJDK.properties file. This must be done after downloading the tool, but before starting/using the tool.
1. Using Notepad (or any other text editor), open DataValidator\exec\resources\dist\startupOpenJDK.properties
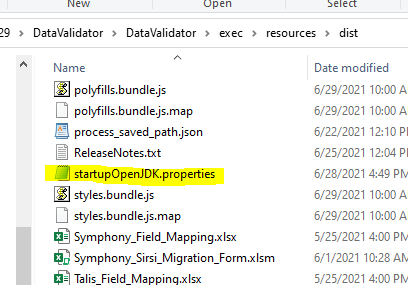
2. Enter the full path to your OpenJDK's java.exe. In the example below, OpenJDK is installed at C:\OpenJDK\bin\java.exe
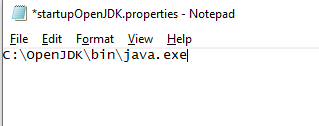
3. Save and close the file, and then open the Data Validator as normal.
Download and Installation
The Data Validation Tool is available for download from the Ex Libris SFTP server (MFT).
- From the email sent to you by your Ex Libris representative, download the package.
- Extract DataValidator.zip to your local drive by right-clicking the file and selecting Extract.
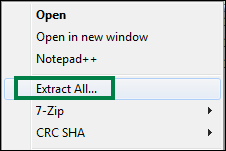
- Open the extracted folder
- If using OpenJDK, set the path for OpenJDK as described above in 'OpenJDK Configuration'.
- Run DataValidator\exlibris-migration.bat.
- There may be a delay of approximately 30 seconds while the tool is loading before you see the main screen.
The Data Validation Tool is installed.
If you have already run a previous version of the migration tool, then you should restart your PC after installing the updated version.
Migration Validation - General
After opening the validation tool, select your ILS from the drop-down list.
The Migration Validation picks up where you left off previously. It stores configuration files in the Migration Validation directory. If you are validating files from multiple systems and wish to do so concurrently, re-extract the tool in a different directory.
The maximum number of errors reported is 10,000. After 10,000 errors are logged, the validation tool stops processing the file, with an error message: "Too many errors: invalid file".
Error messages and data are stored in the following directories. Customers may view files in this directory, in case they are returning to review errors later, or simply wish to troubleshoot locally.
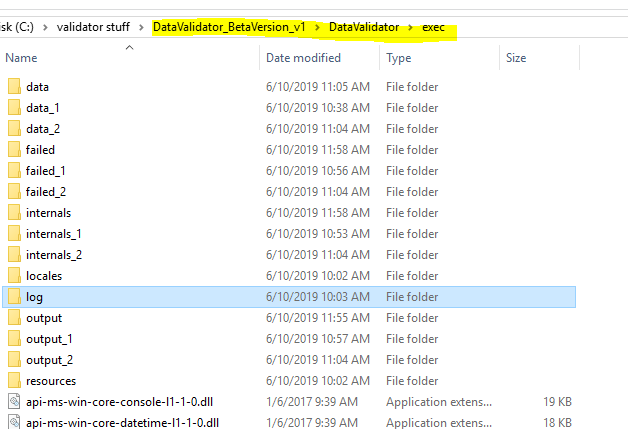
The directories contain:
data: validated files which are to be uploaded to the MFT server
failed: validation errors and warnings
internals: internal (intermediate) files used by the validation programs. In the case of errors, Ex Libris may ask you to send copies of these files for programmer review
log: log files
output: Filled Field Mapping form, and save files if you wish to save the configuration
If you restart a validation process, new directories are created and the previous set of directories are saved with _1, _2, etc.
Select a Previously Used Field Mapping Form (Optional)
You may optionally select a field mapping form which was used for a previous load. For example, if you are validating files for your production load, you may want to start this process with the field mapping form that was used for your cutover load.
To find the previously used field mapping form, look in the directory:<validator root>\DataValidator\DataValidator\exec\output\. The field mapping form is automatically saved/updated after each entity's validation process.
After the field mapping form is specified on the opening page, you must still say 'Import Mapping' in each data entity in order to use the previous field mapping information.
Validate Against Migration Form (Optional)
You may optionally select your migration form, and the Migration Validation Tool will compare your incoming data files against the data elements specified in the form during the validation process. The tool will validate the file for structure and also validate the file against the migration form.
For example, it will compare the incoming location codes on the Alma Location mapping tab against the appropriate column(s) in the inventory records. This will help to reduce the number of locations not found in the map, which are usually assigned to an ERROR or UNASSIGNED location.
Validating with the Migration Form is optional, but it is strongly recommended. If the customer does not validate the values with the tool, the migration analyst will do so after the files are submitted.
Since the Migration Form Validation is optional, the error messages may all be considered warnings. Validated data files may still be submitted to the MFT server even if the migration form check reports a mismatch.
Do not load a previously created Migration Form if you will be using the 'Populate Migration Form' tool, as described in the next section. The populate tool will generate a new form.
The recommended workflow for populating and validating the migration form is:
1. validate your incoming data
2. populate a migration form from all validated data (see below)
3. complete Migration form
4. Validate completed migration form against previously validated data, just prior to submitting
Populate Migration Form (Optional)
You may optionally choose to populate a new migration form with values from the validated data files. If a previously created Migration Form was loaded on the first screen, it will not be used in this tool. It is not mandatory to pre-populate the migration form with the validated data. Customers may still manually fill in the incoming data elements and validate the migration form as before.
The Populate Migration Form tool will take all of the values in your data for a migration form map, and place them in a migration form. For example, the item file contains a field or fields which contain library and/or location. The "Populate Migration Form" tool will retrieve the possible values from the item file for these fields, and place them in the Location Mapping tab. You would then fill in the Alma mapped values. Populating the migration form with actual values from your files will reduce migration errors that result from missed data.
If you are generating holding records from a tag in the bib record (HOL FROM BIB, located near the bottom of the main screen), then fill out the HOL FROM BIB information prior to validating the MARC bib records. This is the only way that the locations from the HOL FROM BIB tags will be included in the generated migration form Alma Location tab.
After validating file(s), you may choose to populate the migration form with values from that file:
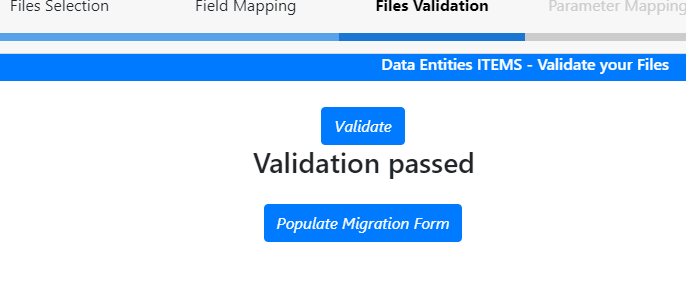
Or you may choose to populate the form after all files have been validated, before uploading to MFT.
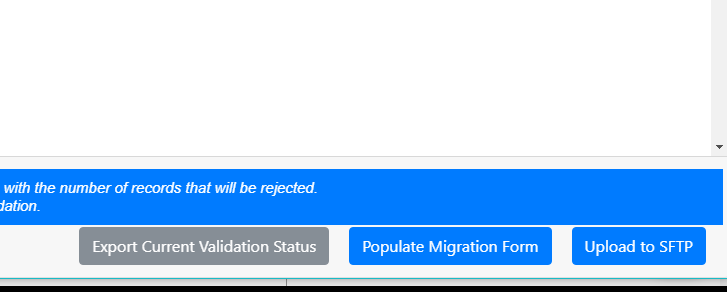
The newly generated migration form can be found in the directory: DataValidator/exec/output_xxxx. If the 'Populate Migration Form' button was selected multiple times, multiple versions of the form were generated.
Specify the Date Format for All Files (Mandatory)
Specify your date format. Later, while validating individual files, you can specify a different date format for specific fields that will override this global date format, if necessary.
M = month, d = day, y = year, H = Hours, m = minutes, s = seconds, mon = three-char month (jan, feb, mar)
Examples of valid date formats:
MM-dd-yyyy
yyyy-MM-dd
yyyyMMdd
MM/dd/yyyy
yyyy/MM/dd
yyyy-mon-dd
yyyy-MM-dd HH:mm:ss (note: only loans will actually use hours, minutes and seconds; other dates will only use up to the day)
yyy-MM-dd HH:mm (note: only loans will actually use hours, minutes and seconds; other dates will only use up to the day)
Horizon-specific: ddddd
The date/time format in a file must be the same throughout the file - we do not accept files with mixed date formats. There are two exceptions to this rule:
- If the files have date fields with both two digit and four digit years (for example MM-dd-yy ad MM-dd-yyyy), then use the two digit date format (MM-dd-yy).
- If the files have one or two digit months, for example 7/12/2008 and 12/4/2008, then use MM.
Validating MARC Records
Every migration is required to submit bibliographic record files, in MARC or Unimarc format. The file validator currently only supports MARC, so if your library uses Unimarc, submit them separately.
Additionally, some customers may submit MARC holdings records, depending on the functionality of the legacy system. MARC bibliographic records are validated separately from MARC holding records.
MARC record validation consists of:
- verifying the records are parseable (file can be read/interpreted)
- their basic structure is correct
- Encoding: the migration program attempts to determine the encoding of the bibliograhic records. If there are too many errors, the migration program does not actually reject the records - they should be sent to the migration team for further analysis.
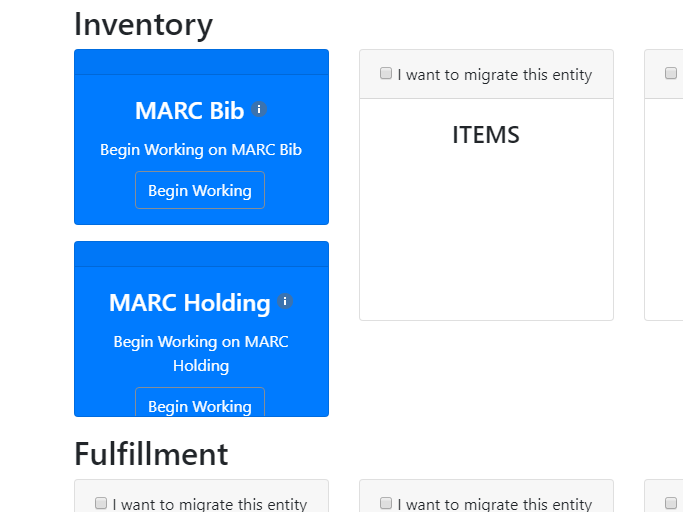
To validate the files, click begin working on the individual entity.
Files must be present on your local PC in order to validate.
Select the file encoding, specify the bib ID key source field, and selected the file(s). Then select Validate.
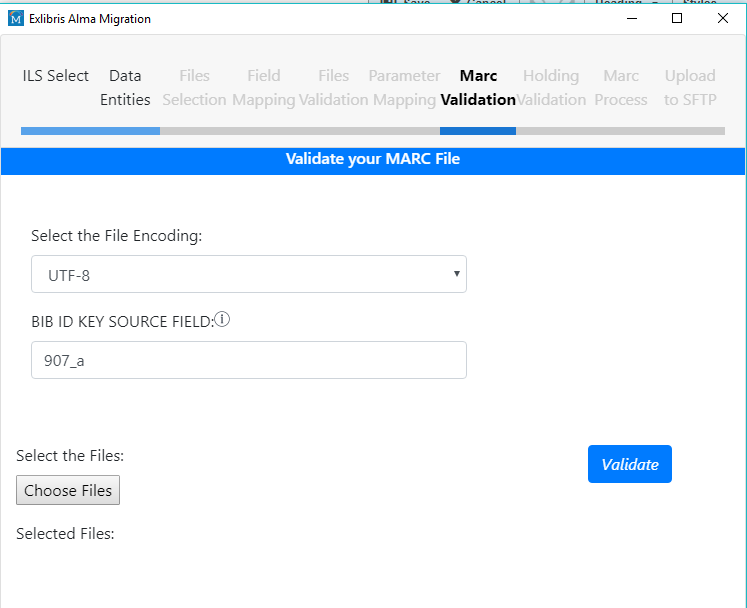
After validation, a list of rejected records is available to view.
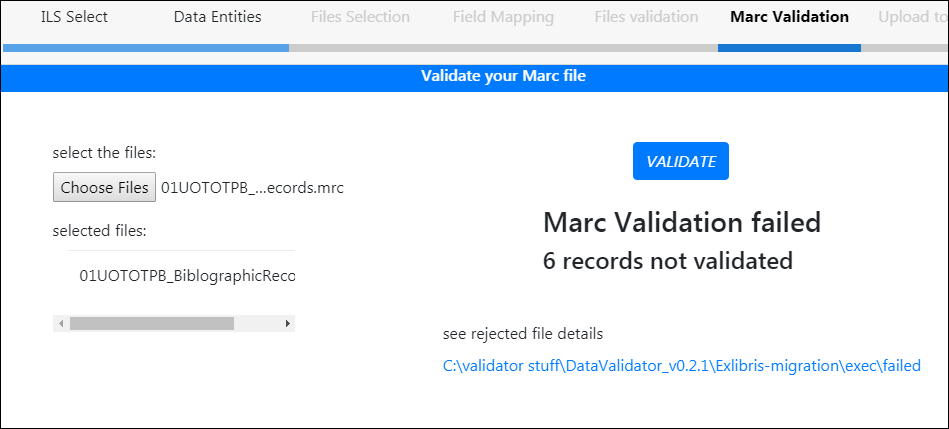
Even if the file fails validation, you can still submit the file to the MFT server at the end of the validation if you are comfortable with the rejection results. Otherwise, modify the file and validate again.
Validating Administrative Data
The validation of administrative data performs multiple functions:
- Validates structure of file
- Maps local ILS fields to expected Ex Libris fields
- Allows customers to put in local information about fields, such as note labels, date formats, and address types
When the validation is completed for all files, send the validated files to the MFT server using your individual account.
Recommendation against modifying exported files
General File Parameters
On the upper right of the Administrative file selection screen, there are two general file parameters.
Select the file encoding. This is usually Latin-1 (ANSI) or UTF-8. If you think you have a different file format, contact your project manager.
Select the file format. This can be CSV comma delimited, or CSV semicolon delimited.
CSV comma delimited:
"field1","field2","field3"
or
field1,field2,field3
CSV semicolon delimited:
Multiple Incoming Files (Split Files)
Almost all customers will provide multiple incoming files for their data entities, when the record count is large. For example your files might be like this:
01CUST_bibs_01_20200202.csv
01CUST_bibs_02_20200202.csv
01CUST_bibs_03_20200202.csv
01CUST_items_01_20200202.csv
01CUST_items_02_20200202.csv
01CUST_patrons_01_20200202.csv
That means you have three bib files, two items files, and a single patron file. The above is normal/expected and is not what is described in this section.
This section addresses the fact that some library systems, for example Millennium/Sierra, have a limit on how many fields are allowed within an export file. For example the upper limit might be 25 fields exported per file, but you want to provide 35 fields in the item record. In this case, the files look like this:
01CUST_items_01_A_20200202.csv
01CUST_items_01_B_20200202.csv
01CUST_items_02_A_20200202.csv
01CUST_items_02_B_20200202.csv
In the above, there are two files for the first set of item records, and two files for the second set of item records. Using the example numbers, the file items_01_A contains 25 fields for the item records, and the file items_01_B contain the other 10 fields (25 + 10 = 35 fields total).
The Ex Libris migration programs will join the two files and make a combined single file of item records.
In order to do this, the files must be submitted as follows:
- files must have _A and _B - see the example naming convention above. Upper case is important here; files cannot be named _a and _b.
- The _A and _B can be in the middle of the name (01CUST_items_01_A_20220222), or at the end (01CUST_items_01_20220222_A).
- The files should be named exactly the same way except for the A and B. Incorrect: 01CUST_items_01_A_20220202 and 01CUST_items_01_20220222_A.
- there should be *only* one key in common between the files. In the case of items, use the item key (i999999999). in the case of orders, use the order number (o999999999). Do not also include the bib key, for example. Files which have more than one key in common will be rejected.
- the common key must be first in the field order for both files
- for the case of Millennium/Sierra, tags which are included from the bib should be in the first file only. See the "Boundwiths file structure: field order" section in the Millennium/Sierra (III) to Alma Migration Guide for more information regarding field order for the fields imported from the bib record.
Assigning Local Fields to Expected Fields
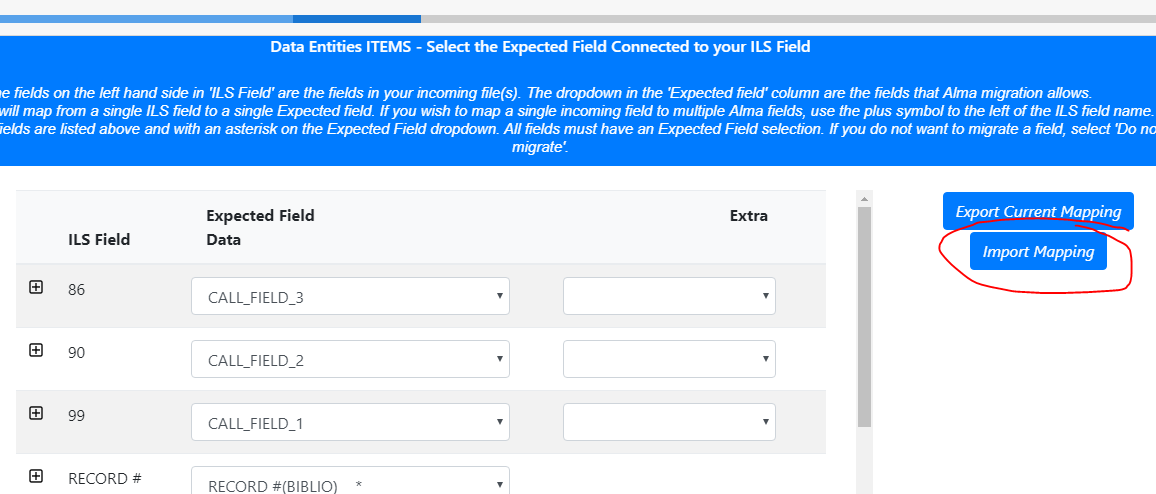
For each incoming field (listed on the left under ILS Field), select an option from the drop-down list.
Options are:
- ExL Expected field name
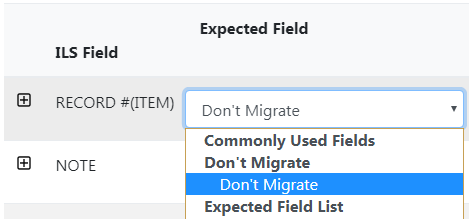
- Do not migrate (meaning, the field is in your file but you choose not to move it to Alma)
- Notes and their labels
- Assigning an incoming field to two Expected fields (use the + symbol to the left of the field)
Mandatory fields are listed on the right hand side in red, and are also marked with an asterisk in the drop-down list.
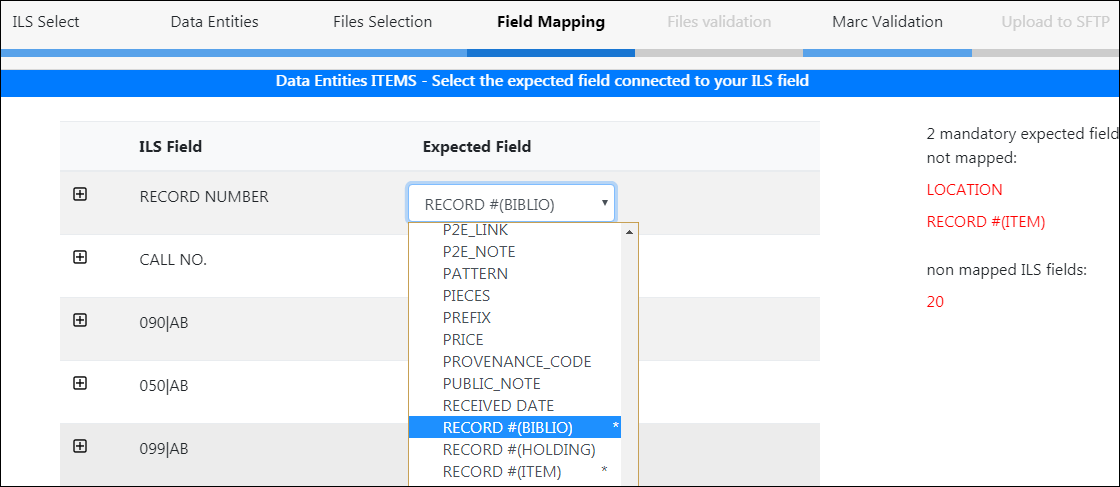
If you do not wish to map the incoming field to any Alma field, then map to 'Don't Migrate'. All fields must have either a field, a note, or the instruction to not migrate.
Using a Previous Field Mapping
In order to use a previously saved Field Mapping form, the form must be loaded at the beginning of the validation process, on the front page.
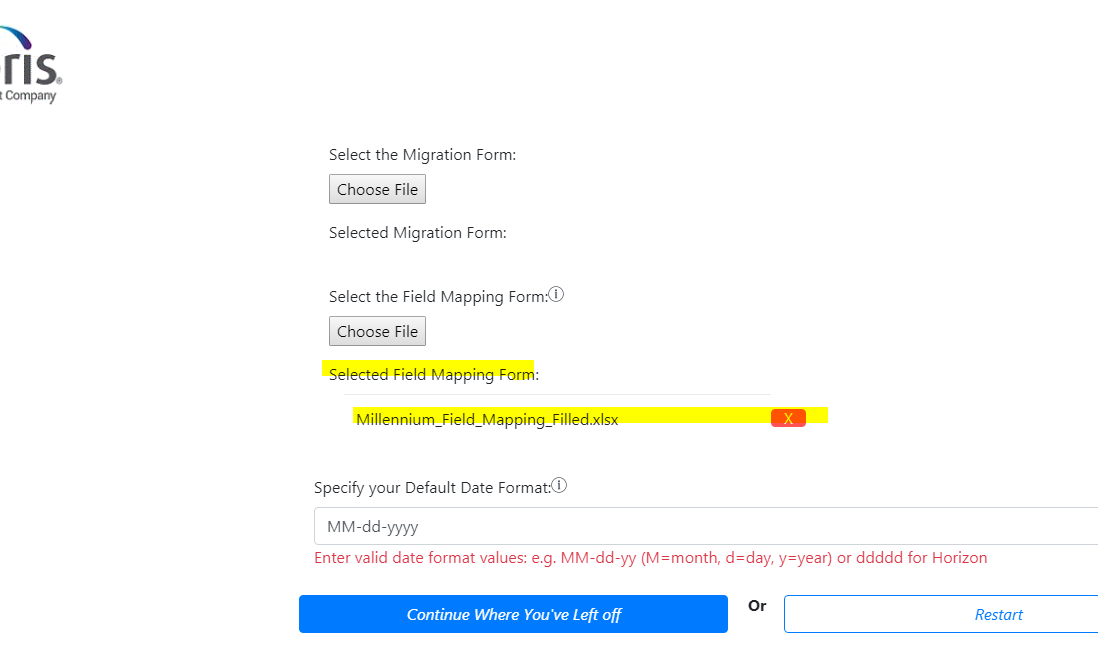
Then, during the individual entity validation, you can specify to load the specific mapping for this entity from that form.
Assigning an Incoming Field to Two Alma Fields
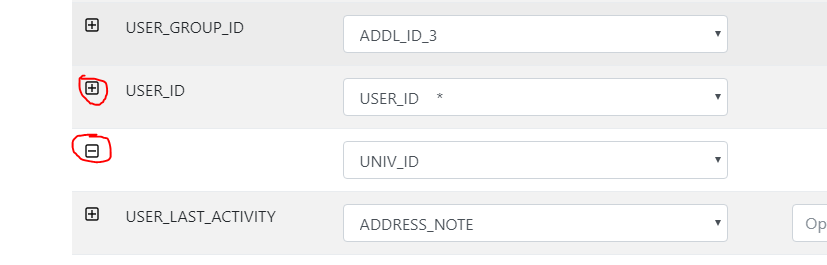
If you want to map an incoming ILS field to two different ExL expected fields, for example to assign the incoming PRICE field to both Inventory Price and Replacement Price, click the plus sign (+) to the left of the ILS field. In the example below, USER_ID is mapped to both USER_ID and UNIV_ID.
Assigning multiple incoming fields to a single Alma note
All notes may have multiple incoming fields assigned to them. Simply assign all of the fields to the same note, using a label if desired.
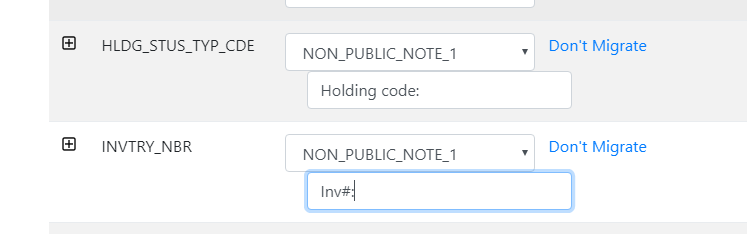
All incoming fields will be placed in the same note field, separated by pipe (|).
Optional Additional Input for Selected Fields
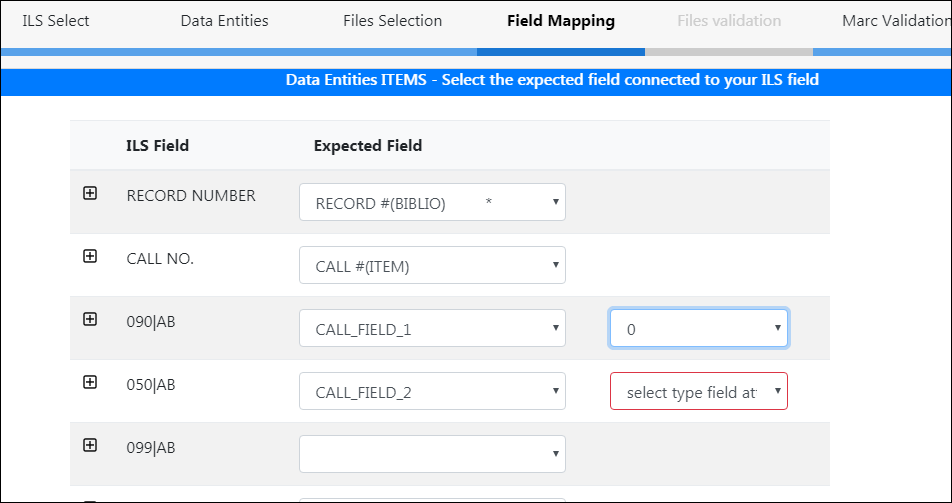
Some fields, when selected, have optional additional input for the field.
Some examples of this are:
- Call number type for call number fields (III only)
- Note field labels
- Address, phone and email types
- Date format if different than global date format
Once the fields are all filled in, select Next to validate the files.
If there are errors in the file, you may review the rejected records.
If you are satisfied with the number of rejected records, for example if it is a very small number, then you can accept the validation by clicking Convert to Alma Format. Otherwise, modify the file and attempt validation again.
Generic Migration
Validation is available for generic migration. This validation is limited to MARC bibs, MARC holdings, items, and patrons only.
Generic file migration can be used to validate bibs or items/patron csv files for Ex Libris supported ILS but which are not supported by the MFVT.
Cross-Entity Validation
The cross-entity validation section checks data against other files.
Currently, Inventory and Fulfillment are supported in cross-checking.
In all cases, the tool identifies which field should be used to check by consulting the field mapping form.
For example, in the field mapping section for items, you indicated a field which is the link from the item to the bib record. This cross-entity checking looks at the field mapping form to determine WHICH field in the item record is the link to the bib.
Inventory
| File | Field | Checks against |
|---|---|---|
| Bibliographic record | Record Key | The bib record is required to have a bib key, but the checking for this is done in the regular MARC file section above. The cross-entity validation tool will use the previously defined record key (i.e. 001, 907 $b) when checking. In other words, if you said previously that 001 is the bib record key, that is the field that the items, holdings, and serials will validate against. |
| Item | link to bib record | Checks if the bib key in the item record finds a match in the bib file. |
| Holding Records | link to bib record | Checks if the bib key in the holding record (usually the 004) finds a match in the bib file. |
| non-marc Serial holding records | link to bib record | Checkis if the bib key in the serial holding record finds a match in the bib file. |
Fulfillment
| File | Field | Checks against |
|---|---|---|
| Patron Record | Record Key | |
| Loan File | link to patron record | Checks if the patron in the loan record has a match in the patron file |
Acquisitions
The Acquisitions section is not yet complete.
Leaving the Validation Program and Returning Later
The validation program stores the configuration in files on your local PC, so you can stop working and close the program. All configuration is saved automatically.
The next time you open the validation program, you can continue where you left off previously.
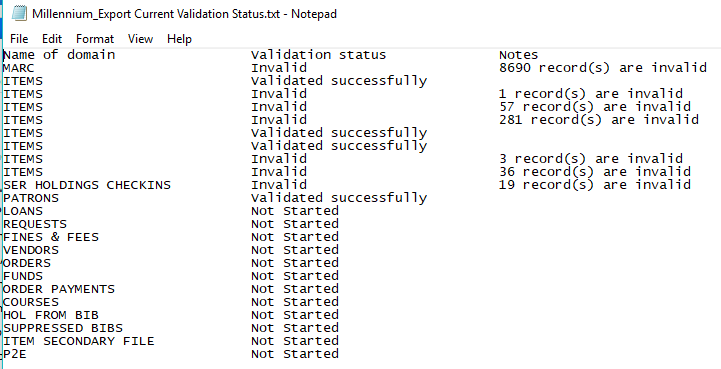
Export Current Validation Status
To save the current validation status, click "Export Current Validation Status". This is a text file with a description of the validation process so far. Here is an example of a validation status text file:
Uploading to MFT
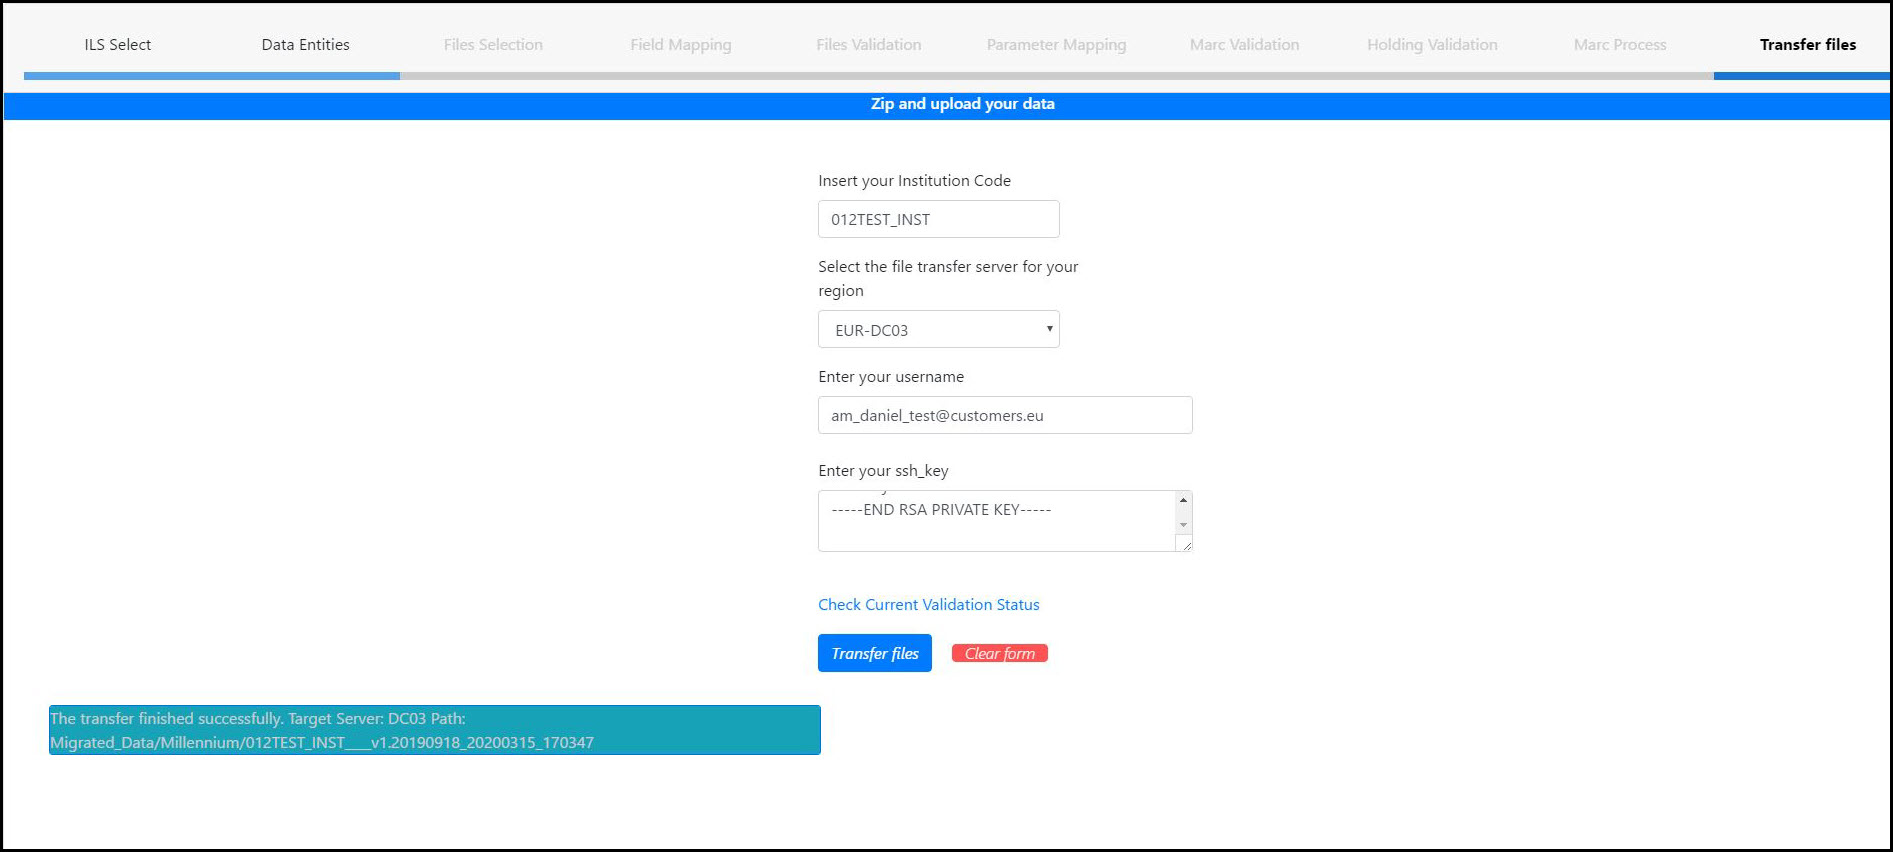
After you have completed the field mapping and validation, upload the files to the MFT server for your region using the username and the SSH Key sent in an email.
For customers in regions that have more then one MFT option, the details regarding the definition of the DC is detailed in the email.
Troubleshooting
You may find the following error messages during data validation.
Startup - spinning cursor
If you get the spinning cursor at startup, triple-check your Java environment.Check that you are using a 64-bit version of Java, and not 32.
If you are using OpenJDK and have multiple versions installed, you must specifically direct the tool to look for the correct version. See OpenJDK Configuration.
Number of Columns in Header Do Not Match the Number of Columns in the Data
There must be exactly the same number of fields in the header as in the fields themselves. The mismatch between header and fields could be simple, like
bibNo,ItemNo,Barcode,Location,Status,Note
12345,33245,4948893039203,MAIN,Missing
In the above, there is no field for the Note in the data, but there is one in the header.
Or it could be less easy to spot, like this
bibNo,ItemNo,Barcode,Location,Status,Note
12345,33245,4948893039203,MAIN,Missing,,,,,,,,,,,,,,,,
"Line is not in correct quotes/commas format" or "Failed to Parse Line"
Page tags: article:topicproduct:almacontent:Documentationlang:english
