Using Normalization Rules Sets
This section contains a brief explanation of managing normalization rule sets. For more in-depth information on using the advanced and basic editors, see Editing Normalization Rules Sets in the Primo Technical Guide.
A normalization rule set defines how a specific data source or group of data sources is converted from its original source format, to the Primo Normalized XML record - the PNX. The normalization rule sets section of the Pipes Configuration wizard enables you to create a normalization rule set for a specific source format. This is performed by using existing rule sets and changing the necessary details to make the rule set appropriate for your format conversion needs.
The following out-of-the-box normalization rule sets are currently available:
-
Generic danMARC2
-
Generic MARC
-
Generic Dublin Core
-
Generic UNIMARC
-
ALEPH danMARC2
-
ALEPH KORMARC
-
ALEPH MARC
-
ALEPH MAB
-
ALEPH UNIMARC
-
Voyager Marc
-
DigiTool - Dublin Core
-
DigiTool - MARC21
-
SFX
-
MetaLib KB
-
Unicorn
-
XML – intended for data sources that are not MARC21 or Dublin Core.
You can configure normalization rule sets during ongoing configuration. You can update the normalization rules sets to suit your system's needs. You can edit or delete normalization rules sets that you created.
To manage the normalization rule sets, you must first access the Normalization Rules Configuration section of the Pipes wizard. After accessing the wizard, you can:
After working with normalization rule sets, you must deploy the rule set for the changes to take effect on the user interface of the system. Follow the instructions in Deploying Normalization Rule Sets.
Creating Normalization Rule Sets
You can add a customized normalization rules set to your Primo system.
-
On the Pipes Configuration Wizard page, click Normalization Rules Configuration.
The Normalization Rules Sets page opens.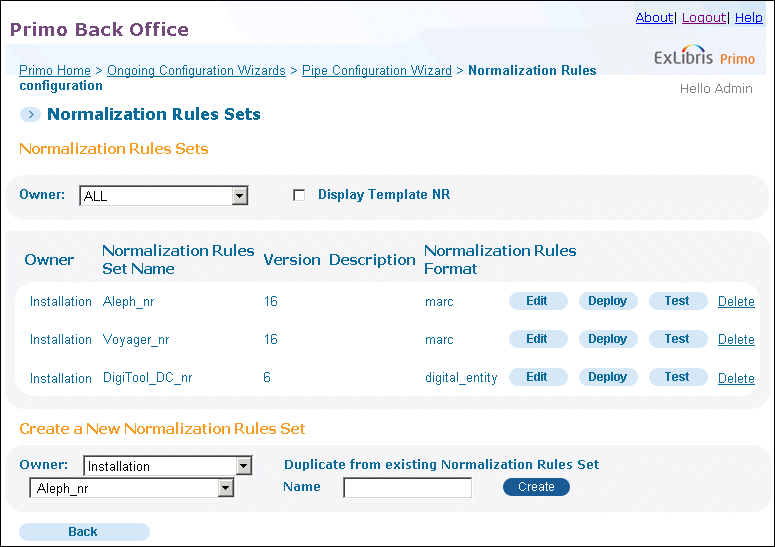 Normalization Rules Sets PageTo display the templates, check the Display Template NR check box. The templates have an OTB (out-of-the-box) owner and cannot be modified by staff users.
 -
Select the institution or installation version from the Owner drop-down list. Note that the institution will be pre-selected for institution-level staff users.
-
In the Create a New Normalization Rules Set area, select the normalization rule set that you want to duplicate from the drop-down list.
-
In the Name field, enter a name for the normalization rules set and click Create.
The Duplicate Rule Set dialog box opens. Duplicate Rule Set Dialog Box
 -
Click OK.
The new normalization rules set appears in the Normalization Rules Sets list. You can now edit the PNX fields using the instructions in Editing Normalization Rules Sets.
Editing Normalization Rules Sets
Editing a normalized rule set enables you to define and edit the PNX fields that are used in the normalization rules set. You cannot edit the normalization rule set templates.
-
On the Pipe Configuration Wizard page, click Normalization Rules Configuration.
The Normalization Rules Sets page opens (see Normalization Rules Sets Page). -
In the Normalization Rules Set List, click Edit next to the normalization rule set that you want to update.
The Manage Normalization Rules page opens, showing the PNX fields that can be edited.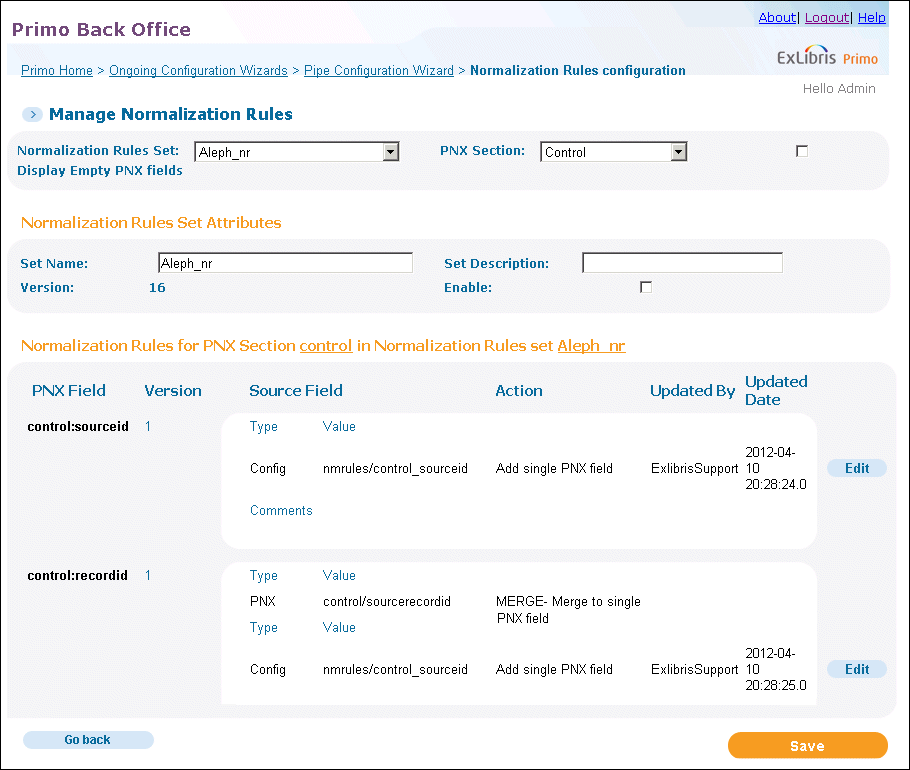 Manage Normalization Rules PageTo edit PNX fields that are not configured, select the Display Empty PNX check box to show all fields.
The following table lists the mandatory PNX fields that can be modified in this section. Pipe errors will be returned if the following fields cannot be mapped from the source: sourcerecordid, sourceid, recordid, type, title, and delcategory.
PNX Mandatory Fields PNX Section PNX Field Field Description Control
Source ID, Record ID, Additional Source Record ID
The Additional Source Record ID is sometimes used when a data source has more than one ID for the record.
Delivery and Scoping
Institution, Delivery Category, and Restricted Delivery Scope
Fields relevant to the delivery functionality.
Facet
Collection
Can include physical, electronic or logical collections.
Display
Resource Type
A description of the material and its location.
Library Level Availability
Also known as availlibrary in the Normalization Set Editor. Includes availability and location information for the record at the library level.
Title
Links
All Fields
A definition of the link templates.
Enrichment
All Fields
Additional information to add to standard data.
Availability
Used for ILS systems other than ALEPH and Voyager and may include temporary availability information that an enrichment program uses to create the Library Level Availability field in the Display section.
Search
Search Scope and Restricted Search Scope
Relevant to the search scopes. For more information, see Search Scope Restrictions.
-
From the PNX section drop-down list, select the PNX section that contains the fields that you want to edit.
The fields within the selected section of the normalization rule display. -
Optionally, you can select Display Empty PNX to view the empty PNX fields that are not being used by the normalization rule.
All of the PNX section's fields appear in the PNX Field list. -
Click Edit next to the PNX field that you want to edit.
The Normalization Set Editor page opens. Normalization Set Editor Page
 -
In the Normalization Rules for the PNX Field area, enter the fields that are described in General Details of the Normalization Set Editor.
You can configure advanced normalization rules by clicking Advanced. For instructions on configuring advanced normalization rules, see Editing Advanced Normalization Rules Sets.General Details of the Normalization Set Editor Field name Description Description
A description of the Normalization rules for the PNX field.
Action
Indicates the action taken by all the rules.
-
ADD– Indicates that the new PNX fields are added for every source field.
-
OR– Indicates that a single PNX field is created. Once the field is created, the system stops checking the remaining source fields.
-
MERGE– Indicates that the system merges all occurrences of the source fields to a single PNX field. See example below.
Enable all rules
Enables all the rules.
Disable all rules
Disables al of the rules.
Last Updated By
The name of the user who last updated the rules.
At
The date and time upon which the rules were updated.
Version
The rule's version number.
Advanced
Toggle to Advanced Set Editor.
In the following example, you can see the PNX fields that are created when you use the ADD,OR, or MERGE actions. If the data sources contain three different fields called 700:$$aJohnson, Melvin
$$aKennelman, Anne
$$aAdams, Mark
The different PNX fields that are created by using the various actions are described in the following table:Example of the Created PNX Fields Action Used Description ADD
Johnson, Melvin
Kennelman, Anne
Adams, Mark
OR
Johnson, Melvin
MERGE
Johnson, Melvin; Kennelman, Anne; Adams Mark
-
-
In the middle of the Normalization Rules for field area, edit the fields according to the source format type.
-
If you selected MARC from the Type drop-down list, enter the rest of the fields according to the following table:
Marc Source Type Details Field name Description Type
Marc.
Field
The Marc three character tag.
Ind1
The first indicator.
-
To use all indicators, leave this field blank.
-
To use multiple indicators, separate indicators with a comma.
-
To exclude an indicator, add the minus symbol before the excluded indicator.
Ind2
The secondary indicator. Edit the field the same way as the Ind1 field.
Subfield
The Subfield drop-down list indicates whether the subfields entered in the following fields are included or excluded from the rule.
In the text box next to the Subfield drop-down list, enter the rules to be excluded or included. You can enter multiple rules either by separating them with a comma or by entering an asterisk to select all subfields.
-
-
If you selected MAB from the Type drop-down list, enter the rest of the fields according to the following table:
Mab Source Type Details Field name Description Type
Mab.
Field
The start of the range of tags the system is going over.
Because MAB repeats the same data element in several tags, you can create a rule for a range of tags.
Ind1
The file type of the rule's source format.
Ind2
The secondary file type of the rule's source format.
Last
The last tag in the range.
Step
The step value for the range. This field allows you skip tags in a range.
For example, if Field is 208, Last is 296, and Step is 4, the rule would apply to the following tags: 208, 212, 216, ..., 296.
Subfield
Whether the subfields entered in the following fields are included or excluded from the rule.
In the text box next to the Subfield drop-down list, enter the rules to be excluded or included. You can enter multiple rules either by separating them with a comma or by entering an asterisk to select all subfields.
-
If you selected XML from the Type drop-down list, enter the rest of the fields according to the following table:
XML Source Type Details Field name Description Source Type
XML.
Path
The path of the XML field.
Attribute
The specific field based on the attribute.1
Value
The specific field based on the attribute value.*
1This is used optionally when the XML file uses attributes. -
If you selected XML from the Type drop-down list, enter the rest of the fields according to the following table:
Complex XML Source Type Details Field name Description Source Type
Complex XML
XPath
This source type supports the use of full X-path capabilities.
It allows you to create rules that are based on any attribute in the path, not just the last attribute as provided with the XML source type.
To use this source type, you must first use the Complex Xml - Template template to create your normalization rules.
You cannot use the Complex XML source type in normalization rules that have the source format set to xml.In the following XML record, you can create a rule that uses the AuthorName attribute, which is a <subitem> element.</subitem>
<item name="PagesEnd">110</item>
<item name="AbstractSupplied"/>
<subitem name="AbstractText"/><subitem name="AbstractLang">English</subitem><subitem name="AbstractLangCode">EN</subitem><subitem name="AbstractSource">ABSTRACT FROM AUTHOR</subitem><item name="Author"/>
<subitem name="AuthorName">Vishnuvardhanarao, Elaprolu</subitem><subitem name="AuthorAffil">1</subitem>For this example, you would set Xpath to the following value:
XPath='item[@name='Author']/subitem[@name= 'AuthorName']'
-
If you selected PNX from the Type drop-down list, enter the rest of the fields according to the following table:
PNX Source Type Details Field name Description Type
PNX.
X-path
The PNX section and field code separated by a slash. For example, to use the Resource Type field in the Display section, enter display/type.
-
If you selected Config from the Type drop-down list, enter the rest of the fields according to the following table:
Config Source Type Details Field name Description Type
Config
X-path
The name of the field located in the Configuration file. The only configuration in use is the Data source configuration. The x-path is entered as nmrules/<field/>. The following are available:
-
nmrules/control_sourceid
-
nmrules/control_originalsourceid
-
nmrules/control_sourcesystem
-
nmrules/control_sourceformat
-
-
If you selected Constant from the Type drop-down list, enter the rest of the fields according to the following table:
Constant Source Type Details Field name Description Type
Constant.
Value
The name of the constant.
Subfield
The Subfield drop-down list indicates whether the subfields entered in the following field are included or excluded from the rule.
In the text box next to the Subfield drop-down list, enter the rules to be excluded or included. You can enter multiple rules either by separating them with a comma or by entering an asterisk to select all subfields.
-
-
In the middle of the Normalization Rules for field area, you can continue editing the Transformation drop-down list. The transformation indicates the way that the rule manipulates the data. The default transformation is Copy as is, which transfers the data from the source field to the PNX field with no changes. For some transformations, an additional parameter field is necessary. Additional transformations include Move and Delete. For more information on these transformations, refer to the Primo Technical Guide.
Every normalization rule must have at least one transformation routine. To add an additional transformation routine, click next to the transformation routine that you want to duplicate. To delete a transformation routine, click
 next to the routine that you want to delete.
 -
If you want to create a new rule, click Create in the Create a New Rule section, or you can create a new rule or create new fields within a rule by clicking
 next to the rule or field that you want to duplicate. To delete a condition, click
 next to the condition or field that you want to delete.The Normalization Set Editor page opens the normalization rules for one PNX field at a time. To edit another PNX field's normalization rules, repeat Steps 3 through 7.
 -
Click Save to save your changes and return to the Normalization Set list. If you want to test your rule before saving, see Testing a Field's Normalization Rules.
Editing Advanced Normalization Rules Sets
This section contains instructions for performing advanced configuration of the modifiable PNX fields. For more in-depth information about managing the rule sets, refer to the Primo Technical Guide.
-
Follow the Steps 1 to 5 in Editing Normalization Rules Sets.
-
In the Normalization Set Editor, click Advanced.
The Advanced Normalization Set Editor page opens.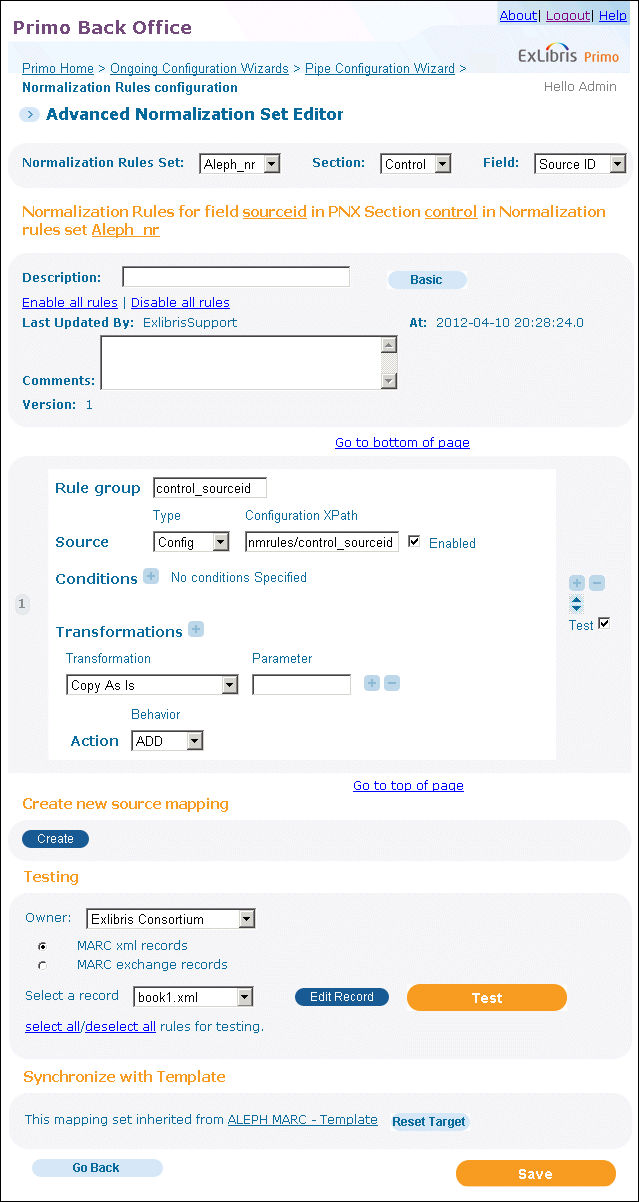 Advanced Normalization Set Editor PageYou can return to the basic Normalization Set Editor page by clicking Basic. For instructions on configuring basic normalization rules, see Editing Normalization Rules Sets.
 -
In the Description field, enter a description for the rule set.
You can enable or disable each rule individually for each PNX field. -
In the Rule group field, specify the name of the rule group.
By default, the system sets this field to the name of the PNX section and tag and processes all rules that share the same source as a group.If you want to process multiple sources together, you must reassign the group for each of these sources. It is recommended that you append a unique number to the default setting. For example, if the default Rule group is display_creator, change it to display_creator_1 so that you can create several groups for the target.For more information on rule groups, see the Primo Technical Guide. -
In the Source area, edit the PNX fields of the normalization rule according to the source format type.
-
If the source format type is Marc, edit the table according to Marc Source Type Details.
-
If the source format type is Mab, edit the table according to Mab Source Type Details.
-
If the source format type is XML, edit the table according to XML Source Type Details.
-
If the source format type is Complex XML, edit the table according to Complex XML Source Type Details.
-
If the source format type is PNX, edit the table according to PNX Source Type Details.
-
If the source format type is Config, edit the table according to Config Source Type Details.
-
If the source format type is Constant, edit the table according to Constant Source Type Details.
-
-
In the Conditions area, edit the PNX fields of the normalization rule, using the field descriptions provided in Conditions Details of the Normalization Rule.
Conditions Details of the Normalization Rule Field name Description Conditions Logic
A condition is defined as either positive or negative. This parameter allows you to assign condition logic to all conditions in a group.
Conditions Relation
This appears when there are more than one conditions defined. The available values are:
-
AND– Indicates that all conditions must be met for the condition to be true.
-
OR– Indicates that at least one of the conditions must be met for the condition to be true.
Conditions Source
The source field on which the condition is based. Any type of source can be defined.
General Parameter
Not in use.
Condition n Logic
A condition is defined as either positive or negative. This parameter allows you to assign condition logic to an n condition.
Condition n Source
The source field on which the condition is based. Any type of source can be defined.
Condition n Routine
You can use transformation routines to effect the way the data is manipulated in the rule. For a complete list, refer to the Primo Technical Guide.
Routine Parameter
An optional parameter, which is necessary for certain routines.
Success if
Indicates when the condition is met.
-
Match any– indicates that the condition is true for any occurrences of the source field.
-
Match current– indicates that the condition is true in the current source field.
-
Match all– indicates that the condition is true for all occurrences of the source field.
-
Match last– indicates that condition is true for the last occurrence of the source field. This is the default.
Enabled
Indicates whether the normalization rule is enabled.
You can create a new condition or create new fields within a condition by clicking next to a condition or field to duplicate it. To delete a condition click
 next to the condition or field you want to delete.
 -
-
In the Transformations area, you can edit the transformation drop-down list. The transformation indicates the way the Rule manipulates the data. The default transformation is Copy as is, which transfers the data from the source field to the PNX field with no changes. For some transformations, an additional parameter field is necessary. Additional transformations include Move and Delete. For more information on these transformations, refer to the Primo Technical Guide.
-
Select the type of action for the rule according to the following table:
Example of the Created PNX Fields Action Description Example ADD
Indicates that the new PNX fields are added for every source field.
Johnson, Melvin
OR
Indicates that a single PNX fields is created. Once the field is created, the system stops checking the remaining source fields.
Johnson, Melvin
Kennelman, Anne
Adams, Mark
MERGE
Indicates that the system merges all occurrences of the source fields to a single PNX field.
Johnson, Melvin; Kennelman, Anne; Adams Mark
Unlike the basic normalization editor, the advanced editor allows you to define a different action for each of the set’s rules. See Example of the Created PNX Fields for an example of the different fields created when using the various actions.In addition, there is a special type of delimiter called new, which indicates to the system to start a new field even when the action is MERGE. -
Click Save to return to the Normalization Set list.
To edit a different field in the same PNX section, select the desired field from the Field drop-down list. To edit a different section in the rule set, select the desired section from the section drop-down list. To edit a different rule set, select the desired rule set from the Rule Set drop-down list.Your Normalization Rule sets are configured.
Testing a Field's Normalization Rules
Before you save a new or modified normalization rule for a PNX field, you can run tests with sample records that are provided with Primo.
On the Normalization Rule Set Editor page, you must test all of the rules for a PNX field, but the Advanced Normalization Rule Set Editor page allows you to select specific rules.
-
On the Manage Normalization Rules page (see Manage Normalization Rules Page), select a PNX section from the drop-down list.
-
Click Edit next to the PNX field that you want to test.
The Normalization Set Editor page opens (see Normalization Rules Sets Page). -
Configure the Testing section:
-
Select the institution or installation version from the Owner drop-down list. Note that the institution will be pre-selected for institution-level staff users.
-
Select a file from the Select a Record drop-down list.
-
Select either MARC or MARC exchange files by selecting the corresponding radio button.
-
Click select all to select all rules for the field.
-
Click Test.The Configure Test page opens, showing the results on the left side of the page and the sample record on the right side of the page.
Configure Test Page (Results) If you want to edit the sample record before running the test, click EditRecord. The Configure Test page opens only the sample record.Configure Test Page (Edit Record) Click Edit, make your changes, and then click Save & Test to test the normalization rules.
-
-
On the Manage Normalization Rules page (see Manage Normalization Rules Page), select a PNX section from the drop-down list.
-
Click Edit next to the PNX field that you want to test.
The Normalization Set Editor page opens (see Normalization Rules Sets Page). -
Click Advanced to display the Advanced Normalization Set Editor page (see Advanced Normalization Set Editor Page).
-
Select the Test check box next to each rule that you want to test.
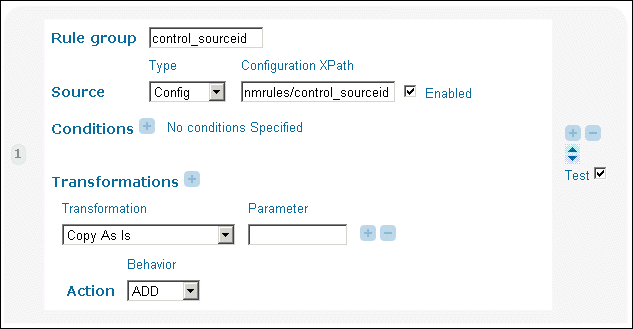 Advanced Normalization Set Editor (Enabled Rule)If you want to clear all fields, click the deselect all link in the Testing section.
 -
Configure the Testing section:
-
Select the institution or installation version from the Owner drop-down list. Note that the institution will be pre-selected for institution-level staff users.
-
Select a file from the Select a Record drop-down list.
-
Select either MARC or MARC exchange files by selecting the corresponding radio button.
-
Click Test.
The Configure Test page opens (see Configure Test Page (Results)). The results display on the left side of the page and the sample record opens on the right side of the page.If you want to edit the sample record before running the test, click EditRecord. The Configure Test page opens only the sample record (see Configure Test Page (Edit Record)). Click Edit, make your changes, and then click Save & Test to test the normalization rules.
-
Deploying Normalization Rule Sets
You must deploy the normalization rule set before your normalization rules can be used by the pipe. Deploying the normalization rule set updates the system's user interface to display the updated normalization rules sets and enables you to choose from the new normalization rule when defining your pipe. After you create, edit, or delete a normalization rule set, you must deploy the rule set.
-
Click Normalization Rules Configuration.
The Normalization Rules Sets page opens (see Normalization Rules Sets Page). -
In the Normalization Rules Set page, click Deploy next to the normalization rule that you want to deploy.
The Deploy Rule Set confirmation box opens. -
Click OK to deploy the set.
-
To monitor the deployment, click the deployment process link above the normalization rules sets list.
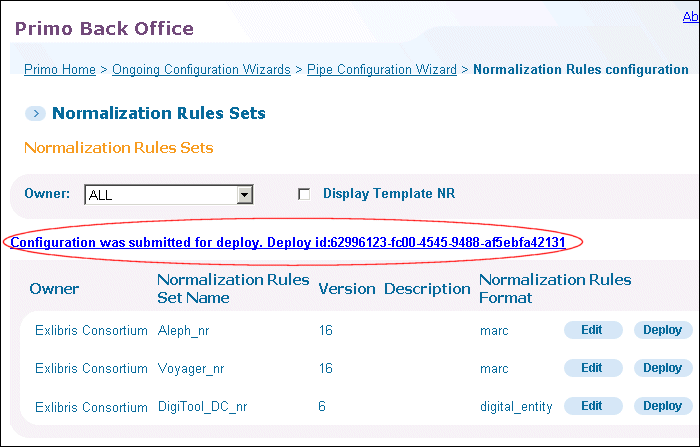 Deployment Link on Normalization Rules Sets Page
For more information on monitoring deployments, see Deploy Monitoring.
Page tags: article:topicProd:Primocontype:documBack Office GuidePipe Configuration Wizardproduct:primocontent:Documentationlang:english
