
Security
This section describes several features in SFX that contribute to the security of the system.
Support for SSL
It is possible to configure an SFX instance so that SFX and SFXAdmin are accessible using HTTPS. There are two reasons for doing this:
- To make SFX more secure
- To support the UNIX file manager in SFXAdmin
SSL Configuration
- Ex-Libris hosted customers (both Direct and Total Care) are not required to perform manual changes. Any changes necessary are done on the infrastructure level by Ex Libris.
- Customers who configured part of their instances for SSL support using documentation from before March 2016 should continue configuring future instances in the same way.
- Customers who use different hostnames for accessing different instances on the same SFX server should contact SFX Support for SSL configuration. The section below does not describe this scenario.
Setup Types
Two types of setup are available: Simple/Automated and Advanced. The Simple/Automated setup is relevant for customers who did not do any non-supported customizations to the following Proxy Apache configuration files:
- proxy/conf/httpd.conf
- sfxglb41/config/reversed_proxy_httpd.config__
Prerequisites
The following are the prerequisites for configuring SSL for SFX:
- SSL certificate – When setting up an HTTPS, an SSL certificate and key is required. There are two possible ways to obtain the certificate and key:
- You can generate your own certificate for testing purposes. See Generating a Self-Signed Certificate for instructions how to create a self-signed certificate.
- A site certificate can be obtained through the UW/IST Certificate Authority. This is recommended for a production environment. See Creating a Certificate Request File for instructions on how to install this certificate.
- Environment information – Proxy SSL port number (usually 443 or 3443)
- During the configuration of the SSL script, you are prompted to enter the port for which HTTPS should be set up.
- Do not configure default SSL port (443) if you do not already use the default port for regular traffic (80). If you do, Proxy Apache is not able to start using the built-in utilities.
- SFX Server hostname (the hostname used in links to SFX) – use the same server name used for SSL certificate creation)
Simple/Automated Setup
The following section describes how to perform the simple/automated setup.
- Log on to the SFX server as the sfxglb41 user and execute the following script:
|
sx admin/filesystem/ssl_config.pl |
You are asked the following questions:
- Enter SSL port number for Proxy Apache – The proxy port for SSL communication with the end-user. This is the port that is used for accessing SFX via HTTPS (browser).
- Enter SFX hostname you use – The hostname used in links to SFX, for example – mylibrary.org. Use the same server name used for SSL certificate creation.
- Restart Proxy Apache. (See Start/Stop Services.)
- Test that Proxy Apache operates correctly. (See Recommended Tests.)
Advanced Setup
The manual setup is the same as the automated setup, except that you perform manually each step of the configuration. This allows you to gain an understanding of each activity and how they can be altered in case you need to make unexpected configuration file changes.
The following are the steps for configuring the advanced setup of SSL/HTTPS for SFX:
- Generate or obtain an SSL certificate.
- Configure Reverse Proxy Apache to support SSL.
- Copy from the example file and customize it.
- Insert a reference to the ssl.config file in the Reverse Proxy Apache httpd.conf file.
- Restart Proxy Apache.
- Test that Proxy Apache operates correctly.
Configure Proxy Apache
Copy from sample and adjust the ssl.config file
All Proxy Apache SSL related configuration is placed in the ssl.config file and pre-configured. The configuration file contains the following instructions:
- Load the Apache SSL module.
- Add the VirtualHost definition to Apache for processing HTTPS traffic.
- Point HTTPS VirtualHost to the SSL certificate files, logs, and other auxiliary files. VirtualHost defines the port that end-users access the SFX server when using a browser (library pages).
- Log on to SFX server as the sfxglb41 user:
|
cn cp ssl.config.sample ssl.config sed -i 's/PROXY_HTTPS_PORT/<proxy ssl port>/g' ssl.config sed -i 's/SERVER_HOST_NAME/<sfx server hostname>/g' ssl.config cp ssl.config /exlibris/sfx_ver/sfx4_1/proxy/conf/ |
<proxy ssl port> – the port to use for SFX HTTPS traffic. (Your browser uses port 443 if you do not specify a port, and the root password is required for Proxy Apache restart).
<sfx server hostname> – the full server name (for example – mylibrary.org). It should be same as the one you used for creating the SSL certificate
The following are examples of commands for <https proxy port> 3443, <http proxy port 3410>, <sfx server hostname> mylibrary.org:>
- sed -i 's/PROXY_HTTPS_PORT/3443/g' ssl.config
- sed -i 's/SERVER_HOST_NAME/mylibrary.org/g' ssl.config
- Log on to SFX server as sfxglb41 user and enter the following to add a reference to the ssl.config file in the Proxy Apache httpd.conf file.
After the ssl.config file is created and configured, put it in the correct place and include it using the correct command in the main Apache configuration file: httpd.conf.
|
cv cd proxy/conf printf '\nInclude /exlibris/sfx_ver/sfx4_1/proxy/conf/ssl.config\n' >> /exlibris/sfx_ver/sfx4_1/proxy/conf/httpd.conf |
- Restart Proxy Apache. See Start/Stop Services.
- Test that Proxy Apache operates correctly. (See Recommended Tests.)
- Perform acceptance testing of all the instances on the SFX server.
- Instances that were not configured to use SSL should be tested also because all the instances share Proxy Apache configuration.
- Instances that were configured to use SSL should be tested with both HTTP and HTTPS requests.
Creating a Certificate Request File
- Log on as sfxglb41 and create a subdirectory for the certificate and key:
|
cd /exlibris/sfx_ver/sfx4_1/sfxglb41/config/ mkdir -p keys |
- Go to the subdirectory you created and create an RSA private key:
|
cd /exlibris/sfx_ver/sfx4_1/sfxglb41/config/keys openssl genrsa -des3 -rand file1:file2:file3:file4:file5 -out server.key 2048 |
- Remove the pass‐phrase from the key:
|
openssl rsa -in server.key -out server.pem__ |
- Generate the CSR:
|
openssl req -new -key server.pem__ -out server.csr |
Two new files are added to the /exlibris/sfx_ver/sfx4_1/sfxglb41/config/keys directory: server.pem__ (server key without passphrase) and server.csr (server certificate request). Both files are likely to be requested by the certificate providing authority.
- After the certification process authority processes your request, it provides you with a certificate file with the .crt extension. Rename this file to server.crt__ and place it in the same directory as the above files.
Generating a Self-Signed Certificate
- Log on as the sfxglb41 user and create a subdirectory for the certificate and key:
|
cd /exlibris/sfx_ver/sfx4_1/sfxglb41/config/ mkdir -p keys |
- Go to the subdirectory you created and create a self-signed certificate by running the following. (Replace
in the command with your actual server name, for example – mylibrary.org):
|
cd /exlibris/sfx_ver/sfx4_1/sfxglb41/config/keys
openssl req -x509 -newkey rsa:2048 -keyout server.pem__ -out
server.crt__ -days 365 -nodes -subj '/CN= |
- For security reasons (not obligatory), the owner of the directory keys and the files located in this directory should be the user:
|
su - cd /exlibris/sfx_ver/sfx4_1/sfxglb41/config/keys/ rm key.pem chmod 600 server.* cd .. chmod 700 keys exit |
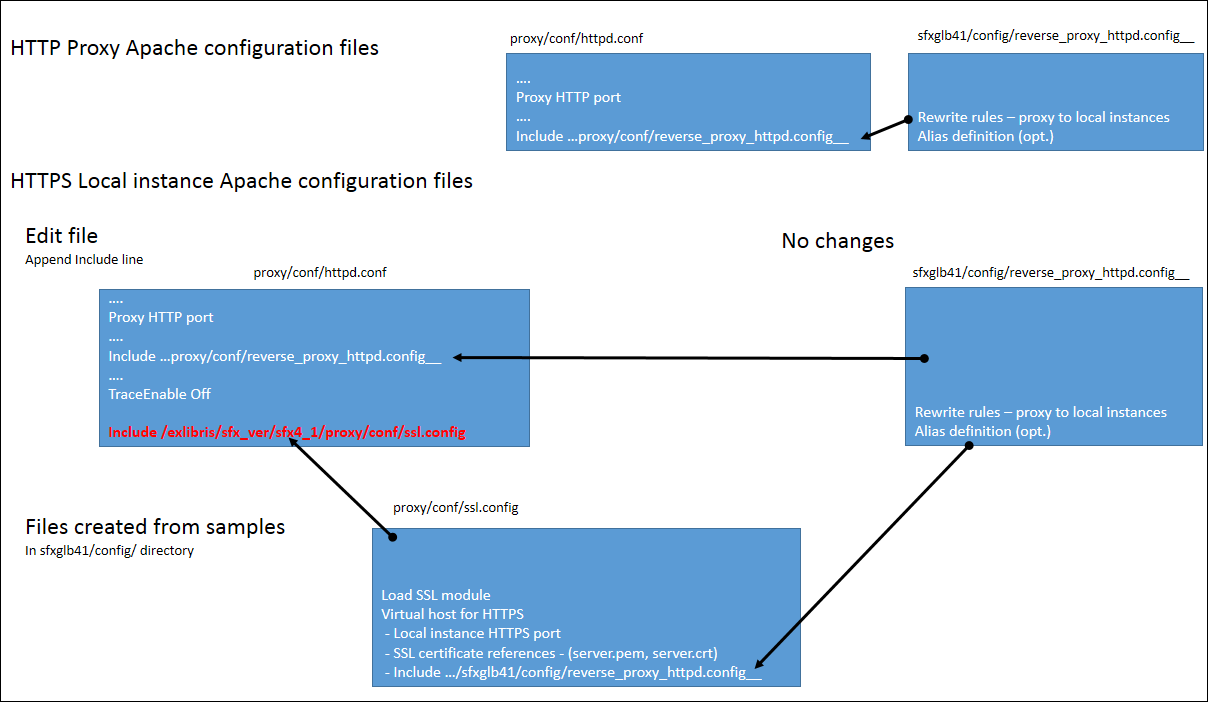
Apache Configuration File Hierarchy
The following diagram illustrates the Proxy Apache configuration file hierarchy for HTTP and HTTPS setups:
Starting Apache with SSL
The section describes how to start Apache with SSL.
Starting Apache with SSL for All Local Instances
Start Apache instances, as usual, with the command:
|
apachectl start (apachectl restart) |
:
Starting the Reverse Proxy Server with SSL
Start the proxy as usual with the command:
|
su - sfxglb41 cv cd proxy/conf ./apachectl start (./apachectl restart) |
Recommended Tests
It is recommended to test the new SSL configuration by sending several URLs to the SFX server using the SSL port. The following are a few examples:
- Test SFXAdmin access by sending the following URL:
http://hostname:PROXY_SSL_PORT_NUMBER/sfxadmin/
- Test access to the SFX menu by sending the following URL:
http://hostname:PROXY_SSL_PORT_NUMBER/<instance>/az
Restricting Access to SFXAdmin
You can restrict access to SFXAdmin for a specific instance based on IP addresses.
- Log on as an instance user.
- Change the directory to the config directory of the instance:
|
cn |
- Create a local copy of connection_admin.config_ by breaking the symbolic link to the file:
|
vi connection_admin.config_ |
The following is displayed:
|
[break symbolic link 'connection_admin.config_' ?] [y/N] |
- Type y.
- Edit connection_admin.config_. In this file, specify the IP ranges that should have access to the SFXAdmin center. The IP information can be specified as a single address or a range of addresses. It is possible to use an asteriks (*) and a hyphen (-) to define IP ranges. See the following examples:
|
Section "connection" 10.1.1.1 10.1.2.11-13 10.1.4.* 10.8.0-79.*-10.8.81-255.* 11.1.*.* EndSection |
Restricting Access to SFX Menus and A-Z Interfaces
You can restrict access to the SFX menu, A-Z interfaces (both A-Z list for journals and eBook search), XML API, and RSI API for a specific instance based on IP addresses.
You can define IP addresses or IP ranges that should be allowed access in the following sections:
- Section "connection"
- Section "sfxmenu_api_connection"
- Section "rsi_api_connection"
- Section "az_connection"
Additionally, you can define IP addresses or IP ranges that should be denied access in the following sections:
- Section "connection_deny"
- Section "sfxmenu_api_connection_deny"
- Section "rsi_api_connection_deny"
- Section "az_connection_deny"
If all sections are left blank, there are no restrictions and all IP addresses have access to the SFX services.
If the same IP (specific or range) appears in both the 'allowed' and 'deny' sections, the 'deny' section takes priority.
- Log on as an instance user.
- Change the directory to the config directory of the instance:
|
cn |
- Create a local copy of connection_user.config_ by breaking the symbolic link to the file:
|
vi connection_user.config_ |
The following is displayed:
|
[break symbolic link 'connection_user.config_' ?] [y/N] |
- Edit connection_user.config_. In this file, specify the IP ranges that should have access to the following:
- the SFX menu screen, including any DirectLink or DirectLink Banner windows
- A-Z interfaces (both A-Z list for journals and eBook search)
- the SFX API, including all XML and image-based responses
- the RSI API
The IP information can be specified as a single address or a range of addresses. It is possible to use an asteriks (*) and a hyphen (-) to define IP ranges. See the following examples:
|
# Restrict access to the SFX menu, SFX API or RSI API based on IP information. # Specify a single address or a range of addresses in the sections below. # Use an asteriks (*)and/or a hyphen (-)to define IP ranges. # # define IP range(s) that will have access to SFX menu (HTML format) # Section "connection" 10.1.1.1 10.1.2.11-13 10.1.4.* 10.8.0-79.*-10.8.81-255.* 11.1.*.* EndSection # define IP range(s) that will have access to SFX API (XML or image formats) Section "sfxmenu_api_connection" 10.1.1.1 10.1.2.11-13 10.1.4.* 10.8.0-79.*-10.8.81-255.* 11.1.*.* EndSection |
|
# define IP range(s) that will have access to RSI API Section "rsi_api_connection" 10.1.1.1 10.1.2.11-13 10.1.4.* 10.8.0-79.*-10.8.81-255.* 11.1.*.* EndSection # define IP range(s) that will have access to AZ journals and eBooks Section "az_connection" 10.1.1.1 10.1.2.11-13 10.1.4.* 10.8.0-79.*-10.8.81-255.* 11.1.*.* EndSection # define IP range(s) that will be blocked in SFX menu (HTML format) Section "connection_deny" # IP Range EndSection # define IP range(s) that will be blocked in SFX API (XML or image formats) Section "sfxmenu_api_connection_deny" # IP Range EndSection # define IP range(s) that will be blocked in RSI API Section "rsi_api_connection_deny" # IP Range EndSection |
|
# define IP range(s) that will be blocked in AZ journals and eBooks Section "az_connection_deny" # IP Range EndSection |
Session Timeout in SFXAdmin
The following file controls the session timeout of the SFXAdmin Center connection:
/exlibris/sfx_ver/sfx4_1/<instance>/config/sfxctrl.config
The section extra contains a parameter called session_expire. The SFXAdmin Center session expires according to this parameter. If the parameter session_expire is not defined in the configuration file, the default value 4h is used.
The format of the session_expire parameter is Xt, where X is a digit and t is a time frame. See the following table for possible time frames:
| Alias | Time Frame |
|---|---|
| s | second |
| m | minute |
| h | hour |
| w | week |
| M | month |
| y | year |
When the session expires, the user is redirected to the SFXAdmin logon page.
XSS - Cross-Site Scripting Security Breach
This section describes how SFX handles a security breach called XSS or cross-site scripting.
A cross-site scripting attack is a security breach caused by harmful HTML tags sent via an OpenURL request. A Web site is vulnerable if it displays user-submitted content without first checking for malicious script tags. When parsing a malicious OpenURL without validation, the SFX software and database can be harmed.
The Common Gateway Interfaces (CGIs) that have been protected from an XSS attack are:
- CGIs that handle the SFX menu (both advanced and simplified template sets) and the CitationLinker:
/exlibris/sfx_ver/sfx4_1/<instance>/cgi/core/sfxmenu.cgi
- The CGI for SFX A-Z version 4:
/exlibris/sfx_ver/sfx4_1/<instance>/cgi/core/azlist_ver3/a-z.cgi
- The CGI for SFXAdmin > KBManager:
/exlibris/sfx_ver/sfx4_1/<instance>/sfxadmin/sfxctrl.cgi
It is possible to disable the XSS validation for specific fields in KBManager. See below.
XSS in SFX is handled by:
- A validation function to verify that requests received by SFX do not contain one of the tags from a list of unacceptable tags.
This function can be found at:
/exlibris/sfx_ver/sfx4_1/<instance>/lib/MetaData/Validator.pm
- A configuration file, XSSlist.config, that contains a list of all tags not allowed in any SFX request.
This configuration file can be found at:
/exlibris/sfx_ver/sfx4_1/<instance>/config/XSSlist.config
When SFX detects that a tag has not been accepted, the following error message is displayed: XXS violation occurred.
This text can be translated via the SFX template file (for the SFX advanced template set) or via the Translations & Display section of the SFXAdmin center (for the simplified template set and the SFX A-Z list version 4).
The following is an example of an XSS violation in the A-Z and SFX menus:
|
<SFX_base_URL>/az?¶m_sid_save=e711b29592ea8a3a8e33b4df6b240338¶m_letter_group_script_save=¶m_current_view_save=detail¶m_textSearchType_save=contains¶m_lang_save=jpn¶m_letter_group_save=¶m_perform_save=searchCategories¶m_chinese_checkbox_save=%22%3E%3Cscript%3Ealert(%27Cross%20Site%20Scripting%20Success!%27)%3C/script%3E¶m_services2filter_save=getFullTxt¶m_jumpToPage_save=1¶m_type_save=textSearch&¶m_perform_value=searchTitle <SFX_base_URL>?isbn=059600313788&rft.title=%22%27%3E%3Cscript%3Ealert(%27Cross%20Site%20Scripting%20Success!%27)%3C/script%3E%22 |
|
disable_XSS_validation "1" |
- In the Edit Target window:
- Public name (global)
- Public name (local) – for both default and institute/group
- Authentication note
- General note
- In the Edit Target Service window:
- Public name(global)
- Public name(local)
- Authentication note
- General note
- In the Object Portfolio window:
- Authentication note
- General note
Password Configuration
- password_expiration – defines the number of days after a password is set that it expires. The default is 0, which means passwords do not expire.
- pre_expiration_warning – defines the number of days before password expiration to display a warning about the expiration. The default is 10 days.
|
password_expiration "0" pre_expiration_warning "10" clean_failed_attempts_table_frequency "7" |
- Captcha_private_key – the CAPTCHA private key for sending to API
- Captcha_public_key – the CAPTCHA public key for sending to API
- Timeout values for Captcha verification and loading
|
Section "captcha_keys" # adding Captcha keys for use in login screen captcha_private_key "6Ldlh9wSAAAAAFDAvMcck1DEXmN62r6sD7czKvzU" captcha_public_key "6Ldlh9wSAAAAAL6C2fFP3xNxVc3xsVR6KVMYt6s7" captcha_verification_timeout "2" captcha_loading_timeout "5" EndSection |
