Retrieving Records with Browse Query
To use Browse Query, you must be assigned permission 018 (Create lists).
To create and maintain saved search templates, you must be assigned permission 641 (Create Lists Template Administration) in addition to permissions 018 and 186 (Review File List Administrator). Permission 640 (Create Lists Limited) allows use of existing saved search templates only.
You can retrieve records by using Boolean logic to construct searches of record data.
- Configure the feature.
-
Access the Browse Query dialog by selecting Tools | Browse query. The search dialog displays. For example:
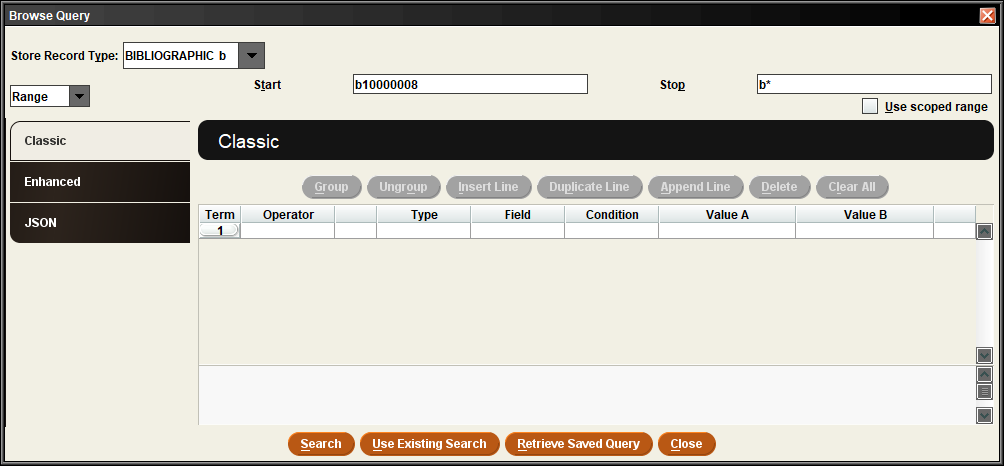
- Specify the search criteria in the search dialog.
Configuring the Feature
These settings apply to Browse Query searching and to sorting, listing, and exporting in Create Lists review files.
If your library's database is scoped, you can set this feature to do one of the following when the user's login has an assigned scope:
- Retrieve all records in the database, regardless of their scope.
- Restrict the retrieved records to those within the current login's scope.
- Offer a check box allowing the user to select a scoped or non-scoped results set.
Contact Innovative to set the scoping options.
If your library uses 880 fields to store romanized and vernacular characters in your database, select (check) the Include equivalent 880s option in the Create Lists Settings to include both main fields and equivalent 880 fields in searches.
Specifying Search Criteria
To specify the search criteria:
- From the search dialog's drop-down menu of record types, choose a record type.
- The item record HOLDING (h852) field
- The item record CALL NUMBER (c) field
- The bibliographic record CALL NUMBER (c) field
- In the drop-down menu of search types, choose Range, Review (review file), Index, or Advanced Advanced Word search).
To search a range of records, enter the starting record number, including the record type indicator (e.g., 'b' for bibliographic, 'i' for item, etc.) in the Start box and the ending record number in the Stop box. To search to the end of the database, enter the record type indicator followed by an asterisk (e.g., "b*" for bibliographic, "i*" for item, etc.).
- In the table for search criteria, enter the type of record to search. The available record types might be limited as a result of your choices in previous steps.
- Enter a field. Valid fields include fixed-length and variable-length data fields, and certain other fields depending on the record type. Enter a field's code to view a list of valid fixed-length and variable-length fields for the type of records you have selected. Press Enter when the field you want is highlighted. Alternatively, double-click the Field cell to view a dialog box with all the fields available for the record type you selected. Click the field you want, and then choose OK.
If you choose ! MARC Tag, the system provides a prompt indicating what to enter:
MARC TAG tttii|ssss
- Choose a condition. The available conditions appear in Using Boolean Searching.
- Enter a value in the Value A cell or double-click the cell for a list of options. Note that double-clicking the Value A cell does not always result in a list of options even if your library has specified a limited list of options for a field (for example, Create Lists does not display a list of options for the LANG PREF fixed-length field in a patron record). For a date or fixed-length field, you must enter a valid value.
- If you chose the "between" or "not within" condition, you must enter a second value in the Value B cell.
- Begin your search by choosing Search, or specify additional search terms.
Including Item and Holdings Record Call Numbers
If the Look up call numbers option is checked in the Create Lists Settings, you can include call numbers from item and holdings records in your search criteria. When you choose this option, if an item or holdings record has no call number, the system "looks up" to the parent record for a call number.
The system searches for call numbers in the following order:
| ttt | 3 numbers for the MARC tag |
| ii | up to 2 numbers or spaces for the indicators (optional) |
| |ssss | up to 4 subfields indicated by the '|' (optional) |
You must enter the MARC tag. However, you can omit the subfields or indicators. For example, enter "130" to instruct the system to look in MARC tag 130, including any indicators and all subfields.
A question mark, '?', can appear in any position in the MARC tag or indicators as a wild card. For example, if you enter "24?", the system looks for the data in all MARC tags in the "240"s, that is, 240, 241, 242, and so on.
Special Fields
You can search specific subfields of the MARC leader, 006, 007, or 008 fields in authority, bibliographic, and holdings (checkin) records.
You can search for records in which a special field does or does not exist.
You can also search the contents of a variety of record property fields, depending on the chosen record type:
Call Number Values
If your library uses more than one call number indexing scheme, you must enter the normalized form of the call numbers in the Value A and Value B cells for searches on the call number field. See Using Call Numbers in Boolean Searches for detailed examples. For more information on how call numbers are normalized, see Call Number Normalization.
- See also:
- Incorporating Saved Searches
- Grouping Search Terms
- Deleting Search Terms
- Saving the Search Strategy for the Current Search
Specifying Additional Search Terms
You can specify additional search terms linked to the existing terms with "and" or "or." The maximum number of terms in a query is 100.
- Specify your search criteria for the first term.
- Choose Append Line to add a search term to the end of the search term list. Choose Insert Line to add a search term before the selected term. The system searches for terms in the order that they appear in the table.
- In the Operator cell of the new search term, choose "and" or "or." The cell's Operator defaults to "and."
- Specify the criteria for the new search term.
- To continue adding terms,continue appending or inserting rows.
- Begin your search by choosing Search.
- See also:
- Incorporating Saved Searches
- Grouping Search Terms
- Deleting Search Terms
- Saving the Search Strategy for the Current Search
Incorporating Saved Searches from Create Lists
Although browse query searches cannot be saved, you can incorporate a search saved in Create Lists when you specify your search criteria:
- From the search dialog's drop-down menu of record types, choose the record type to store.
Choosing a Record Type
Sierra can run a saved search on ANY stored record type, so ensure that you select a record type that is appropriate for the saved search you choose.
- In the drop-down menu of search types, choose Range, Review (review file), Index, or Advanced Advanced Word search).
- Choose Retrieve Saved Query. Sierra displays the list of saved queries. Note that the retrieved query overwrites any existing search criteria.
- Select one of the queries by selecting its row and choosing Select. When you select a query's row, its search criteria appear in the top portion of the window.
- Add more search terms or begin your search by choosing Search.
Incorporating a Review File's Search Strategy
You can incorporate the search strategy used in an existing Create Lists review file when you specify your search criteria:
- From the search dialog's drop-down list of record types, choose the record type to store.
- Choose Use Existing Search. Sierra displays the list of review files. Note that the retrieved search strategy overwrites any existing search criteria.
- Select one of the queries by selecting its row and choosing Use. When you select a query's row, its search criteria appear in the top portion of the window.
- The range of the original search is included in the copied criteria. To refresh the record number range so that it reflects the currently available range, change the Range drop-down menu to Review, and then back to Range again.
- Add more search terms or begin your search by choosing Search.
Grouping Search Terms
You can create hierarchies of search criteria by grouping your search terms. Once you have specified three or more rows of search terms:
- Select the rows to group by highlighting multiple rows with your cursor. You must select at least two rows to create a group. Terms that belong to a group must be adjacent.
- Choose Group. Sierra places parentheses around the search terms you selected.
- See also:
- Ungrouping Search Terms
Ungrouping Search Terms
To ungroup search terms:
- Select the grouped rows.
- Choose Ungroup. Sierra removes the parentheses around the search terms.
Deleting Search Terms
To remove a search term that you have already entered:
- Select the row or rows of the term(s) you want to remove.
- Choose Delete to remove the selected row(s), or choose Clear All to remove all search terms for the current search.