
Configuring Cataloging
Configure metadata profiles and authority vocabularies for bibliographic, holdings, and authority record operations in the MD Editor and for importing and exporting records.
- Catalog Administrator
This role is needed for editing MARC-based profiles using extension packs. Adding, removing, and contributing extension pack files at the Community Zone level requires special privileges assigned to this role. If you are unable to work with extension pack files, contact Customer Support to be assigned these privileges.)
- General System Administrator
This section is about configuring the metadata environment. The profiles configured in the Active Profiles section of the Metadata Configuration List page define the cataloging environment you use when working in the MD Editor. The bibliographic profiles available for you to configure on the Metadata Configuration List page is determined by the Active Registry/Registries set for your institution by Ex Libris. The following Active Registries can be configured for Alma:
- MARC 21
- UNIMARC
- KORMARC
- CNMARC
- Dublin Core
- MODS
- ETD
- DC Application Profiles
This section describes configuring the following characteristics of the MD Editor:
- Which metadata fields and subfields appear in the metadata editor and if they are repeatable
- If the subfields use a controlled vocabulary
- Normalization processes
- Validation processes
You configure the metadata fields from the options provided on the Metadata Configuration List page (Configuration Menu > Resources > Cataloging > Metadata Configuration).

See Working with Authority Records for additional information related to global and local authority records in Alma.
The Metadata Configuration List page displays a list of metadata profiles that are defined for the institution, a link to each profile, which cataloging family it belongs to, and which type of metadata profile it is (authority, bibliographic, or holdings).
Viewing Metadata Profile Details
The Profile Details page provides the following tabs for viewing (and customizing) fields, normalization processes, and validation processes:
- General Information (DC Application Profiles only)
- Fields
- Forms
- Normalization Processes
- Validation Processes
- Validation Exception Profile List
- Other Settings
- On the Metadata Configuration List page (Configuration Menu > Resources > Cataloging > Metadata Configuration), select the link (such as MARC 21 Bibliographic) for the profile you want to view. The Profile Details page appears.

MARC 21 Bibliographic Profile Details Page - Select View in the row actions list for the profile details you want to view. The Field Details page appears.
Field Details Page
Editing Profile Details
You can modify the details of a metadata profile using the options provided in the following tabs on the Profile Details page:
- General Information (DC Application Profiles only) – for more information, see DC Application Profiles - General Information Tab
- Fields – See Editing Fields.
- Forms – See Working with Forms.
- Normalization Processes – See Working with Normalization Processes.
- Validation Processes – See Editing Validation Processes.
- Validation Exception Profile List – See Working with Validation Exception Profiles.
- Other Settings – See Configuring Other Settings.
In addition, you can modify the metadata profile using extension packs. Refer to Editing MARC-Based Profiles with Extension Packs for more information.
Editing Fields
From the Fields tab on the Profile Details page for a specific metadata configuration profile, you can edit the fields of a metadata profile as described in the procedure below. The fields that are available to edit are determined by profile link/type that you select (bibliographic, holdings, authority, or Qualified Dublin Core) on the Metadata Configuration List page (Configuration Menu > Resources > Cataloging > Metadata Configuration).
- On the Metadata Configuration List page (Configuration Menu > Resources > Cataloging > Metadata Configuration), select the link (such as MARC 21 Bibliographic) for the profile you want to edit. The Profile Details page appears.
- For fixed fields that offer a form in the Metadata Editor for cataloging, enable Force Form Editing to require the use of the form for cataloging. When this feature is enabled for a field, free-text cataloging is not an option in the Metadata Editor.
Force Form Editing Configuration Slider See The Alma User Interface for information about working with sliders. - Select Customize(or Edit) in the row actions list for the field you want to edit. The Field Details page appears.
Customize (Edit) Field Details Page - Edit the following field options (which may vary) to match your requirements:
- Mandatory –Yes or No.
- Description – Details for your reference.
- Help URL – A URL that can be used for help. The help information that this URL points to appears on the Info tab in the MD Editor. If you leave this field blank, the default is to the Library of Congress cataloging standard information.
MD Editor Info Tab Related to the Help URL Option - Subfields – For each subfield, you can select Yes or No to indicate that the subfield is mandatory and/or repeatable.
- Select Assign Controlled Vocabulary in the row actions list for the subfield to which you want to assign a specific controlled vocabulary. The Profile Details page with the Create New CV Value section appears.
Assign Controlled Vocabulary - Select a controlled vocabulary (CV) from the Choose Controlled Vocabulary drop-down list. The options in this list are configured in the Configuring Controlled Vocabulary Registry. The details of the controlled vocabulary that you select appear. Select Assign to save this selection.For your convenience, you may use the Create New CV Value section to add controlled vocabulary terms. The terms that you add here only apply to the field that you are editing. If you want to use these terms with another/different field, use the Controlled Vocabulary Registry (see Configuring Controlled Vocabulary Registry) to create a CV that may be used for more than one field.To add a new controlled vocabulary value in the Create New CV Value section, enter a code and description and select Add. When you are finished adding terms, select Assign.
- Select Assign Controlled Vocabulary in the row actions list for the subfield to which you want to assign a specific controlled vocabulary. The Profile Details page with the Create New CV Value section appears.
- First Indicator – In the First Indicator section on the Field Details page, make any required changes.
- Second Indicator – In the First Indicator section on the Field Details page, make any required changes.
- Select Save. The field changes are saved in the metadata profile.
- Select Deploy.
Restoring Profile Field Details
You can restore the profile details to the default values.
- From the Fields tab on the Profile Details page, select Actions > Restore in the row actions list for the profile details that you want to restore. The profile change that was locally customized is restored to the field's default value.
- Select Deploy.
Editing MARC-Based Profiles with Extension Packs
Extension packs (.xml files) for the metadata profiles enable you to adapt MARC-based bibliographic, holdings, and authority profiles with additional fields, subfields, and indicator values, repeating/nonrepeating and mandatory/nonmandatory specifications and URLs for online help for regional needs. This includes the MARC 21, UNIMARC, and CNMARC profiles (but not Dublin Core). With the MARC profile extension packs, you can load and use regional adaptations to the MARC standard.
Extension packs created locally can be shared in the Community Zone by Catalog Administrators with the appropriate privileges. As a Community Zone contributor, you can add and delete extension pack .xml files in the Community Zone.
In addition to data fields, extension packs can include fixed fields such as the LDR and control fields 007 and 008. Changes to the fixed fields appear in the form editor drop-down lists in the MD Editor. See the table below for a summary of how profile elements are handled when adding extension packs.
If a user modifies a MARC profile using an extension pack and would like to add another change to the profile, the user needs to remove the extension pack first and then reload a new one. You cannot load an extension to an already modified profile.
| Profile Element | LDR | Control Field / Fixed Field | Data Field |
|---|---|---|---|
|
Tags |
Out-of-the-box fields and any customized fields that exist in the profile remain. New fields from the extension pack are added. |
Out-of-the-box fields and any customized fields that exist in the profile remain. New fields from the extension pack are added. |
|
|
Subfield codes |
Out-of-the-box codes and any customized codes that exist in the profile remain. New codes from the extension pack are added. |
||
|
Positions |
Out-of-the-box positions that exist in the profile are removed. Any custom positions that exist in the profile remain. New positions from the extension pack are added. |
Out-of-the-box positions that exist in the profile are removed. Any custom positions that exist in the profile remain. New positions from the extension pack are added. |
|
|
Position values |
Out-of-the-box values that exist in the profile remain. Any custom values that exist in the profile are replaced by the new values from the extension pack. |
Out-of-the-box values that exist in the profile remain. Any custom values that exist in the profile are replaced by the new values from the extension pack. |
|
|
Indicator values |
Out-of-the-box values that exist in the profile remain. Any custom values that exist in the profile are replaced by the new values from the extension pack. |
||
|
Subfield controlled vocabulary |
Out-of-the-box and custom values that exist in the profile are replaced by the new values from the extension pack. |
See Extension Pack .xsd for the extension pack schema and the Extension Pack .xml File Example for additional information and an example .xml file.
For more information, see Resource Management – MARC Extensions.
Managing Extension Packs
You can add an extension pack (.xml file) to your local MARC-based profile, or you can add an extension pack to the Community Zone to share with other institutions.
- Create an .xml extension file locally (see Extension Pack .xml File Example for more information).
- From the Metadata Configuration List page (Configuration Menu > Resources > Cataloging > Metadata Configuration), select the link for the MARC-based profile you want to extend.
-
From the Fields tab, select an option in the Add Extensions menu.
- To InstitutionUse this option to add an .xml extension pack file to the profile you are configuring.When you select this option, you may choose to add an extension pack .xml file to your MARC-based profile from the Community Zone or one of your local files.
Add Extension Pack .xml File to the MARC-Based Profile If you select the Community Zone option, a list of Community Zone shared .xml files appears, and you can choose to download an extension pack .xml file to your local storage or add the extension pack .xml file directly to your profile.
- To Institution
- To CommunityUse this option to add an .xml extension pack file to the Community Zone for sharing with other institutions.When you select this option, you are prompted to provide the following extension pack contribution details: name of the extension pack, description, name of the contact for the extension pack, the email address for the contact, and the .xml extension pack file.
Add Extension Pack to the Community Zone - Select Add Extensions.For extension pack .xml files added to the Community Zone, the added file and the contribution message appear on the Shared Extensions page.

Shared Extensions Page If during processing the system encounters more than one occurrence of the same value, the first occurrence is applied and the other redundant occurrences are ignored. - Review/confirm your changes.
- Select Deploy.
To remove all extensions, select Remove Extensions and select Confirm in the confirmation dialog box.
With the appropriate privileges, you can delete extension pack .xml files that you contributed to the Community Zone: select Delete from the row actions list.
When a member edits a Network Zone record of a MARC profile that has an extension pack in the NZ level, only when cataloging a Normal field the controlled vocabulary part of the NZ extension pack will be available. When a member edits an Institution Zone record of a MARC profile that has an extension pack in the IZ level, only when cataloging a Local extension field (with the institution icon ), the controlled vocabulary part of the IZ extension pack will be available.
Extension Pack .xsd
See the .xsd file below that identifies the fields, subfields, indicators, and the values or characteristics that can be specified in the extension pack .xml file.
Extension Pack .xml File Example
See the .xml file below for an example of an extension pack file that can be applied to a metadata profile.
Manually, not using extension packs, you can modify existing field information using the Customize action from the Fields tab on the Profile Details page as described in Editing Fields.
With the extension pack .xml file, you can add extra values (fields, subfields, and indicators) that are not part of the formal standard and update existing values (that are defined as part of the standard or that have been defined as part of a previous Add Extensions load) consistent with the schema identified in the .xsd above (in Extension Pack .xsd).
The extension pack enables you to create multiple unique extensions to the metadata profile so that extensions do not need to be included in a single file. You can load more than one extension pack .xml file. Each additional file that you load customizes only the fields specified in the additional file. If a field was previously customized by an extension pack .xml file and it is defined/customized in a subsequent extension pack .xml file that is added to the metadata profile, that field's customization is overridden to reflect the most recent .xml file added.
For cases in which institutions may want to share a common regional extension pack .xml file, the Ex Libris Developer Network provides the facility for sharing these files. For example, see the blog in the Developer Network,How to add a MARC extension pack for German speaking countries.
Working with Forms
You can create a form that consists of a template of fields to be used when creating digital representations. You can also map MARC fields to labels that are used to create forms. See MARC Slim Configuration.
- Select the Forms tab when configuring Qualified Dublin Core, MARC Bibliographic or MODS profiles.
- Select Add Form and select one of the following:The following appears:
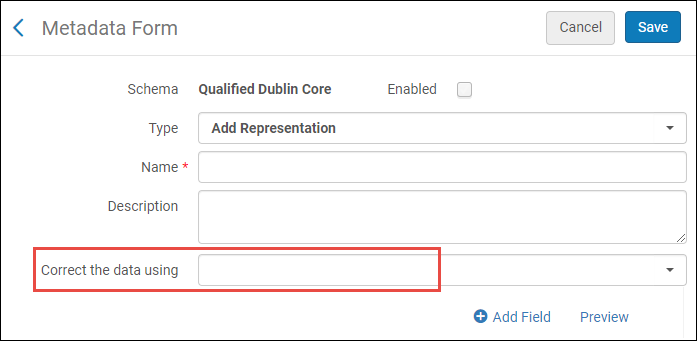
Metadata Form - Fill in the fields of the form and select Add Field. A list of field types appears:
- Checkbox – A single checkbox that can be selected or cleared
- Combo box Multi-select – a drop-down list of checkboxes. Multiple checkboxes can be selected.
- Combo box single-select – a drop-down list of options. Only one can be selected.
- Date – a date picker
- Hidden – a hidden fieldused for automatically adding pre-determined fields and values to the metadata record.
- Radio Button – multiple radio buttons are displayed. Only one can be selected.
- Text Area – a multi-line text box
- Text Box – a single line text box
- Lookup – options appear as you type or select the icon to open a page of options. Only one can be selected.Adding the Lookup field to forms is only available for Representation and Staff Mediated Deposit.
- Select a field type. The fields for the field type you selected appear. For example:
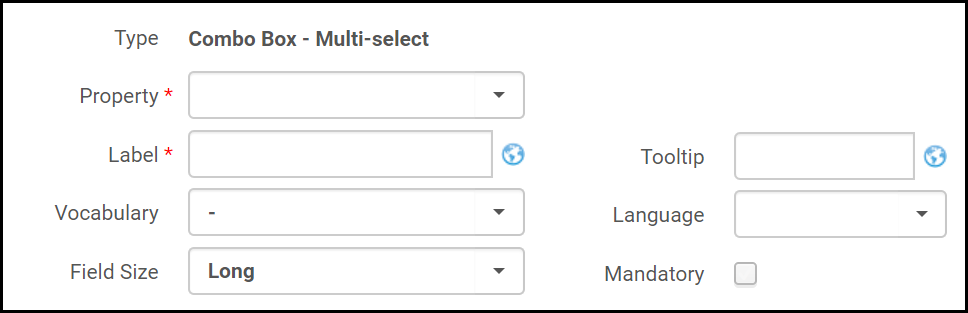 Form Fields (Dublin Core form)
 - Fill in the fields as follows:
- Property / Field – The property you want to add to the form (for Dublin Core), or the field you want to add to the form (for MARC 21).
- Attribute Name – (MODS only) select an attribute name for the field you selected.
- Attribute Value – (MODS only) enter a value for the attribute you selected.
- Label – The label of the property.
- Vocabulary – Select a vocabulary to determine the options that are displayed to the user for this field. For more information, see Controlled Vocabulary Registry - Forms.
- Field Size – Select if you want the field to be short or long.
- Tooltip – a tooltip message to display.
- Language – the languages the institution accepts as a thesis or dissertation language.
- Default Value – Select a default value to appear in the form.
- Mandatory – Select this option if you want the field to be mandatory.
- Repeatable – Select this option to allow the user to add multiple instances of the field.
- Select Save in List. The property is added to the form.
- Repeat the steps for adding fields to the form. Select Preview to see a preview of the form.
- When you are finished adding fields to the form, select Save.
The form is available to be associated with a collection. For more information, see Managing Collections.
Working with Normalization Processes
Normalization processes are used to correct or update metadata in multiple records in bulk. They can make changes such as sorting a record's fields, removing empty fields, or stripping out fields containing order information. Once a normalization process is created, it can be applied while cataloging in the MD Editor or by running a job that uses it. See Configuring Processes for more information.
Records linked to CZ are skipped during the Normalization rules process execution.
Normalization processes can also be created to handle CJK transliterations in the MD Editor.
You can perform the following actions from the Normalization Processes tab on the Profile Details page (Configuration Menu > Resources > Cataloging > Metadata Configuration and select one of the profile links such as MARC 21 Bibliographic):
- Create a customized normalization process. See Configuring Cataloging below.
- Edit a normalization process – Select Edit from the row actions list. The settings for an existing normalization process appear on the following tabs:
- General Information
- Task List
- Task Parameters
- Duplicate a normalization process in order to introduce changes to the duplicate copy – Select Copy from the row actions list.
- Disable a normalization process – If the normalization process is not currently required but may be required in the future, you can disable (enable) it in the Active column.
- Delete a normalization process – Select Delete from the row actions list.
Creating a Normalization Process
Once a new process is saved in the Metadata Configuration, it also becomes available to run as a MARC 21 Bib normalization or Qualified DC normalization job. See Running Manual Jobs on Defined Sets for more information.
- On the Profile Details page, in the Normalization Processes tab, select Add Process(Configuration Menu > Resources > Cataloging > Metadata Configuration and select a profile link). Alternatively, you can also create processes from the Process List page (Configuration Menu > Resources > General > Processes).To create a copy of an existing process, select Copy from the row actions list. Once you have copied the process, you can edit it as needed.
- In the General Information section:
- Enter the name and description for the process. These values will be visible to users on the Process List page.
- In the Status field, select whether the process is enabled (Active) or not. A process that is disabled can be stored and edited in the system without being run. It can be enabled at any time.
- Select Next and select Add Tasks.
- Select the required tasks and select Add and Close. This page contains a predefined list of tasks that you can include in your process (or task chain). See Task List Options for descriptions of the tasks. You cannot define additional tasks and most of these tasks have fixed parameters. Depending on the metadata configuration that you are editing, the tasks vary. Select the "MarcDroolNormalization" (DcDroolNormalization or Marc XSL Normalization) task to be able to select the normalization rules that you created in the MD Editor (refer to Working with Normalization Rules) in the next step.
- Use the up and down arrows to arrange the order in which the tasks are to be performed.
- Select Next. The next page of the wizard appears. The parameters that appear vary depending on the tasks you selected.
- Select Save.
Task List Options
| Process Name | Description |
|---|---|
|
852 field normalization |
Runs a task that takes the control number from the bibliographic record and places it in the correct subfield in the holdings record. See Working with MARC 21 Holdings Profiles for more information. |
| addBibToCollectionNormalizationTask | Assigns imported digital titles to a collection according to the value of the 787 field of the MARC record. For more information, see Managing Import Profiles. |
| Add Hanja to Hangul Transliterations | Converts content such as a title from Hanja to Hangul by configuring source and target fields as shown below. For more information, see Working with CJK Transliterations in Cataloging. This transliteration process can be used for MARC 21 Bibliographic and MARC 21 Authority configurations plus any variety of MARC configurations such as KORMARC, UNIMARC, CNMARC, and so forth. |
| Add Hanja to Hangul CK Transliterations | Converts content such as a title from Hanja to Hangul CK by configuring source and target fields as shown below. For more information, see Working with CJK Transliterations in Cataloging. This transliteration process can be used for MARC 21 Bibliographic and MARC 21 Authority configurations plus any variety of MARC configurations such as KORMARC, UNIMARC, CNMARC, and so forth. |
| Add Hanja to Hangul MOE Transliterations | Converts content such as a title from Hanja to Hangul MOE by configuring source and target fields as shown below. For more information, see Working with CJK Transliterations in Cataloging. This transliteration process can be used for MARC 21 Bibliographic and MARC 21 Authority configurations plus any variety of MARC configurations such as KORMARC, UNIMARC, CNMARC, and so forth. |
| Add Hanja to Pinyin Transliterations | Converts content such as a title from Hanja to Pinyin by configuring source and target fields as shown below. For more information, see Working with CJK Transliterations in Cataloging. This transliteration process can be used for MARC 21 Bibliographic and MARC 21 Authority configurations plus any variety of MARC configurations such as KORMARC, UNIMARC, CNMARC, and so forth. |
| Add Hanzi to Pinyin Transliterations | Converts Chinese content to Pinyin.
Configuration The configuration for this process requires that you specify the source and target fields/subfields from Hanzi to Pinyin.  When the normalization is processed, the first and second indicators in the target field are the same as the indicators in the source field. The transliterated words are placed in the target field/subfield and only the words that have more than one transliteration are placed in the angle brackets < > in the target field/subfield. The cataloger can then choose the right one and delete the others. Note that for the institutions that are configured for the Hong Kong Chinese searching language, the Hanzi to Pinyin transliteration process adds the most commonly used transliteration of the word to the record instead of providing all the possible transliteration options in angle brackets. If content exists in the target subfield, the normalization process will overwrite it. Subfield deletion is not handled as part of this normalization process. To delete subfields, select a normalization process dedicated to that task. Select the Add Alternate Graphic Representation option to identify the 880 field as the target for the Hanzi to Pinyin transliteration. When you use this option, you need to only specify the source fields. All subfields in the source fields will be transliterated to the 880 fields. 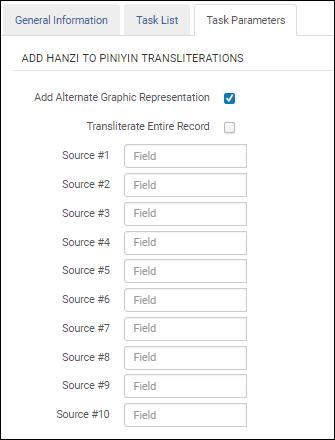 Select the Transliterate Entire Record option to transliterate all fields in a record from Hanzi to Pinyin. This option appears after you have selected the Add Alternate Graphic Representation option. Since all fields will be transliterated (except for those without Chinese), there is no need to specify source fields in the task configuration.  Capitalization For all MARC 21 fields that begin with a Chinese character and that are transliterated, the first transliterated character is capitalized. Personal Names When you use the Add Hanzi to Pinyin Transliterations normalization task and your institution is configured by Ex Libris with the Hong Kong searching language configuration, personal names located in $a of the 100, 600, 700, and 800 fields are handled in the following manner:
See the example below for the Hong Kong transliteration as compared to the Chinese transliteration. Hong Kong: æ¯›æ¾¤æ± => Mao, Zedong Chinese: æ¯›æ¾¤æ± => mao ze dong For more information, see Working with CJK Transliterations in Cataloging. This transliteration process can be used for MARC 21 Bibliographic and CNMARC profiles. |
| Add Kana to Hangul Transliterations | Converts content such as a title from Kana to Hangul by configuring source and target fields as shown below. For more information, see Working with CJK Transliterations in Cataloging. This transliteration process can be used for MARC 21 Bibliographic and MARC 21 Authority configurations plus any variety of MARC configurations such as KORMARC, UNIMARC, CNMARC, and so forth. |
| Add Kana to Romanized Kana Transliterations | Converts content such as a title from Kana to Romanized Kana by configuring source and target fields as shown below. For more information, see Working with CJK Transliterations in Cataloging. This transliteration process can be used for MARC 21 Bibliographic and MARC 21 Authority configurations plus any variety of MARC configurations such as KORMARC, UNIMARC, CNMARC, and so forth. |
| addMmsIdToDcIdentifier | Adds the MMSID to the dc:identifier field of DC records. |
| AuthorityGenerateControlNumberSequence | Runs a task that generates a control number sequence for an authority record. |
| BibGenerateControlNumberSequence | Runs a task that generates a control number sequence for a bibliographic record. |
|
BibGenerateLocalControlNumberSequence |
Runs a task (in MARC 21) that generates a local call number that is stored in the 035 field when, for example, Edit > Enhance the Record is selected while editing a record in the MD Editor.
When you add a new process, select Add Tasks, select Generate Local Control Number Sequence, select Add and Close, and select Next in order to set the task parameters. Note that "Bib Target Field" lists a single option: '035 subfield a'. |
| BibGenerateHandle | |
| CnmarcBibAdd005Task | The 005 field is added only when saving in the MD Editor. |
| CnmarcBibClearEmptyFieldsTask | This process runs a task that deletes the bibliographic fields that are empty. |
| CnmarcBibReSequenceTask | This process runs a task that re-sequences the bibliographic fields according to their proper order—for example, 001, 100, 200, and so forth.
Fields between 500 and 899 are not sorted (or sorted only by hundreds). |
| CnmarcBibTag100OpenDateTask | If the 100 field exists, the current date is placed at the beginning of 100 $a in positions 00-07 using the YYYYMMDD format. |
| CnmarcBibTag100Task | Alma automatically inserts or corrects the dates in the 09-12 and 13-16 positions of the CNMARC 100 field according to the date entered in the CNMARC 210 $d (and 210 $h when it contains four consecutive digits). Additionally, the dates of 210 $d are standardized. For dates like 198? or 19?, for example, Alma replaces the question marks and spaces with "-" (hyphens). |
| Create210BasedOn010 | This normalization process task adds the MARC 210 $a to the record and places the Chinese publisher in the 210 based on the ISBN in the MARC 010 $a and a table managed within Alma. After you create and save a normalization process with this task selected, you can use the Edit > Enhance the Record option in the MD Editor to update records that you are cataloging.
See Enhance the Record in the MD Editor - Edit Menu table on the Navigating the MD Editor page for more information. |
| DcBibClearEmptyFieldsTask | Runs a task that deletes the Dublin Core fields that are empty. |
| DcBibResequenceTask | Runs a task that resequences the Dublin Core fields according to their proper order. |
| DcDroolNormalization | Select the normalization rules to be run. For more information, see MARC Drool Normalization.
Only normalization rules created as shared rules in the MD Editor can be selected. For more information, see Working with Normalization Rules. |
| Identifying Brief Level | Runs a task that calculates the brief level of a record. |
| Generate Chinese Author Call Number | Runs a task (in CNMARC) that generates a Chinese author call number that is stored in the 905 field when, for example, Edit > Enhance the Record is selected while editing a record in the MD Editor.
When you add a new process, select Add Tasks, select Generate Chinese Author Call Number, select Add and Close, and select Next in order to access and select an author number generation routine from the Choose Author Number Generation Routine drop-down list. Select one of the following author number generation routine options:
This is the call number generation routine for the CNMARC bibliographic records based on the General Chinese Author Number table that generates the author number in the 090 field using routine 2.
This is the call number generation routine for the CNMARC bibliographic records based on the General Chinese Author Number table that generates the author number in the 090 field using routine 3.
The next sequence will be generated in the 905 field. This routine should be used only when manually editing a record and not in any batch process.
This maintenance routine saves the sequence in Alma from the 905 field in the bibliographic record. This does not generate new sequences but, instead, saves existing sequences from the bibliographic record. This can be used after batch updates such as after migration or an MD import. This is used to make the Alma sequence and what is stored in the bibliographic record the same. Select the Use when generating author number in MD Editor (F4) parameter to enable, in the MD Editor, the type of author number generation selected in the Choose Author Number Generation Routine parameter.  When you select this option for normalization, pressing F4 in the MD Editor will cause the system to use the author number generation routine identified in this profile instead of the regular author number generation. |
| Generate MARC 21 Author Call Number | Runs a task (in MARC 21) that generates a Chinese author call number that is stored in the 905 field when, for example, Edit > Enhance the Record is selected while editing a record in the MD Editor. This is the MARC 21 version of the Generate Chinese Author Call Number process.
When you add a new process, select Add Tasks, select Generate Chinese Author Call Number, select Add and Close, and select Next in order to access and select an author number generation routine from the Choose Author Number Generation Routine drop-down list.
This is the call number generation routine for the MARC 21 bibliographic records based on the General Chinese Author Number table that generates the author number in the 090 field using routine 3.
This is the call number generation routine for the MARC 21 bibliographic records based on the General Chinese Author Number table that generates the author number in the 090 field using routine 4.
This is the call number generation routine for the MARC 21 bibliographic records based on the General Chinese Author Number table that generates the author number in the 905 field using routine 1.
The next sequence will be generated in the 905 field. This routine should be used only when manually editing a record and not in any batch process.
This maintenance routine saves the sequence in Alma from the 905 field in the bibliographic record. This does not generate new sequences but, instead, saves existing sequences from the bibliographic record. This can be used after batch updates such as after migration or an MD import. This is used to make the Alma sequence and what is stored in the bibliographic record the same. Select the Use when generating author number in MD Editor (F4) parameter to enable, in the MD Editor, the type of author number generation selected in the Choose Author Number Generation Routine parameter. When you select this option for normalization, pressing F4 in the MD Editor will cause the system to use the author number generation routine identified in this profile instead of the regular author number generation. |
| MARC Normalization Rules | Runs the normalization rules that are selected as parameters in the Task Parameters tab. |
|
MARC21 Expand Holding By 863/4/5 Task |
Runs a task that adds an 863/864/865 summary statement holdings field. See Working with MARC 21 Holdings Profiles for more information. |
|
MARC21 Expand Holding By 866/7/8 Task |
Runs a task that adds a description to the 866/867/868 textual holdings fields. See Working with MARC 21 Holdings Profiles for more information. |
| Marc21AuthClearEmptyFieldsTask | Runs a task that deletes the authority fields that are empty. |
| Marc21AuthResequenceTask | Runs a task that resequences the authority record fields according to their proper order. |
| Marc21BibClearEmptyFieldsTask |
Runs a task that deletes the bibliographic fields that are empty. This task cannot be removed from the out-of-the-box process because records with empty fields cannot be saved. |
| Marc21BibResequenceTask | Runs a task that re-sequences the bibliographic fields according to their proper order—for example, 001, 100, 200, and so forth.
Fields between 500 and 899 are not sorted (or sorted only by hundreds). The 689 field (relevant for German markets only) is sorted by its indicators. |
| Marc21createControlNumber | Runs a task that creates a new control number from the bibliographic records' 001 and 003 fields and places it in the 035 field. |
|
Marc21HoldingClearEmptyFieldsTask |
Runs a task that deletes the holdings fields that are empty. See Working with MARC 21 Holdings Profiles for more information. |
|
Marc21HoldingResequenceTask |
Runs a task that resequences the holdings fields according to their proper order. The fields 5XX and 8XX are not sorted. See Working with MARC 21 Holdings Profiles for more information. |
|
MARC21 Holding Fix 001 Field |
Writes a 001 field to the holdings record. See Working with MARC 21 Holdings Profiles for more information. |
| MarcDroolNormalization | Select the normalization rules to be run. Normalization processes use as building blocks the shared normalization rules that were already defined and saved in the Metadata Editor (refer to Working with Normalization Rules).
Private normalization rules cannot be used as in a normalization process.  For more information regarding creating normalization rules see Working with Normalization Rules. |
| MarcXSLNormalization | Select the normalization rules to be run.
Normalization processes use as building blocks the shared normalization rules that were already defined and saved in the Metadata Editor (refer to Working with Normalization Rules). Private normalization rules cannot be used as in a normalization process. For more information regarding creating normalization rules see Working with Normalization Rules. |
| MmsTagSuppressed | Runs a task that suppresses/unsuppresses the bibliographic records from discovery according to the selected value True or False (True for records to be suppressed from publishing to Primo and False to allow records to be published to Primo). |
| MmsTagSyncExternal |
Runs a task that sets the synchronization policy for the bibliographic records with the external catalog according to one of the following selected values:
|
| MmsTagSyncNationalCatalog | Runs a task that sets the synchronization policy for the bibliographic records with the national catalog according to one of the following selected values:
|
|
Sort Subfields Task |
Select this task to sort the order of subfields for a specific field during normalization. After you have added this task to the Process Details - Add Tasks page and you select Next, the Sort Subfields Task section appears where you can customize the order of subfields for a specific field for up to ten different fields.
Sort Subfields Task
When there are other subfields in the field that are not specified in the sort order, they are appended after the sorted subfields in their original order. Any fields that are not customized for sorting maintain their original subfield order. The sorting customization is case sensitive. The lowercase and uppercase versions of a letter are treated separately. |
|
UnimarcBibAdd005Task |
The 005 field is added only when saving in the MD Editor. For institutions using SBN, see Configuring the Task UnimarcBibAdd005Task for SBN / UNIMARC for more information. |
| UnimarcBibClearEmptyFieldsTask | This process runs a task that deletes the bibliographic fields that are empty. |
| UnimarcBibReSequenceTask | This process runs a task that re-sequences the bibliographic fields according to their proper order—for example, 001, 100, 200, and so forth.
Fields between 500 and 899 are not sorted (or sorted only by hundreds). |
| UnimarcBibTag100OpenDateTask | If the 100 field exists, the current date is placed at the beginning of 100 $a in positions 00-07 using the YYYYMMDD format. |
| UnimarcBibTag100Task | Alma automatically inserts or corrects the dates in the 09-12 and 13-16 positions of the UNIMARC 100 field according to the date entered in the UNIMARC 210 $d (and 210 $h when it contains four consecutive digits). Additionally, the dates of 210 $d are standardized. For dates like 198? or 19?, for example, Alma replaces the question marks and spaces with "-" (hyphens). |
| Update originating system information | Use this option to set up the Originating System Version used for version prevention when importing records with Upon match Overlay or Merge options and Consider Originating System or Ignore Originating System options selected. Records stored in the system prior to the September 2015 release, do not have the Originating System Version information. Alma provides the ability to set up this information using a process automation job with Update originating system information selected from the Process List Pool. For records imported after the September 2015 release, the Originating System and Originating System Version are added automatically.
As you process these existing records from prior to the September 2015 release, be aware that the normalization task will not modify any records linked to the Community Zone.
See the procedure To configure normalization for managing the Originating System and Originating System Version information: for steps regarding how to set up a process using Update originating system information. |

Configuring Normalization for Managing the Originating System
- On the Process List page (Configuration Menu > Resources > General > Processes), select Add Process.
- Select the following options for the parameters identified below and select Next:
- Business Entity – Bibliographic title
- Type – MARC 21 Bib normalization (or other option type depending on your environment)
- Complete the General Information section and select Next.
- Select Add Tasks and select Update originating system information.
- Select Add and Close, and select Next.
- Select any of the following parameters according to your requirements:For selected parameters, you must also specify the associated parameter (if any).
- Update Originating System – The originating system that you want identified in the imported record's metadata.

Originating System - Update Originating System Version – The date that you want stored in the record's metadata. This date is used when you select the Prevent Overlay/Merge options in your import profile for processing record matches (see Creating/Editing an Import Profile: Match Profile). The format of this date parameter is MM/DD/YYYY. The format of the Originating System Version is YYYYMMDDhhmmss.f(where hhmmss.f is hours, minutes, seconds, and a fraction of a second and the 24-hour clock is used). When normalization occurs with this parameter specified, Alma enters YYYYMMDD000000.0. Zeroes are entered for the hhmmss.f portion of the Originating System Version.When using metadata import, Alma pulls the date and time (that is formatted as YYYYMMDDhhmmss.f) from the 005 control field of the imported record for the Originating System Version field. See the figure below for an example of the 005 control field and the date/time format:The normalization process updates the Originating System Version field according to the date entered or selected from the calendar in the Originating System Version parameter. When you run a MARC 21 Bib normalization job, for example, that uses a normalization process with a date selected for the Originating System Version parameter, the date that you specify is applied to all the records in the set that you select for the job.
- Update Existing Originating System Version Values – Whether the originating system version you selected (above) overwrites any existing version. If not selected, the existing version remains as it is.
- Update Originating System – The originating system that you want identified in the imported record's metadata.
- Select Save.To run the process that you just created to update the Originating System Version information on a set of records, follow the steps on the Running Manual Jobs on Defined Sets page. Optionally, you can modify/override the Originating System and/or Originating System Version parameters when you run the job.
Editing Validation Processes
The following are examples of the out-of-the-box validation processes:
MARC21 Bibliographic Metadata Configuration
- MARC 21 Bib match validation – Defines the way in which validation is handled when a bibliographic record match is performed during the import process or in the MD Editor.
- MARC 21 Bib validation on save – Defines the way in which validation is handled when importing MARC records using an import profile, copy cataloging via an external resource (such as WorldCat or LoC), and saving a bibliographic record in the MD Editor.
MARC21 Authority Metadata Configuration
- MARC 21 Authority match validation – Defines the way in which validation is handled when an authority record match is performed during the import process or in the MD Editor.
- MARC 21 Authority validation on save – Defines the way in which validation is handled when importing MARC records using an import profile, copy cataloging via an external resource, and saving an authority record in the MD Editor.
You can edit these processes, but you cannot create new validation processes.
If the process is not currently required but may be required in the future, you can disable it in the Active column.
- Select the Edit row action for the validation process that you want to edit from the Validation Processes tab on the Profile Details page (Configuration Menu > Resources > Cataloging > Metadata Configuration and select a profile link).
Validation Processes Tab The Process Details page opens to the General Information tab for the validation process.
Validation Process General Information Tab -
Edit the validation details as required by selecting the validation process tabs (General Information, Task List, and Task Parameters) to access the information you want to modify.From the Task List tab, the validation tasks described in the tables below can be:
- Added using the Add Tasks link
- Removed from the existing task list using the Remove row action
- Reprioritized in the existing task list using the up/down arrows to change the order of the rows
The validation tasks described in the Summary of the MARC21 Bibliographic Metadata Configuration Validation Tasks and Summary of the MARC21 Authority Metadata Configuration Validation Tasks tables are available for the Marc21 Bib matches validation and Marc21 Bib validation on save and the Marc21 Authority matches validation and Marc21 Authority validation onsave validation processes, respectively.Summary of the MARC21 Bibliographic Metadata Configuration Validation Tasks Validation Tasks Description Validation Recognized Fields MARC21 Validates that all fields are recognized by profile. Validation Mandatory MARC21 Validates the existence of mandatory fields. Validation Repeatable MARC21 Validates the repeatable fields. Validation Fixed Fields Positions MARC21 Validates legitimate data in the control field. Validation Variable Fields MARC21 Validates legitimate data in the indicators. Validation Recognized Sub-Fields MARC21 Validates that all sub-fields are recognized by profile. Validation Mandatory Sub-Fields MARC21 Validates the existence of mandatory subfields. Validation Repeatable Sub-Fields MARC21 Validates repeatable subfields. Marc21BibFindMatchesValidationTask Marc21Bib find if it has matches validation. Validation vocabulary data Sub-Fields MARC21 Validates vocabulary data. Validating alternate graphic representation Validates alternate graphic representations. Validate Bib_Heading authorized Validates if bibliographic headings are authorized. Validate Local Call Number Uniqueness MARC21
Use this task to verify that the local call number is unique across all bibliographic records in the repository.
For this task, you can specify the following task parameters (from the Task Parameters tab): 090, 091, 092, 093, 094, 095, 096, 097, 098, 099, and 905.
 Validate Local Call Number Uniqueness
The default is that all 09X fields are specified. You may also select to add 905 to the list (that validates $s in the 905).
When you display the entire drop-down list, you select a value to remove or add the check mark to indicate which 09X field you want to be validated for uniqueness.
In the case where not all 09X fields are selected, the uniqueness check is for the same 09X field in other bibliographic records. So, for example, if you select the 093 field in the BIB fields for call number validation list, the validation check does a comparison of all other bibliographic 093 fields in the repository to determine if there are any duplicate call numbers.
In the case where all 09X fields are selected, the uniqueness check is for any 09X field in other bibliographic records. So, for example, if the bibliographic record has a local call number stored in the 093 field, the validation check does a comparison of all other bibliographic 09X fields (not just the 093 field) in the repository to determine if there are any duplicate call numbers.
As a shortcut, you may select the x next to the 09X field to remove it from the list.
For more information, see How to make a check on the uniqueness of the 090 call number when saving a record in the metadata editor(.docx file).
Validate "Other Standard Number" check digit
When you are configuring the MARC21 Bibliographic profile, select this validation task to validate the following Other Standard Number IDs in field 024:
- UPC (1st indicator = 1)
- ISMN (1st indicator = 2)
- IAN (1st indicator = 3)
After you add the Validate "Other Standard Number" check digit validation task to the task list on the Task List tab, select the Task Parameters tab and identify the subfields that you want to validate in the 024 field. When you specify multiple subfields, enter the subfields separate by a comma and no spaces.
 Other Standard Number Validation Task Parameters - MARC 21 / KORMARC
Validate ISBN check digit
Select this validation task to validate the International Standard Book Number (ISBN).
After you add the Validate ISBN check digit validation task to the task list on the Task List tab, select the Task Parameters tab and select Add fields and subfields to identify the fields/subfields that you want to validate. When you specify multiple subfields, enter the subfields separate by a comma and no spaces.
 ISBN Validation Task Parameters - MARC 21/ KORMARC
 ISBN Validation Task Parameters - UNIMARC / CNMARC
Validate Empty Fields in New MARC21 Bibliographic (This is also available for the KORMARC, UNIMARC, and CNMARC bibliographic metadata configuration profiles.)
After you add the Validate Empty Fields in New MARC21 Bibliographic validation task to the task list, select the Task Parameters tab and identify the fields that you want to validate are empty.  Fields to Validate as Empty
To set up a special error or warning message for this validation check, you need to create a validation exception profile. See Working with Validation Exception Profiles for more information.
This validation check is for new records only, not existing records that you are updating.
For each functionality that uses the validation process (MD Editor, API, import, PO line, and quick cataloging), an error or warning message is provided when the validation identifies that a field specified on the Task Parameters tab is not empty. In the MD Editor, for example, the messages appear in the following manner when 009 is configured as a field to check on the Task Parameters tab:
 Field Not Empty Validation Messages
Validation Form of Material MARC21
Validates that the form of material in the 006 field (position 0) matches the material type in the leader (LDR).
Validate ISSN check digit
Select this validation task to validate the International Standard Serial Number (ISBN).
After you add the Validate ISSN check digit validation task to the task list on the Task List tab, select the Task Parameters tab and select Add fields and subfields to identify the fields/subfields that you want to validate. When you specify multiple subfields, enter the subfields separate by a comma and no spaces.
 ISSN Validation Task Parameters - MARC 21 / KORMARC
 ISSN Validation Task Parameters - UNIMARC / CNMARCValidate EDTF date/timeSelect this validation task to validate the date/time by EDTF standard.After you add the Validate EDTF date/time validation task to the task list on the Task List tab, select the Task Parameters tab and select the EDTF Level and Add fields and subfields to identify the fields/subfields that you want to validate. When you specify multiple subfields, enter the subfields separate by a comma and no spaces.EDTF Validation Task Parameters
Validate UPC check digit
When you are configuring the UNIMARC Bibliographic profile, select this validation task to validate the Universal Product Code (UPC).
After you add the Validate UPC check digit validation task to the task list on the Task List tab, select the Task Parameters tab and select Add fields and subfields to identify the fields/subfields that you want to validate. When you specify multiple subfields, enter the subfields separate by a comma and no spaces.
 Universal Product Code Validation Task Parameters - UNIMARC / CNMARC
Validate ISMN check digit
When you are configuring the UNIMARC Bibliographic profile, select this validation task to validate the International Standard Music Number (ISMN).
After you add the Validate ISMN check digit validation task to the task list on the Task List tab, select the Task Parameters tab and select Add fields and subfields to identify the fields/subfields that you want to validate. When you specify multiple subfields, enter the subfields separate by a comma and no spaces.
 International Standard Music Number Validation Task Parameters - UNIMARC / CNMARC
Validate IAN check digit
After you add the Validate IAN check digit validation task to the task list on the Task List tab, select the Task Parameters tab and select Add fields and subfields to identify the fields/subfields that you want to validate. When you specify multiple subfields, enter the subfields separate by a comma and no spaces.
 International Article Number Validation Task Parameters - UNIMARC / CNMARC
Summary of the MARC21 Authority Metadata Configuration Validation Tasks Validation Tasks Description Validation Recognized Fields MARC21 Validates that all fields are recognized by profile. Validation Mandatory MARC21 Validates the existence of mandatory fields. Validation Repeatable MARC21 Validates the repeatable fields. Validation Fixed Fields Positions MARC21 Validates legitimate data in the control field. Validation Variable Fields MARC21 Validates legitimate data in the indicators. Validation Recognized Sub-Fields MARC21 Validates that all sub-fields are recognized by profile. Validation Mandatory Sub-Fields MARC21 Validates the existence of mandatory subfields. Validation Repeatable Sub-Fields MARC21 Validates repeatable subfields. Validation Mandatory Sub-Fields MARC21 Validates mandatory data. Validation Non Repeatable preferred field Auth Validates nonrepeatable fields. Same value not allowed in 1xx and 4xx Auth Validates mandatory data. Validation 1xx 4xx 5xx - same last 2 digits Validates that 4xx and 5xx have the same last two digits as 1xx. Validation language indication MARC21 Validation of language indication (for multilingual vocabularies). - When you are finished modifying the Process Details on the General Information, Task List, and Task Parameters tabs, select Save.
Working with Validation Exception Profiles
Validation exception profiles allow you to determine the severity of validation issues. You can define whether users are blocked from continuing when Alma encounters an issue, or only warned but allowed to continue. When an issue is found, Alma provides an error or warning message in the panel at the bottom of the Metadata Editor.
Validation exception profiles can be accessed from the Validation Exception Profile List tab on the Profile Details page (Configuration Menu > Resources > Cataloging > Metadata Configuration and select a profile link). When defining an import profile, you define the validation exception profile to be used during the import. The following are the out-of-the-box validation exception profiles:
- MARC XML Bib Import – It is recommended that you select this exception profile to handle invalid data as it is being imported.
- MARC XML Bib Metadata Editing on Save – This exception profile is used when copy cataloging via an external resource (such as WorldCat or LoC) and when cataloging/saving a bibliographic record in the Metadata Editor.
Unlike validation profiles (see Editing Validation Processes), you define a default behavior and you can also define exceptions to that behavior. The top section of the page is where you specify the Default severity, which is the default severity for all validation issues found in the record. In the bottom section you can specify exceptions to that default. These are the rules that you want to treat in the opposite way from the default. In the screenshot below, because the default is set to 'Warning', everything in the exception list will be treated as an error, because it is the exception to the default.

On this page, you can also edit or copy the existing profiles. You can delete the profiles that you created.
Adding a Validation Exception Profile
- On the Profile Details page (Configuration Menu > Resources > Cataloging > Metadata Configuration and select a profile link), select the Validation Exception Profile List tab.To copy an existing validation exception profile and modify it to create a new one, select the Copy row action and modify the duplicate profile it to match your requirements (see Editing a Validation Exception Profile).
- Enter the following for the validation exception profile:
- Name (required) and description for the severity validation profile you want to add
- Select Error or Warning to indicate the default severity. The default severity determines whether violations of the field-level parameters defined in the Fields tab (for example, mandatory, non-repeatable) are treated as warnings (which can be overridden) or as errors (which must be resolved).
- Select Add Validation Severity Profile. The profile is added to the list of Validation Exception Profiles. See Editing a Validation Exception Profile for information about adding a message to your validation exception profile.
Editing a Validation Exception Profile
- From the Validation Exception Profile List tab on the Profile Details page (Configuration Menu > Resources > Cataloging > Metadata Configuration and select a profile link), select the Edit row action for the validation exception profile that you want to update.
- In the GeneralInformation area, make changes to name, description, or default severity as required.
- In the Message area, select the Delete row action to delete unwanted messages.
- Select Add Validation Severity Exception and select a validation exception message from the Message drop-down list. The syntax of the messages in the Message drop-down list is not configurable.
- Select Add Validation Severity Exception.
- Select Save Profile Details and select Back.
Configuring Other Settings
From the Other Settings tab on the Profile Details page for metadata configuration (Configuration Menu > Resources > Cataloging > Metadata Configuration and select a profile link), you can:
- Select a Brief Level Rule (see Setting the Brief Level Rule Default in the Metadata Configuration)
- Select parameters to handle certain fields in a particular manner when saving records (see Configuring Other Settings Parameters)
Configuring Other Settings Parameters
Other Settings parameters are provided for handling the 003, the 035, and the 880 $6 fields when saving records. Use these parameters in the following manner:
- Disable 003 deletion – Select this parameter to maintain the contents of the 003 field when you save records. When this parameter is not selected, the default behavior when saving a record is to delete the 003 field after concatenating its contents with the MMS ID from the 001 field to build an ID like (OCoLC)35397863 that is placed in the 035 field.
- Exclude generation of 035 based on MMS ID – Select this option to turn off the automatic generation of the 035 field that concatenates the contents of the 003 field with the MMS ID from the 001 field when saving records.
- Generate 035 from 001 only – (UNIMARC bibliographic and authority metadata configuration profiles only) Select this option to create a 035 field from the contents of the 001 field (MMS ID) when saving records.

Metadata Configuration Other Settings Tab for UNIMARC - Add alternate graphic representation script code – Use this parameter to add or omit the linked-to script language indication in $6 when the 880 is created. When you select this parameter, the script language indicator is added to $6 in the 880 field. See Working with Linked 880 Fields in Bibliographic Records for more information.
Working with UNIMARC Fields, Normalization, and Validation
Similar to the support Alma provides for MARC 21, Alma provides support for UNIMARC validation and normalization. Alma uses the settings in the validation and normalization profiles when importing records and when working with records in the MD Editor.
For UNIMARC, additional validation function has been implemented for fixed fields (1XX) that have a subfield.
Default normalization processes have been created for UNIMARC bibliographic record normalization. See the Task List Options table for more information.
The UNIMARC metadata profile includes the standard UNIMARC local fields. Specifically, the 9XX local fields are available in the UNIMARC profile. This includes subfields a through z and 0 through 9, plus blank and 0 through 9 values for the first and second indicators.
- Select the UNIMARC Bibliographic link in the Metadata Configuration List page (Configuration Menu > Resources > Cataloging > Metadata Configuration). The Profile Details page appears.
- Select the Normalization Processes tab. The following default normalization processes appear on the Normalization Processes tab:
- Unimarc Bib Initial Normalization
- Unimarc Bib normalize on save
- Unimarc Bib Re-sequence
- Unimarc Bib Re-sequence And Clear empty fields
-
Select Edit from the row actions list for one of the normalization processes, and select the Task List tab to view the UNIMARC tasks provided.See Configuring the Task UnimarcBibAdd005Task for SBN / UNIMARC for more information.
- When you are finished, select Save.
- Select the UNIMARC Bibliographic link in the Metadata Configuration List page (Configuration Menu > Resources > Cataloging > Metadata Configuration). The Profile Details page opens on the Fields tab.
- Locate one of the 9XX fields.
- Select Customize from the row actions list to view the subfields and indicators available for customizing.
UNIMARC Field Details - Expand the Subfields, First Indicator, and Second Indicator sections to view the customizable options.
- Select the UNIMARC Bibliographic link in the Metadata Configuration List page (Configuration Menu > Resources > Cataloging > Metadata Configuration). The Profile Details page opens on the Fields tab.
- Filter the Fields tab by selecting the 1XX: Coded Information Block option.
- For field 100, select View from the row actions list. The Field Details page appears.
- Expand the Positions section to view the positions being validated.The following position validations have been added for UNIMARC:
- Date entered on file
- Type of Publication Date
- Publication Date 1
- Publication Date 2
- When you are finished, select Back until you return to the Metadata Configuration List page.
Managing UNIMARC Local Authority Records
As a multi-format library solution, Alma supports the use of UNIMARC authority records for the purpose of authority control. Alma provides the capability for managing UNIMARC local authority records (and associating them to bibliographic records using the F3 functionality in the MD Editor). From the Metadata Configuration List page, you can create your own UNIMARC authority profile for managing local authorities. In addition, you can create authority record import profiles designed to import UNIMARC records.
- On the Metadata Configuration List page (Configuration Menu > Resources > Cataloging > Metadata Configuration) select Add Local Authority. The Add Local Authority pop-up window appears.
- Complete the parameters required for the UNIMARC local authority profile.
- Name – Enter the vocabulary name that you want to display on the Local Authority Registry page for the profile.
- Code – Enter the vocabulary code name that you want to display when configuring your import profile, for example.
- Family – Select UNIMARC from the drop-down list.
- Type – Select one of the following types from the drop-down list:
- Subject
- Name
- Names and Subjects
- Classification
- Direct ID prefix – Enter the ID prefix if one is used.
- Multilingual – Select Yes or No from the drop-down list.
- Select Add and Close. The local authority registry that you created appears in the list on the Local Authority Registry page.
- Select Save. Your local authority profile appears in the list on the Metadata Configuration List page.
- Select the UNIMARC Authority link to open the Profile Details page and configure fields, normalization, and validation similar to MARC 21.
- When you have completed making changes to the profile details, select Deploy.
Working with KORMARC Fields, Normalization, and Validation
Similar to the support Alma provides for MARC 21, Alma provides support for KORMARC validation and normalization. Alma uses the settings in the validation and normalization profiles when importing records and when working with records in the MD Editor.
Default normalization processes have been created for KORMARC bibliographic record normalization.
- Open the Metadata Configuration List page (Configuration Menu > Resources > Cataloging > Metadata Configuration).
- Select the KORMARC Bibliographic link. The Profile Details page appears.
- Select the Normalization Processes tab. The following default normalization processes appear on the Normalization Processes tab:
- Kormarc Bib normalize on save
- Kormarc Bib Re-sequence
- Kormarc Bib Re-sequence And Clear empty fields
- Select Edit from the row actions list for one of the normalization processes and select the Task List tab to view the KORMARC tasks provided .
- When you are finished, select Save.
Working with CNMARC Fields, Normalization, and Validation
Similar to the support Alma provides for MARC 21, Alma provides configuration options for CNMARC fields, normalization and validation for bibliographic and authority records. See Editing Profile Details and Working with Authority Records for more information.
Alma uses the settings in the validation and normalization profiles when importing records and when working with records in the MD Editor.
Default normalization processes have been created for CNMARC bibliographic record normalization.
- Open the Metadata Configuration List page (Configuration Menu > Resources > Cataloging > Metadata Configuration).
- Select the CNMARC Bibliographic link. The Profile Details page appears.
- Select the Normalization Processes tab. The following default normalization processes appear on the Normalization Processes tab:
- Cnmarc Bib Initial Normalization
- Cnmarc Bib normalize on save
- Cnmarc Bib normalize on Z39.50/SRU search
- Cnmarc Bib Re-sequence
- Cnmarc Bib Re-sequence And Clear empty fields
- Select Edit from the row actions list for one of the normalization processes and select the Task List tab to view the CNMARC tasks provided. See the Task List Options table for an explanation of normalization tasks.
- When you are finished, select Save.
Working with MODS Fields, Normalization, and Validation
Similar to the support Alma provides for MARC, Alma provides support for MODS validation and normalization. Alma uses the settings in the validation and normalization profiles when importing records and when working with records in the MD Editor.
Default normalization processes have been created for MODS bibliographic record normalization.
- Open the Metadata Configuration List page (Configuration Menu > Resources > Cataloging > Metadata Configuration).
- Select the MODS link. The Profile Details page appears.
- Select the Normalization Processes tab. The following default normalization processes appear on the Normalization Processes tab:
- Add MODS BIB to Collection
- MODS Bib Normalization On Save
- Suppress Bib records from discovery MODS
- Select Edit from the row actions list for one of the normalization processes and select the Task List tab to view the MODS tasks provided.
- Select Add Tasks, to add a task to the process. The following table lists the available MODS tasks:
Task Description ModsDroolNormalization Select the normalization rules to be run from the Task Parameters tab. addBibToCollectionNormalizationTask Add the bibliographic record to a collection MmsTagSuppressed Sets the Suppressed flag of MMS MODS Handles Migration Task Copy Handles from the BIB record's metadata to the record's Handle Identifier field Update Record Identifier with MMS ID Update the recordIdentifier element with the MMS ID. Select the Record Change in a recordIdentifier Element checkbox to record the change in the recordinfoNote element under the recordIdentifier element. - Select the tasks that you want to add.
- When you are finished, select Add and Close and select Save.
Working with Dublin Core Fields, Normalization, and Validation
Similar to the support Alma provides for MARC, Alma provides support for Dublin Core validation and normalization. Alma uses the settings in the validation and normalization profiles when importing records and when working with records in the MD Editor.
Default normalization processes have been created for Dublin Core bibliographic record normalization.
- Open the Metadata Configuration List page (Configuration Menu > Resources > Cataloging > Metadata Configuration).
- Select the Qualified Dublin Core link. The Profile Details page appears.
- Select the Normalization Processes tab. The following default normalization processes appear on the Normalization Processes tab:
- Add BIB to Collection
- Qualified DC Bib normalize on save
- Qualified Dublin Core Bib normalize on Z39.50/SRU search
- Select Edit from the row actions list for one of the normalization processes and select the Task List tab to view the Dublin Core tasks provided .
- When you are finished, select Save.
Working with DC Application Profiles
Alma provides two customizable Dublin Core profiles to which you can add local fields. These local fields can be used to contain metadata needed by your institution that is not supported by the standard Dublin Core format.
The Dublin Core application profiles that you configure are available wherever there is an option to select a record format:
- In the MD Editor, when adding fields to a Dublin Core record (Resources > Open Metadata Editor).
- In the Record Format field, when adding a representation in the Record Format field (Resources > Add Digital Representation).
- In the Record Format field, when adding a new collection (Resources > Manage Collections).
- In the Target Format field, when configuring import profiles (Resources > Manage Import Profiles).
- In the Bibliographic record formats to include field, when running the Export Digital Titles job (Admin > Run a Job).
- In areas where you configure the metadata that appears in Alma:
- In Search Indexes, where you configure the fields that are searchable in the Alma repository (Configuration > Resources > Search Configuration > Search Indexes).
- In Delivery Profiles Metadata, where you configure the metadata fields that are displayed when viewing digital content in the Digital Viewer (Configuration > Fulfillment > Delivery Profiles Metadata).
The DC Application profiles appear in the list of profiles when it is configured in your active registry:

DC Application Profiles - General Information Tab
Select a DC Application profile to display the Profile Details page. In addition to the tabs available for the other profiles (see Viewing Metadata Profile Details), the General Information tab appears:

You can enter a name and description for the profile. Select Active to activate the profile.
Adding Fields to DC Application Profiles
You can add local fields to the DC Application profiles.
From the Fields tab on the Profiles Details page, select Add Field. Select one of the options that appear:
- Standard – add a standard qualified DC field. The following appears:
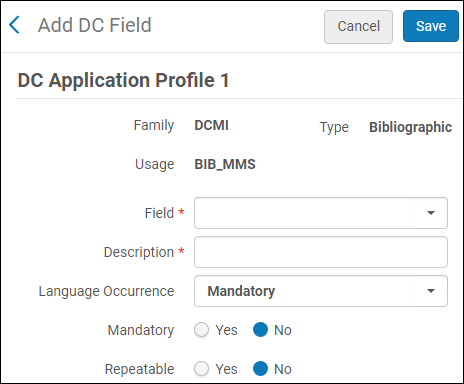 Add Standard Field
- From the Field drop-down list, select a qualified DC field.
- Enter a description for the field.
- Select a language occurrence.
- Select if you want the field to be mandatory:Yes/No.
- Select if you want the field to be repeatable:Yes/No.
- Local – add a local DC field. The following appears:
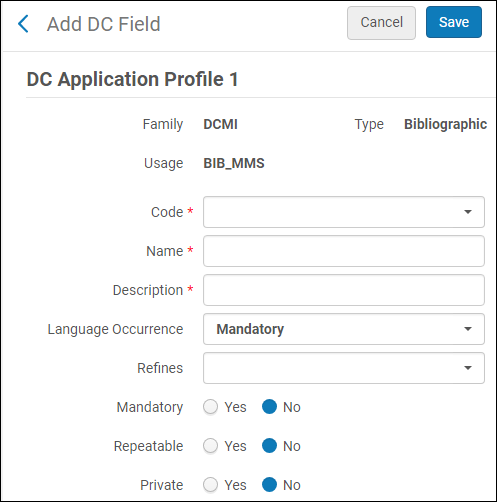 Add Local Field
- From the Code field, select a code for the local DC field.
- Enter a name for the local DC field.
- Enter a description for the local DC field.
- Select a language occurrence.
- From the Refines field you can select a simple DC field that will contain the value of the local field when it is exported.
- Select if you want the field to be mandatory:Yes/No.
- Select if you want the field to be repeatable:Yes/No.
- Select if you want the field to be private:Yes/No. If you select Yes, the field is not exported (but it is indexed).
The field is added to the profile.
- A total of 50 local fields can be added across all profiles that can have local fields configured (DCAP1, DCAP2, and ETD).
- Configure each local field only once across all profiles, that is, do not repeat the same local field code in more than one profile.
Working with the GND Authority Profile
A GND profile is available that enables Alma to better integrate with the GND authority records. This feature includes:
- Search indexes that make it easier to find GND records (see the GND Authority Search Index Mapping section)
- Field/subfield definitions that assist with cataloging
The GND Authority profile is of particular interest to institutions cataloging and contributing records to the GND. While cataloging GND authority records in the Alma MD Editor, the GND Authority profile assists with your GND contributions by having:
- All the GND fields defined, including mandatory definitions
- GND controlled vocabularies in place
- Specific normalization rules
For institutions that have MARC 21 Bibliographic configured as the Active Registry, both the MARC 21 Authority and the GND Authority profile options will be available on the Metadata Configuration List page (Configuration Menu > Resources > Cataloging section > Metadata Configuration).
The configurable fields on the Fields tab and normalization and validation processes are specific to the GND standard.
For information regarding GND indexes, see Configuring Search Indexes.
Working with MARC 21 Holdings Profiles
Working with MARC 21 holdings profiles is similar to working with the bibliographic and authority profiles. They all manage configuration options on the following tabs:
- Fields
- Normalization Processes
- Validation Processes
- Validation Exception Profile List
The differences between them have to do with the fields that are being managed (normalized and validated). Due to the similarities, reference the viewing, editing and configuring sections above for detailed steps in navigating the Metadata Configuration profiles when you work with the MARC 21 Holding link for profile configurations (Configuration Menu > Resources > Cataloging section > Metadata Configuration).
See the table below for MARC 21 Holding profile process options.
| Process Name | Description |
|---|---|
| Normalization Processes: | |
| MARC 21 Holding normalize from BIB | This process is used to normalize MARC 21 holdings from bibliographic records. It provides the following process options in the Process List Pool section on the Task List tab when you edit this process:
|
| MARC 21 Holding normalize on save | This process is used to normalize MARC 21 holdings record when the holdings record is saved in the MD Editor. It provides the following process options in the Process List Pool section on the Task List tab when you edit this process:
|
| MARC 21 Holding Re-sequence And Clear empty fields | This process is used when resequencing and clearing empty fields. It provides the following process options in the Process List Pool section on the Task List tab when you edit this process:
|
| Validation Processes: | |
| MARC 21 Holding validation on save | This process is used to validate holdings record contents when the holdings record is saved in the MD Editor. Select Edit to configure the validation processes.
General Information Tab From the General Information tab, the status for the MARC 21 Holding validation on save validation process can be set to Active or Inactive. Task List Tab The following process options are provided on the Task List tab in the Process List Pool section:
Select processes from the Process List Pool (select Add to Selection) and prioritize the processes in the Processes Selected section that you want performed to validate holdings records when they are saved in the MD Editor. Task Parameters Tab When you select the Duplicate Validation MARC 21 Holding Other Title process on the Task List tab, the Check different locations for duplicate call numbers check box appears on the Task Parameters tab. Select this check box to have the validation check performed on holdings records in different locations. If this check box is not selected, the validation check is performed only on the holdings records in the current location. |
| Validation Exception Profile List: | |
|
Validation exception profiles are used to determine the severity of validation issues. When an issue is found an error or warning message is provided.
The following out-of-the-box profile is provided when you configure the MARC 21 Holding profile:
Unlike validation profiles, you can define additional exception (severity) profiles by selecting Add Validation Severity Profile.
The following severity messages can be configured:
To add a validation severity exception to the MarcXML Holding Metadata Editing On Save profile for library/location not in scope:
|
|
Controlling the Display and Access of Global Authorities in the MD Editor
When your system is configured by Ex Libris for working with local authority records, you can control which global authorities can be viewed and/or accessed in the MD Editor, in order to create local records as an extension to the global authority record. This is done via the Managed Locally indication on the Metadata Configuration List page (Configuration Menu > Resources > Cataloging section > Metadata Configuration), in the Authority Vocabularies” table. On this page, you can tailor the display of authority record options for your work in the MD Editor. When your system is configured for working with local authority records, the Authority Vocabularies section of the Metadata Configuration List page provides the following additional columns:
- Managed LocallyThe Managed Locally column allows you to identify which authority vocabularies you want to appear in the MD Editor. In order to do this, you may enable or disable the vocabulary in this column.
- Managed in CommunityThe Managed in Community column identifies the vocabularies that are maintained in the Community Zone. This column is for informational purposes only. There is no option to enable or disable the vocabulary row in this column.

For institutions that want to limit the number of options in the MD Editor that appear to only those authority vocabulary options that are commonly used versus all that might be available, the Managed Locally column allows you to do that.
In addition to the MD Editor, the selections that you make in the Managed Locally column also determine which authority vocabularies appear in the import profile. Specifically, these selections affect the following areas:
- Templates and Records tabs in the MD Editor
- File > New record options in the MD Editor
- Vocabulary code parameter's drop-down list of options on the Import Profile Details page
- Open the Metadata Configuration List page (Configuration Menu > Resources > Cataloging section > Metadata Configuration). The Metadata Configuration List page appears.<The File > New options list in the MD Editor displays the vocabulary options that are identified as Managed Locally in the metadata configuration.
Authority Vocabulary Options in the MD Editor - Enable the vocabularies in the Managed Locally column to identify the vocabularies that you want to appear in the MD Editor (and the Import profile).
Configuring Controlled Vocabulary Registry
- Catalog Administrator
- General System Administrator
Alma supports validation of subfield values based on a controlled vocabulary (a list of acceptable values for that subfield). Alma supplies several controlled vocabularies out-of-the-box (OTB), and you can implement additional ones.
- Create a controlled vocabulary.
- Assign the controlled vocabulary to a specific MARC 21 subfield.
See the procedure in Editing Fields and the steps that describe editing field options.
You configure controlled vocabularies (CVs) from the Metadata Configuration List page (Configuration Menu > Resources > Cataloging > Controlled Vocabulary Registry).

You can perform the following actions on this page:
- View a controlled vocabulary details (select View from the row actions list)
- Add a controlled vocabulary (see Adding/Editing a Controlled Vocabulary)
- Add or delete controlled vocabulary code values (see Adding/Editing a Controlled Vocabulary)
- Restore a modified out-of-the-box controlled vocabulary (select Restore from the row actions list)
- Delete a controlled vocabulary that you added (select Delete from the row actions list)
Adding/Editing a Controlled Vocabulary
You can add or edit a controlled vocabulary.
- On the Controlled Vocabulary Registry page (Configuration Menu > Resources > Cataloging > Controlled Vocabulary Registry), select Add CV. The Controlled Vocabulary Details page opens.
- Enter a name and description.This name and description then appear on the Controlled Vocabulary Registry page and in the drop-down list of options for Choose Controlled Vocabulary when you assign a controlled vocabulary to a MARC 21 subfield in the metadata configuration profile. See Step 4 in the Editing Fields above. Note that only after you assign a controlled vocabulary to a MARC 21 subfield can this vocabulary be used in the MD Editor as shown in Step 4 below.When a Controlled Vocabulary has more than 100 values, only the first 100 are shown in the Metadata Editor dropdown until you start typing.
- After you have added at least one controlled vocabulary name, select Save to save any further changes to the description.
- In the Add new value area, enter a code and a description. Note that the code can contain spaces or special characters, but cannot contain a subfield delimiter.The code that you enter is the term that is validated or provided as an option when entering a record in the MD Editor.
 Controlled Vocabulary ExampleIn the example above, the codes that you enter appear first in each row, and the description appears to the right of each code in parentheses.The description for the code that you enter in the CV registry can provide additional information regarding the term that you entered.
 - Select Add. The code value is added to the list of controlled vocabulary registries.
- Repeat steps 3 and 4 to add any additional code values (terms).
- Select Delete beside any code value to delete it. A warning appears if you try to delete a code value that was originally included in an out-of-the-box vocabulary.
- Select Cancel to return to the Controlled Vocabulary Registry page.
- On the Controlled Vocabulary Registry page (Configuration Menu > Resources > Cataloging > Controlled Vocabulary Registry), select Actions > Configure or Actions > Edit. The Controlled Vocabulary Details page opens.
- Continue with the steps described in the above procedure, starting from step 3.
Uploading a Controlled Vocabulary List
You can add a controlled vocabulary list in bulk.
- Navigate to the Controlled Vocabulary Details page (Configuration Menu > Resources > Cataloging > Controlled Vocabulary Registry).
- Select Import.
- Navigate to your .csv or Excel file.
- Select Confirm. Alma processes the file and replaces the existing contents of the controlled vocabulary with the new data from the file.
If the file format is incorrect or contains invalid or duplicate entries, Alma generates informative error messages to help identify and correct the issues before retrying the import.
The supported file format is as follows:

The import overwrites the existing Controlled Vocabulary values. To preserve current entries, users can first export the list, modify it as needed, and then re-import the updated file.
Configuring Controlled Vocabulary Registry - Forms
- Catalog Administrator
- General System Administrator
You can configure vocabularies that allow you to define the possible values for form fields (see Working with Forms).
In addition, it is also possible to import controlled vocabulary values from Excel sheets. For details, see Importing Code Table Information.
- On the Controlled Vocabulary Registry - Forms page (Configuration Menu > Resources > Cataloging > Controlled Vocabulary Registry - Forms), select Add CV. The Controlled Vocabulary Details page opens.
- Enter a name and description. This name and description will appear on the Controlled Vocabulary Registry - Forms page and in the drop-down list of options for the Vocabulary field when configuring Forms.
- From the Controlled Vocabulary Registry - Forms page, select the vocabulary.
- Select Add Row.
- Enter a code, a description, and select a default value, if desired. This description is the term that is provided as an option to users for the field.
- Select Add Row.
- Add additional rows to add additional values to the vocabulary.
Configuring Author Number Lists
- Catalog Administrator
- General System Administrator
Generating author numbers (call numbers) requires the use of author number lists. Alma provides standardized author number lists. Using the Author Number Lists configuration option, you can select one or more author number lists, depending on your requirements, to generate author numbers. See Configuring Standard Author Number Lists for more information.
When generating author numbers, the system uses Latin text to locate and generate the automatic author number. If the source text (in a control field such as 100 $a) used by the author number generator in Alma is non-Latin text, the non-Latin text needs to be transliterated to Latin text first. By default, the system uses ICU (International Components for Unicode) for transliteration. If the ICU transliteration results do not meet your requirements, you can customize your own transliteration file to be used instead of the ICU transliteration method. See Configuring Customized Transliteration for Author Number List Generation for more information.
Configuring Standard Author Number Lists
Use the Author Number Lists configuration option to enable one or more standardized author numbers lists to be used for generating author numbers automatically. The following standardized author number lists are available:
- cutter_three_figure_cn.txt
- cutter_three_figure_kor.txt
- lee_jai_chul_1.txt
- lee_jai_chul_2.txt
- lee_jai_chul_3.txt
- lee_jai_chul_4.txt
- lee_jai_chul_5.txt
- lee_jai_chul_6.txt
- lee_jai_chul_7.txt
- lee_jai_chul_8.txt
The cutter_three_figure_cn.txt option contains the Chinese author information, and the cutter_three_figure_kor.txt option contains the Korean author information.
The lee_jai_chul<1-8>.txt options contain the Lee Jai Chul method (see Lee Jai Chul Method Logic) for generating Korean author numbers and can be used with MARC 21 or KORMARC records. One or more of these .txt files may be enabled in the Author Number Lists configuration. As part of the logic of the Lee Jai Chul method, a list of the most popular last names in Korean is maintained by Ex Libris and contains the following last names: ê¹€, ì´, ë°•, 최, ì •, ì¡°, ê°•, 장, í•œ, 윤.
See the instructions below for configuring this capability.
After the Author Number Lists mapping table is configured, you can automatically generate the author number for the local call number field in the MD Editor (using Edit > Generate Author Number). See Generating Author Numbers Automatically and Generating the Author Numbers Automatically for the 090 Local Call Number Field in a KORMARC Bibliographic Record for additional details.
- On the Author Number Lists mapping table (Configuration Menu > Resources > Cataloging > Author Number Lists), select the Customize row action in the row that contains the author number mapping table that you want to use. For more information about mapping tables, see Mapping Tables.
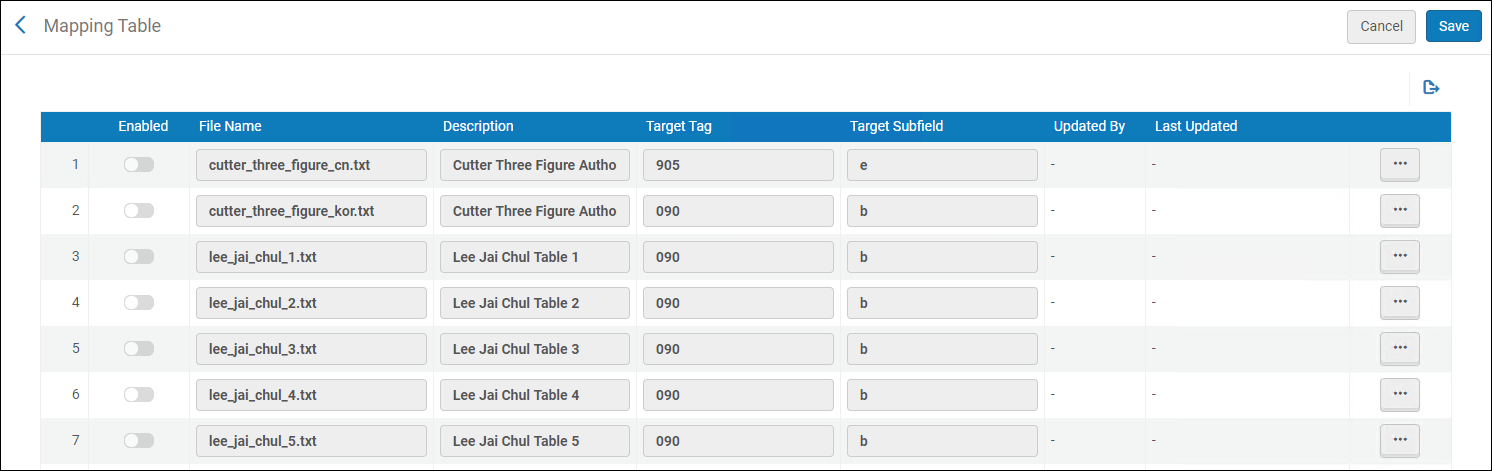
Author Number Lists Mapping Table Page - Confirm that the Target Tag and Target Subfield options are customized to match your requirements. Make changes if necessary.
- Select Save.
Lee Jai Chul Method Logic
The Lee Jai Chul method is implemented in Alma using the following logic:
- The Korean author name is expected to exist in the field in which the cursor is positioned. If no name is found in this field, an author number is not generated.
- The first Hangul character from the author name is stored, and the second Hangul character from the author name is broken down into Hangul Jamo using a Hangul consonant and vowel table (with two or three Jamo per Hangul such as ë„ > ã„· and ã…—). If the first character of the author name is one of the most popular last names, the code from the mapping table for the first Jamo (consonant) and second Jamo (vowel) is concatenated. Otherwise, the code is taken from the mapping table for the first Jamo.
- The generated author number is a string that is the result of the manipulation of the first and second Hangul characters described in the previous bullet. This string is placed in the field/subfield that is identified in the Author Number Lists configuration.
- The author number may be changed by the cataloger after it is generated.
- If the parameter set by Ex Libris for the Lee Jai Chul method (for author last names) contains an asterisk (*), then all the names are considered the most popular.
This logic has the following exceptions:
- When the 5th, 6th, or 8th tables of the Lee Jai Chul method are used and if the first Jamo is ㄱ, the second Jamo is coded regardless of the first character being one of the most popular last names. For example when using the 5th table, ì¶”ê²½ì„ > 추14 (not “추1”).
- If the numeric code for the first Jamo has two digits, there is no need for assigning a code to the second one. For example when using the 2nd table, ì •í•„ëª¨ > ì •84.
- For cases of an author name separated by a comma, the comma and the space after it are copied to the generated author number. For example when using the 5th table, 맨, ë§ˆê°€ë ˆíŠ¸ > 맨, 3.
- When the user-defined call number distinction task in the validation on save process is configured (see MARC 21 Holding validation on save), a duplication check is run for an identical author number in the whole repository. If a duplicate is found, the system displays a message to the cataloger.
- Some tables have dependencies that are taken into consideration. For example when using the 3rd table:
- 3 v ã… -ㄱㄷㅊ 1
This mean that if the value of the first Jamo is not ㄱ, ã„·, or ã…Š, the code for the second Jamo ã… is 1.
- 3 v ㅓ ㄱㄷ 3
This mean that if the value of the first Jamo is ㄱ or ã„·, the code for the second Jamo ã… is 3.
- 3 v ã… -ㄱㄷㅊ 1
Configuring Customized Transliteration for Author Number List Generation
If the ICU default transliteration method (see Configuring Author Number Lists) does not address your requirements, you may configure a custom transliteration file to use as part of the author number list generation process. The custom transliteration file needs to contain the following three columns separated by tabs:
- Hangul (in hexadecimal code points)
- Romanized Hangul
- Description of the character
See below for a partial example of a custom file. In this example, the first two columns are used by Alma for the custom transliteration; and the third column provides a more descriptive reference for the user of the content in the first two columns for each row.

- Select the Local Transliteration Table for Author Number Generation configuration option (Configuration Menu > Resources > Cataloging > Local Transliteration Table for Author Number Generation). The local_transliteration_author_number.txt page appears.

local_transliteration_author_number.txt Page - Copy/paste your custom transliteration file in the space provided for Content.
- Select Save.
Default Cataloging Level Applied to New Records Created by Metadata Import
Whenever a new record is created from the input file, the cataloger level of this record is the default cataloger level, or "00" level if no default is defined.
It is recommended to set a default value in the "Cataloger Permission Level" configuration. See Cataloging Privileges for more information.
Configuring Cataloging Levels for Contribution to Externally Managed Authorities
You can edit authority records in the MD Editor for externally managed systems such as GND or BARE; see Cataloging Externally Managed Authority Records. To configure cataloging levels for contributions, your institution must be configured by Ex Libris Support to allow authority contributions to the Community Zone from external systems. In addition, your institution must be configured to work with cataloging levels in Alma (see Cataloging Privileges).
Each external system stores the cataloging level of a record in a predefined field. To align Alma's cataloger permission levels with the external system's cataloging levels, use the Cataloging Level Mapping for External Authority configuration mapping table (Configuration Menu > Resources > Cataloging > Cataloging Level Mapping for External Authority).
The Cataloging Level Mapping for External Authority configuration that you create identifies how the mapping between Alma cataloging permission levels and the external cataloging levels will be validated in the MD Editor when you are creating and editing externally managed authority records for contribution.
The following is an example for GND.

- On the Cataloger Level to Vocabulary Code mapping table (Configuration Menu > Resources > Cataloging > Cataloging Level Mapping for External Authority), select Add Row to map an Alma cataloging level to an external system cataloging level.
- Select one of the Alma cataloging levels. The cataloging levels are determined by the Cataloger Permission Level configuration. See Cataloging Privileges for more information.
- Enter one of the external system's cataloging levels to map to the Alma cataloging level that you selected.
- Select True or False to indicate whether the mapping that you're creating for the level is the default mapping.Since the mapping table allows you to specify many-to-many relationships, you need to indicate which one is the default mapping.
- Select the relevant vocabulary.Current options are GND, BARE, and NLI.
- Select Add Row.
If you need to change a mapping, select the Delete action for the mapping you want to change and create a new mapping. - When you are finished making your configuration changes, select Save or Save and Distribute. See Centralized Management of Configuration Tables for more information, including an explanation of Stop Network Management.
With the Cataloging Level Mapping for External Authority configuration set, the MD Editor can determine whether the cataloger has the necessary Alma cataloging level for a given authority record being edited. If Alma detects that the cataloger may have insufficient permissions to successfully contribute the authority record, Alma displays a confirmation dialog box.
Since the external system controls which contributed records are accepted or rejected, Alma leaves that determination to the external system and does not block the user from editing the authority record even when it detects that the cataloger may have insufficient permissions. As a result, the ability to edit an authority record in Alma does not guarantee that it will be accepted when contributed.
Configuring Multiple Access Points for CNMARC 6XX Fields
Use the CNMARC 6XX Category configuration option for identifying the CNMARC 6XX fields that should have multiple access points. See Using Multiple Access Points for CNMARC 6XX Fields for more information.
- Select CNMARC 6XX Multiple Heading Configuration in the Cataloging section of the Resource Management configuration (Configuration Menu > Resources > Cataloging > CNMARC 6XX Multiple Heading Configuration). The CNMARC 6XX Category mapping table appears. For more information about mapping tables, see Mapping Tables.
- Select Add Row, enter the 6XX field, its description, and select Add Row for the 6XX field that you want to have segmented.

CNMARC 6XX Field Added - Repeat step 2 for all the 6XX fields that you want to add to the CNMARC 6XX Category mapping table.
- When you have finished adding 6XX fields, select Customize.
Configuring Multiple Access Points for UNIMARC
Use the UNIMARC Multiple Authority ID configuration option for customizing the UNIMARC 600-602 and 604-607 fields for multiple access points. See Using Multiple Access Points for UNIMARC for more information.
- Select UNIMARC Multiple Authority ID configuration in the Cataloging section of the Resource Management configuration (Configuration Menu > Resources > Cataloging > UNIMARC Multiple Authority ID configuration). The list of UNIMARC 6XX fields controlled by multiple authority records appears. For more information about mapping tables, see Mapping Tables.

UNIMARC 6XX Fields - Enable or disable the 6XX fields that you want to use for multiple authority identification and modify the Description field to match your preference.
- When you have finished, select Customize.
MARC Slim Configuration
You can map MARC fields to labels that are used to create forms. To map MARC fields to labels, open the MARC21 Slim mapping table (Configuration Menu > Resources > Cataloging > MARC Slim Configuration). For more information about mapping tables, see Mapping Tables.

Enter the label, the MARC field tag, and the MARC subfield code for the MARC field you want to map. The label of the mapped MARC field is available to be used in a form. For more information, see Working with Forms.
DCMI Material Type Mapping
You can map Alma Material Types to DCMI types in the dc:type and dcterms:type fields. To do this, open the DCMI Material Type Mapping table at Configuration Menu > Resources > Cataloging > DCMI Material Type Mapping. For more information about mapping tables, see Mapping Tables.

Page tags: article:topicConfiguring Resource Managementproduct:almacontent:DocumentationMARCKORMARCCNMARCGNDlang:englishmetadata profileconfigure metadata profilenormalization processvalidation processvalidation exception profile listextension packUNIMARCMARC 21controlled vocabularyauthor number listcatalog level mapping for external authorityholdings profileglobal authoritylocal authoritycommunity managed authority
