
Servicios de soporte
New for February 2026
Los servicios de Soporte permiten a los administradores a nivel de Zona de Red proporcionar servicios avanzados de mantenimiento y resolución de problemas a las instituciones miembros.
Acceder a la página de servicios de Soporte
This requires the Support Services role to be activated.
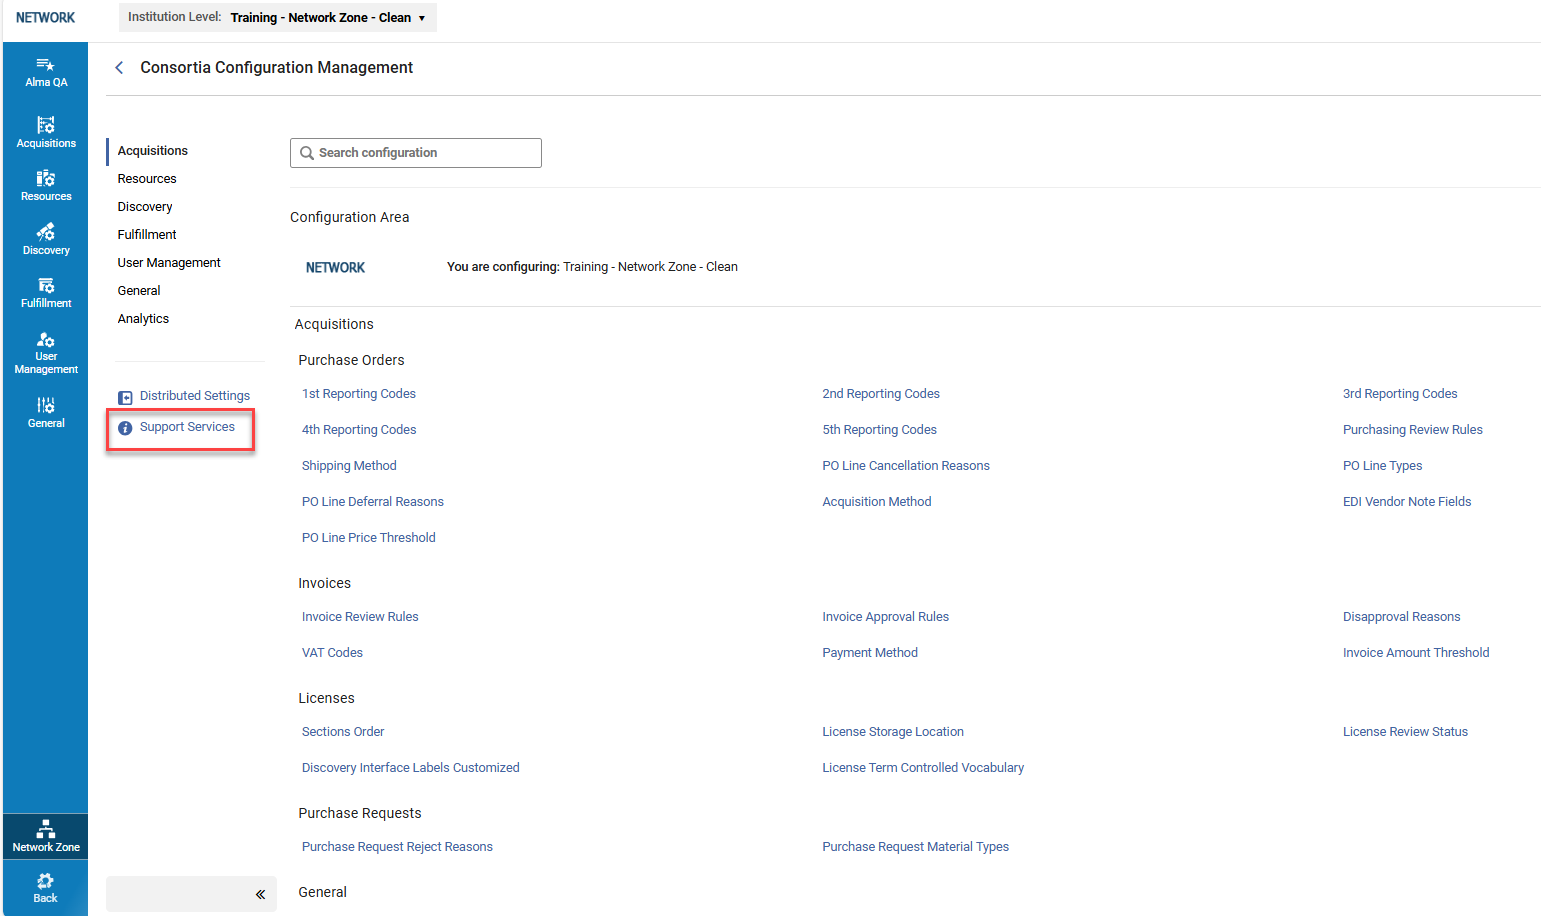
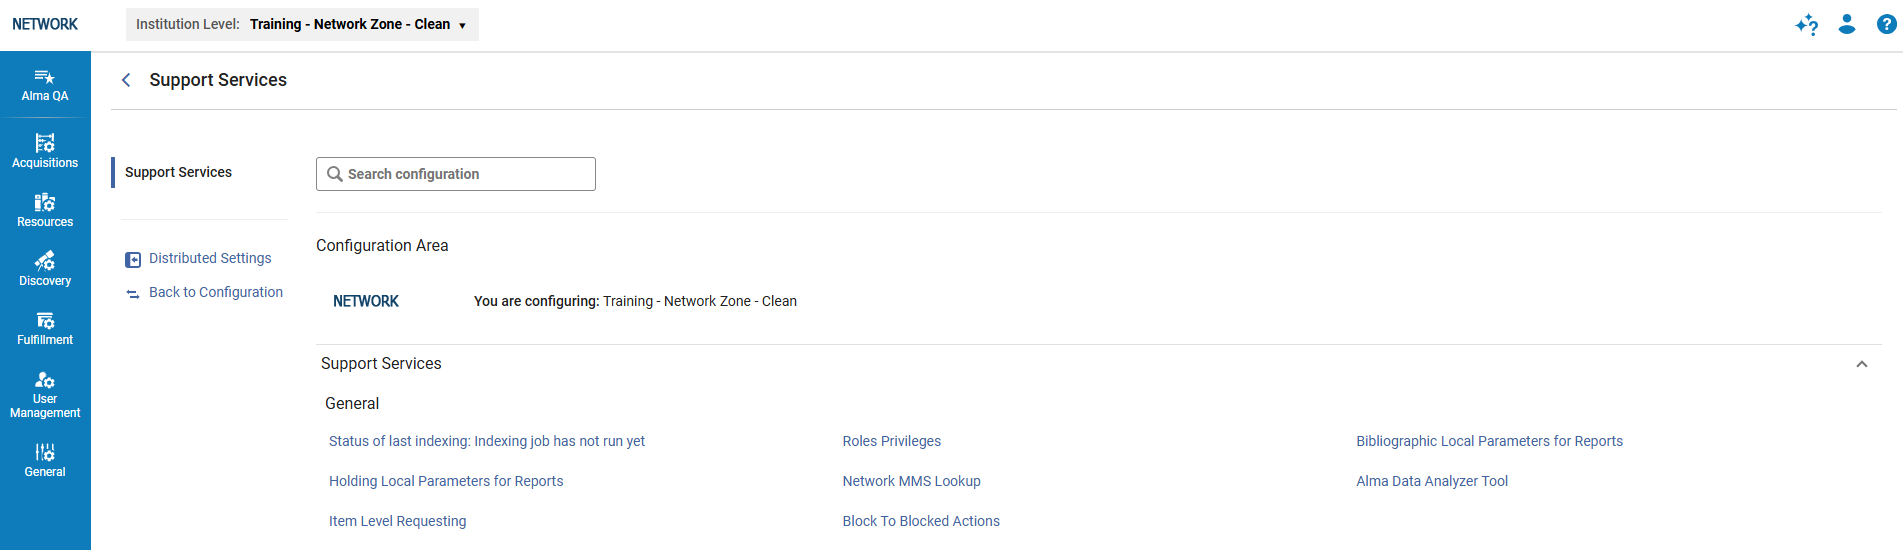
In the Consortia Configuration Management page, select Support Services to open the page.
Último estado de indexación
Select this option to view the last indexing report at the Network level and the member/s level.
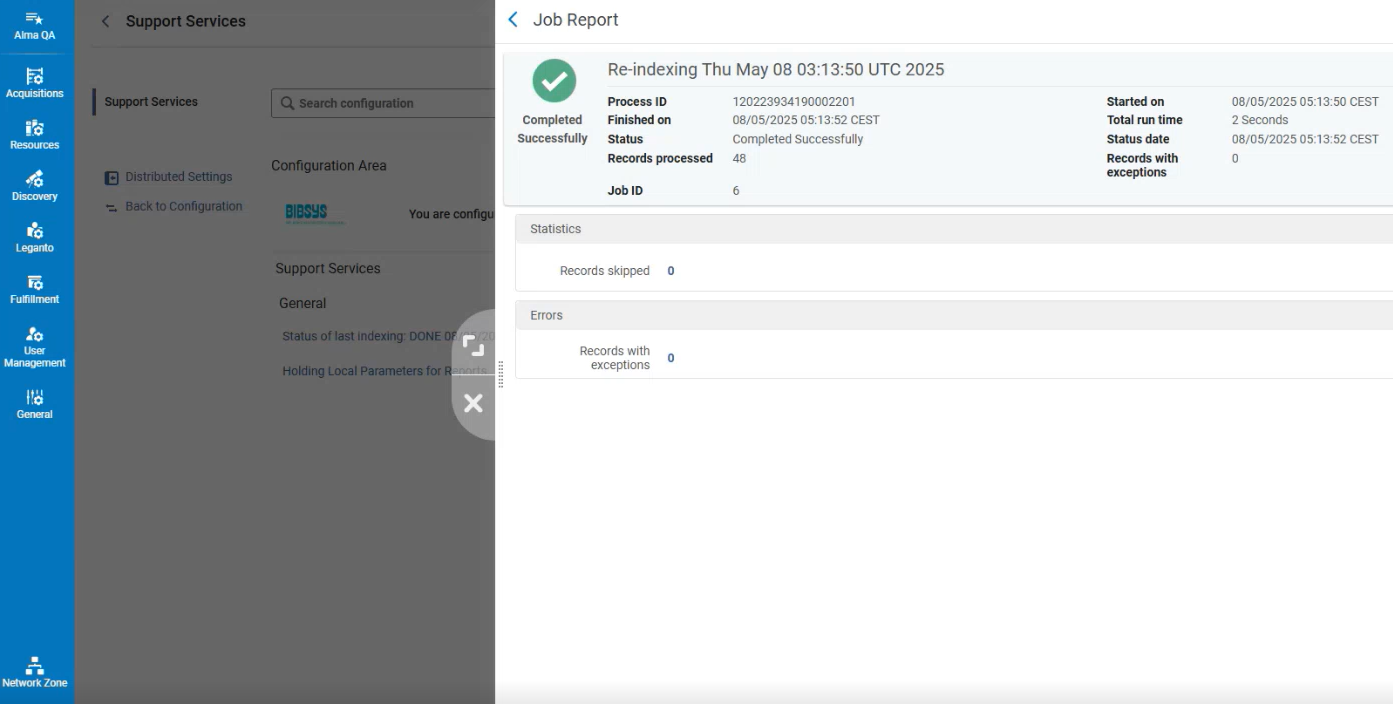
Si aparecen registros con errores, suelen estar relacionados con pequeñas inconsistencias en la base de datos que no afectan los datos y no requieren ninguna acción por parte del usuario.
Roles Privileges
Seleccione esta opción para activar/desactivar privilegios de funciones específicas.
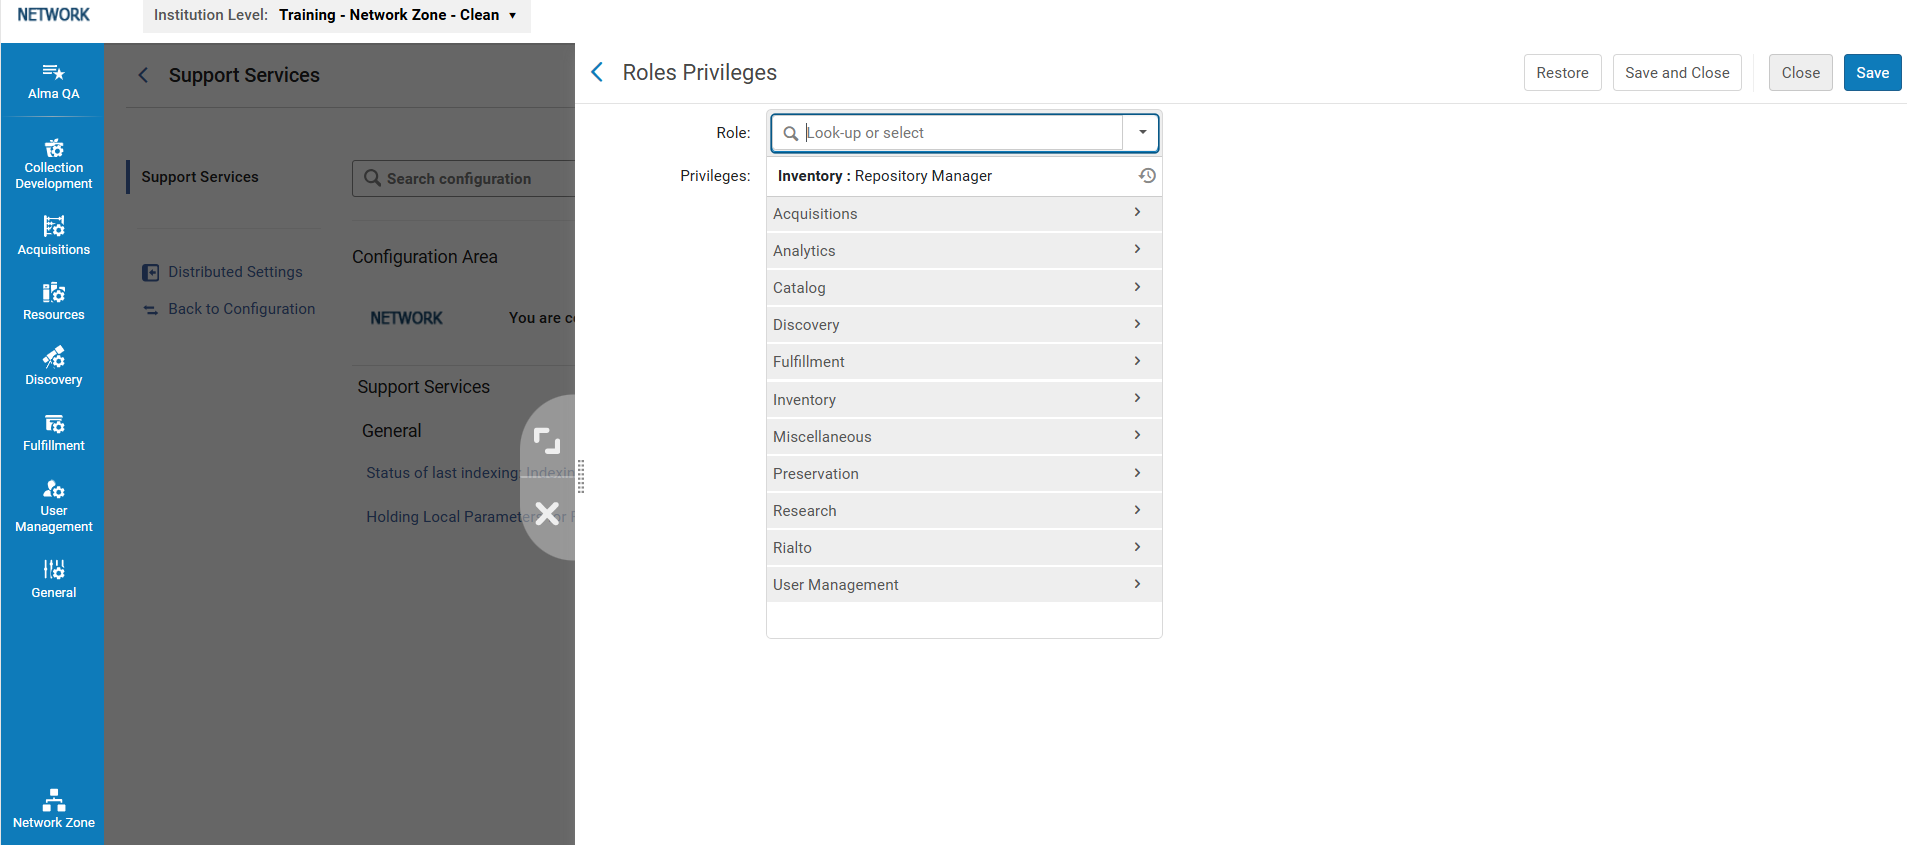
For more information, see Roles and Registration Configuration.
The network administrator can undo any unwanted changes by selecting the Restore button.
Parámetros bibliográficos locales para informes
This enables Consortia to add bibliographic local parameters for reports and run the distribution centrally to the members. For more information, seeAdd bibliographic fields to Alma analytics.
Changing the Bibliographic Local Parameters for Reports
-
In the Institution Level dropdown list, select your Network Zone.
-
Actualice la información de la tabla según sea necesario. The MARC tag (and, optionally, subfield codes) belong in the "Description" column.
Note that if the table has never been updated (out-of-the-box), you first need to select the Customize button in order to edit it. -
Select Save. Ahora tiene dos opciones:
-
Select Apply changes in the row of buttons at the top of the table to run a job that applies the changes to the Analytics data. Los cambios se aplican a nivel de red, pero no se distribuyen automáticamente a los miembros. Note that the Apply changes button is also available when you select a member (IZ from the top drop-down menu list on the top left of the screen). This enables you to make changes only to a specific member (changes that are different from the NZ ones, and therefore are not distributable from there).
-
Select Distribute All. A pop-up window opens, enabling you to choose a specific member/s or all members to distribute the changes to (see Consortia Central Configuration Dashboard). Ensure that the Apply Changes checkbox is selected in order to run the job that applies the changes to the Analytics data.
-
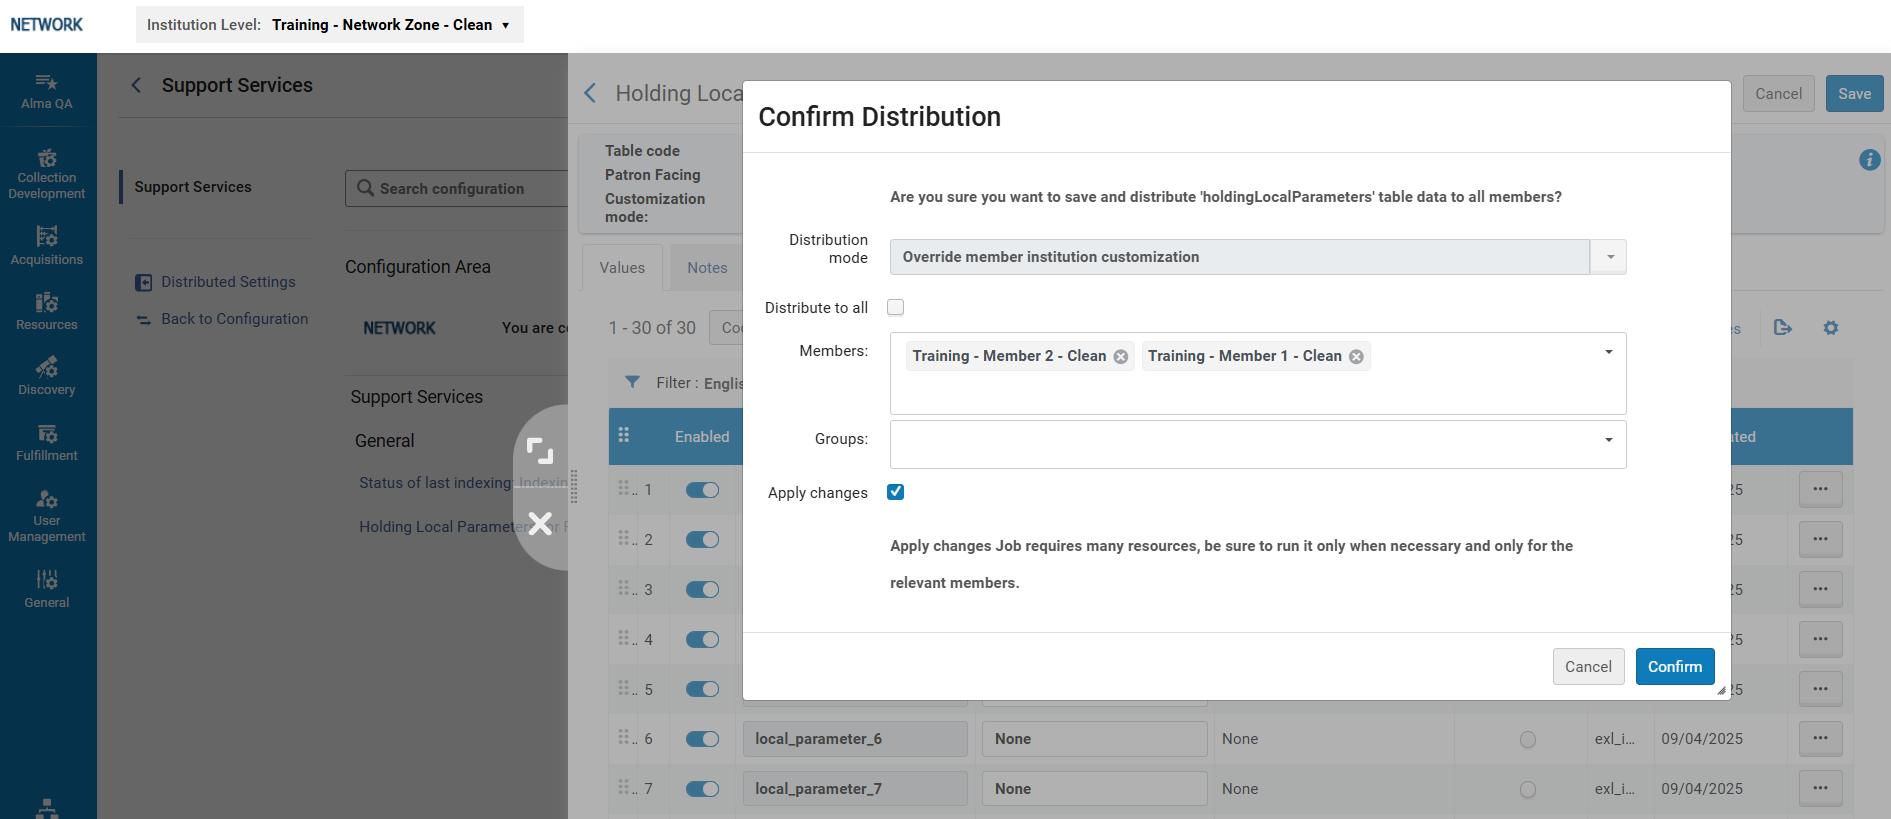
Distribution for bibliographic local parameters
- If a member was selected in the Institution Level drop-down list, the Network Zone administrator can update and save the parameters at the member level, and run the job that applies these changes to the analytics data by selecting the Apply changes button.
-
Para los parámetros locales bibliográficos, se lanza una excepción si el valor de la etiqueta es inferior a 10.
- When editing subfields after the tag, the subfield range or list must be written without spaces between them (for example,100 a-c,k,j-m, which has no spaces between the subfields).
Parámetros de la existencia local para informes
This enables Consortia to add holding local parameters for reports and run the distribution centrally to the members.
Cambiar los parámetros locales de existencias para los informes
-
In the Institution Level dropdown list, select your Network Zone.
-
Actualice la información de la tabla según sea necesario. Note that if the table has never been updated (out-of-the-box), you first need to select the Customize button in order to edit it.
-
Select Save. Ahora tiene dos opciones:
-
Select Apply changes in the row of buttons at the top of the table. Esto ejecutará una tarea que aplicará los cambios a los datos de Analytics. Los cambios se aplican a nivel de red, pero no se distribuirán automáticamente a los miembros. Note that the Apply changes button is also available when you select a member (IZ from the top drop-down menu list on the top left of the screen). This enables you to make changes only to a specific member (changes that are different from the NZ ones, and therefore are not distributable from there).
-
Select Distribute All. A pop-up window opens, enabling you to choose a specific member/s or all members to distribute the changes to (see Consortia Central Configuration Dashboard). Ensure that the Apply Changes checkbox is selected in order to run the job that applies the changes to the Analytics data.
-
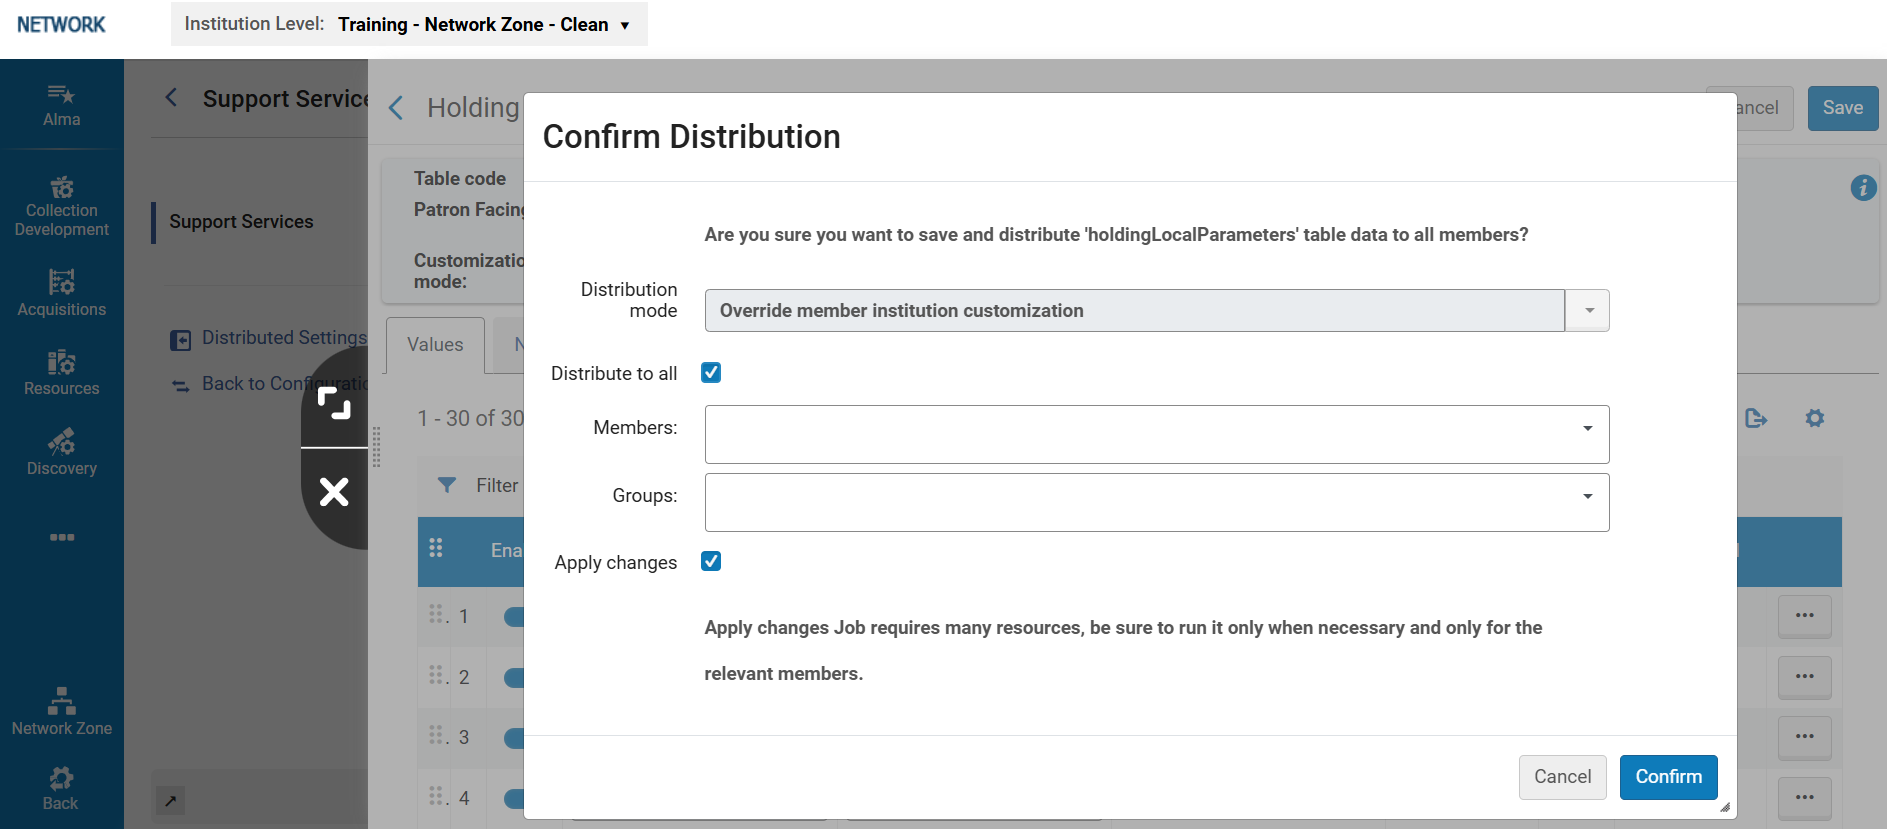
- If a member was selected in the Institution Level drop-down list, the Network Zone administrator can update and save the parameters at the member level, and run the job that applies these changes to the analytics data by selecting the Apply changes button.
- Para parámetros de existencias locales, no se aplica ninguna validación.
- When editing subfields after the tag, the subfield range or list must be written without spaces between them (for example,100 a-c,k,j-m, which has no spaces between the subfields).
Búsqueda MMS de red
Esto permite al operador de la Zona de Red cargar una lista de ID de MMS para registros bibliográficos de la Zona de la Institución y, a continuación, comprobar si están enlazados a un registro bibliográfico de la Zona de Red. Si es así, el operador puede obtener el ID de MMS de la Zona de Red. If the Match on network MMS ID is selected, the network zone operator can upload a list of MMS IDs in the NZ, choose a member IZ, and get the corresponding IZ MMS IDs.
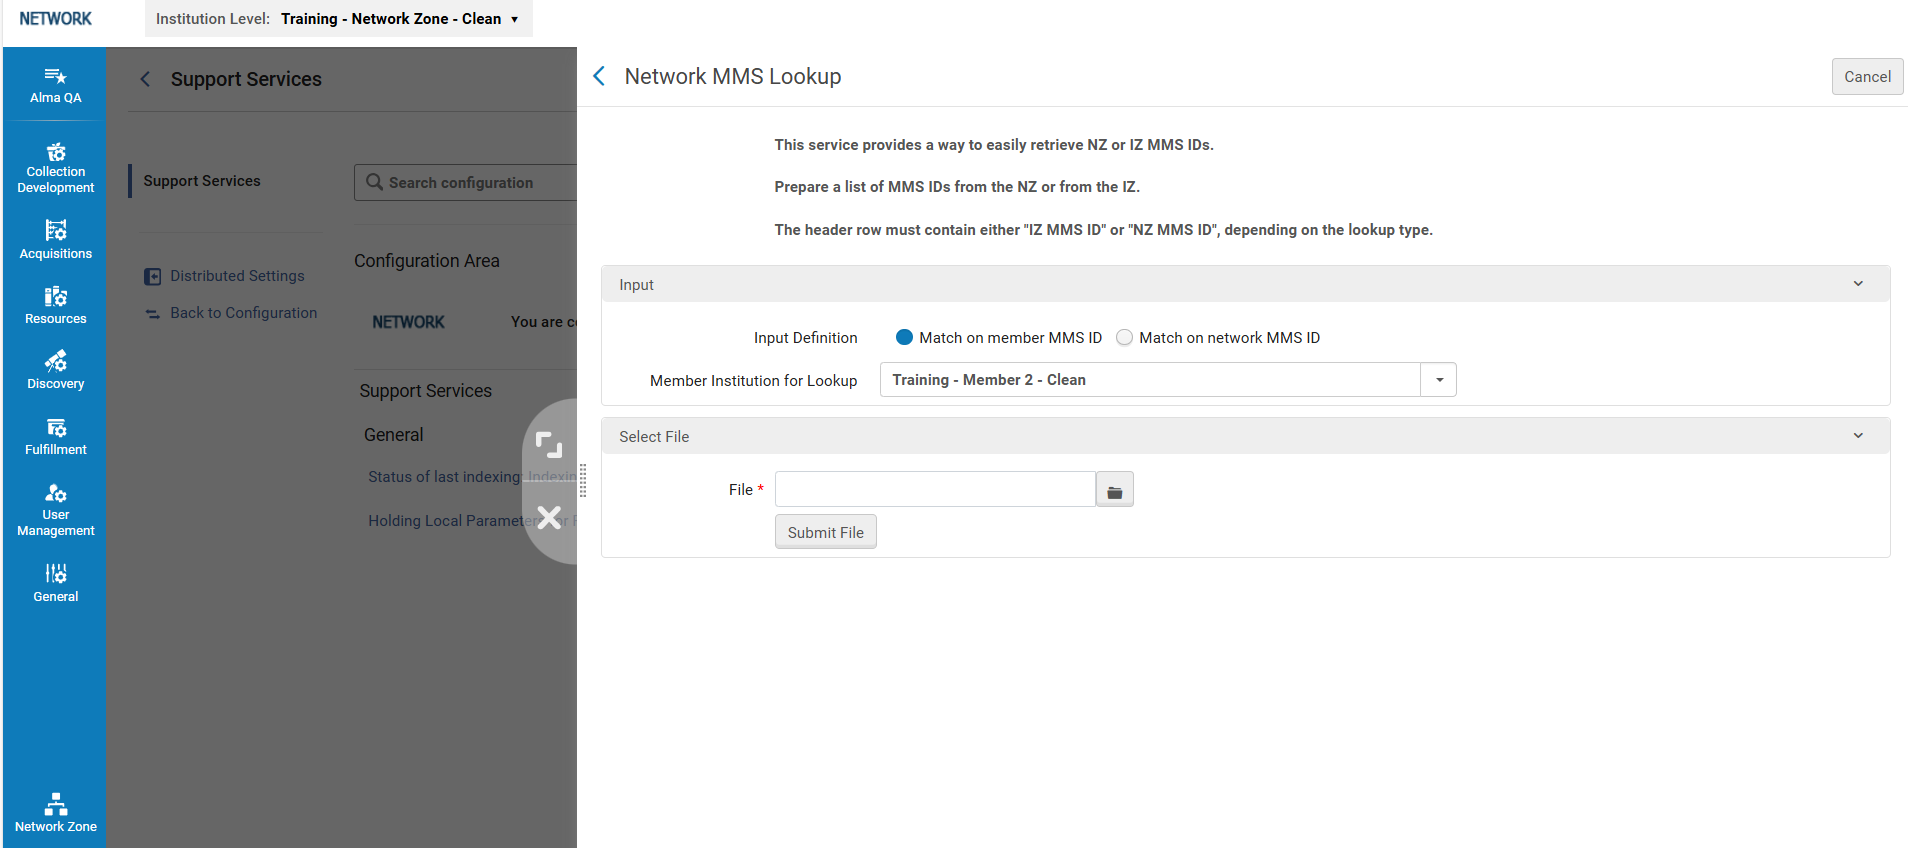
-
Prepare el fichero con los ID de MMS. The IDs should come from either the Network Zone or the Institution Zone. Depending on where the IDs are from, the header row should contain either IZ MMS ID or NZ MMS ID.
Los ID de MMS deben pertenecer a la misma institución, es decir, no se pueden enviar ID de MMS de más de una institución en el mismo fichero. -
For the Input Definition, select either Match on member MMS ID or Match on network MMS ID, depending on what you filled in the header row in the file.
-
Seleccione la institución miembro para realizar la búsqueda.
-
Load the file and select Submit File. Alma analiza los datos y descarga el fichero al ordenador del usuario cuando termina.
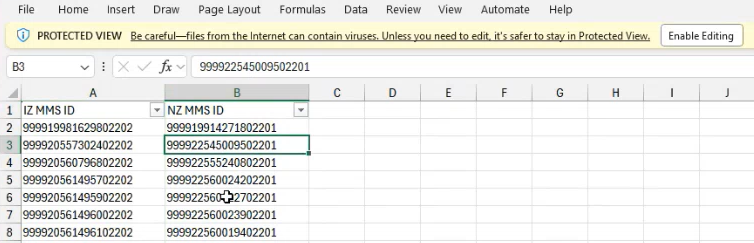
El informe incluye registros vinculados a la Zona de Red y a la Zona de la Institución. En los casos en los que no se encuentra ninguna coincidencia, esto se indica en el informe.

Dependiendo del tamaño del fichero, el proceso tarda un tiempo en analizar los datos antes de descargarlo. Por ejemplo, para un fichero con 50 000 ID de MMS, es posible que tenga que esperar unos 30 segundos.
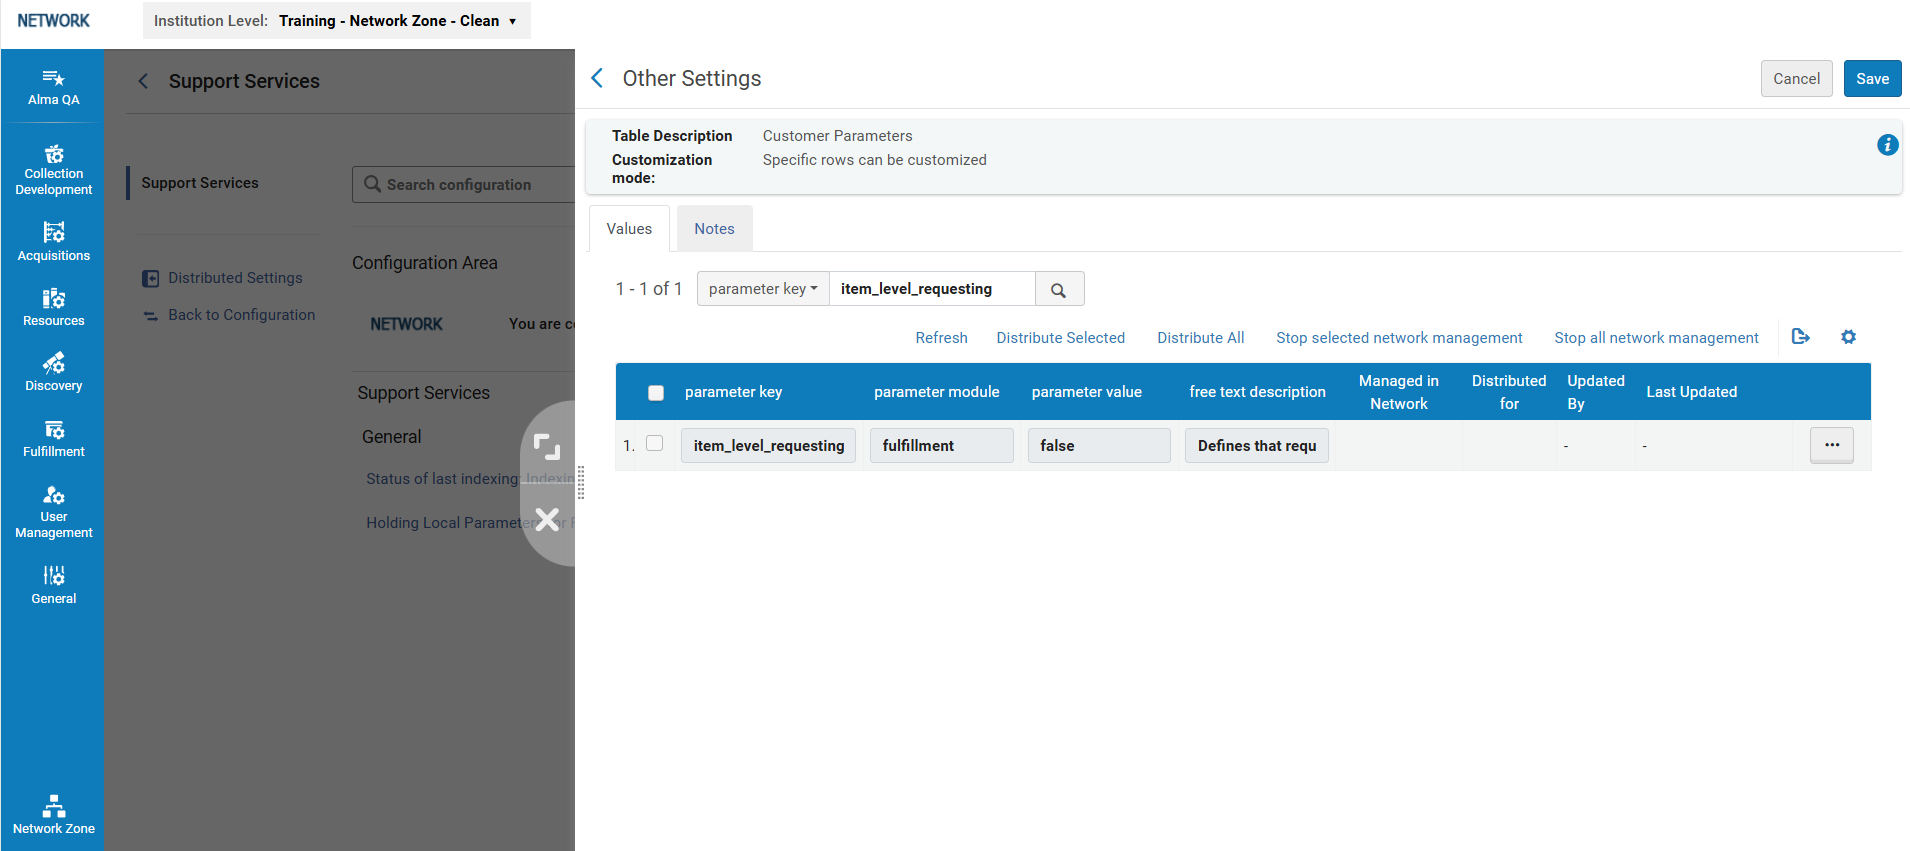
Solicitación de nivel de ejemplar
This parameter defines whether an item without a description is requestable from the item level link in the Primo Get It tab. When set to True, the item request replaces title-level requesting. If set to False, which is the default, items without descriptions are requested via title level requesting.
If this parameter is changed to True, patrons will not be able to request from the title level at all. For example, if a patron wants to request a book with 10 identical items, before updating this parameter, they would see a single request link, and Alma would resolve which item to select according to availability, etc. However, if the parameter is changed to True, the patron sees 10 request links and must decide which one to choose. Dependiendo de cuál elija, el tiempo de espera podría ser mucho más largo.
Sanción a las acciones sancionadas
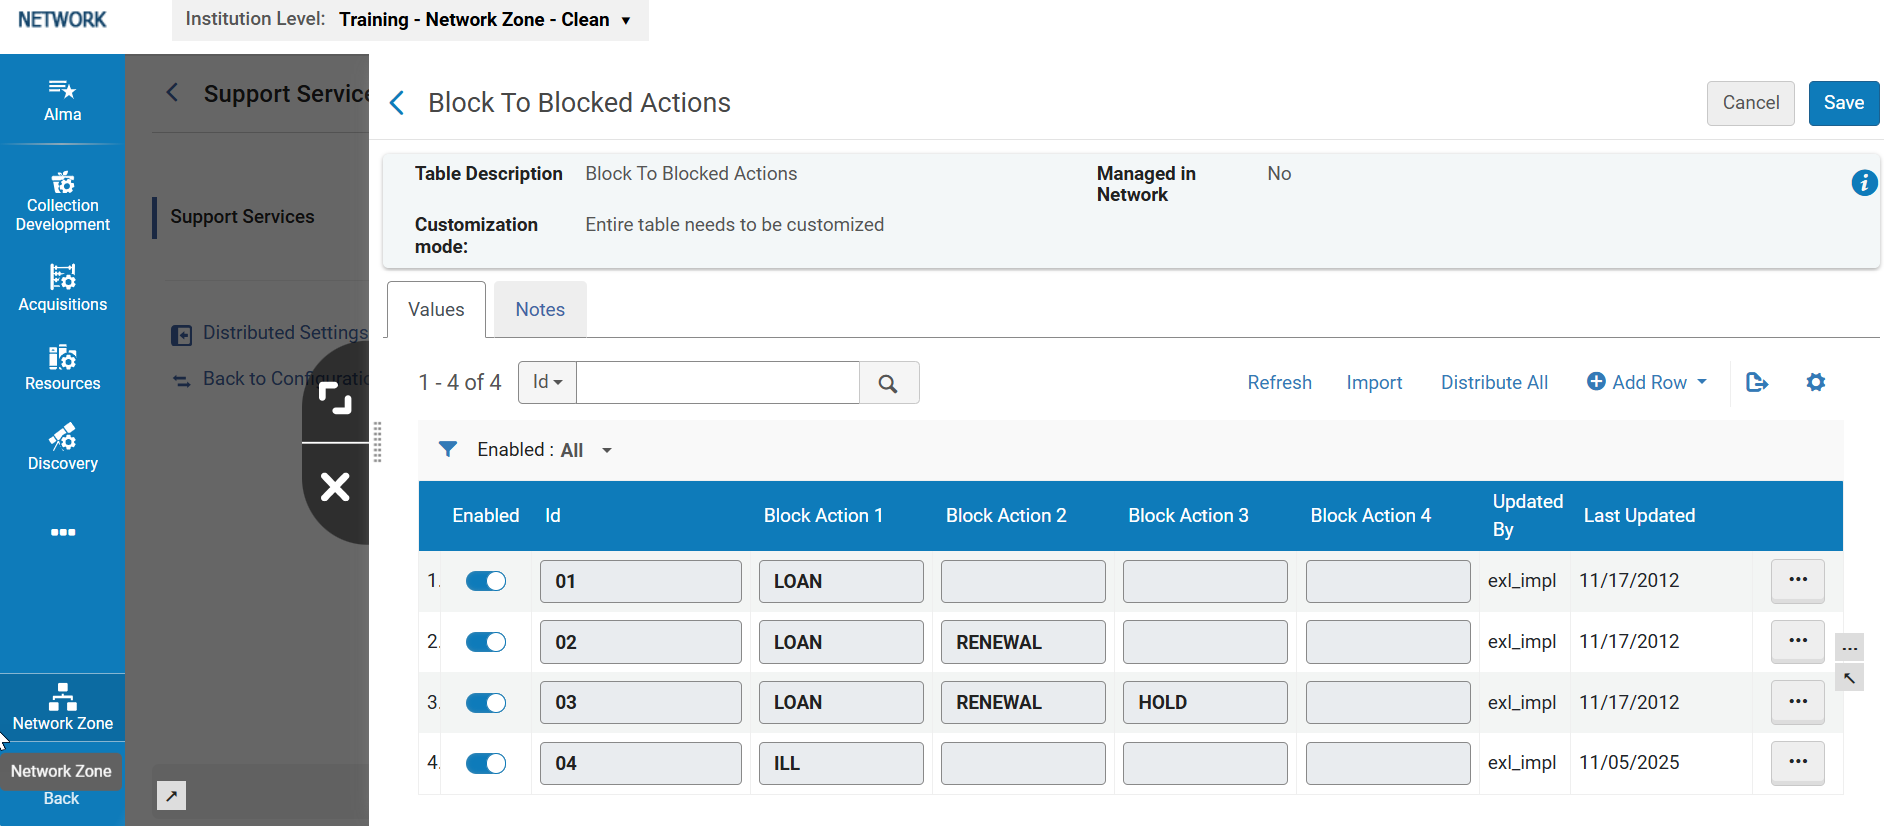
This table is used to configure the block actions that appear when adding user block definitions (see Configuring User Blocks).
Sanción a las acciones sancionadas
LOAN - Loans are blocked
RENEWAL - Renewals are blocked
HOLD - Physical requests are blocked
ILL - Resource sharing requests are blocked
Las acciones de sanción deben escribirse en mayúsculas.
Herramienta Analizador de datos de Alma
Descripción general
La herramienta de Corrección de datos se puede utilizar para ayudar a analizar y solucionar problemas con los registros de Alma en lo que respecta a los datos bibliográficos y de inventario. This could be, for example, a bibliographic record that is found in Primo or analytics but not in Alma. Con la herramienta de Corrección de datos, puede introducir un ID de MMS (consulte Números de registro) y obtener una respuesta y, en algunos casos, incluso solucionar el problema que hay que resolver.
Esta herramienta es utilizada por los administradores de la Zona de Red para analizar y corregir datos en la Zona de la Institución.
For more information, see Record Numbers.
Cómo usar la herramienta
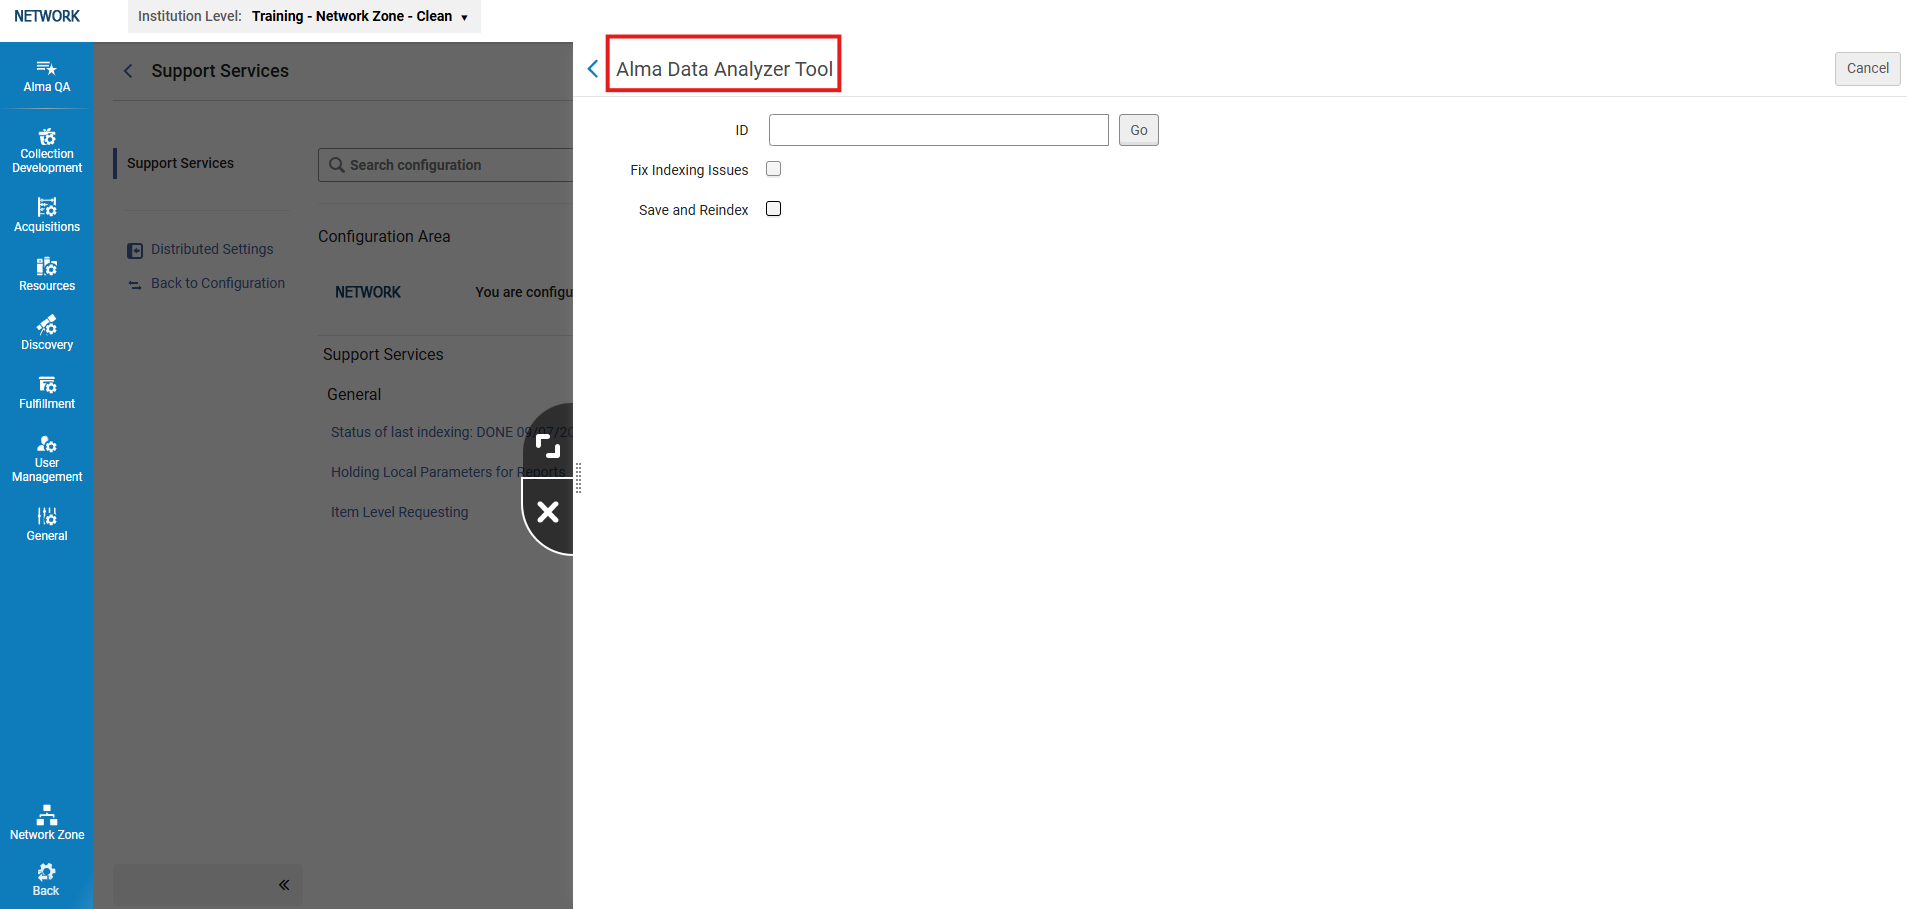
- Select the Alma Alma Data Analyzer Tool option from the Support Services page.
 Herramienta Analizador de datos
- Enter the MMS ID(for the bibliographic or holding record) in the ID field.
- Seleccione la siguiente opción, o siguientes opciones, según sea necesario:
- Fix indexing issues — Fixes indexing issues for the MMS record.
- Save and Reindex — Saves and reindexes the MMS record.
- Select the Go button.
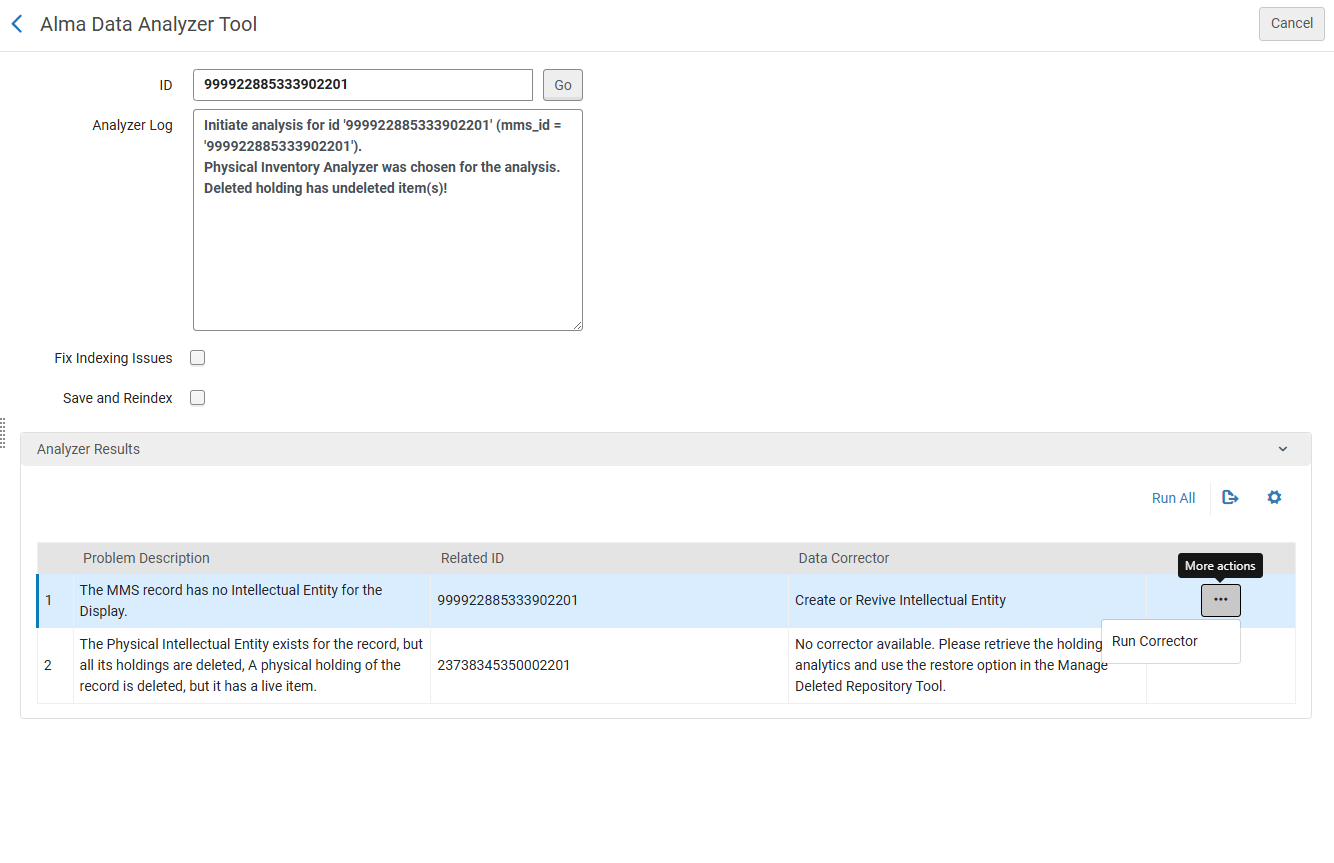 The following information appears on the screen:
- Analyzer Log - Displays the analyzed identifier and the type of analysis that was done
- Analyzer Results
- Problem Description - Description of the problem found.
- Related ID - The ID of the record that was found by the tool to be the source of the problem.
- Data Corrector - The job that needs to be run to fix the issue.
- Select Run Corrector from the actions menu to run the job.
If no data corrector is found by the tool for the issue, then the Run Corrector option does not appear.
