
Configurar sanciones de usuario
Configure patron fulfillment rules.
This page describes how to configure user blocks including demerits, consortial blocks, overdue loans, etc. For configuring block preferences see Loans. For links to all the main fulfillment documentation pages see Fulfillment.
Configuring User Block Descriptions and Definitions
For the how-to that guides you through the process of setting up librarian- and system-assigned blocks to patrons, see How To Set Up Blocks to Prevent Loaning, Renewing and Hold Requests for Patrons.
For details on assigning user blocks to a user, see Blocking and Unblocking Users. These tables are also used when configuring user blocks due to overdue loans (Configuring User Blocks Due to Overdue Loans).
Para configurar las definiciones de sanciones del usuario, primero se deben configurar las descripciones de sanción de usuario (se debe seleccionar una descripción al configurar una definición). User block descriptions also appear in the drop-down list when blocking a user (see Blocking and Unblocking Users).
To access the user block descriptions, access the page at Configuration Menu > Fulfillment > Patron Configurations > User Block Description
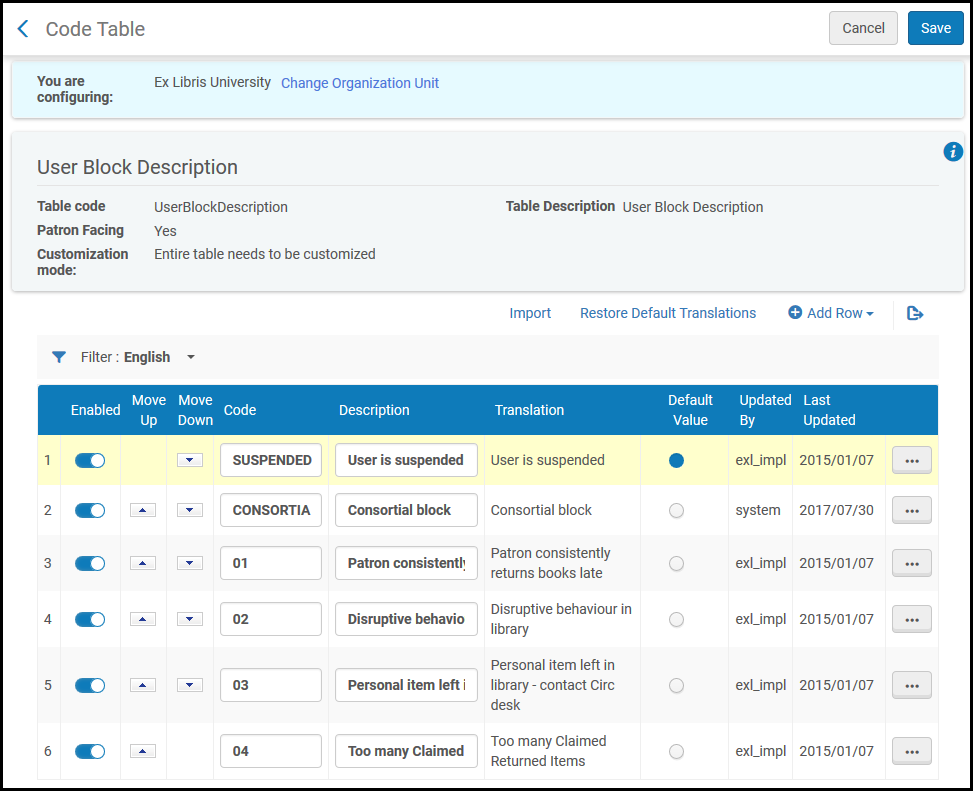
Se pueden efectuar las siguientes acciones en esta página:
- Importar una lista de descripciones de sanciones del usuario desde un archivo
- Agregar una nueva descripción de sanciones del usuario
- Eliminar una descripción de sanciones del usuario
- Habilitar/deshabilitar una descripción de sanciones del usuario
- Reordenar la lista de descripciones de sanciones del usuario
- Modificar el código o los campos de descripción
- Seleccionar una descripción para que sea un valor predeterminado en la lista
You configure user block definitions on the User Block Definitions Mapping Table page (Configuration Menu > Fulfillment > Patron Configurations > User Block Definitions).
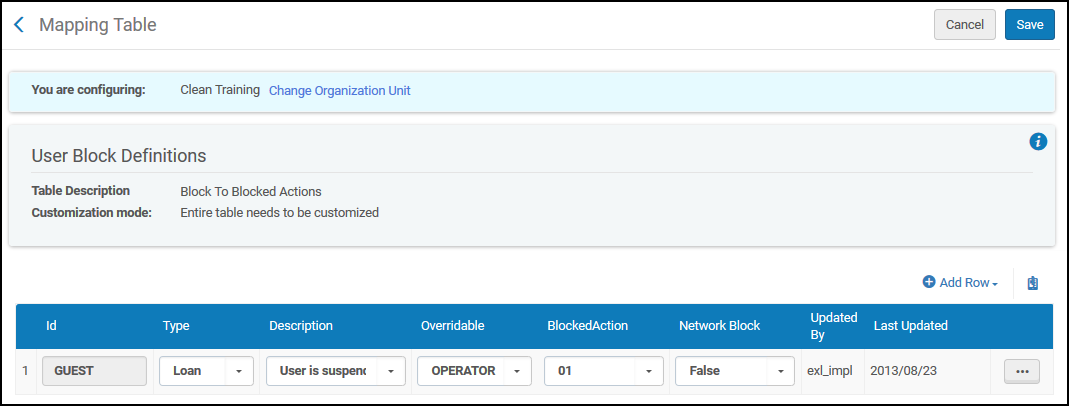
Se pueden efectuar las siguientes acciones en esta página:
- Add a set of user block definitions (see Adding User Block Definitions)
- Editar un conjunto de definiciones de sanciones de usuario (modificar la configuración en la página Tabla de asignación de definiciones de sanciones de usuario. No puede cambiar la ID que se define para un Grupo de usuarios).
- Delete a set of user block definitions (select Delete)
Agregar definiciones de sanciones de usuario
Las definiciones de sanciones de usuario que se definan se aplican a todas las bibliotecas de la institución.
- On the User Block Definitions Mapping Table page, select Add Row and enter the ID for the new user block definition in the Id field.
Crear nueva sección de fila de mapeo de la página de tabla de mapeo - Seleccionar la siguiente información de las listas desplegables respectivas:
- Description – Describes the block action; the reason for the block. Esta lista incluye todas las descripciones de sanciones del usuario. Véase más arriba la tabla de códigos Descripciones de sanciones del usuario para definir descripciones.
- Blocked action – Select the blocked action from one of the following:Estas acciones bloqueadas están preconfiguradas en Alma. Para configurar acciones bloqueadas adicionales, incluida una sanción para solicitudes de reservas o recursos compartidos, contactar con el Soporte de Ex Libris.
- 01 – préstamo
- 02 – renovación del préstamo
- 02 – préstamo, renovación, reserva
- Type – Select the type of block from one of the following:The Type value is for information only and does not impact the system, with the exception of the Demerit and Consortial Block type, whose values should not be changed. For information on configuring demerits, see Configuring Demerits. For information on configuring consortial blocks, see Configuring Consortial Blocks.
- Efectivo
- Sanción de consorcio
- Deméritos
- General
- Préstamo
- Solicitud de recursos compartidos
- Usuario
- Overridable – Select whether the block is overridable from one of the following:
- Todo – La sanción es anulable por cualquier operador de mesa de la circulación
- NINGUNO – La sanción no es anulable
- CIRCDESC – La sanción solo es anulable por un director del mostrador de circulación
- OPERADOR - La sanción es anulable por un director del mostrador de circulación o un operador del mostrador de circulación (y no un usuario con operador de mostrador de circulación - permisos limitados)
- Network Block- Select whether the block will be copied when creating or refreshing a linked account.
- VERDADERO - Copiar sanción
- FALSO - No copiar la sanción. Este es el ajuste por defecto.
- Select Add Row. La nueva definición de sanción de usuario se muestra en la parte inferior de la lista de definiciones de sanción de usuario definidas.
- Select Save to store the new set of user block definition.
Configuring Demerits
- Administrador general del sistema
- Administrador de servicios al usuario
Alma permite configurar un sistema de demérito que aplique sanciones de usuarios (por ejemplo, para préstamos) en función del número de deméritos que un usuario haya acumulado dentro de un periodo de tiempo configurado. Una vez que se aplica una sanción, la institución suspende al usuario por el número configurado de días y resta los puntos de demérito utilizados del registro del usuario. Si el usuario recibe más puntos de demérito mientras está en suspensión, estos puntos y los puntos restantes del usuario pueden contribuir a otra suspensión una vez que finalice el periodo de suspensión anterior.
Habilitar el sistema de demérito
Configure the following parameters (see Configuring Other Settings):
- demerit_enable – Set this field to true to enable demerit functionality.
- demerit_history_days – Specify the length of the demerit tracking period in days. If the user's demerit points exceed the value specified in the demerit_maximum_threshold parameter during the demerit tracking period (that is the last number of days specified by this parameter), the system places a block on the user.
- demerit_maximum_threshold – Specify the maximum number of points allowed during the tracking period.
- demerit_suspension_days – Specify the length of a user's suspension period in days.
Configurar puntos deméritos
La tabla de asignación de Puntos de deméritos define los puntos de demérito dados a un tipo de usuario y tipo de material devuelto. También se pueden aplicar diferentes puntos a los materiales vencidos que se han retirado.
-
On the Demerit Points mapping table page (Configuration Menu > Fulfillment > Patron Configuration > User Demerits), in Add Row, enter the following fields to define the points assigned to a user group and material type.
Tabla de mapeo de puntos de deméritos - User group – Select a specific user group or All.
- Material Type – Select a specific material type or All.
- Regular Overdue Points – Enter the number of demerit points to apply to overdue items (not recalled overdue items).
- Recalled Overdue Points – Enter the number of demerit points to apply to recalled overdue items.
- Select Add Row.Alma usa la siguiente prioridad para decidir qué fila de mapeo usar cuando se asignan puntos de demérito a un usuario:
- Tanto el grupo del usuario como el material que se devuelve coinciden con los valores de la tabla.
- The user's group matches the value in the table and the Material Type is set to All in the table.
- The returned item matches the Material Type value in the table and User Group is set to All in the table.
- Both User Group and Material Type are set to ALL in the table.
- Si no se encuentra ninguna coincidencia, no se asignan deméritos.Por ejemplo, si las siguientes filas de demérito están definidas y un alumno devuelve un manuscrito no reclamado tarde, el sistema asigna un punto de demérito al alumno:
Ejemplo de filas de mapeo de puntos deméritos Grupo de usuario LCCN Puntos de vencimiento regulares Puntos de vencimiento reclamados Estudiante Libro 3 5 Todo Manuscrito 3 6 Alumnos Todo 1 2
- After you have added all of your demerit point definitions, select Customize to save your changes to the table.
If a user reaches the demerit threshold, the system applies a Demerit block on the patron record.
Configuración de la sanción de demérito
La tabla de asignación Definiciones de sanciones del usuario define la sanción de demérito dado a los usuarios que han alcanzado el umbral de punto de demérito durante el número de días consecutivos definidos por el umbral del historial de demérito.
For more information, see Configuring User Block Descriptions and Definitions.
Monitorización de las tareas de sanción
The Users - Remove Blocks job runs daily to determine whether suspended users have fulfilled their suspension period and have not exceeded the configured demerit threshold while on suspension,. Si este es el caso, se levanta la sanción del usuario.
For more information, see Viewing Job Reports.
Configuring Consortial Blocks
- Administrador general del sistema
- Administrador de servicios al usuario
Consortial blocks are user blocks in a fulfillment network that are copied from a source institution, or from another target institution, to a target institution when their linked account is created or refreshed. Son un tipo específico de sanción configurado para ser compartido dentro de un consorcio, que aparece en el registro de un usuario en la institución receptora con la designación "Sanción de consorcio". Permiten a un consorcio aplicar restricciones de uso coherentes en todas las bibliotecas miembros basándose en normas establecidas a nivel institucional o de red.
In this context, the source institution is the patron's home institution, while the target institution refers to the institutions where the patron receives services as a guest patron.
En una red en la que los usuarios se gestionan en la Zona de Red, la institución de origen es la institución de origen del usuario, y la Zona de Red es la institución de destino. Blocks are copied from the patron's home institution to the Network Zone, and blocks from the Network Zone are copied to the other institutions.
In a Fulfillment Network, the patrons' information is copied from the source institution to the target institution when the patron receives fulfillment services at an institution that is not their home institution.
Copiar sanciones de origen a destino
A consortial block which is copied from the source institution to the target institution, refers to the incoming block at the target institution. La sanción se copia cuando se crea inicialmente la cuenta enlazada o cuando se actualiza el registro de destino. The copied block appears as a consortial block rather than the original block type from the source, though a block note indicates the original block type as it appeared in the source institution.
To activate consortial blocks on the source side:
- Set up any blocks that will be sent to the target in the User Block Definition table with the Network Block field set to True. See Configuring User Block Descriptions and Definitions.
To activate consortial blocks on the target side:
- Set up Linked Account rules with the Copy Networks Block field set to Yes. See Configuring Linked Account Rules.
- In the User Block Description table, create a record if one does not already exist with code CONSORTIA. Enter CONSORTIA in the Code field and Consortial block in the Description field.
- In the User Block Definitions table, create a record with Type and Description fields set to Consortial block. To ensure that this block is not copied back to the source, set the Network Block field to False. See Configuring User Block Descriptions and Definitions.
Copiar sanciones de destino a origen
Blocks are copied from a target institution to a source institution when creating, updating or deleting a block on the target side. The copied block appears at the source institution as a consortial block rather than the original block type from the target, though a block note indicates the original block type as it appeared in the target institution.
Once copied to the source institution, the block may further propagate to the other target institutions based on the above-described configuration for Copying Blocks from Source to Target.
On the source side:
-
Add a new row in the User Block Description (Configuration > Fulfillment > User Block Description)
-
Set the Code to be FROM_TARGET.
-
Add a description (not mandatory), for example,Block from the target institution for linked account users.
-
Add a new row in the User Block Definitions page (Configuration > Fulfillment > User Block Definitions).
-
Set the Id to FROM_TARGET.
-
Set the Type to Consortial block.
-
Añadir una descripción (no obligatoria) de la lista desplegable.
-
Establecer la sanción de la red en Verdadero para distribuir las sanciones a todos los demás destinos de la red. Esta distribución no se realiza automáticamente. It only happens when the patron enters another target institution; in that case the block is copied to this institution only.
Si deja este campo en Falso, el origen solo recibirá sanciones del destino y no los distribuirá a otros destinos.
On the target side:
-
For any block which the institution would like to copy to the source institution, configure the Network Block in the User Block Definitions page (Configuration > Fulfillment > User Block Definitions) to be True.
Configuring User Blocks Due to Overdue Loans
You can implement a blocking policy so that a loan that is returned overdue will trigger a block on the user record after the patron returns the overdue loan, according to the defined Block When Overdue policy. La política de sanción se puede establecer por separado para cada uno de los Términos de uso. De forma predeterminada, las políticas bloquean existencias, solicitudes de recursos compartidos, préstamos y renovaciones. As noted in the configuration procedure below, the User Block Definitions mapping table and User Block Descriptions code table (see Configuring User Block Descriptions and Definitions) must be configured in order to create overdue blocks. The maximum_overdue_block_per_block parameter should also be configured to define whether the policy is applied to each block individually or to all the blocks in total. See Configuring Other Settings (Fulfillment).
La sanción puede seleccionarse por un periodo de tiempo dependiendo del tiempo que el préstamo está vencido (basado solo en días abiertos o todos los días) o puede ser por un tiempo fijo. The block is automatically lifted once the configured expiry date passes, as part of the Users - Remove Blocks job. Las sanciones también se eliminan automáticamente si el artículo vencido se renueva o se marca como perdido.
También se pueden configurar sanciones para préstamos a corto plazo. To configure this, set the short_loan_overdue_block parameter to true. For more information, see Configuring Short Loan Reminders.
Configuring an Overdue-Loan Blocking Policy
- Access the User Block Description table (Configuration Menu > Fulfillment > Patron Configurations > User Block Description). Add a new row with code OVERDUE(see Configuring User Block Descriptions and Definitions).
- Access the User Block Definitions table (Configuration Menu > Fulfillment > Patron Configurations > User Block Definitions). Add a new row of type Loan using the overdue loan block that was created in the prior step.
- Access the Fulfillment Terms of Use (Configuration Menu > Fulfillment > Physical Fulfillment > Terms of Use and Policies).Add a new loan Terms of Use or edit an existing one (see Configuring Terms of Use).The Block When Overdue Terms of Use does not block by default.
- To create the block, select the blank line from the drop-down, and select Add Policy from the Actions menu.
Añadir política de sanción - On the Policy Details page, select Value type of Other. Enter a number in the Value field. Then select from the Unit of Measurement drop-down list. Las sanciones vencidas pueden calcularse en función del número de días vencidos acumulados en varios préstamos (acumulativos) o en base a los días vencidos de un solo préstamo (discreto). If an applicable Block When Overdue policy has a cumulative unit of measurement, the expiry date is calculated as the latest block expire date plus the number of days as defined by the policy. Si no se elige un valor acumulativo, la fecha de vencimiento será únicamente de acuerdo con la política, sin tener en cuenta las sanciones existentes. Las sanciones por vencimiento se calculan sobre la base de días completos de 24 horas. Si la unidad de medida es en días, la sanción se aplica durante un día completo (24 horas entre la fecha de devolución y la fecha de vencimiento).
- For cumulative, inactive blocks are considered when calculating the expiry date of newly created blocks.
- If Days per Overdue Days - Discrete or Open Days per Overdue Days - Discrete is selected as a unit of measurement, the calculation is <Overdue/Open overdue days> * <Value>.
Available values for Block When Overdue are:- Todos los días - Acumulativo
- Todos los días - Discreto
- Días por días vencidos - Acumulativo
- Días por días de vencimiento - Discreto
- Meses - Acumulativo
- Meses - Discreto
- Días de apertura - Acumulativo
- Días de apertura - Discreto
- Días de apertura por días vencidos de apertura - Acumulativo
- Días de apertura por días vencidos de apertura - Discreto
- Semanas - Acumulativo
- Semanas – Discreto
- Ninguno
- Select Save.
- On the Terms of Use Details page, select Maximum Period for Overdue Block. La política del periodo máximo de sanción por devolución tardía afecta el cálculo de la fecha de vencimiento de la sanción del préstamo vencido. Si se calcula que la fecha de caducidad de una sanción es posterior al máximo, la sanción se acortará para que coincida con el límite. La política predeterminada no establece un periodo máximo de sanción por devolución tardía.
- To create the maximum block policy, select the blank line from the drop-down, and select Add Policy from the Actions menu.
Vista de sanciones de usuario
El registro de usuario incluye información sobre las sanciones activas al usuario.
- In the persistent search box, search for the user (see Searching in Alma). La cuenta del usuario aparece en la lista de usuarios en la página Buscar y gestionar usuarios. If blocks exist for the user, a checkmark appears under Blocks in their row.
- To see details about the blocks, select the user. Se abre la página Detalles del usuario.
- Select the Blocks tab to see details about all the active blocks on the user.
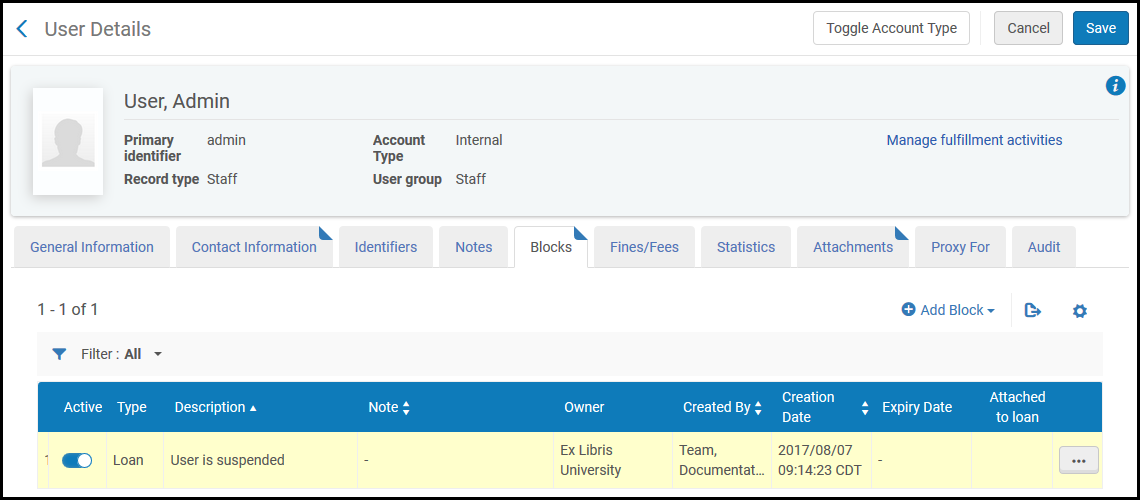
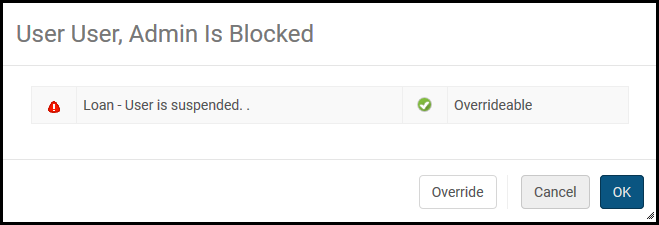
Notification of a block also appears when you attempt to perform certain actions, such as loaning an item:
Sanciones de usuarios eliminados automáticamente
User blocks that have passed their expiry date are automatically removed when the Users - Remove blocks job runs. Overdue blocks that were previously created by the Overdue and Lost Loan Profiles job are removed automatically when the loan is renewed or marked as lost.
- Access Monitor Jobs. Find the Users - Remove Blocks job.
- Within the report, select the link Delete user overdue loan block.For more information about patron blocking due to overdue loans, see the Patron blocking due to overdue loans video (11:22 mins).
Page tags: article:topicproduct:almacontent:Documentationlang:englishUser groupsadd currencyConfigure patron fulfillment rulesConfigure patronPatron user groupspatron limitsloan limitsuser block definitionsadd user block definitiondemeritsdemerit blockdemerit pointsuser authentication
