
Patrones de Predicción
- Operador de inventario físico
- Técnico de inventario físico extendido (requerido para eliminar operaciones)
Alma supports prediction patterns to enable you to more easily manage serials. Con la compatibilidad con los patrones de predicción, es posible crear ejemplares de publicación seriada antes de su fecha de recepción según una plantilla de predicción.
This capability uses the 853-855 holdings record fields for the predicted item information such as enumeration, chronology, date, and so forth. Alma provides many predictive pattern templates from which you can select to enter the 853-855 field information.
For holdings that have a predictable pattern, the On order until <date> information is displayed in the Primo Get It tab.
Una vez que ha creado los ejemplares esperados, pueden verse usando la Lista de ejemplares recibidos de adquisiciones para gestionar su recepción. See the procedure To receive new physical material for more information regarding receiving continuous physical materials and processing claims.
Any PO lines that are associated with predicted items must include the Claiming grace period.
For more information about prediction pattern support for managing serials, see Presentations and Documents - Serials.
Crear un registro de existencias con contenido del patrón predictivo
- Locate a holdings record (that is connected to a physical subscription order type) to which you want to add the predictive pattern information. Ábralo en el editor MD.The order provides the vendor Subscription interval information that is used in combination with the Next Predicted's Item Information to calculate the expected arrival date.
- Select Editing Actions> Expand from Template, select a relevant predictive pattern template that fits your requirements, and select OK.The dialog offers the following options:
- Override- Replaces any existing-matching fields of the record with the template fields.
- Add missing- The fields of the template will supplement only the template's fields missing in the record.
- Add all- Adds all the template's fields to the record, keeping the existing record's fields, even if matched. Téngase en cuenta que debe borrar los campos no deseados manualmente.
Since the journal used in this procedure is a quarterly publication, the Serial prediction quarterly months template is selected:
Publicación trimestral 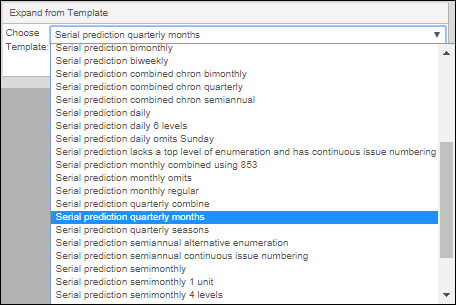
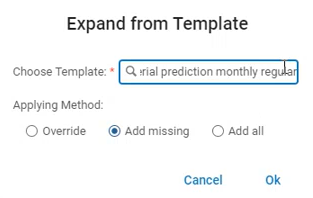 Opciones del patrón predictivo Expandir desde la plantillaEl sistema añade un campo 853 (o campo 854/855, dependiendo de la plantilla que haya seleccionado) al registro de existencias, y un campo 590 que contiene una descripción de la plantilla:
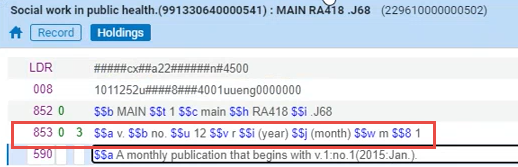 Opcionalmente se puede introducir manualmente el campo 853/854/855. See http://www.loc.gov/marc/holdings/hd853855.html for more information.También se puede duplicar y editar una plantilla de patrón de predicción para crear su propia plantilla de patrón de predicción. See To create/customize prediction pattern holdings templates.Para obtener más información sobre patrones de predicción y publicaciones seriadas, consulte:
- Serials - Prediction patterns guide and examples.docx
- Serials How To Documents
- Select the icon in the 853 (or 854/855) row to open the form with the next predicted item's information. You can also press F3 or select the
 icon to open the form when the 853 (or 854/855) is the active row, or you can select Record Actions> Next predicted item's information. Si ingresa manualmente el campo 853/854/855, no se muestra ningún ícono. En este caso, presionar F3 para abrir el formulario.
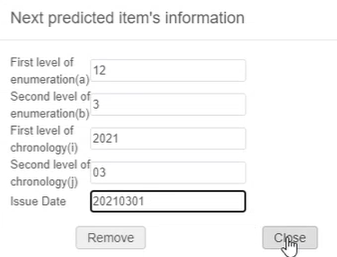
- Make any changes you require for the next predicted item and select Close. Las entradas en este formulario (enumeración, cronología y fecha de emisión) determinan el comienzo del patrón de predicción empezando con el siguiente ejemplar esperado. The Issue Date is the date of the first serial in the prediction pattern. Select Remove to clear the form.
- Select Record Actions> Open predicted item to view the pattern that Alma created for this holdings record. The predicted pattern that is created includes the expected arrival date(see the figure below). The predicted issue's Expected Arrival Date is generated from (1) the Subscription interval in the vendor information portion of the PO line AND (2) the Issue Date of the expected issue. The Subscription Interval value should be the best estimate of the number of days, relative to the date of publication, that the issue arrives in house.Cada ciclo de predicción equivale a un año. If you want to create predicted items for more than one year, you can repeat the Open predicted item step.
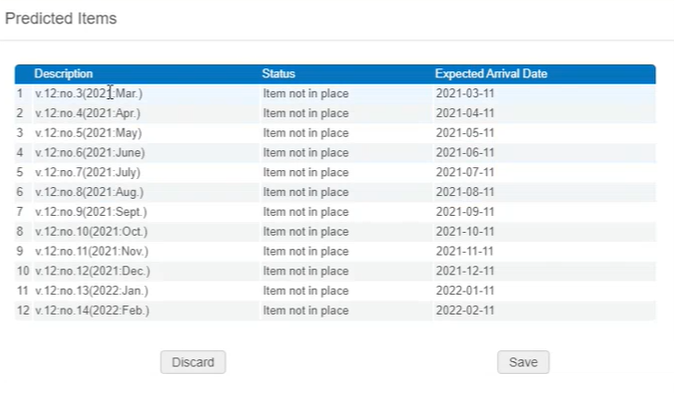 Ejemplares esperados creados
El idioma del segundo nivel de enumeración en la tabla de Ejemplares Esperados es el idioma definido en el campo 008 pos.22-24. Este valor contiene el idioma del registro de existencias. In the below example, this value is German, and the predicted items are generated in German.
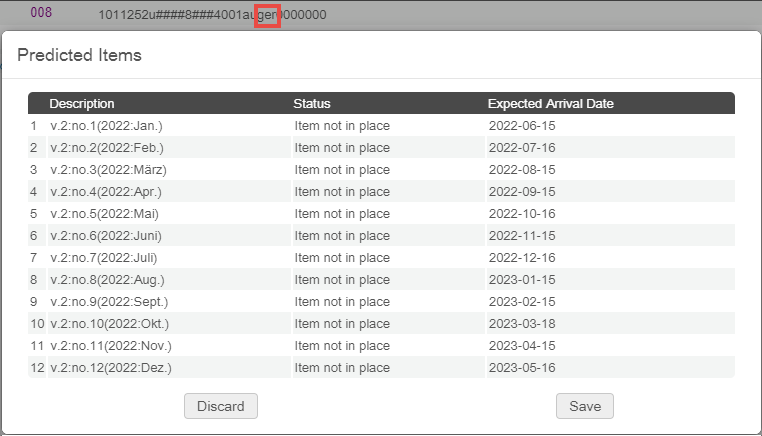
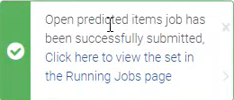
- Select Save to save the predicted items that have been created, or select Discard if you do not want to save the predicted items. This closes the Predicted Items form.Note: If the number of predicted items to be created is larger than 50, then the item creation is conducted as a Open Predicted Items job that runs in the background, allowing you to work on your other tasks while the items are being created. Click the link in the notification message to view the job. If you would like the Open Predicted Items job to be triggered not at 50 items, but at a higher or lower number of items, contact Customer Support.
- Select the Save Record icon when you have completed making your changes.
Now you can view the materials you created in the Acquisitions > Received Items List where you can manage their receipt. See the procedure To receive new physical material for more information regarding receiving continuous physical materials and processing claims.
Crear/personalizar una plantilla de existencias de patrón de predicción
- Abrir el Editor MD.
- Select the Templatestab in the Navigation pane, and expand the Shared folder.
- Select one of the prediction pattern templates provided by Ex Libris that is similar to the one you want to create , right-click and select Duplicate. The Template Properties dialog appears.
- Optionally, make changes to the template properties such as Name and Description, and select Save. El sistema crea un duplicado de la plantilla que se puede personalizar.
- Select the copied template and select Edit. Los detalles de la plantilla aparecen en el panel derecho del Editor MD.
- Personalizar la plantilla para que cumpla los requisitos y guarde los cambios.
- En el Editor MD, abre el registro bibliográfico que tiene las existencias para las que se crearon los ejemplares esperados.
- Select View Related Data> View Inventory).The predicted items that you created increment the No. of Items total that appears on the Holdings tab in the MD Editor (View Related Data View Inventory) for the bibliographic record of this continuous holdings record.
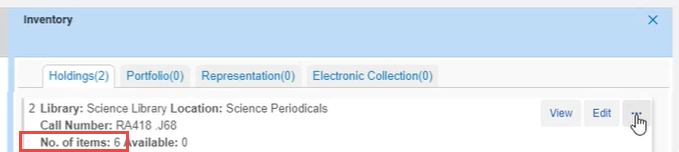 Número de incrementos de ejemplares para existencias de registro bibliográfico
- Select View Items. Los ejemplares esperados del ciclo fueron creados sin fecha de recepción (porque todavía no han sido recibidos).While viewing the details of the List of Items page,Open Predicted Items can be used to create another cycle of predicted items. Véase el siguiente procedimiento, más adelante, para crear otro ciclo. For more information about the List of Items page, see Working with the List of Items.
- For one of the predicted items, select Actions > Edit to open the Physical Item Editor page. Note that the Expected receiving date was set by the prediction pattern.
Crear ejemplares esperados adicionales usando Abrir ejemplares esperados
- Using search, enter the search criteria for the record to which you want to create an additional cycle of predicted items, and select the Items link. Depending on your workflow and the number of holdings records, you can also select Holdings to open the List of Holdings page (see Working with the List of Holdings), and then select View items. from the row actions. The List of Items Page appears with the Open Predicted Items option. For more information about the List of Items page, see Working with the List of Items.
- Select Open Predicted Items. Aparece la lista de nuevos ejemplares esperados. Note that the Tools option enables you to view/save the list in Excel format.
- Select Save Items to save the predicted items and close the list.
- Select Back to return to your search results page.
Opening Predicted Items in Bulk Job
(New for August 2026) You can open predicted items for a set of holdings records with the Open predicted items in bulk job. The job can be run from the manual jobs page (see Manual Jobs) or directly from the Holdings and Physical Titles search results pages, using the Run a job bulk action (see Searching in Alma). The input for the job should be a set of holdings records with prediction patterns defined on each record.
Recibir ejemplares esperados
- As with receiving materials, you must be at your library's acquisitions desk; see Receiving Physical Material.
- An item that was created from a prediction pattern, but not yet received by the institution, is not reflected in the 86X field. The 866 field is created automatically in the Holdings record only upon receiving of the item. For details, see Presentations and Documents - Serials.
- It is not possible to scan and receive multiple items using a scanner. It is possible to receive multiple items at once if you enter the barcodes manually.
- The Alma Open Predicted Items process creates items from the year 1900 and newer.
- Open the Receive New Material page (Acquisitions > Receiving and Invoicing > Receive), and select the Continuous tab. See Receiving Physical Material for additional information regarding receiving continuous orders for physical materials and processing claims.
- Filter the Receive New Material page to locate the PO line that contains the predicted item(s) you want to receive.
- For the specific PO line containing the predicted item(s) that you want to receive, select the Manage Items row action. Aparece la página Lista de ejemplares recibidos. When receiving and managing items, you can tell which items have already arrived and which are still waiting to arrive by reviewing the Date Received column.
- Use the Sort routine,Receiving status, and Location options in the PO Line Items section to organize and locate the predicted item(s) to be received.
- Select Receiving date from the drop-down list for Sort routine.
- Select Not Received for the Receiving Status.
- Select the specific location/library for Location.
- Select the Receive row action for a specific predicted item, or select the check boxes for multiple rows and select Save and Receive to save and receive multiple items. Al recibir ejemplares con un código de barras, seleccionar la casilla de verificación y escanear el código de barras. See the section Scanning Items for more information about scanning barcodes.
- Repetir los pasos de recepción anteriores hasta que se haya completado la recepción de todos los ejemplares esperados.
- Select the Save Record icon when you have completed making your changes.
