
Managing Search Queries and Sets
Any role that can perform a repository search can save a query in order to create a set and manage sets(a user can only manage sets created by that user).
However, users can do so only for content types with which a user is allowed to work according to user's role.
他のユーザーが作成したセットの組み合わせ結果を表示するには、リポジトリマネージャーの役職である必要があります。The Repository Manager can see/edit/delete public and private sets.
The following roles are required depending on the content type of the set:
- 受入コンテンツタイプのセットの場合、下記の役職のいずれかが必要です:
- 発注/購入マネージャー (注文ラインセットのみ)
- ベンダーマネージャー (ベンダーのセットのみ)
- 受入管理者
- 総合システム管理者
- ユーザーセットの場合、下記の役職のいずれかが必要です:
- ユーザーマネージャー
- ユーザー アドミン
- 図書リストおよびコースセットには、次の役職のいずれかが必要です:
- コースリザーブオペレータ/マネージャー
- フルフィルメントサービスオペレータ/マネージャー
- リサーチアセットのセットを管理するには、機関でEsploroを有効にした上で、下記の役職が必要になります:
- リサーチアセットマネージャー
- 研究者のセットを管理するには、機関でEsploroを有効にした上で、下記の役職が必要があります:
- リサーチマネージャー
- 他の人が作成したセットからレコードを削除するには、リポジトリマネージャーの役職が必要です。
- 他のユーザーが作成したセットの組み合わせ結果を表示するには、リポジトリマネージャーの役職である必要があります。
セットは、Almaのレコードのコレクションです。They can be created manually, as a list built up item-by-item by the user, or dynamically, in which case the set is a saved search query whose results are determined each time the search is run.Sets do not have a size limit.
セットは、メタデータの一括公開、レコードのグループの移動、またはジョブの実行に使用できます。For information on running jobs on defined sets, see Running Manual Jobs on Defined Sets.
You can run a job directly on selected search results and PO lines without first defining a set.See Manual Jobs for details.
Types of Sets
セットには下記の2種類があります:
- Itemized sets – Static sets of individual items that are manually selected or uploaded by the librarian (see Creating Itemized Sets),
- Logical sets – These are the results of a saved search query, and are created dynamically each time the search is run (see Creating Logical Sets).
Set Content Types
セットは、複数のコンテンツタイプから作成できます。上記の[アクセス許可]セクションで説明されているように、特定のコンテンツタイプのセットを作成できるかどうかは、アクセス許可によって異なります。
- 受入セット
- 注文明細
- ベンダー
- コースセット
- ユーザーセット
- 図書リストセット
- リソース管理セット
- 全タイトル
- 典拠
- 引用
- コレクション
- デジタルファイル
- デジタルタイトル
- 電子コレクション
- 電子ポートフォリオ
- 電子タイトル
- 物的所蔵
- 冊子
- 冊子タイトル
- Esploroセット (貴機関でEsploroが有効になっている場合にのみ表示できます):
- Researcher sets (similar to user sets)
- リサーチアセットのセット (リソース管理セットに類似)
For information, see Creating Batches of Records in Alma - Sets (7:14 mins.).
Managing Sets
Sets are managed on the Manage Sets page (Admin > Manage Jobs and Sets > Manage Sets).
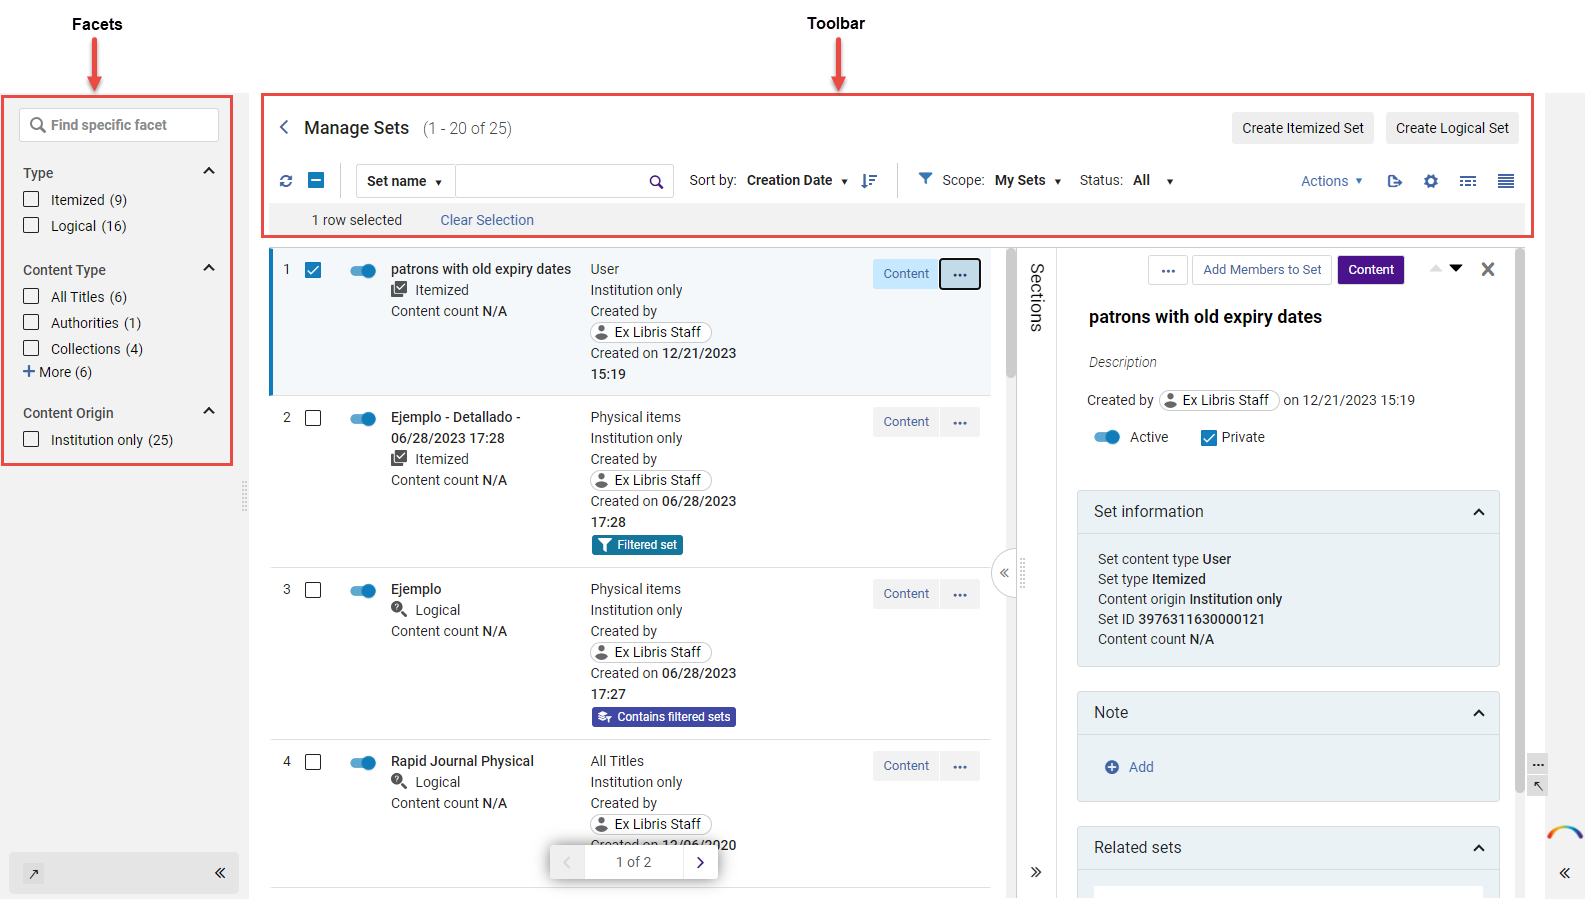
For more information on Facets, see New Layout > Facets.
Manage Sets Toolbar
次の機能がセットの管理ツールバーに表示されます。
| フィールド/アイコン | 説明 |
|---|---|
 Refresh |
セットの管理ページを更新します。 |
 Select/Unselect all items |
Selects all or Unselects all items only in the displayed list.多数のページにまたがる多数のセットがある場合は、現在のページのアイテムのみが選択/選択解除されます。 Additionally, you can select an individual set (not all) in the list by selecting its checkbox ( |
 Search |
Search the list results by SetName or Created by (user ID: user first name or user last name).ドロップダウン・フィールドで、「Set Name(セット名)」または「Created by(作成者)」を選択し、いずれかのオプションの検索文字を入力します。
Use asterisk (*) wildcard character to search for a string that begins with the searched characters.たとえば、「ser*」を検索すると、「series」および「serology」とともに「serials」が検索されます。 If the set name includes dashes (hyphens), when using an asterisk (*) as a wildcard character, replace the dashes with spaces in the search query.For example, if the set is named test-try-check, searching for test-t* will not find the set.Instead, search for test t* to return results. |
Sort by:  Ascending/Descending |
セットのリストを名前または作成日のいずれかで並べ替えます。ドロップダウン フィールドで、並べ替えるオプションを選択します。Additionally, select the Ascending or Descending button to display the results in ascending or descending order according to the option selected (Name or Creation Date). |
 Filter |
検索範囲:
ユーザーは、次のように表示されたセットをフィルタリングできます。
|
| ステータス:
Presents the option to filter the sets by whether the sets are active, inactive, or all (for both inactive and active sets). An Active set refers to whether the set can be selected when running a manual job. An Inactive set refers to a set that cannot be selected by users when running a manual job. |
|
| 一括アクション |
When one or more sets are selected, the Bulk Action buttons are enabled.
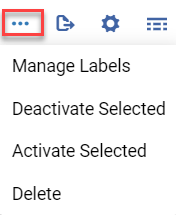
画面の解像度によっては、行アクションアイコンの下にオプションが表示される場合があります。
オプションについては以下に説明します。
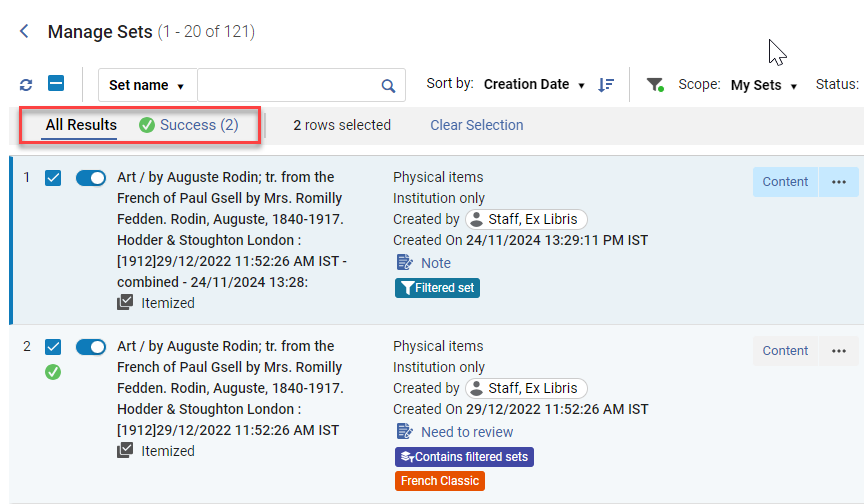
You can activate/deactivate an individual set (not all) in the list by using the slide activate/deactivate toggle button ( 削除できるのは、あなたが作成したセットのみです。リポジトリマネージャーは、すべてのセットを削除できます。 セットに関して一括アクションを実行すると、成功数と失敗数を含む、結果を示す情報と結果へのリンクがページの上部に表示されます。
|
| ラベルを管理する | See Labels in the Manage Sets Page.画面解像度によっては、このオプションが行アクションアイコンの下で使用できる場合があることに注意してください (一括アクションを参照)。 |
 Export |
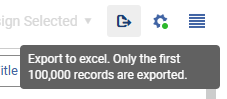
セットを Excel (*.xlsx形式) にエクスポートします。
一部のページでは、最初の100,000件のレコードのみがエクスポートされます。You can identify if this applies to the current export by the message that appears in the tooltip. |
 Customize |
Enables users to personalize various aspects of the Manage Sets List.This includes determining the sequence and appearance of sections, tables and facets, as well as customizing the display of records (see Manage Sets List Customization). |
|
|
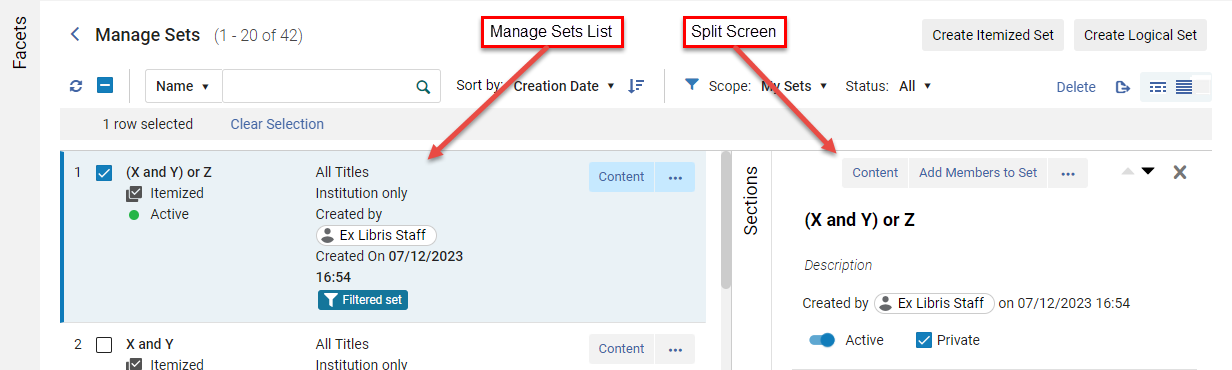
When a set is selected in the Manage Sets screen, the screen splits to display an additional screen indicating associated information with the selected set.For more information, see Split View ( ).
|
| アイテムセットを作成 | Creates a static set of individual items that are manually selected or uploaded by the librarian (see Creating Itemized Sets). |
| ロジカルセットの作成 | Creates a saved search query, and is dynamically updated each time the search is run (see Creating Logical Sets). |
 When no sets are selected, the options are not enabled.

 /
 ) to the left of the set name.
 Switch to table view
 Switch to record view
 Switch to list view
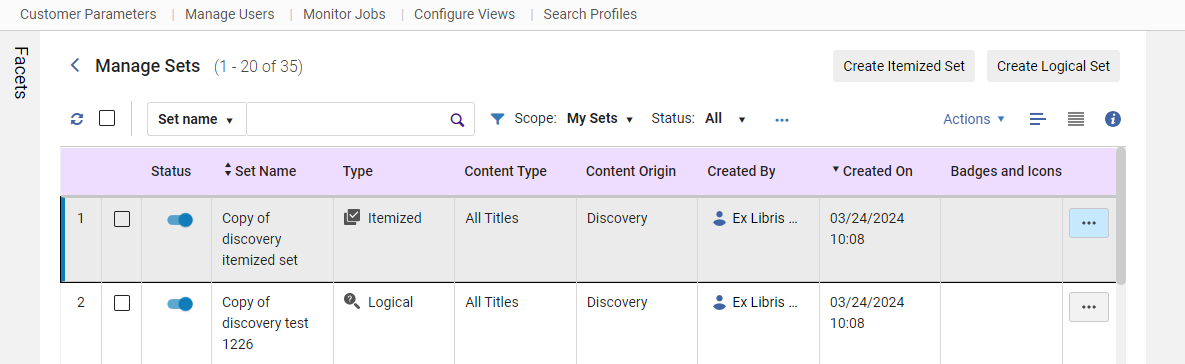
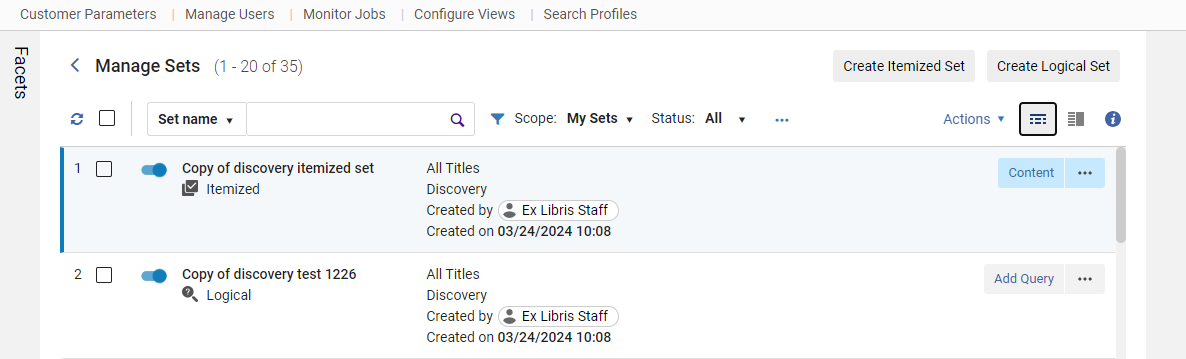
Manage Sets Page More Actions Menu
アクションメニューには、下記のアクションが含まれます:
以下に説明するアクションは、全般的な主要アクションです。There may be additional actions/options depending on the content type of a set.
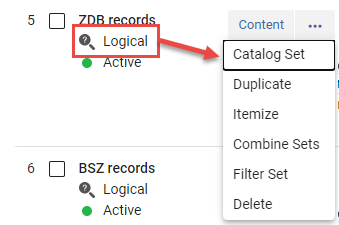
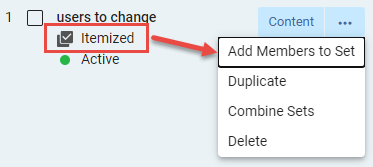
| アクション | 説明 |
|---|---|
| 内容 | 保存された検索クエリを実行し、結果を表示します。 |
|
目録セット |
Opens the set in the MD Editor, but only if the set contains less than 200 items.See Working with Catalog Sets in the Metadata Editor. For Community Zone sets, this option is available for bibliographic and authority records. このアクションは、典拠コミュニティゾーンの検索結果から作成されたセットには使用できません。 |
| [複製] |
セットをコピーします。複製されたセットは、セット名に接頭語として追加された単語のコピーとともに「セットの管理」ページに追加されます。 Note that this creates a private copy that can only be viewed when the Scope filter is set to My Sets or All. |
| アイテム化 | ロジカルセットをアイテムセットに変換します。Select Confirm in the Confirmation Message dialog box; see Converting Logical Sets to Itemized Sets. |
| セットを結合する | Create a new set based on the members of two existing sets; see Combining Sets. |
|
フィルターのセット |
表示ルールを使用してセットをフィルタリングするオプションを提示します。表示が「真」の際は、レコードはセットに含まれます。 See Filtering Sets for more information. |
| 削除 |
セットを削除します。確認メッセージダイアログボックスで確認を選択します。 削除できるのは、あなたが作成したセットのみです。リポジトリマネージャーは、すべてのセットを削除できます。 |
| アクション | 説明 |
|---|---|
| 内容 | 保存されたセットの結果を表示します。 |
| セットにメンバーを追加 | Display the members (results) of the saved set; see Viewing Members (Itemized Sets Only). |
| 複製 |
セットをコピーします。複製されたセットは、セット名に接頭語として追加された単語のコピーとともに「セットの管理」ページに追加されます。 Note that this creates a private copy that can only be viewed when the Scope filter is set to My Sets or All. |
| セットを結合する | Create a new set based on the members of two existing sets; see Combining Sets. |
| 削除 |
セットを削除します。確認メッセージダイアログボックスで確認を選択します。 削除できるのは、あなたが作成したセットのみです。リポジトリマネージャーは、すべてのセットを削除できます。 |
Manage Sets List Customization
Users can personalize various aspects of the Manage Sets List.This includes determining the sequence and appearance of sections and facets, as well as customizing the display of records.This provides users with a range of options that enable them to configure the sections within the edit view, select the elements visible in the record view, and select the facets that are available for the list.
以下のカスタマイズから選択できます:
- Sections Customization
- Records Customization
- Facets Customization
- Table Customization
- Actions Customization
To Customize the Manage Sets List:
- In the Manage Sets List page (Admin > Manage Jobs and Sets > Manage Sets), select the Customize() icon or select Actions > Customize.
カスタマイズオプションを含むサイドバーペインが表示されます。
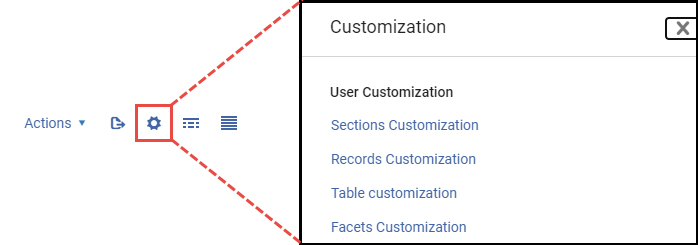
Sections, Table and Facets Customization:
セクションとファセットは、そのカスタマイズと本質的に似ています。
- In the Customization sidebar pane options, select either Sections Customization, Table Customization or Facets Customization.
カスタマイズオプションは選択ごとに表示されます。
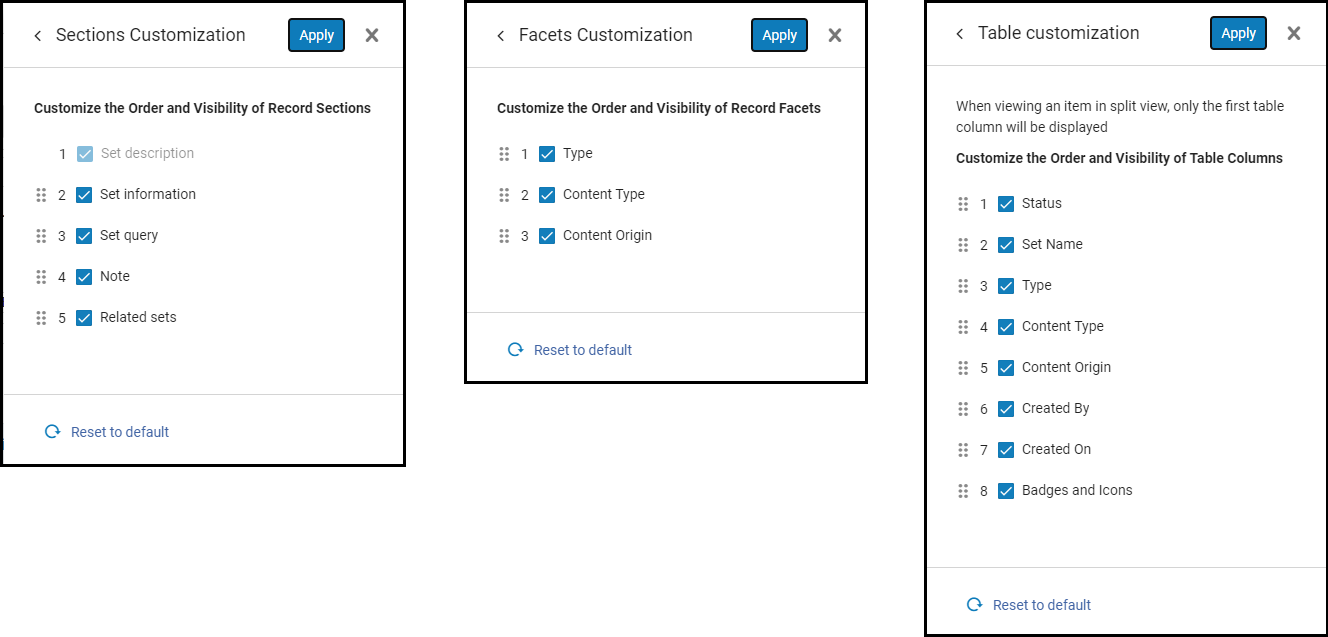
-
You can re-order the Sections, Table or Facets fields as you want them to appear in the UI.Simply drag and drop the fields in the order of position.Select Apply when finished.
セクションのカスタマイズのフィールドにあるセットの説明を非表示にしたり、並べ替えたりすることはできません。
-
You can hide (disable) Sections, Table or Facets fields from being displayed.Unselect (
 ) a field to disable it from being displayed or Select (
 ) a field to have it displayed.Unselected field(s) will not appear in the UI.Select Apply when finished.
-
You can reset the order and appearance back to the default display by selecting
 Reset to default.
- [カスタマイズ] サイドバー ペインのオプションで、レコードのカスタマイズを選択します。
レコードのカスタマイズ オプションが表示されます。
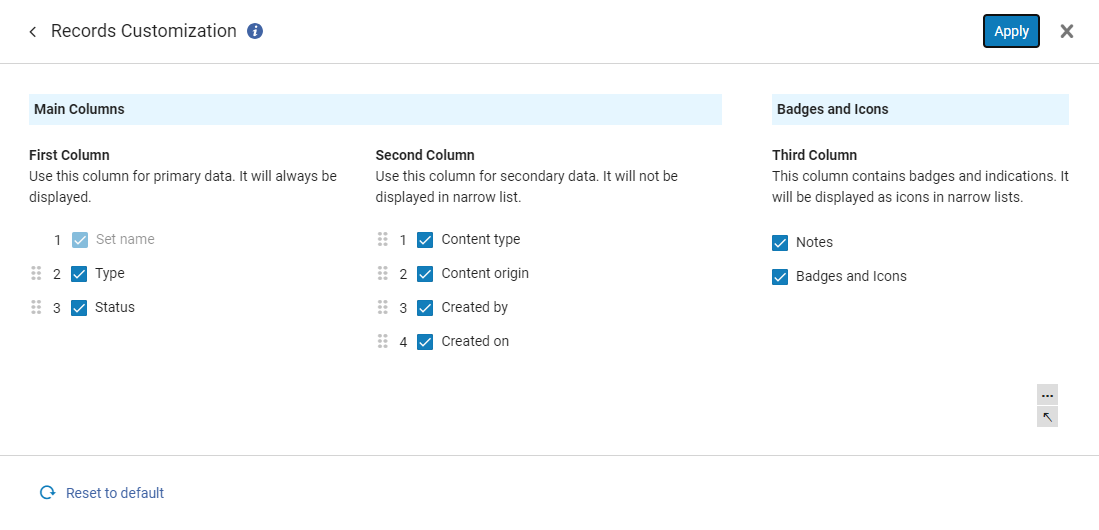
- You can select the fields that are to be displayed or hidden in the UI by selecting () or un-selecting () the field's checkbox.Select Apply when finished.
- You can re-order the Records fields as you want them to appear in the UI.Simply drag and drop the fields in the order of position.Select Apply when finished.
- First Column- fields in this column are always displayed even in narrow lists (when UI screen is re-sized).
- Second Column - fields in this column are of less priority and are not displayed in narrow lists.
- Third Column - fields in this column are always displayed.狭いリストでは、アイコンとして表示されます。
レコードのフィールドカスタマイズは、1列目または2列目で並べ替えることができます。In addition, any field from either column can be moved between the columns.
Fields in the Third column (Badges and Icons) can not be re-ordered, moved, or hidden.
The Set name field in Records Customization can not be hidden or re-ordered. - You can reset the order and appearance back to the default display by selectingReset to default.
- In the Customization sidebar pane options, select Actions Customization.
The Actions Customization options are displayed.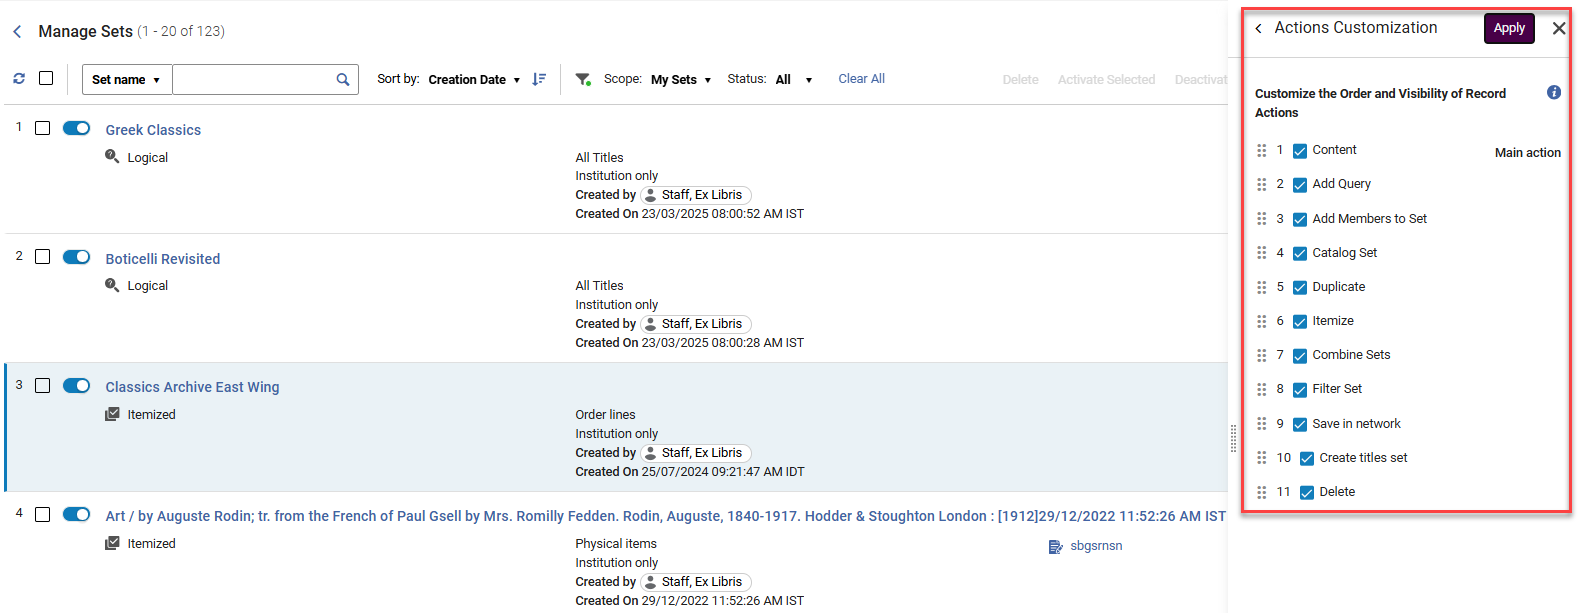
-
You can select the fields that are to be displayed or hidden in the UI by selecting (
) or un-selecting () the field's checkbox.
Select Apply when finished. -
You can re-order the Records fields as you want them to appear in the UI.
Simply drag and drop the fields in the order of position.
Select Apply when finished. -
You can reset the order and appearance back to the default display by selecting
Reset to default.
Quick Access Module
このセクションでは、セットの管理ページのクイック アクセスモジュールについて説明します。See also New Layout for a general overview of this feature in Alma.
セクションスライドアウトパネルのリンクの下にネストされているのは、クイックアクセスモジュールです。This module enables users to streamline their search and focus on particular sections, fields, or actions within the details pane (right panel) of the split screen view in the Manage Sets page.Users can initiate the module through two distinct methods.
To open the Quick Access Module:
- Utilize the keyboard shortcut (period '.')or
- Select the last link labeled Quick Access situated below the links in the Sections slide-out pane.
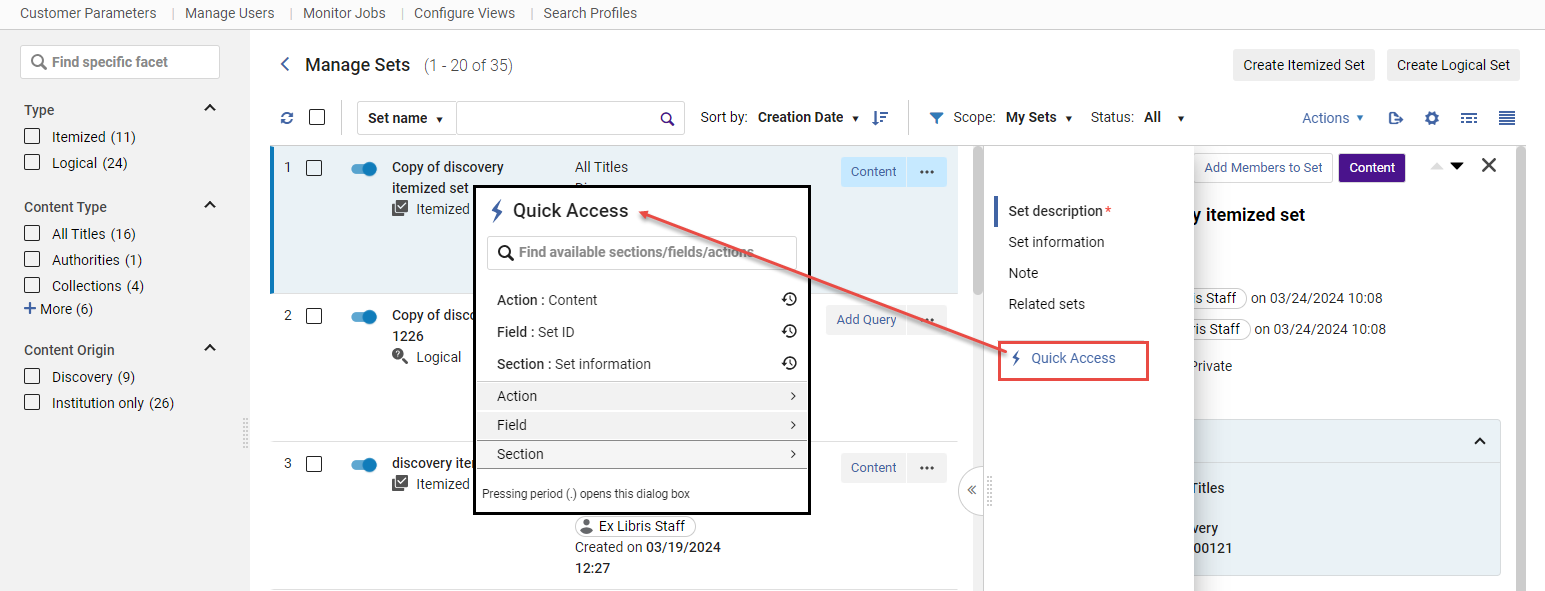
Quick Access Module Options
Depending on the set you have selected in the Manage Sets page, the Action,Field, and Section options displayed in the Quick Access module will differ since they relate to the focused set.If the Quick Access module was previously accessed, the sticky selections chosen (indicated with a icon) are displayed above the Action, Field, and Section menu options.
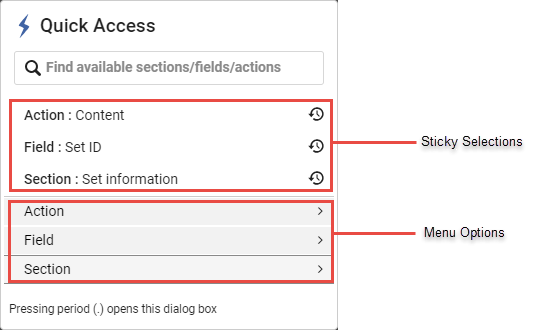
| メニュー | 説明 |
|---|---|
| アクション | Displays the options in the  More actions drop menu for each set.For more information, see Manage Sets Page More Actions Menu. |
| フィールド | セットの詳細ペイン内の特定のフィールドに直接リンクします。
|
| セクション |
セットの詳細ペインで選択したセクションに直接リンクします。
|
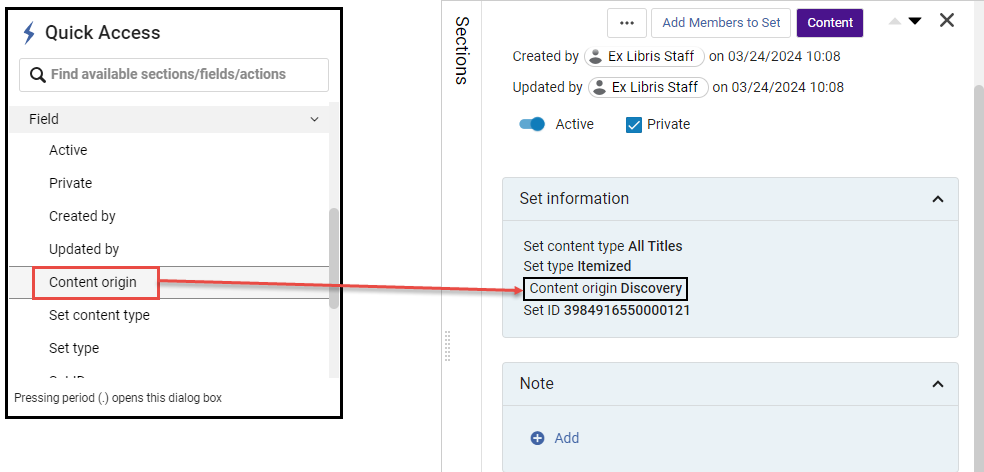
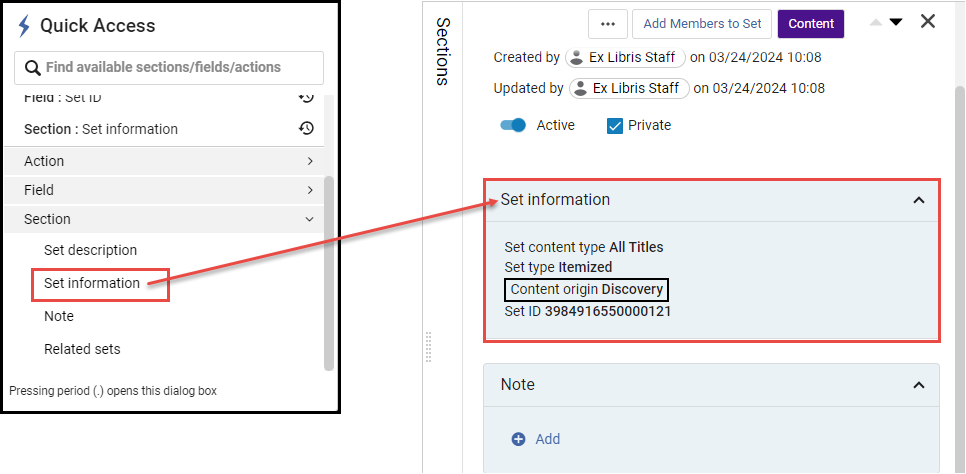
Sections in the Manage Sets Page
For general information on sections see New Layout.
セットの管理ページには次のセクションが表示されます。
- Set information - General information for the set.
- Note - See Managing Notes in the Details Pane.
- Related sets - Shows related sets such as filtered, combined, and logical sets that were itemized.
Alma は、新しい UI を使用するコンテンツ タイプに基づいて、すべてのセットのクエリを表示します。Alma は、従来のテクノロジーに基づくクエリを使用しているセットに対して「クエリは利用できません」というメッセージを表示します。
Labels in the Manage Sets Page
セットにラベルを追加できます。For more details see Managing Labels in Alma.

Creating Itemized Sets
アイテムセットは、リポジトリ内の個々のレコードの静的なコレクションです。It can be created on the Manage Sets page, from a search (in areas such as All titles, Physical holdings and - PO Lines).For information about creating a set based on loan status, see Creating an Itemized Set Based on Loan Status.For more information about searches in Alma, see Searching in Alma.
コンソーシアムメンバーの場合、項目別セットアクションは機関スコープで検索する場合にのみ使用できます(ネットワークスコープまたは複合スコープでは使用できません)。
Creating Itemized Sets on the Manage Sets Page
「セットの管理」ページでは、ファイル、検索、または分析からアイテム別検索を作成できます。
To create an itemized set on the Manage Sets page:
- On the Manage Sets page (Admin > Manage Jobs and Sets > Manage Sets), select Create Itemized Set.The Itemized Set Details page opens.
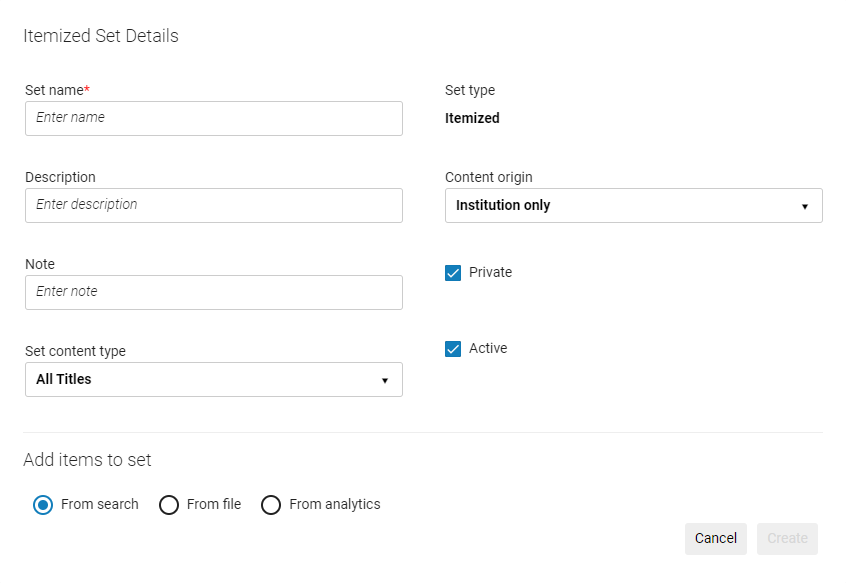
- Enter the set details in the respective fields.Set name is a mandatory field and must be unique.
セット名に特殊文字を含めることはできません (例:&、#、$、%)。
- オプションとして、説明またはメモを含めることで、セットに追加情報を含めることができます。
- このページの冒頭で説明したように、セットのコンテンツタイプで使用可能なオプションは、権限によって異なります。
- By default, the set is designated as a Private() set.つまり、このセットはあなたとリポジトリマネジャーのロールを有するユーザーだけが使用できます。If you unselect the checkbox (), the set becomes a public set and is available to all other users.
- By default, the Status is set to Active ().Optionally, unselect the checkbox () to make the set Inactive.Inactive sets cannot be selected by users when running a manual job.
- コンテンツの出典フィールドは、ソースレコードの出典を示し、機関のみに設定されています。
- 下記の方法のいずれかを使用して、レコードをセットに追加します:
- セット名を入力し、他のフィールドを定義した後、作成を選択します。選択したコンテンツタイプに応じて、検索ページが開きます。
- Continue with step 9.
- 識別子(MMS ID、ISSN、ISBNなど)を含むファイルからセットへセクションのコンテンツを追加、でファイルを選択します。
ファイルをアップロードすることでセットにレコードを追加する場合、メンバーをセットに追加するには何の機能もないため、選択しないでください。
The imported file must be a text file (.txt or .csv and the files must be encoded as UTF-8) or Excel file (.xls or .xlsx).For the data to be read, it must have the correct Header at the top of the column (see Header Types table), for instance, "MMS ID" and not "MMS Id" or "MMS_ID".Excelファイルに複数の列がある場合、有効なヘッダータイプを持つデータの最初の列を使用します。See the Header Types table for acceptable header types.ファイル内の他の情報はすべて無視されます。
Creating itemized sets using Network Zone MMSs for Network Zone-managed records is not supported.Instead, Institution Zone MMSs must be used.
The file must not contain any duplicate barcodes.If the file does contain some duplicate barcodes, Alma skips all instances of them (for example, if the same barcode is mentioned twice in the file, Alma skips both instances).
デジタル表記物からのセット作成はサポートされていません。
ヘッダーとしてPIDを持つセットは正常にインポートされます。ただし、既知の問題により、このようなセットのメンバーを表示することはできません。
詳細については、ビデオ識別子のリストをアップロードしてアイテムセットを作成する (1分53秒) を参照してください。
ユーザー:
When uploading users to an itemized set with an Excel file, the A1 cell must contain either the code of the identifier type used in the file (see Viewing Additional User Identifier Types) or USERNAME (for the primary ID), and the ensuing cells of the A column must contain the user identifiers.同様に、.txtファイルをアップロードする際、最初の行にはファイルで使用される識別子タイプのコードかユーザー名が含まれている必要があります。また、後続の行にはユーザー識別子が含まれている必要があります (各識別子はキャリッジリターンで区切ります)。たとえば、ユーザー名 (デフォルトのプライマリID) のセットをアップロードしたい場合、Excel/.txtファイルの先頭行にテキストでユーザー名を入力し、その後のセル/行にユーザーの実際の名前を入力します。
For details on available user identifier types, see Managing User Identifiers.
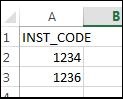
設定されたタイプのユーザー、注文明細、および冊子アイテムに対して検証が実行されます。The Add Members to Set job runs and creates a set from the file.Several instances of this job can run in parallel.
- If you select Add Members to Set after selecting a file, the file is not loaded.Select Confirm in the confirmation dialog box to search the repository for records to include in the set.The records that are then selected, and not those in the file that was previously selected, are included in the set after you select Done.
- インポートファイルの最大サイズは10MBです。
- 無効なデータでインポートを実行すると、無効な各セルは無視されます。
- ファイルをインポートしてからコンテンツタイプを変更した場合は、ファイルを再インポートする必要があります。
- Continue with step 9.
- Select From analytics.Note that using this method you cannot add members (items, users, etc.) to an existing set.アナリティックスを使用して新しいセットを作成することしかできません。
分析セットを作成する場合、プライベートセットではなく、機関セットのみを使用できます。
下記のオプションが表示されます:
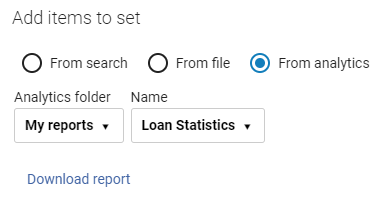
- Select an option from the Analytics folder drop-down list:
- Recent reports – Reports that were recently used in the Manage Sets screen (not recently-created reports in Analytics).Select the report from the Name field.The Name field is populated for recent reports when you have created an itemized set from a report and saved it.
- My Reports – Reports to which you have permissions to access (see Analytics Object List).Select the report from the Name field.
- この機能はレポートでのみ機能し、ダッシュボードやデータ可視化(DV)では機能しません。
- この機能が動作するには、レポートが共有フォルダー内にある必要があります。
- レポート名に特殊文字を含めることはできません。特殊文字を含めると、「分析への接続に失敗しました」というエラーメッセージが表示されます。
Select Download Report to download the report.
Similar to when creating an itemized set from a file, the Analytics report must contain a Header(see Header Types) with a valid field for creating the report.リポートの上部にタイトルヘッダーが含まれている場合は、それを削除する必要があります。
ジョブは、アナリティックスリポートからAlmaのセットを作成します。
For a video that describes this feature, see Create a Set from a Report.
- Continue with step 9.
Header Types
コンテンツタイプ ヘッダー IDの接頭語 When you use the 035 field option in a file (see below), the matching process to build your itemized set uses only 035 $a to create the set.Note that this is different from the matching method used in an advanced search with the Other System Number parameter: it includes the 035 $9, however this field is not accepted when creating an itemized set.
ヘッダー列には、各行に 1 つの値のみを含める必要があります。つまり、行ごとに、識別子が 1 つだけということです。たとえば、MMS レコードに複数の ISSN 値がある場合、インポートされるファイルには 1 つだけを含める必要があります。
全タイトル - MMS ID
- ISSN (matches on both active and non-active fields (022 $a,z) )
- ISSN_A (matches only on active fields (022 $a) )
- ISBN (matches on both active and non-active fields (020 $a,z)
- ISBN_A (matches only on active fields (020 $a) )
- OCLC番号
- 035フィールド
99 典拠 MMS ID 98 引用 引用ID コレクション PID 81 コース Course_ID.For more information, see Managing Courses.
デジタルファイル PID
アナリティックスリポートからアイテムセットを作成する場合、これはIEDです (Rep IDではありません)。
13 デジタルタイトル - PIDアナリティックスリポートからアイテムセットを作成する場合、これはIEDです (Rep IDではありません)。
- ISSN
- ISBN
- MMS ID
- OCLC番号
- 035フィールド
11 電子コレクション PID 61 電子ポートフォリオ - PID
- ポートフォリオID
53 電子タイトル - PID
- ISSN
- ISBN
- MMS ID
- OCLC番号
- 035フィールド
51 発注明細 発注明細リファレンス
PO Line Reference number needs to be the exact and full PO Line Number, such as POL-1234, rather than 1234.
物的アイテム - アイテムID (またはPIDやアイテムPID)When creating itemized sets from analytics reports, this is the Physical Item ID (23) (not the bibliographic MMS ID).For more information, see Record Numbers.
- バーコード
23 冊子タイトル - PID
分析レポートから項目別セットを作成する場合、これはIEP(21)または物理的資料ID(23)です(書誌MMS IDではありません)。For more information, see Record Numbers.
- ISSN
- ISBN
- MMS ID
- OCLC番号
- 035フィールド
21 物理的所蔵 - 所蔵ID
リーディングリスト READING_LIST_CODE ユーザー - バーコード
- ユーザー名 (デフォルトのプライマリID)
- PRIMARYIDENTIFIER
- 機関ID
ベンダー ベンダーコード - When you are done, select Create.
- このファイル入力方法を使用した場合、システムはジョブを実行してセットを構築し、それが完了するとセットのリストに表示されます。結果として得られるセット内のレコード/メンバーの数は、入力ファイル内のエントリーの数より多い場合も少ない場合もあります。たとえば、AlmaデータベースでISBNに複数の一致がある場合、見つかったすべての一致がメンバーとしてセットに追加されます。一致が見つからない場合、セットには追加されません。Similar to other jobs that are run, you can view the job status/history on the Monitor Jobs page (see Viewing Running Jobs and Viewing Completed Jobs).
- ファイル入力方式を使用して[メンバーを設定に追加]ジョブを実行すると、送信されたファイルがMMS ID、ポートフォリオID、プライマリIDなどの1対1の識別子のリストを使用している場合、結果のジョブリポートには検証ファイルが含まれます。
- When the Add Members to Set job is run using identifiers that have the potential for many matches per identifier, there will be no Validation File in the Job Report.
項目別セットの場合: レコードがネットワーク機関にリンクされており、コンテンツをクリックすると表示される場合、「ネットワーク」アイコンはクリックできません。
Creating Itemized Sets from Search Results
検索結果ページで特定のアイテムを選択し、それらのアイテムを含むアイテム別セットを作成できます。For adding items to an existing set, see Editing Itemized Sets.See also Searching in Alma.
これは現在、すべてのタイトルでサポートされています。今後は他の検索も追加される予定です。
To create an itemized set on the search results page:
- 検索結果ページで、セットに追加するアイテムを選択します。
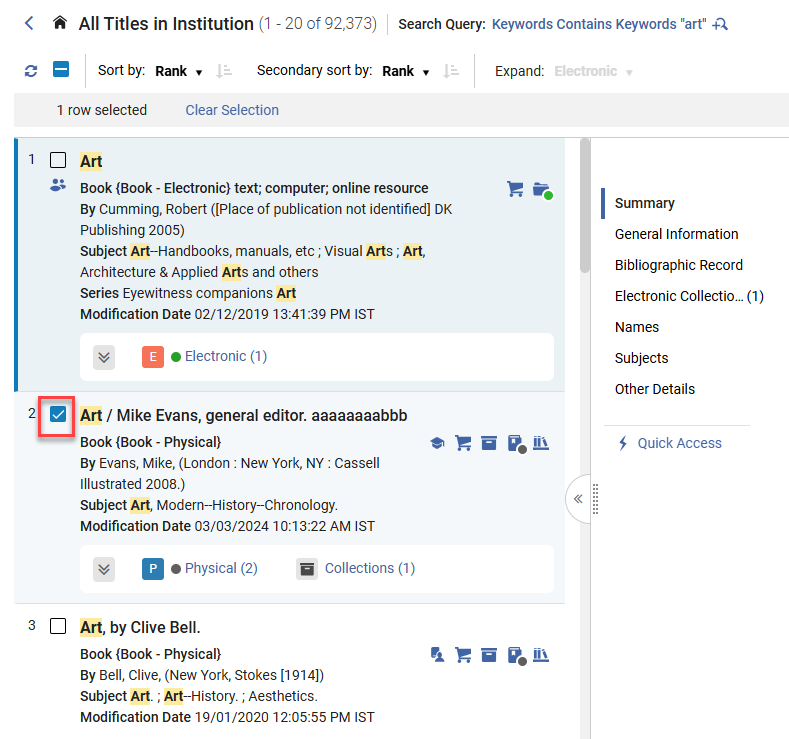
アイテム別セット詳細ページ
-
Select the Create Itemized Set button.
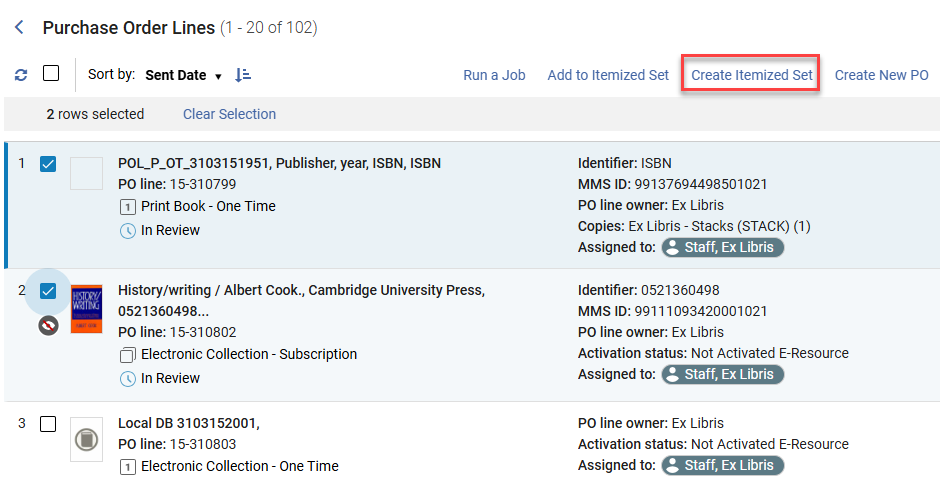
-
Enter the set details in the respective fields.Set name is a mandatory field and must be unique.
セット名に特殊文字を含めることはできません (例:&、#、$、%)。
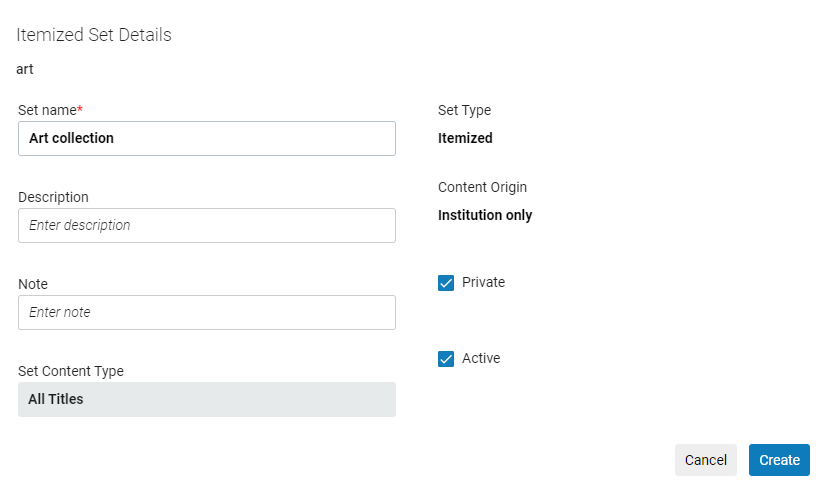
-
オプションとして、説明またはメモを含めることで、セットに追加情報を含めることができます。
-
このページの冒頭で説明したように、セットのコンテンツタイプで使用可能なオプションは、権限によって異なります。
-
By default, the set is designated as a Private(
) set.つまり、このセットはあなたとリポジトリマネジャーのロールを有するユーザーだけが使用できます。If you unselect the checkbox (), the set becomes a public set and is available to all other users. -
By default, the Status is set to Active(
).Optionally, unselect the checkbox () to make the set Inactive.Inactive sets cannot be selected by users when running a manual job. -
コンテンツの出典フィールドは、ソースレコードの出典を示し、機関のみに設定されています。
-
完了したら、作成を選択します。
-
このファイル入力方法を使用した場合、システムはジョブを実行してセットを構築し、それが完了するとセットのリストに表示されます。結果として得られるセット内のレコード/メンバーの数は、入力ファイル内のエントリーの数より多い場合も少ない場合もあります。たとえば、AlmaデータベースでISBNに複数の一致がある場合、見つかったすべての一致がメンバーとしてセットに追加されます。一致が見つからない場合、セットには追加されません。Similar to other jobs that are run, you can view the job status/history on the Monitor Jobs page (see Viewing Running Jobs and Viewing Completed Jobs).
項目別セットの場合: レコードがネットワーク機関にリンクされており、コンテンツをクリックすると表示される場合、「ネットワーク」アイコンはクリックできません。
Creating Itemized Sets from PO Lines
PO Lineリストで特定のPO Lineを選択し、それらを含む項目別セットを作成できます。To add PO lines to an existing set, see Adding PO Lines to an Itemized Set.
To create an itemized set on the search results page:
- In the list of PO lines, select the PO line/s to use for creating a set.
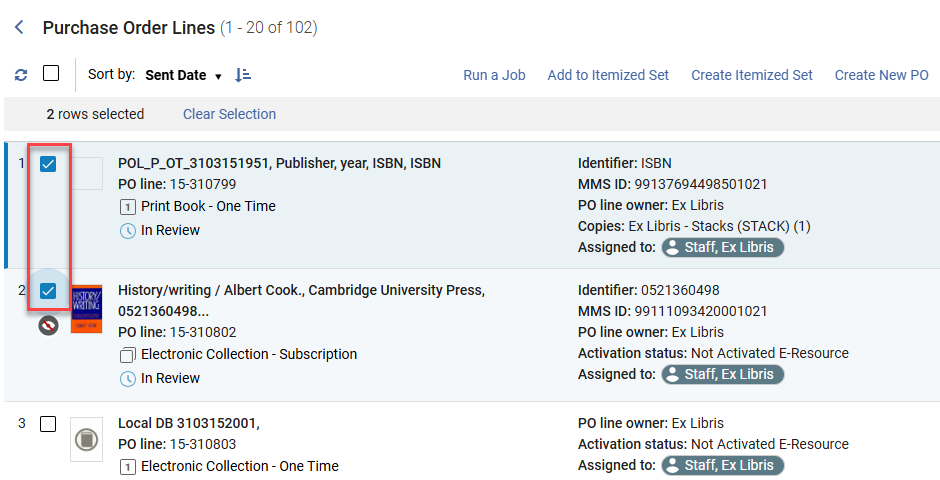
- Select the Create Itemized Set button.
- Enter the set details in the respective fields.Set name is a mandatory field and must be unique.
セット名に特殊文字を含めることはできません (例:&、#、$、%)。
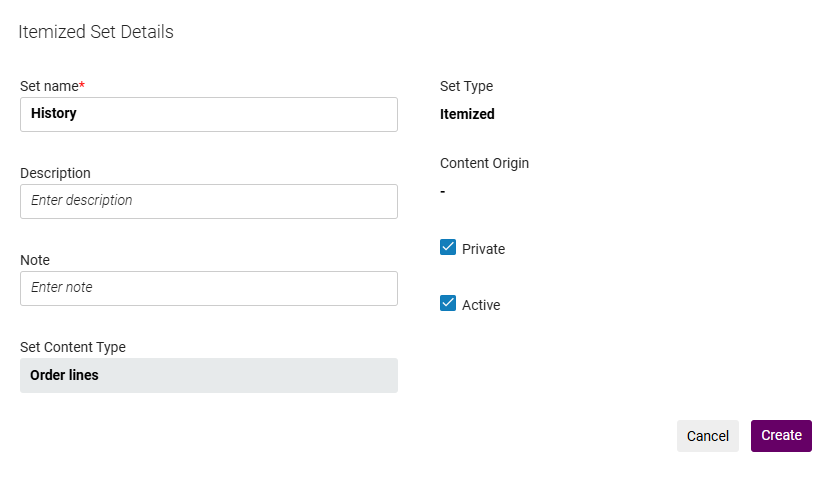
- オプションとして、説明またはメモを含めることで、セットに追加情報を含めることができます。
- By default, the set is designated as a Private() set.つまり、このセットはあなたとリポジトリマネジャーのロールを有するユーザーだけが使用できます。If you unselect the checkbox (), the set becomes a public set and is available to all other users.
- By default, the Status is set to Active().Optionally, unselect the checkbox () to make the set Inactive.Inactive sets cannot be selected by users when running a manual job.
- コンテンツの出典フィールドは、ソースレコードの出典を示しています。
- 完了したら、作成を選択します。
リソース管理セット
リソース管理セット (タイトル、典拠、コレクション、または何らかの目録) の場合、汎用検索ページが開きます。簡易検索または詳細検索を使用して、セットに追加したいコンテンツを検索します。ページが更新され、検索結果が表示されます。For more information, see Searching in Alma.
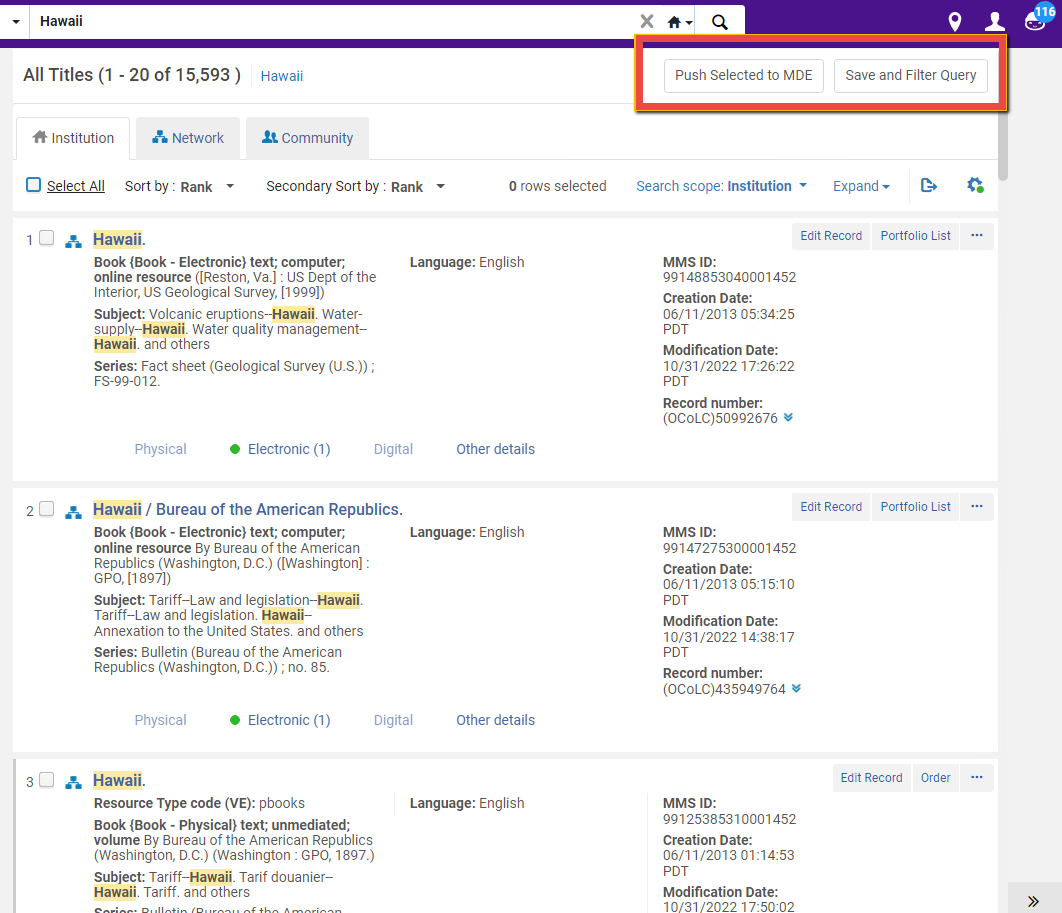
セットに含めたいアイテムを選択し、クエリの保存とフィルタリングを選択します。選択したレコードがセットに追加されます。If the number of items is large, a Manage set members job is run to add the items to the set; to see the results, see Viewing Completed Jobs.
すべてのタイトルで検索を実行する場合は、結果の全ページの全アイテムを追加できます:すべてを追加を選択し、確認ダイアログボックスで確認を選択します。
アイテムセットの場合、レコードの検索・選択・追加を続行できます;ロジカルセットの場合、現在の検索クエリがセットを定義します。終了したら、完了を選択します。アイテムセットが保存されます。「セットの管理」ページが開き、新しいセットや更新されたセットが表示されます。
図書リストのセット
For a reading list set, a search page appears, with a search for reading lists pre-selected; see Resource Management Sets for more information.
Order Line Sets
For an Order-line set, a search page appears, with a search for PO lines pre-selected; see Resource Management Sets for more information.
ベンダーのセット
ベンダーのセットの場合、「ベンダーの検索」ページが開きます。
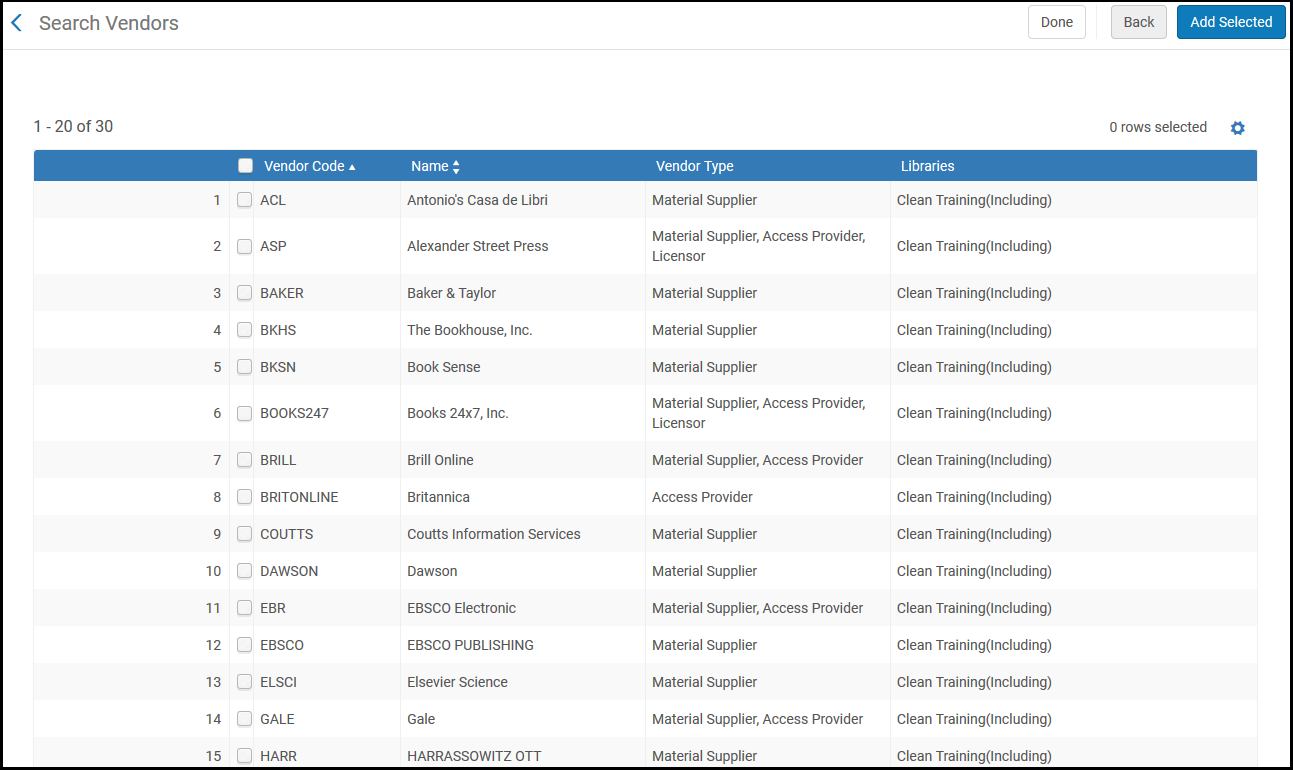
セットに含めたいアイテムを選択し、選択したものを追加するを選びます。選択したレコードがセットに追加されます。
アイテムセットの場合、レコードの検索・選択・追加を続行できます;ロジカルセットの場合、現在の検索クエリがセットを定義します。終了したら、完了を選択します。アイテムセットが保存されます。「セットの管理」ページが開き、新しいセットや更新されたセットが表示されます。
ユーザーセット
ユーザーセットの場合、「ユーザーの検索と管理」ページが開きます。
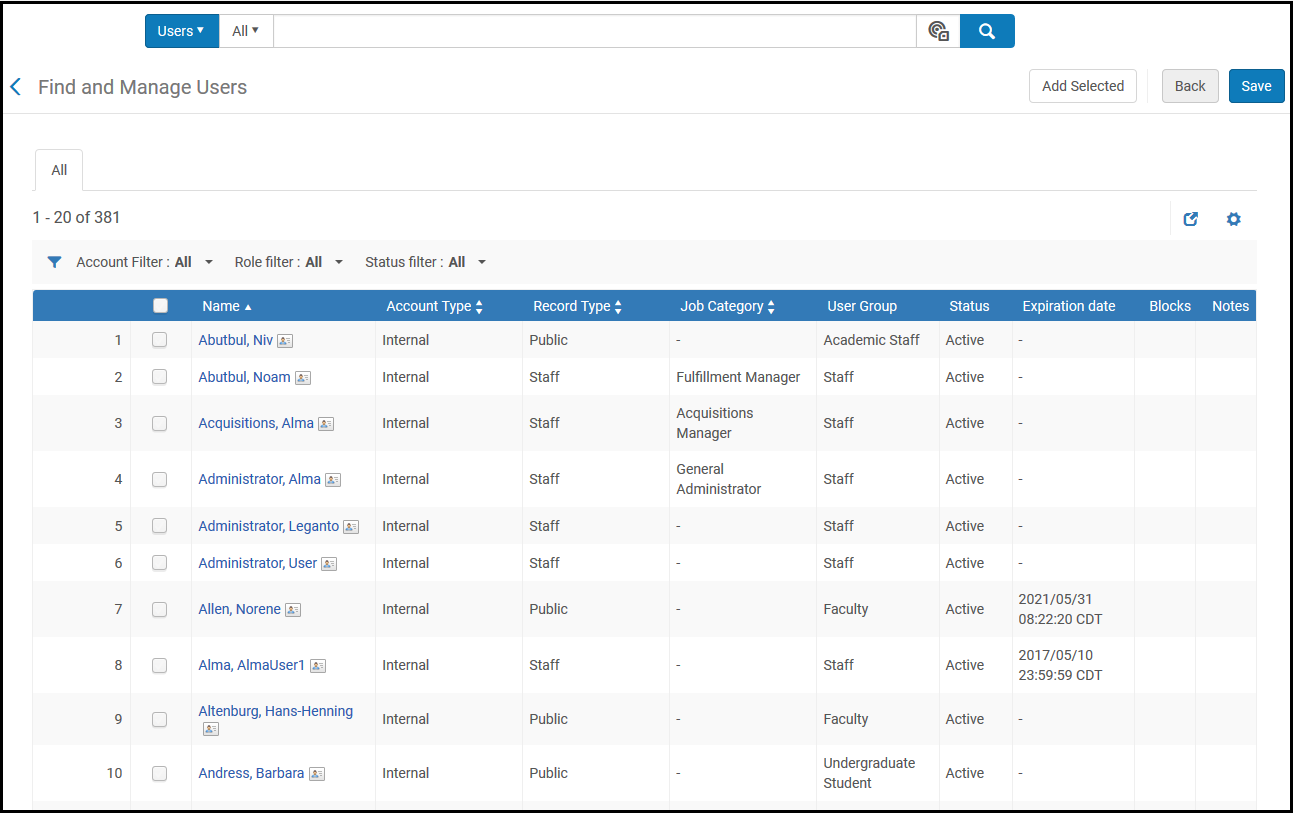
セットに含めたいアイテムを選択し、選択したものを追加するを選びます。選択したレコードがセットに追加されます。
アイテムセットの場合、レコードの検索・選択・追加を続行できます;ロジカルセットの場合、現在の検索クエリがセットを定義します。終了したら、完了を選択します。アイテムセットが保存されます。「セットの管理」ページが開き、新しいセットや更新されたセットが表示されます。
Esploro Sets
Esploroのセットを作成するオプションは、貴機関でEsploroが有効な場合にのみ表示されます。See Esploro Overview.
Researcher Sets
「研究者の検索と管理」ページが開きます。See Managing Researchers.
セットに含めたいアイテムを選択し、選択したものを追加するを選びます。選択したレコードがセットに追加されます。
アイテムセットの場合、レコードの検索・選択・追加を続行できます;ロジカルセットの場合、現在の検索クエリがセットを定義します。終了したら、完了を選択します。アイテムセットが保存されます。「セットの管理」ページが開き、新しいセットや更新されたセットが表示されます。
Research Asset Sets
リサーチアセットを検索できる汎用検索ページが開きます。簡易検索または詳細検索を使用して、セットに追加したいコンテンツを検索します。ページが更新され、検索結果が表示されます。For more information, see Managing Research Assets.
セットに含めたいアイテムを選択し、選択したものを追加するを選びます。The selected assets are added to the set.If the number of items is large, a Manage set members job is run to add the assets to the set; to see the results, see Viewing Completed Jobs.
アイテムセットの場合、アセットの検索・選択・追加を続行できます;ロジカルセットの場合、現在の検索クエリがセットを定義します。終了したら、完了を選択します。アイテムセットが保存されます。「セットの管理」ページが開き、新しいセットや更新されたセットが表示されます。
Creating an Itemized Set Based on Loan Status
フルフィルメント管理者またはリクエストオペレーターは、貸出ステータスに基づいて、冊子アイテムのアイテムセットを作成できます。これは、フルフィルメントセットの管理ページで行います。
このタイプのセットには、アクティブな貸出のみを含めることができます。
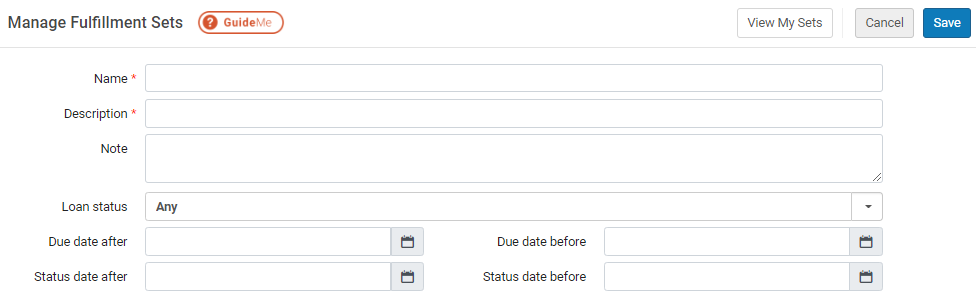
To create itemized physical-item sets based on their loan status:
- On the Manage Fulfillment Sets page (Fulfillment > Advanced Tools - General > Create Fulfillment Sets), fill in the fields as follows:
フルフィルメントセットの管理ページ フィールド
フィールド 説明 名前(必須) セットの名称。 Description (Required) セットの説明。 メモ セットに関するメモ。 以降の返却期日 示された日付以降の返却期日を持つアイテムの貸出がセットに含まれます。 以前の返却期日 示された日付以前の返却期日を持つアイテムの貸出がセットに含まれます。 以降のステータス日付 示された日付以降にステータスが変更されたアイテムの貸出がセットに含まれます。 以前のステータス日付 示された日付以前にステータスが変更されたアイテムの貸出がセットに含まれます。 貸出ステータス 示されたステータスに一致するアイテムの貸出がセットに含まれます。可能な値は以下の通りです: - 通常
- リコール
- 更新
- 紛失
- 返却済の申出あり
- すべて
- [保存]を選択します。The set is saved and the fields on the Manage Fulfillment Sets page are cleared, enabling you to create another fulfillment set.
「セットの管理」ページを開くには、マイセットの表示を選択します。
Viewing and Removing Members of Itemized Sets
アイテムセットのメンバー(選択したアイテム)を表示または削除できます。
To view members of an itemized set:
- On the Manage Sets page (Admin > Manage Jobs and Sets > Manage Sets), find the set and select Content in the row actions list.A list of members is displayed:
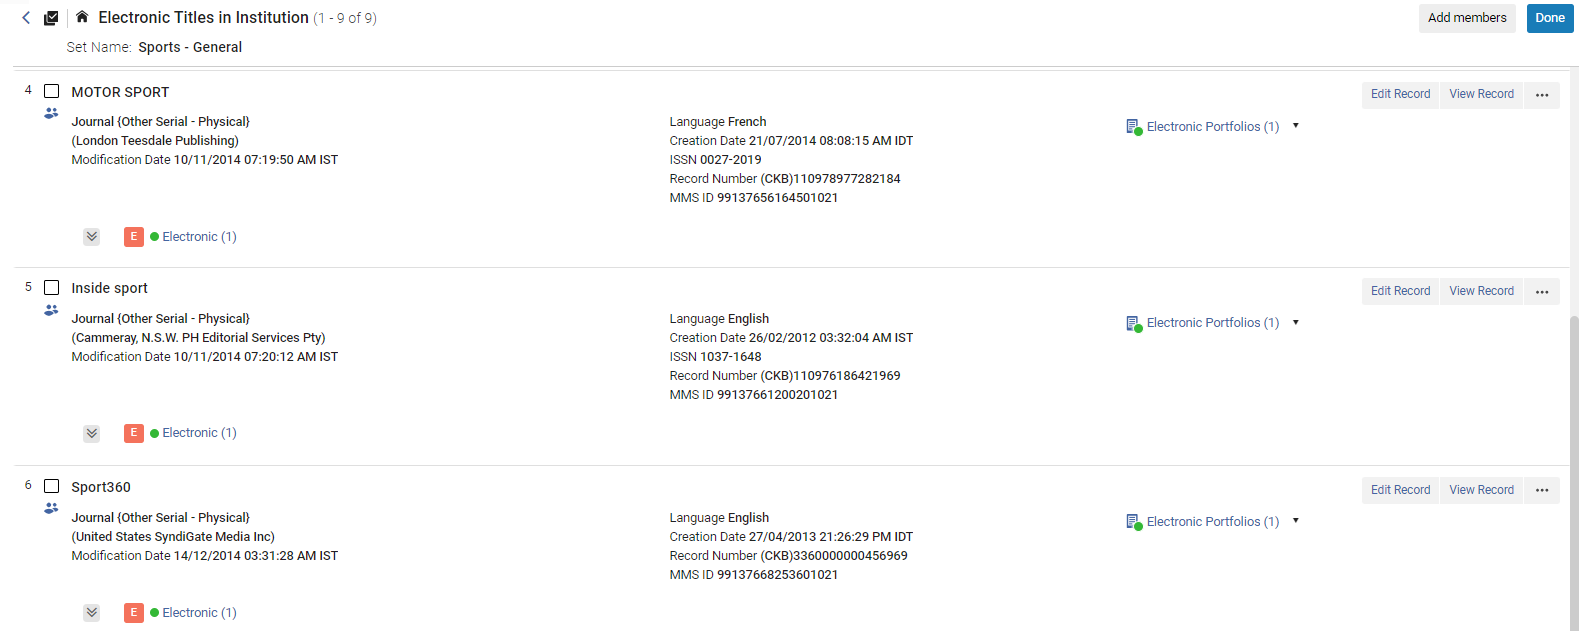
You can also view items in a set by selecting the View Set button when adding members to an itemized set (see Add items to an itemized set).
To remove one or more members of an itemized set:
- メンバーを表示します。
- 複数のメンバーの場合 – 削除したいメンバーを選択し、セットから削除を選択します。
- 1つのメンバーの場合 – その行のアクションリストで削除を選択します。
- [完了]を選択します。When removing members from a set, selecting Done or using the Back button saves the changes.
Another way to remove records is to create a set of unwanted records, then use the Combine Sets operation (see Combining Sets) with the 'Not' operator.
Editing Itemized Sets
セットの詳細は以下のように編集できます。
To edit the set details:
- On the Manage Sets page (Admin > Manage Jobs and Sets > Manage Sets), scroll to the itemized set you want to edit and select it.The Set Details are displayed in a split screen.
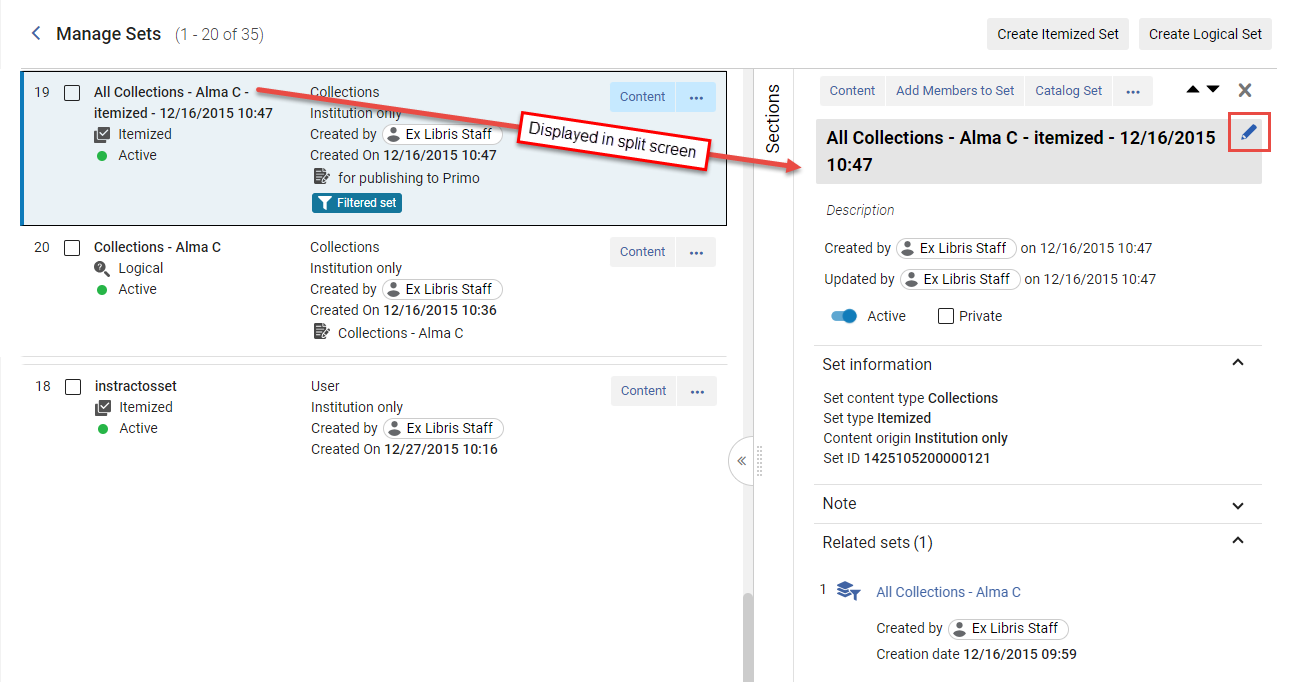
- In the split screen, hover over the section to edit and select the Edit icon (
 ).必要に応じてセットの詳細を変更します。The Set name is a mandatory field and must be unique (see Adding Itemized Sets for a description of the fields).
- When you navigate away from the section you updated, Alma saves your changes with the following indication (
 ).
Adding Items to Itemized Sets
Adding Items to Sets from Manage Sets
To add items to an itemized set from the Manage Sets page:
- On the Manage Sets page (Admin > Manage Jobs and Sets > Manage Sets), scroll to the itemized set to which you want to add items and select the Content button.The Edit page opens.Alternatively, you can select Add Members to Set from the row actions menu or from the details pane, and then enter the search parameters as per step 3 below.
- Select Add members and enter the search query.
- Enter the search parameters and select Search.
- Select the items you want to be included in the set and select Add selected, or select Select All.
- Select View Set to view the new set content.From here you can add new members to the set by selecting Add members or exit to the Manage Sets page by selecting Done.
Adding Items to Sets from All Titles
To add items to an itemized set from the All Titles search results page:
- On the All Titles search results page, select the items to add.
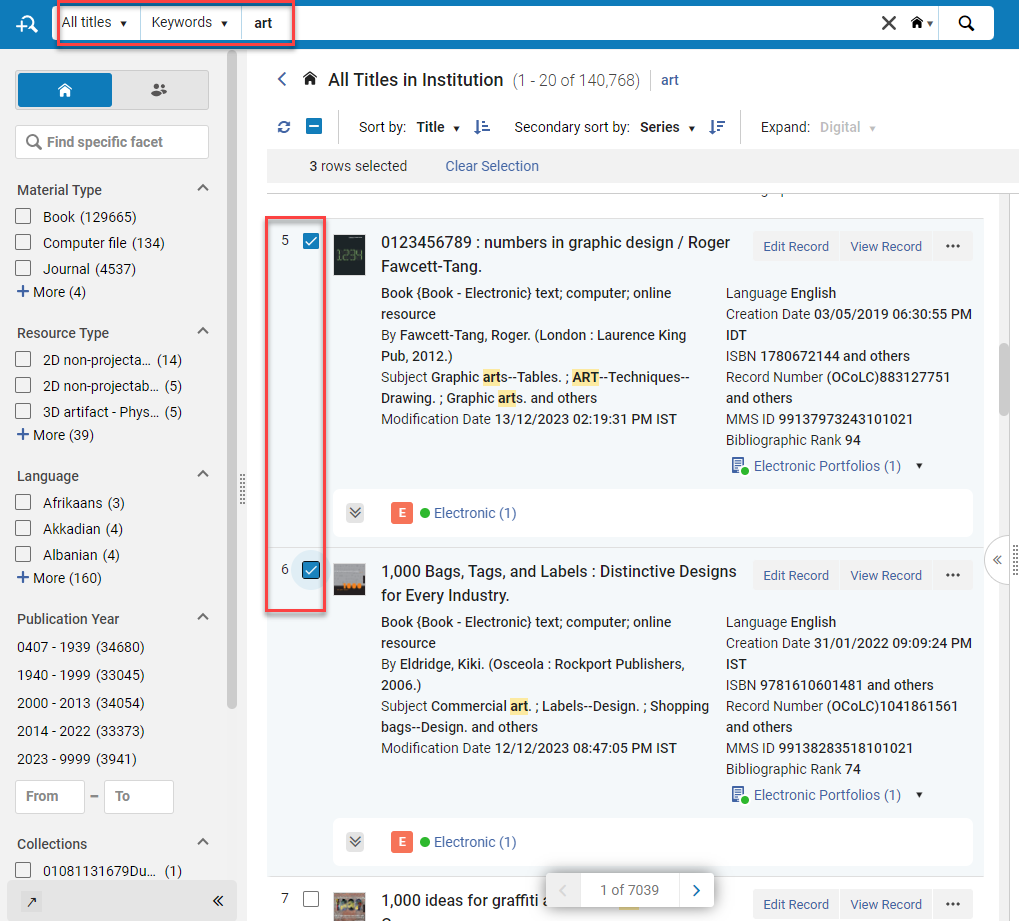
- Select the Add to Itemized Set button.

- Select the set to which you want to add the item/s and then the Select button.
Adding PO Lines to Sets
You can add PO lines to itemized sets from the PO lines list.To create itemized sets from PO lines, see Creating Itemized Sets from PO Lines.
To add PO lines to an itemized set from the PO lines task list:
- In the list of PO lines, select the PO line/s to add to the set.
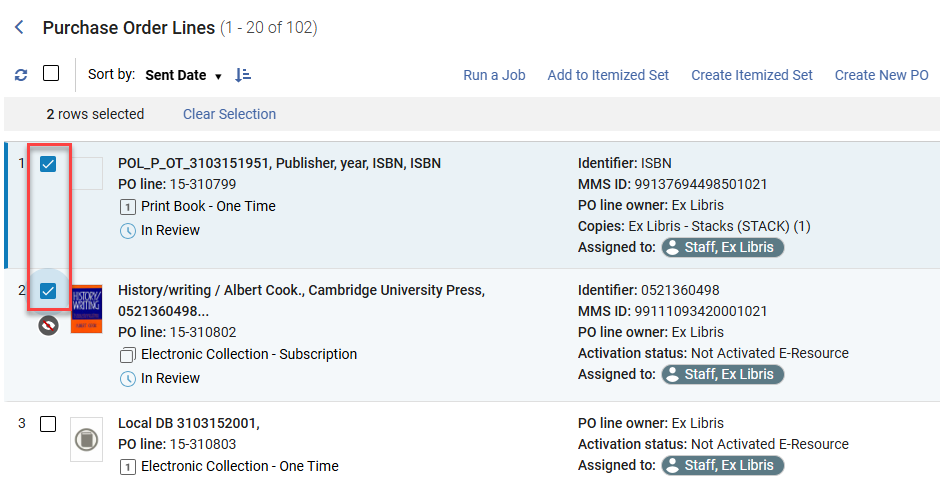
- Select the Add to Itemized Set button.

- Select the set to which you want to add the item/s and then the Select button.
Identifying Records Matching to Alma Records Based on Itemized Set
Institutions often get a list of record identifiers used in external systems (e.g. in a vendor system).You load this list to Alma and easily get a list of what you already have in Alma and what you don't have in Alma, in order to facilitate your purchasing decisions.
To get a list of records matching / not matching the Alma records:
- Load your input file of identifiers into Alma (see Creating Itemized Sets).Alma runs a job to create the set and produces the Add Members to Set report.
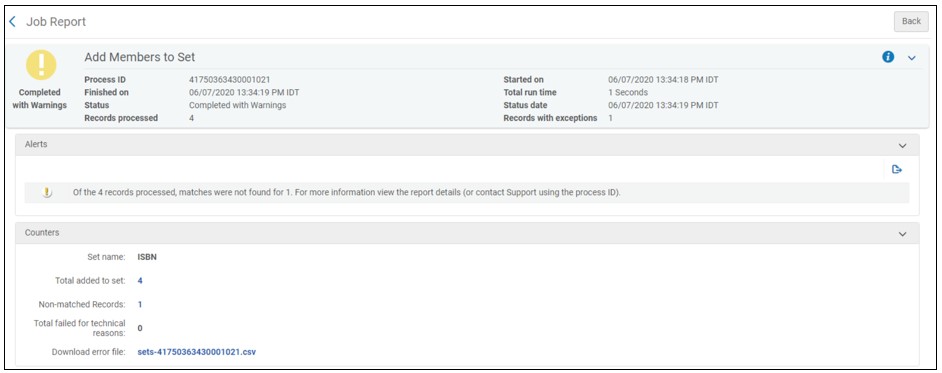
- 以下のうち一つを実行して下さい:
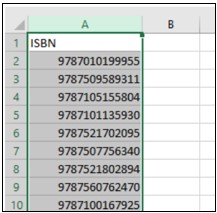
- To download a file of records for which a match was not found with Alma records, click the counter for Non-matched Records to download a .csv file of identifiers for which a match was not found with Alma records, for example:
- To download a file of records matching Alma records, click the counter for Total added to set to download a .csv file of identifiers for which a match was found with Alma records.The file features an additional column that indicates the ID of the records for which a match was found, for example:
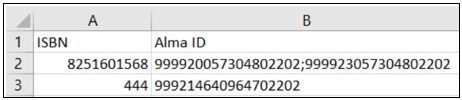
The file provides the following Alma ID for each set content type:セットコンテンツタイプ Alma ID コレクション PID デジタルファイル PID 電子コレクション PID 電子ポートフォリオ PID 冊子アイテム バーコード POL POL番号 リーディングリスト リーディングリストコード タイトル MMS ID ユーザー プライマリID ベンダー ベンダーコード
Creating Logical Sets
リポジトリセットの場合、ロジカルセットは保存されたクエリと同じです:論理セット内のアイテムは、クエリを実行することによって毎回決定されます。他の種類のセットの場合、検索ページで結果をフィルタリングすることによりロジカルセットが作成されます。
ロジカルセットは検索から作成することもできます。For more information, see Saving and Reusing Search Queries.
To create a logical set:
- On the Manage Sets page (Admin > Manage Jobs and Sets > Manage Sets), select the Create Logical Set button.The Set Details page opens.
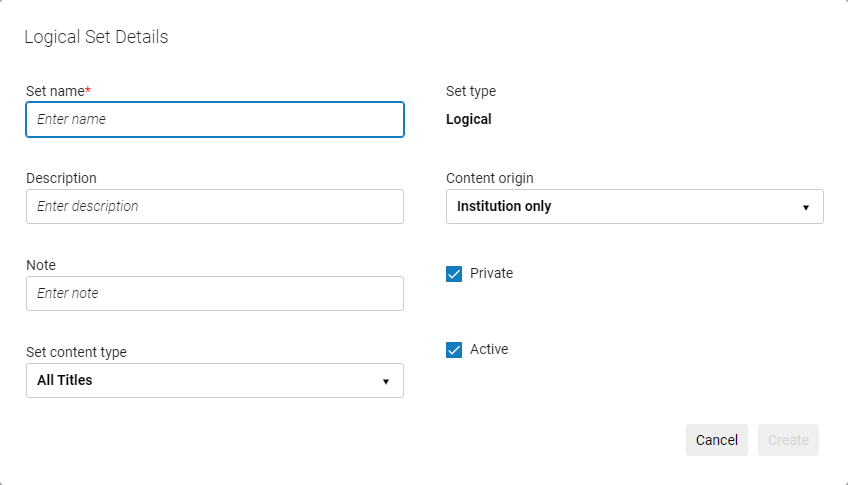
- 各フィールドにセットの詳細を入力します。Note that the Set name is a mandatory field and must be unique.
セット名に特殊文字を含めることはできません (例:&、#、$、%)。
- このページの冒頭で説明したように、セットのコンテンツタイプで使用可能なオプションは、権限によって異なります。
- By default, the set is designated as a Private() set.つまり、このセットはあなたとリポジトリマネジャーのロールを有するユーザーだけが使用できます。If you unselect the checkbox (), the set becomes a public set and is available to all other users.
- By default, the Status is set to Active().Optionally, unselect the checkbox () to make the set Inactive.Inactive sets cannot be selected by users when running a manual job.
- コンテンツの出典フィールドは、ソースレコードの出典を示し、機関のみに設定されています。
- 作成するを選択します。A search page opens for the content type you selected.
- リポジトリのセットの場合、セットの検索パラメータを入力します。リポジトリ検索の抑制パラメータは、メタデータエディタ経由で実施された抑制のみを考慮し、場所によって設定された抑制は考慮しないことに注意してください。For other kinds of sets, filter the list to determine the parameters for the set.
It is recommended not to use Keywords contains * as a basis for a logical set.A term such as Tag Suppressed (Title) equals "No" is more efficient.
- [保存]を選択します。ロジカルセットが保存されます。
Editing Logical Set Details
ロジカルセットの詳細を編集できます。To change the set contents, see Editing Logical Set Queries.
To edit a logical set:
- On the Manage Sets page (Admin > Manage Jobs and Sets > Manage Sets), scroll to the logical set you want to edit and select it.The Set Details are displayed in a split screen.
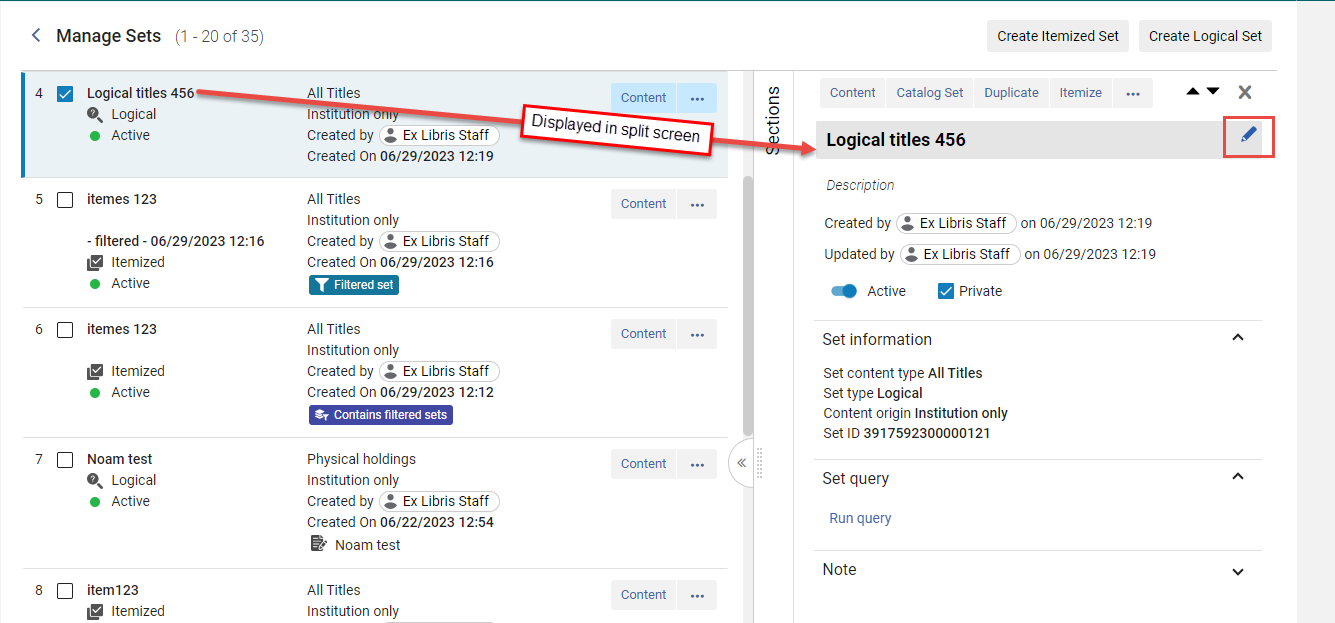
- In the split screen, hover over the section to edit and select the Edit icon ().必要に応じてセットの詳細を変更します。セット名は必須フィールドであり、他と重複してはいけません。(See Creating Logical Sets for a description of the fields).
- When you navigate away from the section you updated, Alma saves your changes with the following Saved indication ().
Viewing the Content of Logical Sets
論理セットのコンテンツ(つまり、論理セットを使用して検索を実行した際に返されるレコード)を表示できます。ロジカルセットの母集団は、現在リポジトリにあるレコードを反映して動的に決定されます。
To view the content of a logical set, on the Manage Sets page (Admin > Manage Jobs and Sets > Manage Sets), scroll to the logical set whose content you want to view and select Content.コンテンツタイプに応じて、検索ページが開きます:
ロジカルセットのクエリの編集
ロジカルセットのクエリを編集できます。
To edit resource management logical set queries:
- On the Manage Sets page (Admin > Manage Jobs and Sets > Manage Sets), scroll to the logical set whose query you want to edit and select the Content button.クエリの検索ページが開きます。
- Change the search as required.

- セットを保存するには、保存を選択し、確認します。
- You can also save the set under a new name - see Create a New Set from an Existing Logical Set Query.
Create a New Set from an Existing Logical Set Query
既存の論理セットクエリから新しいセットを作成することができます。
To create a new set from an existing logical set query:
- On the Manage Sets page (Admin > Manage Jobs and Sets > Manage Sets), scroll to the logical set whose query you want to use as the basis for the new set.
- Select the Content button.クエリの検索ページが開きます。
- 必要に応じて、検索クエリやファセットを変更します。
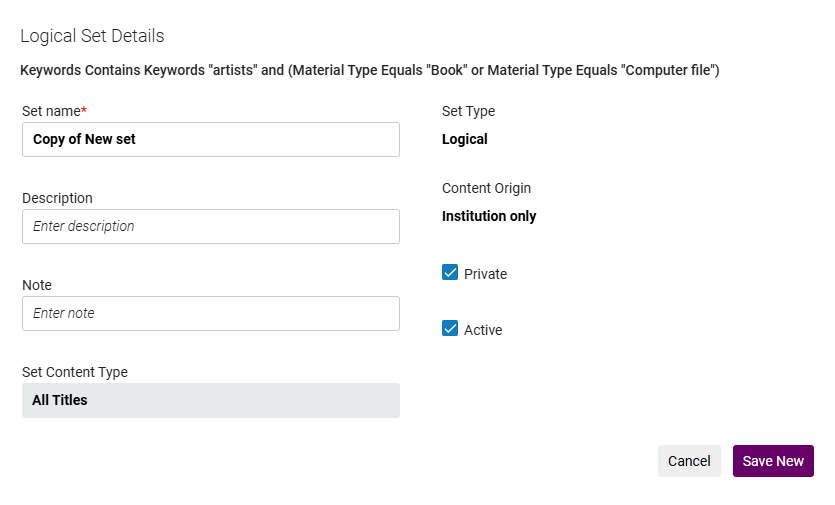
- Select the Save as New button.
- Update the Logical Set Details and select Save New.
ロジカルセットをアイテムセットに変換する
ロジカルセットに完全な結果セットがある場合は、それをアイテム別セットとしてキャプチャできます。これにより、元のロジカルセットが保持され、現在の結果のスナップショットが新しいアイテム別セットとして作成されます。
To convert a logical set to an itemized set:
- On the Manage Sets page (Admin > Manage Jobs and Sets > Manage Sets), scroll to the logical set that you want to convert to an itemized set and select Itemize in the row actions list.The New Itemized Set page opens with the set name filled in:
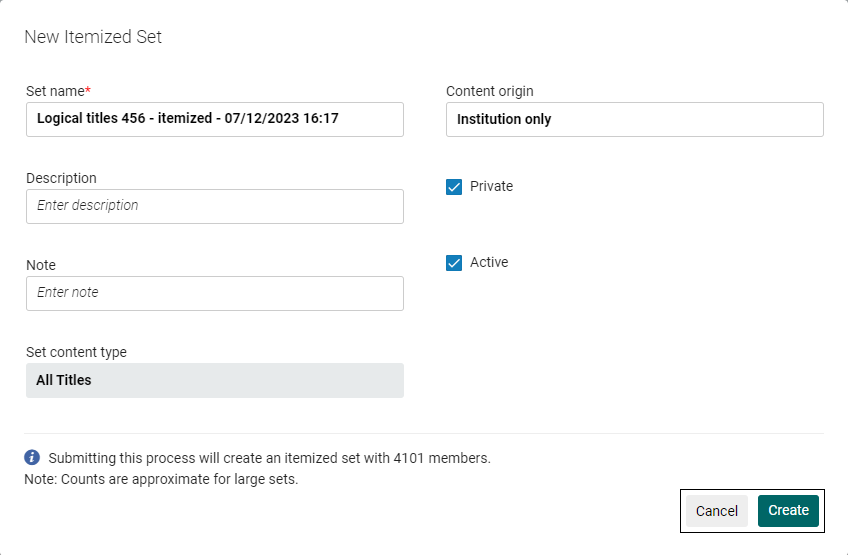
- 必要に応じてセットの詳細を変更します。See Creating Itemized Sets for a description of the fields.
- 作成するを選択します。A confirmation message opens.
- アイテム別セットが作成されます。It also appears in the Related sets section of the original logical set.The original logical set appears in the Related sets section of the itemized set (see Sections in the Manage Sets Page).
Combining Sets
2つの既存のセットが同じタイプである限り、これらのセットのメンバーに基づいて新しいセットを作成できます (たとえば、2つの「全タイトル」検索セットや2つの「冊子タイトル」検索セットなら可能ですが、1つの「全タイトル」セットと1つの「冊子タイトル」セットなら不可です)。結合されたセットは、アイテムセットになります。
You need the Repository Manager role to see the combined results of sets made by other users.
For more information on Combining Sets, see the Combine Two Sets of Items video (3:42 mins).
- On the Manage Sets page (Admin > Manage Jobs and Sets > Manage Sets), scroll to the set whose members you want to combine with another set and select Combine Sets in the row actions list.The Combine Sets page opens.
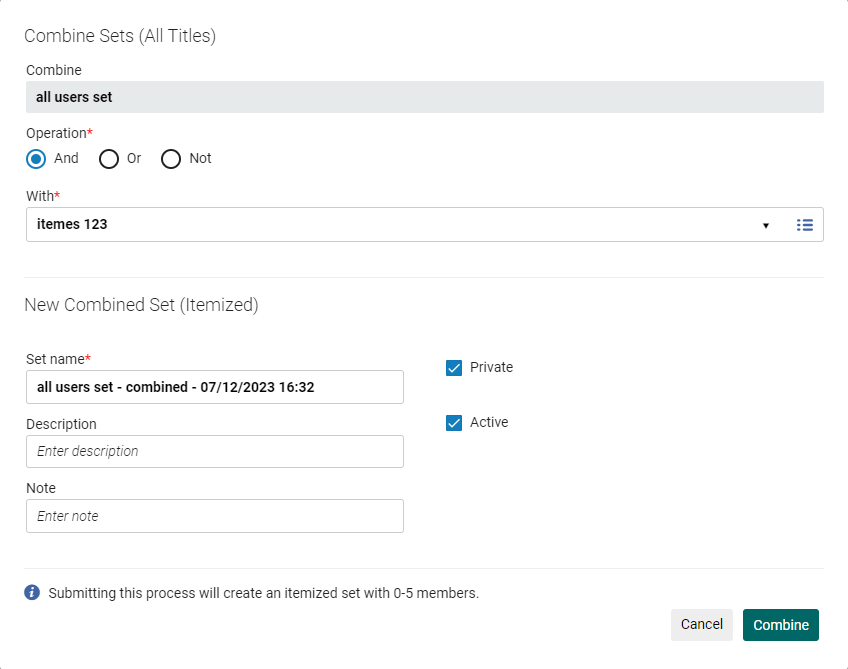
- 操作リストから操作を選択します:
- および – 新しく結合したセット内で、2つのセット間で共通するメンバーのみを含めます。
- ない – 新しく結合したセット内で、第二のセットではなく、第一のセットのメンバーのみを含めます。
- または – 新しく結合したセット内の両方のセットのメンバーすべてを含めます。
- 結合先で、選択した第一のセットと結合したいセットを選択します。
- セット名フィールドに、結合されたセットの名前を入力するか、Almaのデフォルト名を使用します。
- Select the Combine button.A confirmation message is displayed.
セットを結合するジョブが実行されます。ジョブが終了すると、新しいセットがセットのリストに追加されます (新しいセットを表示するにはリストを更新する必要があります)。
- Combined sets appear in the Related sets section (see Sections on the Manage Sets Page).
- The following badges are displayed on the combined sets:
- Combined set- The new combined set
- Used for combined sets- The original sets that were used to create the combined set
Combining Sets - Example
以下は、セットを組み合わせて次のようなセットを作成する例です:
XとY
To create this set:
- セットXとセットYを作成します。
- セットXについて、その行のアクションリストでセットを結合するを選択します。
- Combine set X with set Y:
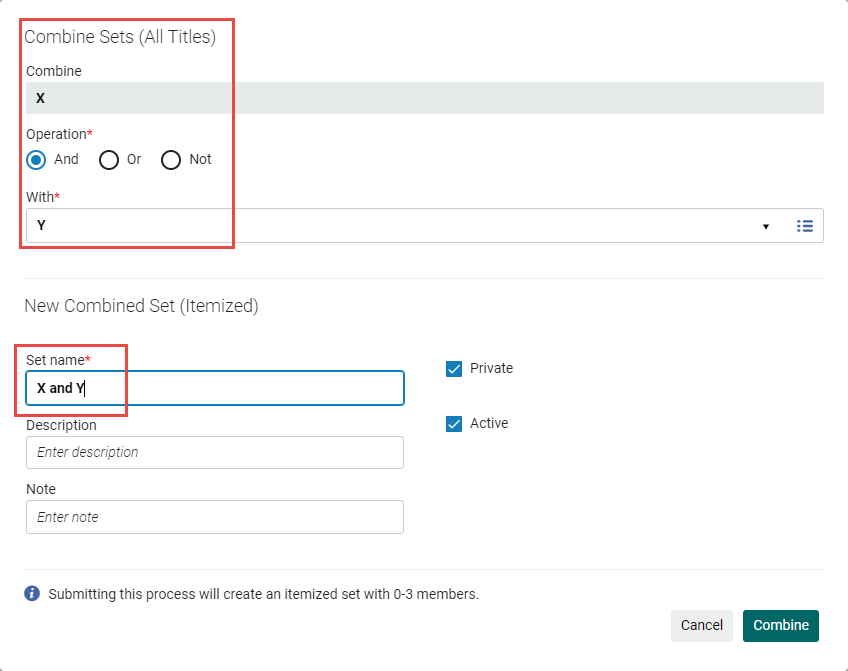
- 新しい組み合わせセットが利用可能になりました。
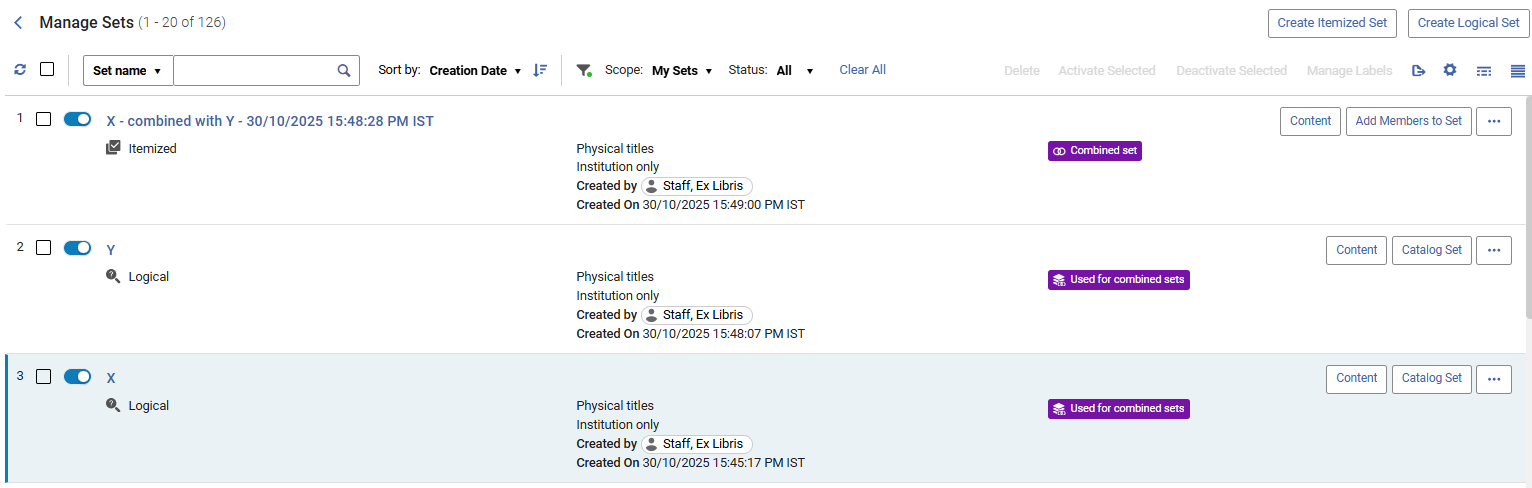
(New for February 2026) The new combined set receives an icon to indicate that it is a Combined set, and the sets used to create it are marked as Used for combined sets.
Creating a Titles Set from an Items, Portfolios, or Files Set
タイトルセットは、目録レコードのセットではなく、冊子アイテム、電子ポートフォリオ、デジタルファイルなどの書誌レコードのセットです。冊子アイテム、電子ポートフォリオ、またはデジタルファイルのアイテムセットからタイトルセットを作成できます。新しいセットには、元のセットのアイテムのタイトルが含まれます。
- タイトルセットは、リソース管理のコンテンツタイプからのみ作成できます。
- ロジカルセットからタイトルセットを作成するには、まずそのセットをアイテムセットに変換する必要があります。
To create title sets:
- On the Manage Sets page (Admin > Manage Jobs and Sets > Manage Sets), select Create title set in the row actions list for an itemized set of physical items, electronic portfolios, or digital files.The Create Titles Set (Itemized) page opens with information concerning the new title set - such as the date and time that the set was created - added to the set name.
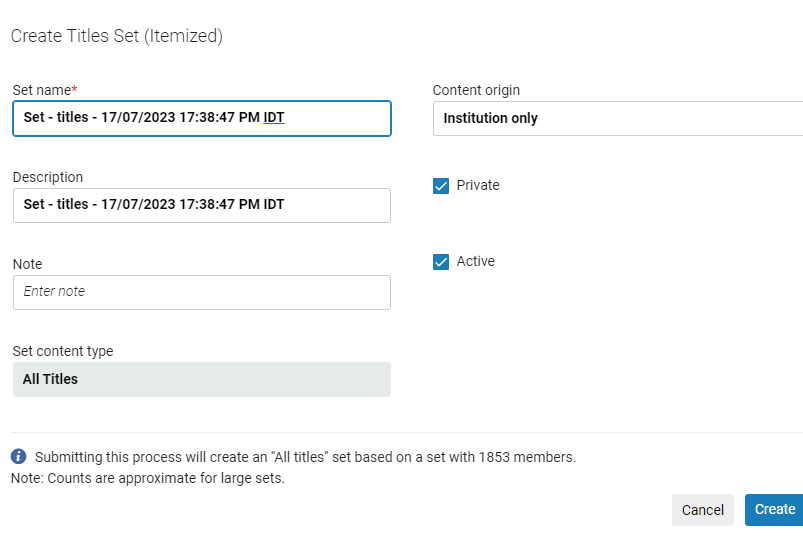
- 説明フィールドとメモフィールド (オプション) に入力し、作成を選択します。確認メッセージが表示されます。ジョブが実行され、タイトルセットが作成されます。
セットのフィルタリング
- フィルタリングセットは、リソース管理コンテンツタイプでのみ可能です。
- Filtering sets is possible only for sets derived by Title searches (All Titles, Physical Titles, Electronic Titles, Digital Titles).
- ユーザーは好みに基づいてフィルタを定義できます。フィルタリングされた検索は固定的であり、ユーザーがページを再訪問したときに保存されます。これにより、ユーザーは表示されたページの定義済みフィルタ設定を手動で再選択する必要がなくなります。
You can filter existing sets to create new itemized sets.フィルタリングセットは、索引化されていないメタデータ要素に基づくセットが必要な場合に役立ちます。属性が索引化されているかどうかにかかわらず、書誌レコードの内容に一致するレコードのみを含むようにセットを絞り込むことができます。
この機能は、表示ルールを使用して実装されます。表示ルールは、正規化ルールと同様に、柔軟なDroolsロジックを使用して、既存のセットをフィルタリングします (パブリックセットとプライベートセット両方)。Droolsロジックを使用すると、索引化されていないフィールドを含む可能性のある下記の例に示すように、セットをフィルタリングし、さまざまな特性に基づいて新しいセットを作成できます:
- 政府文書を除く (008フィールドのバイト28は#、空白、またはuに等しい)
- MARC 074または086フィールドを含まない書誌レコード
- 書誌レコードを印刷ジャーナルに制限する (リーダー06レコードタイプ= aか、リーダー07書誌レベル= s)
さらに、Droolsロジックを使用して、簡易書誌レコードや欠落したフィールドを確認できます。
For information about filtering sets, see the Filtering Sets Using Drools Logic video (3:24 mins).
To filter existing sets using indication rules:
以下の最初のいくつかのポイントでは、検索結果からフィルターセットページにアクセスする方法について説明します。Another way to reach the Filter Set page is from the the Manage Sets page (Admin > Manage Jobs and Sets > Manage Sets): locate the main set that you want to refine, and select Filter Set in the row actions list.
- 必要な表示ルールを作成し、MDエディターの共有フォルダに保存します。See Creating Indication Rules.
- Search for the items to include in the set by any of the repository Title searches (All Titles, Physical Titles, Electronic Titles, Digital Titles).
- 検索結果画面で、目的のアイテムを選択し、「クエリの保存とフィルタリング」をクリックします。セット詳細ページが開きます。
- Define your set (see Creating Logical Sets) and select "Save and Filter".A new page opens where you can create the filtered set while the main set is created in the background.
- Select Filter This Set to create an itemized filtered set.The Filter Set page is displayed.
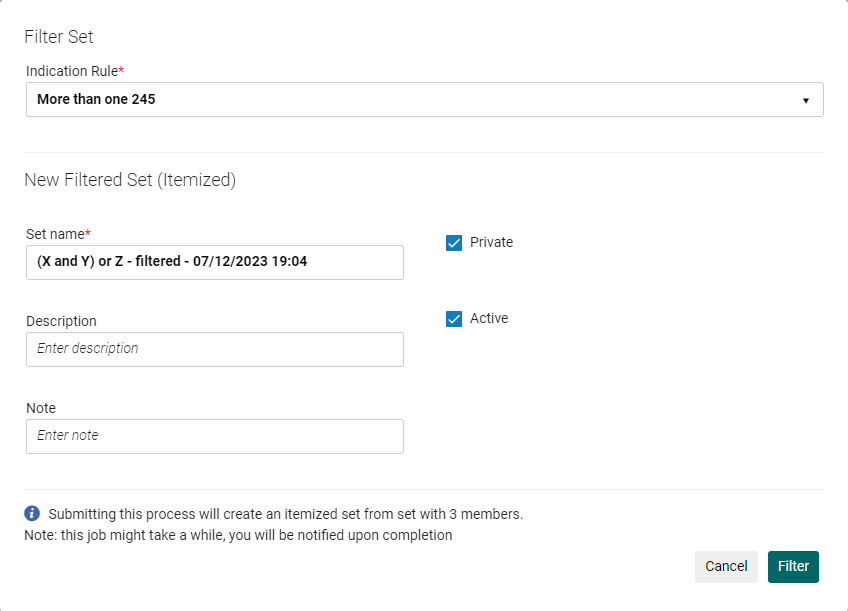
- 表示ルールを選択します。表示ルールをドロップダウンに表示するには、ルールがローカルかつパブリックである必要があることに注意してください
- 新しいセット名を入力するか、自動生成されたセット名を使用して、要件に合わせて残りのオプションに記入し、フィルタリングを選択します。A confirmation message is displayed.
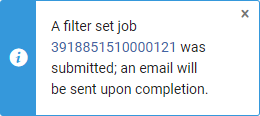
フィルタリングリクエストを処理するために、指示によるセットのフィルタリングジョブが実行され、新しいアイテムセットが作成されます。フィルタリングのプロセスは、メインセット内のすべてのレコードを調べて、指定された表示ルールを適用します。表示ルールの条件を満たさないレコードは、セットからフィルターで除外されます。ジョブが完了すると、システムはリクエストを開始したユーザーにEメールを送信します。
- 確認メッセージで「確認」を選択します。
- You can view progress or the job results for the Filter Set by Indication job on the Monitor Jobs page (see Viewing Running Jobs and Viewing Completed Jobs).結果を表示するには、アクション > リポートを選択します。リポートには、処理されたレコードの数と、新しくフィルタリングされたセットで作成されたレコードの数が表示されます。
- 新しいセットがメインセットの[セットの詳細]ページに表示されます。リンクをクリックして開きます。このページから指示ルールを選択して、別のフィルタリングされたセットを作成することもできます。
- このセットが作成された元のセットの同様のセクションが[セットの詳細]ページに表示され、フィルタリング処理されたすべてのセットがリスト表示されます。
- 元のセットは、新しくフィルタリングされたセットの関連セットセクションに表示されます。
- ジョブが完了すると、新しいセットと元のセットが「セットの管理」ページに表示されます。The new set appears with the Filtered set badge and the original set with the Used for filtered sets badge.
Saving Sets in the Network Zone
You can save a local set of bibliographic records in the Network Zone, in order to later make bulk changes to them using normalization rules.A set can only be built on the Institution Zone because the query uses search criteria from either localized fields in the bibliographic record or from the inventory (holdings, items, portfolio, etc.) Saving a local set to the Network allows you to apply the necessary normalization rules on the bib records.
This action runs a job that creates a set in the Network Zone containing only the records linked to the Network.
- この機能は、コンソーシアムの一部である機関でのみ利用可能です。
- この機能は、書誌とタイトルセットでのみ利用可能です。
To save a local set in the Network Zone:
- In the Manage Set page, create a new set of one of the following types:Physical titles,All titles,Electronic titles.You can create either logical or itemized set.
- Select Save In Network in the row actions list.
- 表示される画面で、ネットワークゾーン(NZ)で作成されるセットの名前を入力します。Follow the naming convention displayed in the field.The default name is '<original set name>_<member_institution> - date/time'.Prefixing the institution name to the set name will help you find the set in the NZ.

- Select Submit and then select Confirm in a confirmation message that opens.Alma sends a message saying that the job was created, and an email will be sent upon completion.
The Save Set in Network job is submitted and runs in the background in the IZ.The job is displayed in the member institution who initiated the action.「ネットワーク内でセットを保存する」のレポートはメンバー機関で生成されます。
プロセスが失敗した場合、たとえレコードの一部が処理されたとしても、NZでセットは作成されません。
