Working with App URLs
You enter URLs in various sections of the App Manager, particularly when creating a redirect for the end-user to select. There are several possible scenarios for linking with campusM:
- When linking within campusM, you can use the built-in URL builder in the App Manager.
- When linking from campusM to other applications, use the parameters as described in Linking to an External App.
- When linking from campusM to the Web, you can use normal links and use the URL builder to choose whether to open in the app or out of the app.
- When linking from anywhere else into campusM, you can use deep links with the parameters described in Using deep links to a Service or an Area in the app.
- You can also create a tile that, when selected, opens a prompt enabling the user to call a specified phone number.
Linking to an External App
Changes may occur in future in the schema of external apps - these are not reflected in this documentation.
To link to an external app, use the following URL:
Where:
As of iOS 10, Apple requires that the launch URL prefix for the external app is added to the allow list during the app build. Please open a Salesforce ticket to campusM Support to add the external apps to the allow list.
| Parameter | Value |
|---|---|
| app_name | Name of app to open. |
| ios_app_url | Define the URL of the external app to open on iOS, this depends on the 3rd party vendor supporting app deeplink. |
| android_app_url | Define the URL of the external app to open on Android, this depends on the 3rd party vendor supporting app deeplink |
| ios_store_url | (Optional) Appstore URL, in case the app is not yet installed clicking the tile directs the user to the app store to download the app. |
| android_store_url | (Optional) Google Play Store URL, in case the app is not yet installed clicking the tile directs the user to the app store to download the app. |
| prompt | (Optional) When not included in the URL, or when set to Y, the end-user is prompted if the app is not yet installed. |
| noandroidtoolbar (not shown) | (Optional) When set to Y, the navigation overlay toolbar (pictured below) will be hidden from the end-user.
|
The following example links to Twitter.
The information below is an example only.
| Parameter | Unencoded | Encoded |
|---|---|---|
| app_name | ||
| ios_app_url | =twitter://user?screen_name=_campusM_ | ios_app_url=twitter%3A%2F%2Fuser%3Fscreen_name%3D_campusM_ |
| android_app_url | android_app_url=http://twitter.com/_campusM_ | android_app_url=http%3A%2F%2Ftwitter.com%2F_campusM_ |
| ios_store_url | ios_store_url=https://itunes.apple.com/gb/app/twitter/id333903271?mt=8 | ios_store_url=https%3A%2F%2Fitunes.apple.com%2Fgb%2Fapp%2Ftwitter%2Fid333903271%3Fmt%3D8 |
| android_store_url | &android_store_url=https://play.google.com/store/apps/details?id=com.twitter.android | android_store_url=https%3A%2F%2Fplay.google.com%2Fstore%2Fapps%2Fdetails%3Fid%3Dcom.twitter.android |
| prompt | prompt=Y | prompt=Y |
As a URL:
To add this to HTML directly into service code, use:
The most common URL scheme is openURL. This opens any link, either in the native app webview, or externally in a browser app on your mobile device. Here is an example:
campusm://openURL?url=https://www.google.com
To open in an external browser app on any native device, append “type=external†to the URL as a query parameter:
campusm://openURL?url=https://www.go...&type=external
URLs passed into the openURL scheme should also be URL encoded. For example:
campusm://openURL?url=https%3A%2F%2Fwww.google.com
We also require the HTTPS protocol to be specified for cross-platform support, and do not support or recommend HTTP-only links.
Native apps URL Scheme examples:
- Cisco Jabber -ciscojabber://
- DoubleMap -doublemap://
- Flickr -flickr://
- Gmail -Gmail://
URL example:
campusm://launchapp?app_name=Gmail&ios_app_url=https%3A%2F%2Fmail.google.com&android_app_url=https%3A%2F%2Fmail.google.com&ios_store_url=https%3A%2F%2Fapps.apple.com%2Fus%2Fapp%2Fgmail-email-by-google%2Fid422689480&android_store_url=https%3A%2F%2Fplay.google.com%2Fstore%2Fapps%2Fdetails%3Fid%3Dcom.google.android.gm%26hl%3Den_US&prompt=Y
- Maze Maps -mazemap://
- One Drive -ms-onedrive://
- Outlook -ms-outlook://
URL example:
campusm://launchapp?app_name=Outlook&ios_app_url=ms-outlook%3A%2F%2F&android_app_url=ms-outlook%3A%2F%2F%0A&ios_store_url=https%3A%2F%2Fapps.apple.com%2Fgb%2Fapp%2Fmicrosoft-outlook%2Fid951937596&android_store_url=https%3A%2F%2Fplay.google.com%2Fstore%2Fapps%2Fdetails%3Fid%3Dcom.microsoft.office.outlook%26hl%3Den_GB&prompt=Y
- Skype for business -ms-sfb://
- Unit4/Agresso -
- AgressoTasks://
- AgressoReports://
- accom.unit4.AgressoTimesheets://
- UNIT4Me://
-
Zoom -
- iOS -https://apps.apple.com/us/app/zoom-cloud-meetings/
- Android -zoomus://
URL example:
campusm://launchapp?app_name=Zoom&io...en_GB&prompt=Y
- Canvas Teacher -
- iOS -canvas-teacher://
- Android -canvas-teacher://
URL example:
campusm://launchapp?app_name=canvas-teacher&ios_app_url=canvas-teacher%3A%2F%2F&android_app_url=canvas-teacher%3A%2F%2F%0A&ios_store_url=https%3A%2F%2Fapps.apple.com%2Fus%2Fapp%2Fcanvas-teacher%2Fid1257834464&android_store_url=https%3A%2F%2Fplay.google.com%2Fstore%2Fapps%2Fdetails%3Fid%3Dcom.instructure.teacher%26hl%3Den&prompt=Y
The above information regarding External Application prefixes should only be treated as a guide. Sometimes external application prefixes change.
Contact your Application Provider directly. If one stops working, we recommend you contact your Application Provider directly.
Linking to a Service or Area in the App
To link to a service or other area of the app, use any of the following URL formats:
Parameters in the URL scheme are inserted here in square brackets:[value]. When constructing your own links,do not include these square brackets.
| Area | URL | Notes |
|---|---|---|
| App home page | campusm://home | Loads the home page |
| App Search |
campusm://search |
Loads the home page and opens the search tab to allow the user to perform a search |
| Calendar | campusm://opencalendar | Opens the campusM Calendar. |
| App Feedback | campusm://feedback | Links through to the App Feedback section in the App Settings |
| Arrange Home Screen | campusm://arrange | Links to the Arrange page, where an end user can rearrange their tiles |
| App with the specified menu option selected | campusm://menu=[your menu option ID] | You can see a menu option ID when adding a link to the menu option in the App Builder as an Action URL, in the static content simple WYSIWYG HTML editor, or as a location action. In any of these cases, when you select the field to enter the link, the link selector appears. Enter the name, or part of the name, of the menu option and you will see the link in the selector. The ID is the last part of the link.
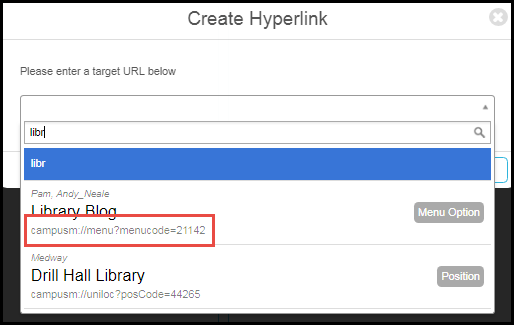 The final link will always look something like this: campusm://menu?menucode=12345. |
| Static content service | campusm://pocketguide?pg_code=[static content service ID] | You can see a static content service ID when adding a link to the service in the App Builder as an Action URL, in the static content simple WYSIWYG HTML editor, or as a location action. In any of these cases, when you select the field to enter the link, the link selector appears. Enter the name, or part of the name, of the service and you will see the link in the selector. The ID is the last part of the link.
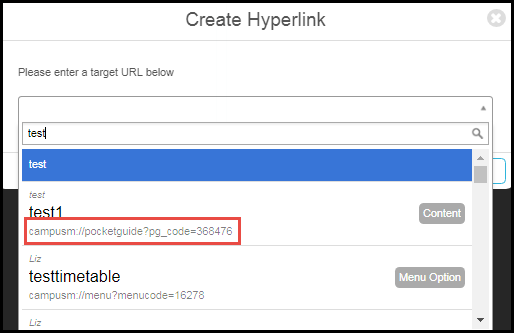 The final link will always look something like this: campusm://pocketguide?pg_code=123456. |
| AEK service |
campusm://loadaek?toolbar=[toolbar code]&sid=[sid]&otherparameter1=[AA]&otherparameter2=[BB] |
To get the menu option ref code, open the service for editing (AEK > App Extension Kit > AEK Menu Options) and copy the value in Component type. The value will look something like AEK12345.
Alternately, in the App Builder, select the service, select Code, and copy the value of menuRefCode. For example:"menuRefCode": "AEK16368", The optional "sid" parameter is the service id when an AEK component needs to send the user ’s credentials. You can find the ID required for this by opening the record for the credentials used by the AEK screen under “App Settings†> “Authentication Accessâ€, and once you ’ve got the details page open its URL should be in the form https://appmanager.ombiel.com/app-se...iceaccess/[sid here]/. The "otherparameter" values can be called anything, and set to anything (e.g. "firstname=John") and will be passed to the AEK page. You don't have to set any of these. The final link will always look something like this: campusm://loadaek?toolbar=AEK1234 |
| Map location | campusm://uniloc?posCode=[location code] | To get the location code, open the location for editing (App Settings > Maps/Locations > Positions) and copy the location code from the URL. For example:
https://.../app-settings/CampusM/position/44227/ Alternatively, if you have defined a value for Customer Location Reference for the location, you can use that as the location code. The final link will always look something like this: campusm://uniloc?posCode=1234 |
|
Location Categories
|
campusm://uniloc?mapCode=[map code]&locCode=[category code]
|
To link to a location category for a map, the URL format must be: campusm://uniloc?mapCode=[map code]&locCode=[category code], where the Map Code and Location Code can be found in the URL when selecting the respective configuration in App Manager (App Settings > Maps/Locations > Location Categories). For example: https://.../app-settings/CampusM/loc...category/5639/ The final link will always look something like this: campusm://uniloc?mapCode=1&locCode=2 |
| App home page with the indicated profile selected | campusm://switchprofile?profile_id=[profile ID] | To get the profile ID, open the profile for editing (App Settings > Enterprise Roles > App Profiles) and copy the profile ID from the URL. For example:
https://.../app-settings/CampusM/userappprofile/3282/ Note that switching profiles does not currently work with single sign-on. Additional parameters for this URL include:
The final link will always look something like this: campusm://switchprofile?profile_id=1234 |
| Profile deep link (web only) |
https://NAEM.campusm.exlibrisgroup.c.../[profileCode] |
Obtain a profile code by using the Base URL followed by the profile registration authentication code listed in App Manager > App Settings > Profile Registration Authentication. |
| "My Profile" instance |
campusm://productscreen/myprofile/myprofile/[My Profile ID] |
You can find the My Profile ID by editing the desired instance of My Profile in App Manager, and looking at the last part of the URL in your browser. |
Using deep links to a Service or an Area in the app
To link to a service or an area in the app from outside the app, you can use deep links.
If the app is installed on the device, the link opens the app directly to the specific content. If the app is not installed, the link then opens in the default browser.
If the user is not authenticated, the system prompts for login using SAML/OAuth and only then redirects to the intended destination.
Use the following formats to build the deep link URLs:
- Parameters in the URL scheme are inserted here in square brackets:[value]. When constructing your own links,do not include these square brackets.
- The [campusM URL] parameter is found in App Manager> App Settings > App Configuration > Web hostname. When constructing your own links,do not include these square brackets.
- Deep links into Preview Environments are not expected to work, and will always attempt to open the production app. For testing Deep Links, we recommend using Sandbox instead.
For more information, see Deep Links. (2:45 min)
|
Area |
URL format | Notes |
|---|---|---|
| AEK Service | [campusM URL]/campusm/deeplink?feature=loadaek&toolbar=[toolbar Code]&sid=[sid]&otherparameter1=[AA]&otherparameter2=[BB] | To get the menu option ref code, open the service for editing (AEK > App Extension Kit > AEK Menu Options) and copy the value in Component type. The value will look something like AEK12345.
Alternately, in the App Builder, select the service, select Code, and copy the value of menuRefCode. For example:"menuRefCode": "AEK16368", The optional "sid" parameter is the service id when an AEK component needs to send the user ’s credentials. You can find the ID required for this by opening the record for the credentials used by the AEK screen under “App Settings†> “Authentication Accessâ€, and once you ’ve got the details page open its URL should be in the form https://appmanager.ombiel.com/app-se...iceaccess/[sid here]/. The "otherparameter" values can be called anything, and set to anything (e.g. "firstname=John") and will be passed to the AEK page. Including these parameters is optional, and depend on your specific AEK setup. |
| App Feedback | [campusM URL]/campusm/deeplink?feature=feedback | Links through to the App Feedback section in the App Settings. |
| Attendance (Lecturer) | [campusM URL]/campusm/deeplink?feature=attendance-lecturer | Links through to the Attendance feature for lecturers. |
| Attendance (Student) | [campusM URL]/campusm/deeplink?feature=attendance-student | Links through to the Attendance feature for students. |
| Calendar | [campusM URL]/campusm/deeplink?feature=calendar | Links through to the Calendar feature. |
| Events | [campusM URL]/campusm/deeplink?feature=events&instance=[instance] |
Links through to the Events feature. You can find the instance by editing the desired instance in App Manager, and looking at the last part of the URL in your browser. |
| Map Location | [campusM URL]/campusm/deeplink?feature=uniloc&posCode=[location code] | To get the location code, open the location for editing (App Settings > Maps/Locations > Positions) and copy the location code from the URL. For example:
https://.../app-settings/CampusM/position/44227/ Alternatively, if you have defined a value for Customer Location Reference for the location, you can use that as the location code. |
| Location Categories | [campusM URL]/campusm/deeplink?feature=uniloc&mapCode=[mapCode]&locCode=[category code] |
To link to a location category for a map, the URL format must be: campusm://deeplink?feature=uniloc&mapCode=[mapCode]&locCode=[category code], where the Map Code and Location Code can be found in the URL when selecting the respective configuration in App Manager (App Settings > Maps/Locations > Location Categories). For example: https://.../app-settings/CampusM/loc...category/5639/ The final link will always look something like this: campusm://deeplink?feature=uniloc&mapCode=1&locCode=2 |
| Newsfeed | [campusM URL]/campusm/deeplink?feature=newsfeed&instance=[instance] |
Links through to the Newsfeed feature. You can find the instance by editing the desired instance in App Manager, and looking at the last part of the URL in your browser. |
| My Profile | [campusM URL]/campusm/deeplink?feature=my-profile&instance=[myProfile instance id] | You can find the My Profile ID by editing the desired instance of My Profile in App Manager, and looking at the last part of the URL in your browser. |
| Static content service | [campusM URL]/campusm/deeplink?feature=pocketguide&pg_code=[static content service ID] | You can see a static content service ID when adding a link to the service in the App Builder as an Action URL, in the static content simple WYSIWYG HTML editor, or as a location action. In any of these cases, when you select the field to enter the link, the link selector appears. Enter the name, or part of the name, of the service and you will see the link in the selector. The ID is the last part of the link.
The final link will always look something like this: |
| Polls | [campusM URL]/campusm/deeplink?feature=polls&instance=[instance] |
Links through to the Polls feature. You can find the instance by editing the desired instance in App Manager, and looking at the last part of the URL in your browser. |
| Switch Profile | [campusM URL]/campusm/deeplink?feature=switchprofile&profile_id=[profile id] |
Links to a direct profile switch.Profile ID determines the profile to which the link switches the current profile. You can find the My Profile ID by editing the desired instance of My Profile in App Manager, and looking at the last part of the URL in your browser. |
Using Token Attributes in Links
If you need to use a CMAuth token attribute as a part of a link on a tile, you can do so by adding a placeholder for the attribute you want to use.
This functionality only works for query parameter values.
All placeholders must start with cmattr_, followed by the name of the token attribute you wish to include. Several of these are hard-coded:
- cmattr_username
- cmattr_mail
- cmattr_firstName
- cmattr_lastName
The rest come from the "Additional Mappings" list in the Integration Profile associated with your CMAuth login.
For a placeholder to work, the suffix must exactly match the attribute name that has been mapped in the profile. For example, if it has a mapping named AlmaID, then the resulting attribute placeholder would be:
cmattr_AlmaID
The attribute name must be alphanumeric, and the only separator allowed is “_â€.
This is an example of how this would look in an openURL scheme (with everything URL encoded correctly):
campusm://openURL?url=https%3A%2F%2F...Dcmattr_AlmaID
This would create the following link, with “cmattr_AlmaID†replaced with the user ’s actual Alma ID value:
https://www.google.com?myID=cmattr_AlmaID
Other profiles are not supported; this system pulls the data from the token you get from logging in, and not from tokens that come from secondary authentications (like the Canvas PI).
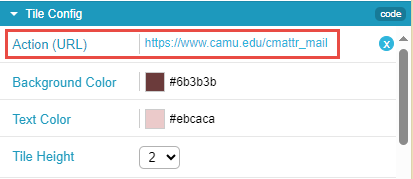
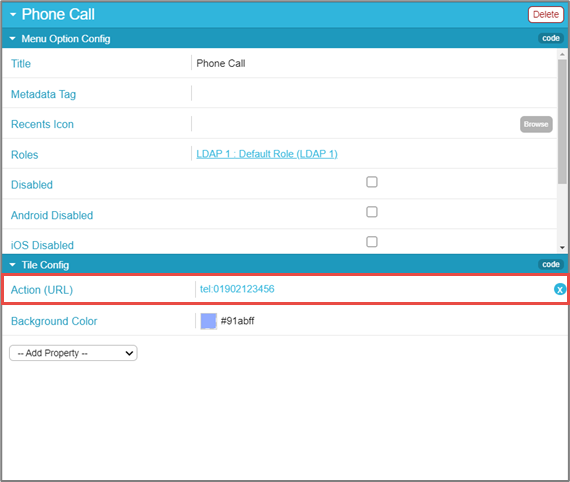
Adding a Phone-Number Link to a Tile
You can define an ActionURL for a Menu Option (tile) that initiates a prompt to a user to make a call to a defined telephone number. On mobile devices, this option can simplify the process of making calls to support services or security services where a phone call is required.
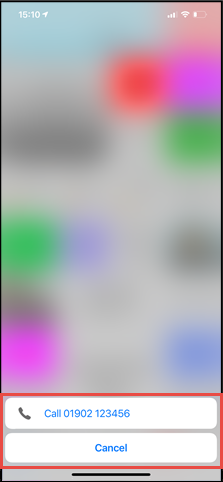
- In the App Builder, in the configuration of the menu option, under Tile Config, add the Action (URL)tel:[phone number].
Page tags: article:topiccontent:Documentationproduct:campusmlang:englishcommunity:training_materials