
Integration XSL Converters
The following role is required to define XSL converters:
- General System Administrator
When importing users to Alma from SIS systems that use other data formats than Alma, you can convert data from the source system formats to the format required by Alma.
Currently, this is possible for the following integrations (see Student Information Systems):
- SIS import
- SIS synchronization
You can upload and manage XSLT converters from the Integration XSL Converters page (Configuration Menu > General > External Systems), as well as share converters in the Community Zone.
- When uploading an XSL file, there is no strict character limit, and the full content is processed.
- When editing an XSL file, the XSL must be 4096 characters or fewer in order to be supported.
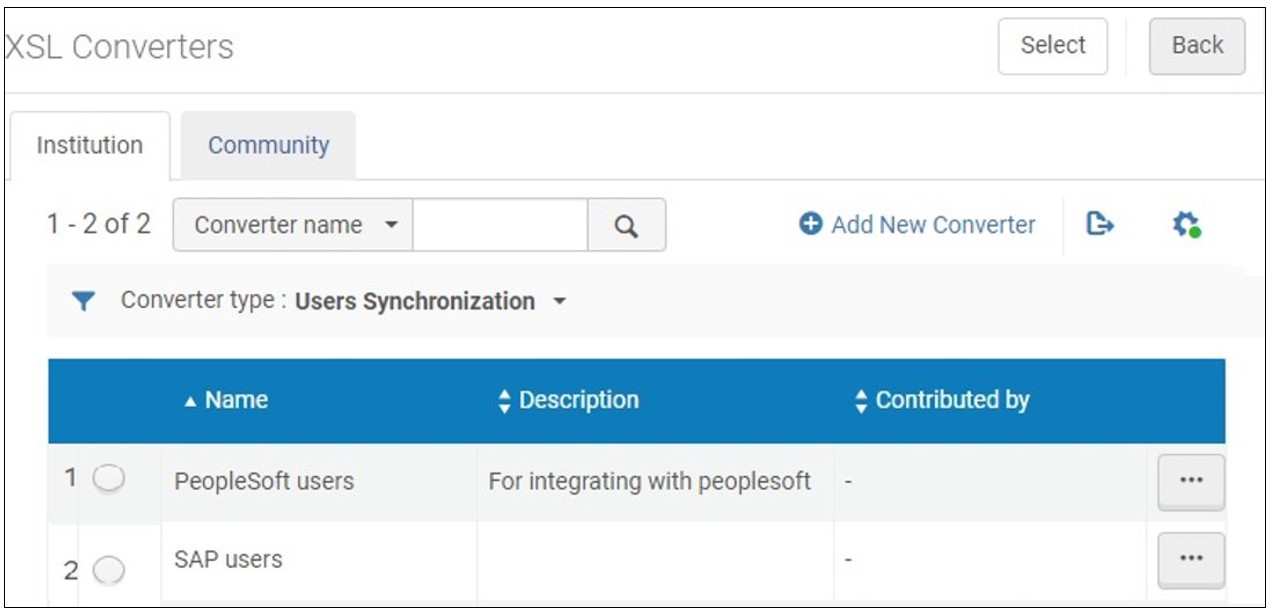
On this page, you can do the following:
- Upload XSLT converters
- Edit XSLT converters
- Validate XSLT converters and preview results on a demo file
- Share XSLT converters between institutions
Once the XSLT converter has been defined and validated, you can apply it to Integration Profiles, see Student Information Systems.
Uploading XSLT Converters
- Open the Integration XSL Converters page (Configuration Menu > General > External Systems).
- Select Add New Converter. A dialog box opens.
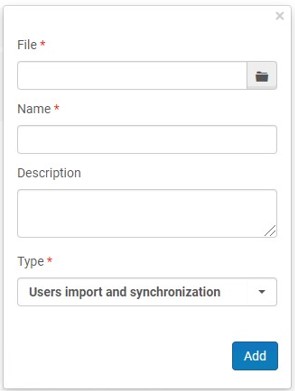
- Browse to upload the file.
- Enter the file name. The file must have the *xsl suffix and must have a valid XML structure.
- Select the type. Currently, the only type that is enabled is Users import and synchronization.
Editing XSLT Converters
- Open the Integration XSL Converters page (Alma Configuration > General > External Systems).
- Select a converter and click Edit in the row actions list. A screen opens where you can edit the converter.
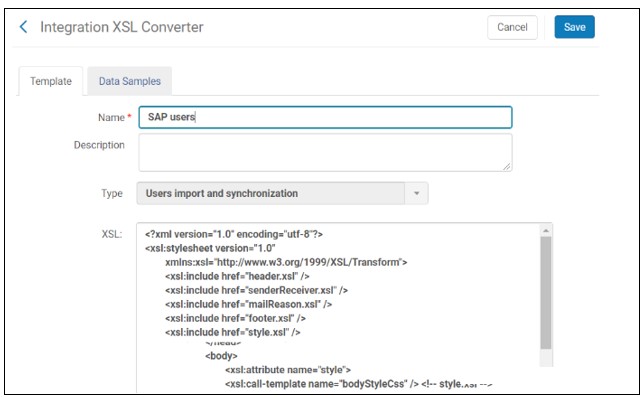
- On the Template tab, you can edit the name and description, and the raw XSL text.
- Select Save to save your changes.
Validating XSLT Converters
You can upload a sample file to validate the converter against the relevant XSD according to the converter type.
You can open the XML file to modify and download it.
- Open the Integration XSL Converters page (Configuration Menu > General > External Systems).
- Select a converter and select Edit in the row actions list.
- Open the Data Samples tab.
- Click Upload sample (XML), then browse for the data sample file and upload it.

- To modify the XML file and download it, select Edit in the row actions list, edit the file and select Download XML.
- To preview the resulting XML file, select Preview in the row actions list, select the particular converter type
- To delete the data sample file from the list, select Delete in the row actions list.
Contributing XSLT Converters to the Community Zone
Institutions spend many hours creating XSLT converters. To save time and effort, librarians can contribute these converters to the Community Zone and copy and use the converters that other institutions contributed to the Community Zone. Once the converter has been copied to the institution, the institution can make changes to it in order to customize it for its needs.
Contributed XSLT converters appear in the Community tab on the Integration XSL Converters page. Copied converters appear in the Institution tab.
The Aleph to Alma converter of integration type 'Users import and synchronization' was contributed to the Community Zone by Ex Libris.
- From the row actions, select Contribute for an XSLT converter on the Institution tab of the Integration XSL Converters page (Configuration Menu > General > External Systems). A confirmation message opens.
- Edit the name and description in the message, and add a contact person, as relevant. Then select Yes in the confirmation message. Upon confirmation, the converter is copied to the list of converters in the Community tab and can be copied by any institution.
- Open the Community tab on the Integration XSL Converters page (Configuration Menu > General > External Systems).
To view the XSLT converter, select View from the row actions. The profile details appear.
- Select Copy in the row actions list of the converter. The converter is copied to your institution and the new converter is opened for editing. The converter is copied and its status is Inactive by default.
- Edit the converter details to match your requirements.
- When you are done, select Save.
- Select the Institution tab to view the converter that you copied.
- Select Delete in the row actions list of the converter and select Confirm in the confirmation dialog box.
The converter is no longer available to other institutions. However, it is not deleted; you can continue using it in the Institution tab. Also, if another institution already copied this converter, the deletion of your converter has no effect on their local copy.
Page tags: article:topicproduct:almacontent:Documentationlang:english
