
Managing Search Queries and Sets
Any role that can perform a repository search can save a query in order to create a set and manage sets(a user can only manage sets created by that user).
However, users can do so only for content types with which a user is allowed to work according to user's role.
Necesita el rol de Gestor de repositorios para ver los resultados combinados de los conjuntos realizados por otros usuarios. The Repository Manager can see/edit/delete public and private sets.
The following roles are required depending on the content type of the set:
- Para conjuntos del tipo de contenido de Adquisición, se requiere uno de los siguientes roles:
- Operador de compras/Gestor de compras (únicamente conjuntos de línea de orden)
- Gestor de Proveedores (únicamente conjuntos de proveedor)
- Administrador de adquisiciones
- Administrador general del sistema
- Para conjuntos de usuarios, se requiere uno de los siguientes roles:
- Gestor de usuarios
- Administrador de usuarios
- Para conjuntos de listas de lecturas recomendadas y cursos, se requiere uno de los siguientes roles:
- Operador/Gestor de reservas de curso
- Operador/Gerente de servicios al usuario
- Para gestionar un conjunto de activos de investigación, Esploro debe estar habilitado para su institución y usted debe tener el siguiente rol:
- Gerente de activos de investigación
- Para gestionar un conjunto de investigadores, Esploro debe estar habilitado para su institución y usted debe tener el siguiente rol:
- Gerente de investigadores
- Para eliminar registros de conjuntos creados por otros, se debe poseer el rol de Gestor de repositorio.
- Para ver los resultados combinados de los conjuntos realizados por otros usuarios, debe tener el rol de Gestor del repositorio.
Los conjuntos son colecciones de registros en Alma. They can be created manually, as a list built up item-by-item by the user, or dynamically, in which case the set is a saved search query whose results are determined each time the search is run. Los conjuntos no tienen límite de tamaño.
Los conjuntos se pueden usar para la publicación masiva de metadatos, para mover un grupo de registros o para ejecutar tareas. For information on running jobs on defined sets, see Running Manual Jobs on Defined Sets.
You can run a job directly on selected search results and PO lines without first defining a set. See Manual Jobs for details.
Types of Sets
Existen dos tipos de conjuntos:
- Itemized sets – Static sets of individual items that are manually selected or uploaded by the librarian (see Creating Itemized Sets),
- Logical sets – These are the results of a saved search query, and are created dynamically each time the search is run (see Creating Logical Sets).
Set Content Types
Los conjuntos pueden ser creados a partir de distintos tipos de contenido. La capacidad para crear un conjunto de un cierto tipo de contenido depende de los permisos, según se describe en la sección de Permisos indicada anteriormente.
- Conjuntos de Adquisición
- Líneas de orden
- Proveedores
- Conjuntos de cursos
- Conjuntos de Usuario
- Conjuntos de Lista de Lecturas
- Conjuntos de Gestión de Recursos
- Todos los Títulos
- Autoridades
- Citas
- Colecciones
- Ficheros Digitales
- Títulos Digitales
- Colecciones Electrónicas
- Portafolios Electrónicos
- Títulos Electrónicos
- Existencias físicas
- Ejemplares Físicos
- Títulos Físicos
- Conjuntos de Esploro (visibles solo si Esploro está habilitado para su institución):
- Researcher sets (similar to user sets)
- Conjuntos de activos de investigación (similares a los conjuntos de gestión de recursos)
For information, see Creating Batches of Records in Alma - Sets (7:14 mins.).
Managing Sets
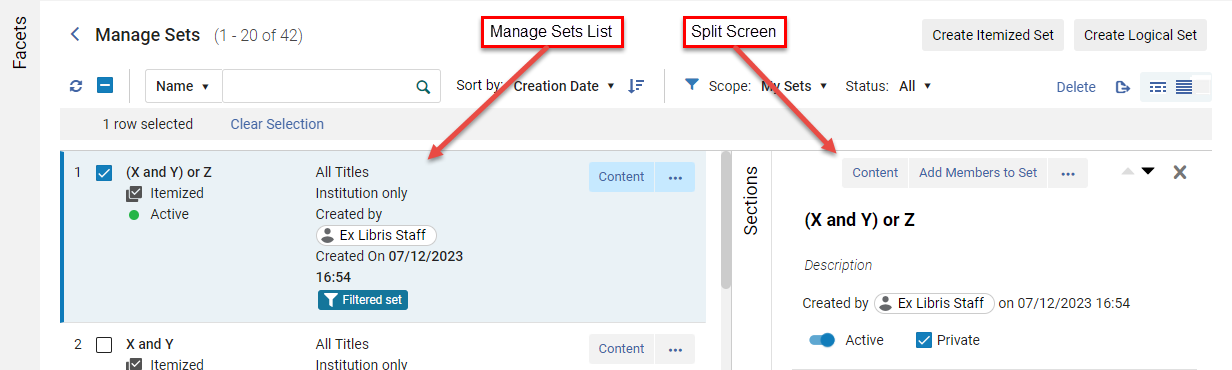
Sets are managed on the Manage Sets page (Admin > Manage Jobs and Sets > Manage Sets).
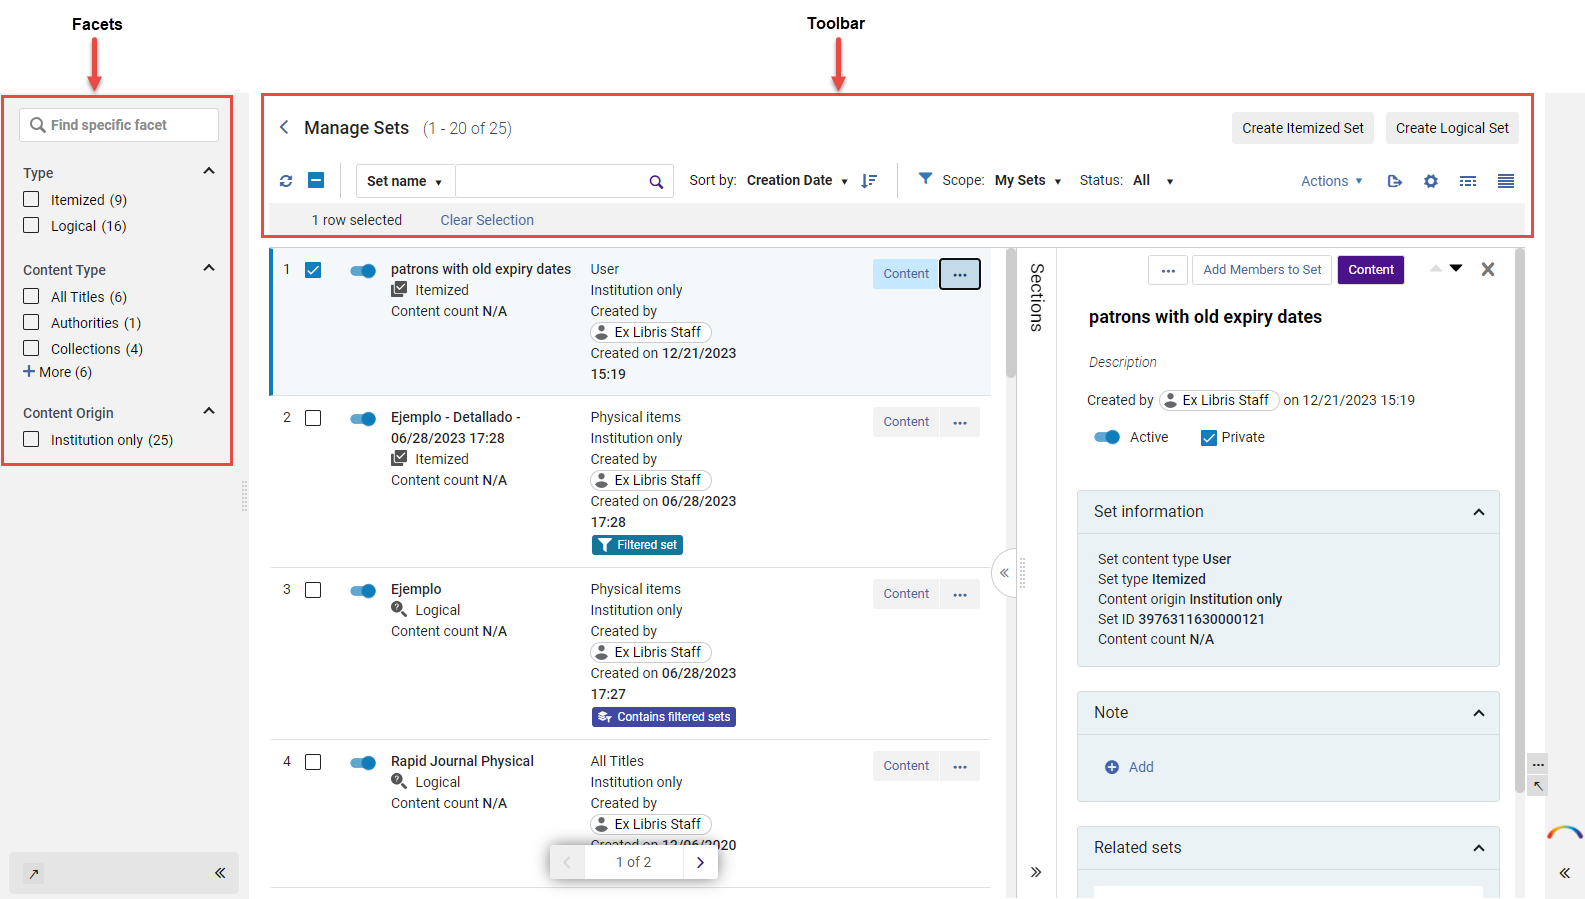
For more information on Facets, see New Layout > Facets.
Manage Sets Toolbar
The following functionality is displayed in the Manage Sets toolbar:
| Campo/Icono | Descripción |
|---|---|
 Refresh |
Refreshes the Manage Sets page. |
 Select/Unselect all items |
Selects all or Unselects all items only in the displayed list. Si muchos conjuntos abarcan numerosas páginas, solo se seleccionan/deseleccionan los ejemplares de la página actual. Additionally, you can select an individual set (not all) in the list by selecting its checkbox ( |
 Search |
Search the list results by SetName or Created by (user ID: user first name or user last name). En el campo desplegable, seleccione Nombre del conjunto o Creado por e introduzca el texto de búsqueda para cualquiera de las opciones.
Use asterisk (*) wildcard character to search for a string that begins with the searched characters. Por ejemplo: Busque "ser*" para buscar "seriales" junto con "series" y "serología". If the set name includes dashes (hyphens), when using an asterisk (*) as a wildcard character, replace the dashes with spaces in the search query. For example, if the set is named test-try-check, searching for test-t* will not find the set. Instead, search for test t* to return results. |
Sort by:  Ascending/Descending |
Sort the list of Sets by either Name or Creation Date. In the drop-down field, select the option to sort. Además, seleccione el botón Ascendente o Descendente para mostrar los resultados en orden ascendente o descendente según la opción seleccionada (Nombre o Fecha de creación). |
 Filter |
Scope:
Los usuarios pueden filtrar los conjuntos mostrados como sigue:
|
| Status:
Presents the option to filter the sets by whether the sets are active, inactive, or all (for both inactive and active sets). An Active set refers to whether the set can be selected when running a manual job. An Inactive set refers to a set that cannot be selected by users when running a manual job. |
|
| Acciones masivas |
When one or more sets are selected, the Bulk Action buttons are enabled.
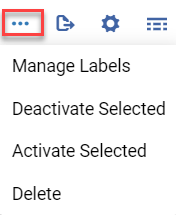
Dependiendo de la resolución de la pantalla, las opciones pueden estar disponibles bajo el icono de acciones de fila.
Las opciones se describen a continuación:
You can activate/deactivate an individual set (not all) in the list by using the slide activate/deactivate toggle button (
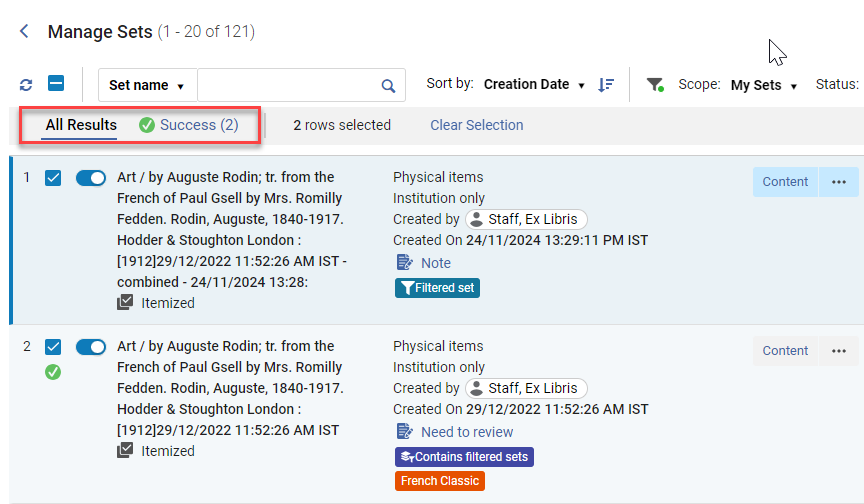
Después de ejecutar acciones masivas para conjuntos, en la parte superior de la página aparece información que muestra los resultados, incluido el número de aciertos y fallos y un enlace a los resultados.
|
| Gestionar etiquetas | See Labels in the Manage Sets Page. Tenga en cuenta que, dependiendo de la resolución de la pantalla, esta opción puede estar disponible bajo el icono de acciones de fila (consulte Acciones masivas). |
 Export |
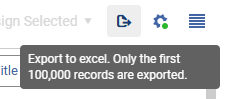
Exporta los conjuntos a Excel (formato *.xlsx).
En algunas páginas, solo se exportan los primeros 100 000 registros. You can identify if this applies to the current export by the message that appears in the tooltip. |
 Customize |
Enables users to personalize various aspects of the Manage Sets List. This includes determining the sequence and appearance of sections, tables and facets, as well as customizing the display of records (see Manage Sets List Customization). |
|
|
When a set is selected in the Manage Sets screen, the screen splits to display an additional screen indicating associated information with the selected set.For more information, see Split View ( ).
|
| Crear conjunto detallado | Creates a static set of individual items that are manually selected or uploaded by the librarian (see Creating Itemized Sets). |
| Crear conjunto lógico | Creates a saved search query, and is dynamically updated each time the search is run (see Creating Logical Sets). |
 When no sets are selected, the options are not enabled.

 /
 ) to the left of the set name.
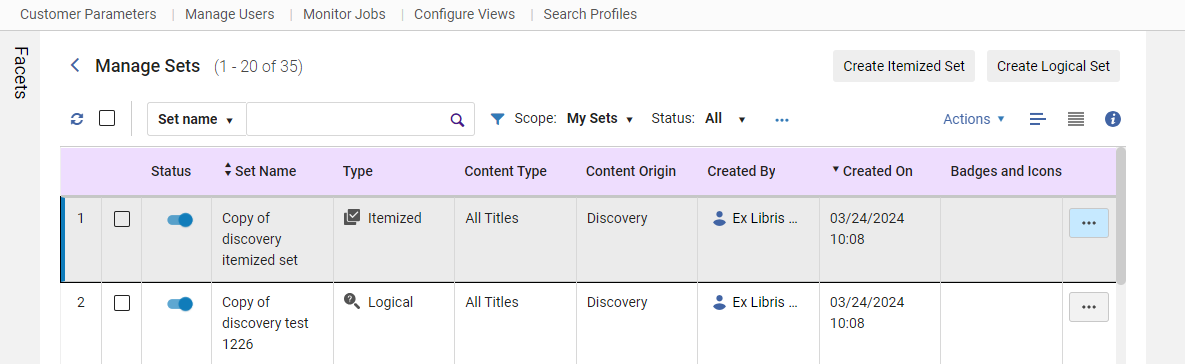
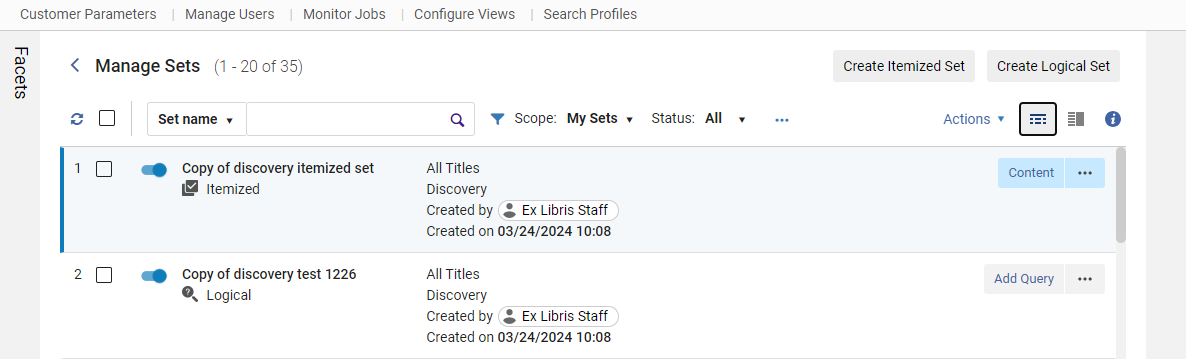
 Switch to table view
 Switch to record view
 Switch to list view
Manage Sets Page More Actions Menu
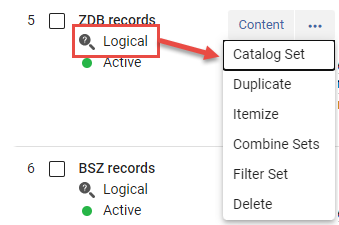
El menú de acciones incluye las acciones siguientes:
Las acciones descritas abajo son acciones principales generales. There may be additional actions/options depending on the content type of a set.
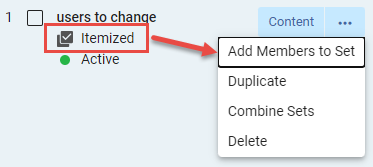
| Acción | Descripción |
|---|---|
| Contenido | Ejecuta la consulta de búsqueda guardada y muestra los resultados. |
|
Conjunto de catálogo |
Opens the set in the MD Editor, but only if the set contains less than 200 items. See Working with Catalog Sets in the Metadata Editor. For Community Zone sets, this option is available for bibliographic and authority records. Esta acción no está disponible para conjuntos creados a partir de los resultados de búsqueda de la Zona de la Comunidad de Autoridades. |
| Duplicado |
Copiar un conjunto. The duplicated set is added to the Manage Sets page with the words Copy of added as a prefix to the set name. Note that this creates a private copy that can only be viewed when the Scope filter is set to My Sets or All. |
| Detallar | Convertir un conjunto lógico en un conjunto detallado. Select Confirm in the Confirmation Message dialog box; see Converting Logical Sets to Itemized Sets. |
| Combinar Conjuntos | Create a new set based on the members of two existing sets; see Combining Sets. |
|
Filtrar Conjuntos |
Presenta la opción de filtrar el conjunto mediante una regla de indicación. Los registros se incluirán en el conjunto cuando la indicación es verdadera. See Filtering Sets for more information. |
| ¿Seguro que desea eliminar esta plantilla de expurgación? |
Borrar un conjunto. Select Confirm in the Confirmation Message dialog box.
|
| Acción | Descripción |
|---|---|
| Contenido | Muestra los resultados del conjunto guardado. |
| Añadir miembros al grupo | Display the members (results) of the saved set; see Viewing Members (Itemized Sets Only). |
| Duplicado |
Copiar un conjunto. The duplicated set is added to the Manage Sets page with the words Copy of added as a prefix to the set name. Note that this creates a private copy that can only be viewed when the Scope filter is set to My Sets or All. |
| Combinar Conjuntos | Create a new set based on the members of two existing sets; see Combining Sets. |
| ¿Seguro que desea eliminar esta plantilla de expurgación? |
Borrar un conjunto. Select Confirm in the Confirmation Message dialog box.
|
Manage Sets List Customization
Users can personalize various aspects of the Manage Sets List. Esto incluye determinar la secuencia y apariencia de secciones y facetas, así como personalizar la visualización de registros. Esto proporciona a los usuarios una variedad de opciones que les permiten configurar las secciones dentro de la vista de edición, seleccionar los elementos visibles en la vista de registro y seleccionar las facetas que están disponibles para la lista.
Puede elegir entre las siguientes opciones de personalización:
- Sections Customization
- Records Customization
- Facets Customization
- Table Customization
- Actions Customization
To Customize the Manage Sets List:
- In the Manage Sets List page (Admin > Manage Jobs and Sets > Manage Sets), select the Customize() icon or select Actions > Customize.
Se muestra un panel lateral con las opciones de personalización.
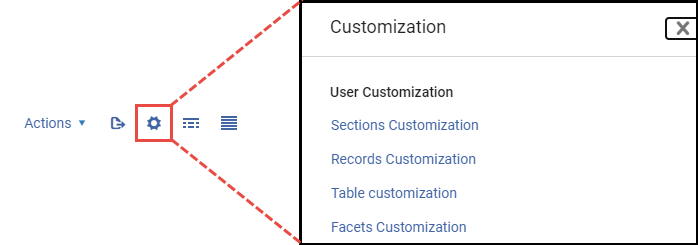
Sections, Table and Facets Customization:
Las secciones y facetas son similares en naturaleza a su personalización.
- In the Customization sidebar pane options, select either Sections Customization, Table Customization or Facets Customization.
Las opciones de personalización se muestran para cada selección.
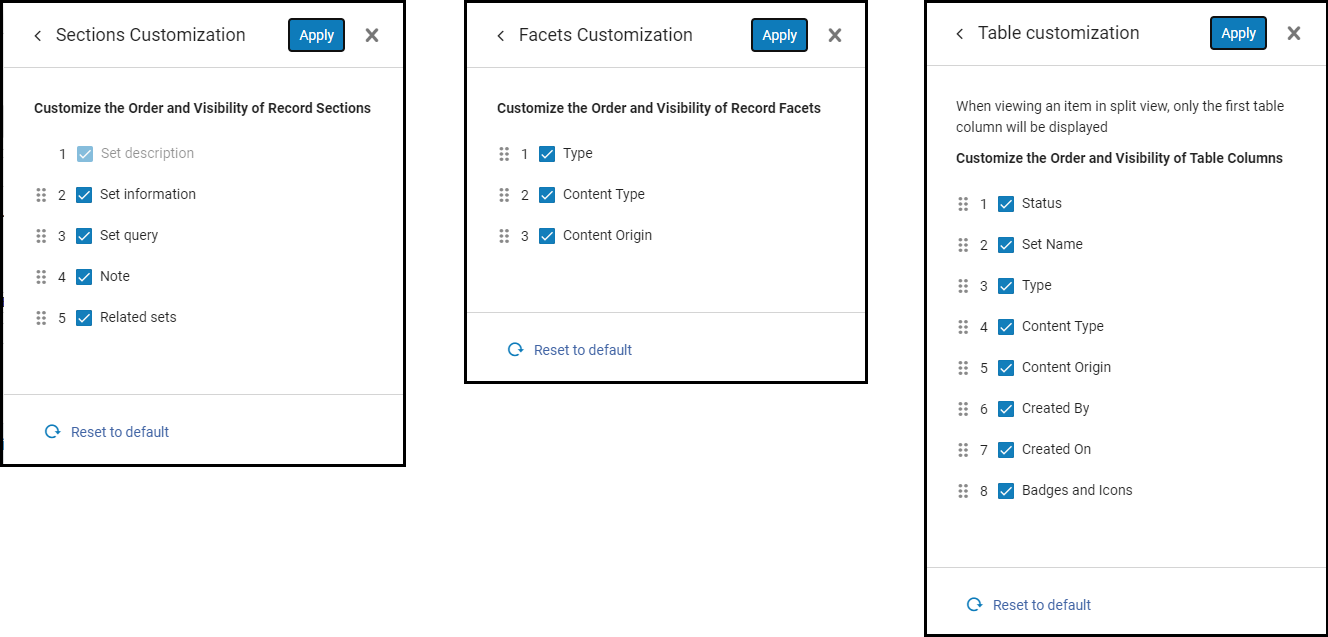
-
You can re-order the Sections, Table or Facets fields as you want them to appear in the UI. Simply drag and drop the fields in the order of position. Select Apply when finished.
The Set description field in the Sections Customization can not be hidden or re-ordered.
-
You can hide (disable) Sections, Table or Facets fields from being displayed. Unselect (
 ) a field to disable it from being displayed or Select (
 ) a field to have it displayed. Unselected field(s) will not appear in the UI. Select Apply when finished.
-
You can reset the order and appearance back to the default display by selecting
 Reset to default.
- In the Customization sidebar pane options, select Records Customization.
Se muestran las opciones de Personalización de registros.
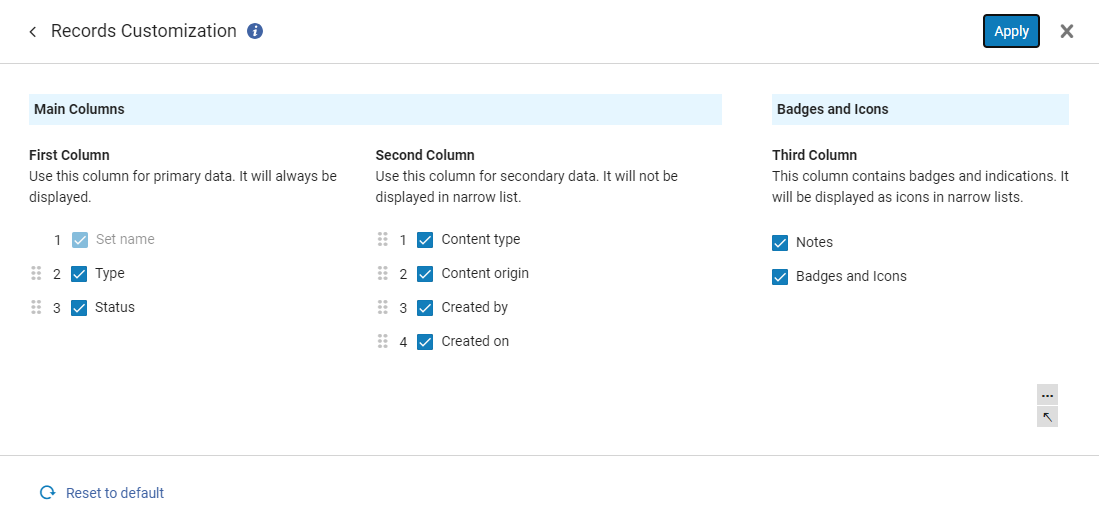
- You can select the fields that are to be displayed or hidden in the UI by selecting () or un-selecting () the field's checkbox. Select Apply when finished.
- You can re-order the Records fields as you want them to appear in the UI. Simply drag and drop the fields in the order of position. Select Apply when finished.
- First Column- fields in this column are always displayed even in narrow lists (when UI screen is re-sized).
- Second Column - fields in this column are of less priority and are not displayed in narrow lists.
- Third Column - fields in this column are always displayed. En listas estrechas, se muestran como iconos.
Fields in Records Customization can be re-ordered in either the First or Second column. In addition, any field from either column can be moved between the columns.
Fields in the Third column (Badges and Icons) can not be re-ordered, moved, or hidden.
The Set name field in Records Customization can not be hidden or re-ordered. - You can reset the order and appearance back to the default display by selectingReset to default.
- In the Customization sidebar pane options, select Actions Customization.
The Actions Customization options are displayed.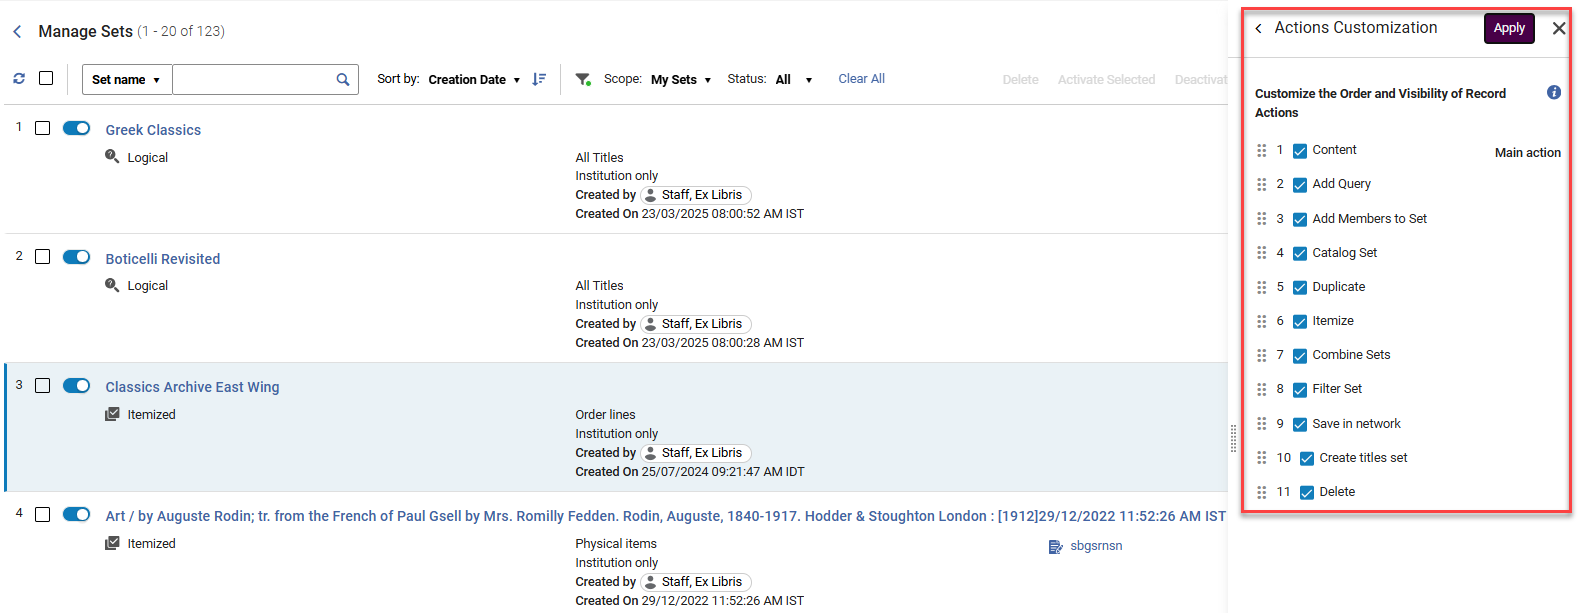
-
You can select the fields that are to be displayed or hidden in the UI by selecting (
) or un-selecting () the field's checkbox.
Select Apply when finished. -
You can re-order the Records fields as you want them to appear in the UI.
Simply drag and drop the fields in the order of position.
Select Apply when finished. -
You can reset the order and appearance back to the default display by selecting
Reset to default.
Quick Access Module
Esta sección describe el módulo de acceso rápido en la página Gestionar conjuntos. See also New Layout for a general overview of this feature in Alma.
Nested under the links in the Sections slide-out pane is the Quick Access module. This module enables users to streamline their search and focus on particular sections, fields, or actions within the details pane (right panel) of the split screen view in the Manage Sets page. Los usuarios pueden iniciar el módulo con dos métodos distintos.
To open the Quick Access Module:
- Utilize the keyboard shortcut (period '.')or
- Select the last link labeled Quick Access situated below the links in the Sections slide-out pane.
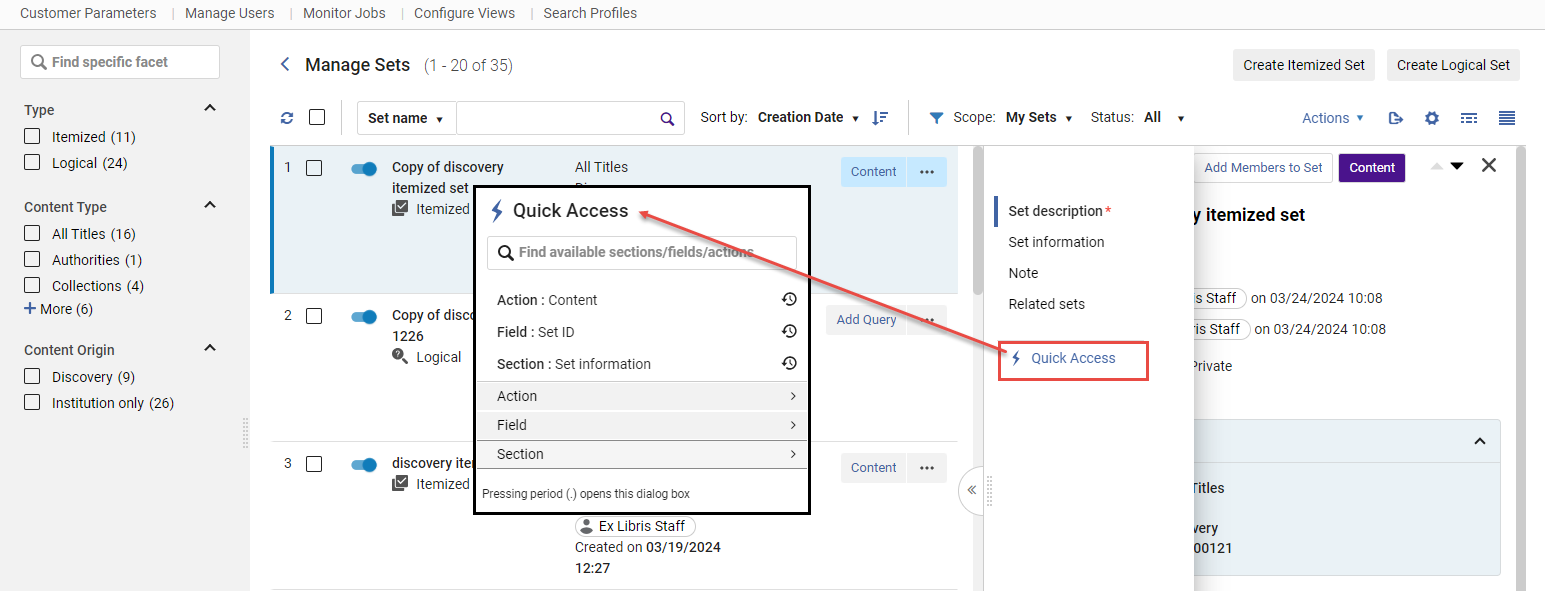
Quick Access Module Options
Depending on the set you have selected in the Manage Sets page, the Action,Field, and Section options displayed in the Quick Access module will differ since they relate to the focused set. If the Quick Access module was previously accessed, the sticky selections chosen (indicated with a icon) are displayed above the Action, Field, and Section menu options.
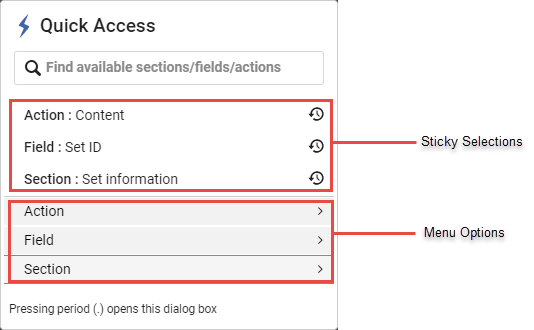
| Menú | Descripción |
|---|---|
| Acción | Displays the options in the  More actions drop menu for each set. For more information, see Manage Sets Page More Actions Menu. |
| Campo | Enlaza directamente al campo específico en el panel de detalles del conjunto.
|
| Sección |
Enlaza directamente a la sección seleccionada en el panel de detalles del conjunto.
|
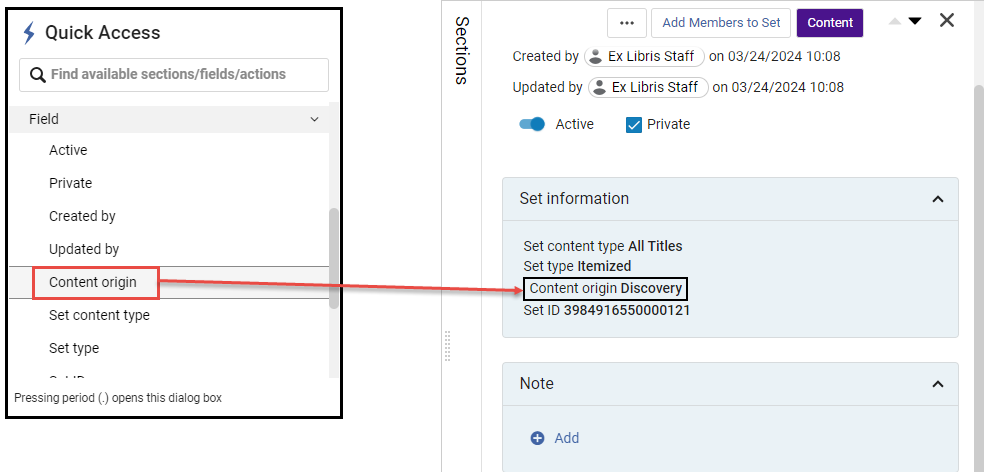
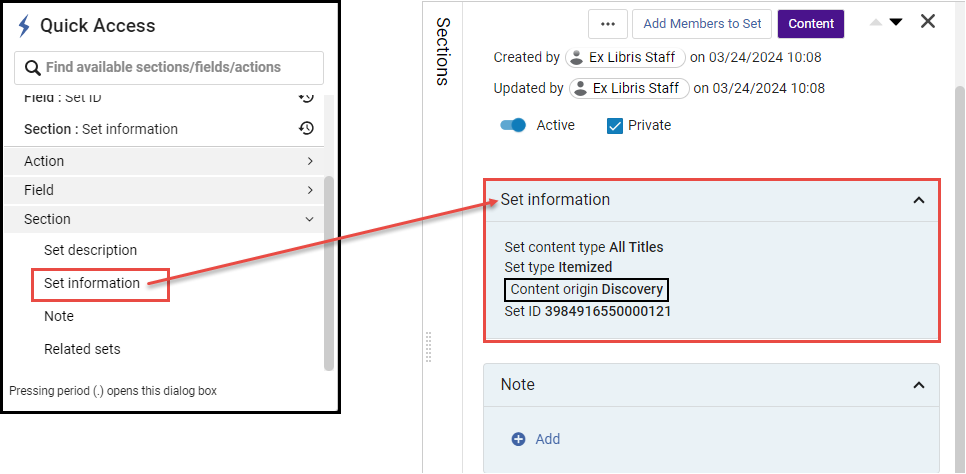
Sections in the Manage Sets Page
For general information on sections see New Layout.
Las siguientes secciones aparecen en la página Administrar conjuntos:
- Set information - General information for the set.
- Note - See Managing Notes in the Details Pane.
- Related sets - Shows related sets such as filtered, combined, and logical sets that were itemized.
Alma muestra la consulta para todos los conjuntos basados en tipos de contenido que utilizan la nueva interfaz de usuario. Alma muestra el mensaje "Vista de preliminar de consulta no disponible" para los conjuntos que utilizan consultas basadas en la tecnología heredada.
Labels in the Manage Sets Page
Puede añadir etiquetas a los conjuntos. For more details see Managing Labels in Alma.

Creating Itemized Sets
Un conjunto detallado es una colección estática de registros individuales en el repositorio. It can be created on the Manage Sets page, from a search (in areas such as All titles, Physical holdings and - PO Lines). For information about creating a set based on loan status, see Creating an Itemized Set Based on Loan Status. For more information about searches in Alma, see Searching in Alma.
Para los miembros de consorcios, las acciones de conjunto detallado solo están disponibles cuando se busca en el ámbito de la institución (no en ámbitos de red o combinados).
Creating Itemized Sets on the Manage Sets Page
En la página Gestionar conjuntos, puede crear búsquedas detalladas a partir de un fichero, una búsqueda o desde Analytics.
To create an itemized set on the Manage Sets page:
- On the Manage Sets page (Admin > Manage Jobs and Sets > Manage Sets), select Create Itemized Set. The Itemized Set Details page opens.
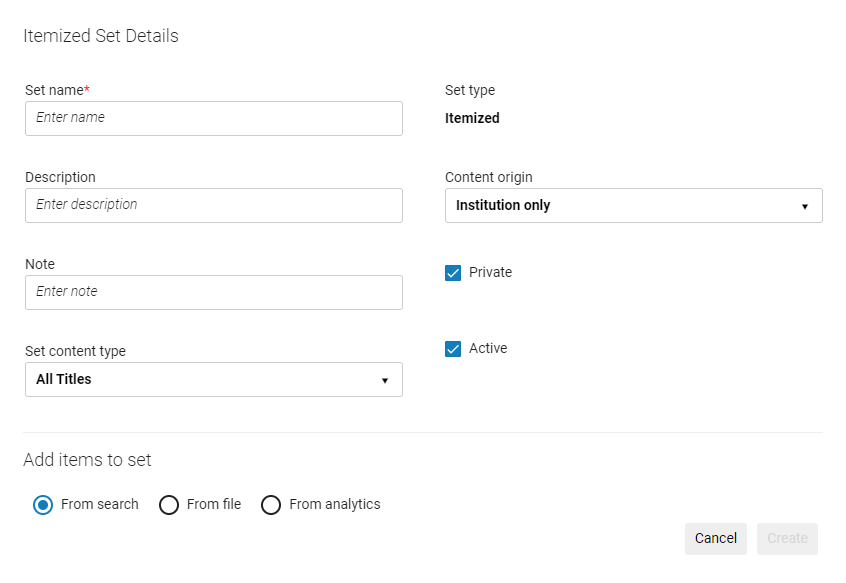
- Enter the set details in the respective fields.Set name is a mandatory field and must be unique.
The set name cannot contain special characters (for example: &, #, (, $, %).
- You may optionally include additional information for the set by including a Description or Note.
- The options that are available for Set content type depend on your permissions as described at the top of this page.
- By default, the set is designated as a Private() set. Esto significa que el conjunto solo está disponible para usted y los usuarios con el rol de Gestor de repositorios. If you unselect the checkbox (), the set becomes a public set and is available to all other users.
- By default, the Status is set to Active (). Optionally, unselect the checkbox () to make the set Inactive. Inactive sets cannot be selected by users when running a manual job.
- The Content Origin field indicates the origin of the source records, which is set to Institution only.
- Añadir registros a un conjunto utilizando uno de los métodos siguientes:
- After entering a set name and defining the other fields, select Create. Se abre una página de búsqueda, dependiendo del tipo de contenido que haya seleccionado.
- Continue with step 9.
- Select a file in the Add Contents from File to Set section that contains the identifiers (MMS ID, ISSN, ISBN, and so forth).
Do not select Add Members to Set since this has no functionality when adding records to the set by uploading a file.
The imported file must be a text file (.txt or .csv and the files must be encoded as UTF-8) or Excel file (.xls or .xlsx).For the data to be read, it must have the correct Header at the top of the column (see Header Types table), for instance, "MMS ID" and not "MMS Id" or "MMS_ID". Si el archivo Excel posee más de una columna, se utiliza la primera columna de datos que posea un tipo de encabezado válido. See the Header Types table for acceptable header types. Cualquier otra información en el fichero es desestimada.
Creating itemized sets using Network Zone MMSs for Network Zone-managed records is not supported. Instead, Institution Zone MMSs must be used.
The file must not contain any duplicate barcodes. If the file does contain some duplicate barcodes, Alma skips all instances of them (for example, if the same barcode is mentioned twice in the file, Alma skips both instances).
No se admite la creación de conjuntos desde ficheros digitales.
Los conjuntos que posean PIDs como encabezados serán importados con éxito. Sin embargo, debido a un problema conocido, no es posible ver los miembros de tales conjuntos.
For more information, see the Create Itemized Sets by Uploading List of Identifiers video (1:53 mins).
Users:
When uploading users to an itemized set with an Excel file, the A1 cell must contain either the code of the identifier type used in the file (see Viewing Additional User Identifier Types) or USERNAME (for the primary ID), and the ensuing cells of the A column must contain the user identifiers. Similarly, when uploading a .txt file, the first row must contain either the code of the identifier type used in the file or USERNAME, and the ensuing rows must contain the user identifiers (each separated by a carriage return). For example, if you want to upload a set of user names (default primary ID), enter the text USERNAME in the top row of your Excel/.txt file, and enter the actual user names in the ensuing cells/rows.
For details on available user identifier types, see Managing User Identifiers.
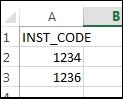
La validación se efectúa para los tipos de conjuntos de Usuarios, Líneas de orden y Ejemplares físicos. The Add Members to Set job runs and creates a set from the file. Se pueden ejecutar en paralelo diversas instancias de esta tarea.
- If you select Add Members to Set after selecting a file, the file is not loaded. Select Confirm in the confirmation dialog box to search the repository for records to include in the set. The records that are then selected, and not those in the file that was previously selected, are included in the set after you select Done.
- El fichero de importación puede tener un tamaño máximo de 10 MB.
- Si se realiza una importación con datos inválidos, cada celda inválida será ignorada.
- Si se importa un fichero y luego se modifica el tipo de contenido, debe re-importarse el fichero.
- Continue with step 9.
- Select From analytics. Note that using this method you cannot add members (items, users, etc.) to an existing set. Sólo puede usar Analytics para crear un nuevo conjunto.
Al crear un conjunto de análisis, solo pueden utilizarse conjuntos de instituciones, no conjuntos privados.
Se muestran las siguientes opciones:
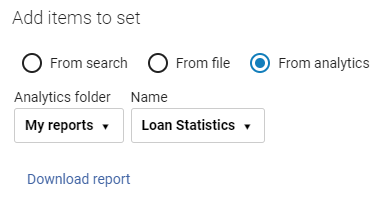
- Select an option from the Analytics folder drop-down list:
- Recent reports – Reports that were recently used in the Manage Sets screen (not recently-created reports in Analytics). Select the report from the Name field. The Name field is populated for recent reports when you have created an itemized set from a report and saved it.
- My Reports – Reports to which you have permissions to access (see Analytics Object List). Select the report from the Name field.
- Esta función solo funciona con informes, no con tableros ni visualizaciones de datos.
- Los informes deben estar en una carpeta compartida para que esta característica funcione.
- Los nombres de los informes no pueden contener un carácter especial, de lo contrario, aparecerá el mensaje de error "Error al conectar con Analytics".
Select Download Report to download the report.
Similar to when creating an itemized set from a file, the Analytics report must contain a Header(see Header Types) with a valid field for creating the report. Si el informe contiene un encabezado de Título en la parte superior, debe ser eliminado.
Una tarea crea el conjunto de Alma desde el informe de Analytics.
For a video that describes this feature, see Create a Set from a Report.
- Continue with step 9.
Header Types
Tipo de contenido Encabezado Prefijo ID When you use the 035 field option in a file (see below), the matching process to build your itemized set uses only 035 $a to create the set. Note that this is different from the matching method used in an advanced search with the Other System Number parameter: it includes the 035 $9, however this field is not accepted when creating an itemized set.
La columna del encabezado debe tener solo un valor para cada línea; es decir, solo un identificador para cada línea. Por ejemplo, si un registro MMS tiene varios valores ISSN, solo uno debe incluirse en el fichero de importación.
Todos los Títulos - MMS ID
- ISSN (matches on both active and non-active fields (022 $a,z) )
- ISSN_A (matches only on active fields (022 $a) )
- ISBN (matches on both active and non-active fields (020 $a,z)
- ISBN_A (matches only on active fields (020 $a) )
- Número OCLC
- Campo 035
99 Autoridades MMS ID 98 Citas ID de cita Colecciones PID 81 Curso ID_curso. For more information, see Managing Courses.
Ficheros digitales PID
Cuando se crean conjuntos detallados a partir de informes de Analytics, este es el IED (no el ID de Informe).
13 Títulos Digitales - PIDCuando se crean conjuntos detallados a partir de informes de Analytics, este es el IED (no el ID de Informe).
- ISSN
- Encontrar
- MMS ID
- Número OCLC
- Campo 035
11 Colecciones electrónicas PID 61 Portafolios electrónicos - PID
- ID del Portafolio
53 Títulos Electrónicos - PID
- ISSN
- Encontrar
- MMS ID
- Número OCLC
- Campo 035
51 Línea de orden Referencia a la línea de orden de compra
PO Line Reference number needs to be the exact and full PO Line Number, such as POL-1234, rather than 1234.
Ejemplares físicos - ID del ejemplar (o PID o PID del Ejemplar)When creating itemized sets from analytics reports, this is the Physical Item ID (23) (not the bibliographic MMS ID). For more information, see Record Numbers.
- Código de barras
23 Títulos físicos - PID
When creating itemized sets from analytics reports, this is the IEP (21) (not the bibliographic MMS ID). For more information, see Record Numbers.
- ISSN
- Encontrar
- MMS ID
- Número OCLC
- Campo 035
21 Existencias físicas - ID DE EXISTENCIAS
Lista de lecturas READING_LIST_CODE Usuario - Código de barras
- Nombre de usuario (ID principal por defecto)
- IDENTIFICADORPRIMARIO
- ID de Institución
Proveedor Código de proveedor - When you are done, select Create.
- Si se ha utilizado el método de fichero de entrada, el sistema ejecuta una tarea para construir su conjunto, que se muestra en la lista de conjuntos cuando haya finalizado. El número resultante de registros/miembros en el conjunto puede ser mayor o menor al número de entradas en el fichero de entrada. Si, por ejemplo, un ISBN posee múltiples coincidencias en la base de datos de Alma, todas las coincidencias encontradas son añadidas como miembros al conjunto; y lo contrario también sucede cuando no se encuentra ninguna coincidencia. Similar to other jobs that are run, you can view the job status/history on the Monitor Jobs page (see Viewing Running Jobs and Viewing Completed Jobs).
- Cuando se ejecuta la tarea Añadir miembros al conjunto con el método de entrada de fichero, el Informe de tarea resultante incluirá un Fichero de validación, si el fichero entregado usa una lista de identificadores individuales, como MMS ID, ID del portafolio, ID principal, etc.
- When the Add Members to Set job is run using identifiers that have the potential for many matches per identifier, there will be no Validation File in the Job Report.
For Itemized sets: If a record is linked to a Network Institution and displayed upon Content click, the "Network" icon is not clickable.
Creating Itemized Sets from Search Results
En la página Resultados de búsqueda puede seleccionar ejemplares específicos y luego crear un conjunto detallado que incluya esos ejemplares. For adding items to an existing set, see Editing Itemized Sets. See also Searching in Alma.
Actualmente, esto es compatible con Todos los títulos. En el futuro, se agregarán otras búsquedas.
To create an itemized set on the search results page:
- En la página de resultados de búsqueda, seleccione los ejemplares para añadir al conjunto.
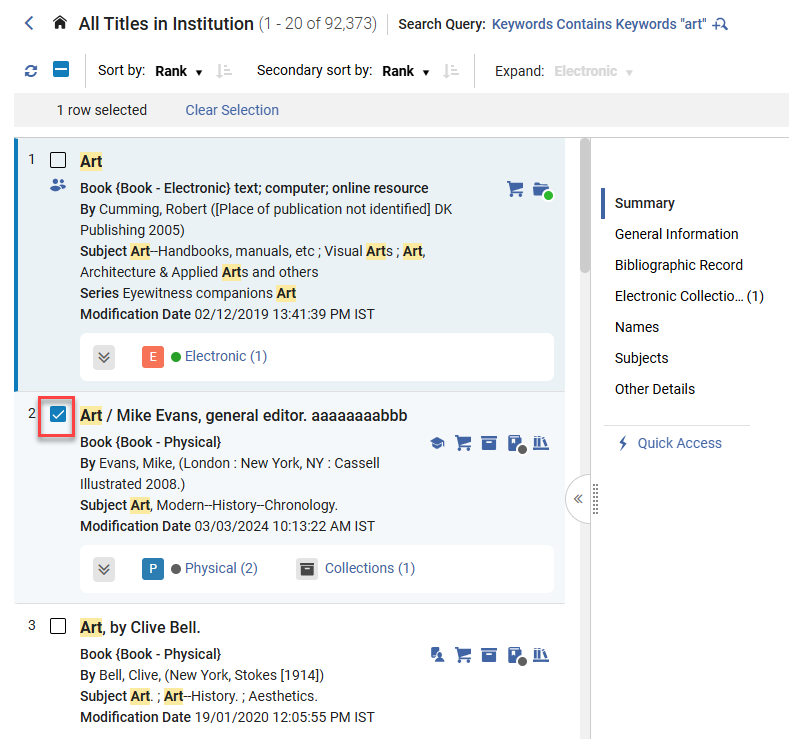
Página de Detalles del conjunto detallado
-
Select the Create Itemized Set button.
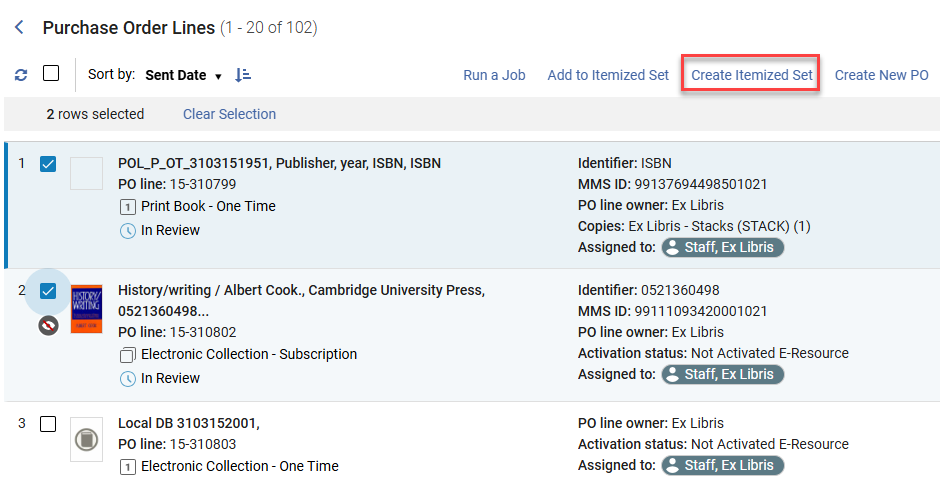
-
Enter the set details in the respective fields.Set name is a mandatory field and must be unique.
The set name cannot contain special characters (for example: &, #, (, $, %).
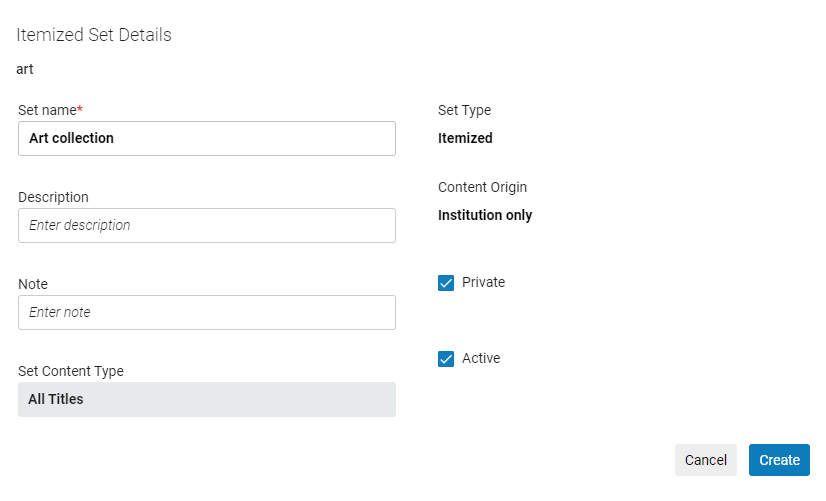
-
You may optionally include additional information for the set by including a Description or Note.
-
The options that are available for Set content type depend on your permissions as described at the top of this page.
-
By default, the set is designated as a Private(
) set. Esto significa que el conjunto solo está disponible para usted y los usuarios con el rol de Gestor de repositorios. If you unselect the checkbox (), the set becomes a public set and is available to all other users. -
By default, the Status is set to Active(
). Optionally, unselect the checkbox () to make the set Inactive. Inactive sets cannot be selected by users when running a manual job. -
The Content Origin field indicates the origin of the source records, which is set to Institution only.
-
When you are done select Create.
-
Si se ha utilizado el método de fichero de entrada, el sistema ejecuta una tarea para construir su conjunto, que se muestra en la lista de conjuntos cuando haya finalizado. El número resultante de registros/miembros en el conjunto puede ser mayor o menor al número de entradas en el fichero de entrada. Si, por ejemplo, un ISBN posee múltiples coincidencias en la base de datos de Alma, todas las coincidencias encontradas son añadidas como miembros al conjunto; y lo contrario también sucede cuando no se encuentra ninguna coincidencia. Similar to other jobs that are run, you can view the job status/history on the Monitor Jobs page (see Viewing Running Jobs and Viewing Completed Jobs).
For Itemized sets: If a record is linked to a Network Institution and displayed upon Content click, the "Network" icon is not clickable.
Creating Itemized Sets from PO Lines
Puede seleccionar líneas de orden de compra específicas en la lista de líneas de orden de compra y, a continuación, crear un conjunto detallado que las incluya. To add PO lines to an existing set, see Adding PO Lines to an Itemized Set.
To create an itemized set on the search results page:
- In the list of PO lines, select the PO line/s to use for creating a set.
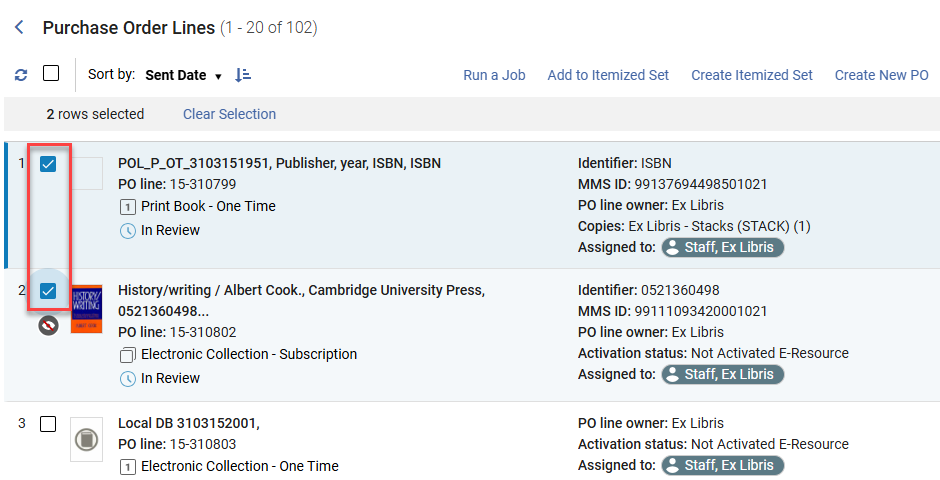
- Select the Create Itemized Set button.
- Enter the set details in the respective fields.Set name is a mandatory field and must be unique.
The set name cannot contain special characters (for example: &, #, (, $, %).
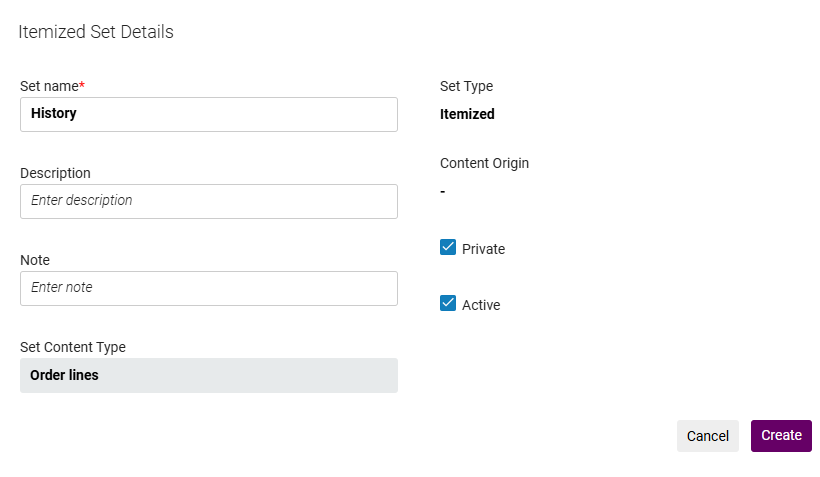
- You may optionally include additional information for the set by including a Description or Note.
- By default, the set is designated as a Private() set. Esto significa que el conjunto solo está disponible para usted y los usuarios con el rol de Gestor de repositorios. If you unselect the checkbox (), the set becomes a public set and is available to all other users.
- By default, the Status is set to Active(). Optionally, unselect the checkbox () to make the set Inactive. Inactive sets cannot be selected by users when running a manual job.
- The Content Origin field indicates the origin of the source records.
- When you are done, select Create.
Resource Management Sets
Para un conjunto de Gestión de Recursos (un título, autoridad, colección, o algún tipo de inventario), se abre una página de búsqueda genérica. Buscar el contenido que se desea añadir al conjunto utilizando una búsqueda simple o avanzada. La página se actualiza para mostrar los resultados de la búsqueda. For more information, see Searching in Alma.
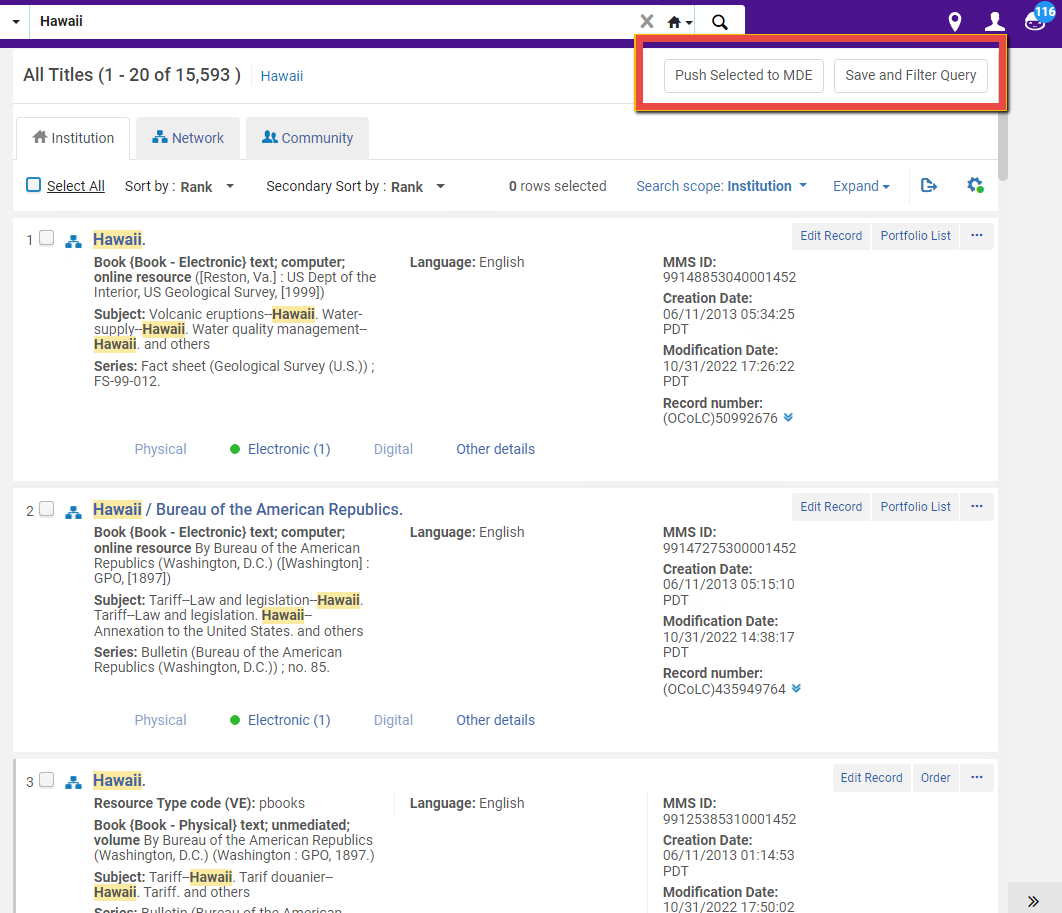
Select the items you want included in the set and select Save and Filter Query. Los registros seleccionados son añadidos al conjunto. If the number of items is large, a Manage set members job is run to add the items to the set; to see the results, see Viewing Completed Jobs.
If you perform an All Titles search, you can add all items on all pages of results: select Select All and select Confirm in the confirmation dialog box.
Para conjuntos detallados, se puede continuar buscando, seleccionando, y añadiendo registros; para conjuntos lógicos, la consulta de búsqueda actual define al conjunto. When you are finished, select Done. El conjunto detallado es guardado. La página Gestionar conjuntos se abre con un conjunto nuevo o actualizado.
Reading List Sets
For a reading list set, a search page appears, with a search for reading lists pre-selected; see Resource Management Sets for more information.
Order Line Sets
For an Order-line set, a search page appears, with a search for PO lines pre-selected; see Resource Management Sets for more information.
Vendor Sets
Para un conjunto de Proveedor, se abre la página de Buscar Proveedor.
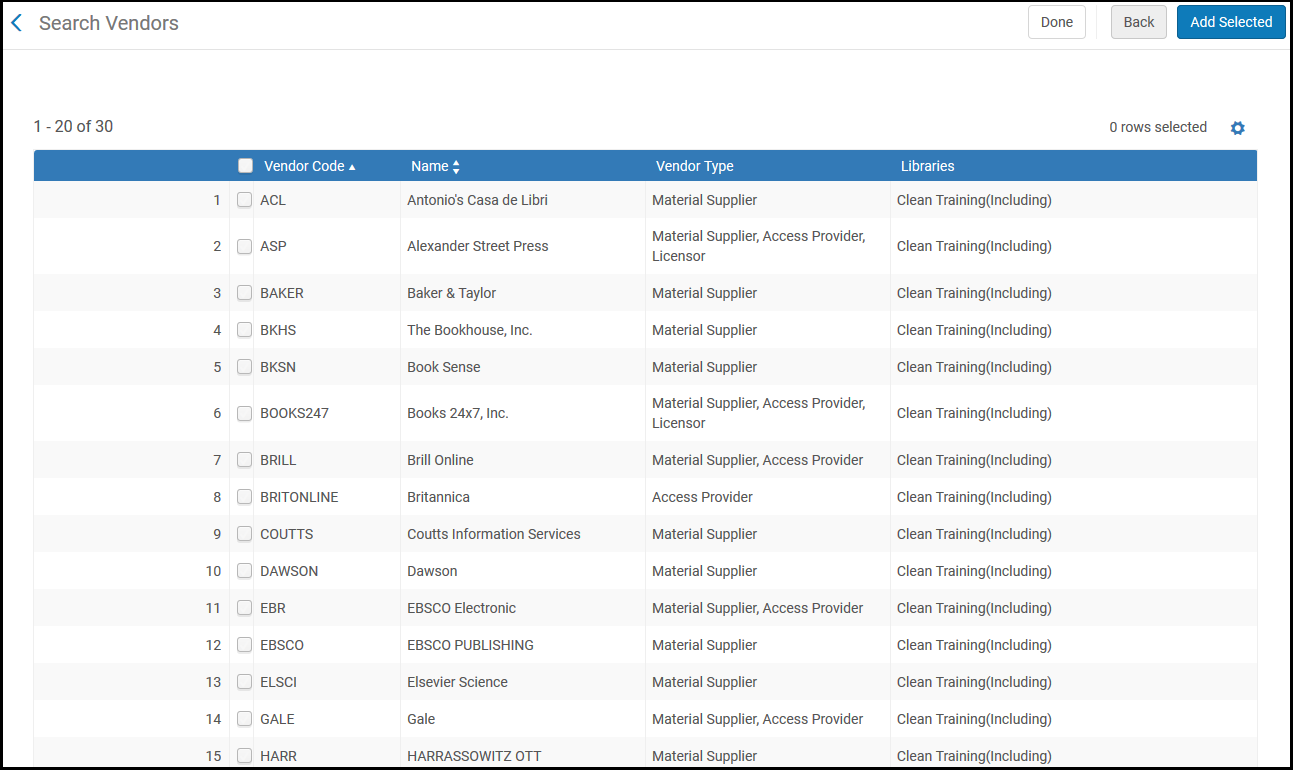
Select the items you want included in the set and select Add Selected. Los registros seleccionados son añadidos al conjunto.
Para conjuntos detallados, se puede continuar buscando, seleccionando, y añadiendo registros; para conjuntos lógicos, la consulta de búsqueda actual define al conjunto. When you are finished, select Done. El conjunto detallado es guardado. La página Gestionar conjuntos se abre con un conjunto nuevo o actualizado.
User Sets
Para un conjunto de Usuario, se abre la página de Buscar y Gestionar usuarios.
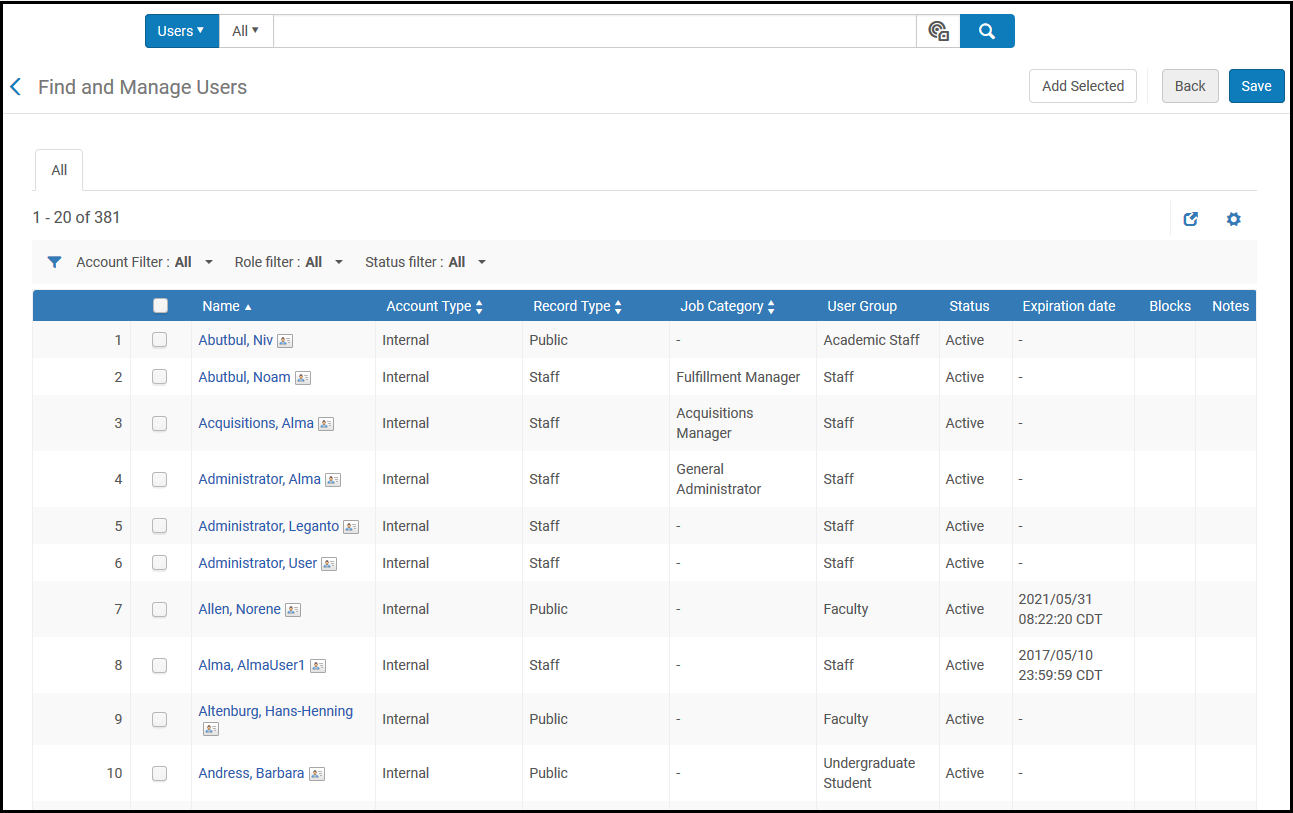
Select the items you want included in the set and select Add Selected. Los registros seleccionados son añadidos al conjunto.
Para conjuntos detallados, se puede continuar buscando, seleccionando, y añadiendo registros; para conjuntos lógicos, la consulta de búsqueda actual define al conjunto. When you are finished, select Done. El conjunto detallado es guardado. La página Gestionar conjuntos se abre con un conjunto nuevo o actualizado.
Esploro Sets
Las opciones para crear un conjunto de Esploro solo aparecen si su institución está habilitada para Esporo. See Esploro Overview.
Researcher Sets
Se abre la página Encontrar y gestionar investigadores. See Managing Researchers.
Select the items you want included in the set and select Add Selected. Los registros seleccionados son añadidos al conjunto.
Para conjuntos detallados, se puede continuar buscando, seleccionando, y añadiendo registros; para conjuntos lógicos, la consulta de búsqueda actual define al conjunto. When you are finished, select Done. El conjunto detallado es guardado. La página Gestionar conjuntos se abre con un conjunto nuevo o actualizado.
Research Asset Sets
Se abre una página de búsqueda genérica que le permite buscar activos de investigación. Buscar el contenido que se desea añadir al conjunto utilizando una búsqueda simple o avanzada. La página se actualiza para mostrar los resultados de la búsqueda. For more information, see Managing Research Assets.
Select the items you want included in the set and select Add Selected. The selected assets are added to the set. If the number of items is large, a Manage set members job is run to add the assets to the set; to see the results, see Viewing Completed Jobs.
Para conjuntos detallados, puede continuar buscando, seleccionando y añadiendo activos; para conjuntos lógicos, su consulta de búsqueda actual define el conjunto. When you are finished, select Done. El conjunto detallado es guardado. La página Gestionar conjuntos se abre con un conjunto nuevo o actualizado.
Creating an Itemized Set Based on Loan Status
Un administrador de servicios al usuario u operador de solicitudes puede crear un conjunto detallado de ejemplares físicos basado en sus estados de préstamo. Esto se hace en la página de Gestión de conjuntos de servicios al usuario.
Solo los préstamos activos se pueden incluir en este tipo de conjunto.
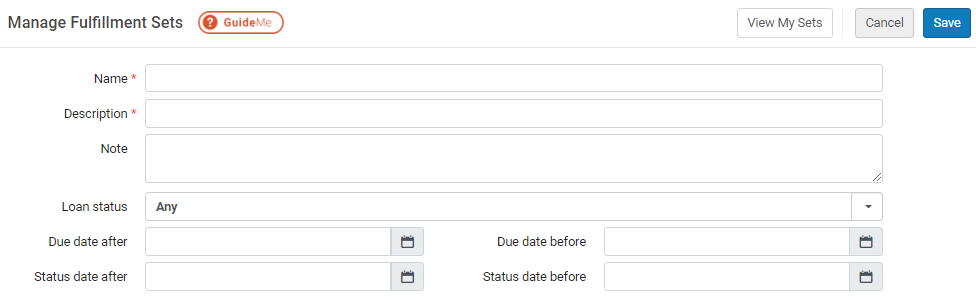
To create itemized physical-item sets based on their loan status:
- On the Manage Fulfillment Sets page (Fulfillment > Advanced Tools - General > Create Fulfillment Sets), fill in the fields as follows:
Campos de la página de Gestión de conjuntos de servicios al usuario
Campo Descripción Nombre (requerido) Nombre del conjunto. Description (Required) Descripción del conjunto. Nota Notas acerca del conjunto. Fecha de vencimiento posterior a Aquellos ejemplares con fecha de vencimiento posterior a la indicada son incluidos en el conjunto. Fecha de vencimiento anterior a Aquellos ejemplares prestados con fecha de vencimiento anterior a la indicada son incluidos en el conjunto. Fecha de estado posterior a Aquellos ejemplares prestados cuyo estado se haya modificado luego de la fecha indicada son incluidos en el conjunto. Fecha de estado anterior a Aquellos ejemplares prestados cuyo estado se haya modificado antes de la fecha indicada son incluidos en el conjunto. Estado del préstamo Aquellos ejemplares prestados cuyo estado coincida con el estado indicado son incluidos en el conjunto. Los posibles valores son: - Normal
- Devolución solicitada
- Renovado
- Perdida
- Reclamación devuelta
- Cualquiera
- Select Save. The set is saved and the fields on the Manage Fulfillment Sets page are cleared, enabling you to create another fulfillment set.
Select View My Sets to open the Manage Sets page.
Viewing and Removing Members of Itemized Sets
Es posible ver o eliminar miembros (ejemplares seleccionados) en un conjunto detallado.
To view members of an itemized set:
- On the Manage Sets page (Admin > Manage Jobs and Sets > Manage Sets), find the set and select Content in the row actions list. A list of members is displayed:
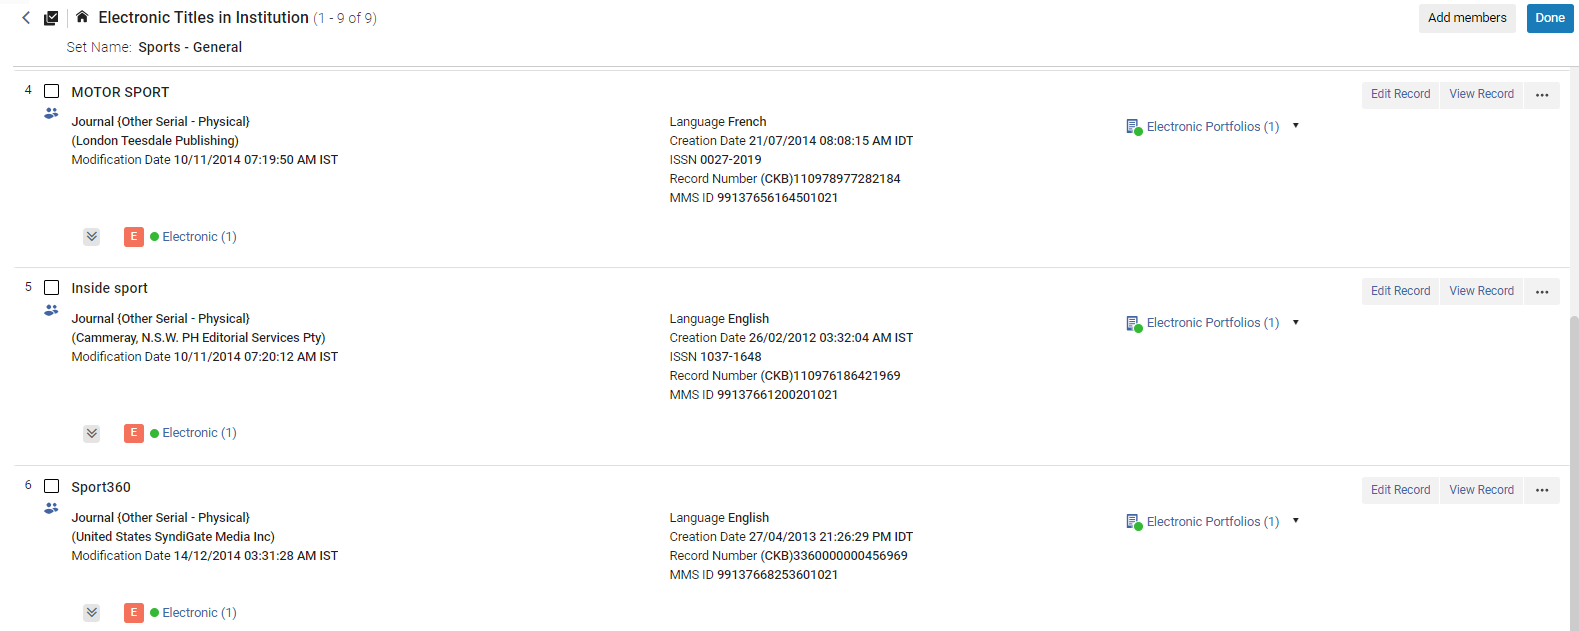
You can also view items in a set by selecting the View Set button when adding members to an itemized set (see Add items to an itemized set).
To remove one or more members of an itemized set:
- Véase miembros.
- For multiple members – Select the members you want to remove and select Remove from set.
- For one member – Select Remove in the row actions list.
- Select Done. When removing members from a set, selecting Done or using the Back button saves the changes.
Another way to remove records is to create a set of unwanted records, then use the Combine Sets operation (see Combining Sets) with the 'Not' operator.
Editing Itemized Sets
Puede editar los detalles del conjunto como se describe a continuación.
To edit the set details:
- On the Manage Sets page (Admin > Manage Jobs and Sets > Manage Sets), scroll to the itemized set you want to edit and select it. The Set Details are displayed in a split screen.
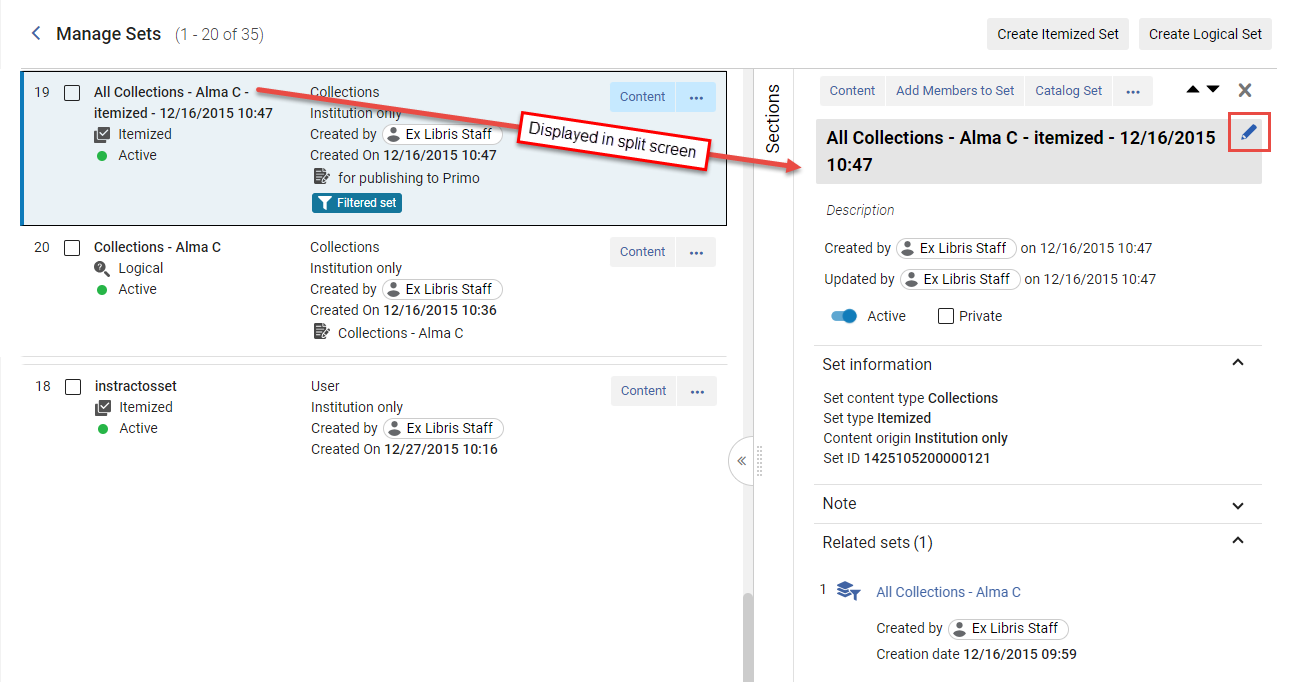
- In the split screen, hover over the section to edit and select the Edit icon (
 ). Modificar los detalles del conjunto según se requiera. The Set name is a mandatory field and must be unique (see Adding Itemized Sets for a description of the fields).
- When you navigate away from the section you updated, Alma saves your changes with the following indication (
 ).
Adding Items to Itemized Sets
Adding Items to Sets from Manage Sets
To add items to an itemized set from the Manage Sets page:
- On the Manage Sets page (Admin > Manage Jobs and Sets > Manage Sets), scroll to the itemized set to which you want to add items and select the Content button. The Edit page opens. Alternatively, you can select Add Members to Set from the row actions menu or from the details pane, and then enter the search parameters as per step 3 below.
- Select Add members and enter the search query.
- Enter the search parameters and select Search.
- Select the items you want to be included in the set and select Add selected, or select Select All.
- Select View Set to view the new set content. From here you can add new members to the set by selecting Add members or exit to the Manage Sets page by selecting Done.
Adding Items to Sets from All Titles
To add items to an itemized set from the All Titles search results page:
- On the All Titles search results page, select the items to add.
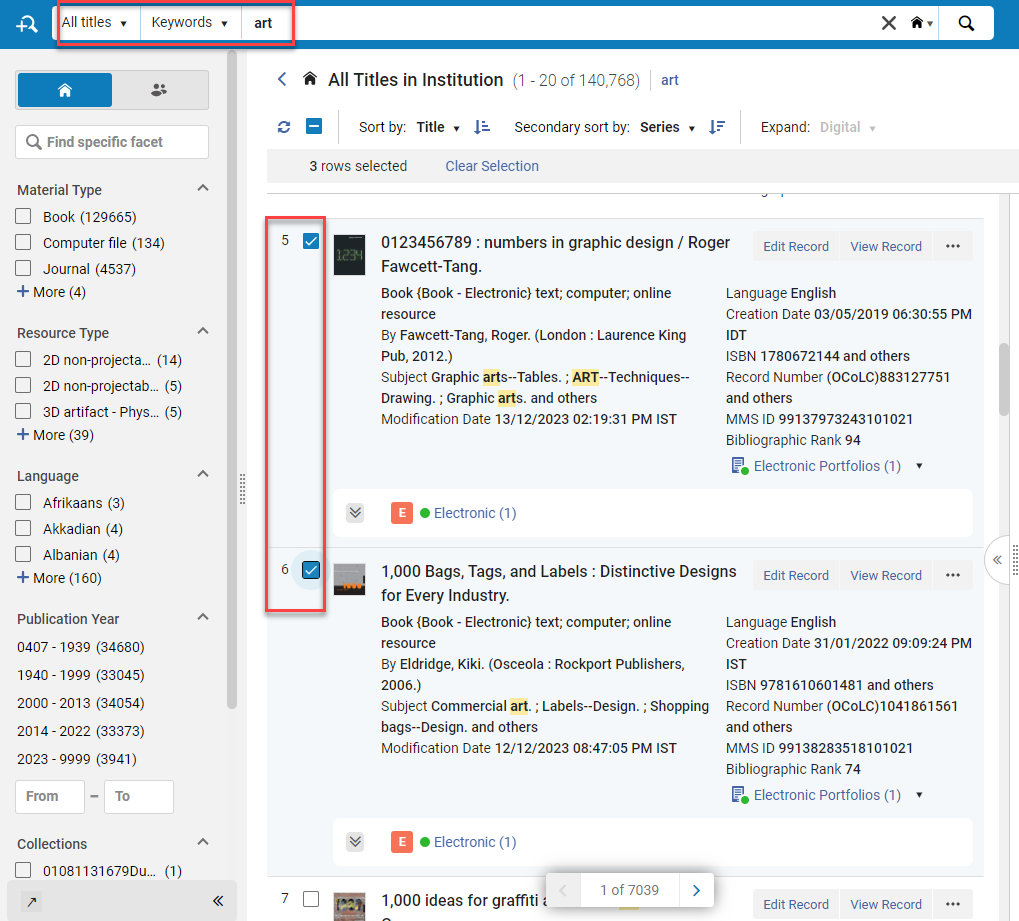
- Select the Add to Itemized Set button.

- Select the set to which you want to add the item/s and then the Select button.
Adding PO Lines to Sets
Puede añadir líneas de orden de compra a conjuntos detallados desde la lista de líneas de orden de compra. To create itemized sets from PO lines, see Creating Itemized Sets from PO Lines.
To add PO lines to an itemized set from the PO lines task list:
- In the list of PO lines, select the PO line/s to add to the set.
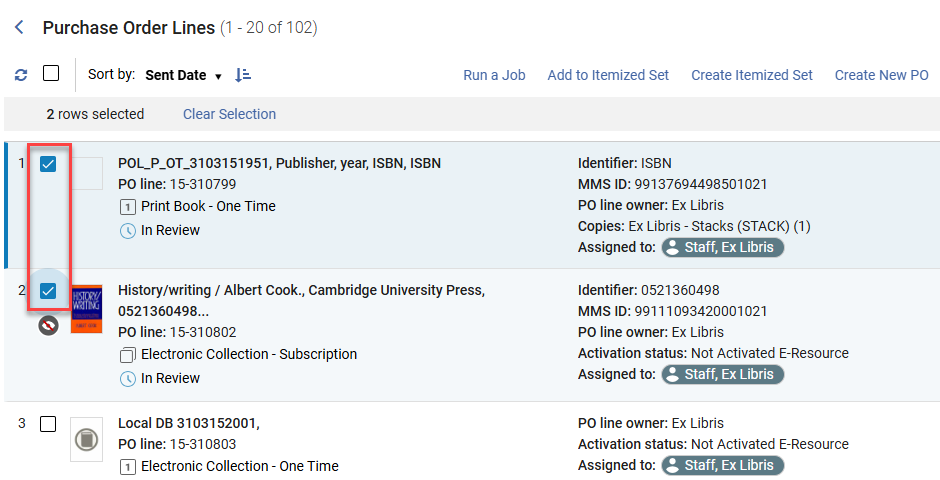
- Select the Add to Itemized Set button.

- Select the set to which you want to add the item/s and then the Select button.
Identifying Records Matching to Alma Records Based on Itemized Set
Institutions often get a list of record identifiers used in external systems (e.g. in a vendor system). You load this list to Alma and easily get a list of what you already have in Alma and what you don't have in Alma, in order to facilitate your purchasing decisions.
To get a list of records matching / not matching the Alma records:
- Load your input file of identifiers into Alma (see Creating Itemized Sets). Alma runs a job to create the set and produces the Add Members to Set report.
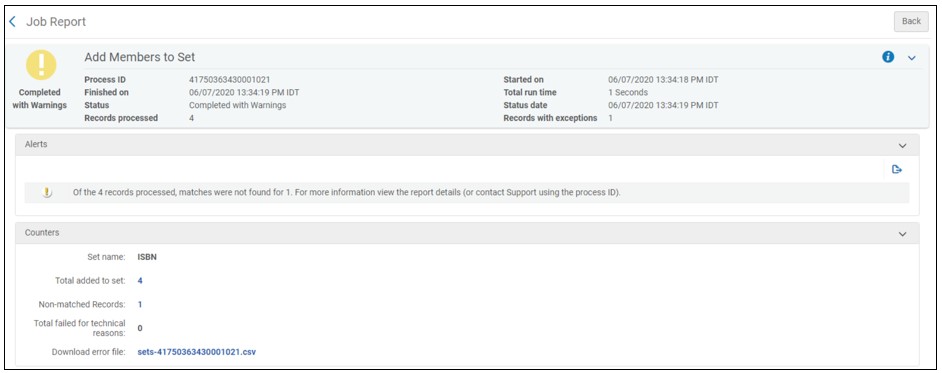
- Llévese a cabo una de las siguientes opciones:
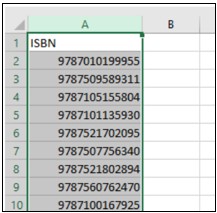
- To download a file of records for which a match was not found with Alma records, click the counter for Non-matched Records to download a .csv file of identifiers for which a match was not found with Alma records, for example:
- To download a file of records matching Alma records, click the counter for Total added to set to download a .csv file of identifiers for which a match was found with Alma records. The file features an additional column that indicates the ID of the records for which a match was found, for example:
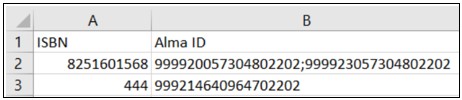
The file provides the following Alma ID for each set content type:Tipo de Contenido del Conjunto ID de Alma Colecciones PID Ficheros digitales PID Colecciones electrónicas PID Portafolios electrónicos PID Ejemplares físicos Código de barras POL Número POL Listas de lectura Código de Lista de Lecturas Recomendadas Título MMS ID Usuarios Id primario Proveedores Código de proveedor
Creating Logical Sets
For repository sets, a logical set is the same as a saved query: the items in a logical set are determined each time by running the query. Para otros tipos de conjuntos, un conjunto lógico es creado al filtrar los resultados en la página de búsqueda.
También se pueden crear conjuntos lógicos a partir de una búsqueda. For more information, see Saving and Reusing Search Queries.
To create a logical set:
- On the Manage Sets page (Admin > Manage Jobs and Sets > Manage Sets), select the Create Logical Set button. The Set Details page opens.
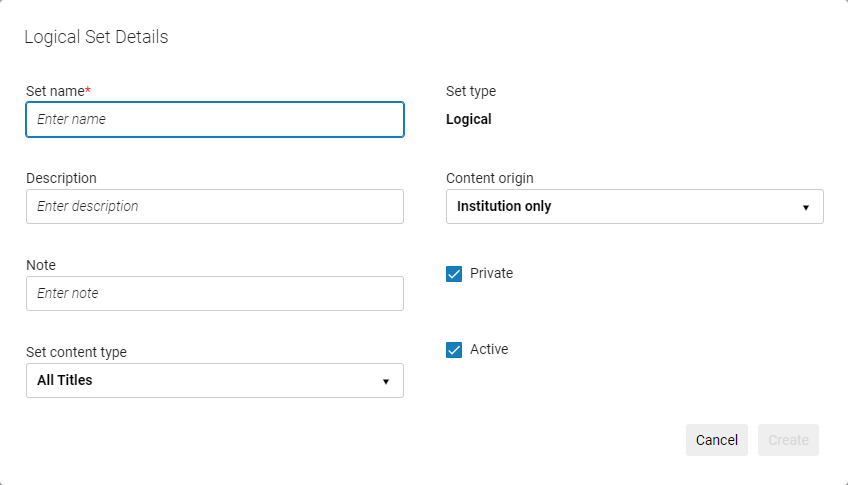
- Introducir los detalles del conjunto en sus campos respectivos. Note that the Set name is a mandatory field and must be unique.
The set name cannot contain special characters (for example: &, #, (, $, %).
- The options that are available for Set content type depend on your permissions as described at the top of this page.
- By default, the set is designated as a Private() set. Esto significa que el conjunto solo está disponible para usted y los usuarios con el rol de Gestor de repositorios. If you unselect the checkbox (), the set becomes a public set and is available to all other users.
- By default, the Status is set to Active(). Optionally, unselect the checkbox () to make the set Inactive. Inactive sets cannot be selected by users when running a manual job.
- The Content Origin field indicates the origin of the source records, which is set to Institution only.
- Select Create. A search page opens for the content type you selected.
- Para conjuntos de repositorio, introducir los parámetros de búsqueda para el conjunto. Tenga en cuenta que el parámetro de supresión en las búsquedas del repositorio solo tiene en cuenta la supresión realizada a través del Editor de metadatos, no la supresión configurada por ubicación. For other kinds of sets, filter the list to determine the parameters for the set.
It is recommended not to use Keywords contains * as a basis for a logical set. A term such as Tag Suppressed (Title) equals "No" is more efficient.
- Select Save. El conjunto lógico es guardado.
Editing Logical Set Details
Es posible editar los detalles del conjunto lógico. To change the set contents, see Editing Logical Set Queries.
To edit a logical set:
- On the Manage Sets page (Admin > Manage Jobs and Sets > Manage Sets), scroll to the logical set you want to edit and select it. The Set Details are displayed in a split screen.
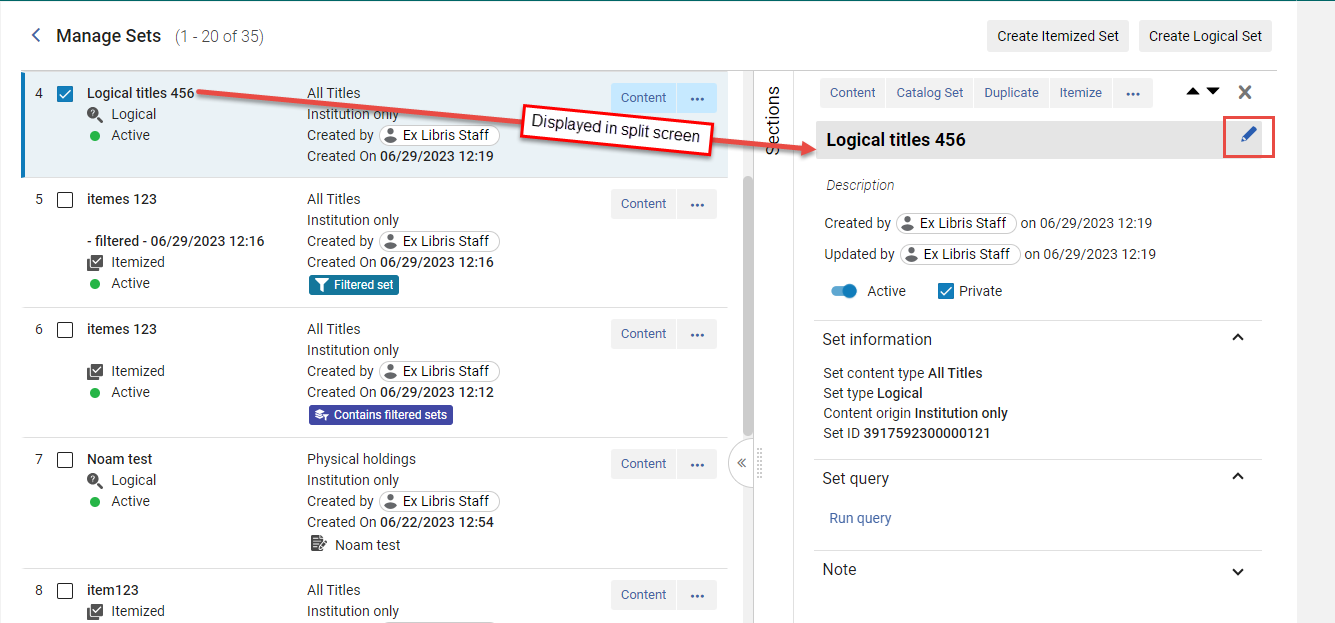
- In the split screen, hover over the section to edit and select the Edit icon (). Modificar los detalles del conjunto según se requiera. The Set name is a mandatory field and must be unique. (See Creating Logical Sets for a description of the fields).
- When you navigate away from the section you updated, Alma saves your changes with the following Saved indication ().
Viewing the Content of Logical Sets
Puede ver el contenido de un conjunto lógico (en otras palabras, los registros devueltos al ejecutar una búsqueda utilizando el conjunto lógico). La población de un conjunto lógico es determinada de forma dinámica, reflejando los registros presentes actualmente en el repositorio.
To view the content of a logical set, on the Manage Sets page (Admin > Manage Jobs and Sets > Manage Sets), scroll to the logical set whose content you want to view and select Content. Se abre una página de búsqueda, dependiendo del tipo de contenido:
Editing Logical Set Queries
Es posible editar las consultas del conjunto lógico.
To edit resource management logical set queries:
- On the Manage Sets page (Admin > Manage Jobs and Sets > Manage Sets), scroll to the logical set whose query you want to edit and select the Content button. Se abre la página de búsqueda para la consulta.
- Change the search as required.

- To save the set, select Save and then Confirm.
- You can also save the set under a new name - see Create a New Set from an Existing Logical Set Query.
Create a New Set from an Existing Logical Set Query
Puede crear un nuevo conjunto a partir de una consulta de conjunto lógico existente.
To create a new set from an existing logical set query:
- On the Manage Sets page (Admin > Manage Jobs and Sets > Manage Sets), scroll to the logical set whose query you want to use as the basis for the new set.
- Select the Content button. Se abre la página de búsqueda para la consulta.
- Si es necesario, cambie la consulta de búsqueda o los filtros.
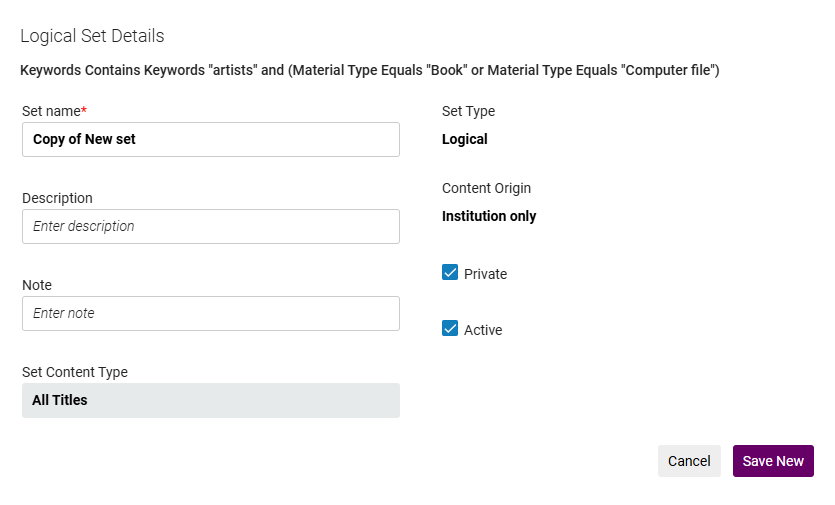
- Select the Save as New button.
- Update the Logical Set Details and select Save New.
Converting Logical Sets to Itemized Sets
Si tiene un conjunto perfecto de resultados en un conjunto lógico, puede capturarlo como un conjunto detallado. Esto conserva su conjunto lógico original y crea una captura de los resultados actuales como un conjunto detallado.
To convert a logical set to an itemized set:
- On the Manage Sets page (Admin > Manage Jobs and Sets > Manage Sets), scroll to the logical set that you want to convert to an itemized set and select Itemize in the row actions list. The New Itemized Set page opens with the set name filled in:
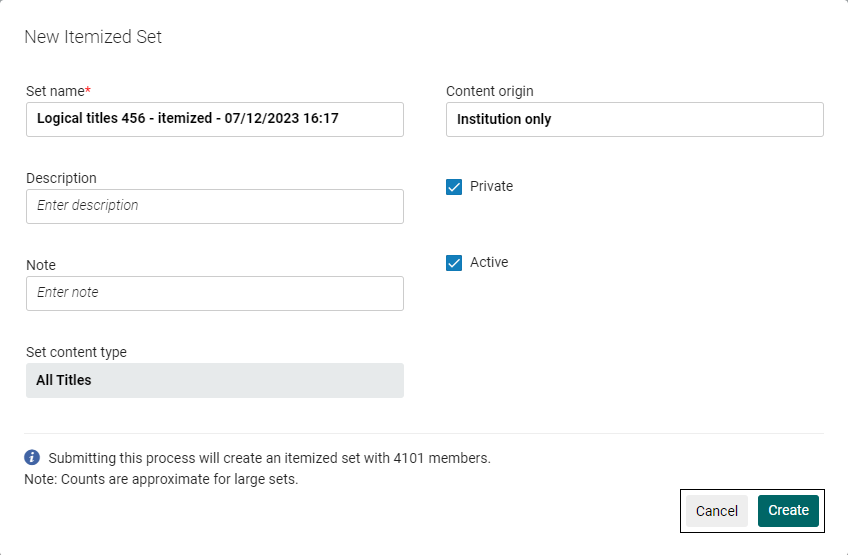
- Modificar los detalles del conjunto según se requiera. See Creating Itemized Sets for a description of the fields.
- Select Create. A confirmation message opens.
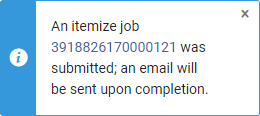
- Se crea el conjunto detallado. It also appears in the Related sets section of the original logical set. The original logical set appears in the Related sets section of the itemized set (see Sections in the Manage Sets Page).
Combining Sets
Se puede crear un nuevo conjunto basado en los miembros de dos conjuntos existentes, siempre y cuando los conjuntos sean del mismo tipo (por ejemplo, dos conjuntos de búsqueda de Todos los Títulos o dos conjuntos de búsqueda de Títulos Físicos, pero no un conjunto de Todos los Títulos y uno de Títulos Físicos). El conjunto combinado es un conjunto detallado.
You need the Repository Manager role to see the combined results of sets made by other users.
For more information on Combining Sets, see the Combine Two Sets of Items video (3:42 mins).
- On the Manage Sets page (Admin > Manage Jobs and Sets > Manage Sets), scroll to the set whose members you want to combine with another set and select Combine Sets in the row actions list. The Combine Sets page opens.
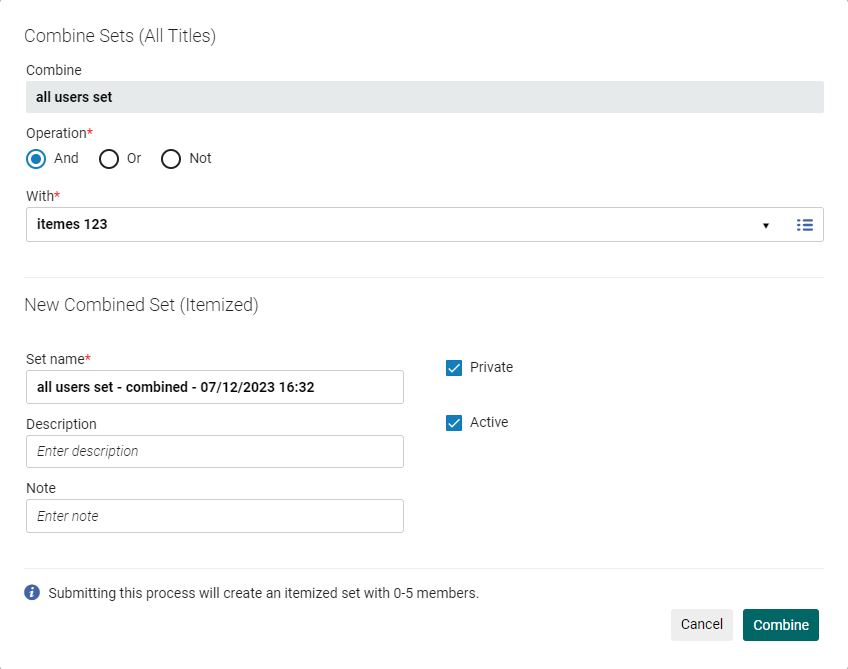
- Seleccione una operación de la lista de operaciones:
- And – Include only the members in common between the two sets in the new combined set.
- Not – Include only the members that are in the first set and not in the second set in the new combined set.
- Or – Include all of the members in both of the sets in the new combined set.
- In With, select the set that you want to combine with the first set you selected.
- In the Set Name field, type a name for the combined set or use the default name from Alma.
- Select the Combine button. A confirmation message is displayed.
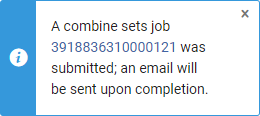
Se ejecuta una tarea para combinar los conjuntos. Luego de finalizada la tarea, el nuevo conjunto es añadido a la lista de conjuntos (se debe actualizar la lista para poder ver el nuevo conjunto).
- Combined sets appear in the Related sets section (see Sections on the Manage Sets Page).
- Las siguientes insignias aparecen en los conjuntos combinados:
- Combined set- The new combined set
- Used for combined sets- The original sets that were used to create the combined set
Combining Sets - Example
El siguiente es un ejemplo de combinación de conjuntos para crear un conjunto como
X and Y
To create this set:
- Crear conjunto (X e Y).
- For set X, select Combine sets in the row actions list.
- Combine set X with set Y:
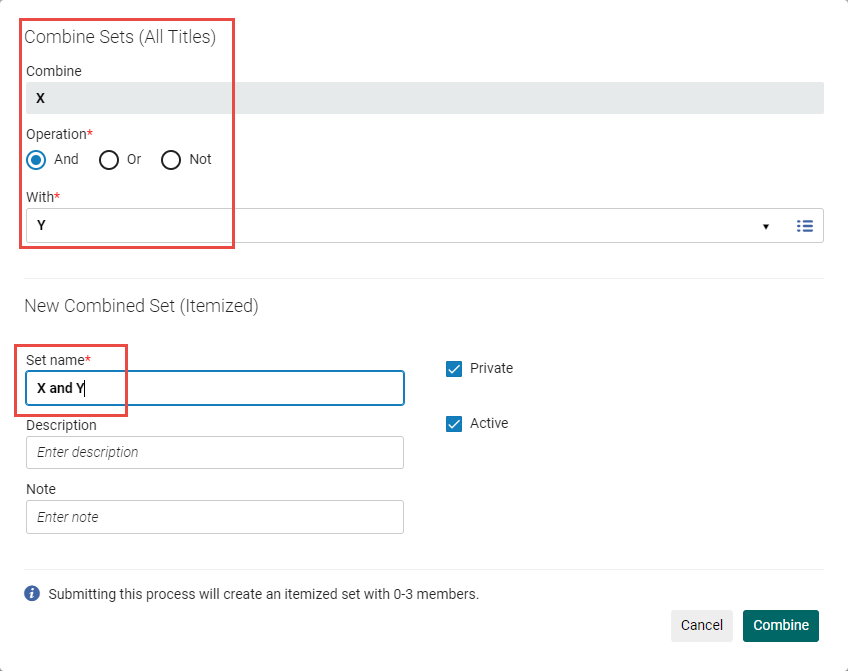
- El nuevo conjunto combinado ya está disponible.
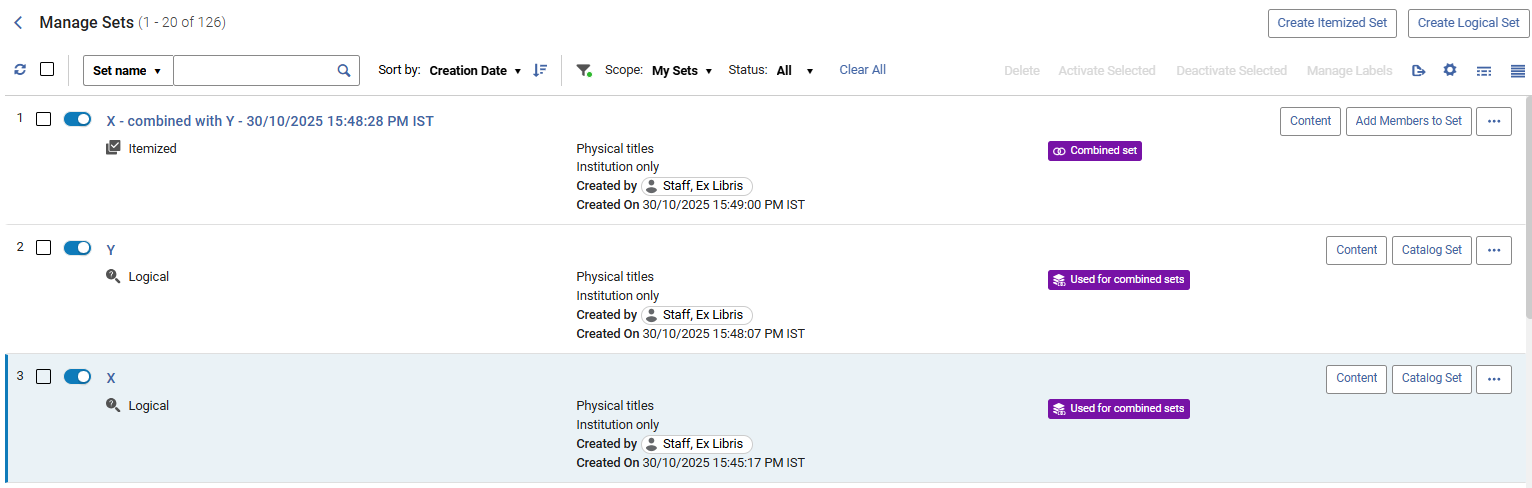
(New for February 2026) The new combined set receives an icon to indicate that it is a Combined set, and the sets used to create it are marked as Used for combined sets.
Creating a Titles Set from an Items, Portfolios, or Files Set
Un conjunto de títulos es un conjunto de registros bibliográficos, a diferencia de un conjunto de registros de inventario, como ejemplares físicos, portafolios electrónicos o ficheros digitales. Es posible crear un conjunto de títulos desde un conjunto detallado de ejemplares físicos, portafolios electrónicos o ficheros digitales. El nuevo conjunto contiene los títulos de los ejemplares en el conjunto original.
- Los conjuntos de títulos pueden ser creados únicamente desde tipos de contenido de Gestión de Recursos.
- Para crear un conjunto de títulos desde un conjunto lógico, se debe primero convertir el conjunto en un conjunto detallado.
To create title sets:
- On the Manage Sets page (Admin > Manage Jobs and Sets > Manage Sets), select Create title set in the row actions list for an itemized set of physical items, electronic portfolios, or digital files. The Create Titles Set (Itemized) page opens with information concerning the new title set - such as the date and time that the set was created - added to the set name.
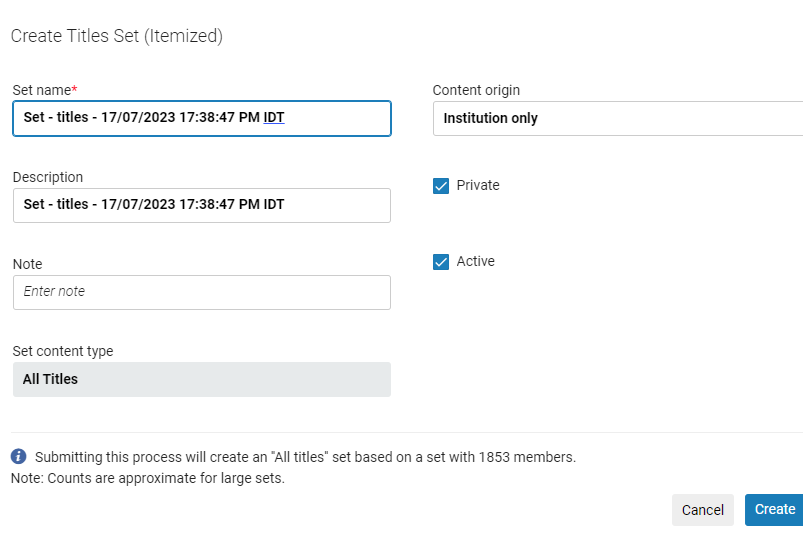
- Fill in the Description and Note fields (optional) and select Create. Aparecerá un mensaje de confirmación. Se ejecuta la tarea y crea el conjunto de títulos.
Filtering Sets
- El filtrado de conjuntos sólo es posible para tipos de contenido de Gestión de recursos.
- Filtering sets is possible only for sets derived by Title searches (All Titles, Physical Titles, Electronic Titles, Digital Titles).
- Los usuarios pueden definir filtros según sus preferencias. Las búsquedas filtradas son fijas y se guardan cuando los usuarios vuelven a visitar la página. Esto elimina la necesidad de que los usuarios vuelvan a seleccionar manualmente la configuración de filtros definida de una página vista.
You can filter existing sets to create new itemized sets. Filtrar los conjuntos es útil cuando necesita un conjunto que esté basado en elementos de los metadatos que no estén indexados. Es posible refinar cualquier conjunto para incluir solamente los registros que coincidan con los contenidos del registro bibliográfico, sin importar si los atributos están indexados o no.
Esta funcionalidad es implementada utilizando reglas de indicación. De modo similar a las reglas de normalización, las reglas de indicación utilizan Drools lógicos flexibles para filtrar conjuntos existentes, tanto públicos como privados. Con un Drools lógico, se puede filtrar un conjunto para crear uno nuevo basado en diferentes características, como se muestra en los siguientes ejemplos que pueden incluir campos no-indexados:
- Exluir documentos del Gobierno (en donde el campo 008 byte 28 es igual a #, vacío, o u).
- Registros bibliográficos que no contengan un campo MARC 074 o 086
- Limitar registros bibliográficos para imprimir diarios (en donde el tipo de registro cabecera 06 = a o el tipo de registro cabecera 07 = s)
Adicionalmente, es posible verificar registros bibliográficos breves o campos faltantes utilizando el Drools lógico.
For information about filtering sets, see the Filtering Sets Using Drools Logic video (3:24 mins).
To filter existing sets using indication rules:
Los primeros puntos de abajo describen cómo llegar a la página Filtrar conjunto desde los resultados de búsqueda. Another way to reach the Filter Set page is from the the Manage Sets page (Admin > Manage Jobs and Sets > Manage Sets): locate the main set that you want to refine, and select Filter Set in the row actions list.
- Cree la regla de indicaciones requerida y guárdela en la Carpeta compartida en el Editor MD. See Creating Indication Rules.
- Search for the items to include in the set by any of the repository Title searches (All Titles, Physical Titles, Electronic Titles, Digital Titles).
- En la pantalla de resultados de búsqueda, seleccionar los ejemplares deseados y clicar en "Guardar y filtrar consulta". Se abre la página de Detalles del Conjunto
- Define your set (see Creating Logical Sets) and select "Save and Filter". A new page opens where you can create the filtered set while the main set is created in the background.
- Select Filter This Set to create an itemized filtered set. The Filter Set page is displayed.
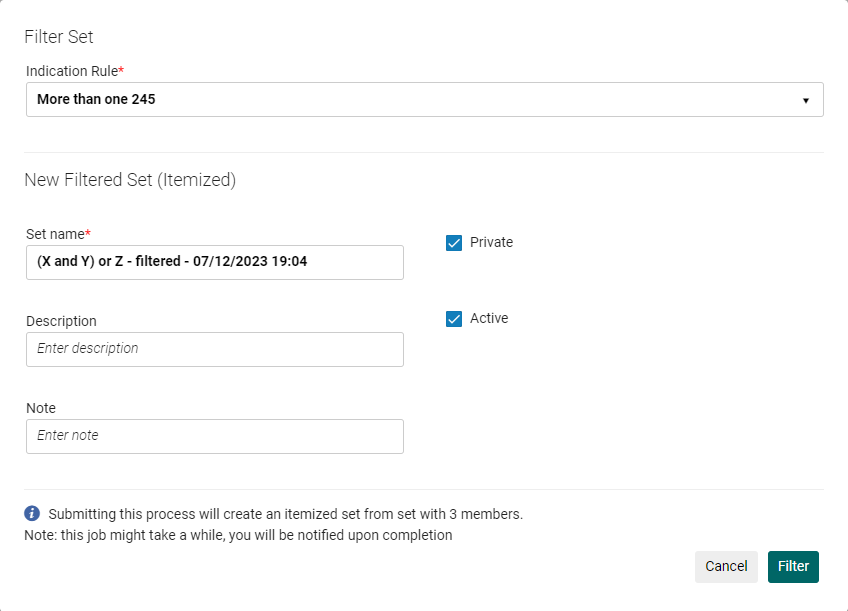
- Seleccionar la regla de indicación. Tenga en cuenta que para que la regla de indicación aparezca en el menú desplegable, la regla debe ser local y pública.
- Enter a new set name or use the automatically-generated one, and complete the remaining options to match your requirements and select Filter. A confirmation message is displayed.
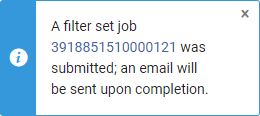
The Filter set by indication job runs to process your filtering request and creates a new itemized set. El proceso de filtrado examina todos los registros en el conjunto principal y aplica las reglas de indicación especificadas. Aquellos registros que no cumplen con la condición de las reglas de indicación son excluidos del conjunto. Cuando la tarea finaliza, el sistema le envía un correo electrónico al usuario que inició la solicitud.
- Seleccione "Confirmar" en el mensaje de confirmación.
- You can view progress or the job results for the Filter Set by Indication job on the Monitor Jobs page (see Viewing Running Jobs and Viewing Completed Jobs). Select Actions > Report to view the results. El informe muestra el número de registros procesados y el número de registros creados en el nuevo conjunto filtrado.
- El nuevo conjunto aparece en la página Detalles del conjunto del conjunto principal; haga clic en el enlace para abrirlo. También puede seleccionar una regla de indicación desde esta página para crear otro registro filtrado.
- Aparece una sección similar en la página Detalles del conjunto para el conjunto original desde el que se creó el conjunto, con una lista de todos sus conjuntos filtrados.
- El conjunto original aparece en la sección Conjuntos relacionados del nuevo conjunto filtrado.
- Una vez finalizada la tarea, los conjuntos nuevos y originales aparecen en la página Gestionar conjuntos. The new set appears with the Filtered set badge and the original set with the Used for filtered sets badge.
Saving Sets in the Network Zone
You can save a local set of bibliographic records in the Network Zone, in order to later make bulk changes to them using normalization rules. A set can only be built on the Institution Zone because the query uses search criteria from either localized fields in the bibliographic record or from the inventory (holdings, items, portfolio, etc.) Saving a local set to the Network allows you to apply the necessary normalization rules on the bib records.
This action runs a job that creates a set in the Network Zone containing only the records linked to the Network.
- Esta funcionalidad solo está disponible para instituciones que formen parte de un consorcio.
- Esta funcionalidad solo está disponible para conjuntos bib y de títulos.
To save a local set in the Network Zone:
- In the Manage Set page, create a new set of one of the following types:Physical titles,All titles,Electronic titles. You can create either logical or itemized set.
- Select Save In Network in the row actions list.
- En la ventana que se abre, proporcione el nombre del conjunto que se creará en la Zona de red. Siga la convención de nomenclatura mostrada en el campo. The default name is '<original set name>_<member_institution> - date/time'. Prefixing the institution name to the set name will help you find the set in the NZ.

- Select Submit and then select Confirm in a confirmation message that opens. Alma sends a message saying that the job was created, and an email will be sent upon completion.
The Save Set in Network job is submitted and runs in the background in the IZ. The job is displayed in the member institution who initiated the action. El informe Guardar Conjunto en la Red se genera en la institución miembro.
Si el proceso falla, aunque se hayan procesado algunos de los registros, no se crea ningún conjunto en la Zona de Red.
