
Trabajar con reglas de indicación
Las reglas de indicación se utilizan para filtrar conjuntos. Las reglas de indicación no modifican datos. They are solely used to read records that are part of a set and filter records out based on conditions. El resultado del proceso de filtrado es un nuevo conjunto que se crea que es un subconjunto del conjunto original/filtrado. See Filtering Sets on the Managing Search Queries and Sets page for more information.
Las reglas de indicación se utilizan para los registros bibliográficos MARC, mientras que las reglas de indicación XML se utilizan para los registros Dublin Core.
Las siguientes secciones describen cómo crear y probar reglas de indicación y proporcionan ejemplos que se pueden incorporar al flujo de trabajo:
- Creating Indication Rules
- Testing Indication Rules
- MARC Indication Rules Syntax Examples
- XML Indication Rules Syntax Examples
- Form-Based Indication Rules
Además, se pueden crear reglas de indicación para otras áreas funcionales que usan conjuntos:
- Delete holding records with no items job – See Delete holding records with no items.
- General Publishing Profile (Resources > Publishing > Publishing Profiles > select Add Profile > General Profile) – See Filter Records.
- Import Profile Details – See Filter out the data using.
No se pueden utilizar las mismas reglas de indicación para todas las áreas y flujos de trabajo en Alma.
Creating Indication Rules
Se crean y mantienen reglas de indicación a través del Editor MD.
For Network Zone consortia members, users can control whether to save new rules locally or in a network institution. To make this selection, open the Records or Templates area, and go to New > Placement Options. Téngase en cuenta que esta selección es por usuario.
Backslashes (\) are used as escape characters for Indication Rules and Form-Based Indication Rules, according to the same principles as the Normalization Rules.
- Abrir el Editor MD.
- Select New > Indication. The Indication Rules Properties dialog opens.
 Cuadro de diálogo Propiedades
-
Indique el nombre para la regla y una descripción que ayude a los demás usuarios a saber lo que la regla hace.
- In "Type" , select whether to create the rule as Drool (for MARC bibliographic records) or as XSL (for Dublin Core records).
- Indicar si se desea crear la regla como Privada o Compartida. This determines in which folder the indication rule is saved. Tal vez se desee guardar las reglas de indicación en la carpeta Privada y probarlas primero antes de moverlas a la carpeta Compartida (al cambiar las Propiedades). Private indication rules cannot be used in the "Filter Set" functionality invoked from the Manage Sets page. Tenga en cuenta que la carpeta Comunidad tiene reglas de indicación que puede copiar para crear sus propias reglas de indicación.
- Select Save in the dialog. Se abre el panel de edición del Editor MD.
- Crear una regla como se indica a continuación:
- If you selected to create an indication rule for MARC records, enter the Drools logic for your indication rule. Refer to the section Normalization Rules – Syntax and Examples for the syntax to use when creating indication rules. Las siguientes reglas de indicación son proporcionadas en Alma:
See the Indication Rules Syntax Examples section for more examples.MultiTitleIndication.dslr BriefIndication.dslr Regla de indicación proporcionada (Títulos múltiples) En lo que respecta a esta regla, no existen condiciones para los campos de control.Regla de indicación proporcionada (Materias breves) Aunque se permite incluir varios operadores booleanos en las reglas, cuando son seleccionados un gran número de operadores booleanos, es probable que el rendimiento se ralentice. Por lo tanto, cada regla debe incluir como máximo 200 operadores booleanos. - If you selected to create an XML indication rule for Dublin Core records, enter the indication rule in XML format.
- If you selected to create an indication rule for MARC records, enter the Drools logic for your indication rule. Refer to the section Normalization Rules – Syntax and Examples for the syntax to use when creating indication rules. Las siguientes reglas de indicación son proporcionadas en Alma:
- Select Save.
Testing Indication Rules
Antes de ejecutar una tarea para filtrar un conjunto utilizando una regla de indicación, se puede probar la regla en el Editor MD.
Tanto las reglas de indicación como las de normalización funcionan en modo de prueba.
- Abrir un registro bibliográfico en el Editor MD.
- Select
 Split Editor.
- Select the Rules tab in the left pane and expand the Indication rules folder.
- Locate the rule that you want to test in the Private or Shared(not the Community) folder. Seleccionar una regla para ver una lista de acciones:
- Edit
- Delete
- Contribute to CZ
- Duplicate
- Properties
- Select Edit. La regla de indicación se abre en la pantalla dividida al lado del registro bibliográfico.La regla de indicación se abre en la pantalla dividida
- Select Try it. Depending on the results, a pop-up appears with either True or False response indicating that the bibliographic record either met or did not meet the Drool logic in the indication rule.
 Regla de indicación - Respuesta Inténtelo
Indication Rules for MARC Records - Syntax Examples
Examples of indication rules syntax are provided below and at Alma Indication Rule Examples. See Conditions for more information.
In rules that search for a certain term, use an asterisk to find the exact term. Si el subcampo contiene cualquier cosa además del término, no se encontrará a menos que haya un asterisco. Téngase en cuenta que solo se necesita colocar el asterisco al final del término, no se necesita ponerlo al principio.
The line exists "130.a.Bible" works as an "Equals" search, thus if the subfield contains anything in addition to the term, it will not find it, unless there is an asterisk..
Example 1
Identificar los registros en un conjunto que contiene $a en el campo 949.
Example 2
Identificar registros en un conjunto que contiene un 1XX o 6XX o 7XX en $0 (subcampo cero).
Example 3
Identificar registros en un conjunto que contiene $0 (subcampo cero) en un campo que empieza por 650 así como 650 o 659.
Example 4
Identificar registros en un conjunto que contiene $0 (subcampo cero) en un campo que empieza por 6 así como 600, 630, 650 o 659.
Example 5
Recuperar todos los registros que tienen múltiples campos 300 cada uno teniendo un subcampo a
Example 6
Crear un conjunto de todos los registros que tienen subcampos duplicados x y z en los campos 630 y 650.
See the Alma Indication Rule Examples page in the Developer Network for more examples of indication rules.
Reglas de indicación XML para registros DC - Ejemplos de sintaxis.
Los siguientes son ejemplos de sintaxis de reglas de indicación XML:
Example 1
Lo siguiente es un ejemplo de una regla de indicación XML que devuelve Verdadero si el registro tiene un campo dc:subject:
Example 2
The following is an example of an XSL indication rule that returns False if the record has a dc:subject field that equals Theology:
Example 3
The following is an example of an XSL indication rule that returns true if the record has a dc:creator field or a dcterms:creator field containing Tolstoy:
Reglas de indicación basadas en formato
All users can create indication rules.
Ex Libris provides the ability to create indication rules in the MARC format using a structured form, thus making the process easy and intuitive (this new functionality is in addition to the existing abilities to create Drool rules in the MARC format and create XML rules in the DC format manually, both of which remain unchanged). For complete information about indication rules, see Working with Indication Rules.
The structured form allows to enter the different fields and subfields and values in a wizard-like fashion, and provides pop-up assistance when entering tags and tag names. Una vez que se ha creado una regla, el formato estructurado permite probar si la regla funciona como se espera, antes de implementarla.
Esta funcionalidad está desactivada por defecto. To enable it for your institution, contact Customer Support.
Limitaciones
- Currently you can create only MARC21 and UNIMARC form-based indication rules.
- The form-based rules can only be used for filtering sets at this time, and the ability to use them in other workflows that use indication rules is on our roadmap and will be added in the future.
Nuevas reglas de indicación basadas en formato
Se introdujo el tipo "Formato" de reglas de indicación. This type has the same rule actions as the other indication rules (New,Edit,Delete,Duplicate,Contribute to CZ, etc.). Al crear una nueva regla basada en formato, esta recibe la insignia de "Formato" en el Editor de metadatos.

Creating a Form-Based Indication Rule
- Open the Metadata Editor >Rules area.
- Select New > Indication. The Indication Rules Properties dialog opens.

- En "Nombre", coloque un nombre a su regla y en "Descripción" (opcional) proporcione una descripción que ayude a otros usuarios a comprender qué hace esta regla.
- Under "Type", select whether to create the rule as Drool (for MARC bibliographic records), as XML (for Dublin Core records), or as Form.
- En "Nivel de acceso", indicar si se crea la regla como Privada o Compartida. This determines in which folder the indication rule is saved. Tal vez también se desee guardar las reglas de indicación en la carpeta Privada y probarlas primero antes de moverlas a la carpeta Compartida (al cambiar las Propiedades). Private indication rules cannot be used in the "Filter Set" functionality invoked from the Manage Sets page. Tenga en cuenta que la carpeta Comunidad tiene reglas de indicación que puede copiar para crear sus propias reglas de indicación.
- En "Tipo de registro", seleccionar si la regla se utilizará para crear conjuntos de registros bibliográficos, autoridad o existencias.
- En "Formato", seleccionar el registro para el tipo de conjuntos. Las opciones disponibles están determinadas por los formatos activos en su sistema.
- Select Save in the dialog. Se abre el panel de edición del Editor MD.
- In the right-hand panel of the Metadata Editor, configure your rule as per the Configuring the Indication Rules section below.
- Select Save.
Configuring the Indication Rules
Una vez que se crea la regla de indicación basada en formato, se abre un panel donde se pueden configurar las condiciones. An indication rule can be composed of one or more conditions.
Crear reglas de indicación manualmente o con asistencia del sistema
Se puede crear una regla de indicación de una de las siguientes maneras:
- Manualmente, al tipear la información del campo en el que se realiza la consulta.
- Using pop-up assistance to help you select the desired field. The pop-up assistance derives its information from the metadata profile defined in your system (see Configuring Cataloging)
| Para tipear la información manualmente: | Para usar asistencia emergente: |
|---|---|
|
|


Definir campos para reglas de indicación basadas en formato
For the different types of fields, different rule syntax is displayed.
- En las condiciones, definir los campos de la siguiente manera:
Tipo de campo Completar campos de este tipo Campos de control 001 / 003 / 005 / 009 To input a control field 001 / 003 / 005 / 009:- Escriba (o seleccione mediante la asistencia emergente) la etiqueta del campo.
- Seleccionar el comparador deseado.
- Ingresar texto libre.

All other control fieldsPara completar otros campos de control:- Escriba (o seleccione mediante la asistencia emergente) la etiqueta del campo.
- If you are inputting the LDR, 006, 007, or 008 field, from the "Positions" dropdown, select the relevant position and select Done.

The indication rules for the 007 field require two conditions, one for the "Category of material" and another for the "Specific material designation."
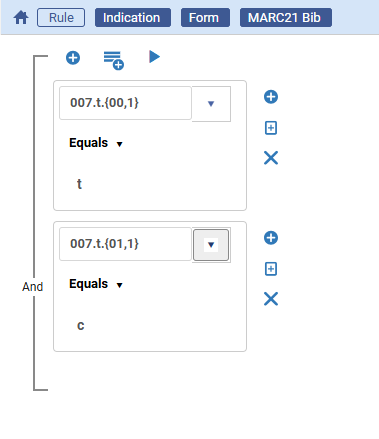
- Seleccionar el comparador deseado.
- Ingresar texto libre.
Data fields — including fields that are not in the metadata profile (e.g. fields defined locally) Para completar un campo de datos:- Escriba (o seleccione mediante la asistencia emergente) la etiqueta del campo.
- Select the desired indicators and subfields and select Done.
- Seleccionar el comparador deseado.
- Ingresar texto libre.

- If you do not specify any value for an indicator/subfield in the condition, this is displayed as * and is interpreted by Alma as any value.
- To indicate an empty (undefined) value for indicators (in the fields that allow it), type in the # value.
- When you enter text in the Value field, Alma does not attempt to validate the text. This enables you to choose a non-valid value for data correction purposes.
- To add more conditions, or groups of conditions,Working with Indication Rules see below.
- Select Save on the toolbar to save the indication rule.
Testing a Form-Based Indication Rule
Prior to running a job to filter a set using an indication rule, it may be a good idea to validate that your rule may works as desired; and if it does not, to edit it some more. Puede probar la regla completa o un solo grupo de condiciones dentro de la regla.
- Once you have created and saved your rule, click
above the rule. Depending on the results, a pop-up appears with either a True or False response, indicating that the bibliographic record either met or did not meet the logic specified in the indication rule.

Trabajar con reglas de indicación basadas en formato
Opción Descripción Para añadir condiciones adicionales a la regla - Select
above the condition to add another condition.
- Select
to the right of the condition and duplicate this condition ; then edit the new condition as necessary.
Para añadir un grupo de condiciones a la regla Cuando se crea una regla de indicación, se pueden añadir condiciones individuales o crear grupos de condiciones. Select above the condition lines and add as many conditions as necessary.
However, not that you can only add up to 3 nested levels of conditions in the form-based rules.

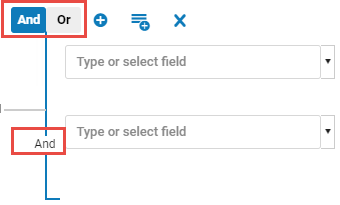
Para cambiar la relación entre grupos de condiciones Baseline conditions default to an AND relationship, meaning that each condition must be true to retrieve the bibliographic record. Cuando añada un grupo de condiciones, puede cambiar la relación en el grupo a OR. In this case, the bibliographic record will be retrieved when either of these conditions is true.
Téngase en cuenta que solo los campos incluidos en la regla se utilizan para recuperar registros. Fields that you did not include in the rule do not affect the retrieval, meaning that records with any values in these fields will be retrieved.
Click on any Boolean operator between the conditions. En la parte superior de la lista, aparecerán las marcas para AND y para OR. Click a flag to select this type of relationship. To stop displaying these flags, click again on the Boolean operator.
While it is permissible to include multiple Boolean Operators in an indication rule, when many of Boolean operators are selected, slower performance is likely to result. Por lo tanto, cada regla debe incluir como máximo 200 operadores booleanos.
Para eliminar una condición Seleccionar la X a la derecha de la condición para eliminarla de la regla. - Select
Page tags: article:topicproduct:almacontent:Documentationlang:english
