Configuring Other Leganto UI Elements
-
See Managing Citations for more configuration options for Leganto (Adding Citation Tags, Additional Resource Information, Disable Resolving, Public Note, Managing a Citation's Digital Representations).
-
Also see Enabling Instructor Rollover and Configuring Citation and Section Tags.
Configuring the General Message for Lists and Citations
You can configure the general message that displays above all lists and items. .

-
Selecting the Stop showing this message checkbox hides the general message until the message is changed.
-
Selecting the X icon message hides the general message until the user's next session.
-
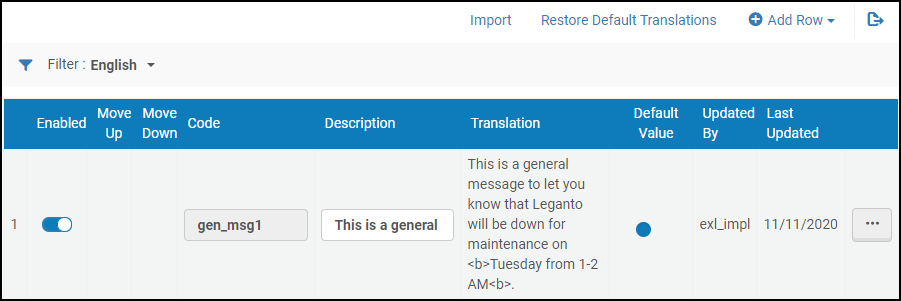
Open the Customer Labels code table (Configuration Menu > Leganto > General > Customer Labels).
-
Select Add Row and specify the following information in the dialog box:
-
Code – Specify a unique code for your general message. You will need this code later when you enable the general message in Leganto.
-
Description – Specify the message's text (which may include HTML markup).
-
-
Save your changes to the table.
-
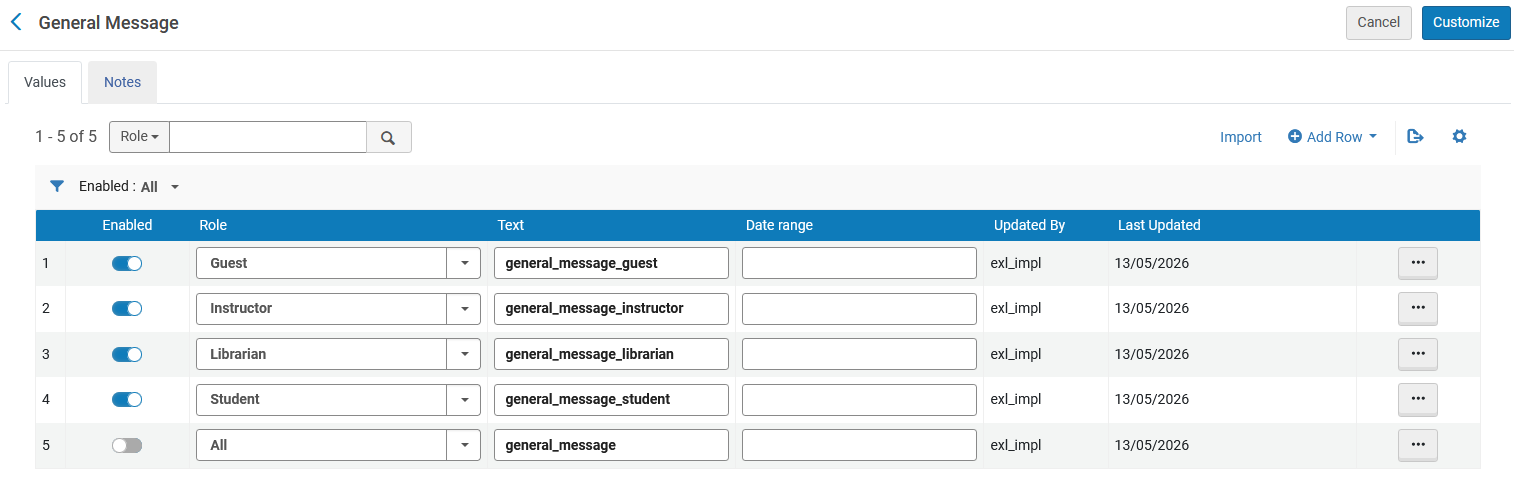
Open the General Message mapping table (Configuration > Leganto > Features > General Message).
-
Add messages to the table by selecting Add Row, defining the target role, message text, and optional date range, and saving the configuration. Each role can appear only once in the table.
Each row in the mapping table defines a message to a specific user group and includes the following columns:
-
Enabled – A toggle that controls whether the message is active
-
Role – The target audience (All, Guest, Instructor, Librarian, Student)
-
Text – The message text, defined using a code from Configuration > Leganto > General > Customer Labels
-
Date range – Optional start and end dates that control when the message is displayed
-
Updated By – The name of the user who last modified the row
-
Last Updated – The date of the last update
By default, the General Message mapping table is empty.
If a general message for the All role is configured, it overrides any role-specific messages and is displayed to all users.
Displaying Leganto in a New Tab
When Leganto is embedded in an iFrame, it may be helpful to open Leganto in a new tab so that users can enlarge it for better viewing. By default, the Open New Tab icon appears in Leganto when Leganto is embedded in an iFrame. Selecting the icon opens Leganto in a new tab so that users can work in Leganto independently.
Set the parameter display_open_new_tab(Configuration Menu > Leganto > Features > Leganto Features) to false.
When accessing Leganto from an LMS, if browser settings are set to block third-party cookies, the OPEN NEW TAB button is now only displayed until it is selected. After selecting the button, the page must be refreshed for the button to be available again.
Set the parameter iframe_open_new_tab(Configuration Menu > Leganto > General > Settings) to false.
The display_logout_in_embedded parameter key (Configuration Menu > Leganto > Leganto Features) determines whether to show (true) or hide (false) the Logout menu item. The default is true.
Configuring Leganto Branding/Customization
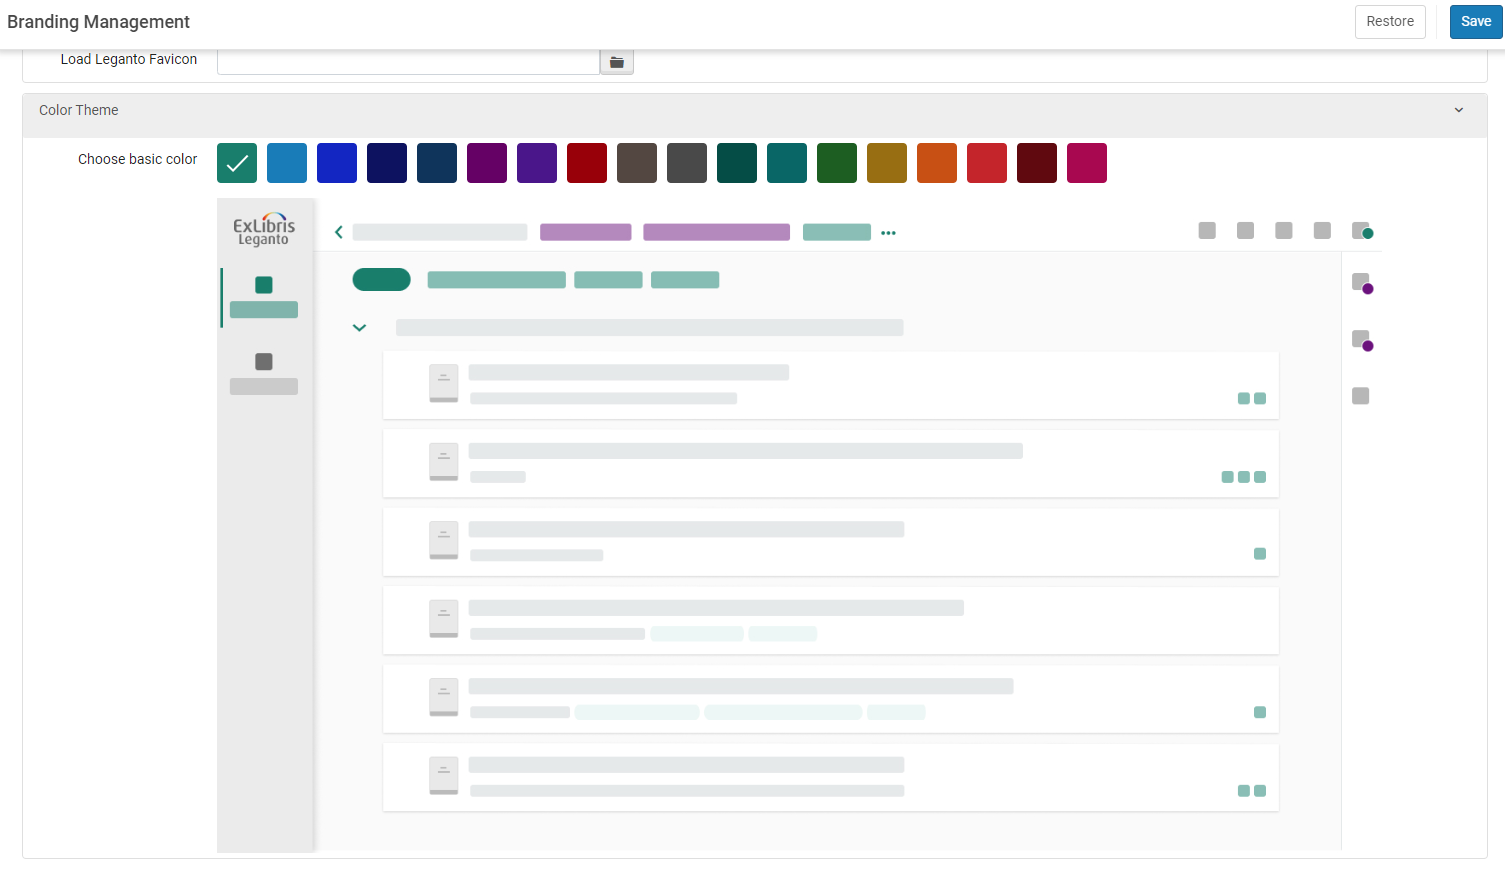
You can configure the color scheme for Leganto's (Configuration > Leganto > UI > Branding) from the Branding Management Color Theme section. When you choose the primary color, the secondary color is auto-selected. The two colors are designed to match each other and to meet accessibility standards. You can view a preview of the color scheme before selecting Save.
Configuring the Default CSS for Holdings from Primo
The holdings_default_leganto_css field in the Leganto Customer Settings mapping table (Configuration Menu > Leganto > Discovery > Settings) enables you to use the same CSS that you are using to display holdings for Primo's Get It. To use Primo's CSS, set this field to false. Otherwise, the system uses Leganto's CSS.
This feature does not apply to Primo VE.
Configuring the Holdings from Primo
Leganto supports the Primo new mashup UI. The following parameters are included in the Primo Settings table (Configuration Menu > Leganto > Discovery > Primo Settings):
- holdings_new_ui enables the new Primo out-of-the-box mashup UI.
- holdings_skin enables your own skins for the mashup that you have customized yourself.
- primo_holdings_expand enables you to display holdings using an expanded method.
- filter_holdings_by_library_view limits displayed physical holdings to only those libraries mapped to the active Primo view.
Mobile support for the holdings page is only supported for Primo VE.
Configuring Language Settings
Language settings are set in the customer parameters table (Configuration Menu > Leganto > General > Settings).
Set the parameter default_language to one of the following country codes:
- en- English
- de- German
- ko- Korean
- it- Italian
- fr- French
- zh- Chinese
- nl- Dutch; Flemish
- es- Spanish
Set the excluded codes separated by a comma in the excluded_language_codes field.
Set the parameter librarian_disable_language_change to true(disable display translation) or false(default).
Enabling SSO When Accessing Find Lists Shareable Link
You can configure whether a logged-in user remains logged in when accessing Leganto using any shareable link or is redirected to the login page. For this feature to work, your IDP (SAML) must support passive mode.
- In the customer parameters table (Configuration Menu > Leganto > General > Settings), set the parameter find_list_sso to true. Your IDP (SAML) must support passive mode. The default is false.
Configuring Working with Reading Lists
Other options on this page also affect how an instructor works with reading lists, but these options are specific to the reading list configuration workflow.
Enabling Reading List Syllabuses
You can enable instructors to add a link and/or file to the top of the reading list. This link or file is intended to be a syllabus and appears to the student with the prefix Syllabus and the option to select the link or download the file.
Set the parameter syllabus in the Leganto Features table (Configuration Menu > Leganto > Features > Leganto Features) to true. When true, instructors see the option to add a syllabus. Note that, regardless of this setting, librarians always see this option.
Enabling Multiple Authentication Profiles
You can configure multiple authentication profiles for logging in to Leganto.
- Verify that you have multiple authentication profiles set up by entering the Integration Profiles table under Leganto Configuration > LTI > Integration Profiles and searching for the authentication profiles. These may be some variation of Local, SAML and/or CAS (e.g. "saml"and "saml2").
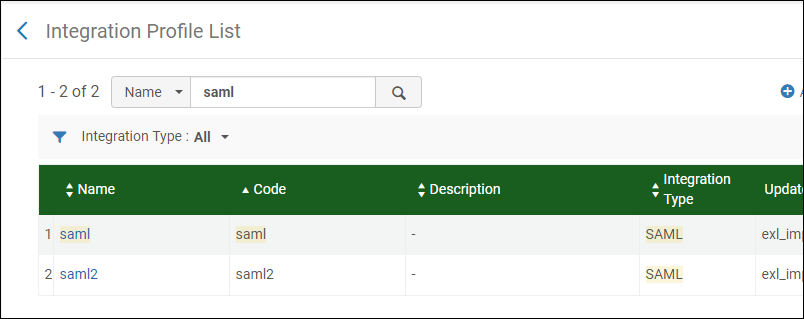
Authentication Profiles - In the authentication_method parameter in the Settings table under Leganto Configuration > General > Settings, enter a value of multiple and select Save.
 Customizing the authentication_method parameter
 - Once you have saved a value of multiple in the authentication_method parameter, the Multiple Login mapping table appears under Leganto Configuration > General. Enter the table and add a new row for each authentication profile that you wish to use. Ensure that the profile type and profile code matches that of the authentication profiles you wish to use, and that each profile code is unique.
 Multiple Login table
 - Select Customize to save the authentication profiles into the Multiple Login table.
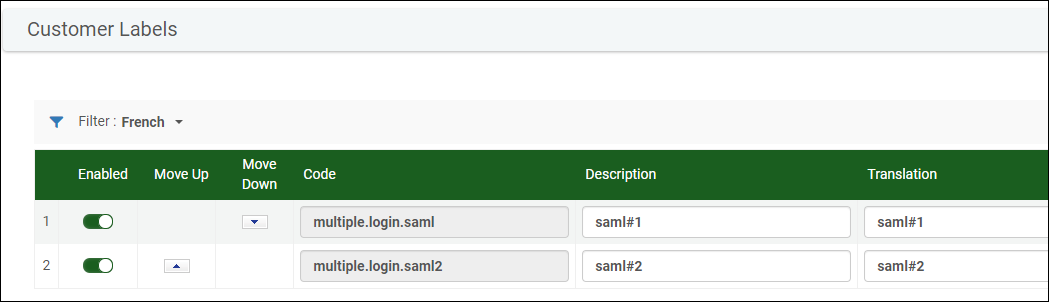
- Navigate to the Leganto Configuration > General > Customer Labels table and add a row for each authentication profile. Ensure that the Code field contains multiple.login.[profile code], and that the Description field contains the name of the profile you want to appear in the login.
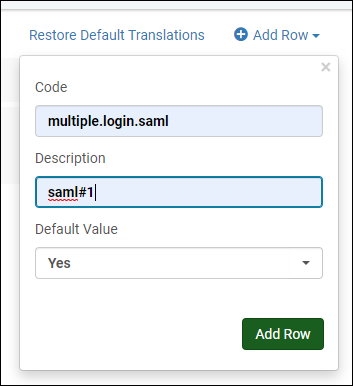 Add row to customer labelsCustomer labels table with authentication profile labels
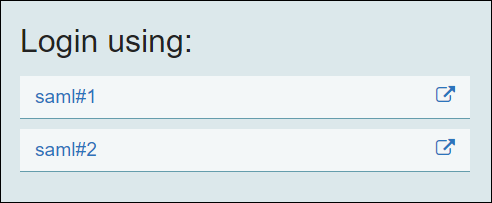
 - Select Customize to register the new labels. When you log in again, these labels appear:
Multiple logins using new labels
Configuring the Default Creative Commons Value for a Reading List
Set the parameter reading_list_creative_commons_default_value(Configuration Menu > Leganto > List Management > Settings) to the creative commons code. If not set, no option is initially selected in the dropdown list. The following codes are available:
| Country | Code | Description |
|---|---|---|
| International | WW_CC_0 | CC0 (Public Domain) |
| WW_CC_BY | CC BY (Attribution) | |
| WW_CC_BY_SA | CC BY-SA (Attribution-Share Alike) | |
| WW_CC_BY_ND | CC BY-ND (Attribution-No Derivatives) | |
| WW_CC_BY_NC | CC BY-NC (Attribution-NonCommercial) | |
| WW_CC_BY_NC_SA | CC BY-NC-SA (Attribution-NonCommercial-Share Alike) | |
| WW_CC_BY_NC_ND | CC BY-NC-ND (Attribution-NonCommercial-No Derivatives) | |
| AU | AU_CC_0 | CC0 (Public Domain) AU |
| AU_CC_BY | CC BY (Attribution) AU | |
| AU_CC_BY_SA | CC BY-SA (Attribution-Share Alike) AU | |
| AU_CC_BY_ND | CC BY-ND (Attribution-No Derivatives) AU | |
| AU_CC_BY_NC | CC BY-NC (Attribution-NonCommercial) AU | |
| AU_CC_BY_NC_SA | CC BY-NC-SA (Attribution-NonCommercial-Share Alike) AU | |
| AU_CC_BY_NC_ND | CC BY-NC-ND (Attribution-NonCommercial-No Derivatives) AU |
Leganto includes the creative_commons(Configuration > Leganto > General > Settings) parameter for institutions that want to control whether to display the Creative Commons license fields for lists and items:
- When the parameter is set to all(default) or true, list admins can set Creative Commons licenses in Leganto for both lists and items.
- When the parameter is set to list, list admins can only set Creative Commons licenses for lists.
- When the parameter is set to item, list admins can only set Creative Commons licenses for items.
- When the parameter is blank or set to false, list admins are not able to set Creative Commons licenses for Leganto.
Disabling Reading List Subjects
You can disable reading list subjects, if they are not relevant for your institution. When disabled, the Subjects tab does not appear on the Edit Reading List page; see Editing a Reading List.
Configure the parameter subject_tags in the Leganto Features table (Configuration Menu > Leganto > Features > Leganto Features) to false. The Subjects tab is removed from the Edit Reading List page and the ability to add or view subjects is removed from Leganto.
Configuring What Happens to Deleted Lists
You can configure whether deleted lists are purged from Alma or remain in Alma so that they can be restored. Deleted lists are similar to archived lists, but they cannot be unarchived by simply changing the status. See Managing Reading Lists.
Configure the parameter delete_reading_list in the customer parameters table (Configuration > Leganto > General > Settings). When set to true(default), deleted reading lists are purged from Alma. When set to logical, deleted reading lists can be restored.
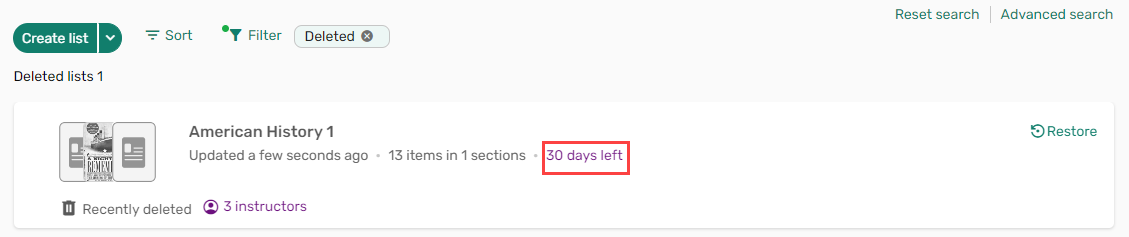
When set to logical, deleted reading lists enter the Recently Deleted lists group. Reading lists in the Recently Deleted lists group are automatically purged from the system once they have spent more than 30 consecutive days in the group. This removal is permanent and is performed by a job that runs in the background. In addition, for each reading list in the Recently Deleted lists group, an indicator tells you how many days are left before the system purges the reading list.
Deleting Reading Lists and Citations
Citations that you delete from Alma or Leganto are automatically purged and cannot be restored. Courses that you delete from Alma are deleted along with any citations and associated reading lists, and are also automatically purged and cannot be restored.
When a citation is deleted, its usage analytics are retained even though the details belonging to that citation are deleted. For example, a reading list's total usage retains all analytics related to the deleted citation even though the citation has been deleted and cannot be viewed.
For more information, see Reading Lists(Reading List Deleted).
Archiving Reading Lists
Archiving a reading list makes it inaccessible to students, and also hides it from the My Lists view for instructors. Archived lists remain indefinitely in the system, pending further action, and can be later unarchived to make them fully visible. You can archive reading lists in the following ways:
- From an individual reading list's Edit page
- From the Task List
- Using the Reading List Bulk Update job
Archiving Individual Reading Lists
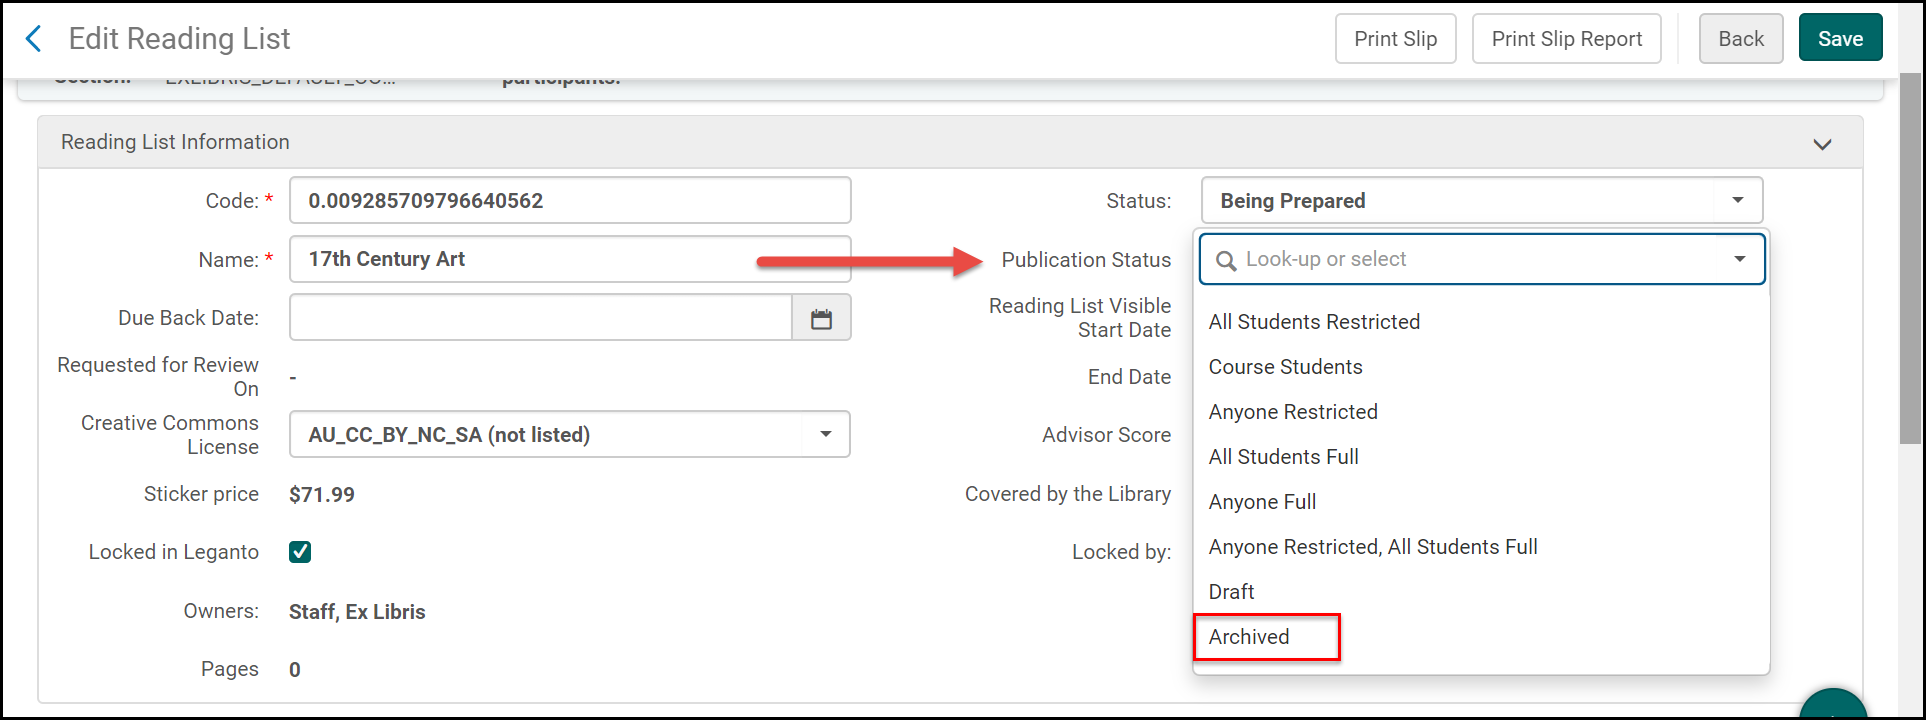
You can archive an individual reading list from its Edit Reading List page and setting its Publication Status to Archived.
Archiving Reading Lists from the Task List
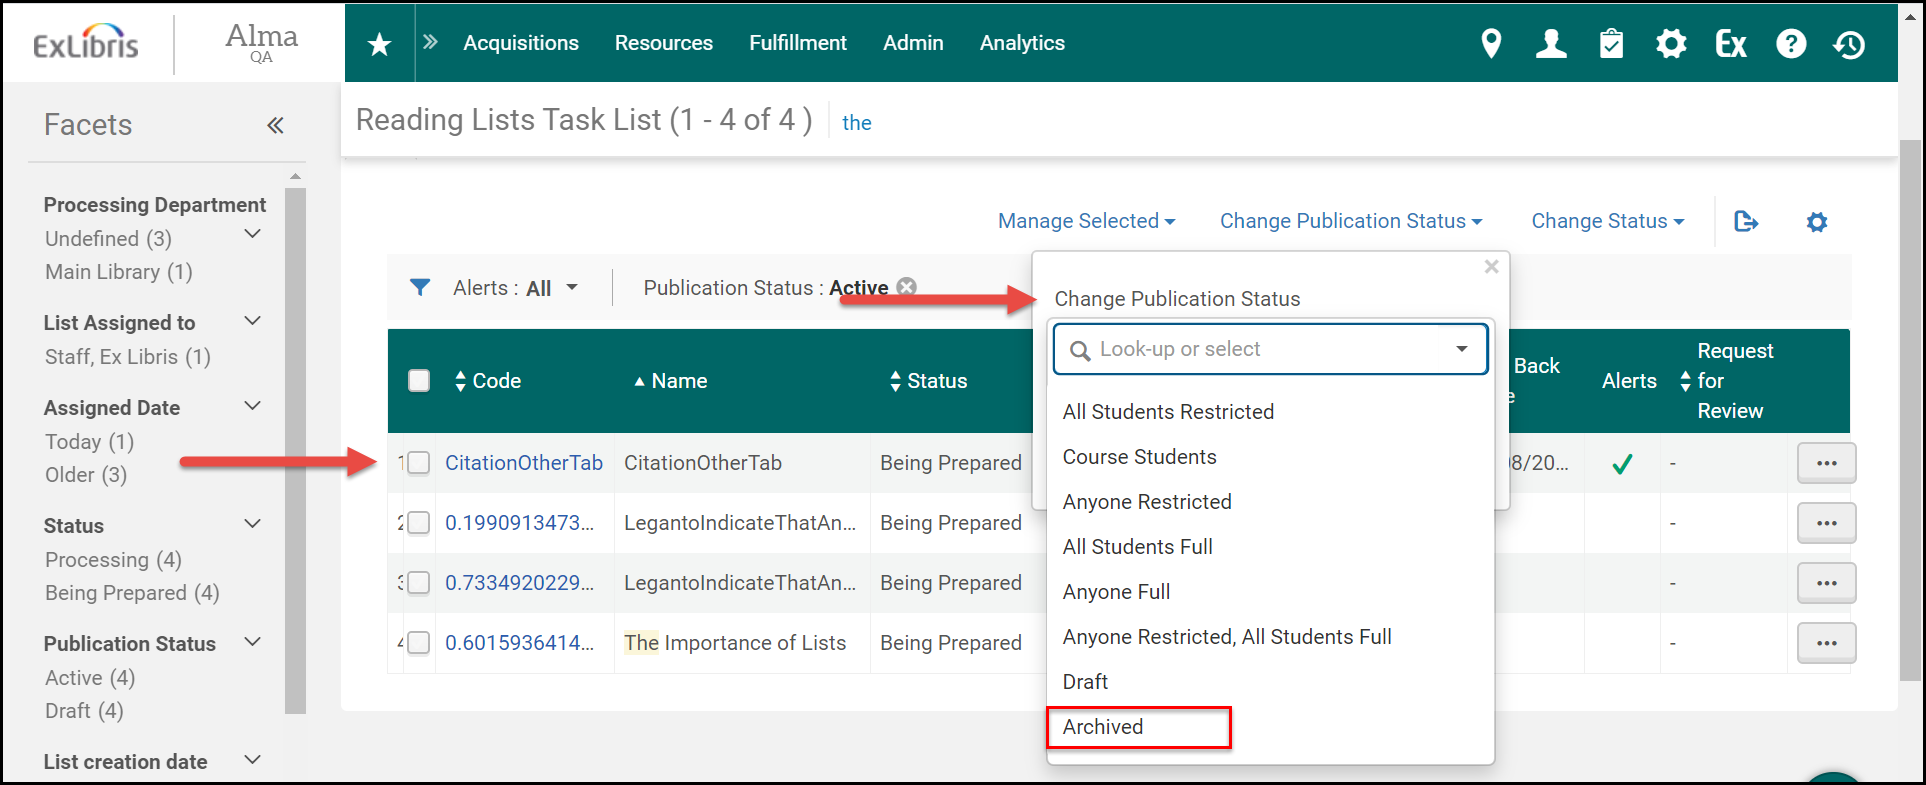
You can archive multiple reading lists from the Reading Lists Task List by selecting them and setting their Publication Status to Archived.
Archiving Reading Lists Using the Reading List Bulk Update Job
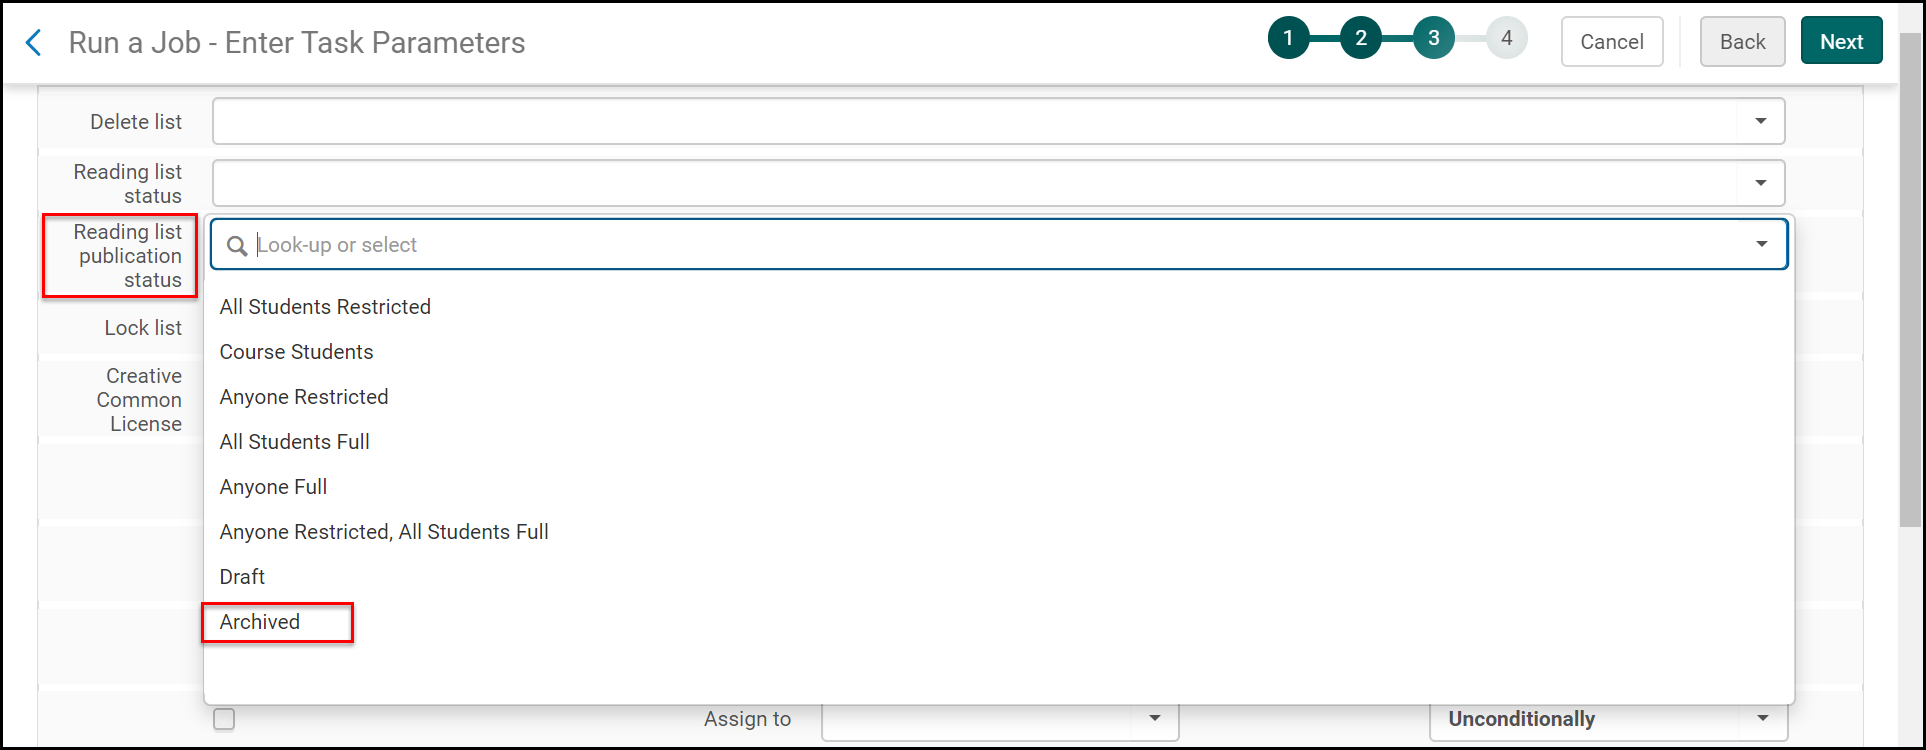
You can archive reading lists in bulk using the Reading List Bulk Update job and setting the Reading list publication status to Archived.
Viewing Archived Reading Lists
Instructors can view and access archived reading lists by selecting the Filter and selecting Archived.
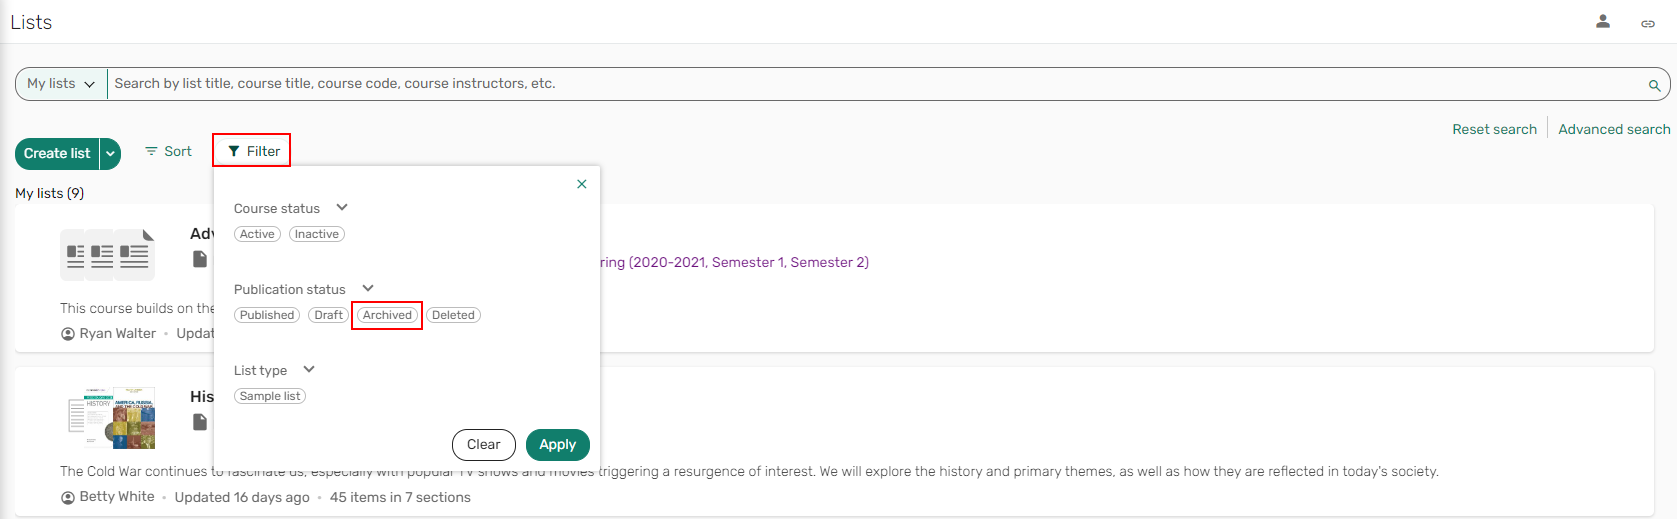
Instructors can only see archived reading lists of which they are list owners.
To view the archived reading lists in Leganto, you must set the archived_lists flag to true(Configuration Menu > Leganto > Features > Leganto Features).
By default, the archived_lists parameter is set to false.

Unarchiving Reading Lists
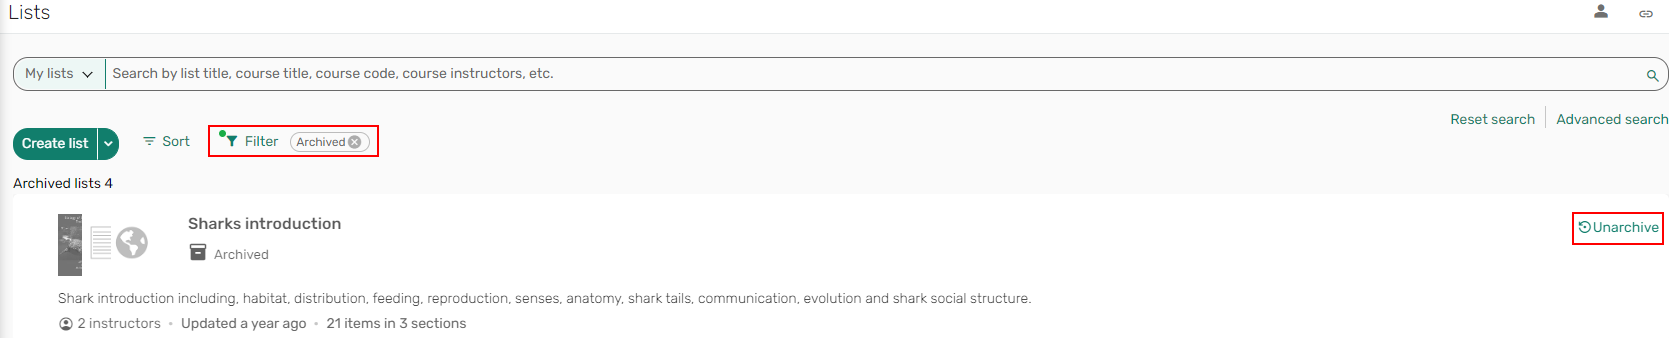
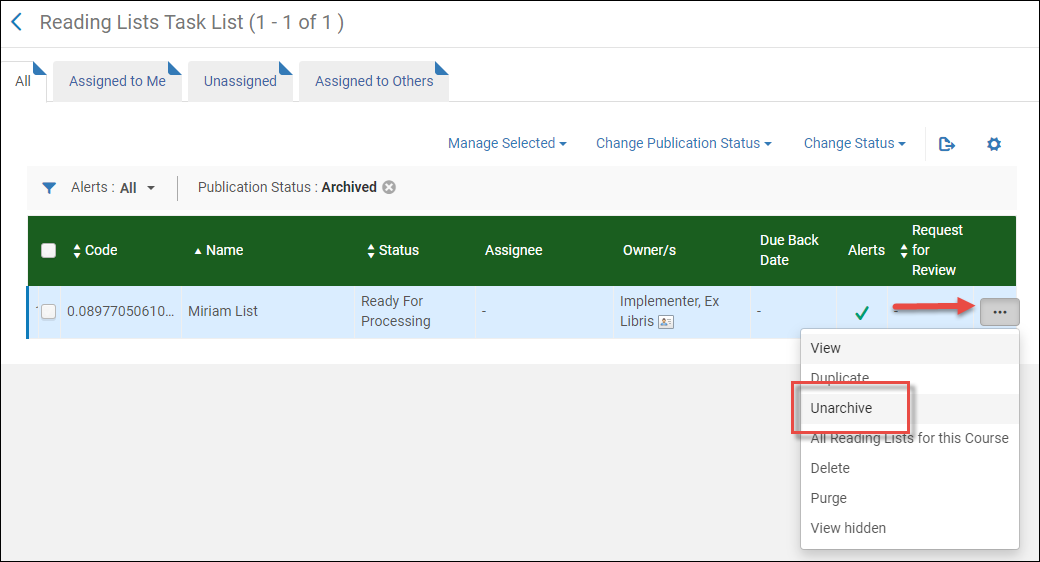
You can unarchive a reading list in Leganto or from within Alma. Unarchiving a reading list puts it in Draft mode.
Filter the list by Archived lists, and then select Unarchive on the list you want to unarchive.
In the list menu for an archived list, select Unarchive.
You must set the archived_lists flag to true to enable the unarchiving feature (Configuration Menu > Leganto > Features > Leganto Features).
By default, the archived_lists flag is set to false.
Configuring List, Section, and Citation Menus
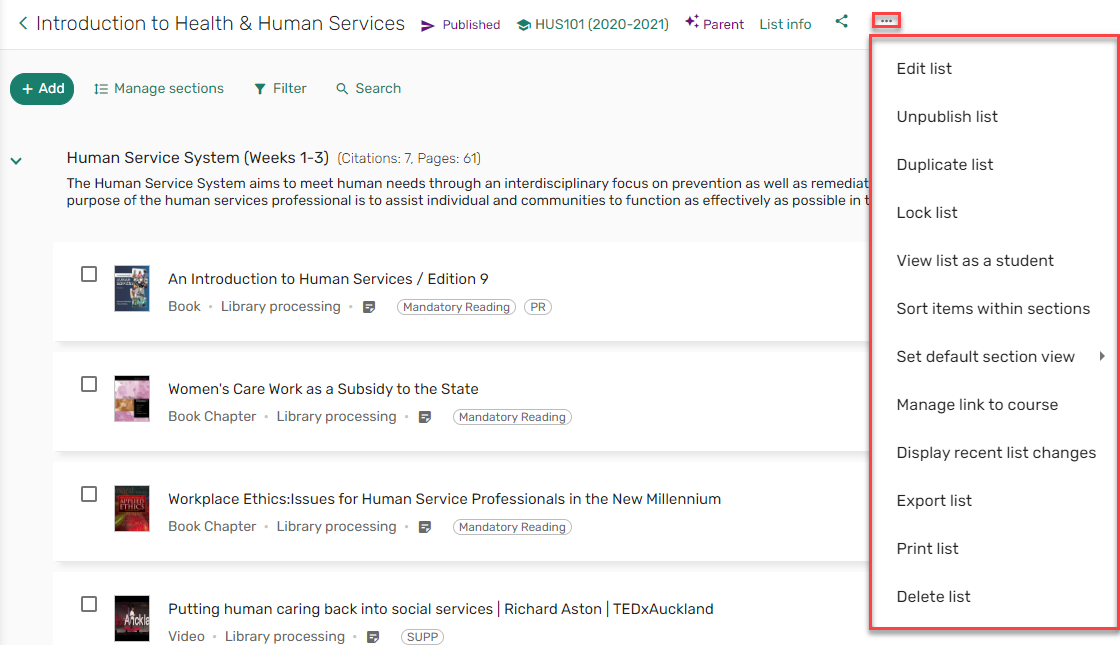
The following mapping tables enable you to configure which options appear in each of the associated menus. By default, all options are enabled in each table.
If either the Enabled toggle or the Enable field are set to false/No, the action is not displayed in the list. Both options must be set to true/Yes for the action to be displayed in the list.
-
List Menu(Configuration Menu > Leganto > UI > List Menu) – Configures the options that appear in the reading list's main menu.
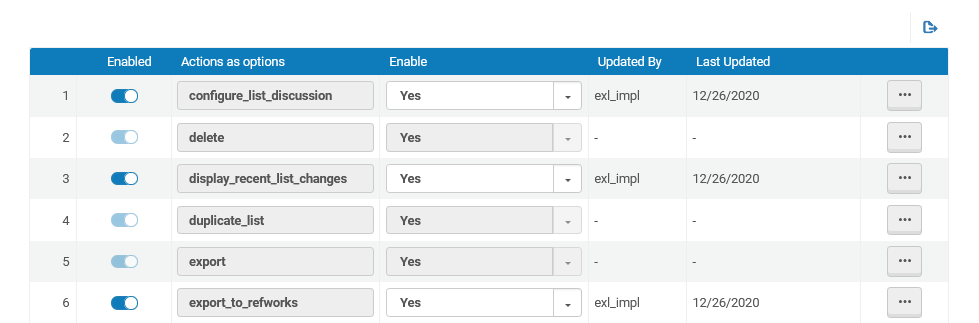 Leganto List Menu Mapping Table
 -
Section Menu(Configuration Menu > Leganto > UI > Section Menu) – Configures the options that appear in the reading list's section menus.
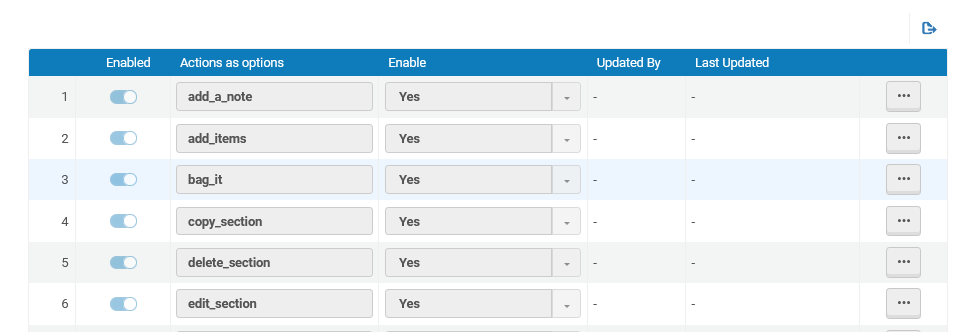 Leganto Section Menu Mapping Table
 -
Citation Menu(Configuration Menu > Leganto > UI > Citation Menu) – Configures the options that appear in the reading list's citation item menus.
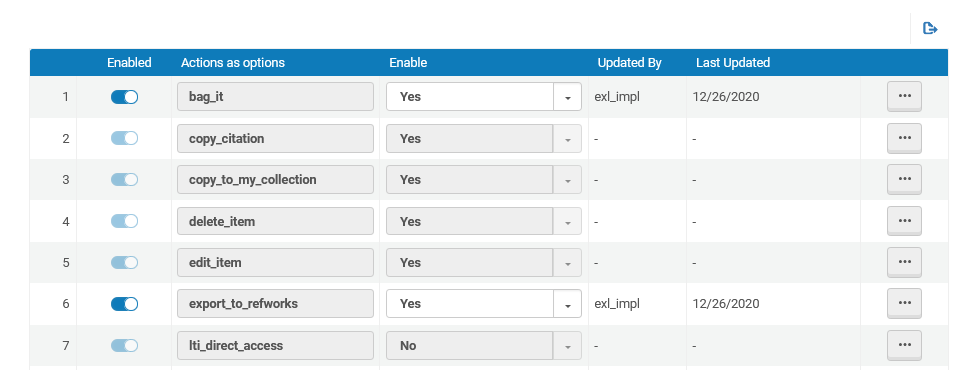 Leganto Citation Menu Mapping Table
Configuring the Student View Error Message for Canvas
When using a learning management system (LMS) such as Canvas, some functionality provided within reading lists may not be accessible if instructors have enabled the LMS's student view. To make sure that instructors are aware of this, you can configure the following message when they access a reading list while the LMS's Student View is enabled:
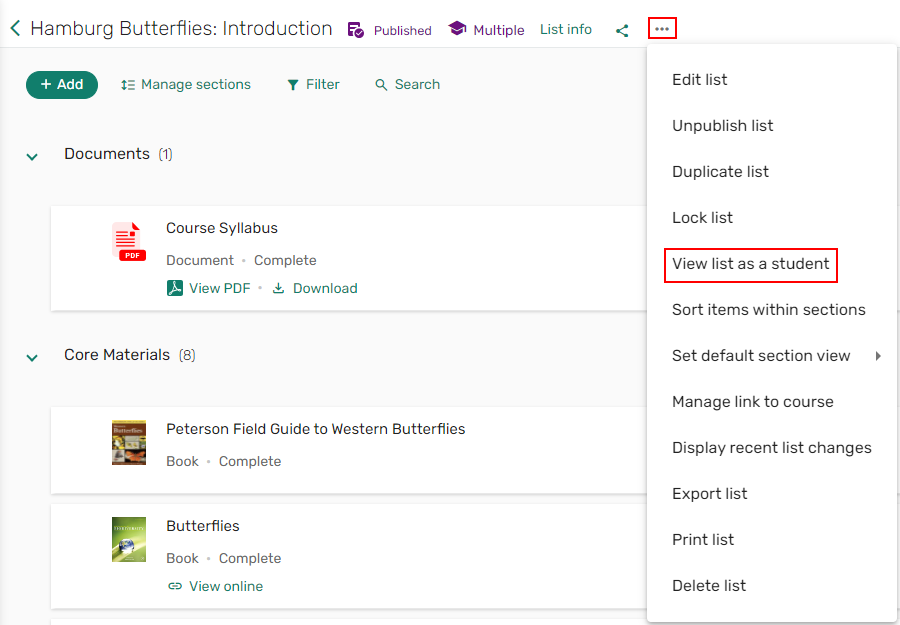
While using your learning management system’s student view, some functionality may not be supported in the reading list. Please exit the student view and then open the reading list’s student view (Reading List’s main menu > View list as a student).
If instructors want access to a reading list's full functionality, they need to disable the LMS's student view and enable the reading list's student view.
Edit the external app and add the following custom field:canvas_masq=$Canvas.masqueradingUser.id. For more details, see Add Custom Field to the External App.
Edit the Description and Translation fields for the new lti.user.error.studentView code that has been added to the UI Leganto Labels code table (Configuration Menu > Leganto > General > Labels).
Configuring Links for Electronic Citations
See also Managing a Citation's Attachment to an Inventory Item.
By default, a link Check Availability appears on the reading list page for each citation. When the user selects this link, the citation details page appears in the Links & Availability section. You can configure the View Online link to appear instead of Check Availability. Selecting this link opens the first electronic version in the list of available links. This also applies to digital citations. The reason that some sites may wish to avoid this is that this link may trigger the popup blocker on some browsers.View online and Check availability links are available in the brief display only when links exist on a citation. If, for instance, you hide all digital presentations, the link is not presented.
You can also configure what happens to the source URL with a citation added using Cite It!. By default, the source URL from Cite It! is saved and any source URL in the resource is ignored. You can instead copy the source URL from Cite It! to the Notes field, remove the source URL and replace it with the source URL from the resource (if any). This only happens if the resource is located in the repository.
You can also configure how the location appears for an availability link.
Configure the parameter force_direct_uresolver in the customer parameters table (Configuration Menu > Leganto > Features > Leganto Features) to true. The View Online link appears for each electronic and digital citation when viewing the reading list in Leganto. When the parameter set to false, rather than presenting the user with several links, when selecting View online, the More options button is hidden and the Full display is presented for the item.
When you select View Online, the first available non-hidden link opens in a new tab. If all links are hidden, the citation page appears instead.
Configure the parameter move_source_url in the customer parameters table (Configuration Menu > Leganto > General > Settings). If you would like to have the source URL copied to the Notes field and removed as a source, set the parameter to one of the following:
-
on_locate– to move the source URL when the citation is matched to a repository item
-
resolving– to move the source URL when the citation matches to library inventory via the link resolver
-
all– both on_locate and resolving
If you do not want to move the source URL, leave the parameter blank.
Configure the parameter citation_availability_format in the customer parameters table (Configuration Menu > Leganto > General > Settings) to one of the following:
- Display first available location and library.
- Display institution name, only.
- Display library and institution if there is only one availability option, otherwise display institution name, only.
Configuring the “Link to Library” Feature
The link_to_library_locate parameter (Configuration > Leganto > Features > Leganto Features) determines how the Manage Link to Library option updates citation metadata in Leganto.
When a user links an item to any record using Manage Link to Library,link_to_library_locate determines how citation metadata is updated. Its behavior mirrors the on_locate parameter in Alma (Fulfillment > Other Settings), which controls metadata enrichment when a new citation is added to a reading list and located automatically.
Both parameters support the same metadata-enrichment logic (override,overlay,merge,ignore,overlay_no_type). The difference is:
- link_to_library_locate applies when a citation is manually linked to a record via Manage Link to Library.
- on_locate applies when a new citation is added to a list and Alma automatically locates a matching repository record.
Link or Relink Citation to Library Resource in Leganto UI (Manual Locate in Leganto)
Leganto provides a way for library staff to link a citation to a specific record in the library collection.
- When logged into Leganto as a library staff member, from the item action list, select Manage link to library. The search window opens.
The search performed is according to the original item's title and author. The user can change the search as needed. When hovering over an item from the search results, the Link action and More details button are displayed. Library staff can link or re-link the original citation to the library record. The citation metadata is updated depending on the link_to_library_locate(Configuration > Leganto > Features > Leganto Features) configuration, and the citation inventory presents the availability of the selected record.
The Manage link tolibrary action is not displayed when a list is locked.
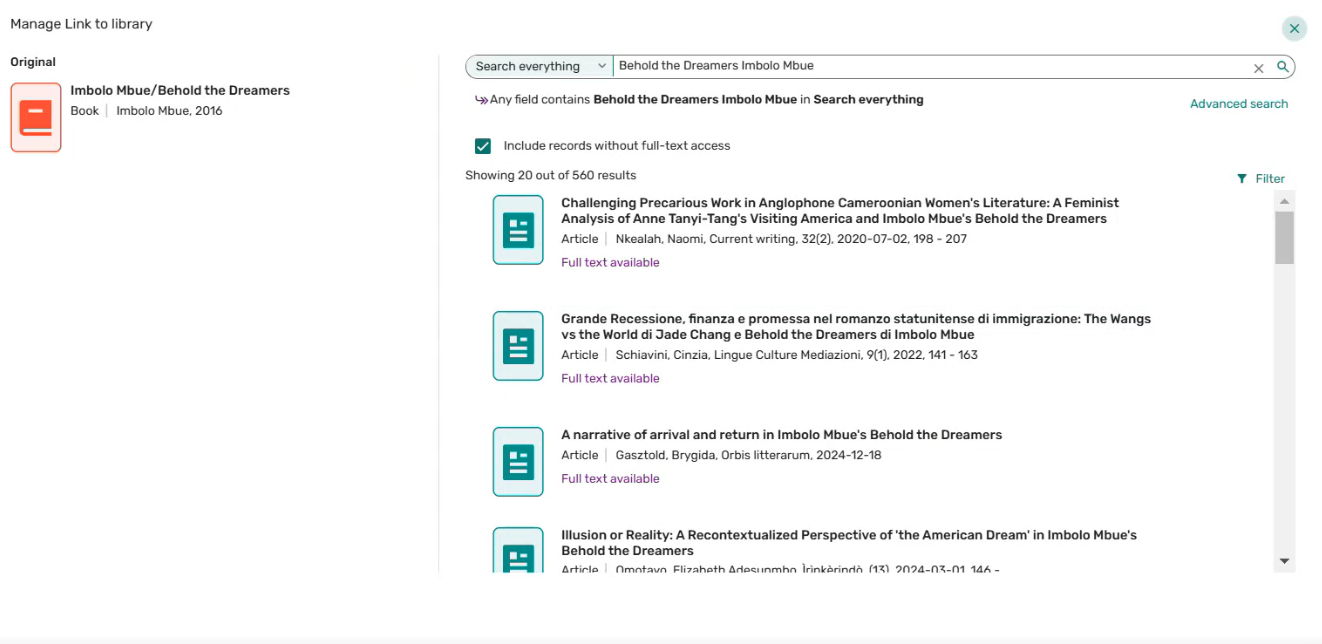
When the citation is updated, any usage, tags, notes, and copyrights are maintained.
The Manage link to library action is not available when accessing Leganto from a mobile phone, as a student, or from the view as student option.
Enabling Broken Link Reporting
To remove alerts about broken links, see Removing Alerts from Citations. For information about debugging an item's uResolver (OpenURL) link, see Debugging Citation uResolver Links.
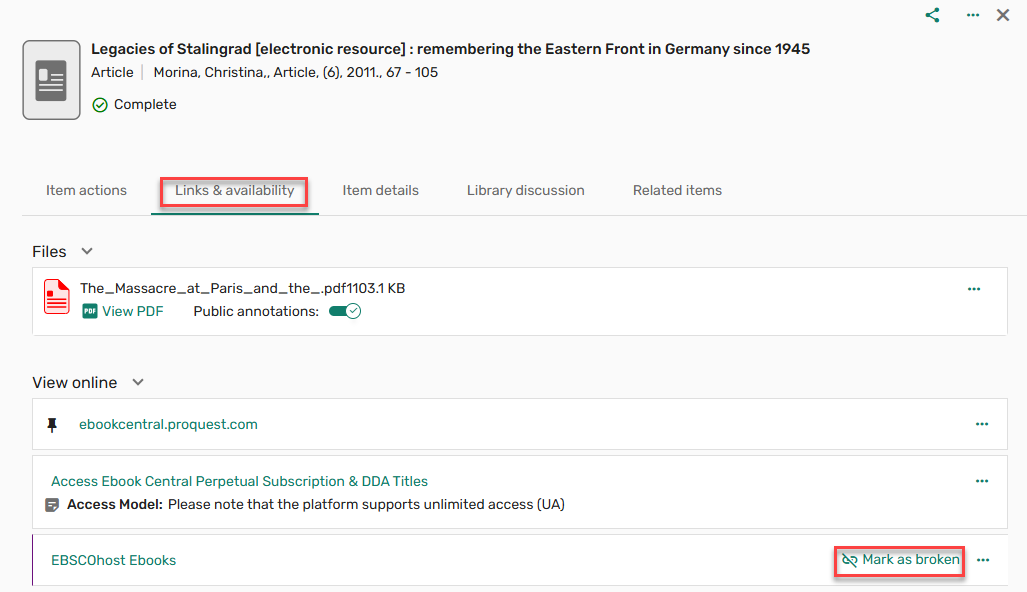
Set the parameter mark_as_broken in the Leganto Features table (Configuration > Leganto > Features > Leganto Features) to links to enable Leganto users to report broken links when there is at least one available link to a resource (electronic, digital, URL, or uploaded file, but not physical). Set to all to enable Leganto users to report broken links also when there is no availability. In both cases, the ability to mark as broken does not appear when there is physical availability and no other links. Leave blank to disable the ability to mark links as broken. The Mark as Broken action appears beside resource links in Leganto.
When the mark_as_broken(Configuration > Leganto > Features > Leganto Features) is set to all, the Mark as broken link also appears when a citation only contains hidden links, so that students can report when links are missing.
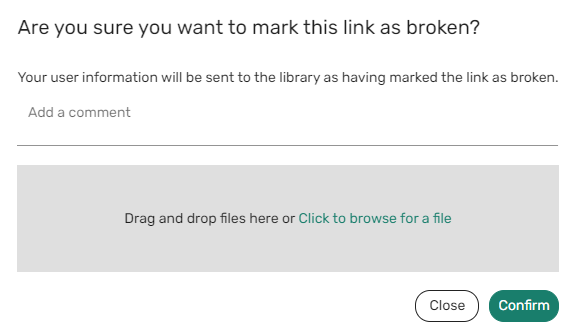
Leganto also includes the parameter mark_as_broken_comment_mandatory(Configuration > Leganto > Features > Leganto Features) to require users to include a comment when reporting a broken link. When set to true, users must enter a comment when reporting a broken link. When set to false, comments are optional. The default for the parameter is false.
When marking a link as broken, when the parameter mark_as_broken_file_upload(Configuration > Leganto > General > Settings) is set to true, users also have the option to include a file when reporting a broken link. The default for the parameter is true.
Supported file types:
-
pdf
-
png
-
jpg
-
jpeg
-
img
-
gif
-
txt
-
mp3
The maximum file size when uploading files is 50 MB.
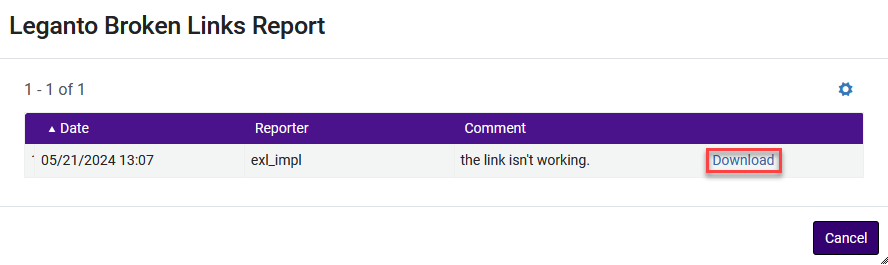
When a link is marked as broken, an alert is added to Alma.
Selecting the reporter's name opens the Leganto Broken Links Report.

The library can then view the file by downloading it from the Leganto Broken Links Report.
Configure the mark_as_broken_email_notification(Configuration > Leganto > Features > Leganto Features) parameter, using a comma to enter multiple entries. If the mark_as_broken_user_notification parameter is populated, a copy of the letter is also available in the user's Attachments list.
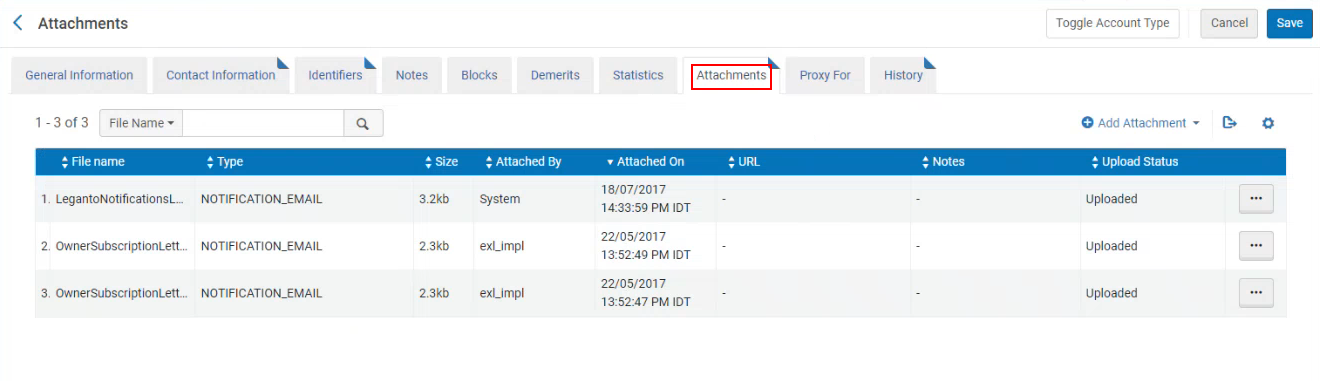
To configure that email notifications are sent to specific email addresses (such as a generic helpdesk), configure the mark_as_broken_email_notification parameter, using a comma to enter multiple entries.
It is possible to have email notifications sent to both specific users and specific email addresses. When either the mark_as_broken_email_notification parameter or the mark_as_broken_user_notification parameter is configured, an email is sent to that address each time a link or file is marked as broken. When multiple users report the same link as broken, a counter is added in the Alerts tab indicating how many users have marked the link as broken.
The Leganto Link Marked As Broken Letter (enabled by default) can be customized under General > Letters > Letter Configuration.
Notifying Users When Broken Links are Resolved
You can send notifications to users who have reported broken links when the library staff has resolved the issue. Upon selecting Remove to remove a broken link alert in Alma, the staff member is prompted to Confirm that they do want to remove the broken link alert. Additionally, the confirmation message now includes the option to send a notification to the user about the resolved link. To send the broken link notification, keep the Notify user checkbox checked and select the relevant notification template (configured from (Configuration > Leganto > Features > Broken Link Notification Template Name)) for the fixed link. The text from the template displays in the Note to user box, and can be customized if needed. There is one out-of-the-box template which reads "We have resolved the issue. You can now access the item using the link below."
If no template is enabled in Configuration > Leganto > Features > Broken Link Notification Template Name, the Leganto Marked As Broken Resolved Letter is sent without the Note to user text.
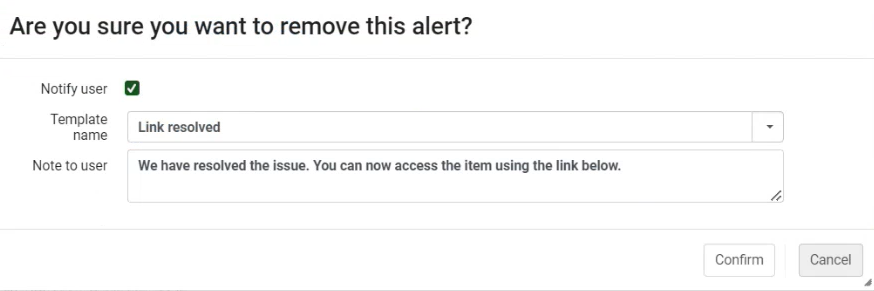
When the library staff member chooses Confirm, each user who reported the broken link receives the Leganto Marked As Broken Resolved Letter (Configuration > General > Letters > Letters Configuration). This letter is enabled by default.
The default text for the Note to user per template is customized in the Note to User(Configuration > Leganto > Features > Broken Link Notification) field. Library staff can override this text when sending the user notification.
Changes to the Note to user text in the alert are sent in the language in which they are inputted, not the user's configured language.
Configuring Whether Instructors Can Disable Availability Links
You can configure whether instructors can disable links from appearing to students in the Links and Availability section for a citation. An instructor can independently disable or enable (when available):
- Each electronic link
- The uploaded file
- The source URL, which is the citation's website
- Each digital representation
- All physical availability as a group; you cannot disable or enable specific holdings.
Set the parameter instructor_manage_citation_available_link in the Leganto Features table (Configuration Menu > Leganto > Features > Leganto Features) to true or false.
Configuring Availability for Citations Grouped in Leganto and Primo
Alma considers availability based on related records. Primo typically runs a DEDUP process, and so the availability of the records is often different than it is in Alma. You can configure whether Leganto uses Alma or Primo availability when displaying citations added using a Primo search scope. Citations added using the Alma search scope or using Cite It! always use Alma availability.
If you are a Primo VE customer, you can force the physical availability request pane on the Citation page to look more closely at how it does in Primo VE.
You can also configure whether Primo availability restrictions appear in Leganto search results when searching for items to add as citations.
Two parameters control the availability in Leganto:
-
related_records: If this parameter is on, and a citation has two related records grouped together in Alma (i.e. one electronic and one physical), and you added availability for one of these to a citation in Leganto, the availability for both items displays in Leganto. The availability can also come from two or more different items if they are related in Alma.
-
primo_availability_for_citations: In Alma, you may have two items, one electronic and one physical, which are not grouped together but are grouped together in Primo (as DEDUP). If the primo_availability_for_citations_added_from_primo parameter is set to true, Leganto displays the merged availability of the two items. If you have a group in Primo and the second parameter is set to false, and you add one item (i.e. electronic) from the group from Primo, it is not grouped in Leganto.
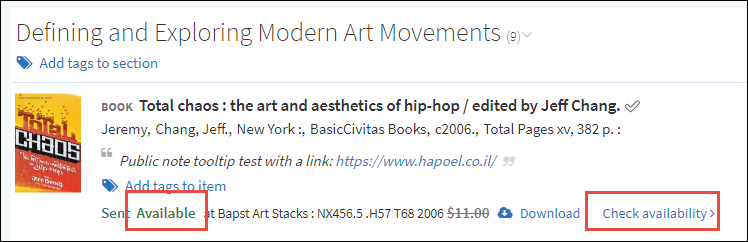
Set the related_records parameter to true or false(Configuration Menu > Leganto > Discovery > Primo Settings). When set to true, record inventory-related in Alma appears for citations in Leganto. For more information on the inventory of related records, see Configuring Related Records for Physical Inventory and Configuring Related Records for Electronic Services).
Configure the parameter primo_availability_for_citations_added_from_primo in the customer parameters table (Configuration Menu > Leganto > Discovery > Primo Settings). When set to true(default), availability is considered as it is in Primo (after the DEDUP process, if configured). When set to false, availability for citations added using a Primo search scope is considered as it is in Alma (using related records, if configured).
When both parameters are on, if an item is added from Primo, the related_records parameter is not used. Thus, if two items are related in Alma but not in Primo, and both parameters are on, if you add an item from Primo, it is not related to the other item.
- Select Enable silent login on the Primo VE User Authentication page; see Configuring the Login Links.
-
Set the parameter primove_getit to true(Configuration Menu > Leganto > Discovery > Primo Settings) to force the physical availability request pane on the Citation page to look more closely at how it does in Primo VE.
Configure the parameter display_primo_ve_login(Configuration > Leganto > Discovery > Primo Settings) to false(default true) to hide the Primo VE login banner so that only the Leganto sign in option is displayed.
Configure the parameter display_primo_restriction_label in the customer parameters table (Configuration Menu > Leganto > Discovery > Primo Settings) to true or false. The labels (access restricted, not restricted, and so forth.) appear in Leganto.
Configure the parameter hide_primo_digitization on the Primo Settings page (Configuration Menu > Leganto > Discovery > Primo Settings) to true to exclude the ability to submit a digitization request. The default setting for the parameter is false. Note that Primo VE is not supported. See Leganto Customer Settings Mapping Table Parameters.
Set the parameter primoNDE_requests(Configuration > Leganto > Discovery > Primo Settings) to true(default:false). This makes the request pane appear in the Links & availability tab when viewing an item’s details, allowing users to place requests for physical items directly from Leganto.
Configuring Display Options
Configuring the Default Reading List Sort Order for Instructors and Students
Set the parameter citation_export_style_order in the customer parameters table (Configuration Menu > Leganto > General > Settings) to list to export the citations in the same order as they appear in the list. Set the parameter to natural to export the citations in the order determined by the style definition (either citation title, citation author, or as otherwise defined for the style).
Configuring Citation Information Appearing in Citation Lists
You can configure how citations appear on a) the reading list page, b) My Collection/Favorites, and c) search results in Leganto in the Brief Citation Format mapping table (Configuration Menu > Leganto > UI > Brief Citation Format). For more information about mapping tables, see Mapping Tables.
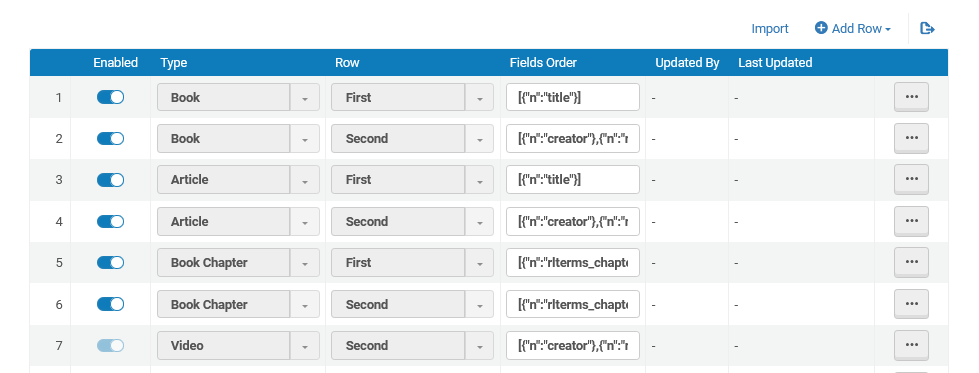
You can configure one or two rows for each material type. Two rows for Book,Article, and Book Chapter material types are defined by default, as well as two rows for Default material type, which is used if the citation's material type is not defined. Note you can edit the entries for Default but you cannot remove them.
You can add, edit, and delete rows in the table, and you can disable or enable rows.
When adding or editing a row:
- In the Type column, select the material type.
- In the Row column, select First or Second for the row that you are configuring. Citation information is typically split between two rows. When a user views a reading list in compact format, only the first row appears.
- In the Fields Order column, enter the row format, using the following guidelines:
- Citation field. In addition to the fields in the Citation Field Code column of the Primo Mapping mapping table (see Field Mapping from Primo PNX to Leganto Citations), you can use the fields part,pmid,rlterms_callNumber,rlterms_chapter.rlterms_volumePartNumber,series_title_number, and source.
- The format is in JSON. Each row contains an array in square brackets [].
- Simple field format:{"n":"field_name"} is replaced by the contents of the field value, if it exists. Otherwise it is skipped. For example,{"n":"title"} might be replaced with History of the Middle Ages.
- Prefix/suffix format:{"n": "field_name", "p": "prefix", "s": "suffix"} is replaced by the contents of the field value, prefixed by the text string in prefix and suffixed by the text string in suffix, if the value exists. If prefix or suffix is a valid label name, the label's value is used (see configuring labels in Configuring Headings and Text in Leganto). For example,{"n": "issue", "p": "(", "s": ")"} might be replaced with (22). You can define a prefix, a suffix, or both.
- Field range format:{"fields": [{"n": "field_1"}, {"n": "field_2"}], "delimiter": "delimiter"} groups two fields together, separated by a delimiter. The delimiter is only used if both fields have a value. For example,{"fields": [{"n": "start_page"}, {"n": "end_page"}], "delimiter": "-"} might be replaced with 1-10. Use {"n":"page_range"} to show page 2-10.
- The out-of-the-box values are:
- Book, first row: Just the book title.
[{"n":"title"}]
- Book, second row: Creator, Additional Person Name. Edition. Place of Publication. Publisher. Volume. Publication Date.Total Pages Total Pages.
[{"n":"creator"},{"n":"rlterms_additionalPersonName"},{"n":"rlterms_edition"},{"n":"rlterms_placeOfPublication"},{"n":"publisher"},{"n":"volume"},{"n":"date"},{"n":"rlterms_pages", "p":"citation.brief.totalPages "}]
- Article, first row: Just the article title.
[{"n":"title"}]
- Article, Second row: Creator. Additional Person Name. Journal Title. Edition. Volume ( Issue ). Date, Start Page - End Page.
[{"n":"creator"},{"n":"rlterms_additionalPersonName"},{"n":"rlterms_journalTitle"},{"n":"rlterms_edition"},{"fields": [{"n": "rlterms_volumePartNumber"}, {"n": "rlterms_issue","p": "(", "s": ")" }], "delimiter": ""},{"n":"date"},{"fields": [{"n": "start_page"}, {"n": "end_page"}], "delimiter": " - "}]
- Book Chapter, first row: Just the chapter title.
[{"n":"rlterms_chapter_title"}]
- Book Chapter, second row: Chapter Author.In Book Title.By Creator. Additional Person Name.Edited by Editor. Edition. Place of Publication. Publisher. Date. Start Page – End Page. Note that In,By, and Edited by are labels that you can configure.
[{"n":"rlterms_chapter_author"},{"n":"title", "p":"citation.brief.bookChapter.inBook "},{"n":"creator", "p":"citation.brief.bookChapter.byCreator "},{"n":"rlterms_additionalPersonName"},{"n":"rlterms_editor", "p":"citation.brief.bookChapter.editedBy "},{"n":"rlterms_edition"},{"n":"rlterms_placeOfPublication"},{"n":"publisher"},{"n":"date"},{"fields": [{"n": "start_page"}, {"n": "end_page"}], "delimiter": " - "}]
- Default, first row: Just the title.
[{"n":"title"}]
- Default, second row: Creator. Additional Person Name. Edition. Place of Publication. Publisher. Volume. Publication Date.Total Pages Total Pages. Note that Total Pages is a label.
[{"n":"creator"},{"n":"rlterms_additionalPersonName"},{"n":"rlterms_edition"},{"n":"rlterms_placeOfPublication"},{"n":"publisher"},{"n":"volume"},{"n":"date"},{"n":"rlterms_pages", "p":"citation.brief.totalPages "}]
- Book, first row: Just the book title.
- If a line containing an author field is too long, the author value is truncated and followed by ellipses (...). Note that any value (other than the title value) is truncated if the screen is too long to display the entire field.
- The creator field is not truncated when it is part of a prefix/suffix or field range format.
Setting Preferred Citation Link
When multiple links are available for a citation, users can set which link should be listed first using the Set first action. When the parameter set_first_link(Configuration > Leganto > Features > Leganto Features) is set to all(librarian and instructor),librarian,instructor(including course operator and collaborator), or true(all), the Set first action is displayed to the configured user type in the link action menu. When left blank or set to false(blank) the Set first action is not displayed. The default setting is all.
This action is not available in edit mode.
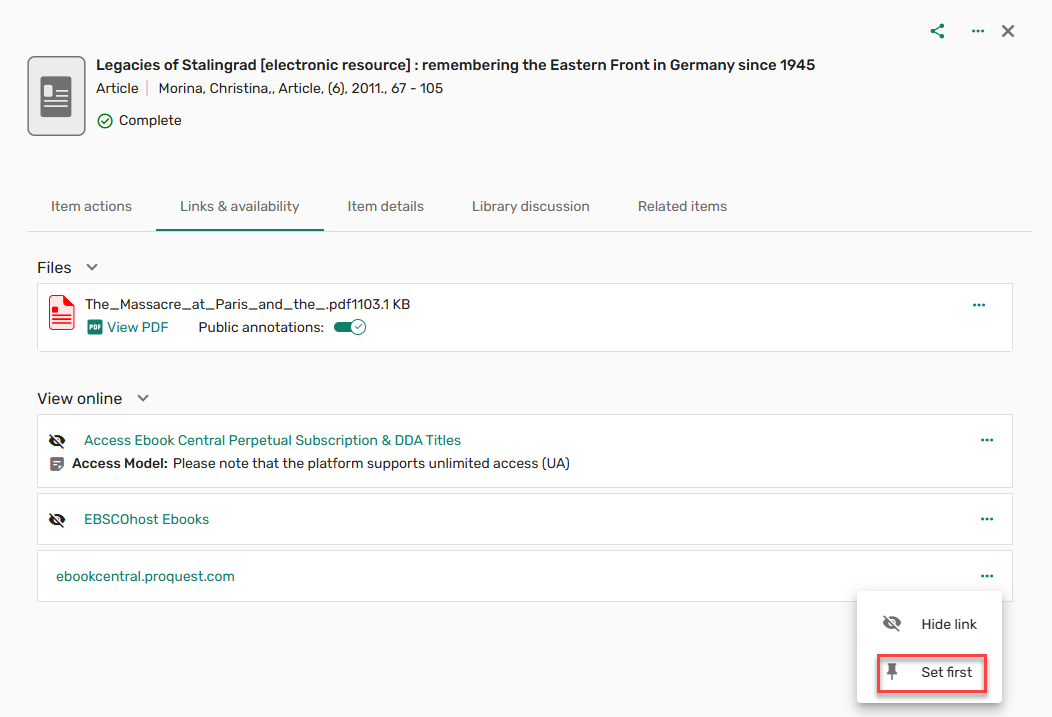
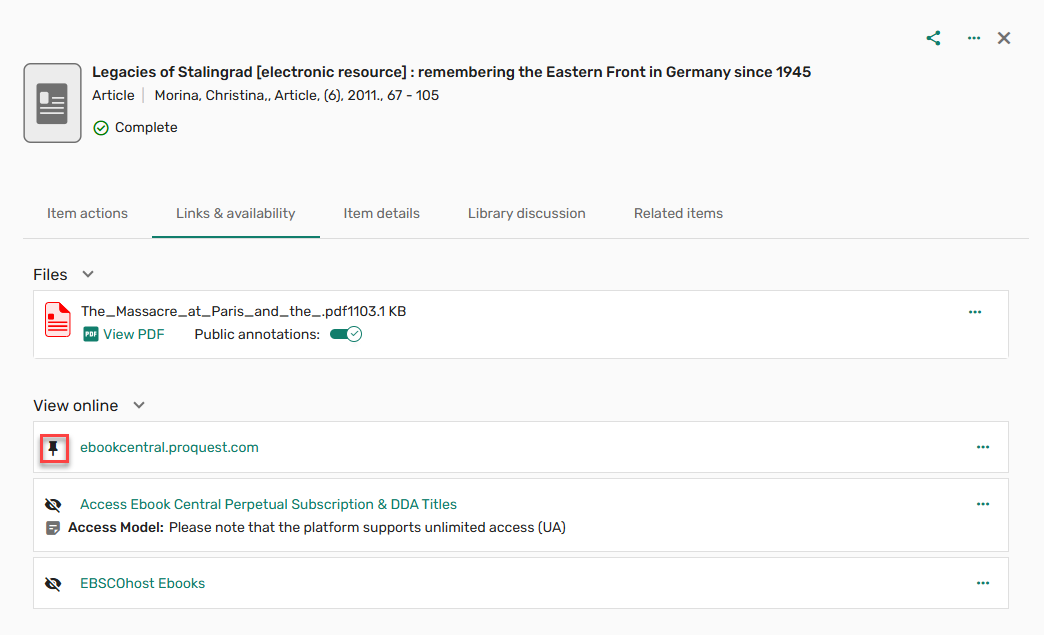
When setting an item as first, the link moves to the top of a list with a pin icon indicating that the link is set as first.
Students do not see the pin indicator, but they do see the item first in the list.
When the parameter force_direct_uresolver(Configuration > Leganto > Features > Leganto Features) is set to true, and multiple links are available, and a link is set as first, selecting View online from the brief view opens the link set as first.
If a YouTube link is set as first, the Watch link is prioritized before the View online in the brief view. If a Browzine link is set as first, the Browzine link is prioritized before the View online in the brief view.
Links cannot be both hidden and set first. When a link is set as first, if the Hide link action is applied to the link, the link is hidden and the Set first indicator is removed. A message is displayed informing the user that a hidden link cannot be set as first.

If the Set first action is applied to a hidden link, the link is no longer hidden, and the link is set as first. A message is displayed informing the user that the link is no longer hidden.

Preventing Users from Viewing Thumbnail Images
To prevent users from viewing thumbnail images, when the parameter show_image_as_thumbnail(Configuration > Leganto > Features > Leganto Features) is set to false(default), all thumbnails for manually added images are now hidden. When set to true, the default thumbnail image is displayed.
Changes to the parameter are not applied retroactively.
Configuring Item Details Display
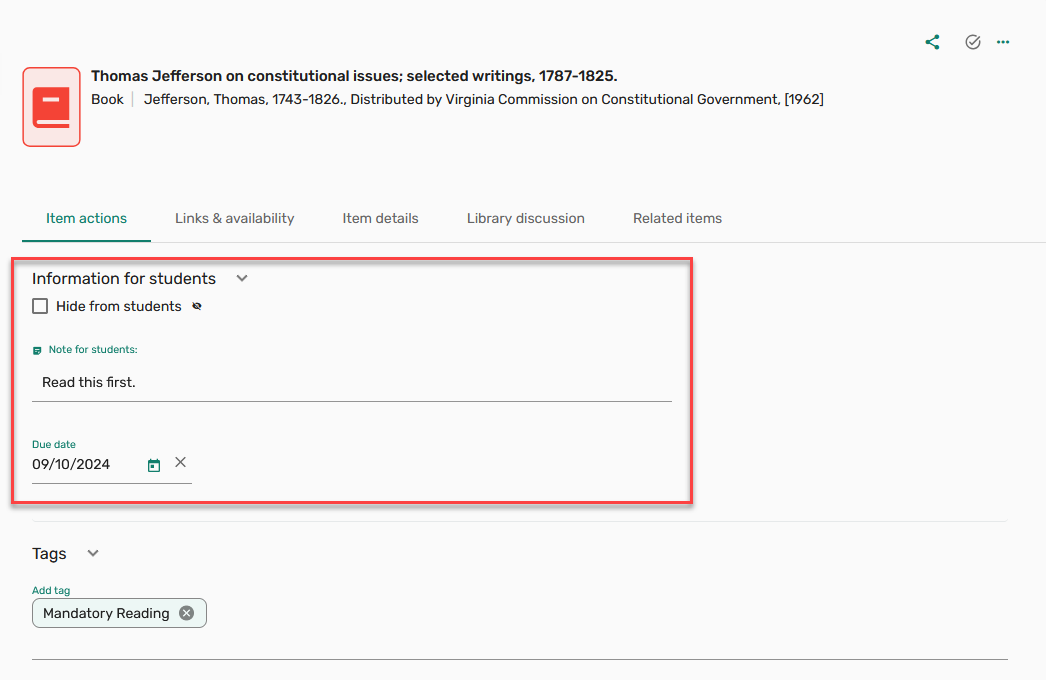
When adding/editing an item, the Item details display can be customized to show/hide the Hide from students checkbox,Due date and/or Note for Students. The parameter item_actions(Configuration > Leganto > Features > Leganto Features) can be left blank to hide all options, set to all to display all options, or set to any combination of hide,date,note to display the Hide from students checkbox,Due date and/or Note for Students.
When not set to all, this setting overrides the setting in item_actions_quick_edit. Hiding one of the actions in the full view will also hide it in the Quick edit.
Configuring Quick Edit Options
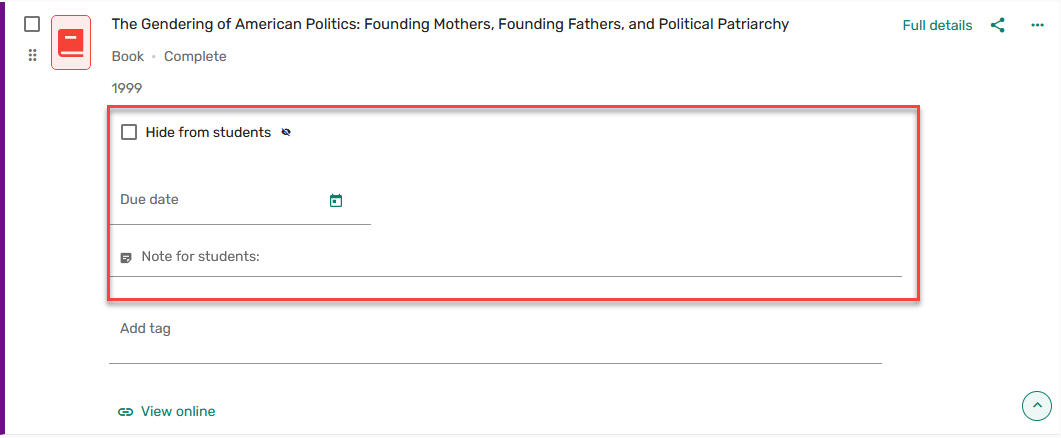
Quick edit can be customized to show/hide the Hide from students checkbox,Due date or Note for Students. The parameter item_actions_quick_editConfiguration > Leganto > Features > Leganto Features) can be left blank to hide all options, set to all to display all options, or hide/date/note to display the Hide from students checkbox,Due date or Note for Students. Regardless of the parameter configuration, all options remain visible in the Full display.
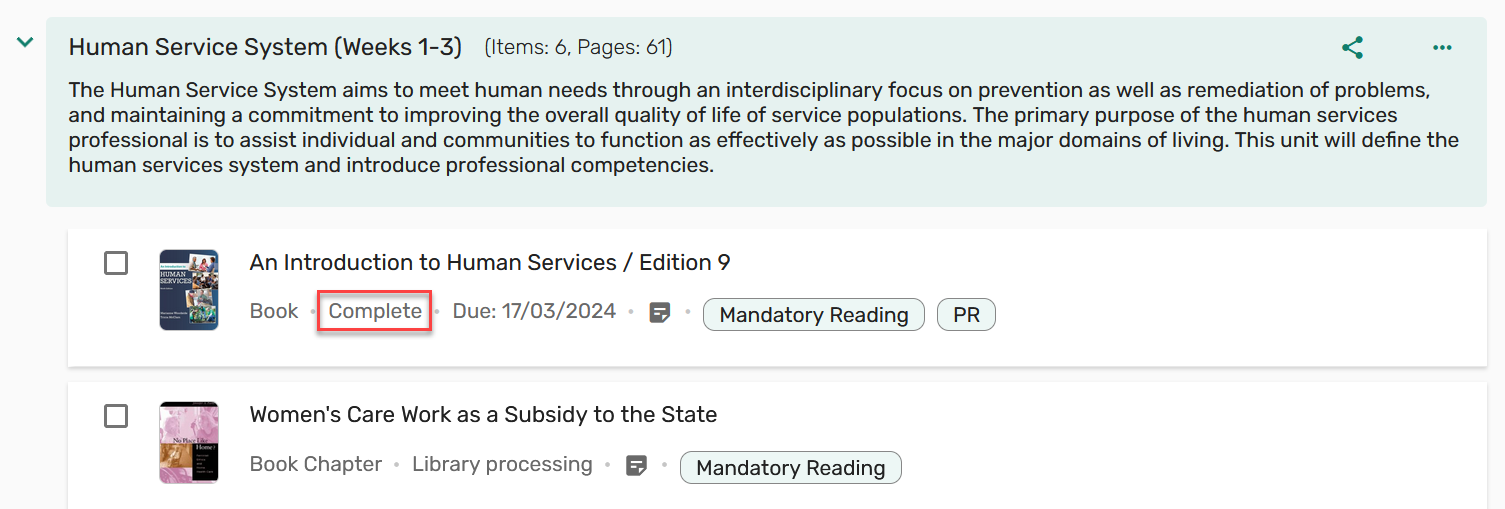
Showing Complete Status on Brief View
Users can configure whether to show/hide the Complete status for items from the brief view. When the parameter complete_citation_status(Configuration > Leganto > Features > Leganto Features) is set (default blank), items with a status of Complete will have their status display in the brief view. The parameter can be configured for both librarians and instructors (all), just librarians (librarian), or just instructors (instructor). When left blank, the status is not displayed.
Adding/Editing Citation Field Mappings
You can configure which fields to include in the citation full display and the citation Add/Edit form. The fields are configured per citation type in the Citation Field Mapping Table (Configuration Menu > Leganto > UI).Types not configured in this table are mapped as TypeOther.
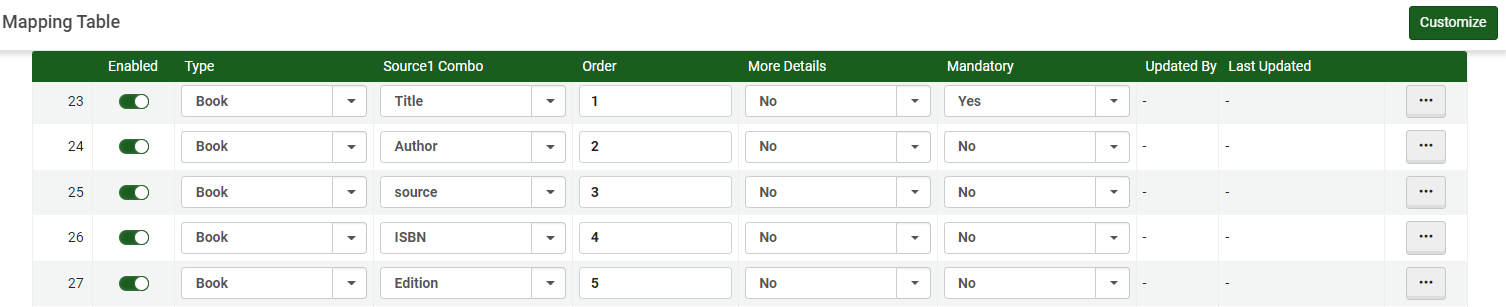
The order of the fields can be defined in the Order field, and fields can be marked as Mandatory or not.
If you reuse a number, the order of those fields is added randomly to the form,
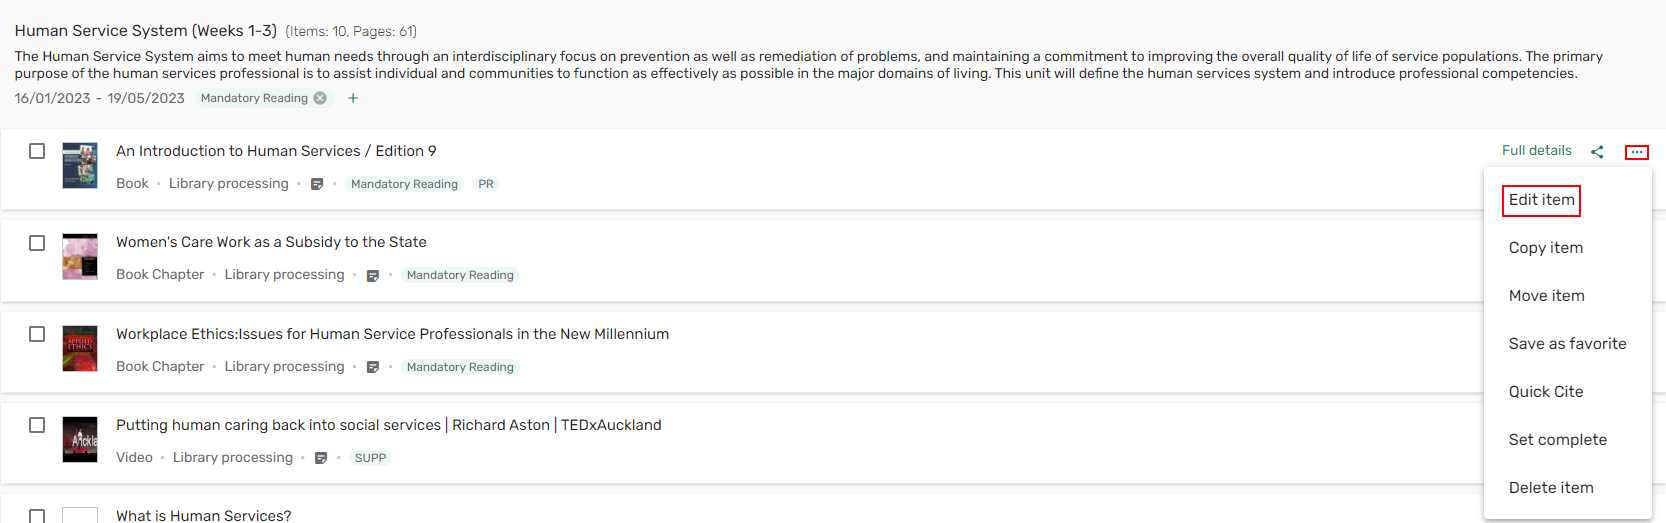
Select Edit item to display the information in the Edit item form.
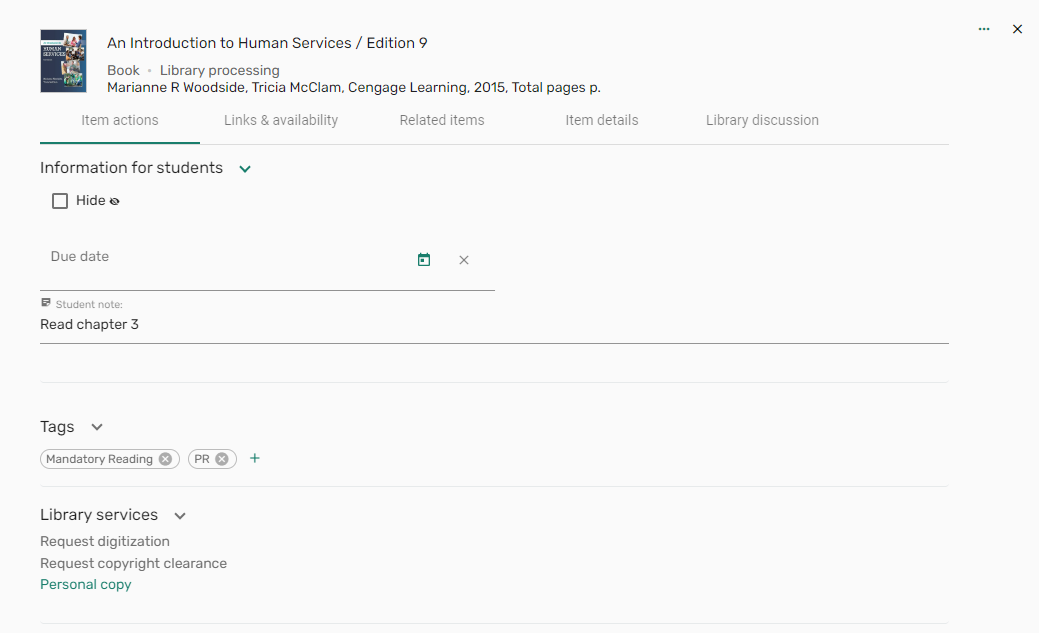
When removing a mapping from this table ensure you also remove this field from the Brief Citation Format mapping table.
For more information, watch Leganto Add/Edit Citation Fields. (1:32 minutes).
Citation Field Mapping
Each field can be defined for all types.
| Citation Field Name | Comment |
|---|---|
| Additional Author | |
| Additional Person Name | |
| Additional Title | |
| Author | |
| Author initials | |
| Barcode | |
| Call Number | |
| Chapter Author | |
| Chapter Number | |
| Chapter Title | |
| Day | |
| DOI | |
| Edition | |
| Editor Tag | |
| End Page | |
| ISBN | |
| ISSN | |
| Issue | |
| Book/Journal Title | When added to a Journal, it appears in the UI as a Journal Title |
| LCCN Number | |
| Month | |
| Note | |
| OCLC Number | |
| Other Standard Id | |
| Page range 2-10 |
This field can only be added when both the start page and end page fields exist for this type. This field can only be at the end of the form. |
| Pages | |
| Part | |
| Place of Publication | |
| PMID | |
| Publication Date | |
| Publisher | |
| Remote record ID | |
| Series Title Number | |
| Source | |
| Start Page | |
| Title* | The Title is mandatory for each type. For Book Chapter, the field is called Book title. |
| Volume | |
| Volume Part Number | |
| Year |
Exporting Filtered Lists from Leganto
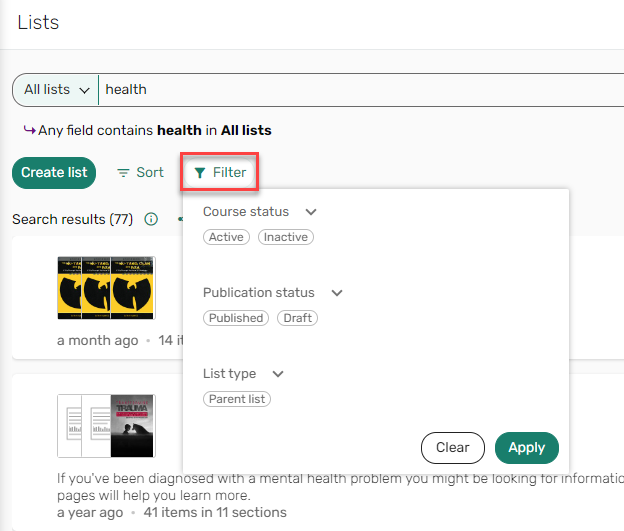
You can export a filtered list from Leganto showing only specific fields. Set your filters by selecting the filter icon and selecting your filter(s).
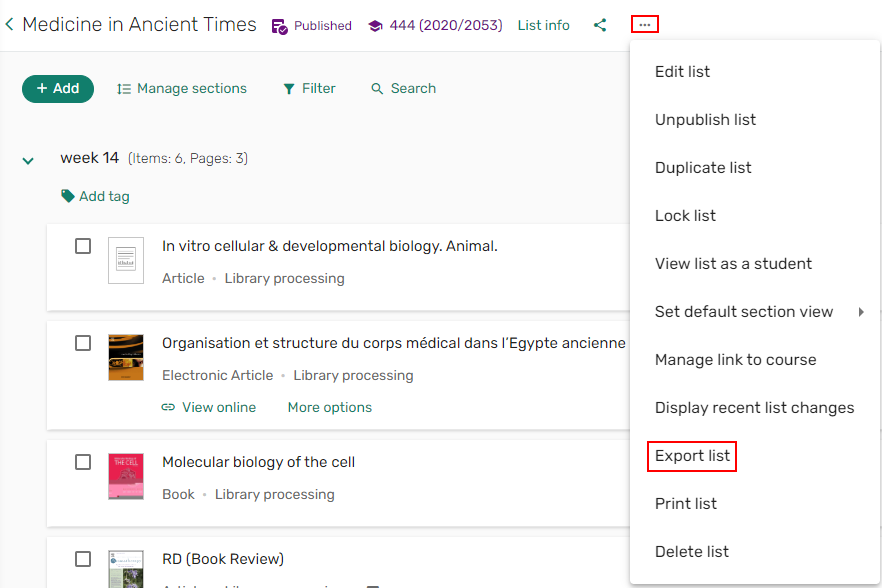
Once you have made a filter selection, you can export the list using the Export list action in the List actions menu.
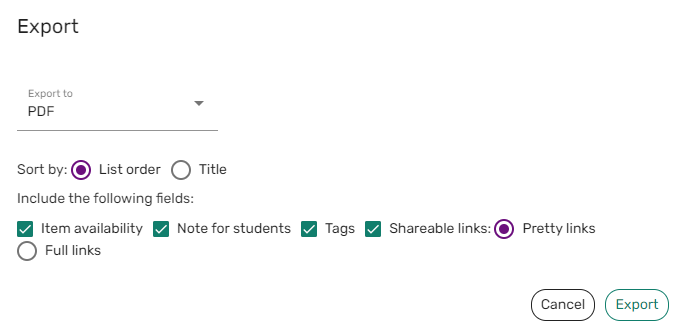
Choose the Export to file type, how to sort the file, and which fields to export.
Enabling Instructor Information in Leganto
The instructors_in_leganto parameter in the Leganto Features mapping table (Configuration Menu > Leganto > Features > Leganto Features) allows you to display instructor information: a list of instructors in course tooltips and a pane in the list information containing the course's instructors. The following options are valid:
-
authenticated– Instructor names appear only for authenticated Leganto users.
-
true – Instructor names appear for all Leganto users.
-
false – Instructor names do not appear for Leganto users.
Instructor names can be turned on and off for each instructor; see Adding a Course.
Enabling Reading List / Citation Analytics Information (List Analysis)
You can configure whether to display Analytics information about reading lists and citations in Leganto. This feature is known as List Analysis. For more information on List Analysis, see Viewing Student Usage.
Configure the parameter list_analysis in the Leganto Features table (Configuration Menu > Leganto > Features > Leganto Features). When set to all, Analytics is enabled for all users. When set to instructors, Analytics is enabled for instructors (and librarians) only. When left blank, Analytics is disabled for all users.
Configuring Digital Representation Display Options
The following parameters in the Leganto Customer Settings mapping table (Configuration Menu > Leganto > General > Settings) enables you to control how digital representations appear in Leganto:
-
display_digital_representations— When set to true(default), digital representations always appear in Leganto. When set to false, the action Manage Digital Representations appears for each digital citation on the Edit Reading List page. See Managing a Citation's Digital Representations.
-
display_inactive_digital_representations— When set to true, Leganto displays digital representations that are inactive in Alma. When set to false(default), Leganto only displays digital representations that are active in Alma
-
display_digital_in_collection— When set to true(default), Leganto allows students to copy digital representations to their collection. When set to false, Leganto only allows students to view the metadata.
Configuring PDFs to Open in a New Tab
You can configure PDFs to open in a new tab by default by setting the pdf_use_leganto_viewer(Configuration Menu > Leganto > Features > Leganto Features) parameter to true. When set to true, the PDF opens in a new tab and is downloadable. If the parameter is left blank or set to false, the PDF does not open in a new tab by default. If the parameter is set to readonly, then the PDF opens in a new tab by default but is not downloadable in the brief or full citation views.
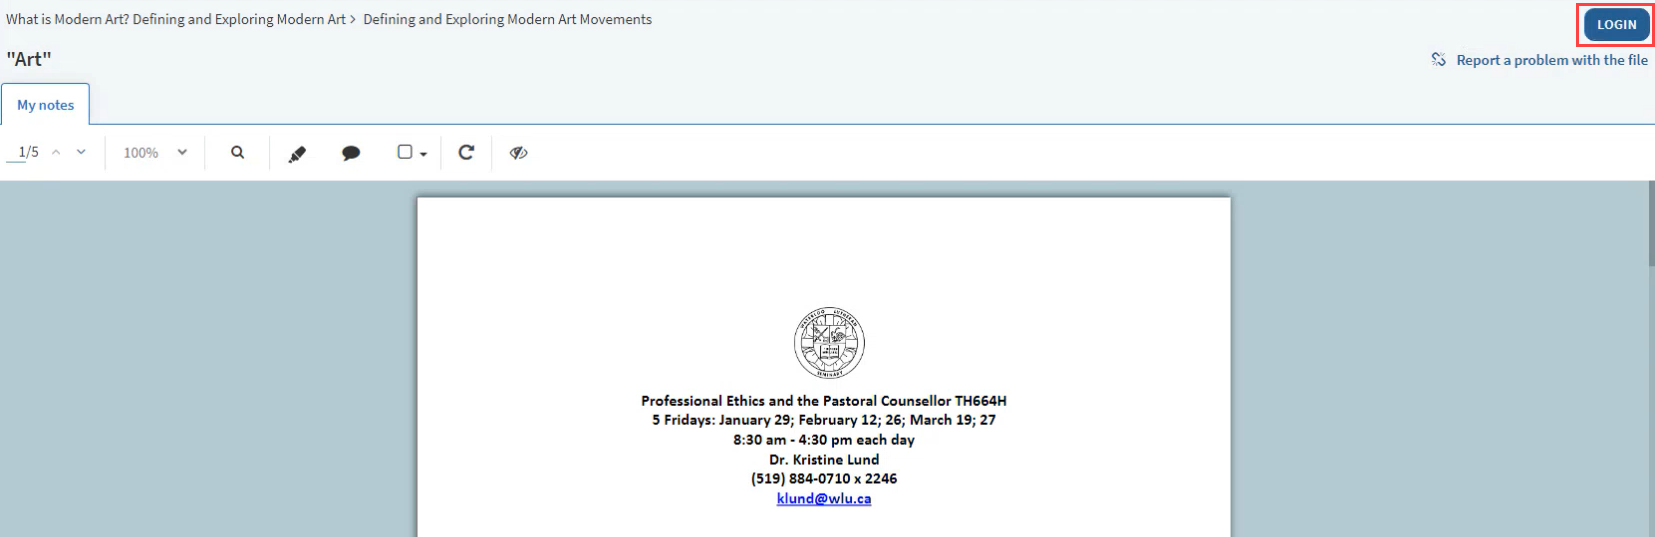
When the parameter force_PDF_viewer(Configuration > Leganto > Features > Leganto Features) is set to true, when opening a shareable link to a PDF, the user is automatically directed to a PDF of the citation rather than to the full citation in Leganto. Files with copyright restrictions require the user to be logged in to view the citation. A LOGIN button is displayed in the PDF viewer to enable users to log in to view the citation.
Creating Private Annotations
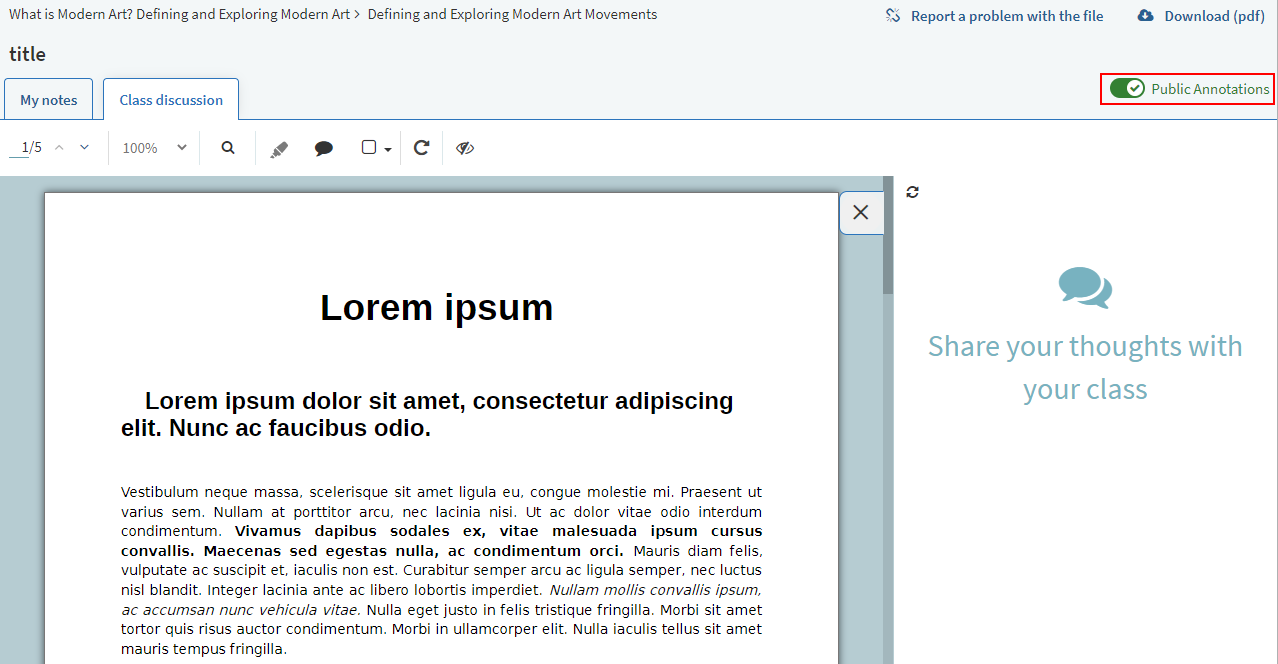
When configured, users can add annotations and highlights to PDFs that are embedded in citations.
When allow_citation_public_annotation(Configuration > Leganto > Features > Leganto Features) is set to true(default), a toggle appears on the Course Materials and you can enable or disable Public Annotations on a per case basis. If Publication Annotations are enabled on the Course Materials, and a comment is added, the comment remains Private(default) and is only visible to the user who added the comment. If a comment is set to Public, the name of the person who wrote the comment, and the date and time of the comment are visible in the annotation menu. Public comments are searchable in the annotations menu. Each student's name appears in a different color above their comment, and instructor comments appear with an instructor icon next to their name. Instructors can delete public comments.
If allow_citation_public_annotation is set to false, the toggle is hidden on the Course Materials.
Social Reading: Public Annotations on Course Materials
When configured, students and instructors can share their annotations with each other. When allow_citation_public_annotation(Configuration > Leganto > Features > Leganto Features) is set to true(default), a toggle appears on citations with embedded PDFs, giving instructors the option to enable or disable Public Annotations on a per PDF/Citation basis.
If allow_citation_public_annotation is set to false, the Public/Private toggle is hidden on the PDF header.
Configuring Discussions in Leganto
- In the Leganto Features table (Configuration Menu > Leganto > Features > Leganto Features), set the parameter library_discussions to all or citation to enable the Library discussions tab.
Configuring Reading List Suggestions
In the Leganto Features table (Configuration Menu > Leganto > Features > Leganto Features), configure the parameter suggestions to all or library(only librarians can suggest citations), or leave blank to disable all suggestions from users.
Configuring the Display of Other Formats and Editions of Citations
- This feature requires the field search:addsrcrecordid in Primo PNX. If you modify the normalization rules and have removed this field, the feature does not work.
- This feature requires you to set primo_default_search_scope to a Primo/Primo VE search scope. For more information on this parameter, see Configuring Search Repository. If primo_default_search_scope is not set, this feature does not work.
You can enable the display of alternate (physical) editions and alternate (electronic) formats of a citation linked to a repository resource. When enabled, the suggested alternatives appear in Leganto, and the ability to view them appears in Alma on the Edit Citations and Edit Reading List pages (see Managing Citations). Suggestions for electronic resources come from the uResolver. Suggestions for alternate physical editions come from the Primo API if FRBR is configured.
Configure the parameter other_formats_and_editions in the Leganto Features table (Configuration Menu > Leganto > Features > Leganto Features). The available options are:
- no value - Do not display other formats or editions
- formats- Display electronic formats
- editions- Display other physical editions
- all- Display formats and editions
When this parameter is not empty,Other Formats and Editions appear as a row action on the Edit Citations and Edit Reading List pages. Select this action to view the suggested alternatives on the Other Resources page.
To add one of the suggested resources as a new citation in the list, select Add to List in the row actions list.
To add one of the suggested resources to the citation, select Add to Citation in the row actions list.
Add to Citation only merges the availability of different types such as P + E or P + D. Trying to merge two physical items, for example, results in a single physical availability.
Configuring Whether the Total Pages of All Citations in a Section or Reading List Appears
You can configure that the total number of pages for all citations in a reading list or section appears at the top of the reading list or section. When enabled, the total also appears on the Edit Reading List page in Alma (see Managing Citations).
Set the parameter page_count in the Leganto Features table (Configuration Menu > Leganto > Features > Leganto Features) to true.
Managing Bibliographic Styles
On the Bibliographic Styles mapping table (Configuration > Leganto > Features > Bibliographic Styles) you can manage bibliographic styles that are available when Leganto users export to Microsoft Word (See Quick Cite: Export a Single Citation in a Specific Reference Format). For more information about mapping tables, see Mapping Tables.
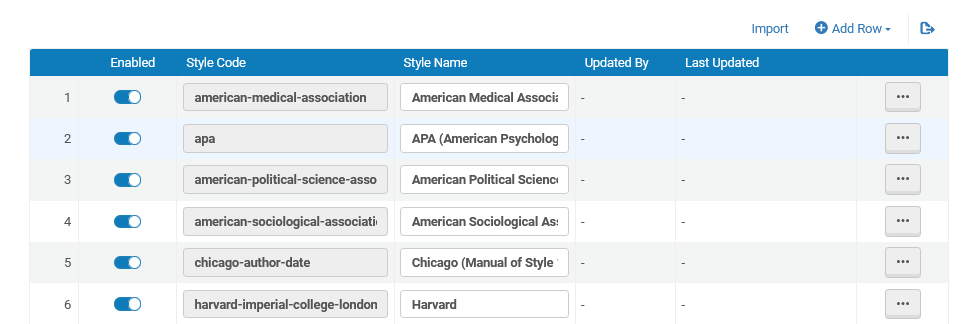
- You can enable and disable styles, and you can change the display name of a style. You can also delete styles.
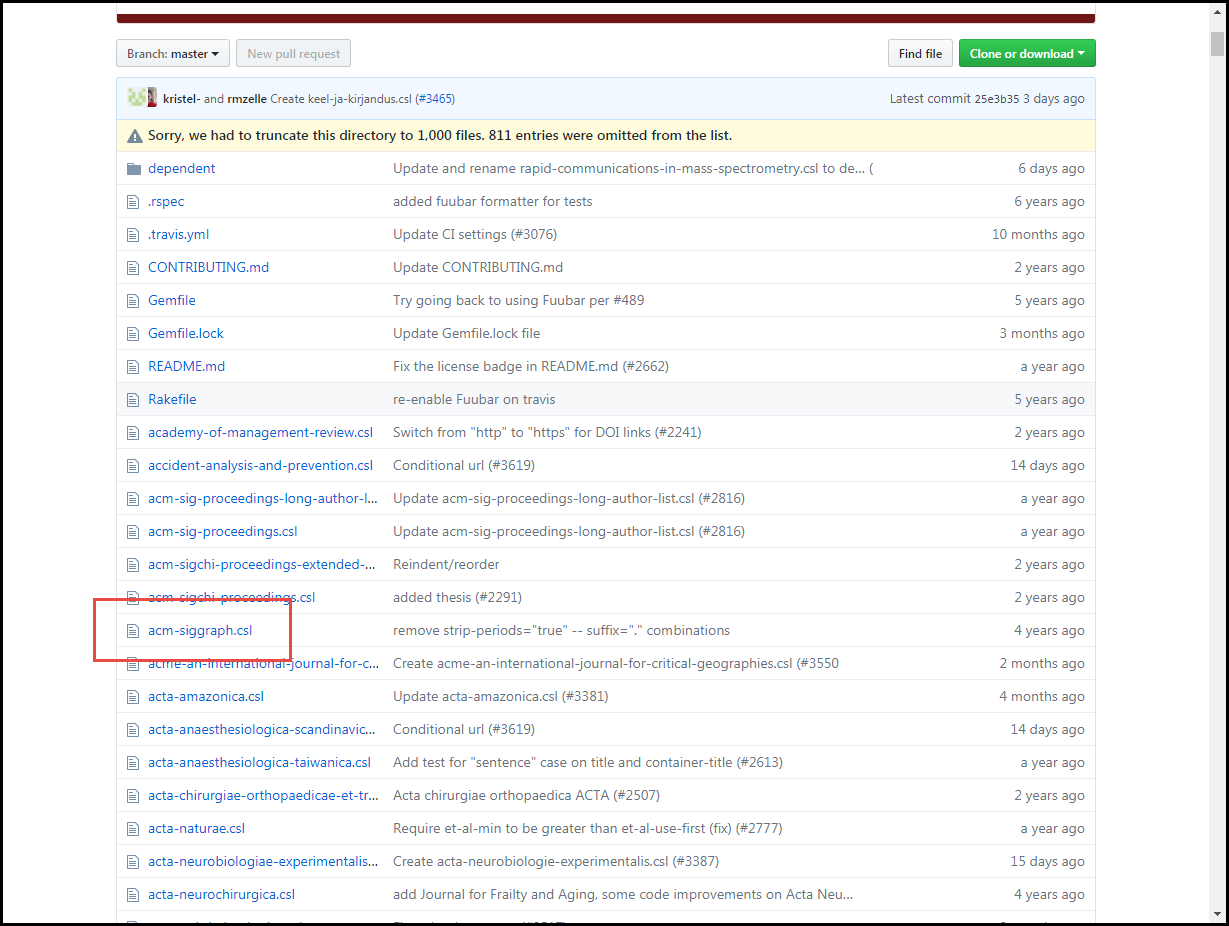
- You can add styles if they have a valid code. Valid codes are items ending with .csl(without the .csl) on the page https://github.com/citation-style-language/styles. For example,acm-siggraph.
 Citation Styles
Primo VE updates the CSL pool of styles on a monthly basis. However, each Primo VE release contains a CSL styles package that was finalized about two months before the release. For example, if there is an update to a CSL style in July 2025, this change is packed into the September release, which is the release that our development team worked on during July. This means that the update to the CSL style will only be visible to customers in September.
Hiding Incomplete Citations from Students
By default, Leganto displays incomplete citations (which are citations that are not marked Complete), but hides the following from students:
-
The option to download a file if one exists.
-
The links of the citation if the citation requires a copyright.
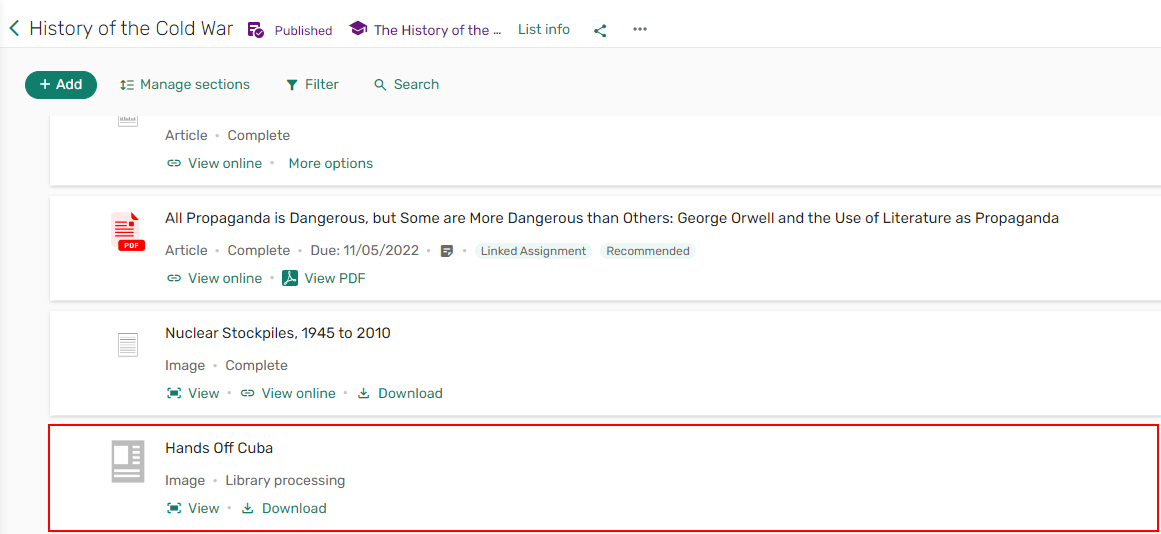
If you set the hide_uncompleted_citations parameter to true in the Leganto Features mapping table (Configuration Menu > Fulfillment > Leganto > Leganto Features), you can hide the entire citation if it has not been marked Complete. When set to false, the citation appears regardless of its status.
If you set the hide_uncompleted_citations to a specific status or combined status (BeingPrepared,Complete,Declined,Inactive,InProcess,ReadyForProcessing, or a code from the Additional Reading List Citation Statuses code table), citations with those specified statuses are hidden from students.
For example, Leganto does not display the highlighted citation to students since it has not been marked Complete:
Configuring File Upload in Leganto
You can configure the following:
- Whether instructors can upload files to the blank form. See Adding an Item Manually.
- Whether instructors can upload a syllabus file for a reading list. See Enabling Reading List Syllabuses.
- Whether instructors can upload files that contain an entire reading list. (This is instead of creating a reading list using the standard Leganto workflow. The option appears on the landing page when entering Leganto using a link from a CMS.) See Configuring Whether Instructors Can Upload Files that Contain Reading Lists.
- The maximum file size and default copyright status when uploading a file as a citation, and whether the instructor can delete the file after uploading it. See Configuring File Upload for My Collection or as Citations.
The following are supported file types for uploads:
- application/pdf
- image/png
- image/jpeg
- image/jpeg
- image/png
- image/gif
- text/plain
- audio/mpeg
- audio/ogg
- video/mp4
- video/webm
- audio/wav
- application/x-navistyle
Configuring File Upload for Favorites or as Citations
You can configure the maximum size for any file uploads (including course reading material or My Collection/Favorites items) by instructors or students. You can also configure whether the instructor can delete the file after uploading it.
Configure the parameters max_file_size_allowed_cms_entry_MB,max_file_size_allowed_faculty_MB, and max_file_size_allowed_students_MB(Configuration Menu > Leganto > General > Settings). If left empty, the default for instructors (faculty) is 50 MB. The default for students is 2 MB. Enter 0 to disable uploading for the relevant user type. When set to 0, file upload is disabled for the user type.
You can configure the copyright options presented to an instructor when the instructor uploads a file while creating a citation.
Add or edit the rows in the File Upload Copyright Options mapping table (Configuration Menu > Leganto > List Management > File Upload Copyright Options).
You can also set the order of copyright options and enable the default setting for the File Upload Copyright Options (Configuration > Leganto > List Management > File Upload Copyright Options).
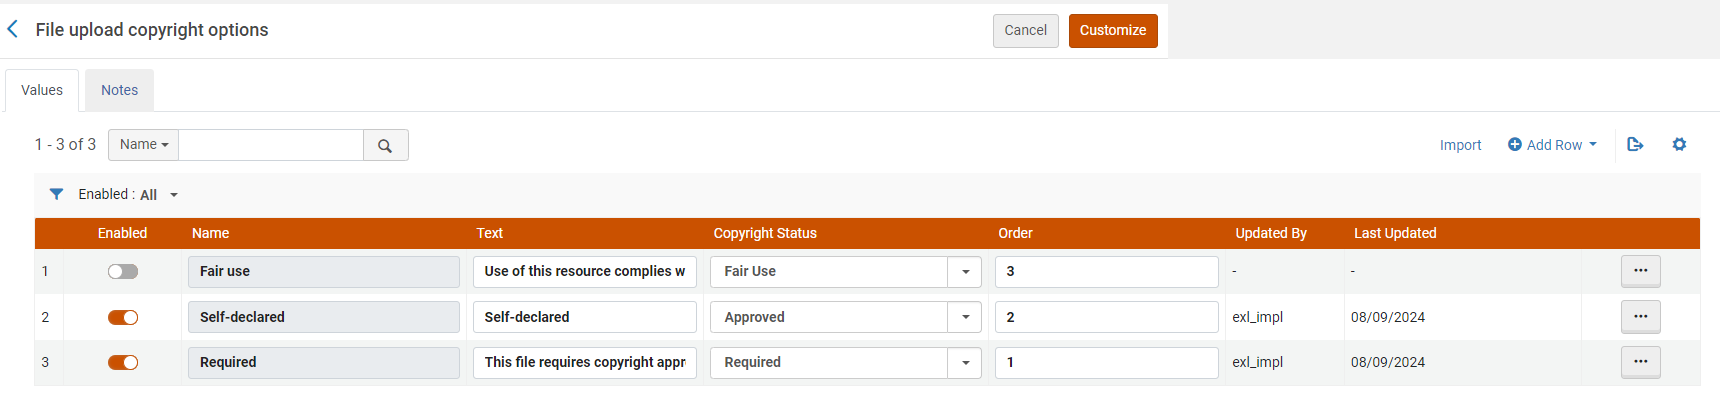
For more information about mapping tables, see Mapping Tables; however, note that this mapping table behaves differently than most mapping tables, as described in the note, below.
The options are presented to the instructor after the instructor uploads a file while manually creating a citation. For each option, you can manually select the copyright status to which the option maps:
- Approved
- Declined
- Fair Use
- Not Determined
- Not Required
- Required
- Self Declared
- Waiting for Approval
- Waiting for CC
For more information on these statuses (including how to customize them), see Managing a Citation's Copyright Status.
The labels that appear in the UI can be translated using the Customer Labels code table in the Configuration > Leganto > General > Customer Labels and Customization > Leganto > General > Labels menu.
- The toggle switch in the Enabled column on this page does not enable or disable the row. Instead, enable the row that you would like to be the default selected value in Leganto and disable all other rows. If you do not enable any rows, no default is selected. If you enable more than one row, one of these rows (essentially a random one) is the default selected option.
- The parameter citation_uploaded_file must have a value for this table to have any effect. See Configuring Default Statuses for Citations/Reading Lists. If no value is assigned to citation_uploaded_file, the options in this table do not appear in Leganto.
- Alma only assigns the status defined in citation_uploaded_file to a citation if (in Leganto) the instructor selects an option from this table with a value of Self Declared or Fair Use. If the instructor selects an option with any other value, the value in citation_uploaded_file is not assigned to the citation.
Configure the parameter instructor_remove_file(Configuration Menu > Leganto > Features > Leganto Features) to true(enable instructors to delete uploaded files) or false.
Configuring Sections Behavior
Set the parameter sections_collapsed in the customer parameters table (Configuration > Leganto > UI > Settings) to true or false. If there is only one section, it will appear expanded, regardless of the setting of this parameter.
Configuring Find Lists Settings
The Find List Settings mapping table (Configuration > Leganto > Features > Find List Settings) enables you to configure the search fields in Find Lists.
From this page, you can configure the following:
-
Enable/disable a search field.
-
Specify whether a search field will appear on the advanced Find Lists page or on both the simple and advanced Find Lists pages
-
Specify a default value for a search field.
-
Add another search field. Select Add Row.
For each mapping row (which defines each search field in Find Lists), specify the following fields:
-
Enabled– Select this option to enable a search field in Find Lists.
-
Name – Specify the name for one or more of the following search fields:
-
course_status
-
academic_department
-
subject
-
publication
-
list_title
-
course_code
-
course_title
-
course_instructors
-
description
-
course_year
-
course_term
-
parent_reading_list
-
-
Type – Specify a search type:Simple(fields appear in both simple and advanced searches) or Advanced (fields appear in advanced searches only).
-
Default – (optional) Specify the default status for the search field. For search fields other than the following fields, you can specify a free-text value:
-
course_status – Select active or inactive.
-
academic department – Select all or a code from the (Configuration > Fulfillment > Courses > Academic Departments).
-
subject – Select all or a code from the (Configuration > Fulfillment > Courses > List Subjects or Additional List Subjects).
-
publication – Select published or draft.
-
Configuring Citation Default Thumbnails
You can use URLs for default thumbnails (those that do not come from Syndetics). This is configured in Citation Default Thumbnails (Configuration Menu > Leganto > UI > Citation default thumbnails).

Select the citation type and enter the Thumbnail URL to be used as the new default thumbnail. The supported size is 100 width * 160 height.
Mandatory Alt Text for Images
Institutions can require users to enter alternative text (alt text) when uploading images to items by setting the alt_text_mandatory parameter (Configuration > Leganto > Features > Leganto Features) to true.
When alt_text_mandatory is set to true, users must enter alt text before they can save the uploaded image. When the parameter is set to false (default), entering alt text is optional.
AI-Generated Alt Text for Images
Leganto supports AI-generated alternative text (alt text) for images. Institutions can enable or disable this functionality by setting the alt_text_using_AI parameter (Configuration > Leganto > Features > Leganto Features) to true.
When enabled, users see a Fill with AI option next to the Alt text field. Selecting this option generates a description based on the image's content and automatically populates the field.
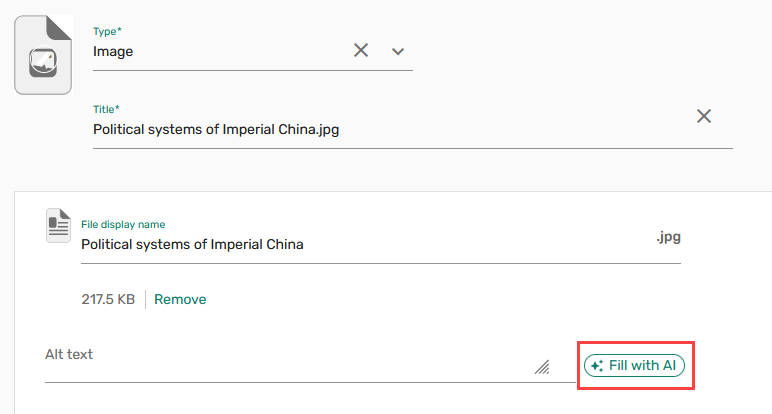
Users can modify the alt text before saving the image, generate a new suggestion, and provide feedback on the output using the Rate this result button (becomes visible after text generation).
When alt_text_using_AI is set to false, the Fill with AI button is not displayed, but users can still manually add alt text. By default, the parameter is set to true.
Page tags: article:topiccontent:Documentationproduct:legantolang:english
