
Gestionar pruebas
Esta página describe cómo gestionar pruebas en Alma. For a description of the workflow see Evaluation Workflow. For information on the overall purchasing workflow see Purchasing Workflow. For an overview of working with acquisitions in Alma, including links to relevant sections such as Infrastructure, Renewals, Configuration, etc., see Introduction to Acquisitions.
- Operador de pruebas
- Gerente de pruebas
For information on how to request or start a trial, see step 2 of the Evaluation Workflow.
Para que una prueba pueda desarrollarse, se debe:
- Introducir los detalles generales de la prueba, incluyendo el título del material, las fechas de inicio y de fin de la prueba, y si la prueba es pública o privada.
- Crear el formulario de la encuesta que deben completar los participantes al evaluar el material.
- Introducir los detalles de los participantes en la prueba, si esta es privada.
For detailed instructions, see Editing Trial Information, below.
Once the information is complete, the trial's status changes to draft. Trials cannot move from the draft stage unless the criteria for publishing a DB is met (See Why is Trial still in Draft status after I have Activated it?). To move from the draft stage, the trial must be linked to an unsuppressed bib with a collection-level URL.
Después de que la prueba haya terminado, analizar los resultados de la misma y registrar una decisión de compra. For detailed instructions, see Analyzing Trial Results, below.
Acceder a pruebas existentes
You manage existing trials on the Manage Trials page (Acquisitions > Purchase Order Lines > Manage Trials).
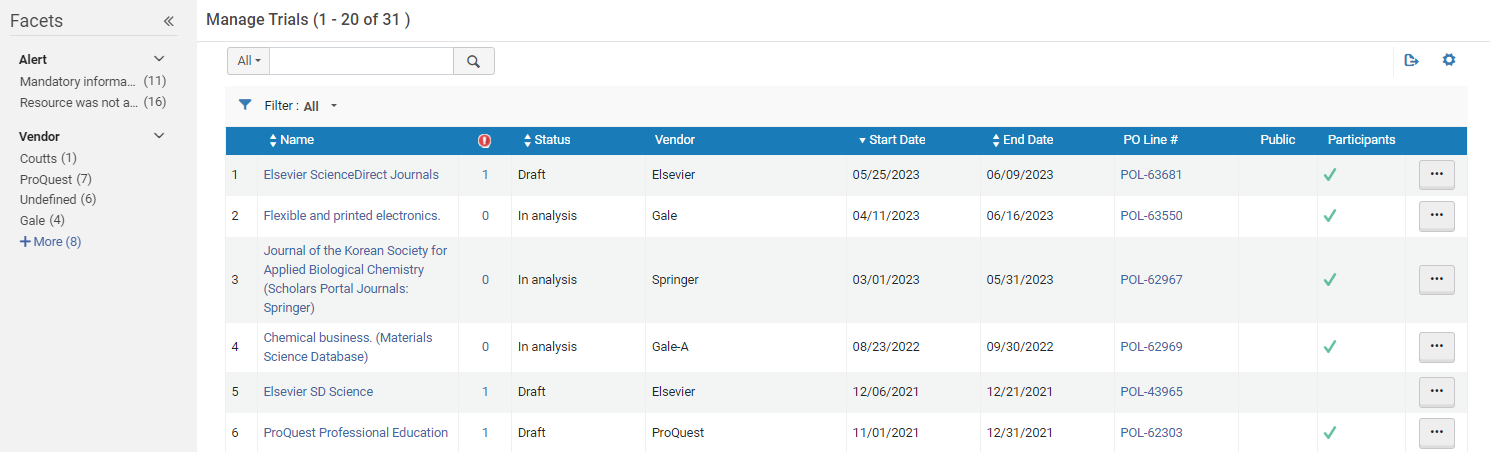
Filtrado previo de la lista de pruebas por estado
- Analysis
- Draft
- Requested
Abrir una línea de orden de compra.
Puede abrir la página Gestionar pruebas para una línea de orden de compra específica desde la lista de tareas de la línea de orden de compra. You can also use the Facets to filter the PO line task list for PO lines whose status (workflow step) is Under Evaluation.
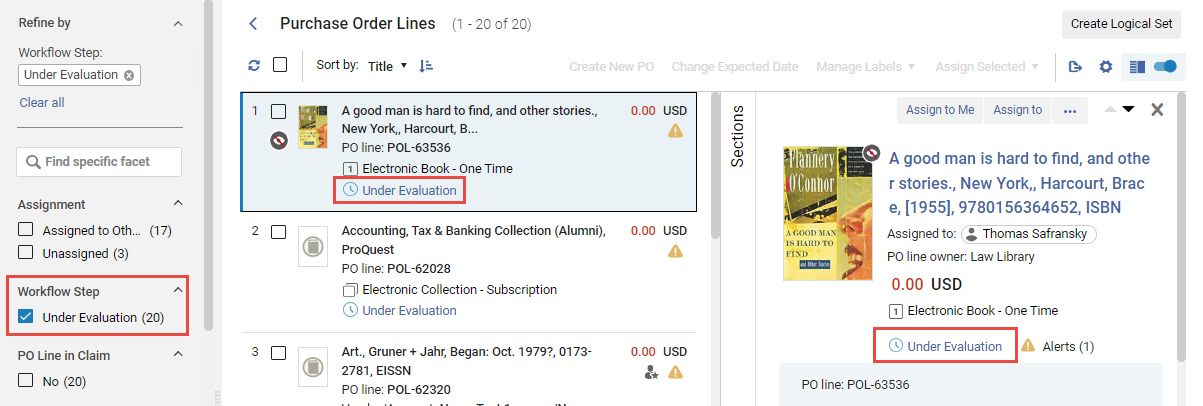
- In the PO line, select the Under Evaluation status. The Manage Trials page opens in a sliding panel, with only the PO line listed.
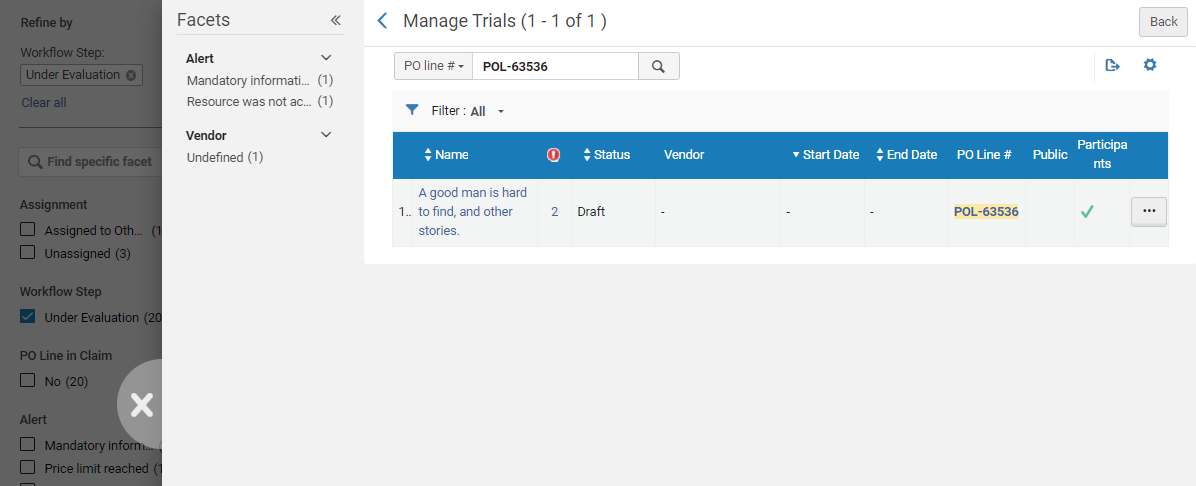
Acciones de fila disponibles
Seleccionar una de las siguientes opciones de la lista de acciones de la fila:
- Edit – Edit trial information (see Editing Trial Information, below).
- Delete – Delete the trial. Select Confirm in the confirmation dialog box. Note that a trial must be deleted before any associated PO lines can be cancelled (see Evaluation Workflow).
- Edit PO Line – Edit the PO line associated with the trial. Opens the Details pane of the PO line (for additional information, see Manually Creating a PO Line).
- Activate – Activate the related resource. Opens the Activation Wizard, as described in Activating Electronic Resources.
After you activate the trial, the daily Trials – Start and Notify Participants job assumes control of the trial until the trial end date. En la fecha de finalización de la prueba, la prueba aparece de nuevo en la lista de tareas, permitiendo al Operador de pruebas estudiar el análisis de los resultados de la prueba y tomar una decisión de compra.
Editar la información de la prueba
You can edit a PO line's trial information.
- On the Manage Trials page (Acquisitions > Purchase Order Lines > Manage Trials), select Edit in the row actions list for the trial you want to edit. Aparece la página Detalles de la prueba.
- In the Summary tab, modify the displayed PO line information, as required. Se proporciona una descripción de los campos en la siguiente tabla.
Campos de la pestaña Resumen de la prueba Sección Campo Descripción Copiar segmento(s) en factura Nombre (requerido) El nombre de la prueba tal como lo introdujo el Operador de compras. Título El título del material de la prueba. Fecha de inicio (requerido) La fecha de inicio de la prueba, seleccionada desde el cuadro de diálogo Calendario. La fecha debe ser posterior a la fecha actual. The trial's status changes to Active on this date. Fecha de finalización (requerido) La fecha de finalización de la prueba, seleccionada desde el cuadro de diálogo Calendario. Esta fecha debe ser posterior a la fecha de inicio. The trial's status changes to In Analysis on this date if the Trials - Start and Notify Participants job is active. Recordar a los participantes antes de que termine la prueba El número de días antes de que termine la prueba que desea que se envíe un correo electrónico de recordatorio a los participantes de la prueba. For emails to be sent, the Trials – Start and Notify Participants job must be Active; see Viewing All Scheduled Jobs. The notification sent is the Trial Letter and can be configured; see Configuring Alma Letters.Disponible para el público Cuando se selecciona, indica que la prueba está disponible para el público (abierta a todo el mundo). De forma predeterminada, esta casilla de verificación no está activada y la prueba es una prueba privada. This means that the trial is limited to the trial participants whom you invite to participate in the trial (in the Participants tab).Contacto Nombre de la persona de contacto en la institución que es responsable de la prueba. URL de la página del participante La ruta hacia la encuesta de la prueba. Se rellena automáticamente después de introducir las fechas de inicio y fin, y no se puede editar. The URL for the trial includes the Participant Page URL field, as follows: https://<Alma domain>/<participant page url> Copiar al portapapeles The full URL can be copied to the clipboard to use it outside of Alma without the need to copy the partial URL and add the server name.
For more information, watch theGet Full URL for Survey of an E-Resource Public Trial video (1:07 min).
Ver formulario Un enlace que muestra la encuesta de la prueba. Análisis y Resultados This section is completed by the Trial Operator after reviewing and analyzing the results of the trial (see Analyzing Trial Results). - In the Survey Form tab, create the questions for the survey.In the Form Configuration section, select the Hide Portfolio Tab and/or Hide Collection Tab check boxes if you want those tabs to be suppressed from the survey form sent to the users. Select the Add Survey Prefix check box to include an explanatory message that appears at the top of the survey. Enter the message in the Prefix Message field.Añadir preguntas a la encuesta para las secciones Información general o Preguntas utilizando uno de los siguientes métodos o ambos:
- In Add from list, select a question from a list of existing questions. The Survey Form Question List page opens. Select the questions you want to use for the survey and select Select. Las preguntas son añadidas al formulario.
- Select Add Question. Aparece la caja de dialogo Añadir pregunta. Introducir la información de la pregunta tal como se indica:
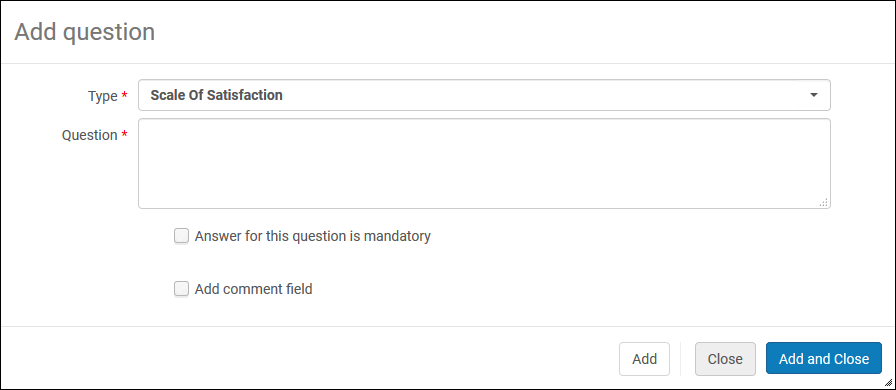
Caja de dialogo Añadir pregunta - From the Type drop-down list, select one of the following types of questions:Scale of satisfied(for example, 1-5),Yes/No,Free text,Multi choice, or Single choice.
- Enter the text of the question in the Question field.En Pruebas, al añadir una pregunta de una o varias opciones, el valor de la opción no puede incluir "&"; utilice "y" en su lugar.
- For Multi choice or Single choice questions, enter a Question code. Este código asociará los valores que introduzca con la pregunta.
- For Multi choice or Single choice questions, select Add Value. Enter a Value and select Add. Repeat this step until you have entered all the values for the question.Los valores de las preguntas de Opción múltiple y Opción simple se pueden almacenar también en la tabla de asignación Pregunta de encuesta tipo test. See Configuring Multiple Choice Survey Questions.
- Select the Answer for this question is mandatory check box to require the user to answer the question.
- Select the Add comment check box to add a comment field to the question. Aparece otro campo para introducir la etiqueta del comentario.
- Select Add to add the question to the survey and leave the dialog box open to add an additional question, or select Add and Close to add the question to the survey and close the dialog box. La pregunta se añade al formulario.
- To edit a question, select Edit in the row actions list for the question you want to edit. Modify the question as required and select OK.To rearrange the order of questions, use the Move Down and Move Up arrows.To delete a question, select Delete in the row actions list for the question you want to delete, and select Confirm in the confirmation box.
- If you are defining a private trial, select the Participants tab to select the participants in the trial.Utilizar la búsqueda secundaria para buscar a los participantes que se ha añadido a la prueba.To add participants, select Select participants to search for and select users on the Find and Manage Users page (see Searching in Alma). Select the users and select Select. Los participantes seleccionados son añadidos a la prueba.To load a participant from a set, select Load from a set and select a set from the set list. At the top of the Trial Details page, a message displays to indicate the number of participants that were added out of the possible set size. Duplicates and deleted users will not be loaded.If a checkmark appears in the Is Notified column, the user has already received a notification. No se enviará otra notificación al usuario cuando se envíen las notificaciones. To reset a user so that they will receive another notification, either select Reset Notification on the row action list, or select a group of users and select Reset All Notifications from the view action list.To remove a participant, select Delete in the row actions list for the user.
- The Analysis tab appears only after the trial is created. In the Alerts tab, view the alerts generated for the trial.
- In the Attachments tab, add, update, or delete attachments for the survey. For details on working with attachments, see Attachments Tab.
- In the Notes tab, add, update, or delete notes for the survey. For details on working with notes, see Notes Tab.
- When you have modified the PO line information for the trial as required, select Save.
Analyzing Trial Results
As responses are completed and submitted by the trial participants, they are recorded and analyzed in the Analysis tab. The Trial Operator reviews the results, makes a purchasing decision, and enters the decision in the Analysis and Results section of the Summary tab (see Entering and Saving Trial Results, above).
Después de introducir los resultados de la prueba, el Operador de pruebas guarda la prueba. Si no se toma ninguna decisión de compra, aparece un cuadro de diálogo pidiendo confirmación de que la prueba se puede guardar sin esta información. La prueba permanece entonces en la página Gestionar pruebas.
Si se ha tomado una decisión de compra:
- La información de la prueba es normalizada y validada.
- Se genera un aviso indicando que hay una decisión de compra para la prueba.
The PO line is sent to the review PO lines task list (see step 2 in Purchasing Workflow). El Operador de compras puede entonces proceder a procesar la línea de la Orden de compra como parte del flujo de trabajo de la compra normal.
- On the Manage Trials page (Acquisitions > Purchase Order Lines > Manage Trials), select Edit in the row actions list for the trial you want to edit. The Trial Details page appears on the Summary tab (see Editing Trial Information, above).
- Select the Analysis tab to open the Trial Analysis page.
The Analysis tab contains the following sections:
- General Information – The number of surveys sent out to participants as well as the number of responses returned (with totals for each category of respondent).
- Questions – Grouped according to the ranges (described in Editing Trial Information, above).
Dentro de cada rango, se muestra la siguiente información:
- Número de pregunta
- Pregunta
- Responses
- Average — For Yes/No questions, the number of yes/no responses is shown. For Scale of satisfied questions, the average of all responses is shown. For questions where the answers are in free text, the number of responses is shown, as well as a list of each response.
Además de los totales de las respuestas, se pueden ver representaciones gráficas de las respuestas a cada pregunta y del total de cada rango de preguntas. Las preguntas del tipo Sí/No y las de opción simple u opción múltiple mostrarán un gráfico circular con una tabla enumerando los resultados por opción y los comentarios. Las preguntas de la escala de satisfacción mostrarán un gráfico de barras y la puntuación media.
Introducir y guardar los resultados de la prueba
After analyzing the responses to the trial, the Trial Operator enters the results and the purchasing decision in the Analysis and Results section of the Summary tab. The minimum information that the Trial Operator must enter in this section is the Result and Result Date.
Después de introducir los resultados, se guarda la línea de la Orden de compra. If the decision was made to purchase the material, the PO line continues with step 2 of the purchasing workflow (see Purchasing Workflow). If the decision was made not to purchase the material, the Purchasing Operator can decide to cancel the PO line on the Purchase Order Lines in Review page (see Canceling PO Lines).
- On the Manage Trials page (Acquisitions > Purchase Order Lines > Manage Trials), select Edit in the row actions list for the trial you want to edit. The Trial Details page appears on the Summary tab (see Editing Trial Information).
- Enter the analysis and results of the trial in the Analysis section. En la siguiente tabla se proporciona una descripción de los campos de esta sección.
Campos de Análisis y resultados Sección Campo Descripción Análisis y Resultados Resultado Seleccionar el resultado de la prueba. Fecha del resultado Seleccionar la fecha en la que se toma la decisión según el resultado de la prueba en el cuadro de diálogo Calendario. Razón del resultado Seleccione la razón del resultado. Para personalizar la lista, contacte con el departamento de soporte de Ex Libris. Decisión de compra Select No or Yes from the drop down list. - Seleccionar uno de los siguientes botones:
- Save — Store the results of the trial. If you decided to purchase the material, the PO line continues with step 2 of the purchasing workflow (see Purchasing Workflow). If you decided not to purchase the material, the PO line can be canceled, as described in Canceling PO Lines.
- Export Survey Feedback — Exports a summary of the trial, with one tab each for the results of General Information and Questions, to an Excel spreadsheet.
Page tags: article:topicproduct:almacontent:Documentationlang:englishedit trial informationanalyze trial resultsenter trial resultssave trial resultsactivate trialtrial surveycreate trial surveysurvey questiontrial analysis
