
Máquinas de autopréstamo
Configure a self-check type of integration profile and associate it with a circulation desk.
- Administrador general del sistema
- Administrador de servicios al usuario
Alma recibe y actúa sobre los mensajes SIP recibidos de las máquinas de autopréstamo SIP 2.0 y devuelve respuestas a estas máquinas. For details on the integration with self check systems, see https://developers.exlibrisgroup.com/alma/integrations/selfcheck.
La configuración en Alma solo es informativa y permite al operador brindar una vista de la configuración de la máquina de autopréstamo. Sin embargo, la ejecución se lleva a cabo según la configuración de la máquina de autopréstamo. Por ejemplo, la biblioteca puede configurar el perfil de autopréstamo de Alma para no permitir devoluciones/préstamos. Sin embargo, esto solo se puede implementar si la máquina de autopréstamo está configurada para no permitir devoluciones/préstamos.
- Configurar un tipo de perfil de integración de autopréstamo (véase el siguiente procedimiento).
- Asociar el perfil de autopréstamo con un mostrador de circulación (véase el siguiente procedimiento). La máquina de autopréstamo solo podrá proporcionar servicios a ubicaciones que estén atendidas por este mostrador de circulación. (Note that a circulation desk, if defined as a primary circulation desk, can service other libraries – see Configuring Fulfillment Services Between Libraries Within an Institution. For general information on circulation desks see Managing Patron Services at a Circulation Desk).Si su institución se encuentra en la fase de implementación, no se podrá llevar a cabo este paso. Contactar con su gestor de proyectos de Ex Libris para que lo lleve a cabo por usted.
- Configure a secure transmission between Alma and the self-check machine, following the instructions located in the Ex Libris Developer Network:https://developers.exlibrisgroup.com/alma/integrations/selfcheck/stunnel. Estos procedimientos deben realizarse después de configurar un perfil de integración de autopréstamo en Alma.Se requiere un modelo de autopréstamo independiente y el certificado correspondiente (véase el paso 5) para cada grupo de máquinas de autopréstamo con diferentes capacidades (por ejemplo, uno para aquellas máquinas que admiten el pago de cuotas y otro para aquellas máquinas que admiten únicamente devolución/préstamo). También es obligatorio un perfil independiente para cada máquina que esté conectada a un mostrador de circulación independiente, ya que cada perfil puede conectarse a un único mostrador de circulación. Nótese que el certificado que se obtiene es válido mientras exista el perfil de integración, independientemente de las modificaciones realizadas en el perfil.
- The format of dates for self-check machine messages is determined by the system_time_format parameter (Configuration Menu > General > General Configuration > Other Settings). If this parameter contains the z symbol, the time zone is included in the date sent in self-check machine messages.
- If you want to use a self check machine to handle items from other institutions in your fulfillment network, this may only be done if you are using unique barcodes across the network as defined in the fulfillment_network_unique_barcodes parameter. See Configuring Other Parameters (Fulfillment).
- On the Integration Profiles List page (Configuration Menu > General > External Systems > Integration Profiles), select Add Integration Profile. Se abre la primera página del asistente del perfil de integración.
- Se han de realizar las siguientes acciones en esta página:
- In the Code and Name fields, enter a code and name (respectively) for the profile you are defining.
- From the Integration type drop-down list, select Self-check.
- In the System (for Ex Libris' informational purposes) field, indicate the type of self-check system with which you are integrating. Téngase en cuenta que esto es obligatorio.
- Si se selecciona Otro en la lista de sistemas, aparecerá el campo Descripción del Sistema para mostrar más información del sistema.
- Optionally, in the Description field, enter a description of the integration you are configuring
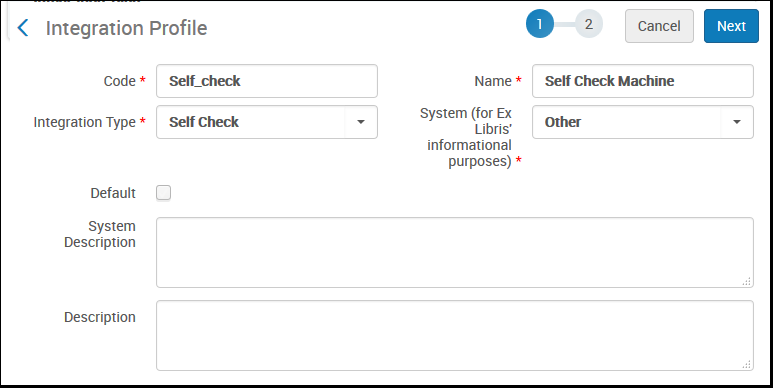 Definición del perfil de integración de una máquina de autopréstamo – Página 1
- Select Next. Aparece la segunda página del asistente.
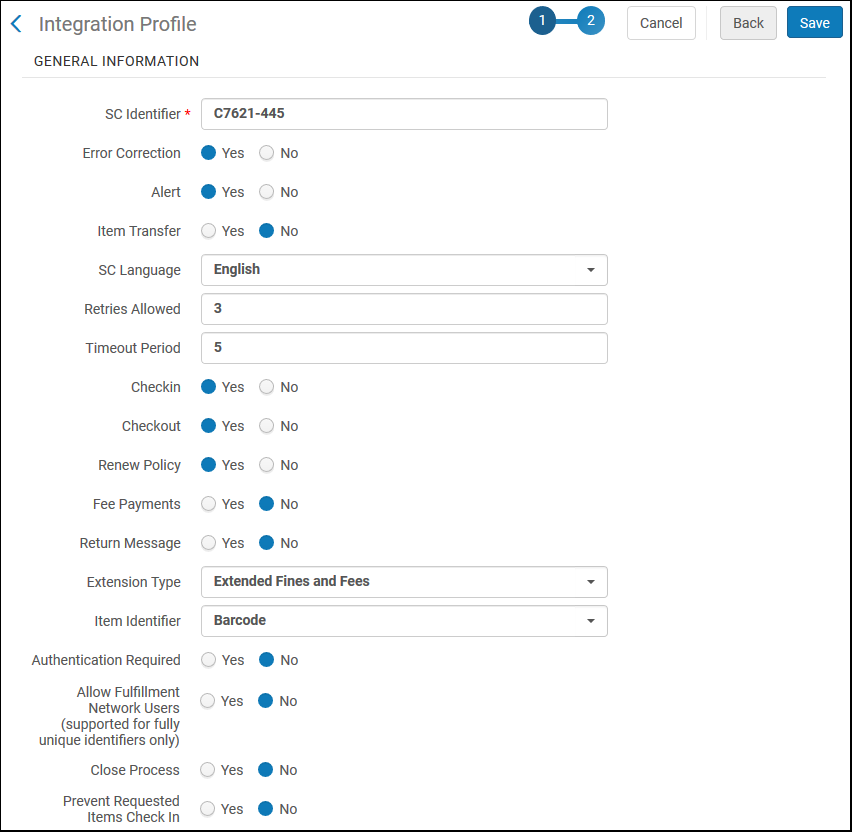 Definición del perfil de integración de una máquina de autopréstamo – Página 2
- Under General Information, perform the following actions:
- In the SC Identifier field, enter any string.
- Seleccionar si se desea que la máquina de autopréstamo envíe lo siguiente a Alma:
- Error correction – Select Yes for Alma to send/receive sequence numbers and checksums as part of the relevant messages. Si esta funcionalidad está habilitada en la máquina de autopréstamo, también debe habilitarse aquí. If you do not want to use this option, select No and turn it off also on the self-check machine.
- Alert – Select Yes for Alma to send/receive alert messages.
- Item transfer – Item transfer messages (not currently supported)
- SC language – select the language in which Alma and the self-check machine communicate.
- Retries allowed and Timeout period – enter the number of times you want Alma or the self-check machine to try to send a message following a failure of the first message to reach its destination, and the amount of time, in seconds, between each retry. For both fields, the value must not be longer than 3 characters.El número recomendado de reintentos permitidos es de 2 a 5, y el período de tiempo de espera recomendado es de 50 a 70 (décimas de segundo).
- Checkin,Checkout,Renew Policy,Fee Payments,Return Message – Select the actions to be supported (Yes/No) between Alma and the self-check machine. (Note that Return message is not currently supported.)
- If you are using a 3M self-check machine, the checkin option must be set to Yes, due to a 3M requirement for enabling initial communication. Si no se desea que la acción de devolución esté permitida, hay que comprobar que se bloquea al configurar la máquina de autopréstamo 3M.
- If Renew Policy is set to No, Primo indicates to the patron that they should not renew the resource, but this setting has no effect on Alma. Si el usuario solicita una renovación en cualquier caso, Alma no bloquea la renovación.
- Extension type – select Extended fines and fees (Extended check-in is not currently supported) to enhance your self-check messages (SIP2) with additional fields. Esta opción incluye los siguientes elementos para cada cargo abierto en el mensaje Respuesta de información del usuario SIP2 y permite a los usuarios de autopréstamos ver esta información (si está disponible) cuando se solicite:No todas las máquinas de autopréstamo admiten esta opción. Esta opción no debe seleccionarse cuando se trata de máquinas de autopréstamo que solo gestionan préstamos y devoluciones (y no pagos).
- EB - Código de barras del ejemplar que está vinculado al cargo (por ejemplo, por el vencimiento/pérdida de un ejemplar).
- ET - Título del ejemplar que está vinculado al cargo
- EC - Código del tipo de transacción en efectivo
- ED - Descripción del tipo de transacción en efectivo
- EF - Suma
- EK - ID de la cuota
- BZ - Número de la transacción de pago
- Item Identifier – select the type of ID—Barcode,Call number, or Item ID—used to match physical items when incoming messages contain item IDs. El menú desplegable Identificador de ejemplar del perfil de integración de autopréstamo establece si la máquina de autopréstamo envía códigos de barras o PID a Alma.
- Authentication required – select Yes if you want the patron to be required to supply a password. Tenga en cuenta que la contraseña debe ser comunicada por la máquina de autopréstamo a Alma dentro del mensaje SIP2, lo que puede afectar la funcionalidad SSO en algunos casos. The PIN code can be updated by the patron in Primo only if the use_pincode_for_selfcheck_machine parameter is set to true in the Customer Parameters table (see Configuring Other Settings).
- Allow Fulfillment Network Users (supported for fully unique identifiers only) – select Yes for Alma to search for the user locally, then in fulfillment network members. La búsqueda se detiene cuando se encuentra una coincidencia y la cuenta enlazada se crea automáticamente. This is only supported if user identifiers are fully unique across the fulfillment network as defined in the network_users_unique_identifiers parameter. See Configuring User Management. When the field is set to No, Alma searches only local users in response to SIP2 messages.
- Allow Fulfillment Network Items – for institutions in fulfillment networks that are set up to only allow fully or partially unique barcodes (this option can be set by Ex Libris support), select Yes to allow SIP2 transactions for items from other institutions, or No to limit the SIP2 to items from the local institution. If Yes is selected, when an item from another institution is handled, Alma checks if duplicate barcodes exist in the network. Si existen, la transacción de autopréstamo se rechaza y el ejemplar solo se puede prestar en el mostrador. De lo contrario, la transacción se completa.
- The Close Process field defines how Alma handles a currently active work order on the item (if any), or a purchase order line that is waiting to be received. For example, if the item is in acquisition and being received from the vendor, or if the item has an active work order (such as an acquisitions technical worker order). This field enables you to to remove work orders from items by scanning their barcodes at the self check machine or to receive an ordered item at the self check machine.
- If you select Yes, Alma marks the existing work order as Done. For example, for a purchased item arriving from a vendor, Alma receives the item, just as if the user selected Receive on the Receive New Material page (see Receiving New Physical Material). El ejemplar se envía a su ubicación permanente (mediante una solicitud de tránsito para volver a colocar en estanterías). If there is a different currently active work order or request on the item, then Alma marks the workflow as Done and continues the item's workflow.
- If you select No, Alma does not change the status of any existing work order. The default value is No.
- Prevent Requested Items Check In – select Yes to prevent checking in requested items and instruct the patron to return the item at the circulation desk.If you want to enable returns of items from other libraries, this option must be set to No. In addition, in the configuration of the circulation desk (Configuration Menu > Fulfillment > Library Management > Circulation Desks > General Details),Primary must be selected (see Configuring Circulation Desks), and in the configuration of the library (Configuration Menu > General > Libraries > Relationships), the library must have a Circulate for relationship with the owning library (see Configuring Libraries).
- For a secure TCP connection, select Download Certificate to download and save the certificate so that it can be used when configuring Stunnel (see step 3 in the introductory section above).
- Select Save. El perfil que se configuró aparece en la Lista de perfiles de integración.
-
Open the Circulation Desks List page (Configuration Menu > Fulfillment >(ensure you have selected the correct library in the location drop down list)> Library Management > Circulation Desk).
-
Select Edit from the row actions list for the circulation desk you want to associate with the previously defined self-check profile, or select the Add Circulation Desk button to create a new circulation desk with which you want to associate the self-check profile.
-
On the Circulation Desk – General Details page, under Self-Check Information, select the Has self-check check box and select a previously defined self-check profile from the Integration profile drop-down list. The password for the self-check machine is automatically listed in the Terminal password field. (For information on the other fields on this page, see Configuring Circulation Desks.)
Sección Información de autopréstamo: Verify that the Circulation Desk associated with the self-check profile does not have the Reading Room Desk check box selected. De lo contrario, los ejemplares que se retiren mediante autopréstamo en este escritorio no se desensibilizarán. -
Select Save to store your changes to the circulation desk.
Page tags: article:topicproduct:almacontent:Documentationlang:englishself-checkself-check machineconfigure a self-check type of integration profileassociate a self-check profile with a circulation desk
