
Configuring Libraries
This page describes how to configure libraries for fulfillment including services between libraries in an institution, transit time rules, resource sharing, etc. For links to all the main fulfillment documentation pages see Fulfillment.
Configuring Fulfillment Services Between Libraries Within an Institution
Para configurar las relaciones de servicios al usuario, se debe tener uno de los siguientes roles:
- Administrador general del sistema
- Administrador de servicios al usuario
Watch the Managing Libraries and Locations video (6 min.).
Fulfillment relationships define the services that one library is able to perform for another library within the same institution. For general information on working with fulfillment networks see Fulfillment Networks.
You configure fulfillment relationships on the Organizational Units Relationships Setup page (Configuration Menu > General > Libraries > Relationships).
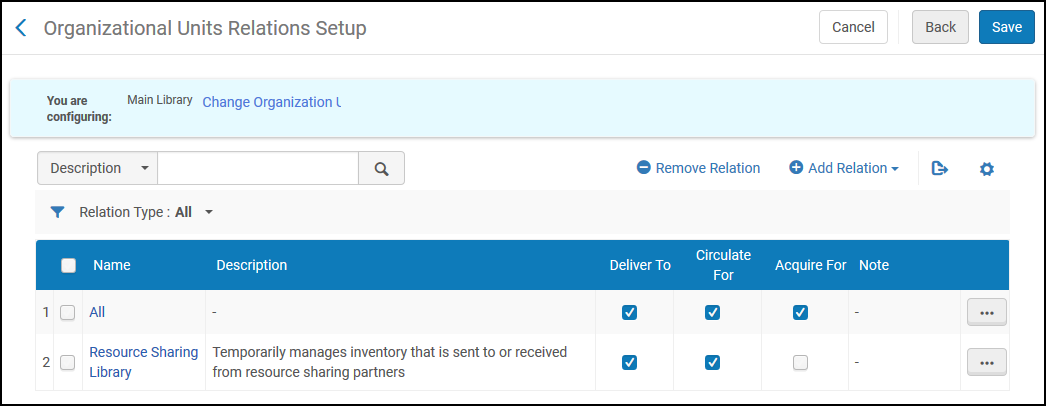
Ensure that you are within the context of the institution/library whose relationships you want to configure by selecting the required institution/library from the Configuring filter on the Fulfillment Configuration page.
Se pueden efectuar las siguientes acciones en esta página:
- Adding Organizational Unit Relationships (see Adding Organizational Unit Relationships)
- Editing Organizational Unit Relationships (select Edit from the row actions list)
- Deleting Organizational Unit Relationships (select Delete from the row actions list)
Adding Library Relationships
Se pueden añadir relaciones de unidades organizativas.
-
On the Organizational Units Relationships Setup page (Configuration Menu > General > Libraries > Relationships), select Add Relation. Aparece el cuadro de diálogo Añadir relaciones de la biblioteca.
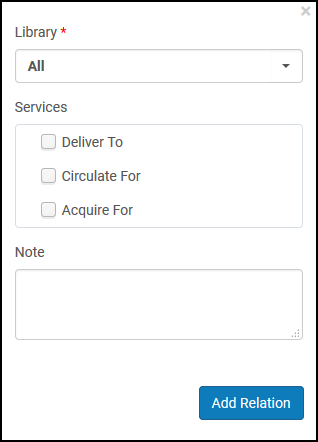 Si selecciona TODO en la lista desplegable Biblioteca al crear la relación, esta selección solo se aplica en el momento de crear la relación.
- From the Library drop-down list, select which library or libraries will receive services from the library that you are configuring.
- Seleccionar los servicios que la biblioteca que se está configurando puede proporcionarle la biblioteca arriba seleccionada:
- Acquire for(available on both the library and institution levels) – The library that you are configuring is able to acquire items for the specified library. Esto significa que puede crear una línea de orden de compra con la biblioteca que está configurando como Propietaria de la línea de orden de compra, y los ejemplares solicitados pueden ser para la biblioteca especificada.
- Circulate for(available on the library level only) – The library that you are configuring is able to check in and check out items for the specified library. Si no se elige esta opción y una biblioteca diferente intenta realizar un préstamo o una devolución, se puede aplicar un bloqueo sobre la acción. For more information on block preferences, see Configuring Block Preferences.
- Deliver to(available on the library level only) – The library that you are configuring is able to deliver requested items to the specified library.
- Supply from(available on the library level only) – The library that you are configuring is able to supply items to the resource sharing library. The libraries for which you configure a Supply from relationship display in the Availability information for lending requests on the Resource Sharing Lending Requests Task List page (see Managing Resource Sharing Lending Requests), and on the Manage Resource Options page when managing fulfillment options for a request (see Managing Fulfillment Options).
Selecting All for any of these service options indicates that the library/institution being configured can provide the service for all libraries or receive the service from all libraries in the institution. If All is selected for a service but an individual library has a different value, the library's selection will take precedence.
- Select Add and Close to close the dialog box. The relationship you defined is listed under Library Relationships on the Organizational Units Relationships Setup page.
Configuring Transit Time Rules
Para configurar las reglas de tiempo de tránsito, se debe tener uno de los siguientes roles:
- Administrador general del sistema
- Administrador de servicios al usuario
Transit-time rules enable Alma to calculate expected delivery times for fulfillment requests. Cuando se recibe la solicitud de un ejemplar, las reglas de tiempo de tránsito de los servicios al usuario se verifican para determinar el tiempo de tránsito basado en la ubicación del ejemplar solicitado, el lugar de recogida y, en algunos casos, el tipo de material del ejemplar (por ejemplo, mover un ejemplar de gran tamaño de una biblioteca a otra puede llevar más tiempo que mover un ejemplar de un tamaño medio). Alma uses the transit-time rules to find the copy of the requested item that can be expected to arrive at the required pickup location the soonest (see also Pickup at Shelf and How does Alma 'choose' the copy that will fulfill a request?).
There is a default transit-time rule that defines the delivery time when none of the transit-time rules is met. This default rule can be modified, but out-of-the-box it is set to a 12-hour delivery time. Cuando se define una nueva regla de tiempo de tránsito, se puede evaluar la regla calculando el tiempo estimado de llegada (ETA) para un escenario en el que se aplica la regla. For details, see To calculate the estimated time of arrival for a resource below.
Cada regla de tiempo de tránsito se puede activar o desactivar. Por defecto, toda regla nueva está activada.
See the following Knowledge Article regarding a scenario in which transit rules will not be considered:Alma Requesting is randomly choosing unavailable items instead of available items
You configure transit-time rules from the Transit Time Rules page (Configuration Menu > Fulfillment > Library Management > Transit Time).
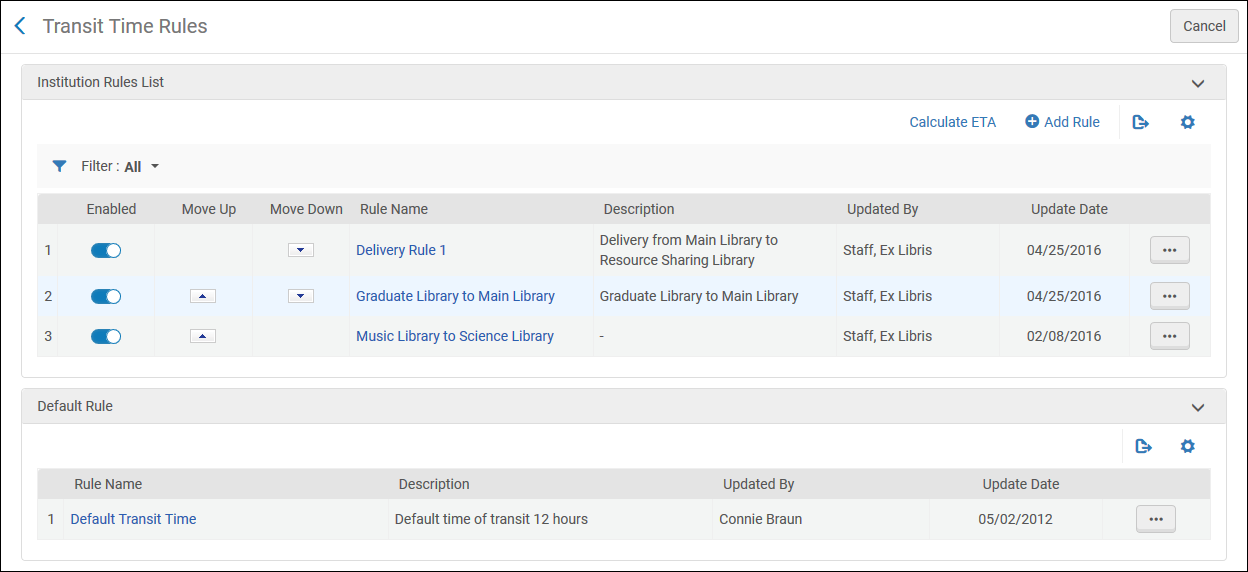
Las reglas de tiempo de tránsito solo se pueden configurar en el nivel de la institución. Select the required institution from the Configuring filter on the Fulfillment Configuration page.
Se pueden efectuar las siguientes acciones en esta página:
- Adding a transit-time rule (see Adding a Transit Time Rule)
- Editing a transit-time rule (select Edit from the row actions list)
- Deleting a transit-time rule (select Delete from the row actions list)
- Editing the default transit-time rule (select Edit from the row actions list for the default rule)
- Activar o desactivar una regla de tiempo de tránsito
- Mover las reglas de tiempo de tránsito para arriba y abajo según orden de preferencia. El orden de las reglas dentro de la lista de reglas es importante porque Alma aplica la primera regla (activada) cuyos parámetros de entrada se cumplen.
- Calculating the ETA for a Resource (see Calculating the Estimated Time of Arrival For a Resource)
Adding a Transit Time Rule
Se puede añadir una nueva regla de tiempo de tránsito, que puede estar activada o desactivada. Por defecto, toda regla nueva está activada.
The calculated delivery time gives an estimate of when a requested item will arrive at the pickup location. This estimate can have an effect on how and when the service is provided to the requesting patron. En algunos casos, el usuario puede no estar interesado en el servicio después de una fecha o un tiempo en particular. En ese caso, los tiempos de entrega más prolongados pueden eliminar ciertas opciones de servicios al usuario.
The material type of the physical item requested and the source (From) location of an item can also limit the fulfillment scenarios available for a given request, as they, too, may affect the speed of the transfer.
-
On the Transit Time Rules page (Configuration Menu > Fulfillment > Library Management > Transit Time), select Add Rule. Aparece la página Editor de reglas de tiempo de tránsito.
If you want to create a copy of an existing transit-time rule, select Duplicate from the row actions menu. Una vez que se haya copiado la regla, se puede modificar según sea necesario.
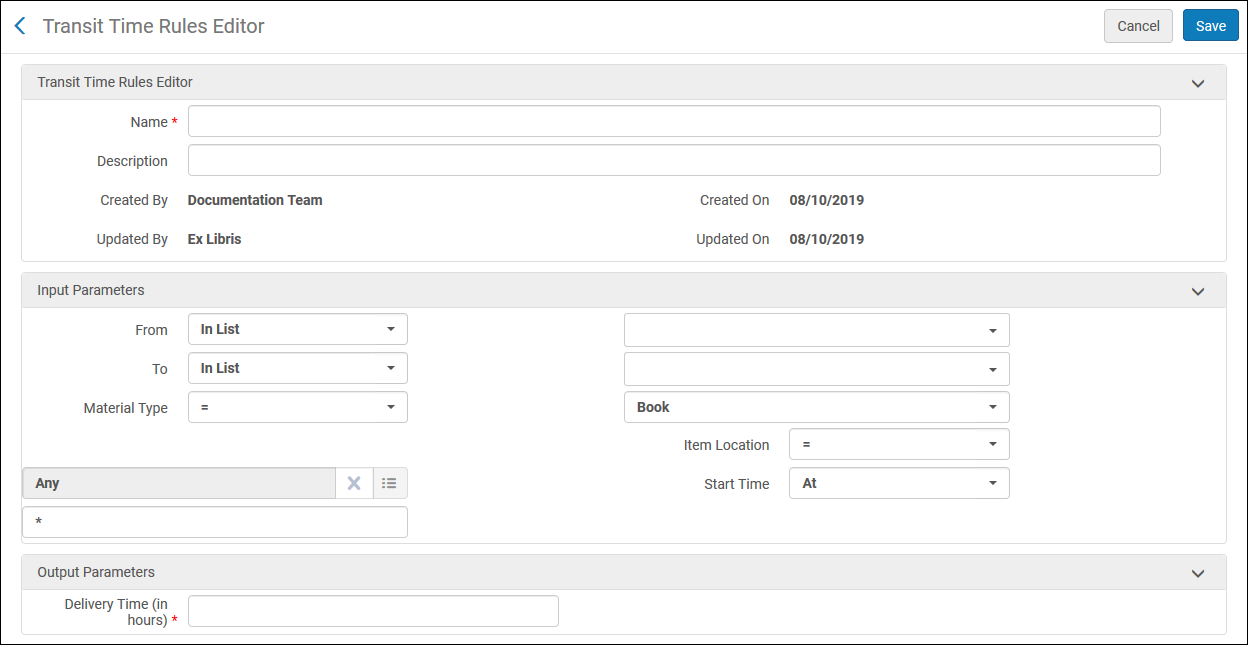
- In the Transit Times Rules Editor section, specify a name (required) and description (optional) for the new rule.
- In the Input Parameters section, specify an operator and enter values for the following parameters:
From – The source organization unit –that is, the library or institution from which the item will be transferred.
You can add several source organization units to be included in the rule by pressing Ctrl on your keyboard while selecting the relevant values.
To – The destination –that is, the library to which the item will be delivered. The To drop-down list includes only those libraries that have a Deliver to relationship with the source location. For details on fulfillment relationships, see Configuring Fulfillment Relationships.
You can add several destinations to be included in the rule by pressing Ctrl on your keyboard while selecting the relevant values.
- Material type – Select the type of item that is to be delivered.
- Item location – Select the physical location inside the source location from which the item will be transferred.
Start time – Enter the time of day at which items are dispatched from the source location to the specified destination. For example, if it takes longer to move around items in the morning than in the afternoon, then you can have a rule with ‘Start Time After 12:00' and another with 'Start Time Before 12:00'.
A diferencia de un ejemplar que fue escaneado y, por lo tanto, tiene una hora conocida en la que se puso en tránsito, no hay una hora conocida de escaneo que el sistema pueda usar para calcular el ejemplar más cercano para cumplir con una solicitud. Therefore, when the system calculates the closest copy that can be used to fulfill a request (see Pickup at Shelf) it uses a rule with no start time, i.e. the Start Time is set to 'At *'.
- In the Output Parameters section:
- Delivery time (in hours) - Time that it will take to deliver the item when the specified input parameters are fulfilled.
- Use for Hold Request Pickup Calculation – Select this checkbox for the rule to be considered for selecting the best copy to fulfill a request (see Pickup at Shelf). The checkbox is displayed only when the From and To library fields are configured, and the Material Type field is set to Any. Por defecto, la casilla de verificación no está seleccionada. (New for February 2026) When this checkbox is selected, the Do not use for Transit Time Calculation checkbox appears. Al seleccionar esta casilla de verificación, ocurre lo siguiente:
- The rule is only used for calculating the selected item for fulfilling the request (see Pickup at Shelf), and not for calculating an estimate of when a requested item will arrive at the pickup location
- The From field is configurable at the location level.
When a hold request is created, and the resource to fulfill the request is not available in the selected pickup location, Alma matches resources to the request using additional parameters, as follows:
- Alma attempts to locate resources belonging to another library on the same campus as the pickup location.
If no resources are found on the same campus, multiple resources exist in different locations on the campus, or no campuses have been defined, Alma checks the Transit Time Rules for which the Use for Hold Request Pickup Calculation checkbox has been selected. If a rule exists for this resource and the Use for Hold Request Pickup Calculation checkbox is selected, Alma chooses this resource.
- If multiple resources have a transit-time rule, then the resource with the shortest transit time is selected.
From and To libraries are the only input parameters in the transit-time rule that are considered for the location calculation.
- Select Save. La regla que se definió aparece en la parte inferior de la lista de reglas en la página Reglas de tiempo de tránsito.
Calculating the Estimated Time of Arrival For a Resource
Se puede calcular el ETA de un recurso que se transferirá de una ubicación a otra. El ETA indica en cuántas horas llegará el recurso a la ubicación de destino, y se basa en las reglas de tiempo de tránsito definidas para las ubicaciones de partida y llegada. Si no se cumplió ninguna de las reglas de tiempo de tránsito, se aplica la regla de tiempo de tránsito por defecto. El cálculo del ETA es útil para probar las reglas que se definieron.
-
On the Transit Time Rules page (Configuration Menu > Fulfillment > Library Management > Transit Time), select Calculate ETA. Aparece la página calcular ETA.
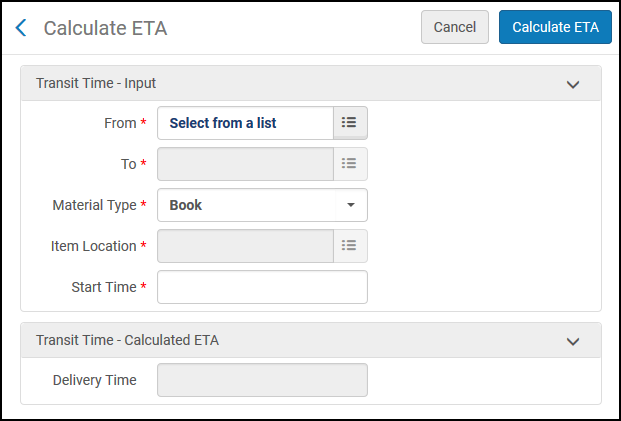
- In the Transit Time - Input section, enter the input parameters for the calculation. See step 3 in Adding a Transit Time Rule for details on the input parameters.
- Select Calculate ETA. The calculated ETA is displayed in the Delivery time field.
Configuring Reshelve-Without-Transit Rules
To configure reshelve-without-transit rules, you must have one of the following roles:
- Administrador general del sistema
- Administrador de servicios al usuario
You can set relation rules between libraries, departments and circulation desks so that transit for reshelving will not be required between certain libraries. Así se reduce el exceso de trabajo superfluo, al no poner automáticamente ejemplares en tránsito para reubicarlos cuando las bibliotecas están cerca unas de otras. Esto no afecta a otros tipos de tránsito, como estante de reservas, orden de trabajo y en proceso. For more detailed information and an example of this functionality, see Transit for Reshelving Rules and “No Transit".
The default rule has no input parameter and an output parameter set to false to put all items into transit when reshelving.
Cada regla se puede habilitar o deshabilitar. Por defecto, toda regla nueva está activada.
You configure reshelve-without-transit rules from the Reshelve Without Transit Rules page (Configuration Menu > Fulfillment > Library Management > Reshelve Without Transit Rules).
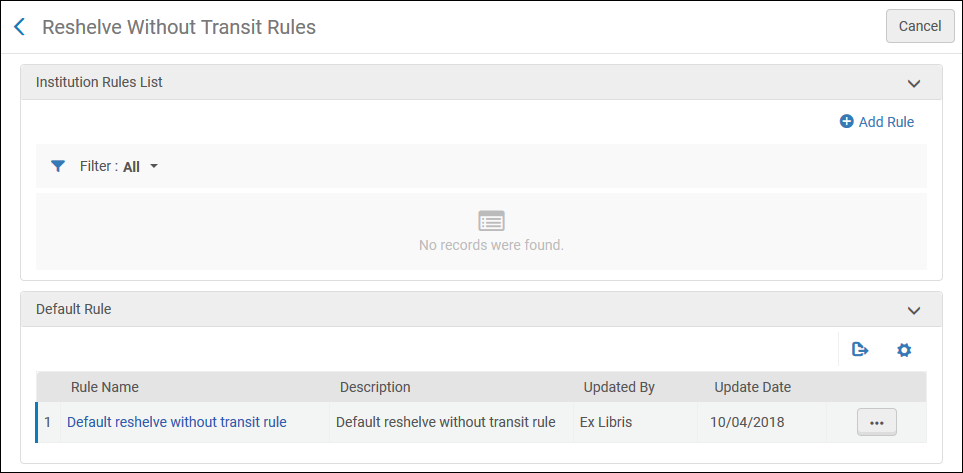
Las reglas de reubicación sin tránsito solo se pueden configurar a nivel de la institución. Select the required institution from the Configuring filter on the Fulfillment Configuration page.
Se pueden efectuar las siguientes acciones en esta página:
- Adding a reshelve-without-transit rule (see Adding a Reshelve-Without-Transit Rule)
- Editing a reshelve-without-transit rule (select Edit from the row actions list)
- Deleting a reshelve-without-transit rule (select Delete from the row actions list)
- Editing the default reshelve-without-transit rule (select Edit from the row actions list for the default rule)
- Enabling or disabling a reshelve-without-transit rule
- Mover las reglas de reubicación sin tránsito hacia arriba o hacia abajo en orden de preferencia. El orden de las reglas dentro de la lista de reglas es importante porque Alma aplica la primera regla (activada) cuyos parámetros de entrada se cumplen.
Adding a Reshelve-Without-Transit Rule
You can add a new reshelve-without-transit rule, which can be either enabled or disabled. Por defecto, toda regla nueva está activada.
-
On the Transit Time Rules page (Configuration Menu > Fulfillment > Library Management > Reshelve Without Transit Rules), select Add Rule. The Reshelve Without Transit Rules Editor page appears.
If you want to create a copy of an existing reshelve-without-transit rule, select Duplicate from the row actions menu. Una vez que se haya copiado la regla, se puede modificar según sea necesario.
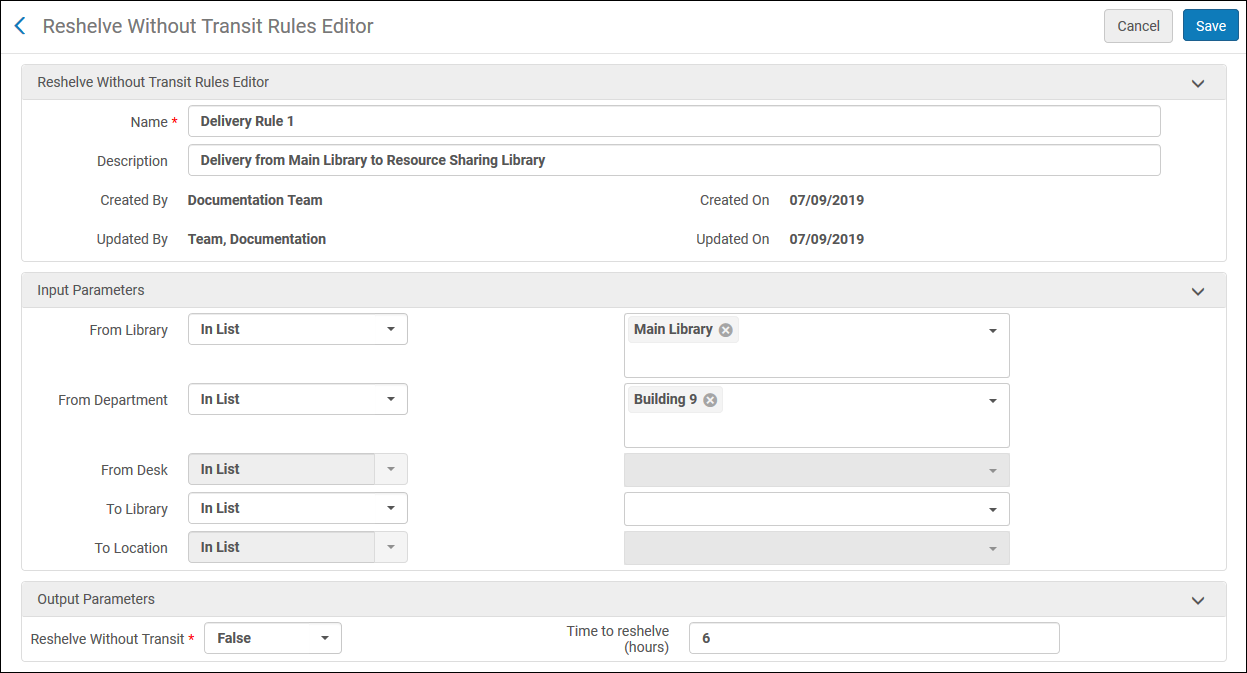
-
In the Reshelve Without Transit Rules Editor section, specify a name (required) and description (optional) for the new rule.
- In the Input Parameters section, specify an operator and enter values for the following parameters. Para todos los parámetros de entrada, se pueden elegir múltiples selecciones:
- From Library – The source –that is, the library from which the item is sent. Select the operator (In List or Not In List) and one or more libraries of this institution.
- From Department- Select the operator (In List or Not In List) and the department. If one library is selected in From Library, all departments within that library are displayed. If no libraries are selected in From Library, all departments in the institution are displayed. If two or more libraries are selected in From Library, the field is disabled and no departments can be chosen.
- From Desk- Select the operator (In List or Not In List) and the desk. If one library is selected in From Library, all circulation desks within that library are displayed. If two or more libraries are selected in From Library, the field is disabled and no desks can be chosen.
- To Library – The destination – that is, the library to which the item is delivered. Select the operator (In List or Not In List) and one or more libraries of this institution.
- To Location – This field is disabled by default. If a single library is selected in the To Library field, select the operator (In List or Not In List) and one or more locations of the selected library.
- In the Output Parameters section, specify the following parameters:
- Reshelve Without Transit – Select True to set the rule to reshelve an item without transit when the specified input parameters are fulfilled. Select False for all items to reshelve with transit.
Time to reshelve (hours) – Specify the period of time in hours (or portions of hours, such as 10.5) that is allotted to place an item back on the shelf after it has been returned. Durante este tiempo, Alma y Primo indicarán a los usuarios y bibliotecarios que el estado del ejemplar es disponible y a la espera de reubicación en estantería. Cuando este período de tiempo expire, el estado mostrará que el ejemplar está en su lugar en la estantería.
Watch the Reshelving Items Time video (2:07 min.).
- Select Save. La regla que se definió aparece en la parte inferior de la lista de reglas en la página Reglas de reubicación sin tránsito.
Cuando se digitaliza un ejemplar a una ubicación distinta de su biblioteca propietaria, Alma verifica estas reglas. If there is no transit relation between the current location of the item and its destination, the item is set to In Transit. Otherwise, it is set to Item In Place.
Configuring Parameters of a Resource Sharing Library
Para configurar los parámetros de la biblioteca de recursos compartidos se debe tener uno de los siguientes roles:
- Administrador general del sistema
Las bibliotecas dentro de una institución o campus pueden estar configuradas para tener relaciones que permitan a los usuarios verificar la entrada o salida de recursos en otra ubicación, enviar ejemplares para un lado y otro, o adquirir (comprar) ejemplares en nombre de otros. If a library is configured to do this for libraries at other institutions (and not only within the institution), it is known as a resource sharing library.
See Configuring Parameters of a Resource Sharing Library for more information.
See Adding a Library for more information about configuring libraries.
Configuring SIP2 Bin Rules
- Administrador general del sistema
- Administrador de servicios al usuario
You can configure rules that determine the sort bin for each item returned via a SIP2 (self-check) machine.SIP2 is the Standard Interchange Protocol v2, which provides a standard interface between a library's automated circulation system and a self-check machine. The sort bin is a field in the protocol that determines into which bin (a physical bucket inside the SIP2 machine) that a returned item is placed.. Se puede configurar el campo de conformidad con las reglas según diferentes valores, como clasificación y biblioteca de destino.
For more information on self-check machines, see https://developers.exlibrisgroup.com/alma/integrations/selfcheck.
You configure rules for self-check machine bin usage from the SIP2 Bin Configuration Rules page (Configuration Menu > Fulfillment > Library Management > SIP2 Bin Configuration).
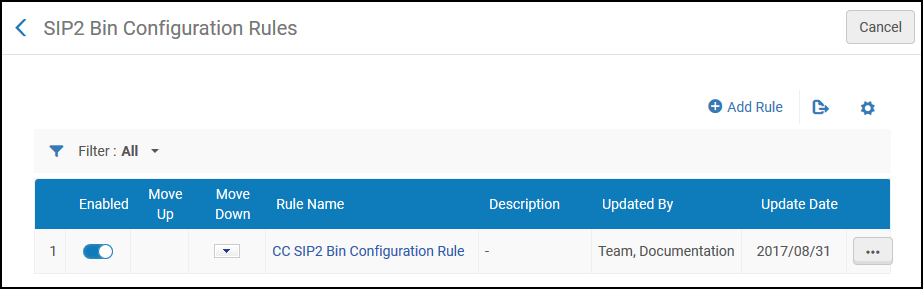
Las reglas de uso de compartimento de las máquinas de autopréstamo se pueden configurar solo a nivel institucional. Select the required institution from the Configuring filter on the Fulfillment Configuration page.
Se pueden efectuar las siguientes acciones en esta página:
- Adding a SIP2 bin configuration rule (see Adding a SIP2 Bin Configuration Rule)
- Editing a SIP2 bin configuration rule (select Edit from the row actions list)
- Deleting a SIP2 bin configuration rule (select Delete from the row actions list)
- Activar o desactivar la regla de configuración SIP2 Bin
Adding a SIP2 Bin Configuration Rule
Se puede añadir una regla de configuración SIP2 Bin.
-
On the SIP2 Bin Configuration Rules page (Configuration Menu > Fulfillment > Library Management > SIP2 Bin Configuration), select Add Rule. Aparece la página Configuración SIP2 Bin.
If you want to create a copy of a SIP2 bin configuration rule, select Duplicate from the row actions list. Una vez que se haya copiado la regla, se puede modificar según sea necesario.
- In the upper Input Parameters section, enter a name and description of the SIP2 Bin Configuration rule.
-
In the lower Input Parameters section, specify the components of the input parameter (Name,Operator, and Value). A set of input parameters may look like this:
Destination Library=ArtLibrary.The available Name field values (that is, the criteria which determine when the SIP2 Bin Configuration rule is to take effect) and their respective values are described in the following table:
Regla de configuración SIP2 Bin - Valores de parámetros de entrada
Nombre Valor Biblioteca de destino La bibliotecas de la institución. For details on adding a library, see Configuring the Institution and Its Libraries. Mostrador de circulación de destino Mostrador de circulación. For details on configuring circulation desks, see Configuring Circulation Desks. Unidades de servicio de destino Departamentos dentro de la institución, como departamentos de órdenes de trabajo y departamentos de digitalización. For details on configuring work order departments, see Configuring Work Order Departments. Desde la signatura The call number from which you specify the rule to take effect when the item's call number is numerically greater than the indicated value. Se solicita Indicates if the resource has been requested (Yes or No). Lexicographical From call number The call number from which you specify the rule to take effect when the item's call number is lexicographically (in other words, alphabetically) greater than the indicated value. Por ejemplo, 2 > 10 > 1 en orden lexicográfico. Lexicográfico a clasificación / signatura The call number from which you specify the rule to take effect when the item's call number is lexicographically (in other words, alphabetically) less than the indicated value. For example, 1 < 10 < 2 in lexicographic order. Refrescar ubicación del ejemplar La biblioteca dentro de la institución donde se quiere volver a colocar el ejemplar en la estantería. For details on adding a library, see Configuring Libraries. Mostrador de circulación de autopréstamo El mostrador de circulación donde se desea realizar el autopréstamo. For details on associating a self-check machine with a circulation desk, see Self-Check Machines. A signatura The call number from which you specify the rule to take effect when the item's call number is numerically less than the indicated value.
The logic of the Lexicographical From call number and Lexicographical To call number parameters is:
- First, try to compare the call number against the rule value as numbers. If this fails e.g., the call number/rule contains non-digit characters, then:
- Extract only the numeric parts from the strings (removing all non-digit and non-dot characters) and compare those as numbers. If this fails as well e.g., no numeric characters are included, then:
- Compare values as strings, regardless of the call number type.
- Select Add Parameter. El conjunto de parámetros internos se añade a la lista de parámetros para la regla de Configuración de ubicación SIP2 Bin.
-
Repetir los dos pasos anteriores para añadir todos los parámetros requeridos para la regla.
Se deben cumplir todos los parámetros de entrada para que se aplique la regla.
- In the Output Parameters section, enter a bin number – the number of the bin in which the self-check machine is to place the item. Comprobar que este número concuerde con el número de compartimento configurado en la máquina SIP2.
- Select Save to store the new rule. La regla se muestra en la página Reglas de configuración de ubicación SIP2 Bin.
- If you have defined more than one rule, use the Move Up and Move Down arrows to set the order of the rules. El orden de las reglas es importante, ya que el sistema aplicará la primera (y solo la primera) regla apropiada.
