
RFIDサポート
RFIDがAlmaで機能するために必要なコンポーネントを設定します。
- 一般システム管理者
RFIDリーダーを使用して、アイテムのバーコードをスキャンしたり、チェックアウトやチェックインの登録を行うことができます。RFID統合プロファイルが追加されると、現在の場所ドロップダウンからロケーションが選択されている間は、メインメニューバーに接続アイコンが表示されます。
RFID対応デバイス
For a list of supported RFID devices, see https://developers.exlibrisgroup.com/alma/integrations/rfid.
For information for other vendors on how they can integrate with Alma (development may be needed on the vendor's side), see https://developers.exlibrisgroup.com/alma/integrations/rfid/information_for_rfid_vendor/
Using RFID to Read an Item Barcode
If the RFID connection is not currently active, it appears as grayed out:
- 接続アイコンを選択して、RFID通信ポップアップウィンドウを開きます。This enables the communication with the reader and must be left open in order to read from or write to the reader.
The connection icon on the menu bar changes to activated
 to show that the connection has been made.アクティブな接続は、ユーザーとデスク/部門ごとに維持されます。新しいデスクに切り替えるときは、接続アイコンを選択して接続を再度アクティブにする必要があります。
- Select the Read RFID icon (
 ) next to the search bar to activate the RFID reader to read the barcode of the item that is currently at the counter, and display the item.
 All input boxes that accept a barcode show this icon as long as the RFID connection is active.これらのボックスは次の場所にあります:スキャンイン、返却アイテム、ユーザーサービス、リポジトリ検索、新規資料の受領、冊子アイテムエディター、クイック目録、永続検索(Alma全体)。Additionally, while on a screen that has the icon to read a barcode, the keyboard shortcut Alt+A, activates the reader to display the listing.冊子アイテムを検索すると、検索結果にRFIDセキュリティステータスが表示されます。When scanning a multi-part item using RFID, if some of the resources have not been scanned, a message will be displayed indicating that not all of the item resources were scanned.RFIDリーダーを使用してアイテムをスキャンおよび貸与すると、RFIDタグのセキュリティビットが無効になります。アイテムを返却すると、セキュリティタグが再度有効になります。
RFID統合プロファイルの設定
- 統合プロファイルリストページ(設定メニュー > 一般 > 外部システム > 統合プロファイル)で、統合プロファイルを追加を選択します。統合プロファイルウィザードの最初のページが開きます。
- Enter a Code and a Name for the profile.
- 統合タイプドロップダウンリストから、RFIDを選択します。
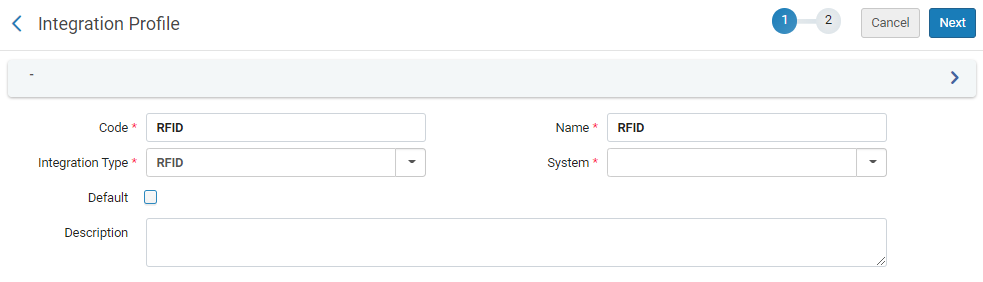 統合プロファイル-ステップ1でRFIDを選択
- システムドロップダウンリストから使用中のRFIDシステムを選択し、 次へを選択します。Supported systems are (see RFID Support):
- Bibliotecha-Liber8Connectリンク
- 3M - 896
- セレット
- Nedap
- その他システムのリストから[その他]を選択すると、システムの詳細を示す、[システムの説明]フィールドが表示されます。
- オプションで、[説明]でプロファイルの説明を追加します。この[デフォルト]フィールドは現在機能していません。
- 次を選択します。ウィザードの2ページ目が開きます。
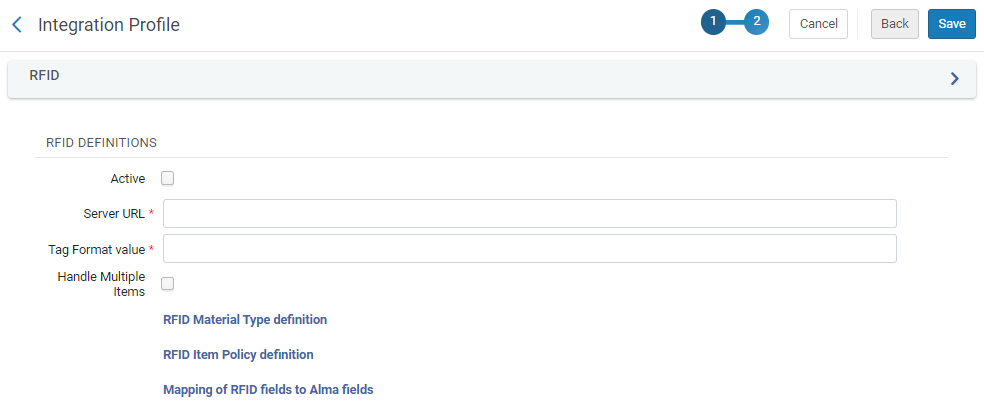 統合プロファイル-ステップ2
- Select the Active checkbox to make this an active RFID definition.Note: the profile is inactive by default.
- サーバーURLで、次のように、ご使用のRFIDデバイスが接続されているRFIDシステムのURLを入力します:
- For 3M™ RFID Staff Workstation (Model 896):http://localhost:5000/TagService
- For Bibliotheca:http://localhost:5000/BibliothecaRFIDPadService.svc
- For Nedap and Seret: If NGINX isn't needed, you can link directly to the RFID driver, e.g.http://localhost:1801
- For Nedap with NGINX:http://localhost:5000/NedapRfidWebService.asmx(and the NGINX on localhost should proxy to the main server)
- For MK Solutions:http://localhost:4039/mkStaffStation_Alma
- For other integrations that support one central server which then proxies the requests to the readers:https://server-address:port/path(must be http s)For additional information, see Alma – RFID Integration in the Developers Network.
- For 3M - 896 only, the Tag Format value field appears.Contact your RFID supplier for the relevant tag format for the device and enter it in this field.
- Select Handle Multiple Items to accept multiple items on the RFID reader.
- If the System(field on the previous page) is Other, the Item Information Update option appears.Select this option to enable Alma to update item information on RFID tags when they are updated in Alma.
- 次の定義を設定および/またはレビューします。
- Nedapシステムはチェックインとチェックアウトにのみ使用され、タグ自体の更新は許可しません。したがって、マッピング定義はNedap RFIDプロファイルでは使用できません。
- When Other is selected in the System field on page 1 of the integration profile, the Item Information Update field appears.この場合、定義はチェックボックスを選択した後にのみ表示されます。
- If IPs need to be configured for the RFID readers, the reader IPs need to be configured on the circulation desk configuration as well, for example when working with Nedap, or with some RFID vendors that integrate with the Alma Other RFID Integration profile type.See Adding a Circulation Desk.
- RFID Material Type Definition (see the Configuring the RFID Material Type Definition section below)
- RFID Item Policy Definition (see the Configuring the RFID Item Policy Definition section below)
- Mapping of RFID Fields to Alma Fields (see the Mapping the RFID Fields to Alma Fields section below)
- 保存を選択します。
For more information on configuring RFID, see https://developers.exlibrisgroup.com/alma/integrations/rfid.
RFID資料タイプ定義の設定
You can map the RFID material type codes used by your vendors to the alphabetic material type codes that you currently have defined in Alma in the RFID Material Type Code Table.RFID資料タイプコードテーブルは、冊子資料タイプコードテーブル定義を使用します。See Configuring Physical Item Material Type Descriptions for more information.
- 統合プロファイルリストページ(設定メニュー > 一般 > 外部システム > 統合プロファイル)で、RFID統合プロファイルを開き、RFID資料タイプ定義リンクを選択します。RFID資料タイプコードテーブルページが表示されます。ネットワーク環境では、ネットワーク内のテーブルの管理オプションが表示されます。
ネットワークでのRFID資料タイプコードテーブルの設定-ネットワークでテーブルを管理ボタン ネットワークでのRFID資料タイプコードテーブルの設定-ネットワーク管理の保存と配布/停止 - In the Create a New Code Table Row section, select one of the existing material type codes from the Code drop-down list, enter the vendor's RFID code for the Description(mandatory), and select Add Row.ベンダーの数値を割り当てたいRFIDリーダーに、各Alma資料タイプの行の追加を続けます。
追加されたRFID資料タイプ行 ドロップダウンリストで提供されるものに加えて、新しい資料タイプを作成する必要がある場合は、冊子資料タイプコードテーブル設定オプションを使用します。See Configuring Physical Item Material Type Descriptions for more information. - Select Customize(or Save if you have previously edited this code table).
RFIDアイテムポリシー定義の設定
You can map the RFID item policy codes used by your vendors to the alphabetic item policy codes that you currently have defined in Alma in the RFID Item Policy Code Table.
- 統合プロファイルリストページ(設定メニュー > 一般 > 外部システム > 統合プロファイル)で、RFID統合プロファイルを開き、RFIDアイテムポリシー定義リンクを選択します。RFIDアイテムポリシーコードテーブルページが表示されます。ネットワーク環境では、ネットワーク内のテーブルの管理オプションが表示されます。
ネットワークでのRFIDアイテムポリシーコードテーブルの設定-ネットワークでテーブルを管理ボタン ネットワークでのRFIDアイテムポリシーコードテーブルの設定-ネットワーク管理の保存と配布/停止 - In the Create a New Code Table Row section, select one of the existing item policy codes from the Code drop-down list, enter the vendor's RFID code for the Description(mandatory), and select Add Row.ベンダーの数値を割り当てたいRFIDリーダーに、各Almaアイテムポリシーの行の追加を続けます。
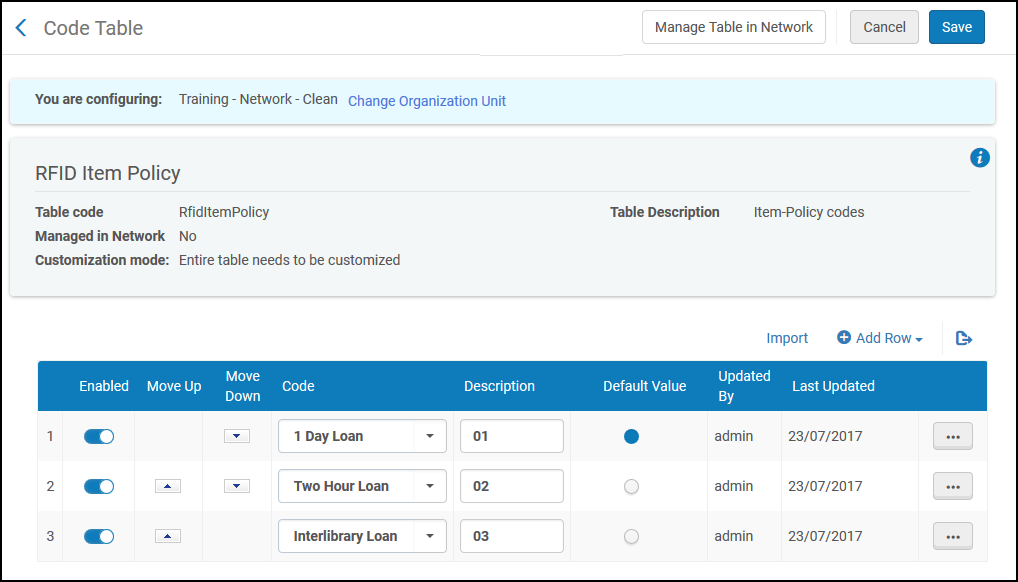
追加されたRFIDアイテムポリシー行 - Select Customize(or Save if you have previously edited this code table).
AlmaアルマフィールドへのRFIDフィールドのマッピング
RFIDフィールドのAlmaフィールドへのマッピングリンクには、RFIDフィールドマッピングテーブルの設定が表示されます。このページの設定により、RFIDタグに書き込まれる情報が決まります。このページから、RFIDタグへの書き込みが有効になっているフィールドを確認できます。さらに、各RFIDタグフィールドにマッピングされた次のAlmaフィールド設定のいずれかを確認できます。
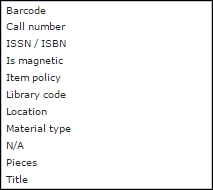
フィールドマッピングをカスタマイズする必要がある場合、RFIDタグに書き込むことができるフィールドをカスタマイズする必要がある場合は、サポートにお問い合わせください。
RFID用の図書館コードの設定
You can map the RFID library codes used by your vendors to the alphabetic library codes that you currently have defined in Alma in the Alma library configuration (navigate to Configuration Menu > General > Libraries section > Add a Library or Edit Library Information, select the Library tab and then select the library to add the code for).
- RFID用コードフィールドは、RFIDコンテンツに書き込みするために設定する必要があります。
- This field is only visible when the RFID connection is active as described in Using RFID to Read an Item Barcode.
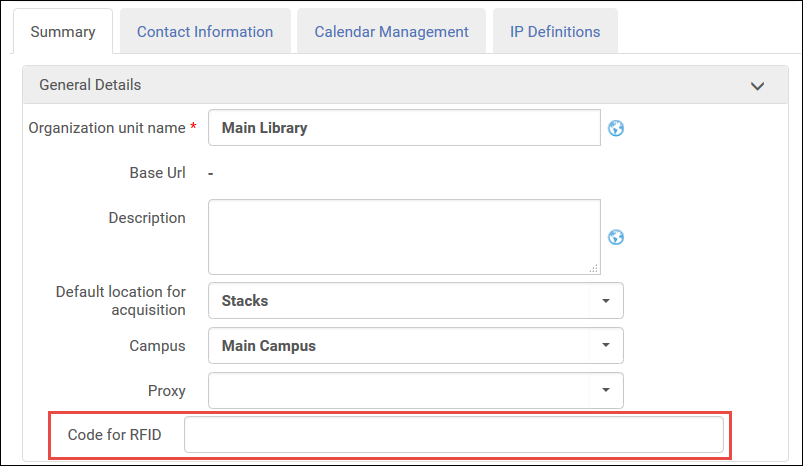
For more information, see Adding/Editing Institution Libraries.
RFID用場所コードの設定
You can map the RFID location codes used by your vendors to the alphabetic location codes that you currently have defined in Alma in the Alma location configuration (Configuration Menu > Fulfillment > Locations > Physical Locations when configuring a specific library).RFIDの場所コードフィールドは、RFIDコンテンツに書き込みするために設定する必要があります。このフィールドは、RFID接続がアクティブな場合にのみ表示されます。
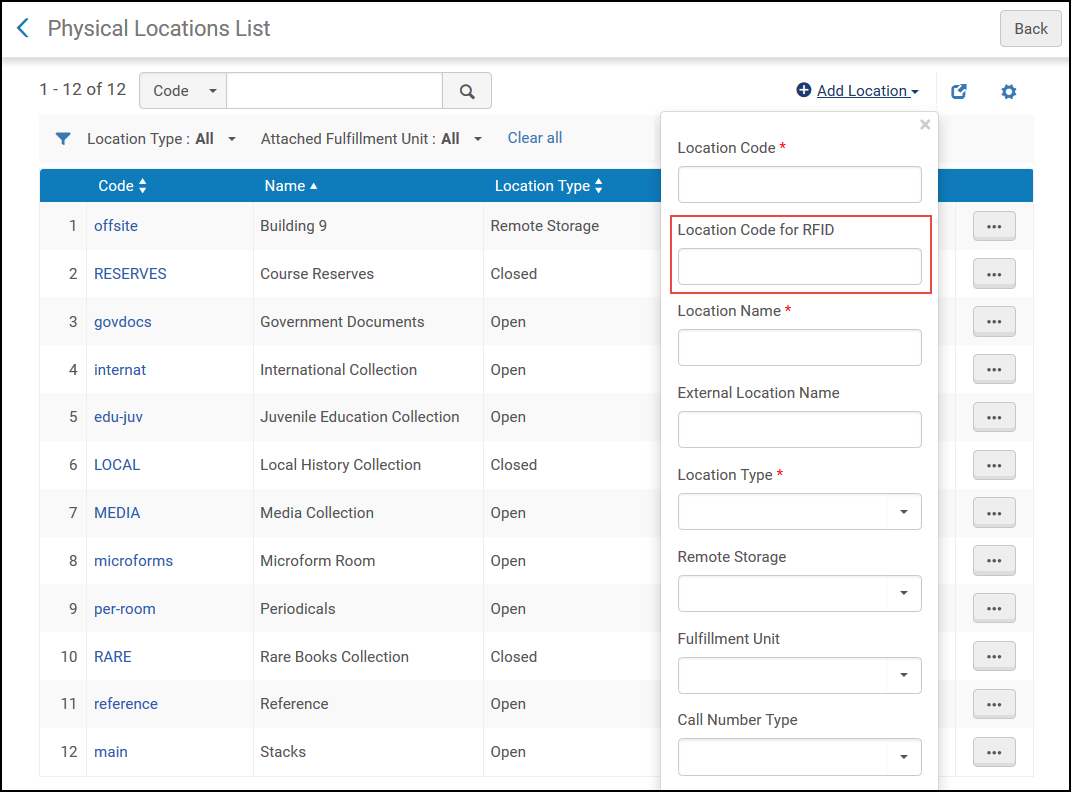
For more information, see Configuring Physical Locations.
取引ログ
接続アイコンを選択すると開くRFID通信ウィンドウを展開して、リクエストと応答のRFID取引アクティビティのリストを表示できます。このログを使用して、RFID通信で失敗した取引を解決します。送信する可能性のあるRFID Salesforceの発行にこのログのコピーを含めます。
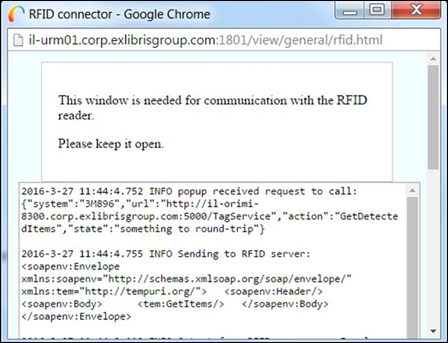
For more information, see https://developers.exlibrisgroup.com/alma/integrations/rfid.
Scanning Multiple Items
When the RFID button is pressed, the items on the RFID pad will be processed.When processing is complete, a summary confirmation popup will appear, detailing how many items were handled successfully, and presenting any alerts that came up during the scan.If all items are successfully processed, a success message is displayed.If an item requires action, the process is paused until you select Confirm or Cancel.Selecting Cancel only stops processing for the specific item.When multi-scan processing is completed, a summary of the processing is provided.アクションが必要なアイテムは、失敗した、またはキャンセルされたアイテムの下に表示されます。注意が必要なアイテムの下に、アクションを必要としないアイテムが表示されます。
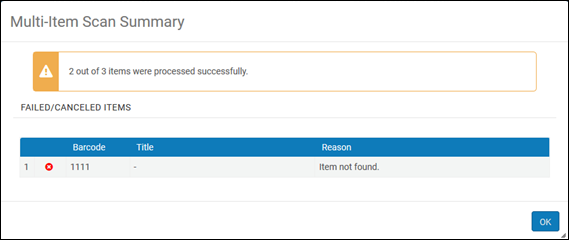
RFIDパッドに単一のアイテムまたは複数のアイテムがある場合、次のページのRFIDボタンを使用できます:
- アイテムをスキャンする
- Scan in items > change item information - On this tab, multiple items can be processed as stated above with the exception of the following circumstances;
- 新しいバーコードが作成されたとき。
- RFID統合プロファイルがアイテムを更新するように設定され、[RFIDの更新]がタブで選択されている場合。
- ユーザーサービスの管理 > [貸与]タブ
- ユーザーサービスの管理 > [返却]タブ
- アイテムを返却する
For Bibliotecha, this is only supported when using staffConnect Link (using the Other type in the integration profile) or D-Tech.For additional assistance with StaffConnect link, contact support-ch@bibliotheca.com.For a list of supported RFID vendors, see Alma - RFID Integration on the Developer Network.
Page tags: article:topicproduct:almacontent:DocumentationRFIDlang:englishConfigure an RFID integration profileConfigure an RFID Material Type DefinitionRFID material typeRFID item policyMap RFID fields to AlmaLibrary codes for RFIDLocation codes for RFIDRFID transaction log
