
Waiving Fines in Bulk Using a Job
Define parameters and run job to remove fines in bulk.
- Gestor de usuarios
- Administrador de usuarios
For more information about managing user fines and fees on the User Details page, see Managing User Fines and Fees. Here, users can select fines and fees across the full fees list and waive them.
For waiving fines and fees on the Manage Patron Services page, see Managing Patron Services at a Circulation Desk.
You can waive user fines and fees in bulk by running a job. You run the job on the Bulk Fine Waiving page (Admin > User Management > Bulk Fine Waiving).
For information on waiving fines and fees, watch User Management Workflows (4:05).
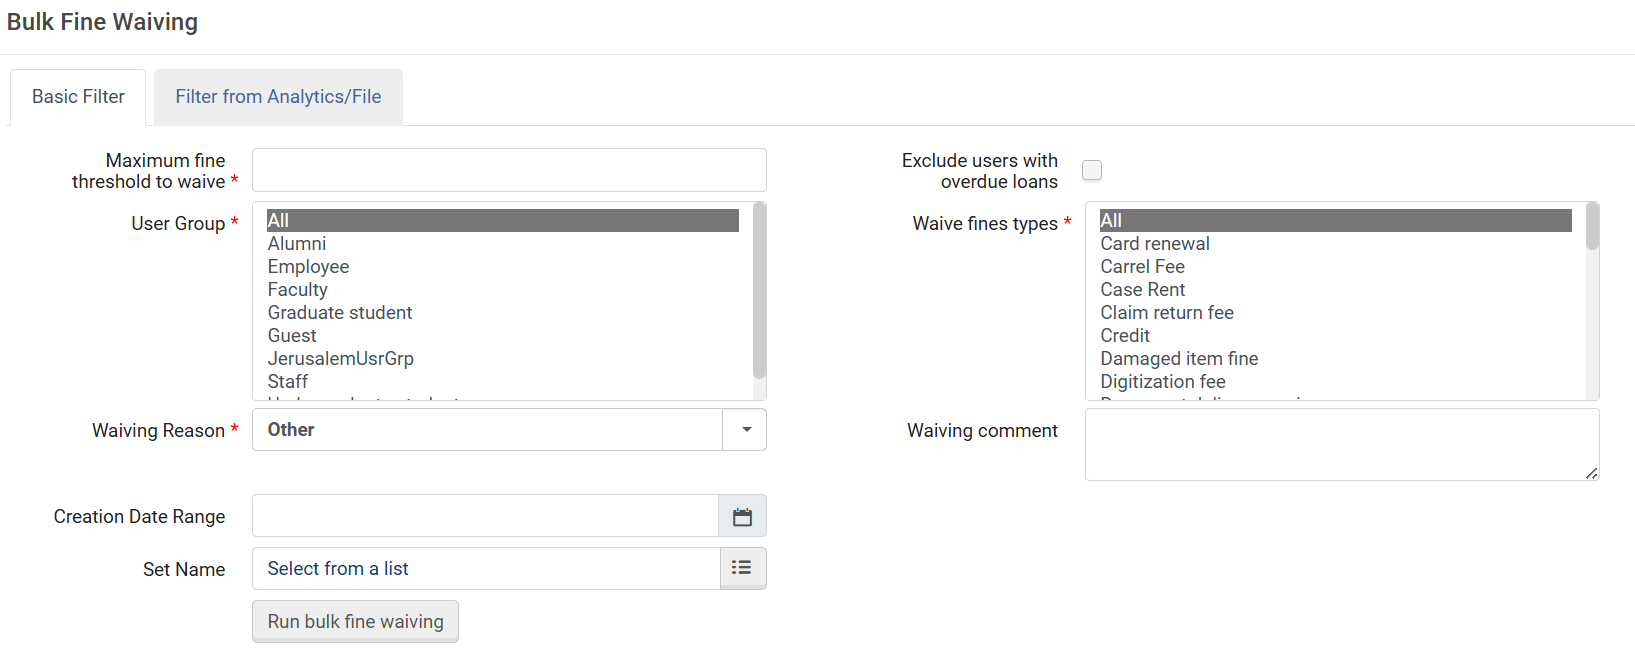
To waive user fines in bulk:
Basic Filter
In the Basic Filter tab, enter the following information:
- Maximum fine threshold to waive – The maximum fine to waive. If the total amount of a user's fines is greater than the threshold, none of the user's fines are waived.
- For example: Since the total of the patron's fines exceeds the Maximum fine threshold to waive value, none of the fines are waived.
- Maximum fine threshold to waive= $120
- El usuario tiene multas de $10, $50 y $70
- For example: Since the total of the patron's fines exceeds the Maximum fine threshold to waive value, none of the fines are waived.
- Exclude user with overdue loans – Whether to exclude users who have overdue loans.
- User Group – Specify user groups for which to waive fines.
- Waive fine types – Specify the types of fines to waive.
- Waiving reason – The reason for waiving the fine. Por ejemplo, puede ser que se quiera condonar la multa acumulada por su facultad.
- Waiving comment – Add a comment as needed. Este campo no es obligatorio.
- Creation Date Range – The fines in the selected date range will be used for waiving, together with the other filtering options that were selected on the page. Este campo es opcional.
- Set Name – Select the Pick-Up button and select a set of users. Las multas para los usuarios del conjunto seleccionado se utilizarán para la condonación, junto con las demás opciones de filtro seleccionadas en la página.
- When you have completed Select Run bulk fine waiving and select Confirm in the confirmation dialog box. Se ejecuta la tarea y la información sobre la tarea aparece en la página. Select Refresh to monitor the progress of the job. Also see Viewing Running Jobs and Viewing Completed Jobs.
Filter from File
In the Filter from Analytics/File tab, select From File and enter the following information:
- File – Upload a file that contains the relevant fines. El tamaño máximo del fichero es de 10 MB. The imported file must be a text file (.txt or .csv and the files must be encoded as UTF-8) or Excel file (.xls or .xlsx).
For the data to be read, it must have the FINE FEE ID Header at the top of the column. This header can also be with hyphens, i.e.,FINE-FEE-ID or with underscores, i.e.,FINE_FEE_ID. Si el fichero de Excel posee más de una columna, busca la primera columna de datos que posea un tipo de encabezado válido. The ensuing cells of the Header column must contain the fine identifiers. Below is an example: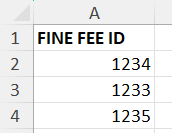 When uploading a .txt file, the first row must contain the FINE_FEE_ID header, and the ensuing rows must contain the fine identifiers (each separated by a carriage return, a commaor an apostrophe).
-
Si se realiza una importación con datos inválidos, cada celda inválida será ignorada.
- Waiving reason – The reason for waiving the fine. Por ejemplo, puede ser que se quiera condonar la multa acumulada por su facultad.
- Waiving comment – Add a comment as needed. Este campo no es obligatorio.
- When you have completed Select Run bulk fine waiving and select Confirm in the confirmation dialog box. Se ejecuta la tarea y la información sobre la tarea aparece en la página. Select Refresh to monitor the progress of the job. Also see Viewing Running Jobs and Viewing Completed Jobs.
Filter from Analytics
-
Esta función solo funciona con informes, no con tableros ni visualizaciones de datos.
-
Los informes deben estar en una carpeta compartida para que esta característica funcione.
-
The Analytics report must contain a Header with a valid field for creating the report. In this case, the Header must be the Fine Fee ID.
In the Filter from Analytics/File tab, select From Analytics and enter the following information.
- Analytics folder – Select the folder.Recent reports – Reports that were recently used in the Bulk Fine Waiving screen (not recently-created reports in Analytics). Select the report from the Name field.My Reports – Reports to which you have permissions to access (see Analytics Object List). Seleccione el informe del campo Nombre.
- Name – Enter a name for the report. Los nombres de los informes no pueden contener un carácter especial, de lo contrario, aparecerá el mensaje de error "Error al conectar con Analytics".
- When you have completed Select Run bulk fine waiving and select Confirm in the confirmation dialog box. Se ejecuta la tarea y la información sobre la tarea aparece en la página. Select Refresh to monitor the progress of the job. Also see Viewing Running Jobs and Viewing Completed Jobs.
