
Managing Users
This page describes how to manage users including adding, editing, deleting and distributing users. For information on working with user roles (including user profiles) see Managing User Roles.
Para gestionar usuarios se debe tener uno de los siguientes roles:
- Gestor de usuarios
- Administrador de usuarios
- Gerente del mostrador de circulación
- Operador del mostrador de circulación
Los usuarios con el rol de Administrador de servicios al usuario pueden ver la información del usuario descrita a continuación, pero no pueden editarla.
You manage users on the Find and Manage Users page (Admin > User Management > Manage Users). You can also access this page by searching for a user in the persistent search; see Searching in Alma.
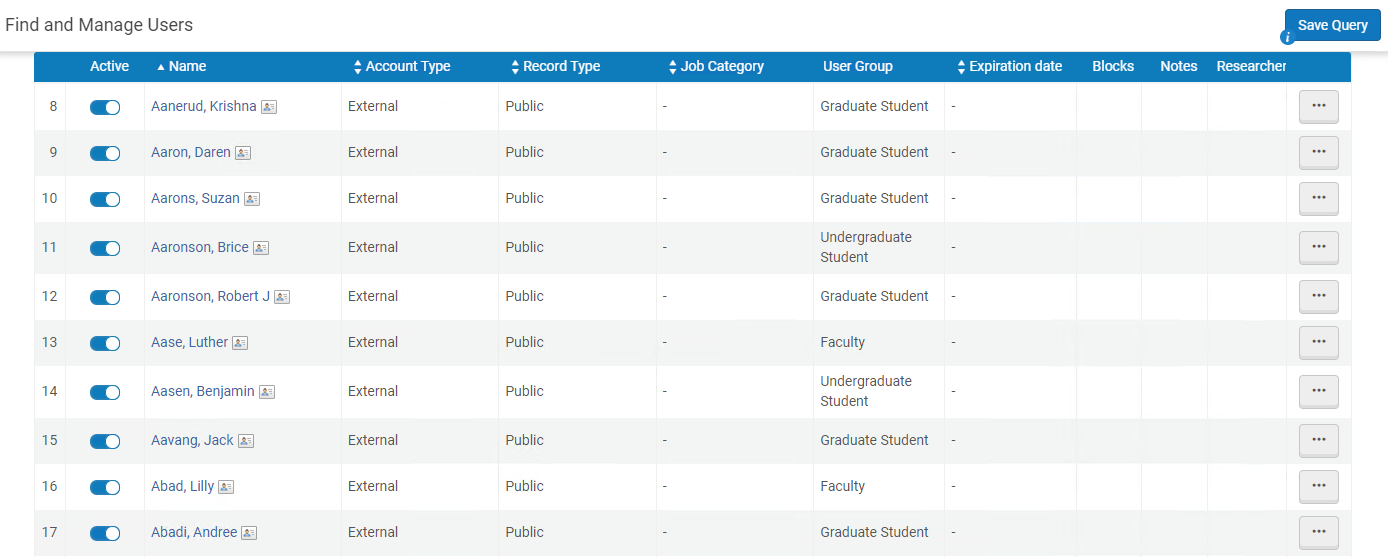
For information on finding and editing existing users and adding new users, watch the Users in Alma video (4:33 min).
Use the tabs (Staff, Public, Contact, and All) to filter the user list according to user record type.
- When searching for Email or Identifiers, you must enter the entire string; a partial match is not performed.
- For additional information on managing users in a collaborative network, see Centrally Managing Users in a Network Zone.
Use Account, Role, and Status filters within a tab to further filter the user list:
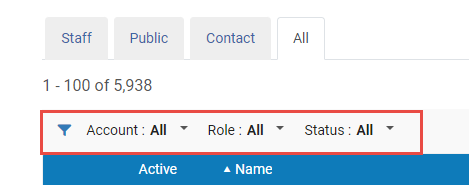
- Account filter - filter the user list to display only; a)External, b)Internal, c)Internal with external authentication, and d)All users.
- Role filter - filter the user list to display only the users with a specific role, i.e. Catalog Administrator, and so forth.
- Status filter - filter the user list to display only users with the following statuses; a)All, b)Active and not expired, c)Not active or expired.
The following columns appear on this page.
| Nombre de columna | Descripción |
|---|---|
| Activas | Los nuevos usuarios se activan automáticamente.
Marking a user as not active is equivalent to blocking the patron account. Por ejemplo:
|
| Nombre | El nombre del usuario. Select this link to open the User Details page (see Editing Users). |
| Tipo de cuenta |
|
| Tipo de registro (Todas las pestañas solo) | El tipo de usuario. See Adding Users for more information about this field.
|
| Categoría de tarea | The user's job category; see Configuring Job Categories. |
| Grupo de usuarios (no en la pestaña de Contacto) | The user's user group; see Configuring User Groups. |
| Estado | Whether the user is Active or Inactive. For internal users, who are authenticated by Alma, this is a manual setting not tied to the expiration date. For more information about authentication, see Expiration Date below. |
| Expiration Date | Alma distingue entre autenticación, que es el acto de determinar si el usuario es un usuario legal, y autorización, que es el acto de definir lo que el usuario podrá realizar en el sistema:
Expiration date may impact the due date of the loan. The due date is shortened to the patron's expiry date. This can be configured using the extend_due_date_beyond_user_expiry parameter. If a patron is nearing her expiration date, the due date of the loan is automatically set as the expiration date, and cannot be changed manually. See also the knowledge articleIs it possible to change an item due date past the user expiration date in Alma? The User Registration Terms of Use (see Configuring Terms of Use) enable you to configure the User Renewal Period policy and other policies associated with how patrons are registered at the circulation desk. For more information, see Configuring Terms of Use. After you define the User Registration Terms of Use, assign the Terms of Use for each user group (see Configuring User Registration Rules). No es posible establecer fechas de vencimiento en el pasado. |
| Sanciones (no en la pestaña de Contacto) | Si hay cualquier sanción para el usuario. |
| Notas | Si hay cualquier nota sobre el usuario. |
You can do the following on the Find and Manage Users page:
- Adding Users
- Editing Users - This action is typically required immediately after adding a new user.
- Deleting Users - Only the User Manager or User Administrator Roles can delete users.
- Distributing Users
Los usuarios que hayan introducido su contraseña incorrectamente cinco veces seguidas son bloqueados en Alma y desbloqueados automáticamente después de 30 minutos.
Las tareas de gestión de usuario suplementarias incluyen:
Adding Users
Se puede añadir usuarios nuevos desde cualquiera de las pestañas en la página Buscar y gestionar usuarios.
- External users are synchronized with Alma using the User integration profile.
- When creating a patron by selecting Register New User on the Manage Patron Services page (see Registering Patrons), it is possible to register external users as well.
- Todos los identificadores primarios y adicionales deben ser únicos para los usuarios, incluso para el mismo usuario.
- When adding new users from Find and Manage Users, the Role Assignment Rules are applied (see Configuring Role Assignment Rules).
To add a new user:
Note that Circulation desk managers and operators can only add users by using the Register New User option in the Manage Patron Services page (see Registering New Patrons).
- On the Find and Manage Users page (Admin > User Management > Manage Users), select Add User.
Aparecerá la página de Gestión rápida de usuarios
- On the All tab, you are prompted to select the record type (Staff,Public, or Contact).
Contact is reserved for vendor contacts and should not be used.
- On any other tab, the record type is set according to the tab.
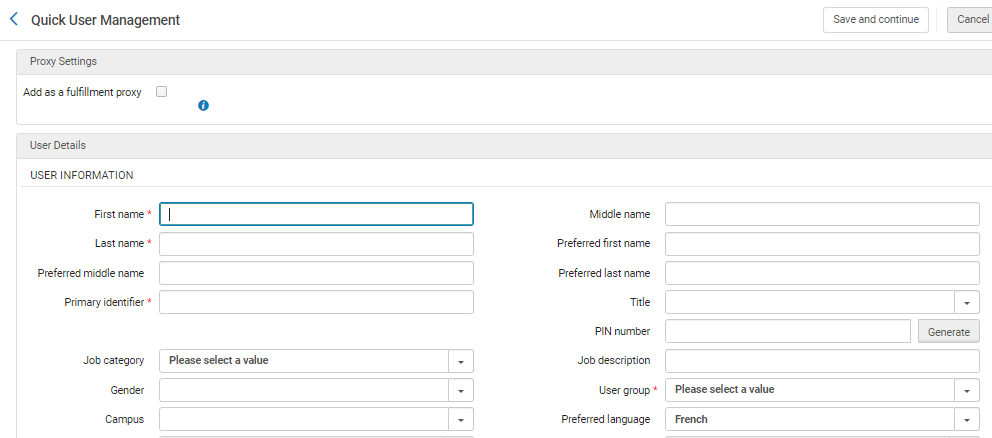
- On the All tab, you are prompted to select the record type (Staff,Public, or Contact).
- Introducir la siguiente información: The fields marked as mandatory in the following table are by default; an administrator can configure which fields are mandatory (see Configuring Patron Information).
An Authorized for resource sharing requesting checkbox is visible for institutions that use Rapido when new users are created. For more information, see Enabling Self Registration for Partners.
Quick User Management Page Fields
Sección Campo Descripción Ajustes de proxy Añadir como Proxy de servicios al usuario Si se selecciona esta opción, se creará un nuevo usuario como proxi de servicios al usuario. Todas las solicitudes de este usuario y los préstamos que este retire se asociarán con el usuario patrocinado. No local Encontrar un usuario en otra institución See Registering Patrons. User Information To configure how user names appear in Alma, see Configuring the Display of User's Names
First / middle / last name El nombre y los apellidos son obligatorios. Nombre/ segundo nombre/ apellidos preferidos Preferred names replace the main first/middle/last names in all places that the name appears within Alma, for example, letters, Manage Patron Services, and the Active Hold Shelf. Una búsqueda por nombre encuentra tanto las entradas regulares como preferidas. For example, a search for the last name finds both the Last name and Preferred last name values. Ambos se indexan bajo apellido.
For information about using preferred names in system notifications and letters, see Working with Names in System Notifications and Letters.
Los campos de nombres preferidos son editables por usuarios internos similares a los otros campos de nombres. Para usuarios externos, los campos de nombres preferidos son actualizados por el sistema SIS y pueden actualizarse manualmente. For more information, see the SIS details provided in the Ex Libris Developer Network.
Identificador principal (obligatorio) ID primario de usuario La ID debe ser única dentro de la institución. For details on identifiers, see https://developers.exlibrisgroup.com...user-management. Se puede exigir introducir un identificador primario en un formato determinado. See the parameter primary_identifier_regex in Configuring Other Settings.
If you arrived at this page by selecting Register New User on the Patron Identification page, this field is pre-filled if you have configured user ID generation; see Configuring User ID Generation. Se puede cambiar una ID pregenerada.
Título Un título de usuario. These can be configured by an administrator; see Configuring User Titles. Número PIN A four-digit number which serves as a password for the user to log on to the self-check machine (SIP2); see Configuring SIP2 Bin Configuration. Manually enter a number or select Generate to generate a PIN number. El número de PIN se envía en la Carta de generación de número de PIN. PIN number generation is available only if the pin_number_method parameter is enabled and set to fourDigit. For information, see Configuring Other Settings.
Categoría de la tarea The user's job category. Por ejemplo, Operador de adquisiciones, Catalogador o Gestor. Las categorías de tarea disponibles dependen del tipo de registro seleccionado (parte superior). To configure job categories, see Configuring Job Categories. To associate job categories with record types, see Mapping Job Categories to User Record Types.
If the job category is associated with role assignment rules (see Configuring Role Assignment Rules), then the role profiles associated with the job category are added to the user after you select Save. De esta forma, las categorías de tarea permiten asignar múltiples roles a un usuario a la vez, a fin de que no se deba configurar los roles para el usuario individualmente.
Descripción de la tarea A free text description of the user's responsibilities. Gender (Obsolete) El género del usuario. User group (not required for Contacts) The user's user group, such as Faculty, Patron, and so forth. Los grupos de usuario disponibles dependen del tipo de registro seleccionado (parte superior). To configure user groups, see Configuring User Groups. To associate user groups with record types, see Mapping User Groups to User Record Types.
If the user group is associated with role assignment rules (see Configuring Role Assignment Rules), then the role profiles associated with the user group are added to the user after you select Save. De esta forma, los grupos de usuario permiten asignar múltiples roles a un usuario a la vez, a fin de que no se deba configurar los roles para el usuario individualmente.
Campus El campus del usuario. See Managing Campuses. URL del sitio web Sitio web del usuario, si hubiera. Idioma preferido El idioma para la correspondencia por correo electrónico. Para correspondencias por correo electrónico que deben ser enviadas en el idioma seleccionado, el idioma debe estar activado en la Tabla de asignación de idiomas. For details, see Configuring Institution Languages. Estado (solo editar) El estado activo o inactivo del usuario. Fecha del estado (solo editar, solo lectura) Fecha del último cambio de estado del usuario. Fecha de nacimiento La fecha de nacimiento del usuario. Fecha de caducidad La fecha estimada en la que el usuario se espera que abandone la institución. For more information, see Expiration Date. Fecha de purga La fecha en la que el usuario será purgado. See Purging Users.
No es posible establecer fechas de purga en el pasado.
Last Patron Activity Date La última fecha en que se ejecutaron las actividades seleccionadas. Cuando la función está activada, este campo se actualiza cuando se ejecuta cualquiera de las siguientes actividades:
- Colocar una solicitud de cualquier tipo: espera, reserva, digitalización, adquisición, recursos compartidos
- Tomar en préstamo un ejemplar (todos los flujos de trabajo, incluidos autopréstamo / API)
- Devolver un ejemplar (todos los flujos de trabajo, incluidos autopréstamo / API)
- Renovación de préstamo (excepto renovación automática), o solicitud de renovación (para préstamos de recursos compartidos)
- Actualizar información de usuario desde Primo
Las siguientes actividades NO actualizan este campo:
- Using the Pay button on the Manage Patron Services page
- Cancelar una solicitud en Alma o Primo
- Solicitud de Compra del Usuario enviada desde Primo
Debido a cuestiones de privacidad, solo se recopilarán los datos partir de la activación de esta función. Si esta opción esta deshabilitada, se eliminarán todos los datos recopilados en este campo para todos los usuarios.
To enable this option, select yes in the Record Last Patron Activity Date page.
Watch the Last Patron Activity Date video (1:36 min).Biblioteca de recurso compartido Una biblioteca de intercambio de recursos responsable de las solicitudes de intercambio de recursos iniciadas por este usuario. Solo las bibliotecas definidas como bibliotecas de intercambio de recursos aparecen en la lista. (To configure resource sharing libraries, see Configuring Parameters of a Resource Sharing Library.) You can select one or more resource sharing libraries in this multi-select field.
When multiple resource sharing libraries are selected, they appear in the For library field on the Primo Get it tab, according to the ill_item_creation_lib_code parameter (see Configuring Other Settings).
When no value appears in this field, the default library specified in the ill_item_creation_lib_code value is used.
Cuando se modifique este campo para un usuario existente, el valor nuevo del campo no es anulado durante una actualización de la API SIS/Usuario.
Solicitud de compra de biblioteca Una biblioteca responsable de solicitudes de compra iniciadas por el usuario. Se puede seleccionar una o más bibliotecas en este campo de selección múltiple. Cuando se seleccionen bibliotecas, estas aparecen en el formulario de solicitud de compra Primo en la pestaña Obtener. Nivel de catalogador El nivel de catalogador. This field appears only if cataloging permissions are enabled for your institution; see Cataloging Privileges. Selected Patron Letters Que el usuario acepte o no las notificaciones. Seleccionar o desactivar las casillas de verificación al lado de cada notificación que se quiere activar o desactivar para el usuario. For more information, see Configuring Library Notices Opt In. Las cartas de investigación aparecen solo si su institución está habilitada para Esploro. See Managing Researchers in the Esploro documentation.
Enviar una carta de invitación de inicio de sesión social See Social and Email Login. Información de la gestión de usuario (no obligatorio) Patron has institutional record (appears only after selecting Register New User on the Patron Identification page) See Registering Patrons. Contraseña A user's password for Alma, Leganto, and/or Primo (see https://developers.exlibrisgroup.com...user-management). Mientras esta contraseña no sea cambiada en la cuenta Primo, sigue siendo válida para ambos, Alma y Primo. Cualquier texto que se introduzca aquí no será mostrado, así que se debe introducir la contraseña con mucha atención. Las contraseñas son opcionales para usuarios internos. Verificar contraseña Introducir la contraseña otra vez para verificar que se haya introducido correctamente. Forzar un cambio de contraseña al inicio de la siguiente sesión Una vez seleccionada, los usuarios deben cambiar su contraseña la próxima vez que inicien sesión en Alma (solo pertinente para Alma). Activar la autenticación multifactor Añadir autenticación multifactor para este usuario. This checkbox only displays if the mfa_for_alma_hep parameter is enabled (see User Settings). For more information on MFA see Ex Libris Identity Service. User Identifier (this section appears if Identifier 1 is selected as a mandatory field for this record type; see Managing User Identifiers) Tipo de identificador (obligatorio) Seleccionar el tipo de identificador de usuario. Valor (obligatorio) El identificador de usuario. The following fields that appear on the Quick User Management page when adding a user appear in the Contact Information tab when editing a user. Direcciones de correo electrónico Tipos de correo electrónico (obligatorio) Se debe introducir una dirección de correo electrónico. Seleccionar un tipo de dirección de correo electrónico: - Alternativo (solo personal/público)
- Demanda (solo contacto)
- Pedido (solo contacto)
- Pago (solo contacto)
- Devoluciones (solo contacto)
- Personal
- Obra
- Escuela (solo público)
Dirección de correo electrónico (obligatorio) La dirección de correo electrónico del usuario. Se puede exigir que se introduzca una contraseña en un formato determinado. See the parameter email_regex in Configuring Other Settings. Direcciones Tipos de dirección Seleccionar un tipo de dirección de correo electrónico: - Demanda (solo contacto)
- Pedido (solo contacto)
- Pago (solo contacto)
- Devoluciones (solo contacto)
- Inicio
- Obra
- Alternativo (solo público)
- Escuela (solo público)
- Dirección postal - Se puede exigir que se introduzca una dirección en un formato determinado. See the parameters address_lineX_regex in Configuring Other Settings.
- Ciudad
- Estado/Provincia
- Código postal - Se puede exigir que se introduzca un código postal en un formato determinado. See the parameters postal_code_regex in Configuring Other Settings.
- País
Número de teléfono Tipos de teléfono Seleccionar un tipo de numéro de teléfono: - Inicio
- Móvil
- Oficina
- Fax de reclamaciones (solo contacto)
- Teléfono de reclamaciones (solo contacto)
- Fax de pedidos (solo contacto)
- Fax de pagos (solo contacto)
- Teléfono de pagos (solo contacto)
- Fax de devoluciones (solo contacto)
- Teléfono de devoluciones (solo contacto)
- Fax de oficina (solo personal/público)
Número de teléfono El numero de teléfono del usuario. Se puede exigir que se introduzca un número de teléfono en un formato determinado. See the parameter phone_regex in Configuring Other Settings. - Select one of the following options: In either case, continue configuring user details as described in each of the following topics.
Si se añade un usuario con el mismo nombre, apellido y la misma fecha de nacimiento que un usuario que ya existe, aparecerá un mensaje de advertencia.
- Select Save or Save and Continue. El usuario nuevo se guarda y se vuelve a la página Buscar y gestionar usuarios. Continue with editing the user; see Editing Users.
- Select Save and Continue. El usuario se guarda y se continua con la edición de usuario. See Editing Users.
Editing Users
Editar usuarios inmediatamente después de añadirlos o por cualquier otra razón. You edit users on the Find and Manage Users page (Admin > User Management > Manage Users).
- Para usuarios internos, se pueden editar todos los campos de registro de usuario.
- Los usuarios externos se actualizan en un sistema externo, como el SIS (Sistema de información de estudiantes). Para usuarios externos:
- Solo se pueden editar ciertos campos en la pestaña de Información general de la página de Detalles de usuario.
Las actualizaciones posteriores del SIS no anulan los cambios en los campos de Información general que están editados. You can select the original value option from the drop down of selectable values if you would like to revert a changed field and re-synchronize it with the value that is managed in the SIS system. Esta opción aparece solo si el campo se cambia manualmente del valor proporcionado por la fuente SIS. Manually changing the field value to the value that is stored in the SIS has the same effect of re-synchronizing the field with future updates from the SIS.
- Se puede añadir la información de contacto en la pestaña de Información de contacto, pero no se puede editar en ella información.
- Solo se pueden editar ciertos campos en la pestaña de Información general de la página de Detalles de usuario.
- To edit users in bulk, see Editing/Messaging Users in Bulk.
For an in-depth explanation of internal and external users in Alma, see https://developers.exlibrisgroup.com/alma/integrations/user-management.
To edit user information:
- On the Find and Manage Users page, select Edit in the row actions list or select the user's name. The User Details page appears.

- If the patron has a social account attached, select Detach from Social Account to disassociate the social login from the patron.
- To distribute the user in a Network Zone, see Centrally Managing Users in a Network Zone.
- To enable editing other fields of external users, select Open for Update, and select Yes. Edit the relevant fields and select Save. Téngase en cuenta que las modificaciones efectuadas en la mayoría de los campos se perderán después de la siguiente tarea de sincronización SIS. However, Alma prompts you to determine whether the following fields will be overridden with the next SIS synchronization job:Title, PIN number, Job category, User group, Campus, Preferred language, Resource sharing libraries, Cataloger level, Selected patron letters. (Téngase en cuenta que esta determinación se mantiene para uso interno y no se exterioriza en el registro de usuario de ningún modo.)
-
To change an internal user to an external user (and vice versa), select Toggle Account Type.
When toggling an account from internal to external, the owner is set to SIS_temp. Este es un código que se utiliza para marcar la próxima tarea de sincronización de usuario para actualizar el registro. Only users with the User Manager or User Administrator roles can toggle accounts.
- Edit the required information in the General Information tab. For information about most of the fields on this page, see Adding Users.
- Website URL - The user's website.
- Status- Whether the user is Active or Inactive.
- Status date- The date on which the user was registered or the date of the user's last status change.
Send Message- Select the type of message you'd like to send.
Operators with Can't edit restricted users configured are not able to send an Email to a user account defined as restricted for editing. For more information, see Restricting Users for Editing.
Las opciones que se puede elegir son (cualquier otra opción, tales como una opción de proveedor de identidad, para uso futuro):
General mail- This sends a general message. Select Compose to open the E-mail Message pop-up window, where you can write an email to send to the user with any questions, issues, or notifications. Fill in the fields and select Send E-Mail to send the message. (For more information on the letters, see Configuring Alma Letters. To configure the default From: address of this email, see the parameters disable_from_address and from_address in Configuring Other Settings. To send emails to users in bulk see Editing/Messaging Users in Bulk.)
The General mail letter does not appear in General > Letters > Letters Configuration, with no additional configuration changes options. The letter ILL Email to User needs to be activated for the General mail function to work. Esta carta no es personalizable.
Patron personal information mail- This sends an email with an attached file containing the complete XML record of the data stored about the patron in their user accounts, including attachments. El mensaje se envía al correo electrónico preferido del usuario. The email letter itself is the Personal Information Letter.
In order to send a Personal Information Letter to a patron, the parameter Send Patron Information Letter must be enabled under Circulation Desk roles'. The parameter Send Patron Information Letter is activated for users with a Circulation Desk role by default. If it is not activated or you wish to deactivate it, open a ticket with Ex Libris support.
- Social Login Mail- This sends a letter containing information to activate login to Primo/Alma with a social network. Esta opción aparece si un perfil de integración es definido para una red social. La carta usada es la Carta de invitación de inicio de sesión social. For more information on this integration profile, see Configuring Integration Profiles.
- Created By - The staff user or process (e.g. SIS job, APIs) that created this user.
- Updated By - The staff user or process (e.g. SIS job, APIs) that last updated this user.
- Disable all login restrictions - Select to disable login restrictions by IP range. Esta casilla de verificación puede desmarcarse automáticamente y ser de solo lectura, en función de las opciones seleccionadas en la página Configuración de restricciones de inicio de sesión. For more information, see Restricting Alma Logins by IP Range.
- Allow Ex Libris Simulated Login - Give permission to Ex Libris to simulate login for this user. This checkbox only appears when the allow_exl_to_login_as_staff_users option is enabled (see Configuring Other Settings for User Management).
User Roles - See Adding Roles to Users
The Created By and Updated By fields have been moved to an information box that is accessed by selecting the
 icon on the top right corner of the page. The information box also includes Created Date,Last Updated Date, and Last Updated by Job. The Last Updated Date is updated when making a change to the user's details in the General Information tab, and also when adding a note in the user's Notes tab or a block in the Blocks tab
Los siguientes campos/opciones complementarios aparecen al editar un usuario.
- Editar la información en las siguientes pestañas:
- Contact Information – See Managing User Contact Information.
- Identifiers(not available for Contact users) – See Managing User Identifiers.
- Notes – See Managing User Notes.
- Blocks(not available for Contact users) – See Blocking and Unblocking Users.
- Fines/Fees(available only for users with the Patron role) – See Managing User Fines and Fees.
- Statistics – See Managing User Statistics.
- Attachments – See Managing User Attachments.
- Proxy For – See Managing Proxy Users
- History- See Viewing Changes to the User Record.
- If the user has the Patron role, select Manage Fulfillment Activities to access the Patron Services page. Actions like loan, return, or pay a fine are not available when viewing Manage Fulfillment Activities via User Management. For details on patron services, see Managing Patron Services. Select Back to close the Patron Services page and return to the User Details page.
- To edit the user picture, see Managing User Pictures.
- If you made changes in the General Information tab, selecting Save is required to have the changes saved. You are then returned to the Find and Manage Users page. Changes made to other tabs in the User Details screen are automatically saved in Alma.
- Cambios realizados en otras pestañas
- The Identifiers and Blocks tabs are not available for Contact users.
- The Fines/Fees tab is available only if the user has been assigned the Patron role (see Managing User Roles).
- Demerits information appears only when enabled by Ex Libris and only for the following roles: Circulation Desk Operator, Circulation Desk Operator - Limited, Circulation Desk Manager, Fulfillment Services Operator, Fulfillment Services Manager, Fulfillment Administrator. To enable demerits information, contact Ex Libris Support. For more information on demerits, see Configuring Demerits.
Managing User Contact Information
You can manage user contact information, including addresses, phone numbers, and email addresses, on the Contact tab of the User Details page. Las direcciones son usadas cuando se recibe el material (como por ejemplo, en una solicitud de recursos compartidos). Para tipos de registro de Contacto, como mínimo debe añadirse un número de teléfono. Phone numbers marked as Preferred SMS receive SMS notifications. Para usuarios del Personal y Públicos, debe añadirse una dirección de correo como mínimo. Email addresses are used for receiving Alma letters (see Configuring Alma Letters).
Alma can send emails to multiple recipients simultaneously - for example, emails addressed to under-aged patrons can also be sent to their legal guardians. To enable this, Alma supports a "CC address" email type for public and staff type users only. When an email is sent to the patron, it is sent to all of the CC addresses, in addition to the address that is marked as Preferred. Note that you can indicate an email address as both a CC address and a different type of address (Alternative, Personal or Work). However, other types of email address do not have any functional implication, thus indicating them as such is for information only.
- Users can also be configured to receive email notifications that are sent after a scheduled job runs. Se pueden configurar las notificaciones que se enviarán a los usuarios de Alma o las direcciones de correo electrónico introducidas de forma manual. For information, see Configuring Email Notifications for Scheduled Jobs.
Cuando los usuarios actualizan su dirección a través de Mi cuenta de Primo, el cambio solo se aplica a las direcciones internas y preferidas:
- Si la dirección preferida es externa, el sistema creará una nueva dirección interna y la establecerá como la preferida.
- Si la dirección preferida ya es interna, simplemente se actualizará dicha dirección.
If you have multiples of one type of contact information, you can designate one of them as Preferred, which makes it the default. En algunos casos, Alma usa automaticamente el contacto por defecto. You must set one email address to Preferred in order for the user to receive letters from Alma. On some pages, you can select a non-default contact.
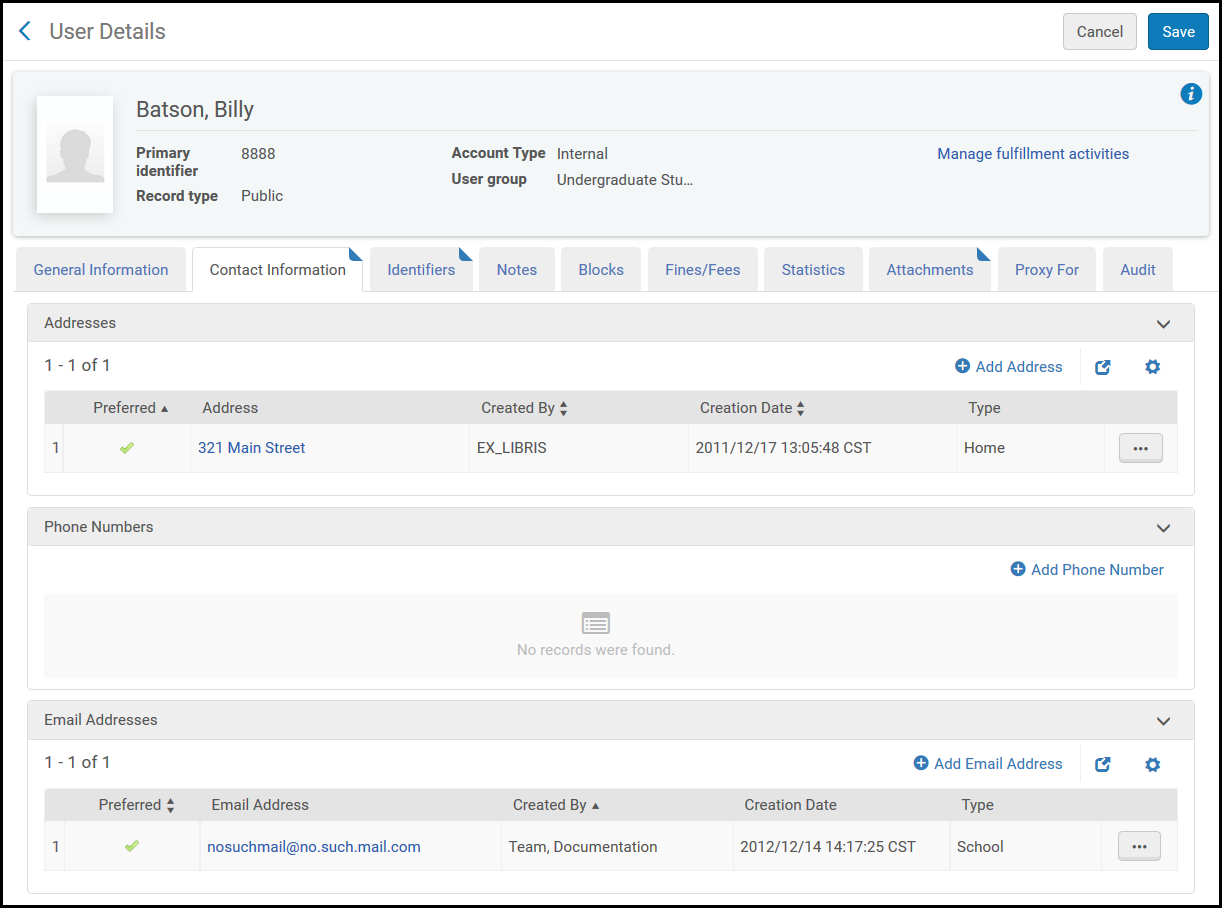
- In the Contact Information tab of the User Details page (Admin > User Management > Manage Users), select Add Address, Add Phone Number, or Add Email Address. Se abre el cuadro de diálogo pertinente.
- Introducir los detalles de contacto, según sea necesario.
Note that you can set the address, phone number, and email address as preferred in this step, as shown below:
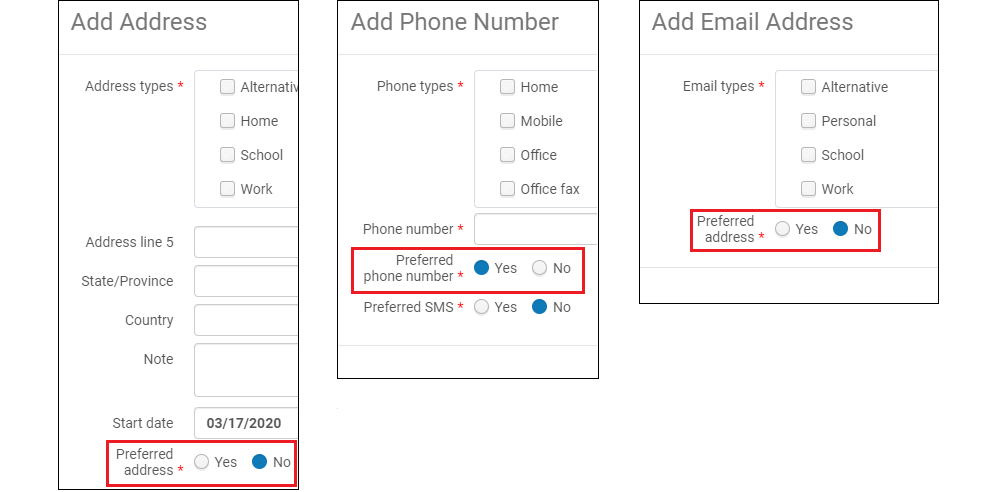
Note that the Start date and End date are for informational purposes only. The Start date is the date from which the address is relevant and the End date is the date after which the address is no longer relevant.
When working with an external user, the Add as an external checkbox appears. Seleccionar la opción para añadir información de contacto como datos externos que son sobrescritos durante la sincronización SIS. Si no se selecciona la casilla de verificación, las informaciones de contacto son añadidas como datos internos y no serán sobrescritas durante la sincronización SIS. For more information, see https://developers.exlibrisgroup.com/alma/integrations/user-management/sis. Internal fields cannot be turned into external – they need to be removed instead.
- Save the details to the Contact Information tab as follows:
- Select Add to save the details and add additional entries.
- Select Add and Close to save the address details and exit the dialog box.
When saving external data, a green check mark appears in the External Data column.
Para editar, duplicar o borrar la información de contacto, seleccionar la acción pertinente en la lista de acciones de fila.
Managing User Identifiers (Tab)
The Identifiers tab is not available for Contact users.
Además de un identificador principal, puede asociarse cualquier identificador de usuario complementario definido con un usuario, tal como una identificación de estudiante, un código de barras, una identificación de inicio de sesión social, un enlace a una foto del usuario, etcétera. For more information about identifier types, see Managing User Identifiers.
Para instituciones que estaban activas en Alma antes de junio 2018, los identificadores adicionales son sensibles al uso de mayúsculas y minúsculas. Para instituciones que han pasado a ser activas desde junio 2018 hacia adelante, los identificadores adicionales no son sensibles al uso de mayúsculas y minúsculas. For more details regarding case sensitivity of identifiers, see the detailed blog post on the Ex Libris Developer Network.
The table on the Identifiers tab of the User Details page (Admin > User Management > Manage Users; select Edit in the row actions list) functions like a mapping table. For more information, see Mapping Tables. Se puede añadir, editar, duplicar y borrar identificadores. También se puede activar y desactivar un identificador.
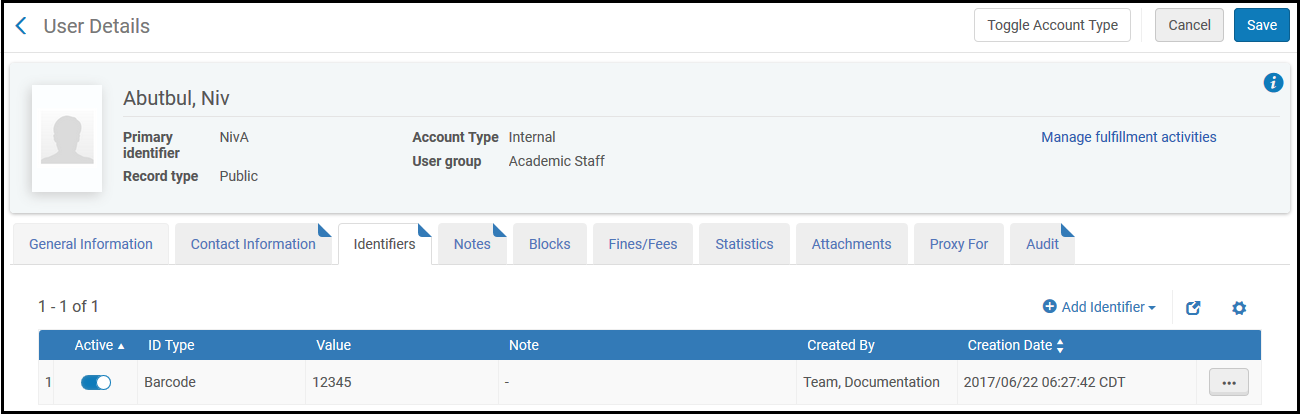
Los campos son:
- Identifier Type - The type of identifier. Ex Libris crea y configura los tipos cuando se crea su institución. In addition to social media options, other options include barcode and institution ID (the ID assigned to the user from an SIS; see Student Information Systems). Esta lista podría ser diferente para los usuarios del personal y usuarios públicos.
- Value - The value of the identifier for this user.
- Note - An optional note.
- Todos los identificadores primarios y adicionales deben ser únicos para los usuarios, incluso para el mismo usuario.
- Identificadores de usuario asociados con Inicios de sesión con redes sociales (Twitter, Google y Facebook) no aparecen en esta pestaña, aunque son definidos para el usuario. They still exist: they can be used to log in using the social login page (see Social and Email Login), and you can search for the user using the identifier.
- When working with an external user, the Add as an external checkbox appears. Seleccionar para añadir el identificador como datos externos que son sobrescritos durante la sincronización SIS. Si no se selecciona esta opción, el identificador se añade como datos internos y no se sobrescribe durante la sincronización SIS (a menos que el mismo valor sea enviado luego por el SIS, en cuyo caso el identificador se marca como externo). For more information, see https://developers.exlibrisgroup.com/alma/integrations/user-management/sis.
- Cuando están definido por Ex Libris, algunos identificadores deben ser únicos en toda la institución para que el usuario pueda iniciar sesión en Alma o Primo.
- When saving external data, a green check mark appears on the in the External Data column.
- Cuando se cambia un usuario de interno a externo, todos los identificadores internos se convierten en externos.
Managing User Notes
A user's Notes tab contains additional features that are not available in other Notes tabs in Alma (see Notes Tab). Se puede adjuntar notas internas o externas a los detalles de usuario. The notes entered for the various note types (for example, Address, Circulation, Library, Registrar) appear in the User Notes tab on the Patron Services page (see Patron Services Page – Loans Tab in Managing Patron Services), and in Primo on the Blocks & Messages page in the My Account tab.
The arbitrary order in which the notes appear in the User Notes tab on the Patron Services page cannot be controlled.
When library independence is activated for an institution, each note has an owner - either a specific library within the institution, or the entire institution. In this case, users can only see notes that are owned by the libraries that are either within these users' scopes (see Managing User Roles), or owned by the institution. Notes owned by libraries that are outside of a user's scope are not displayed in this tab, are not retrieved in searches, and are excluded from API calls. Library-level notes can only be activated in institutions in which library independence is turned on. For additional information about library independence, see Fulfillment Library Independence.
You manage user notes on the Notes tab of the User Details page (Admin > User Management > Manage Users; select Edit in the row actions list). Se puede añadir, editar, duplicar y borrar notas.
For more information, see Notes and Blocks (2:10 min).
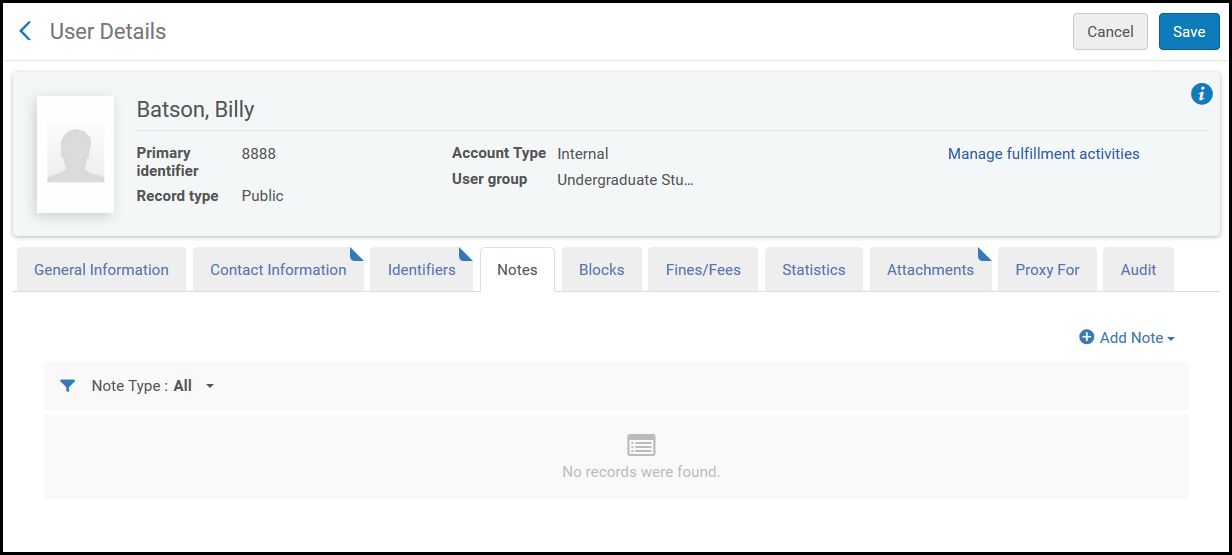
- In the Notes tab, select Add Note. The Add Note dialog box appears.
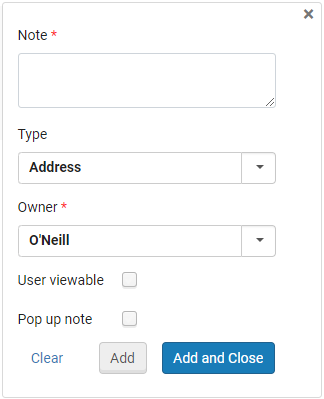
- Under Notes, enter the text of the note.
- Under Type, select a note type. Los tipos de nota son solo con fines informativos y no sirven para un propósito funcional en Alma. La lista de tipos de nota es estándar en todas las instituciones.
- Under Owner, select the library that owns the note. Solo los usuarios cuyos roles estén dentro del alcance de esta biblioteca podrán ver esta nota. This option only appears if library independence is activated for the institution (see Fulfillment Library Independence).
- Select Pop up note to make the note pop up when the user record is displayed in the Manage Patron Services page.
-
Select User viewable to enable the indicated user to view the note.
When working with an external user, the Add as an external checkbox appears. Seleccionar esta opción para añadir la nota como datos externos que son sobrescritos durante la sincronización SIS. Si no selecciona esta opción, la nota será añadida como datos internos y no será sobrescrita durante la sincronización SIS. For more information, see https://developers.exlibrisgroup.com/alma/integrations/user-management/sis.
- Guardar la nota:
- Select Add to save the note details and add additional notes.
- Select Add and Close to save note details and close the Add Note dialog box.
When saving external data, a green check mark appears on the in the External Data column.
Para editar, duplicar o borrar una nota, seleccionar la opción pertinente en la lista de acciones de fila. You can also select the note text in the Note column to edit the note.
Blocking and Unblocking Users
The Blocks tab is not available for Contact users.
You restrict users from using library services by adding user blocks. Las sanciones son añadidas para usuarios que tienen multas, préstamos pendientes o varios retrasos en las devoluciones de libros. Un usuario sancionado se ve impedido para realizar acciones con elementos de la biblioteca, tales como préstamos, renovaciones, etcétera. The block note is displayed in Primo if the patron is blocked from requesting by the block. The blocks that can be assigned to a user are configured on the User Block Definitions mapping table page (see Configuring User Block Descriptions and Definitions).
Note that items or users can also be blocked based on other conditions; see Configuring Block Preferences.
The table on the Blocks tab of the User Details page (Admin > User Management > Manage Users; select Edit in the row actions list) functions like a mapping table. For more information, see Mapping Tables. Se pueden añadir, editar, duplicar y borrar sanciones de usuario. También se puede activar o desactivar una sanción de usuario.
For more information, see Notes and Blocks (2:10 min).
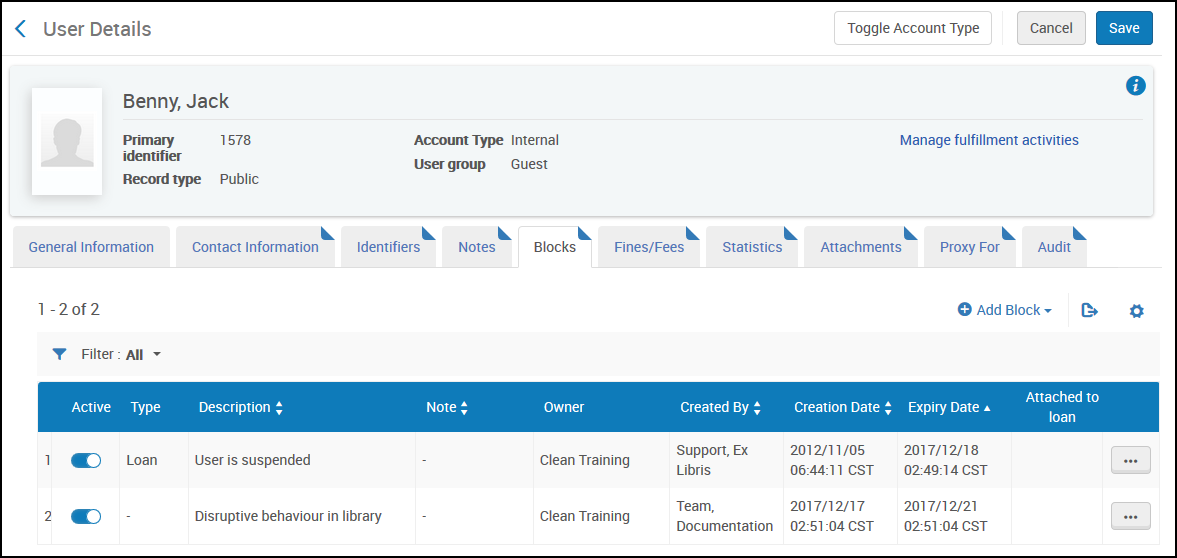
Los campos son como sigue:
- Block description- The block type. Esta lista está preconfigurada por Ex Libris.
- Expiry Date- An optional date when the block will be lifted.
- Owner- The library that owns the block. Only users with a role scoped to this library will be able to see this block. This option only appears if the library independence is activated for the institution (see Fulfillment Library Independence).
- Note- An optional note.
- External Block Owner - The name of the institution from which the block comes (see Configuring Consortial Blocks). Por defecto, esta opción no se muestra. In order to display it, select the gear icon next to the Add Block button and mark the checkbox next to External Block Owner. Tenga en cuenta que este campo se rellena para las sanciones que se han copiado de una institución de destino (otra institución en la que el usuario es invitado), pero no para las sanciones que se han copiado de una institución de origen (la institución de origen del usuario). Tenga en cuenta que, por defecto, este campo no se muestra. To display it, mark it in the Customization menu (see New Layout).
- When working with an external user, the Add as an external checkbox appears. Seleccionar esta opción para añadir la sanción como datos externos que son sobrescritos durante la sincronización SIS. Si no selecciona esta opción, la sanción será añadida como datos internos y no será sobrescrita durante la sincronización SIS. For more information, see https://developers.exlibrisgroup.com/alma/integrations/user-management/sis.
- If a user has an active block, a check mark appears in the Blocks column on the Manage Users page for that user.
- When saving external data, a green check mark appears in the External Data column.
Managing User Fines and Fees
- The Fines/Fees tab is available only for users with the Patron role.
- La interfaz de usuario del mostrador de circulación también admite la gestión de multas y cuotas con una funcionalidad adicional. See Managing Fines and Fees.
You manage user fines and fees on the Fines/Fees tab of the User Details page (Admin > User Management > Manage Users; select Edit in the row actions list).
Users can select fines and fees across the full paginated fees list (among multiple pages) and waive them by selecting the Waive All option in the Fines/Fees tab.
No se puede condonar más de 100 cuotas seleccionadas en una acción. This limit can be configured with the waiving_fines_fees_limit parameter (see Configuring Other Settings). For waiving fines and fees (specifically or in bulk) on the Manage Patron Services page, see Managing Patron Services at a Circulation Desk. You can also use a dedicated job to waive fines and fees in bulk (see Waiving Fines and Fees Using a Job).
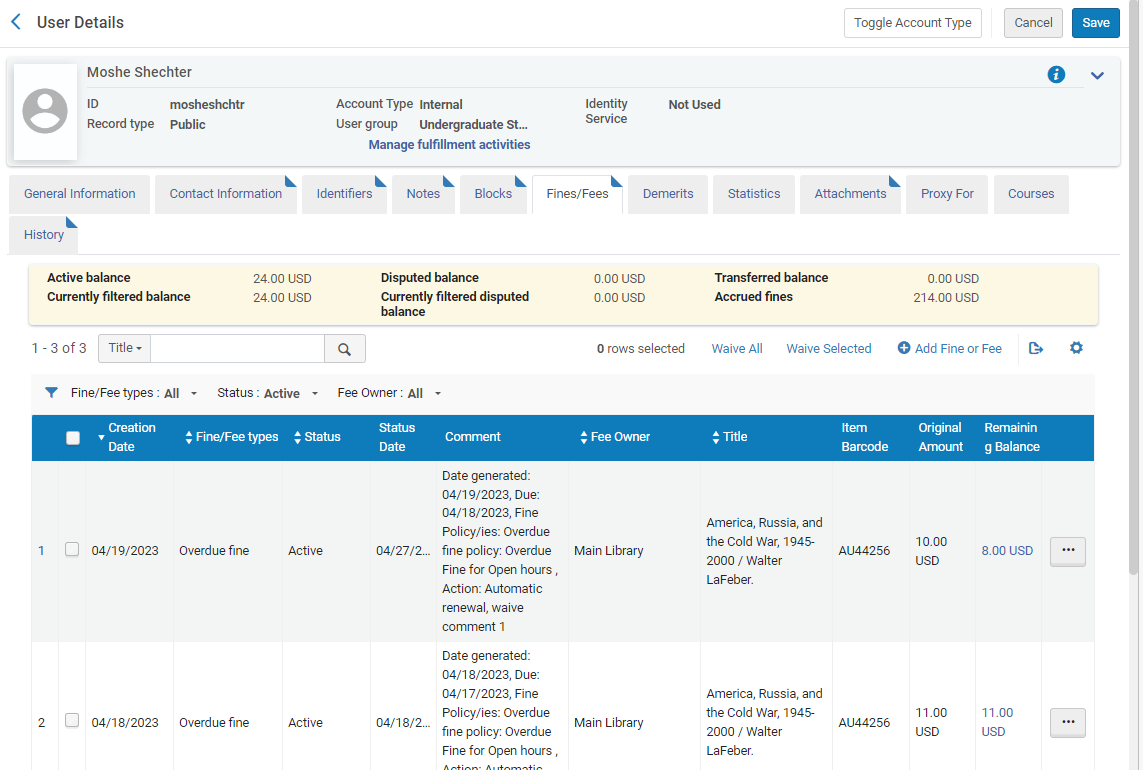
The Fines and Fees Summary area shows a summary of the user's balance, including:
- Active balance: The balance of fines and fees. This may include transferred balance depending on the allow_activity_on_transferred_finesfees parameter. See Configuring Other Settings (Fulfillment).
- Currently filtered balance: The balance of fines and fees that are currently filtered due to your selections in the filters.
- Disputed balance: The balance of disputed fines and fees.
- Currently filtered disputed balance: The balance of disputed fines and fees that are currently filtered due to your selections in the filters.
- Transferred balance: When bursar fees are set to Exported status, they appear as transferred balances.
- Accrued fines: Additional fines that may still be increasing, because the patron has not yet returned an overdue loan. Note that accrued fines are not included in the calculation of the debt limit that, if reached, would prevent the patron from borrowing additional items (see Patron Configurations).
Las multas acumuladas solo se calculan si el usuario no tiene más de 100 préstamos vencidos.
The Fines and Fees Details area lists transaction details of the user's fines and fees. When the Status filter is set to Active(default), disputed, waived, transferred, and closed fees remain hidden. To see all fees, select All for this filter. To limit the fines/fees shown for a specific owner, select the library in the Fee Owner filter.
Watch the Filter Fines and Fees by Owning Library video (1:05 min).
Se puede personalizar la visualización de los Detalles de multas y cuotas seleccionando el icono de la Visualización de columna situada encima del área de detalles. Las columnas seleccionadas por defecto son:
- Crear
- Tipo de Multa/Cuota
- Estado
- Estado
- Comentario
- Propietario de cuota
- Título
- Código de barras del ejemplar
- Cantidad original
- Saldo restante
Las columnas complementarias que pueden mostrarse son:
- IVA original
- IVA restante
- Bursar Transaction ID - see Configuring Bursar Transaction IDs.
- Condonar razones
Se puede añadir o condonar una multa o cuota, indicar que una multa o cuota está bajo disputa y enlazar la multa o cuota a un ejemplar de repositorio. Una multa o cuota disputada puede ser condonada o restituida. Una multa o cuota condonada no puede ser restituida. When a fine or fee has not been paid, waived, disputed, or exported to the bursar system, it is Active. Realizar una de estas acciones cambia su estado.
To waive fines in bulk, see Waiving Fines in Bulk. To configure when and to whom notifications are sent about fines and fees, see Configuring Fines/Fees Notifications.
Una cuota disputada:
- Is not included in the user's Active Balance
- No se muestra en la lista de multas en Primo
- No se integra al invocar una sanción basada en la cantidad adeudada.
Por ejemplo:
- Un usuario no puede tomar prestados ejemplares si la cantidad adeudada es de $100 USD o superior.
- El usuario debe $100 USD pero ha disputado $20 USD de esa cantidad.
- Alma muestra que el usuario adeuda $80 USD y la sanción no se aplicará.
To enable waiving a fine or fee (including a credit), you must ensure that the specific fine/fee is configured as waivable on the Fine Fee Type Definition mapping table (see Configuring Fines/Fees Behavior). When paying or waiving a fine or fee, the transaction creator is the circulation desk (indicated in the Currently at: field at the top of the page). If no circulation desk indicated in this field, the transaction creator is indicated as Not at desk.
Se puede actualizar la tesorería institucional periódicamente con las multas y cuotas de usuario gestionadas por el sistema mediante un perfil de integración de Tesorería. For details, see Bursar Systems.
For more information assigning a fine/fee to a specific item, see the Link Fee to Inventory video (2:56 mins).
To add fines and fees:
If the fine or fee is listed as owned by Library on the Fine Fee Type Definition mapping table (see Configuring Fines/Fees Behavior), you must be at a circulation desk to add the fee. In order to register a Credit, select the Credit fee type and enter the amount as a positive sum. When you save it, the Credit fee appears in the Fines/Fees list with a negative amount. If you select the Credit fee type, the Comment field is mandatory.
- In the Fines/Fees tab, select Add Fine or Fee. Aparece el cuadro de diálogo de Añadir multa o cuota.
- Seleccionar el tipo de multa/cuota . The types are those configured for manual creation on the Fine Fee Type Definition mapping table; see Configuring Fines/Fees Behavior.
- Seleccione la biblioteca o institución propietaria. Las bibliotecas son seleccionables solo si el tipo de cuota ha sido definido como 'permitir un alcance de biblioteca'.
- Enter the amount of the fine or fee (The amount cannot be negative).
- In the Item barcode field, browse for the item to which you want to attach the fee, as required.
Al añadir un código de barras, la multa/cuota está asociada al ejemplar especificado por el código de barras. El ejemplar y el código de barras aparecen en la pestaña de Multas/Cuotas de la página de los Detalles de usuario.
- In the Comment field, optionally enter a comment for the fine or fee, as needed.
If you select the Credit fee type, the Comment field is mandatory.
- Guardar como sigue:
- Select Add to save the fine or fee details and add additional fines or fees.
- Select Add and Close to save fine or fee details and close the Add Fine or Fee dialog box.
El saldo activo del usuario está actualizado con la cantidad necesaria; si la multa/cuota se encuentra sujeta a IVA, este se incluirá en la cantidad. (Las columnas del IVA están ocultas por defecto en la página. To configure the VAT, see Configuring Fines/Fees Behavior.) For a Credit type fee, the amount is subtracted from the balance. Para todos los demás tipos de cuota, la cantidad es añadida al saldo.
To link an existing fine/fee to a repository item:
- In the Fines and Fees tab of the User Details page, select Link to Item in the row actions list for a Fine/Fee. Aparace la página de enlace al ejemplar.
- En el campo de código de barras del ejemplar, buscar el ejemplar al que se quiere adjuntar la cuota.
- Select Link to Item. The Title and Item Barcode column values on the Fines and Fees Details page update accordingly.
To view a loan's history:
In the Fines/Fees tab, select the fines/fees you want to waive and select View Loan in the row actions list. Aparece la página Proceso de Auditoría del Préstamo. For more information, see Viewing Loan History.
To waive a fine or fee:
- In the Fines/Fees tab, select the fines/fees you want to waive and select Waive Selected in the table actions list. Alternately, select Waive in the row actions list for the fine/fee that you want to waive. The Waiving Fine/Fee page appears.
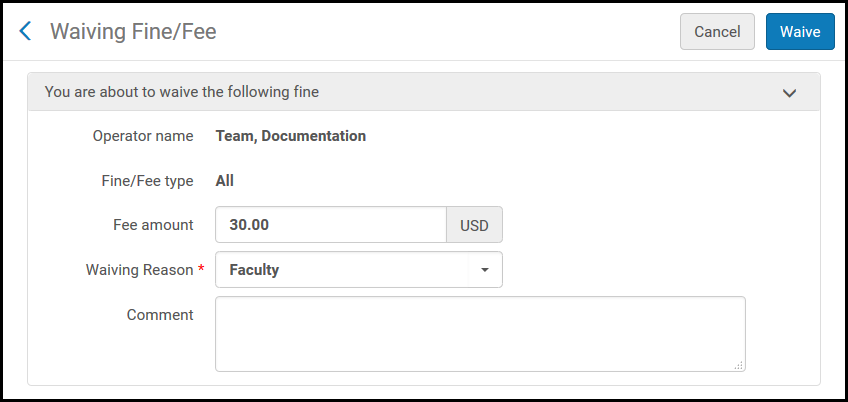
- Enter the amount of the fee you want to waive in the Fee amount field.
- In Waiving reason select a reason for waiving the fee (this list is predefined by a system administrator; see Configuring Reasons for Waiving Fines/Fees).
- Enter any text/comment for waiving the fine or fee in the Comment field.
- Select Waive. and select Confirm in the confirmation dialog box. The amount that is waived is deducted from the amount of the fine or fee (in the Original Amount column), and the balance owed for the fine or fee in the Remaining Balance column is reduced. The balances shown in the Fines and Fees Summary area for Active balance and Disputed balance are updated.
To view the transactions for any fine or fee, select the amount link in the Remaining Balance column.
If a lost item is waived, there is no reduction in the Remaining Balance value. En cambio, la cantidad condonada se muestra como crédito.
To dispute fines or fees:
- Select Dispute in the row actions list for the fine or fee that you want to dispute. Aparece la página de Disputa de multa/cuota.
- Enter any text/comment for disputing the fine/fee in the Comment field.
- Select Dispute and select Confirm in the confirmation dialog box. The balances shown in the Fees and Fines Summary area for Active balance and Disputed balance are updated.
To restore fines or fees:
Select Restore in the row actions list for the disputed fine or fee that you want to restore (ensure the Status filter is set to All or In Dispute). Aparece la página Restaurar una multa o cuota.
Solo las multas y cuotas que están en disputa pueden ser restauradas.
- Enter any text/comment for restoring the fine or fee in the Comment field.
- Select Restore and select Confirm in the confirmation dialog box. The original amount of the fine or fee (in the Original Amount column) is restored, and the balance owed for the fine or fee in the Remaining Balance column is adjusted. The balances shown in the Fees and Fines Summary area for Active balance and Disputed balance are also updated.
Managing User Statistics
Los informes de Analytics pueden desglosar o filtrar usuarios por grupo de usuarios, categoría de tareas, etc. In addition to these categories, you can add additional statistical categories to the user specifically to use in Analytics reports or fulfillment-unit rules. An administrator must first configure statistical categories and category types, and then map statistical categories to category types, in the User Management configuration area (see Configuring Statistical Categories for Analytics).
You add statistical categories to the table on the Statistics tab of the User Details page (Admin > User Management > Manage Users; select Edit in the row actions). Esta tabla funciona como una tabla de mapeo. For more information, see Mapping Tables. Se pueden añadir, editar, duplicar y borrar categorías para el usuario.
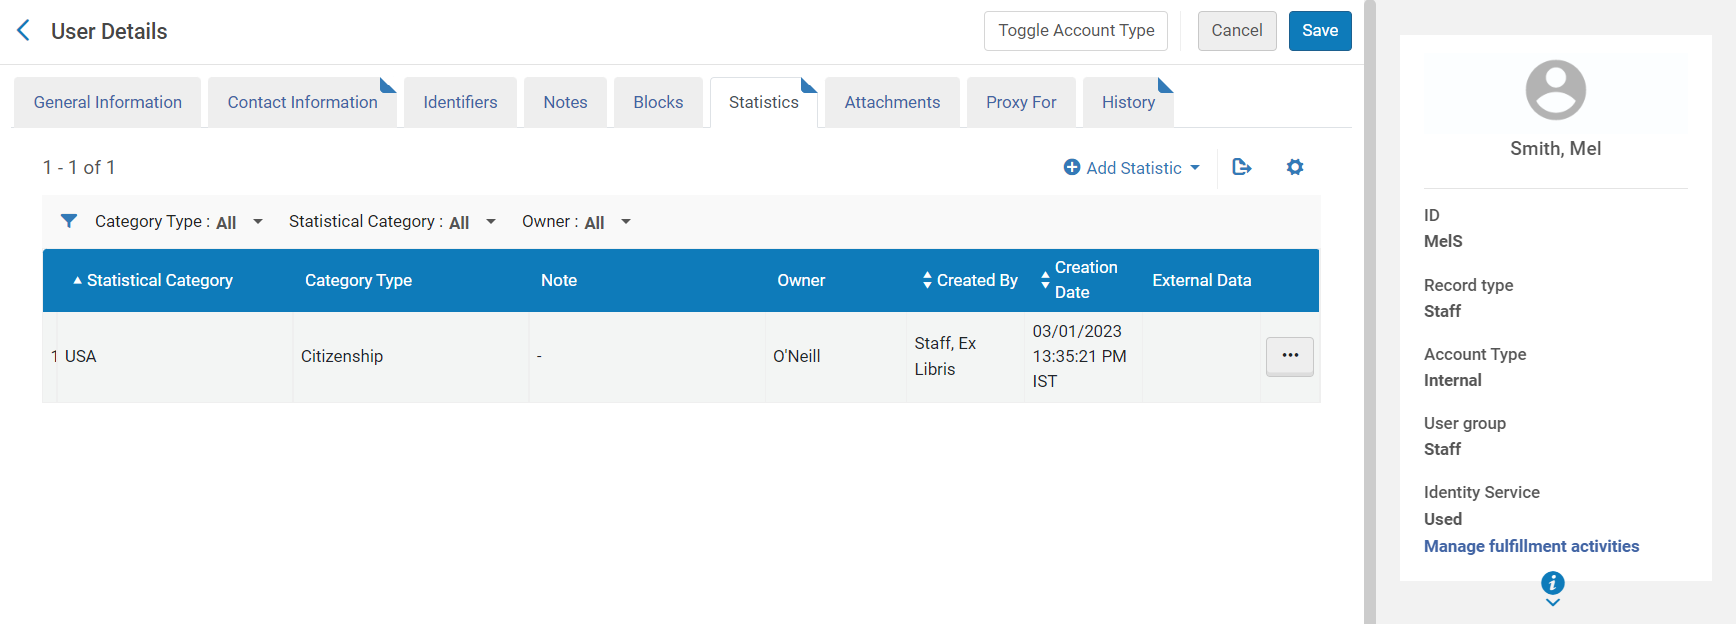
Los campos de esta pestaña son los siguientes:
- Category type - Category types are predefined by a system administrator in the Statistical Categories Types mapping table (see Creating Statistical Category Types).
- Statistical category - Statistical categories are predefined by a system administrator in the Statistical Categories context of User Management Configuration (see Configuring Statistical Categories).
- Note - Add a note as required.
- Owner - When library independence is activated for an institution, this field appears in the Statistics tab. In this case, users can only see statistical information that is owned by the libraries that are within these users' scopes (see Managing User Roles). Information that is outside of a user's scope is not displayed in this tab, is not retrieved in searches, and is excluded from API calls. Las estadísticas a nivel de biblioteca solo se pueden activar en instituciones en las que está activada la independencia de la biblioteca. For additional information about library independence, see Fulfillment Library Independence.
- When working with an external user, the Add as an external checkbox appears. Seleccionar esta opción para añadir la categoría estadística como datos externos que son sobrescritos durante la sincronización SIS. Si no se selecciona esta opción, la categoría estadística se añade como datos internos y no se sobrescribe durante la sincronización SIS (a menos que el mismo valor sea enviado luego por el SIS, en cuyo caso la categoría estadística se marca como externa). For more information, see https://developers.exlibrisgroup.com/alma/integrations/user-management/sis.
- When saving external data, a green check mark appears on the in the External Data column.
Managing User Attachments
Se puede añadir documentos adjuntos para un usuario. You manage attachments on the Attachments tab of the User Details page (Admin > User Management > Manage Users; select Edit in the row actions list). For more information about this tab, see Attachments Tab.
Attachments added manually to this page are not sent to the user; they are simply appended to the user's record for reference.
Attachments sent to the user in a letter (see Configuring Alma Letters) also appear on this page. Si un usuario constata que no ha recibido una notificación por correo electrónico enviada por Alma, puede reenviar el documento adjunto a la dirección de correo electrónico preferida del usuario. To resend an attachment, select Resend Notification in the row actions list. Alma reenvía el documento adjunto al usuario. La carta usada para esto es Volver a enviar carta de notificación.
When library independence is activated for an institution, the Owner field appears in the Attachments tab. In this case, users can only see attachments that are owned by the libraries that are within these users' scopes (see Managing User Roles). Information that is outside of a user's scope is not displayed in this tab. Library-level attachments can only be activated in institutions in which library independence is turned on. For additional information about library independence, see Fulfillment Library Independence.
Managing Proxy Users
Se puede definir un usuario para que sea un usuario proxy para otro. A proxy user can loan and return items on behalf of another user (see Selecting a Patron). You manage proxy users on the Proxy For tab of the User Details page (Admin > User Management > Manage Users; select Edit in the row actions list).
Any user can be a proxy user, but the target user for whom the proxy performs actions must have the Patron role. Se pueden añadir y eliminar usuarios para los cuales un usuario es un proxy.
To add a proxy user:
- Open the Proxy For tab of the User Details page. Select Add Proxy For.
- In the Proxy for field, enter or select the patron for whom you want the current user to be a proxy.
- Select Add User. Se añade el usuario; el usuario es ahora un proxy para este usuario.
To remove the patron, select Delete in the row actions list.
Se puede crear un registro de usuario como Proxy de servicios al usuario en el momento que se crea el registro del nuevo usuario. Unlike the regular circulation proxy, the Fulfillment Proxy is a full proxy, for example not only are this patron's loans associated with the sponsor, but also the patron's requests and resource sharing requests. Emails that have to do with the request, such as hold shelf notifications and request reminders are also sent to both the proxy user and the sponsor user. The Fulfillment Proxy cannot be unlinked from the sponsor record and cannot place requests or check out items without the request or loan being associated with the sponsor record. Además, las solicitudes que el Proxy de servicios al usuario realiza aparecen en Mi cuenta de Primo, tanto para el proxy como para el patrocinador.
Si bien los usuarios como Proxy de servicios al usuario pueden solicitar ejemplares tanto locales como de la AFN en nombre del Patrocinador de proxy, y los usuarios como Proxy de servicios al usuario y Patrocinador de proxy reciben notificaciones de Estantería de reservas, solo el Patrocinador de proxy recibe correos electrónicos de notificación de Estantería de reservas para ejemplares de la AFN. El Proxy de servicios al usuario NO recibe también la carta para los ejemplares de la AFN en reserva.
Viewing Changes to the User Record
Changes made to the user record are recorded in the History tab of the User Details page (Admin > User Management > Manage Users; select Edit in the row actions list). For more information, see History Tab. Además de seguir los cambios hechos en la IU de Alma, también se capturan los cambios hechos por SIS, APIs, actualizaciones de cuentas enlazadas y la tarea de Actualizar/Notificar usuarios.
El acceso al historial de un usuario puede estar limitado según su rol.
For information about limiting access to certain user roles, contact Ex Libris support. Changes to the Last patron activity date are not recorded in the user's History tab. For more information on the Last patron activity date, see Managing Users and Configuring Last Patron Activity Date.
La información del historial se puede filtrar por Todo, los Últimos 7 días, el Último mes o el Último año. Por defecto, la información se filtra por los Últimos 30 días.
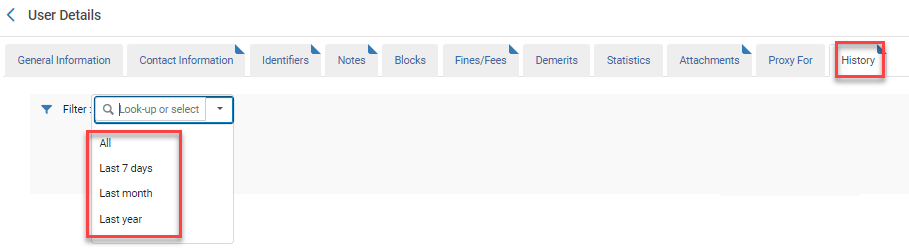
Solo los cambios relacionados con los siguientes campos se muestran en la pestaña de historial del usuario:
- Pestaña general:
- nombre de usuario
- nombre
- apellido
- segundo nombre
- título de usuario
- número de PIN
- título de la tarea
- código de campus
- grupo de usuario
- idioma del usuaruo
- fecha de caducidad
- Fecha de eliminación
- código de biblioteca de rs
- nivel de catalogador
- tipo de registro
- contraseña
- dirección
- teléfono
- correo electrónico
- identificadores
- notas
- sanciones
- proxy para
- funciones
The length of time that the user audit trail record is retained is determined by the user_audit_retention_period parameter. See Configuring Other Settings. A weekly job, User audit purge with retention, deletes history records that are older than the value of the retention period.
Any updates to the user record update the created by/modified by fields.
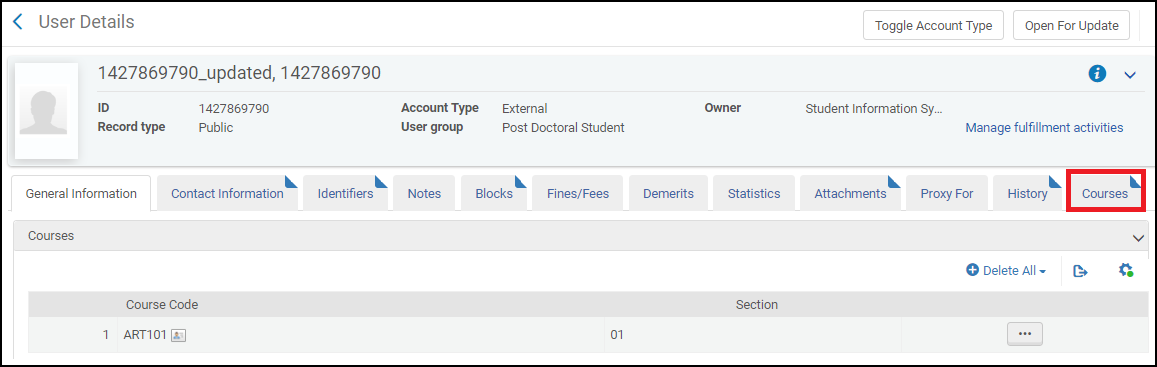
Gestionar cursos
(Leganto only) The Courses tab allows you to view all courses to which a student has enrolled and to delete specific courses or all courses to which a student has enrolled.
For information on how to load user enrollment information, see Configuring Importing Course Enrollment Jobs.
Managing User Pictures
Se pueden gestionar fotos de usuario en un servidor externo y hacer que aparezcan en la página de Detalles de usuario en Alma. To do this, you must first configure the following parameters (see Configuring Other Settings):
When using a photo server (secured or not secured, i.e. https or HTTP), you must open access to campus staff member computers.
- photo_server_url- The URL to the location (directory) containing user pictures. La URL debe ser HTTPS. In order to use HTTPS, the certificate may not be self-signed and must be signed by a known certificate authority (the list of supported certificates can be found here). The URL must end with a forward slash (/). For example,http://institution.edu/pictures/.
- photo_identifier_type- The user identifier to use as the user picture file name. Possible values are: USERNAME(the primary ID) or a code in the User Identifier Types code table (see Viewing User Identifiers).
- photo_suffix - The suffix to use for the user picture file suffix. For example,png.
The advised size (in pixels) for user photos to be properly uploaded to the Patron cards is 160*190.
You view a user's picture on the User Details page (Admin > User Management > Manage Users; select Edit in the row actions list).
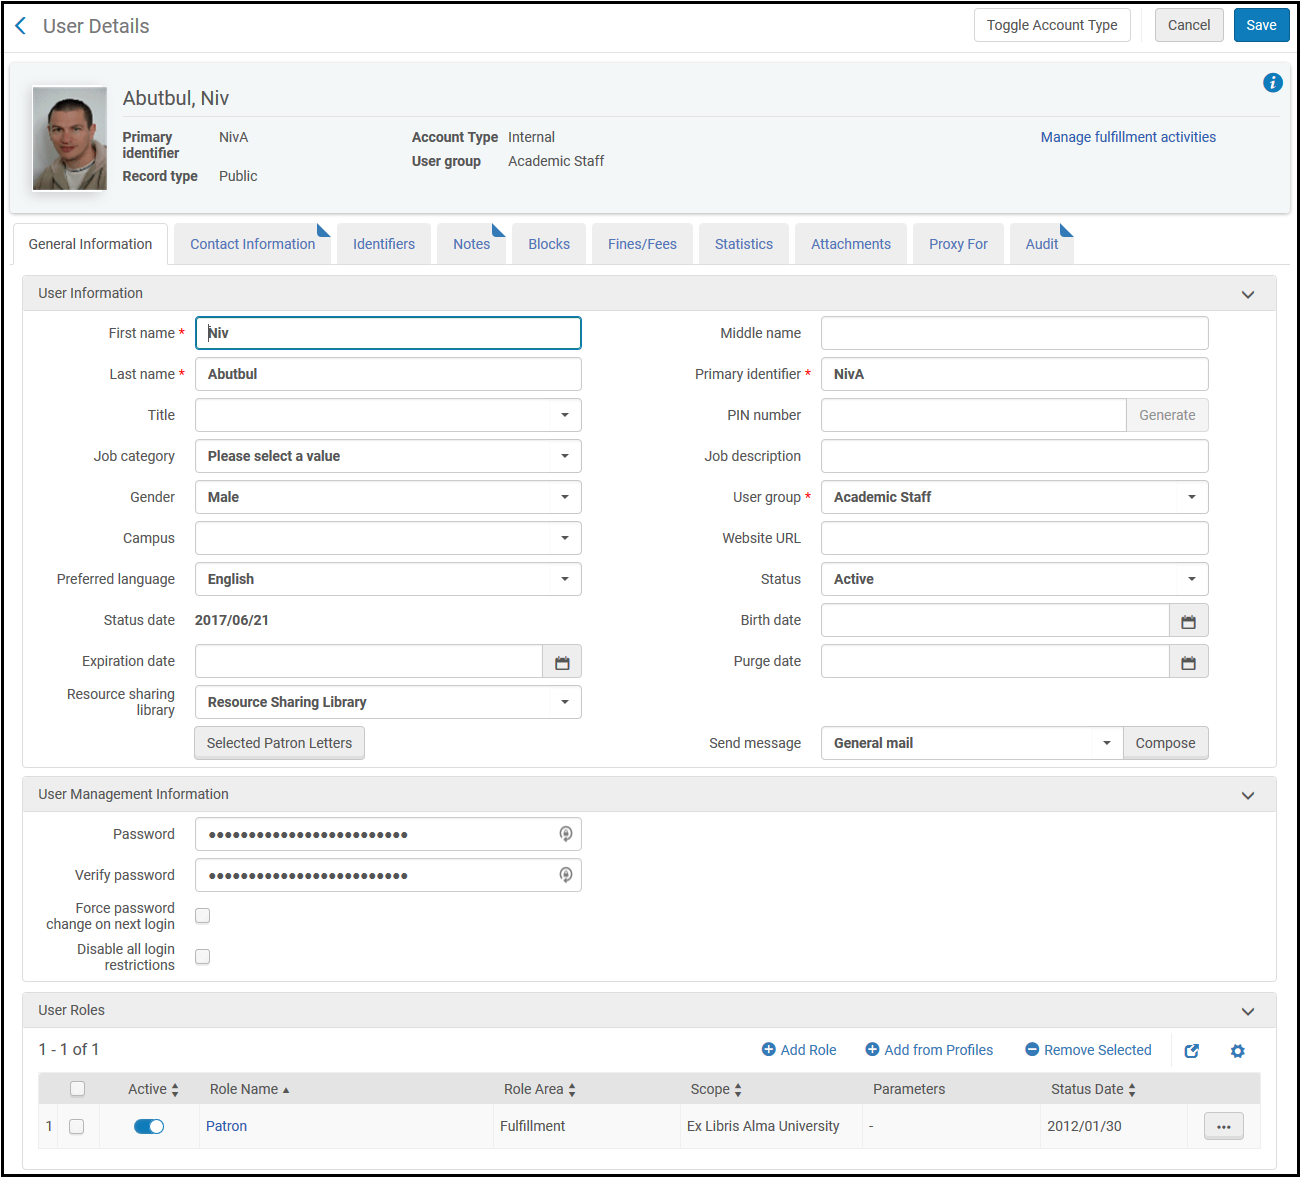
- Upload user pictures to the directory defined in photo_server_url with the name <user identifier>.<photo_suffix>, for example 12345.png.
- Comprobar que cada usuario tiene un identificador que coincide con el nombre del fichero de foto de usuario. See Managing User Identifiers.
To edit or remove a picture, edit or remove the picture at photo_server_url. No hay ninguna acción requerida en Alma.
For more information, see  How to configure the display of user pictures on the User Details and Patrons Services page in Alma.
Deleting Users
Se pueden borrar usuarios si:
- No presentan un saldo adeudado en su cuenta.
- No tienen préstamos pendientes.
- No tienen ninguna línea de orden de compra, órdenes de compra o facturas asignadas.
- No tienen ningún registro bibliográfico bloqueado.
- No tienen ningún perfil de importación asignado.
- They are not currently working in the MD Editor.
- They do not have active Purchase Requests (Purchase Requests with the following status are considered ‘not active' and do not prevent deleting a user: Rejected, Approved, Order Complete, To be Canceled, Failed, Cancelled).
- El registro de usuario no está actualmente bloqueado por una tarea en ejecución.
- (Si Esploro está habilitado para su institución), tienen activos o subvenciones asociados.
Note that the purge users job does not delete users with Resource Sharing requests that are on the Hold shelf (see Configuring User Deletion).
Cuando un usuario se borra usando el procedimiento que se encuentra a continuación, será borrado completamente. No se mantienen datos estadísticos o comunicables.
Delete only Staff or Public users. Contact users are reserved for vendors and should not be deleted.
To delete users in bulk, see Purging Users
To delete a user:
- On the Find and Manage Users page (Admin > User Management > Manage Users), select Delete in the row actions list for the user you want to delete. Aparece una casilla de diálogo de confirmación.
Find the user record you want to delete using the persistent search bar's ‘Users' option.
- If the user can be deleted, select Confirm. El usuario se borra.
- If the user cannot be deleted, a message such as the following appears.
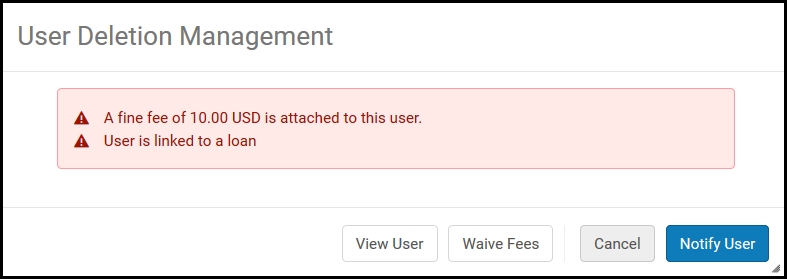
Seleccionar una de las opciones siguientes:
- Cancel – Do not delete the user.
- View User(appears only when fines/fees are attached to the user) – See Editing Users.
- Waive Fees – See Managing User Fines and Fees. Aparece una casilla de diálogo de confirmación, en la que se puede confirmar que se quiere borrar el usuario.
- Notify User(appears only when fines/fees are attached to the user) – Send the User Deletion Letter informing the user that there is a balance due on the user's account. A copy of the email is added to the Attachments tab (see Managing User Attachments). For more information on configuring the letter, see Configuring Alma Letters.
Distributing Users
Se puede repartir un usuario a todas las instituciones miembro implementando una Zona de red. For more information, see Distributing Users Across a Network Zone. For additional user sharing options in a fulfillment network, see Linking Users in Fulfillment Networks.
