
Lavorare con le Regole di Indicazione
Indication rules are used to filter sets. Indication rules do not modify data. They are solely used to read records that are part of a set and filter records out based on conditions. Il risultato del processo di filtraggio è un nuovo Set che viene creato come sottoinsieme del Set originale/filtrato. See Filtering Sets on the Managing Search Queries and Sets page for more information.
Le regole di indicazione vengono utilizzate per il record bibliografico MARC, mentre le regole di indicazione XML vengono utilizzate per il record Dublin Core.
Le sezioni seguenti descrivono come creare e testare le regole di indicazione e forniscono esempi che si possono incorporare nel flusso di lavoro:
- Creating Indication Rules
- Testing Indication Rules
- MARC Indication Rules Syntax Examples
- XML Indication Rules Syntax Examples
- Form-Based Indication Rules
Inoltre, è possibile comporre regole di indicazione per altre aree funzionali che utilizzano Set:
- Delete holding records with no items job – See Delete holding records with no items.
- General Publishing Profile (Resources > Publishing > Publishing Profiles > select Add Profile > General Profile) – See Filter Records.
- Import Profile Details – See Filter out the data using.
Le stesse regole di indicazione non possono essere utilizzate per tutte le aree e il flusso in Alma.
Creating Indication Rules
Lei crea e mantiene le regole di indicazione tramite l'Editor MD.
For Network Zone consortia members, users can control whether to save new rules locally or in a network institution. To make this selection, open the Records or Templates area, and go to New > Placement Options. Si noti che questa selezione è per l'utente.
Backslashes (\) are used as escape characters for Indication Rules and Form-Based Indication Rules, according to the same principles as the Normalization Rules.
- Apri l'Editor MD.
- Select New > Indication. La finestra di dialogo Proprietà delle regole di indicazione si apre.
 Finestra di dialogo proprietà
-
Indichi il nome della regola e una descrizione che aiuti gli altri utenti a capire a cosa serve la regola.
- In "Type" , select whether to create the rule as Drool (for MARC bibliographic records) or as XSL (for Dublin Core records).
- Indichi se creare la regola come privata o condivisa. This determines in which folder the indication rule is saved. You may want to save indication rules to the Private folder and test them first, before moving them to the Shared folder (by changing the Properties). Private indication rules cannot be used in the "Filter Set" functionality invoked from the Manage Sets page. Noti che la cartella Community contiene regole di indicazione che può copiare per creare le Sue regole di indicazione.
- Select Save in the dialog. Si apre il riquadro di modifica dell'Editor MD.
- Crei la Sua regola come segue:
- If you selected to create an indication rule for MARC records, enter the Drools logic for your indication rule. Refer to the section Normalization Rules – Syntax and Examples for the syntax to use when creating indication rules. In Alma sono fornite le seguenti regole di indicazione:
See the Indication Rules Syntax Examples section for more examples.MultiTitleIndication.dslr BriefIndication.dslr Regola di indicazione fornita (Titolo multiplo) Per questa regola, non esistono condizioni per il campo di controllo.Regola di indicazione fornita (Breve soggetto) Sebbene sia consentito includere più operatori booleani nelle regole, quando ne viene selezionato un numero elevato, è probabile che le prestazioni risultino più lente. Pertanto, ogni regola dovrebbe includere non più di 200 operatori booleani. - If you selected to create an XML indication rule for Dublin Core records, enter the indication rule in XML format.
- If you selected to create an indication rule for MARC records, enter the Drools logic for your indication rule. Refer to the section Normalization Rules – Syntax and Examples for the syntax to use when creating indication rules. In Alma sono fornite le seguenti regole di indicazione:
- Seleziona Salva.
Testing Indication Rules
Prima di eseguire un processo per filtrare un Set utilizzando una regola di indicazione, è consigliabile testare la regola nell'MD Editor.
Sia l'indicazione che le Regole di normalizzazione funzionano in modalità prova.
- Apri un record bibliografico nell’Editor di metadati.
- Select
 Split Editor.
- Selezionare la scheda tab nel riquadro di sinistra ed espandere la cartella Regole di indicazione.
- Locate the rule that you want to test in the Private or Shared(not the Community) folder. Seleziona la regola per vedere un elenco di azioni:
- Modifica
- Delete
- Contribuisca a CZ
- Duplica
- Proprietà
- Selezionare Modifica. La regola dell’indicazione si apre nella schermata divisa accanto al record bibliografico.Regola di indicazione aperta nello schermo diviso
- Select Try it. Depending on the results, a pop-up appears with either True or False response indicating that the bibliographic record either met or did not meet the Drool logic in the indication rule.
 Regola di indicazione - Risposta Provalo
Indication Rules for MARC Records - Syntax Examples
Examples of indication rules syntax are provided below and at Alma Indication Rule Examples. See Conditions for more information.
In rules that search for a certain term, use an asterisk to find the exact term. Se il Sottocampo contiene qualcosa oltre al termine, non verrà trovato, a meno che non ci sia un asterisco. Si noti che è necessario posizionare l'asterisco alla fine del termine, non è necessario posizionarlo all'inizio.
The line exists "130.a.Bible" works as an "Equals" search, thus if the subfield contains anything in addition to the term, it will not find it, unless there is an asterisk..
Esempio 1.
Identificare il record in un set contenente $a nel campo 949.
Esempio 2
Identificare il record in un set contenente un 1XX, 6XX o 7XX in $0 (sottocampo zero).
Esempio 3
Identifica il record in un Set contenente $0 (Sottocampo zero) in un campo che inizia con 65, come 650 o 659.
Esempio 4
Identificare il record in un set contenente $0 (sottocampo zero) in un campo che inizia con 6, come 600, 630, 650 o 659.
Esempio 5
Recupera tutti i record che hanno più campi 300, ognuno dei quali ha un Sottocampo a.
Example 6
Crea un set di tutti i record che hanno i Sottocampi x e z duplicati nei campi 630 e 650.
See the Alma Indication Rule Examples page in the Developer Network for more examples of indication rules.
Regole di indicazione XML per i record DC - esempi di sintassi
Di seguito sono riportati esempi di sintassi per le regole di indicazione XML.
Esempio 1.
Di seguito è riportato un esempio di una regola di indicazione XSL che restituisce True se il record ha un campo dc:subject:
Esempio 2
Di seguito è riportato un esempio di una regola di indicazione XSL che restituisce False se il record ha un campo dc:subject che è uguale a Teologia:
Esempio 3
Di seguito è riportato un esempio di una regola di indicazione XSL che restituisce true se il record ha un campo dc:creator o un campo dcterms:creator contenente Tolstoy:
Regole di indicazione basate su moduli
All users can create indication rules.
Ex Libris provides the ability to create indication rules in the MARC format using a structured form, thus making the process easy and intuitive (this new functionality is in addition to the existing abilities to create Drool rules in the MARC format and create XML rules in the DC format manually, both of which remain unchanged). For complete information about indication rules, see Working with Indication Rules.
The structured form allows to enter the different fields and subfields and values in a wizard-like fashion, and provides pop-up assistance when entering tags and tag names. Una volta che avrà creato una regola, il modulo strutturato consente di verificare che la regola funzioni come previsto, prima di distribuirla.
Questa funzionalità è disattivata per default. To enable it for your institution, contact Customer Support.
Limitazioni
- Currently you can create only MARC21 and UNIMARC form-based indication rules.
- The form-based rules can only be used for filtering sets at this time, and the ability to use them in other workflows that use indication rules is on our roadmap and will be added in the future.
New Form-Based Indication Rules
È stato introdotto il tipo di regole di indicazione "Form". This type has the same rule actions as the other indication rules (New,Edit,Delete,Duplicate,Contribute to CZ, etc.). Quando si crea una nuova regola basata su un modulo, questa regola riceve il badge “Modulo” nell'editor dei metadati.

Creating a Form-Based Indication Rule
- Open the Metadata Editor >Rules area.
- Select New > Indication. The Indication Rules Properties dialog opens.

- Sotto "Nome", assegni un nome alla regola e sotto "Descrizione" (facoltativamente) fornisca una descrizione che aiuterà gli altri Utenti a comprendere cosa fa questa regola.
- Under "Type", select whether to create the rule as Drool (for MARC bibliographic records), as XML (for Dublin Core records), or as Form.
- Sotto "Livello di accesso", indichi se creare la regola come privata o condivisa. This determines in which folder the indication rule is saved. You may also want to save indication rules to the Private folder and test them first, before moving them to the Shared folder (by changing the Properties). Private indication rules cannot be used in the "Filter Set" functionality invoked from the Manage Sets page. Noti che la cartella Community contiene regole di indicazione che può copiare per creare le Sue regole di indicazione.
- In "Tipo di record", selezioni se la regola verrà utilizzata per creare un set di record bibliografici, di autorità o di holding.
- Under "Format", select the registry for the type of sets. The available options are determined by the formats active in your system.
- Select Save in the dialog. Si apre il riquadro di modifica dell'Editor MD.
- In the right-hand panel of the Metadata Editor, configure your rule as per the Configuring the Indication Rules section below.
- Selezioni Salva.
Configuring the Indication Rules
Una volta creata la regola di indicazione basata sul modulo, si apre un pannello in cui è possibile configurarne le condizioni. An indication rule can be composed of one or more conditions.
Creazione di regole di indicazione manualmente o con l'assistenza del sistema
È possibile creare una regola di indicazione in uno di questi modi:
- Digitazione manuale delle informazioni del campo su cui viene eseguita la ricerca.
- Using pop-up assistance to help you select the desired field. The pop-up assistance derives its information from the metadata profile defined in your system (see Configuring Cataloging)
| Per inserire manualmente le informazioni: | Per utilizzare l'assistenza pop-up: |
|---|---|
|
|


Definizione dei campi per le regole di indicazione basate su modulo
For the different types of fields, different rule syntax is displayed.
- Nelle condizioni, definisca il campo come segue:
Tipo di campo Inserimento del campo di questo tipo Control fields 001 / 003 / 005 / 009 Per inserire un campo di controllo 001/003/005/009:- Digitare (o selezionare tramite l'assistenza pop-up) il tag del campo.
- Selezionare il comparatore desiderato.
- Inserisca testo libero.

Tutti gli altri campi di controlloPer inserire altri campi di controllo:- Digitare (o selezionare tramite l'assistenza pop-up) il tag del campo.
- If you are inputting the LDR, 006, 007, or 008 field, from the "Positions" dropdown, select the relevant position and select Done.

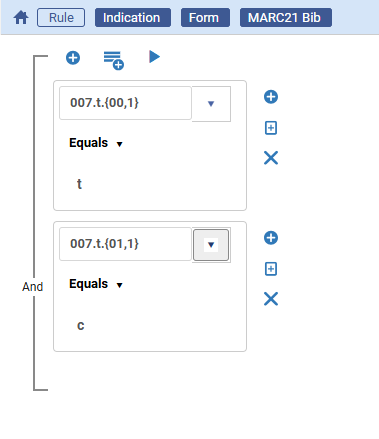
The indication rules for the 007 field require two conditions, one for the "Category of material" and another for the "Specific material designation."
- Selezionare il comparatore desiderato.
- Inserisca testo libero.
Campo dati - inclusi i campi che non sono nel profilo dei metadati (e.g). campo definito localmente) Per inserire un campo di dati:- Digitare (o selezionare tramite l'assistenza pop-up) il tag del campo.
- Selezioni l'Indicatore (di campo) e il Sottocampo desiderati e selezioni Fatto.
- Selezionare il comparatore desiderato.
- Inserisca testo libero.

- If you do not specify any value for an indicator/subfield in the condition, this is displayed as * and is interpreted by Alma as any value.
- To indicate an empty (undefined) value for indicators (in the fields that allow it), type in the # value.
- When you enter text in the Value field, Alma does not attempt to validate the text. This enables you to choose a non-valid value for data correction purposes.
- To add more conditions, or groups of conditions,Working with Indication Rules see below.
- Selezioni Salva sulla barra degli strumenti per salvare la regola di indicazione.
Testing a Form-Based Indication Rule
Prior to running a job to filter a set using an indication rule, it may be a good idea to validate that your rule may works as desired; and if it does not, to edit it some more. È possibile testare l'intera regola oppure solo un singolo gruppo di condizioni all'interno della regola.
- Once you have created and saved your rule, click
above the rule. Depending on the results, a pop-up appears with either a True or False response, indicating that the bibliographic record either met or did not meet the logic specified in the indication rule.

Lavorare con le regole di indicazione basate su moduli
Opzione Descrizione Per aggiungere un'ulteriore condizione alla regola - Select
above the condition to add another condition.
- Select
to the right of the condition and duplicate this condition ; then edit the new condition as necessary.
Per aggiungere un gruppo di condizioni alla regola Quando si crea una regola di indicazione, è possibile aggiungere condizioni singole oppure creare gruppi di condizioni. Select above the condition lines and add as many conditions as necessary.
However, not that you can only add up to 3 nested levels of conditions in the form-based rules.

Per cambiare la relazione tra gruppi di condizioni Baseline conditions default to an AND relationship, meaning that each condition must be true to retrieve the bibliographic record. Quando si aggiunge un gruppo di condizioni, è possibile cambiare la relazione all'interno del gruppo in OR. In questo caso, il record bibliografico verrà recuperato quando una qualsiasi di queste condizioni è vera.
Nota che solo i campi che hai incluso nella regola vengono utilizzati per recuperare i record. Fields that you did not include in the rule do not affect the retrieval, meaning that records with any values in these fields will be retrieved.
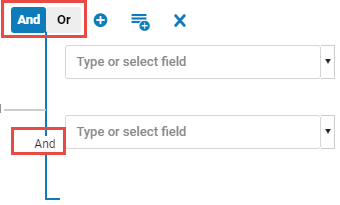
Click on any Boolean operator between the conditions. I flag per AND e OR appariranno in cima alla lista. Click a flag to select this type of relationship. To stop displaying these flags, click again on the Boolean operator.
While it is permissible to include multiple Boolean Operators in an indication rule, when many of Boolean operators are selected, slower performance is likely to result. Pertanto, ogni regola dovrebbe includere non più di 200 operatori booleani.
Per rimuovere una condizione Selezioni la X a destra della condizione per rimuoverla dalla regola. - Select
Page tags: article:topicproduct:almacontent:Documentationlang:english
