
Managing Search Queries and Sets
Any role that can perform a repository search can save a query in order to create a set and manage sets(a user can only manage sets created by that user).
However, users can do so only for content types with which a user is allowed to work according to user's role.
È necessario il Ruolo di Gestore Archivio per visualizzare i risultati combinati dei Set creati da altri Utenti. The Repository Manager can see/edit/delete public and private sets.
The following roles are required depending on the content type of the set:
- Per i set di tipi di contenuto di acquisizione, è richiesto uno dei seguenti ruoli:
- Purchase operatore/Purchase Manager (solo Linea d'ordine Set)
- Gestore Fornitori (solo set fornitore)
- Amministratore Acquisizioni
- Amministratore di Sistema Generale
- Per Utente Set, è richiesto uno dei seguenti Ruoli:
- Gestore utenti
- Amministratore Utenti
- Per leggere la Lista e il corso Set, è richiesto uno dei seguenti ruoli:
- Operatore/Gestore Course Reserves
- Gestore servizi operatore/Manager
- Per gestire un set di risorse di ricerca, Esploro deve essere abilitato per la Sua istituzione e deve avere il Ruolo:
- Gestore delle risorse di ricerca
- Per gestire un Set di ricercatori, Esploro deve essere abilitato per la Sua istituzione e Lei deve avere il Ruolo:
- Gestore ricercatori
- Per rimuovere un record dal set creato da altri, è necessario disporre del ruolo Archivio Manager.
- Per vedere i risultati combinati dei set creati da altri utenti, è necessario avere il ruolo di Archivio Manager.
I Set sono collezioni di record in Alma. They can be created manually, as a list built up item-by-item by the user, or dynamically, in which case the set is a saved search query whose results are determined each time the search is run. I set non hanno un limite di grandezza.
I Set possono essere utilizzati per il Processo di pubblicazione di metadati in blocco, per spostare un gruppo di record o per eseguire processi. For information on running jobs on defined sets, see Running Manual Jobs on Defined Sets.
You can run a job directly on selected search results and PO lines without first defining a set. See Manual Jobs for details.
Types of Sets
Esistono due tipi di set:
- Itemized sets – Static sets of individual items that are manually selected or uploaded by the librarian (see Creating Itemized Sets),
- Logical sets – These are the results of a saved search query, and are created dynamically each time the search is run (see Creating Logical Sets).
Set Content Types
I set possono essere creati da diversi tipi di contenuto. La tua capacità di creare un set di un certo tipo di contenuto dipende dalle tue autorizzazioni, come descritto nella sezione Permessi sopra.
- Set di acquisizione
- Linee d’ordine
- Fornitori
- Set di corsi
- Set utente
- Set di reading list
- Set di Gestione Risorse
- Tutti i titoli
- Authorities
- Citazioni
- Collezioni
- File digitali
- Titoli Digitali
- Collezioni elettroniche
- Portfolio elettronici
- Titoli Elettronici
- Holding fisiche
- Holding fisiche
- copia fisica
- Set Esploro (visibili solo se Esploro è abilitato per la tua istituzione):
- Researcher sets (similar to user sets)
- Set di asset di ricerca (simile al set di gestione delle risorse)
For information, see Creating Batches of Records in Alma - Sets (7:14 mins.).
Managing Sets
Sets are managed on the Manage Sets page (Admin > Manage Jobs and Sets > Manage Sets).
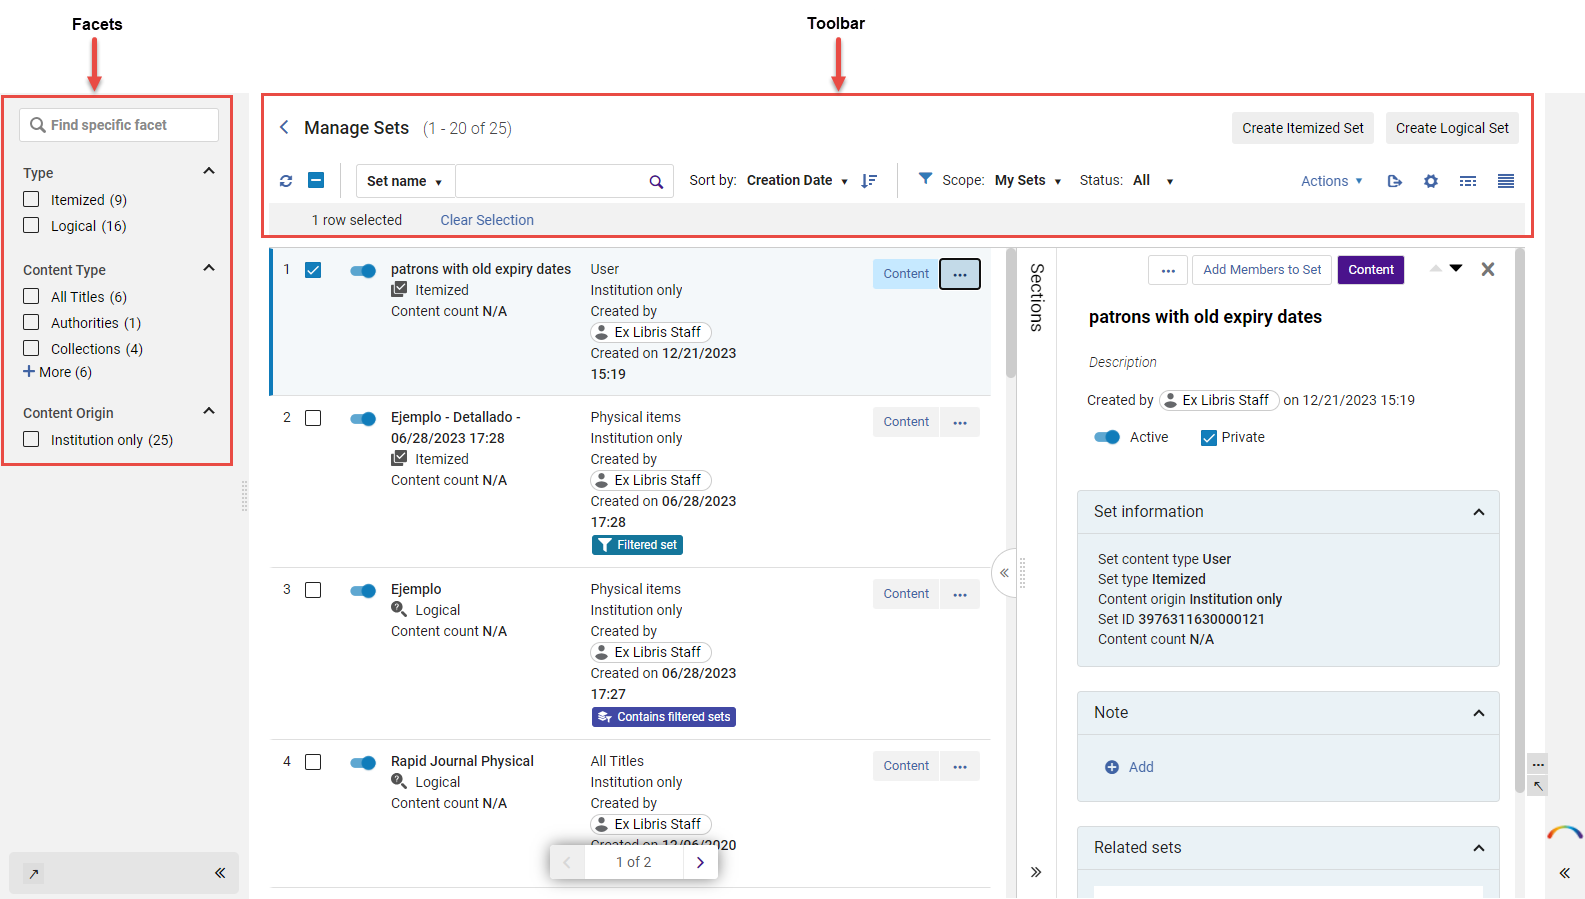
For more information on Facets, see New Layout > Facets.
Manage Sets Toolbar
Nella barra degli strumenti Gestisci set viene visualizzata la seguente funzionalità:
| Campo/Icona | Descrizione |
|---|---|
 Refresh |
Aggiorna la pagina Gestisci set. |
 Select/Unselect all items |
Selects all or Unselects all items only in the displayed list. Se molti Set si estendono su più pagine, vengono selezionati/deselezionati solo gli elementi della pagina corrente. Additionally, you can select an individual set (not all) in the list by selecting its checkbox ( |
 Search |
Search the list results by SetName or Created by (user ID: user first name or user last name). In the drop-down field, select Set Name or Created by and enter the search text for either option.
Use asterisk (*) wildcard character to search for a string that begins with the searched characters. Utilizzi l'asterisco (*) come carattere jolly per cercare una stringa che inizia con i caratteri cercati. If the set name includes dashes (hyphens), when using an asterisk (*) as a wildcard character, replace the dashes with spaces in the search query. For example, if the set is named test-try-check, searching for test-t* will not find the set. Instead, search for test t* to return results. |
Sort by:  Ascending/Descending |
Ordinamento la Lista dei Set per Nome o Data di creazione. Nel campo a discesa, seleziona l'opzione per Ordinamento. Additionally, select the Ascending or Descending button to display the results in ascending or descending order according to the option selected (Name or Creation Date). |
 Filter |
Ambito:
Gli utenti possono filtrare i set visualizzati nel modo seguente:
|
| Stato:
Presents the option to filter the sets by whether the sets are active, inactive, or all (for both inactive and active sets). An Active set refers to whether the set can be selected when running a manual job. An Inactive set refers to a set that cannot be selected by users when running a manual job. |
|
| Bulk Actions |
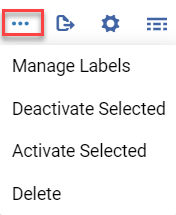
When one or more sets are selected, the Bulk Action buttons are enabled.
A seconda della risoluzione dello schermo, le opzioni potrebbero essere disponibili sotto l'icona delle azioni della riga.
Le opzioni sono descritte di seguito:
You can activate/deactivate an individual set (not all) in the list by using the slide activate/deactivate toggle button (
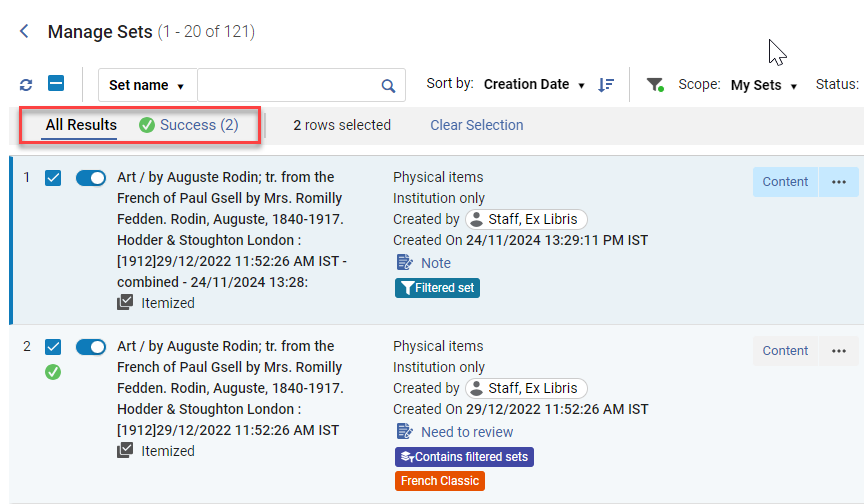
After running bulk actions for sets, information displays at the top of the page showing the results, including the number of successes and failures and a link to the results.
|
| Gestisci etichette | See Labels in the Manage Sets Page. Si noti che, a seconda della risoluzione dello schermo, questa opzione potrebbe essere disponibile sotto l'icona delle azioni di riga (vedere Azioni in blocco). |
 Export |
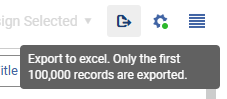
esportazione del Set in Excel (formato *.xlsx).
In alcune pagine, vengono esportati solo i primi 100.000 record. You can identify if this applies to the current export by the message that appears in the tooltip. |
 Customize |
Enables users to personalize various aspects of the Manage Sets List. This includes determining the sequence and appearance of sections, tables and facets, as well as customizing the display of records (see Manage Sets List Customization). |
|
|
When a set is selected in the Manage Sets screen, the screen splits to display an additional screen indicating associated information with the selected set.For more information, see Split View ( ).
|
| Crea set specificato | Creates a static set of individual items that are manually selected or uploaded by the librarian (see Creating Itemized Sets). |
| Crea set logico | Creates a saved search query, and is dynamically updated each time the search is run (see Creating Logical Sets). |
 When no sets are selected, the options are not enabled.

 /
 ) to the left of the set name.
 Switch to table view
 Switch to record view
 Switch to list view
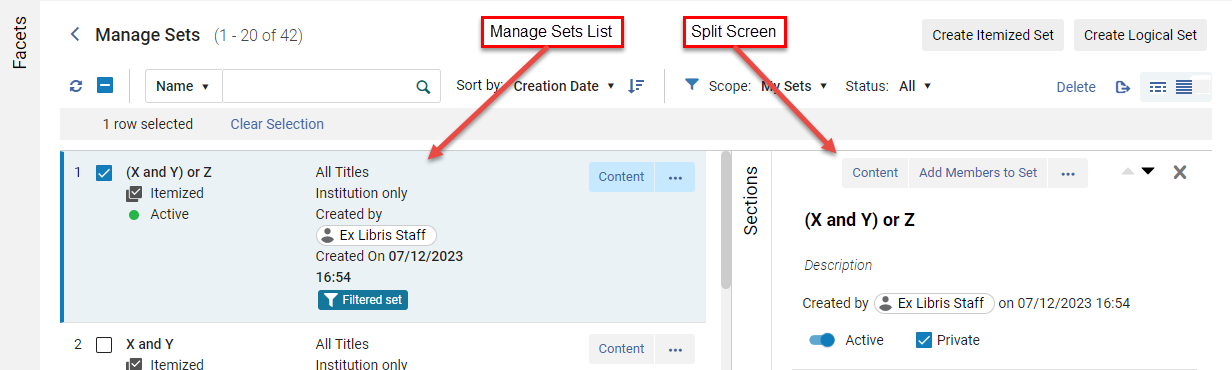
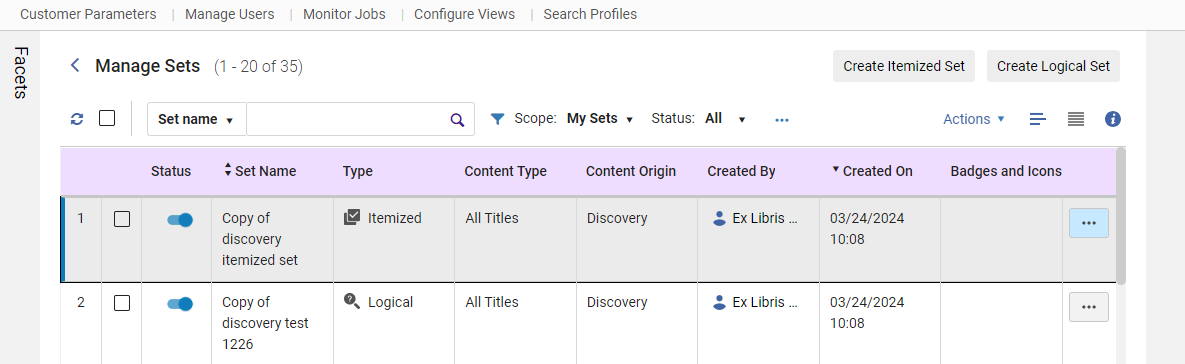
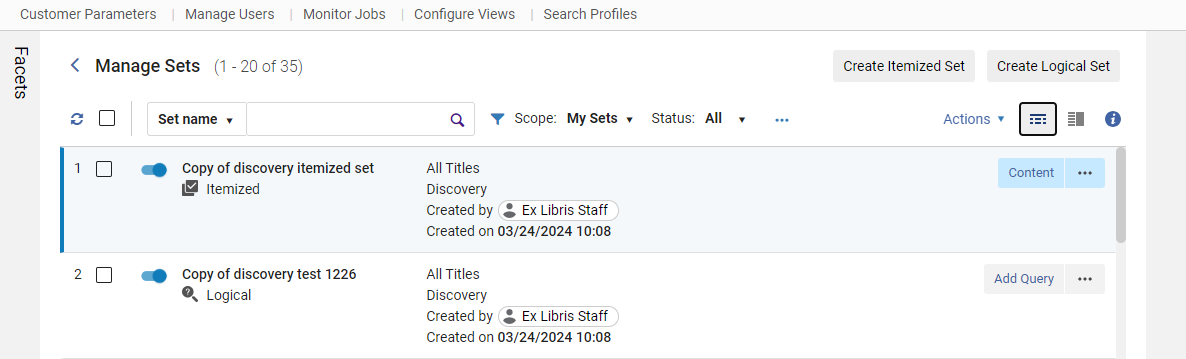
Manage Sets Page More Actions Menu
Il menu Azione include le seguenti azioni:
Le azioni descritte di seguito sono le azioni principali generali. There may be additional actions/options depending on the content type of a set.
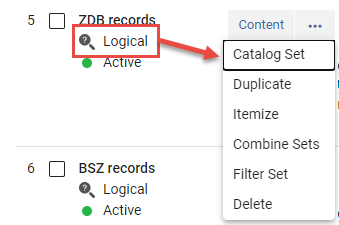
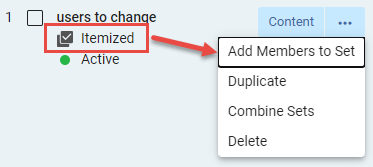
| Azione | Descrizione |
|---|---|
| Contenuto | Esegue la query di ricerca salvata e visualizza i risultati. |
|
Set catalogo |
Opens the set in the MD Editor, but only if the set contains less than 200 items. See Working with Catalog Sets in the Metadata Editor. For Community Zone sets, this option is available for bibliographic and authority records. Questa azione non è disponibile per il set creato dai risultati di ricerca delle autorità nella Community Zone. |
| Duplica |
Copia un set. The duplicated set is added to the Manage Sets page with the words Copy of added as a prefix to the set name. Note that this creates a private copy that can only be viewed when the Scope filter is set to My Sets or All. |
| Specificare | Convertire un set logico in un set specificato. Select Confirm in the Confirmation Message dialog box; see Converting Logical Sets to Itemized Sets. |
| Combina set | Create a new set based on the members of two existing sets; see Combining Sets. |
|
Filtra set |
Offre l'opzione di filtrare il set utilizzando una regola di indicazione. I record saranno inclusi nel set quando l'indicazione è vera. See Filtering Sets for more information. |
| Delete |
Elimina un set. Selezionare Conferma nella finestra di dialogo di conferma del messaggio.
|
| Azione | Descrizione |
|---|---|
| Contenuto | Visualizza i risultati del Set salvato. |
| Aggiungi elementi al set | Display the members (results) of the saved set; see Viewing Members (Itemized Sets Only). |
| Duplica |
Copia un set. The duplicated set is added to the Manage Sets page with the words Copy of added as a prefix to the set name. Note that this creates a private copy that can only be viewed when the Scope filter is set to My Sets or All. |
| Combina set | Create a new set based on the members of two existing sets; see Combining Sets. |
| Delete |
Elimina un set. Selezionare Conferma nella finestra di dialogo di conferma del messaggio.
|
Manage Sets List Customization
Users can personalize various aspects of the Manage Sets List. Questo include la determinazione della sequenza e dell'aspetto delle sezioni e delle Faccette, oltre alla personalizzazione della visualizzazione dei record. This provides users with a range of options that enable them to configure the sections within the edit view, select the elements visible in the record view, and select the facets that are available for the list.
You can select from the following customizations:
- Sections Customization
- Records Customization
- Facets Customization
- Table Customization
- Actions Customization
To Customize the Manage Sets List:
- In the Manage Sets List page (Admin > Manage Jobs and Sets > Manage Sets), select the Customize() icon or select Actions > Customize.
Viene visualizzato un pannello della barra laterale con le opzioni di personalizzazione.
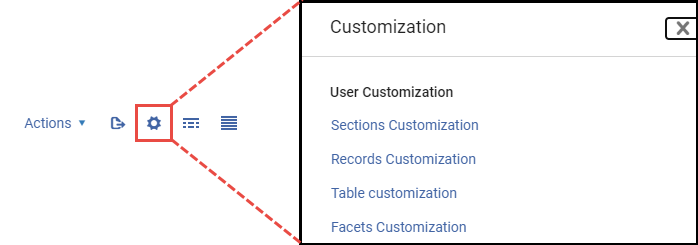
Sections, Table and Facets Customization:
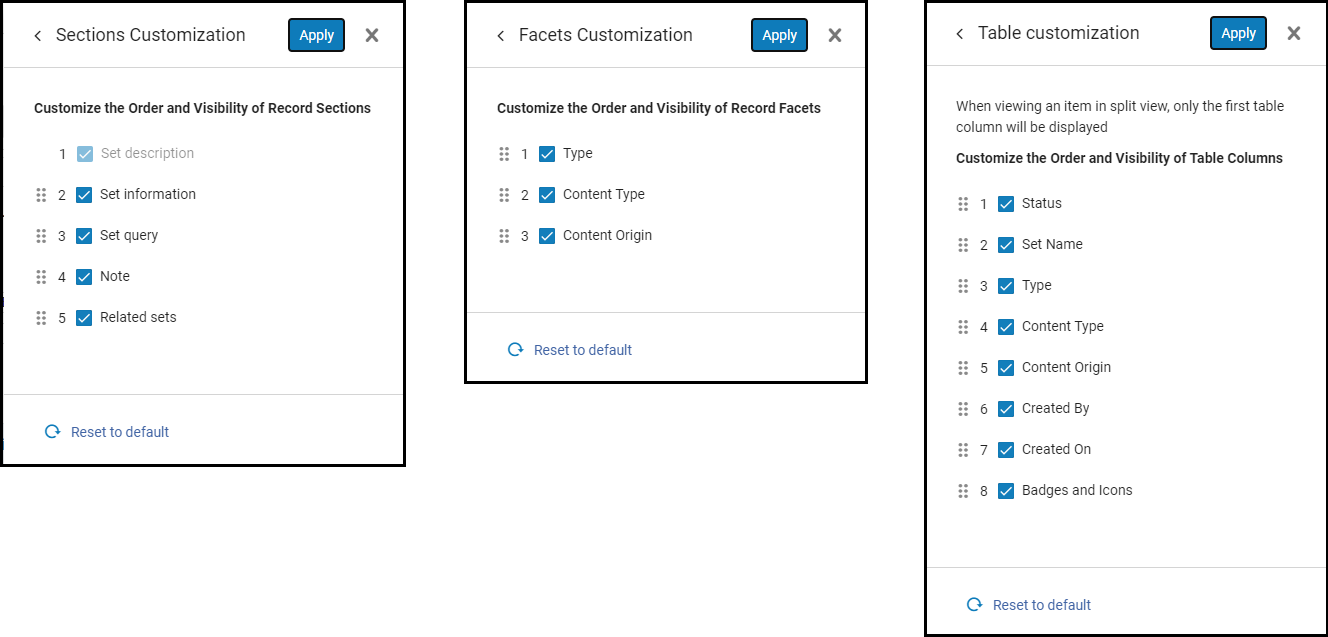
Sections and Facets are similar in nature to their customization.
- In the Customization sidebar pane options, select either Sections Customization, Table Customization or Facets Customization.
Le opzioni di personalizzazione sono visualizzate per ogni selezione.
-
You can re-order the Sections, Table or Facets fields as you want them to appear in the UI. Simply drag and drop the fields in the order of position. Select Apply when finished.
Il campo Set description nella personalizzazione delle sezioni non può essere nascosto né riordinato.
-
You can hide (disable) Sections, Table or Facets fields from being displayed. Unselect (
 ) a field to disable it from being displayed or Select (
 ) a field to have it displayed. Unselected field(s) will not appear in the UI. Select Apply when finished.
-
You can reset the order and appearance back to the default display by selecting
 Reset to default.
- Nelle opzioni del riquadro Personalizzazione della barra laterale, seleziona Personalizzazione del record.
Vengono visualizzate le opzioni di personalizzazione dei record.
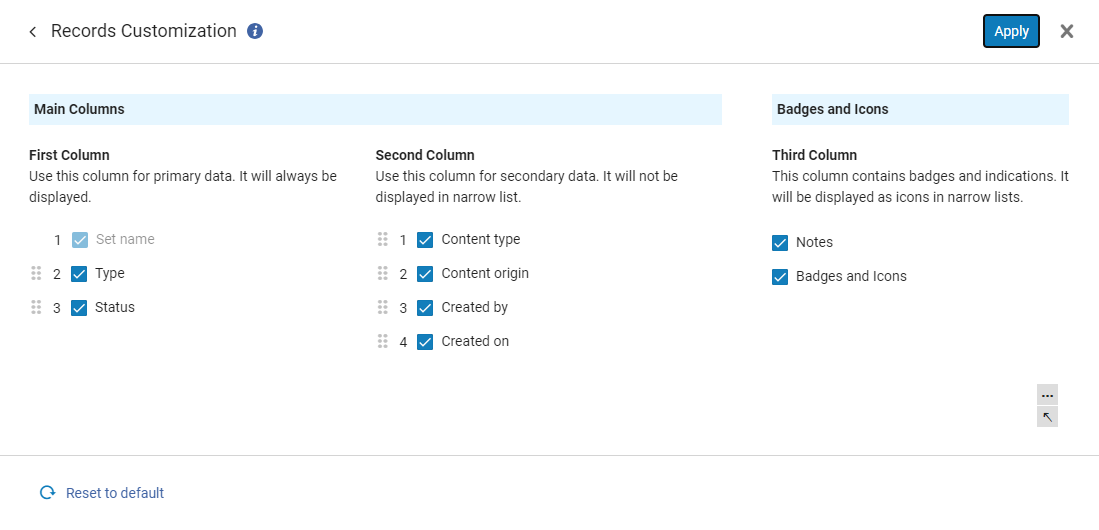
- You can select the fields that are to be displayed or hidden in the UI by selecting () or un-selecting () the field's checkbox. Select Apply when finished.
- You can re-order the Records fields as you want them to appear in the UI. Simply drag and drop the fields in the order of position. Select Apply when finished.
- First Column- fields in this column are always displayed even in narrow lists (when UI screen is re-sized).
- Second Column - fields in this column are of less priority and are not displayed in narrow lists.
- Third Column - fields in this column are always displayed. Nella lista ristretta, vengono visualizzati come icone.
I campi nella personalizzazione dei record possono essere riordinati nella Prima o Seconda colonna. In addition, any field from either column can be moved between the columns.
Fields in the Third column (Badges and Icons) can not be re-ordered, moved, or hidden.
The Set name field in Records Customization can not be hidden or re-ordered. - You can reset the order and appearance back to the default display by selectingReset to default.
- In the Customization sidebar pane options, select Actions Customization.
The Actions Customization options are displayed.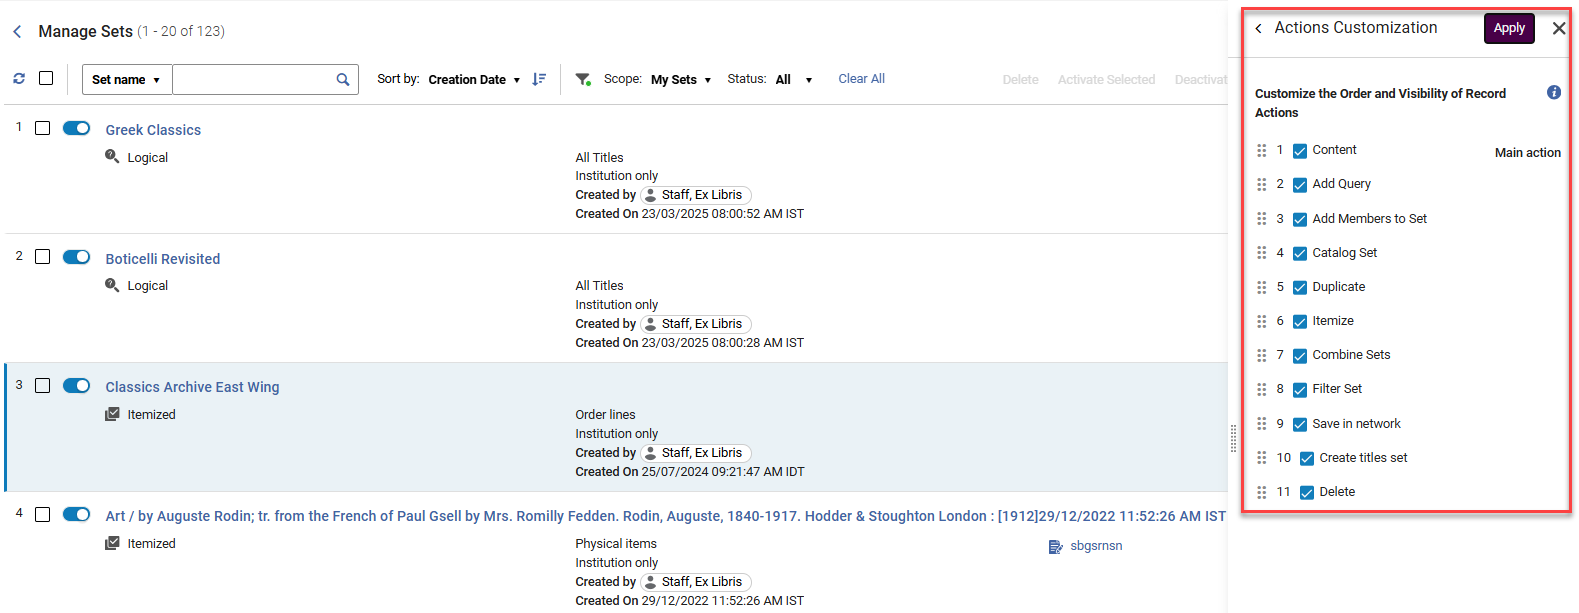
-
You can select the fields that are to be displayed or hidden in the UI by selecting (
) or un-selecting () the field's checkbox.
Select Apply when finished. -
You can re-order the Records fields as you want them to appear in the UI.
Simply drag and drop the fields in the order of position.
Select Apply when finished. -
You can reset the order and appearance back to the default display by selecting
Reset to default.
Quick Access Module
This section describes the Quick Access module on the Manage Sets page. See also New Layout for a general overview of this feature in Alma.
Nidificato sotto i collegamenti nel riquadro a scomparsa Sezioni si trova il modulo Accesso rapido. This module enables users to streamline their search and focus on particular sections, fields, or actions within the details pane (right panel) of the split screen view in the Manage Sets page. Gli utenti possono avviare il modulo tramite due metodi distinti.
To open the Quick Access Module:
- Utilize the keyboard shortcut (period '.')or
- Select the last link labeled Quick Access situated below the links in the Sections slide-out pane.
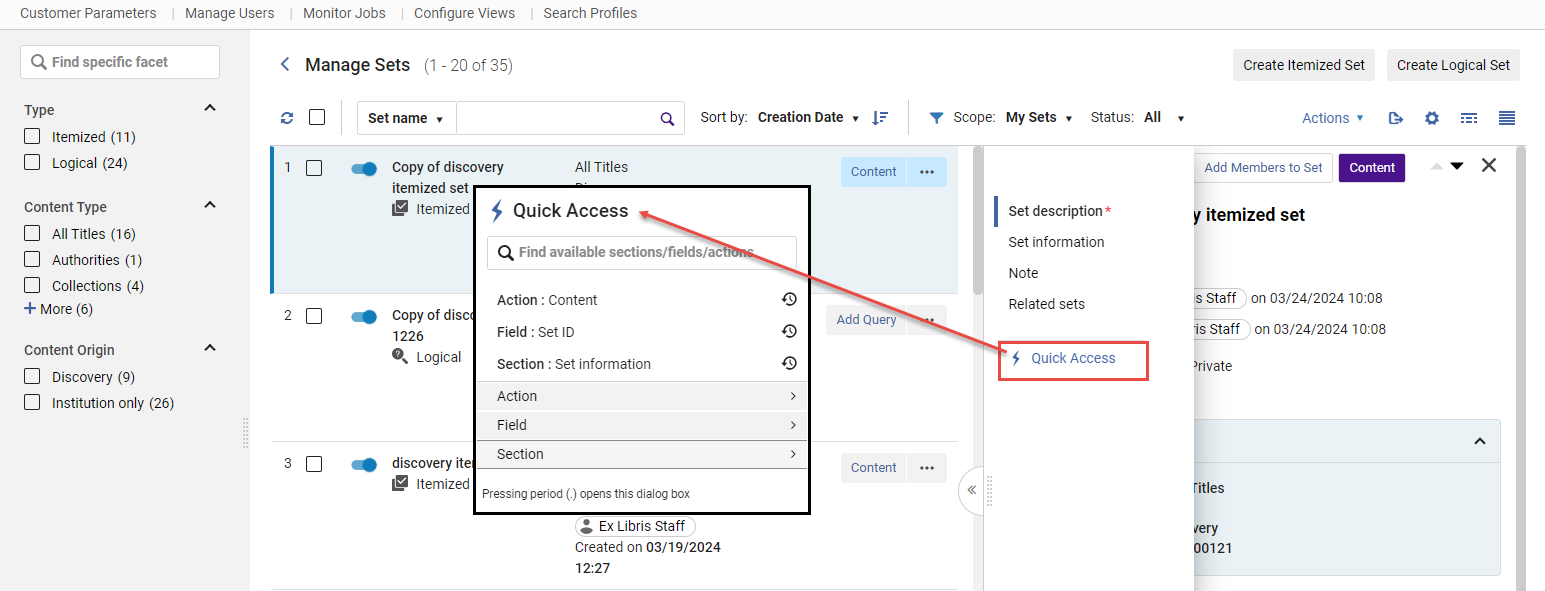
Quick Access Module Options
Depending on the set you have selected in the Manage Sets page, the Action,Field, and Section options displayed in the Quick Access module will differ since they relate to the focused set. If the Quick Access module was previously accessed, the sticky selections chosen (indicated with a icon) are displayed above the Action, Field, and Section menu options.
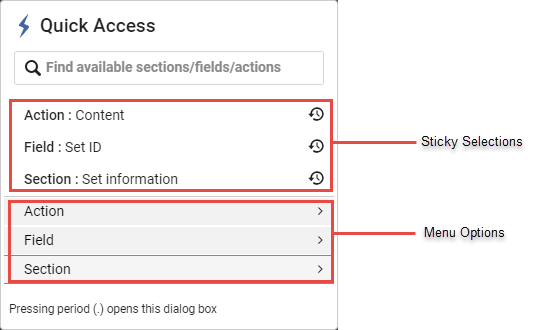
| Menu | Descrizione |
|---|---|
| Azione | Displays the options in the  More actions drop menu for each set. For more information, see Manage Sets Page More Actions Menu. |
| Campo | Collega direttamente al campo specifico nel pannello dei dettagli del Set.
|
| Sezione |
Collega direttamente alla sezione selezionata nel pannello dei dettagli del Set.
|
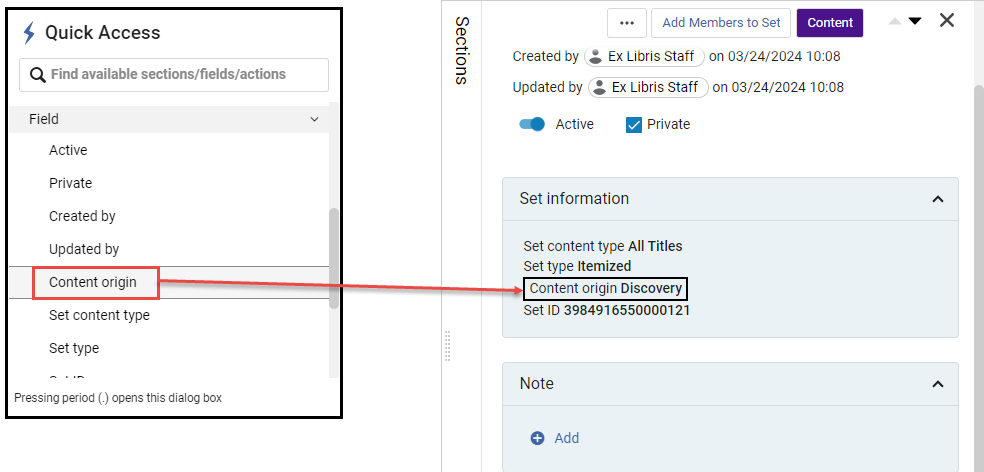
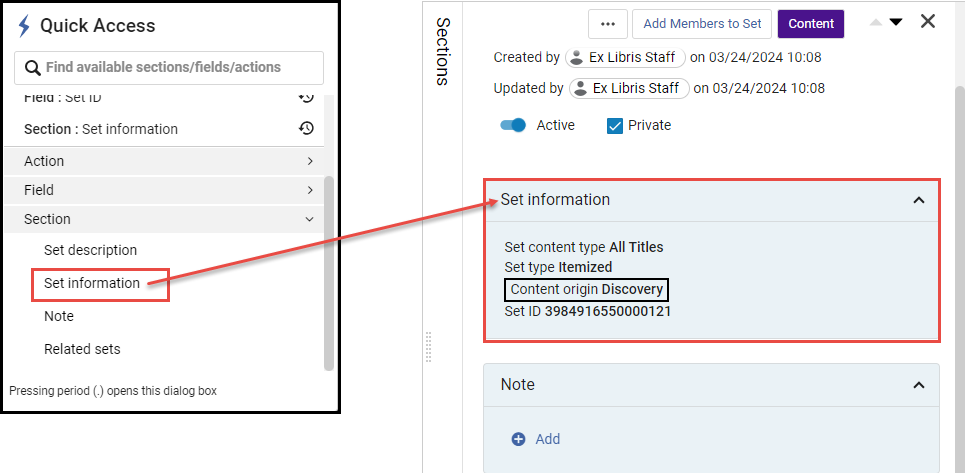
Sections in the Manage Sets Page
For general information on sections see New Layout.
Nella pagina Gestisci Set appaiono le seguenti sezioni:
- Set information - General information for the set.
- Note - See Managing Notes in the Details Pane.
- Related sets - Shows related sets such as filtered, combined, and logical sets that were itemized.
Alma visualizza la ricerca per tutti i Set in base ai tipi di contenuto che utilizzano la nuova UI. Alma visualizza il messaggio "Anteprima ricerca non disponibile" per i Set che utilizzano ricerche basate sulla tecnologia obsoleta.
Labels in the Manage Sets Page
Etichette nella pagina Gestisci Set For more details see Managing Labels in Alma.

Creating Itemized Sets
Un set specificato è una raccolta statica di singoli record nell'Archivio. It can be created on the Manage Sets page, from a search (in areas such as All titles, Physical holdings and - PO Lines). For information about creating a set based on loan status, see Creating an Itemized Set Based on Loan Status. For more information about searches in Alma, see Searching in Alma.
Per i membri dei consorzi, le azioni di set specificati sono disponibili solo quando si effettua una ricerca nell'ambito dell'istituzione (non nell'ambito della rete o combinato).
Creating Itemized Sets on the Manage Sets Page
Nella pagina Gestisci set, è possibile creare ricerche dettagliate da un file, da una ricerca o da Report e statistiche.
To create an itemized set on the Manage Sets page:
- On the Manage Sets page (Admin > Manage Jobs and Sets > Manage Sets), select Create Itemized Set. The Itemized Set Details page opens.
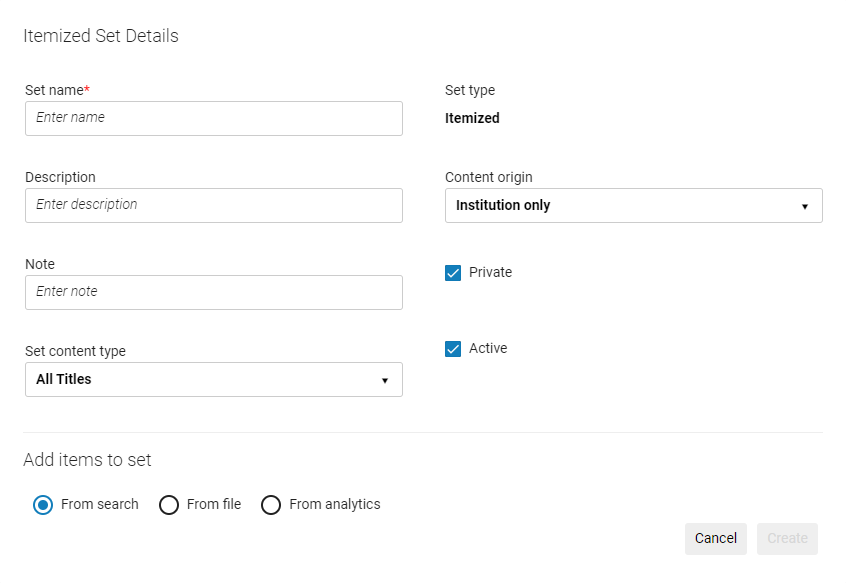
- Enter the set details in the respective fields.Set name is a mandatory field and must be unique.
The set name cannot contain special characters (for example: &, #, (, $, %).
- Facoltativamente, può includere informazioni aggiuntive per il set includendo una descrizione o nota.
- Le opzioni disponibili per Set tipo di contenuto dipendono dalle autorizzazioni di cui dispone, come descritto nella parte superiore di questa pagina.
- By default, the set is designated as a Private() set. Ciò significa che il set è disponibile solo per te e per gli utenti con il ruolo di Gestore dell’archivio. If you unselect the checkbox (), the set becomes a public set and is available to all other users.
- By default, the Status is set to Active (). Optionally, unselect the checkbox () to make the set Inactive. Inactive sets cannot be selected by users when running a manual job.
- Il campo Origine del contenuto indica l'origine del record originario, che è impostato su solo istituzione.
- Aggiunga un record a un set utilizzando uno dei seguenti metodi:
- Dopo aver immesso un nome per il set e definito l'altro campo, selezioni Crea. Si apre una pagina di ricerca, a seconda del tipo di contenuto che ha selezionato.
- Continue with step 9.
- Selezionare un file nella sezione Aggiungi Contenuti da File al Set che contenga l'identificativo (ID MMS, ISSN, ISBN e così via).
Non selezionare Aggiungi membri al set poiché non ha alcuna funzionalità quando si aggiungono record al set caricando un file.
The imported file must be a text file (.txt or .csv and the files must be encoded as UTF-8) or Excel file (.xls or .xlsx).For the data to be read, it must have the correct Header at the top of the column (see Header Types table), for instance, "MMS ID" and not "MMS Id" or "MMS_ID". Se il file Excel ha più di una colonna, utilizza la prima colonna di dati che ha un tipo di intestazione valido. See the Header Types table for acceptable header types. Tutte le altre informazioni nel file sono ignorate.
Creating itemized sets using Network Zone MMSs for Network Zone-managed records is not supported. Instead, Institution Zone MMSs must be used.
The file must not contain any duplicate barcodes. If the file does contain some duplicate barcodes, Alma skips all instances of them (for example, if the same barcode is mentioned twice in the file, Alma skips both instances).
La creazione di un set da file digitali non è supportata.
I Set che hanno PID come intestazioni verranno importati con successo. Tuttavia, a causa di un noto fascicolo, non è possibile vista i membri di questi Set.
Per maggiori informazioni, vedere il video Crea set specificato caricando Elenco di identificativo (1:53 min).
Utenti:
When uploading users to an itemized set with an Excel file, the A1 cell must contain either the code of the identifier type used in the file (see Viewing Additional User Identifier Types) or USERNAME (for the primary ID), and the ensuing cells of the A column must contain the user identifiers. Similarly, when uploading a .txt file, the first row must contain either the code of the identifier type used in the file or USERNAME, and the ensuing rows must contain the user identifiers (each separated by a carriage return). For example, if you want to upload a set of user names (default primary ID), enter the text USERNAME in the top row of your Excel/.txt file, and enter the actual user names in the ensuing cells/rows.
For details on available user identifier types, see Managing User Identifiers.
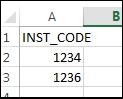
La convalida viene eseguita per i tipi di set Utente, Linea d'ordine e copia fisica. The Add Members to Set job runs and creates a set from the file. È possibile eseguire diverse istanze di questo lavoro in parallelo.
- If you select Add Members to Set after selecting a file, the file is not loaded. Select Confirm in the confirmation dialog box to search the repository for records to include in the set. The records that are then selected, and not those in the file that was previously selected, are included in the set after you select Done.
- Il file Importazione può avere una dimensione massima di 10 MB.
- Se si esegue un'importazione con dati non validi, ogni cella non valida viene ignorata.
- Se si importa un file e poi si modifica il tipo di contenuto, è necessario re-importare il file.
- Continue with step 9.
- Select From analytics. Nota che utilizzando questo metodo non è possibile aggiungere membri (copie, Utenti, ecc.) a un Set esistente. Puoi usare solo Report e statistiche per creare un nuovo Set.
Quando si crea un Set di Report e statistiche, è possibile utilizzare solo i Set istituzionali, non i Set privati.
Vengono visualizzate le seguenti opzioni:
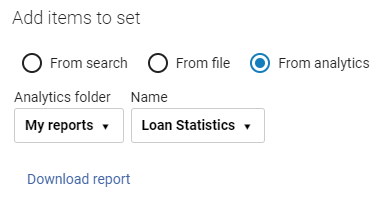
- Select an option from the Analytics folder drop-down list:
- Recent reports – Reports that were recently used in the Manage Sets screen (not recently-created reports in Analytics). Select the report from the Name field. The Name field is populated for recent reports when you have created an itemized set from a report and saved it.
- My Reports – Reports to which you have permissions to access (see Analytics Object List). Select the report from the Name field.
- Questa funzionalità funziona solo con i report, non con le dashboard o le visualizzazioni dati.
- Per il funzionamento di questa funzionalità, i report devono trovarsi in una cartella condivisa.
- I nomi Report non possono contenere caratteri speciali o viene visualizzato un messaggio di errore «Impossibile connettersi ad Analytics».
Select Download Report to download the report.
Similar to when creating an itemized set from a file, the Analytics report must contain a Header(see Header Types) with a valid field for creating the report. Se il report contiene un'intestazione 'Titolo' nella parte superiore del report, deve essere rimossa.
Un processo crea il Set Alma dal report di Report e statistiche.
For a video that describes this feature, see Create a Set from a Report.
- Continue with step 9.
Header Types
Tipo di contenuto Intestazione Prefisso ID When you use the 035 field option in a file (see below), the matching process to build your itemized set uses only 035 $a to create the set. Note that this is different from the matching method used in an advanced search with the Other System Number parameter: it includes the 035 $9, however this field is not accepted when creating an itemized set.
La colonna di intestazione deve contenere un solo valore per ogni riga, cioè un solo identificativo per ogni riga. Ad esempio, se un record MMS ha diversi valori ISSN, solo uno dovrebbe essere incluso nel file importato.
Tutti i titoli - ID MMS
- ISSN (matches on both active and non-active fields (022 $a,z) )
- ISSN_A (matches only on active fields (022 $a) )
- ISBN (matches on both active and non-active fields (020 $a,z)
- ISBN_A (matches only on active fields (020 $a) )
- Numero OCLC
- campo 035
99 Authorities ID MMS 98 Citazioni ID citazione Collezioni PID 81 Corso ID_corso. For more information, see Managing Courses.
File Digitali PID
Quando si crea uno specificato set dal report di analisi, questo è l'IED (non l'ID del report).
13 Titoli Digitali - PIDQuando si crea uno specificato set dal report di analisi, questo è l'IED (non l'ID del report).
- ISSN
- ISBN
- ID MMS
- Numero OCLC
- campo 035
11 Collezioni Elettroniche PID 61 Portfolio elettronici - PID
- ID Portfolio
53 Titoli Elettronici - PID
- ISSN
- ISBN
- ID MMS
- Numero OCLC
- campo 035
51 Linee d'ordine Riferimento della linea d’ordine
PO Line Reference number needs to be the exact and full PO Line Number, such as POL-1234, rather than 1234.
Copie fisiche - copia ID (o PID o copia PID)When creating itemized sets from analytics reports, this is the Physical Item ID (23) (not the bibliographic MMS ID). For more information, see Record Numbers.
- Codice a barre
23 Titoli fisici - PID
Quando si crea uno specificato set dal report di analisi, questo è l'IEP (21) (non l'ID MMS bibliografico). For more information, see Record Numbers.
- ISSN
- ISBN
- ID MMS
- Numero OCLC
- campo 035
21 Copie fisiche - ID Holding
Reading list CODICE_ELENCO_LETTURA Utente - Codice a barre
- Nome utente (ID primario default)
- Identificatore primario
- ID Istituzione
Venditore Codice fornitore - When you are done, select Create.
- Se hai utilizzato il metodo di input del file, il sistema Esegue un processo per costruire il tuo Set che appare nella Lista dei Set al termine. Il numero risultante di record/membri nel set potrebbe essere superiore o inferiore al numero di voci nel file di input. Se, ad esempio, un codice ISBN ha più corrispondenze nel database Alma, tutte le corrispondenze trovate vengono aggiunte come membri al Set; al contrario, se non vengono trovate corrispondenze, non viene aggiunto nulla. Similar to other jobs that are run, you can view the job status/history on the Monitor Jobs page (see Viewing Running Jobs and Viewing Completed Jobs).
- When the Add Members to Set job is run using the file input method, the resulting Job Report will include a Validation File, if the submitted file uses a list of one-to-one identifiers, such as MMS ID, Portfolio ID, Primary ID, etc.
- When the Add Members to Set job is run using identifiers that have the potential for many matches per identifier, there will be no Validation File in the Job Report.
Per i set specificati: se un record è collegato a un'istituzione di rete e viene visualizzato al clic sul contenuto, l'icona "Network" non è cliccabile.
Creating Itemized Sets from Search Results
Nella pagina dei risultati della Ricerca è possibile selezionare copie specifiche e quindi creare un set specificato che includa tali copie. For adding items to an existing set, see Editing Itemized Sets. See also Searching in Alma.
Attualmente questa funzione è supportata per Tutti i titoli. In futuro, verranno aggiunte altre ricerche.
To create an itemized set on the search results page:
- On the search results page, select the items to add to the set.
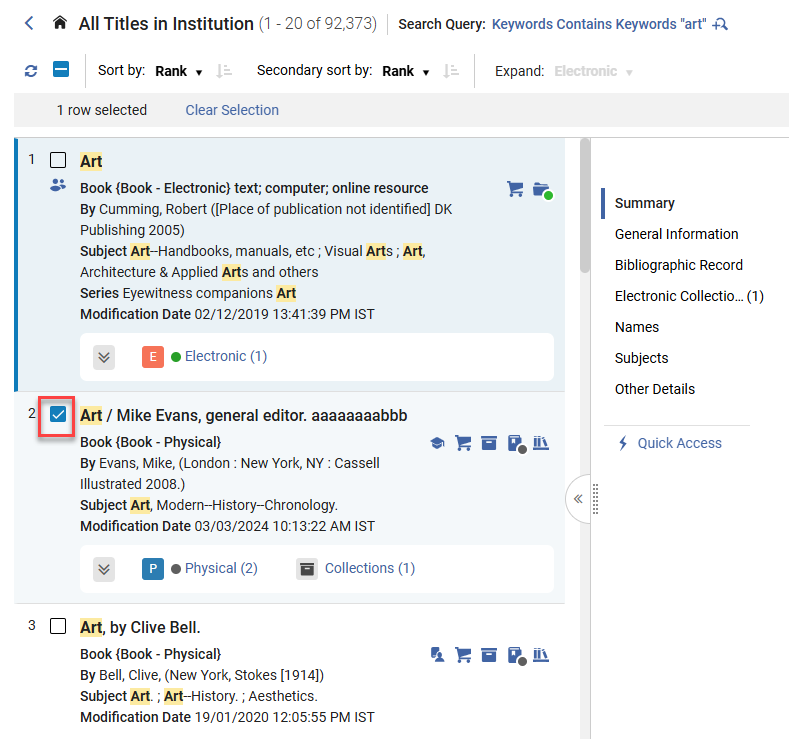
Pagina dei dettagli del set specificato
-
Select the Create Itemized Set button.
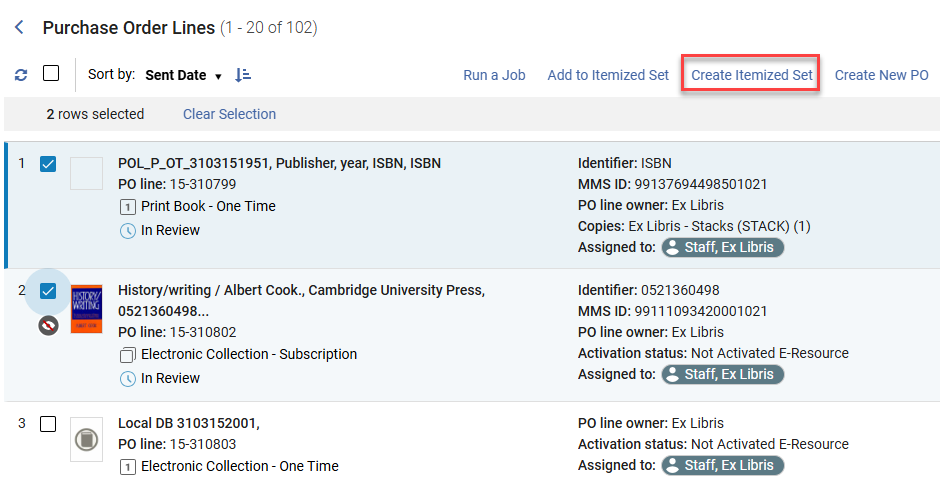
-
Enter the set details in the respective fields.Set name is a mandatory field and must be unique.
The set name cannot contain special characters (for example: &, #, (, $, %).
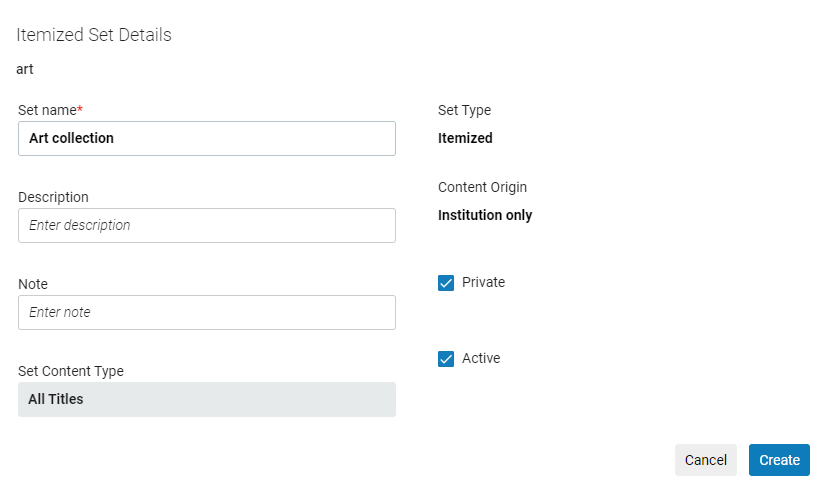
-
Facoltativamente, può includere informazioni aggiuntive per il set includendo una descrizione o nota.
-
Le opzioni disponibili per Set tipo di contenuto dipendono dalle autorizzazioni di cui dispone, come descritto nella parte superiore di questa pagina.
-
By default, the set is designated as a Private(
) set. Ciò significa che il set è disponibile solo per te e per gli utenti con il ruolo di Gestore dell’archivio. If you unselect the checkbox (), the set becomes a public set and is available to all other users. -
By default, the Status is set to Active(
). Optionally, unselect the checkbox () to make the set Inactive. Inactive sets cannot be selected by users when running a manual job. -
Il campo Origine del contenuto indica l'origine del record originario, che è impostato su solo istituzione.
-
Quando ha finito, selezioni Crea.
-
Se hai utilizzato il metodo di input del file, il sistema Esegue un processo per costruire il tuo Set che appare nella Lista dei Set al termine. Il numero risultante di record/membri nel set potrebbe essere superiore o inferiore al numero di voci nel file di input. Se, ad esempio, un codice ISBN ha più corrispondenze nel database Alma, tutte le corrispondenze trovate vengono aggiunte come membri al Set; al contrario, se non vengono trovate corrispondenze, non viene aggiunto nulla. Similar to other jobs that are run, you can view the job status/history on the Monitor Jobs page (see Viewing Running Jobs and Viewing Completed Jobs).
Per i set specificati: se un record è collegato a un'istituzione di rete e viene visualizzato al clic sul contenuto, l'icona "Network" non è cliccabile.
Creating Itemized Sets from PO Lines
È possibile selezionare Linee d'ordine (POL) specifiche nella Lista delle Linee d'ordine (POL) e quindi creare un set specificato che le includa. To add PO lines to an existing set, see Adding PO Lines to an Itemized Set.
To create an itemized set on the search results page:
- In the list of PO lines, select the PO line/s to use for creating a set.
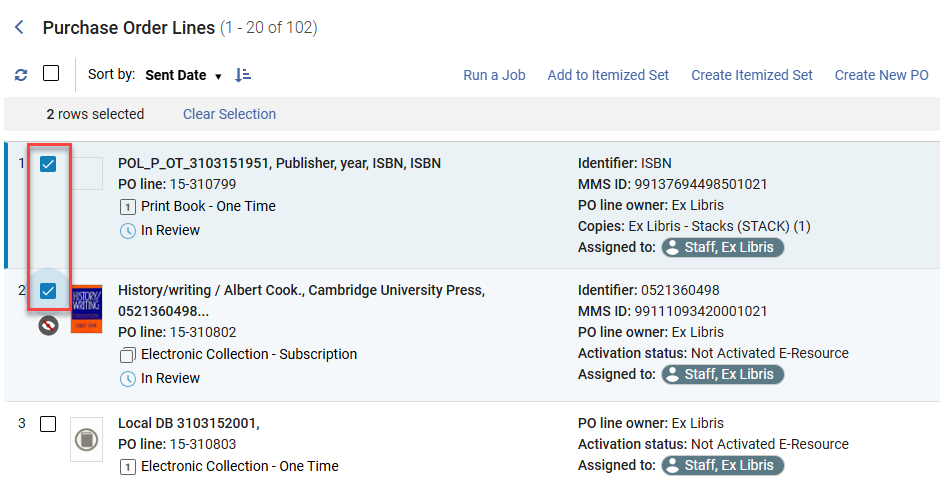
- Select the Create Itemized Set button.
- Enter the set details in the respective fields.Set name is a mandatory field and must be unique.
The set name cannot contain special characters (for example: &, #, (, $, %).
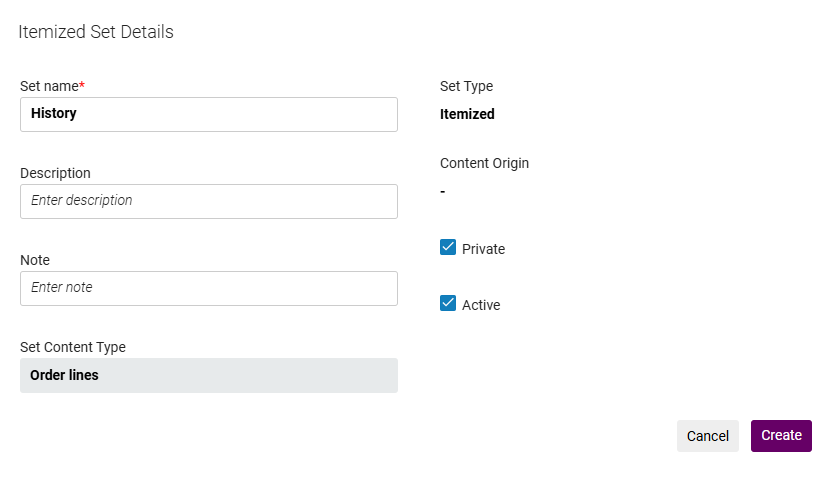
- Facoltativamente, può includere informazioni aggiuntive per il set includendo una descrizione o nota.
- By default, the set is designated as a Private() set. Ciò significa che il set è disponibile solo per te e per gli utenti con il ruolo di Gestore dell’archivio. If you unselect the checkbox (), the set becomes a public set and is available to all other users.
- By default, the Status is set to Active(). Optionally, unselect the checkbox () to make the set Inactive. Inactive sets cannot be selected by users when running a manual job.
- Il campo Origine del contenuto indica l'origine del record originale.
- Quando hai finito, seleziona Crea.
Set di Gestione Risorse
Per un set di gestione delle risorse (un titolo, un'autorità, una raccolta o un qualche tipo di inventario), si apre una pagina di ricerca generica. Cerca il contenuto che desidera aggiungere al Set utilizzando la ricerca semplice o la ricerca avanzata. La pagina si aggiorna per mostrare i risultati della ricerca. For more information, see Searching in Alma.
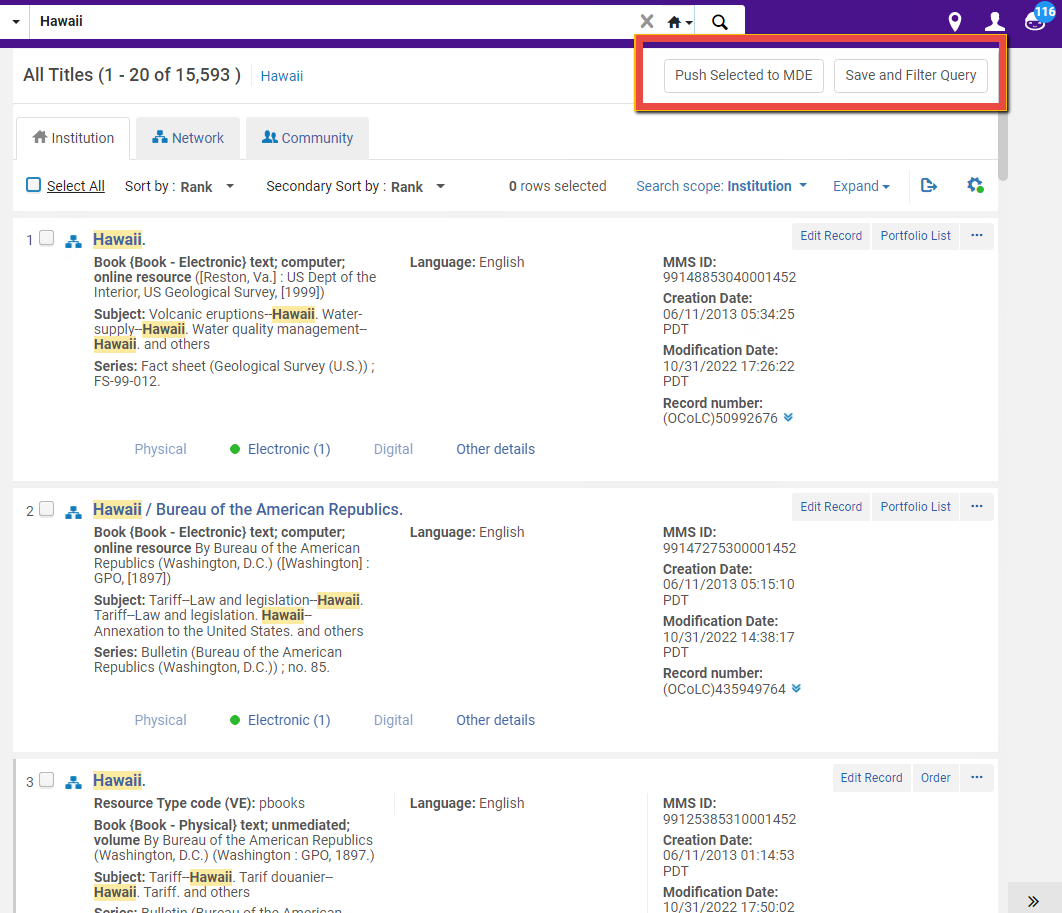
Selezioni la copia che desidera includere nel Set e selezioni Salva e Filtra ricerca. I record selezionati sono aggiunti al Set. If the number of items is large, a Manage set members job is run to add the items to the set; to see the results, see Viewing Completed Jobs.
Se si esegue una ricerca Tutti i titoli, è possibile aggiungere tutti gli elementi su tutte le pagine dei risultati: selezionare Seleziona tutto e selezionare Conferma nella finestra di dialogo di conferma.
Per i set specificati, è possibile continuare a cercare, selezionare e aggiungere record; per i set logici, la query di ricerca corrente definisce il set. Quando hai finito, seleziona Fine. Il set specificato è stato salvato. La pagina Gestisci set si apre con il Set nuovo o aggiornato.
Set di lettura della lista
For a reading list set, a search page appears, with a search for reading lists pre-selected; see Resource Management Sets for more information.
Order Line Sets
For an Order-line set, a search page appears, with a search for PO lines pre-selected; see Resource Management Sets for more information.
Set del Fornitore
Per un Set di Fornitori, si apre la pagina Ricerca Fornitori.
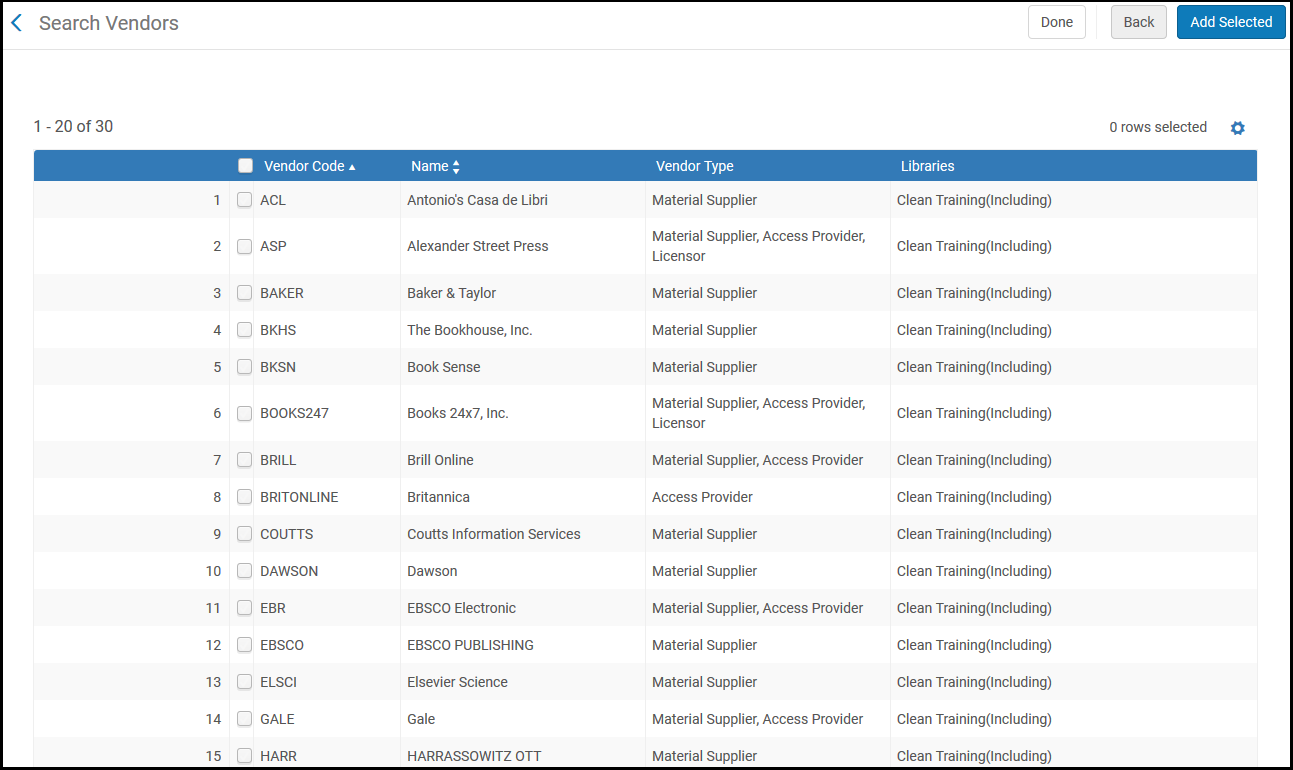
Selezioni la copia che desidera includere nel set e selezioni Aggiungi selezionata. I record selezionati sono aggiunti al Set.
Per i set specificati, è possibile continuare a cercare, selezionare e aggiungere record; per i set logici, la query di ricerca corrente definisce il set. Quando hai finito, seleziona Fine. Il set specificato è stato salvato. La pagina Gestisci set si apre con il Set nuovo o aggiornato.
Set di Utenti
Per un Set Utente, si apre la pagina Trova e Gestisci Utente.
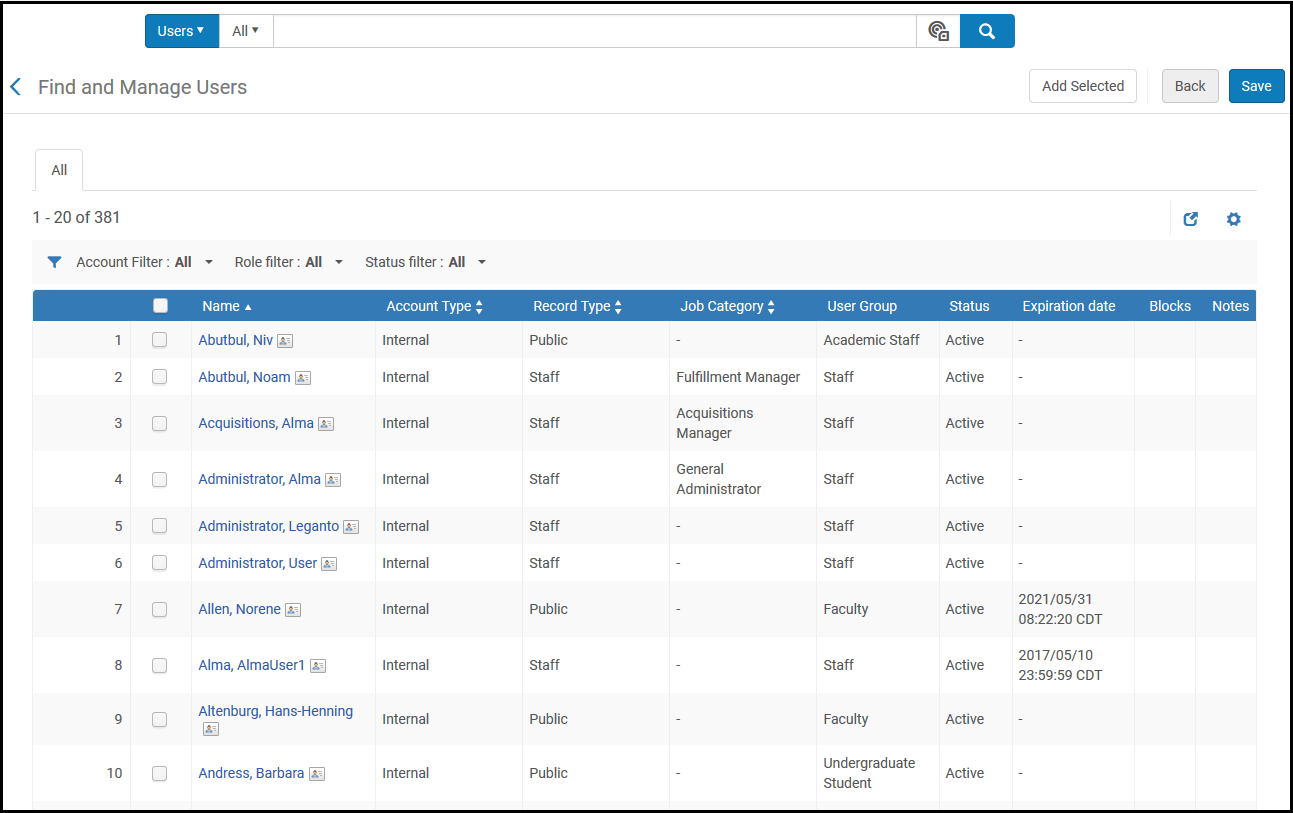
Selezioni la copia che desidera includere nel set e selezioni Aggiungi selezionata. I record selezionati sono aggiunti al Set.
Per i set specificati, è possibile continuare a cercare, selezionare e aggiungere record; per i set logici, la query di ricerca corrente definisce il set. Quando hai finito, seleziona Fine. Il set specificato è stato salvato. La pagina Gestisci set si apre con il Set nuovo o aggiornato.
Esploro Sets
Le opzioni per creare un set Esploro vengono visualizzate solo se la Sua istituzione è abilitata per Esploro. See Esploro Overview.
Researcher Sets
Si apre la pagina Trova e gestisci ricercatori. See Managing Researchers.
Selezioni la copia che desidera includere nel set e selezioni Aggiungi selezionata. I record selezionati sono aggiunti al Set.
Per i set specificati, è possibile continuare a cercare, selezionare e aggiungere record; per i set logici, la query di ricerca corrente definisce il set. Quando hai finito, seleziona Fine. Il set specificato è stato salvato. La pagina Gestisci set si apre con il Set nuovo o aggiornato.
Research Asset Sets
Si apre una pagina di ricerca generica che consente di cercare le risorse di ricerca. Cerca il contenuto che desidera aggiungere al Set utilizzando la ricerca semplice o la ricerca avanzata. La pagina si aggiorna per mostrare i risultati della ricerca. For more information, see Managing Research Assets.
Selezioni la copia che desidera includere nel set e selezioni Aggiungi selezionata. The selected assets are added to the set. If the number of items is large, a Manage set members job is run to add the assets to the set; to see the results, see Viewing Completed Jobs.
For itemized sets, you can continue searching, selecting, and adding assets; for logical sets, your current search query defines the set. Quando hai finito, seleziona Fine. Il set specificato è stato salvato. La pagina Gestisci set si apre con il Set nuovo o aggiornato.
Creating an Itemized Set Based on Loan Status
Un Amministratore di Servizi o un operatore richiesto può creare un set specificato di copie fisiche in base al proprio stato del prestito. Questo viene fatto nella pagina Gestisci set di servizi.
Solo i prestiti attivi possono essere inclusi in questo tipo di set.
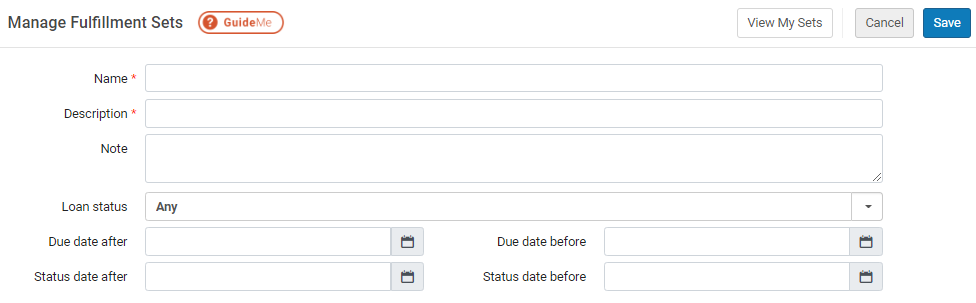
To create itemized physical-item sets based on their loan status:
- On the Manage Fulfillment Sets page (Fulfillment > Advanced Tools - General > Create Fulfillment Sets), fill in the fields as follows:
Gestisci campi pagina Set di Servizi
Campo Descrizione Nome (Obbligatorio) Nome del set. Description (Required) Descrizione del set. nota Nota sul Set. Data scadenza dopo Le copie prestate con una data di scadenza successiva alla data indicata sono incluse nel Set. Data di scadenza prima Sono incluse nel set le copie prestate con scadenza antecedente alla data indicata. Status date after Loaned items whose status has changed after the indicated date are included in the set. Status date before Loaned items whose status has changed before the indicated date are included in the set. Status del prestito Loaned items whose status matches the indicated status are included in the set. I valori possibili sono: - Normale
- Richiamato
- Rinnovato
- Smarrito
- Dichiara restituito
- Qualsiasi
- Seleziona Salva. The set is saved and the fields on the Manage Fulfillment Sets page are cleared, enabling you to create another fulfillment set.
Seleziona Vista i miei Set per aprire la pagina Gestisci set.
Viewing and Removing Members of Itemized Sets
È possibile visualizzare o rimuovere i membri (copia selezionata) in un set specificato.
To view members of an itemized set:
- On the Manage Sets page (Admin > Manage Jobs and Sets > Manage Sets), find the set and select Content in the row actions list. A list of members is displayed:
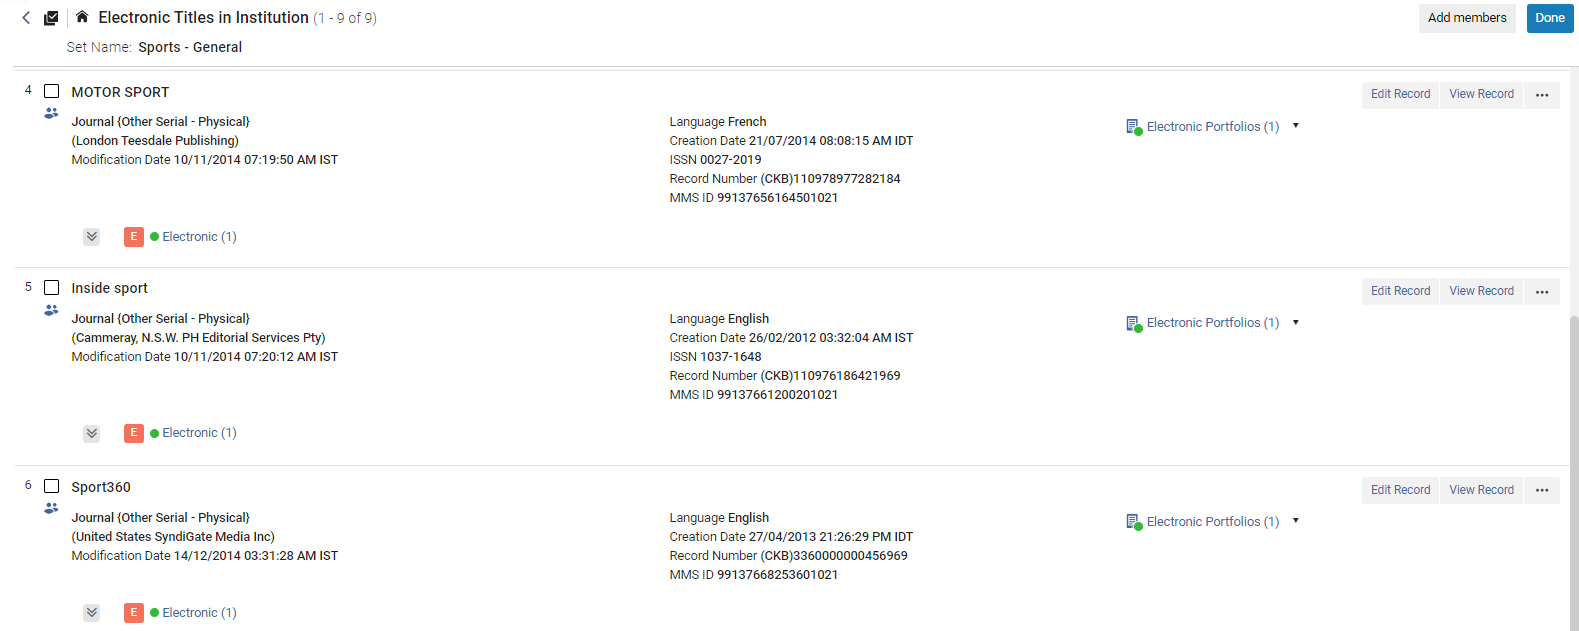
You can also view items in a set by selecting the View Set button when adding members to an itemized set (see Add items to an itemized set).
To remove one or more members of an itemized set:
- Visualizza membri.
- Per più membri – seleziona i membri che desideri rimuovere e seleziona Rimuovi dal set.
- Per un membro – selezionare Rimuovi nella lista azioni di riga.
- Seleziona Fine. When removing members from a set, selecting Done or using the Back button saves the changes.
Another way to remove records is to create a set of unwanted records, then use the Combine Sets operation (see Combining Sets) with the 'Not' operator.
Editing Itemized Sets
È possibile modificare i dettagli del Set come descritto di seguito.
To edit the set details:
- On the Manage Sets page (Admin > Manage Jobs and Sets > Manage Sets), scroll to the itemized set you want to edit and select it. The Set Details are displayed in a split screen.
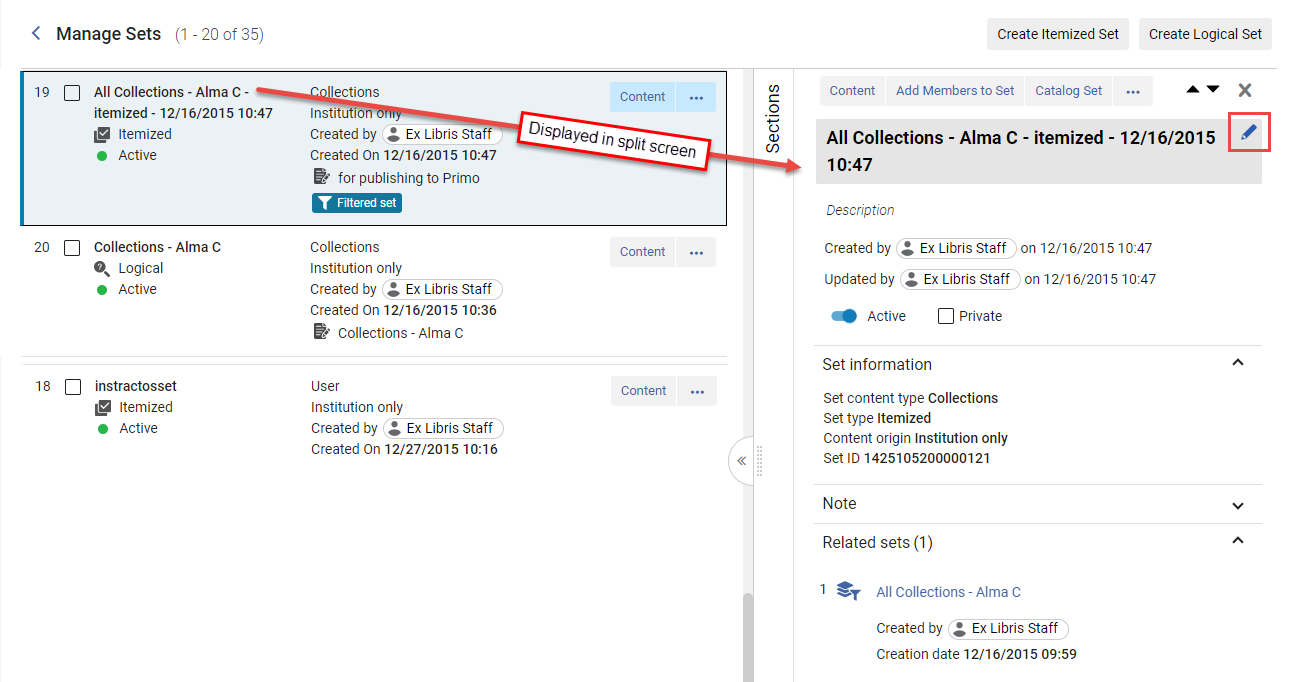
- In the split screen, hover over the section to edit and select the Edit icon (
 ). Modifica i dettagli del set come richiesto. The Set name is a mandatory field and must be unique (see Adding Itemized Sets for a description of the fields).
- When you navigate away from the section you updated, Alma saves your changes with the following indication (
 ).
Adding Items to Itemized Sets
Adding Items to Sets from Manage Sets
To add items to an itemized set from the Manage Sets page:
- On the Manage Sets page (Admin > Manage Jobs and Sets > Manage Sets), scroll to the itemized set to which you want to add items and select the Content button. The Edit page opens. In alternativa, è possibile selezionare Aggiungi membri al Set dal menu Azione di riga o dal pannello dei dettagli, e quindi immettere i parametri di Ricerca come indicato nel passaggio 3 di seguito.
- Select Add members and enter the search query.
- Enter the search parameters and select Search.
- Select the items you want to be included in the set and select Add selected, or select Select All.
- Select View Set to view the new set content. From here you can add new members to the set by selecting Add members or exit to the Manage Sets page by selecting Done.
Adding Items to Sets from All Titles
To add items to an itemized set from the All Titles search results page:
- On the All Titles search results page, select the items to add.
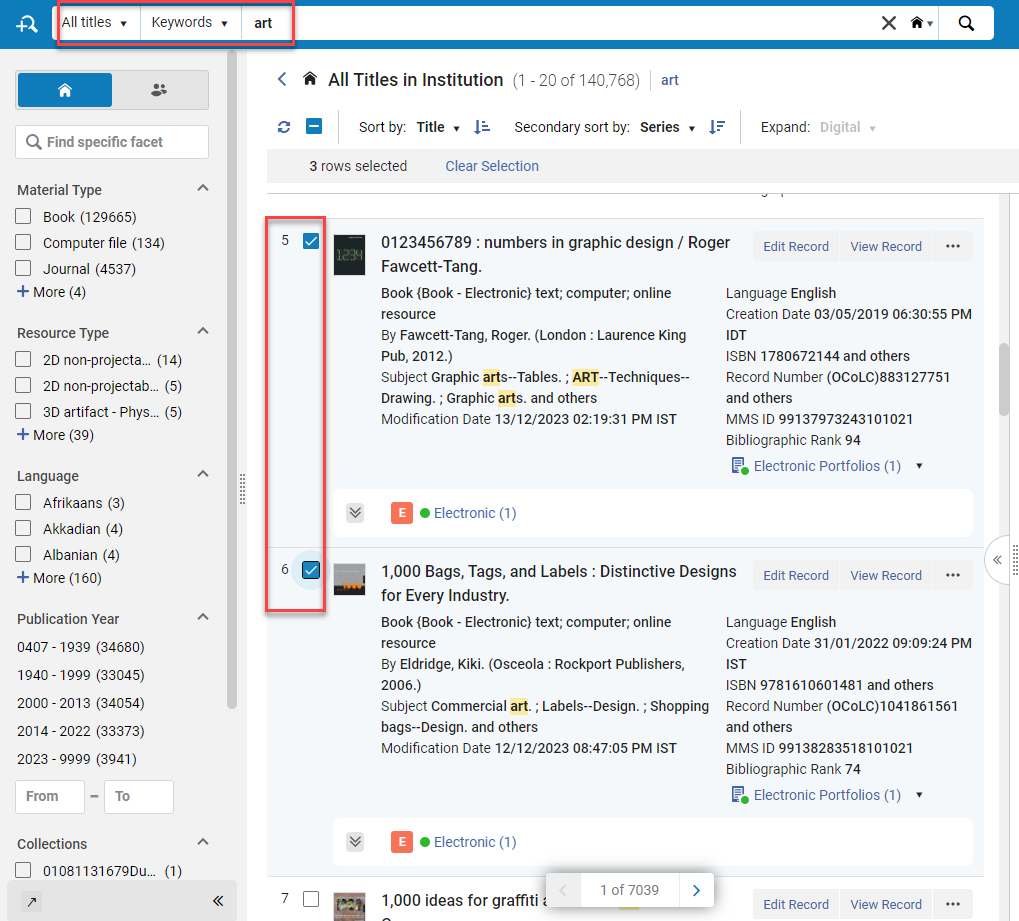
- Select the Add to Itemized Set button.

- Select the set to which you want to add the item/s and then the Select button.
Adding PO Lines to Sets
È possibile aggiungere righe PO per impostare i set specificati dall'elenco delle righe PO. To create itemized sets from PO lines, see Creating Itemized Sets from PO Lines.
To add PO lines to an itemized set from the PO lines task list:
- In the list of PO lines, select the PO line/s to add to the set.
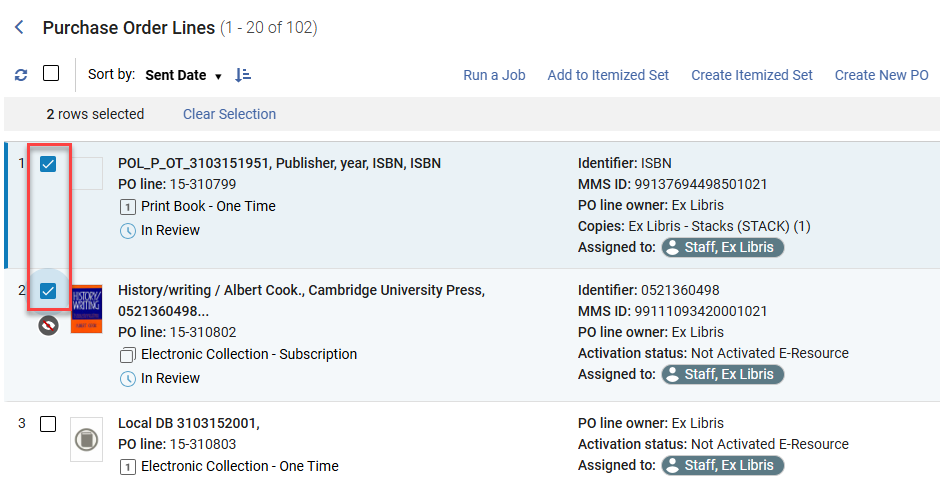
- Select the Add to Itemized Set button.

- Select the set to which you want to add the item/s and then the Select button.
Identifying Records Matching to Alma Records Based on Itemized Set
Institutions often get a list of record identifiers used in external systems (e.g. in a vendor system). You load this list to Alma and easily get a list of what you already have in Alma and what you don't have in Alma, in order to facilitate your purchasing decisions.
To get a list of records matching / not matching the Alma records:
- Load your input file of identifiers into Alma (see Creating Itemized Sets). Alma runs a job to create the set and produces the Add Members to Set report.
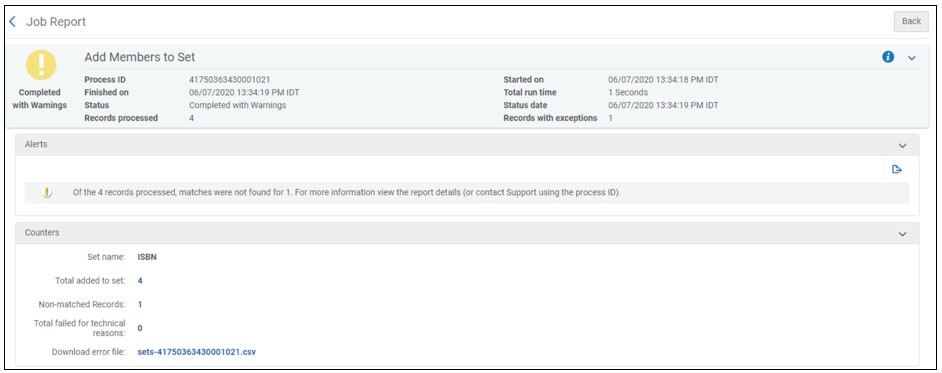
- Effettua una delle seguenti operazioni:
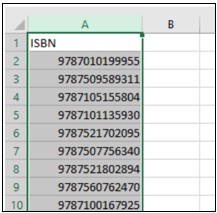
- To download a file of records for which a match was not found with Alma records, click the counter for Non-matched Records to download a .csv file of identifiers for which a match was not found with Alma records, for example:
- To download a file of records matching Alma records, click the counter for Total added to set to download a .csv file of identifiers for which a match was found with Alma records. The file features an additional column that indicates the ID of the records for which a match was found, for example:
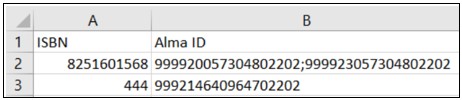
The file provides the following Alma ID for each set content type:Set tipo di contenuto ID Alma Collezioni PID File Digitali PID Collezioni Elettroniche PID Portfolio elettronici PID Copie fisiche Codice a barre POL Numero POL Reading List Codice Reading List Titoli ID MMS Utente ID primario Fornitori Codice fornitore
Creating Logical Sets
Per i Set di Archivio, un set logico è lo stesso di una ricerca salvata: le copie in un set logico vengono determinate ogni volta eseguendo la ricerca. For other kinds of sets, a logical set is created by filtering the results on the search page.
I set logici possono essere creati anche da una ricerca. For more information, see Saving and Reusing Search Queries.
To create a logical set:
- On the Manage Sets page (Admin > Manage Jobs and Sets > Manage Sets), select the Create Logical Set button. The Set Details page opens.
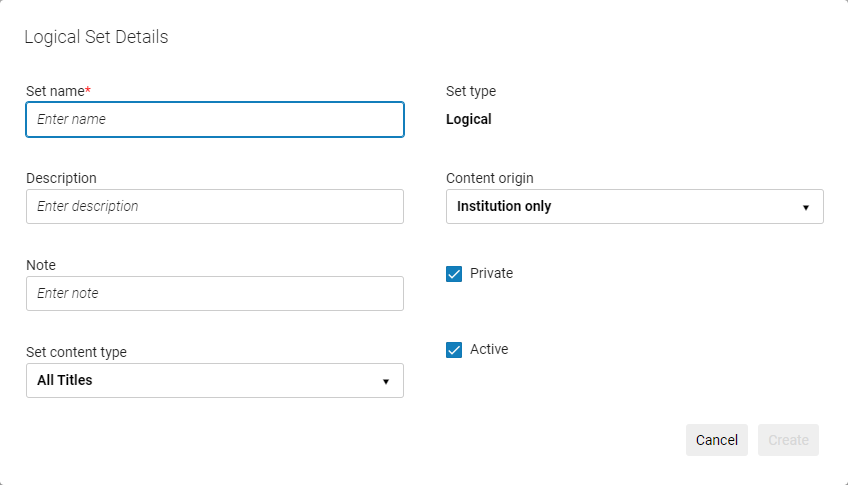
- Inserisca i dettagli del set nel rispettivo campo. Note that the Set name is a mandatory field and must be unique.
The set name cannot contain special characters (for example: &, #, (, $, %).
- Le opzioni disponibili per Set tipo di contenuto dipendono dalle autorizzazioni di cui dispone, come descritto nella parte superiore di questa pagina.
- By default, the set is designated as a Private() set. Ciò significa che il set è disponibile solo per te e per gli utenti con il ruolo di Gestore dell’archivio. If you unselect the checkbox (), the set becomes a public set and is available to all other users.
- By default, the Status is set to Active(). Optionally, unselect the checkbox () to make the set Inactive. Inactive sets cannot be selected by users when running a manual job.
- Il campo Origine del contenuto indica l'origine del record originario, che è impostato su solo istituzione.
- Seleziona Crea. A search page opens for the content type you selected.
- For repository sets, enter the search parameters for the set. Note that the suppression parameter in repository searches only considers suppression done via the Metadata Editor, not suppression configured by location. For other kinds of sets, filter the list to determine the parameters for the set.
It is recommended not to use Keywords contains * as a basis for a logical set. A term such as Tag Suppressed (Title) equals "No" is more efficient.
- Seleziona Salva. Il set logico è stato salvato.
Editing Logical Set Details
È possibile modificare i dettagli del set logico. To change the set contents, see Editing Logical Set Queries.
To edit a logical set:
- On the Manage Sets page (Admin > Manage Jobs and Sets > Manage Sets), scroll to the logical set you want to edit and select it. The Set Details are displayed in a split screen.
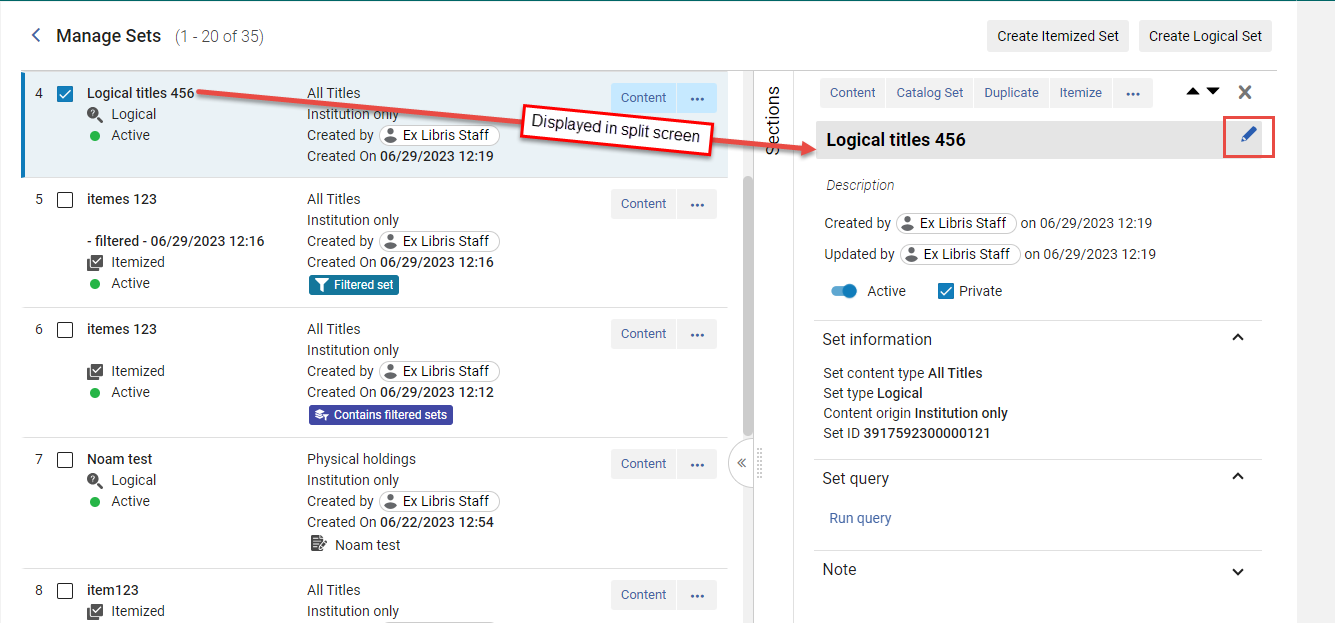
- In the split screen, hover over the section to edit and select the Edit icon (). Modifica i dettagli del set come richiesto. Il nome del set è un campo obbligatorio e deve essere univoco. (See Creating Logical Sets for a description of the fields).
- When you navigate away from the section you updated, Alma saves your changes with the following Saved indication ().
Viewing the Content of Logical Sets
È possibile visualizzare il contenuto di un set logico (ovvero, i record restituiti quando si esegue una ricerca utilizzando il set logico). La popolazione di un set logico è determinata dinamicamente, riflettendo il record attualmente presente nell'Archivio.
To view the content of a logical set, on the Manage Sets page (Admin > Manage Jobs and Sets > Manage Sets), scroll to the logical set whose content you want to view and select Content. Si apre una pagina di ricerca a seconda del tipo di contenuto:
Modifica query set logici
È possibile modificare il set logico di ricerca.
To edit resource management logical set queries:
- On the Manage Sets page (Admin > Manage Jobs and Sets > Manage Sets), scroll to the logical set whose query you want to edit and select the Content button. Si apre la pagina di Ricerca per la ricerca.
- Change the search as required.

- Per salvare il set, selezioni Salva e poi Conferma.
- You can also save the set under a new name - see Create a New Set from an Existing Logical Set Query.
Create a New Set from an Existing Logical Set Query
È possibile creare un nuovo set da un set logico di ricerca esistente.
To create a new set from an existing logical set query:
- On the Manage Sets page (Admin > Manage Jobs and Sets > Manage Sets), scroll to the logical set whose query you want to use as the basis for the new set.
- Select the Content button. Si apre la pagina di Ricerca per la ricerca.
- Se necessario, modificare la query di Ricerca e/o le Faccette.
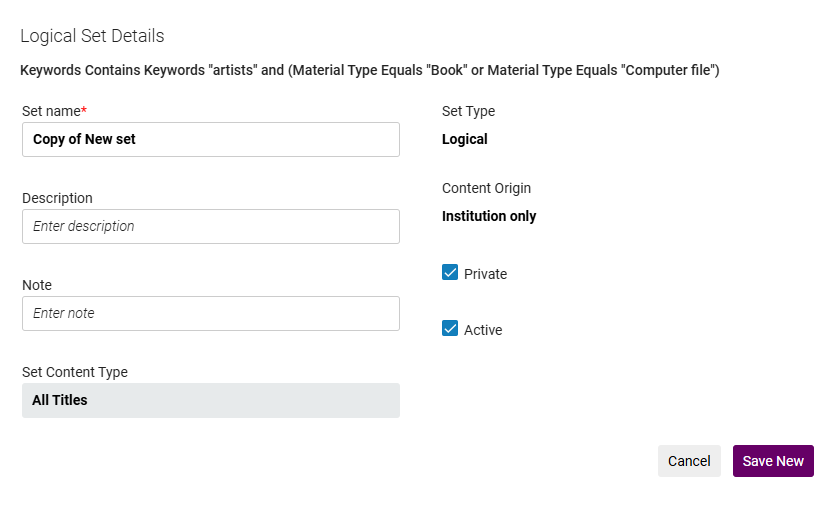
- Select the Save as New button.
- Update the Logical Set Details and select Save New.
Conversione del set logico nel set specificato
Se si dispone di un set perfetto di risultati in un set logico, è possibile acquisirlo come set specificato. Questo mantiene il tuo set logico originale e crea uno snapshot dei risultati attuali come un nuovo set specificato.
To convert a logical set to an itemized set:
- On the Manage Sets page (Admin > Manage Jobs and Sets > Manage Sets), scroll to the logical set that you want to convert to an itemized set and select Itemize in the row actions list. The New Itemized Set page opens with the set name filled in:
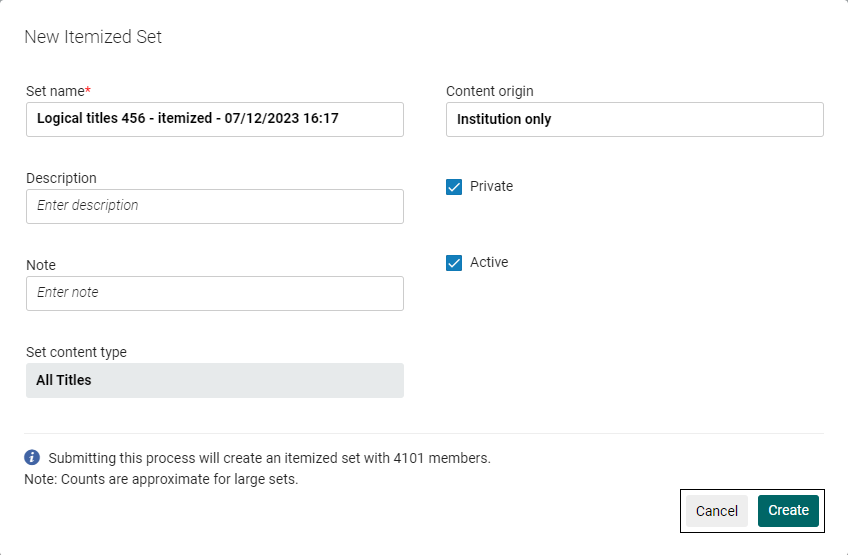
- Modifica i dettagli del set come richiesto. See Creating Itemized Sets for a description of the fields.
- Seleziona Crea. A confirmation message opens.
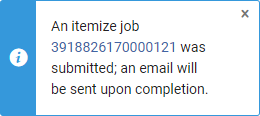
- Viene creato il set specificato. It also appears in the Related sets section of the original logical set. The original logical set appears in the Related sets section of the itemized set (see Sections in the Manage Sets Page).
Combining Sets
È possibile creare un nuovo set basato sui membri di due set esistenti, purché i set siano dello stesso tipo (ad esempio, due set 'Tutti Ricerca per titolo' o due set 'Fisico Ricerca per titolo', ma non un set 'Tutti Titolo' e un set 'Fisico Titolo'). L'insieme combinato è un insieme specificato.
You need the Repository Manager role to see the combined results of sets made by other users.
For more information on Combining Sets, see the Combine Two Sets of Items video (3:42 mins).
- On the Manage Sets page (Admin > Manage Jobs and Sets > Manage Sets), scroll to the set whose members you want to combine with another set and select Combine Sets in the row actions list. The Combine Sets page opens.
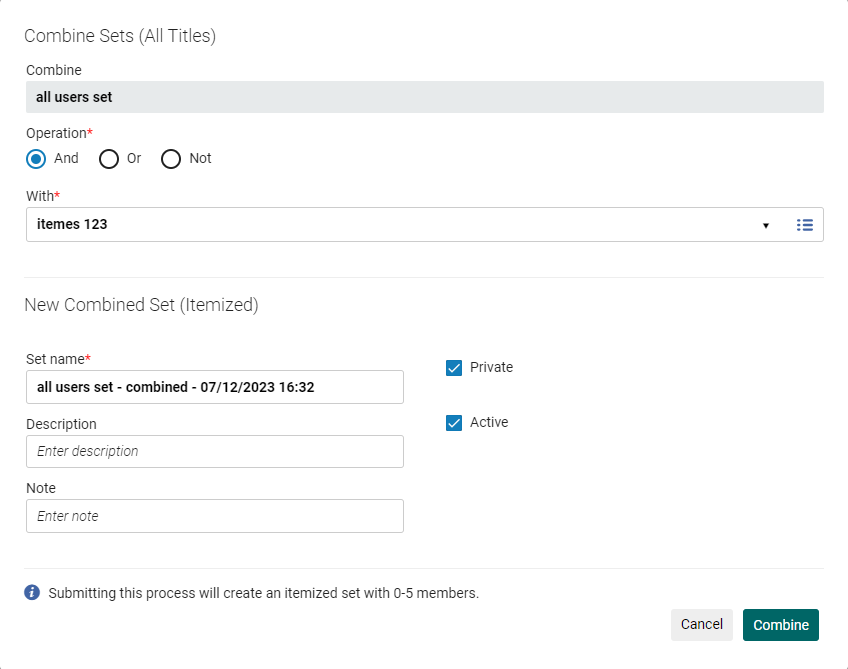
- Selezionare un'operazione dalla Lista delle operazioni:
- E – Includa solo i membri in comune tra i due set nel nuovo set combinato.
- Non – Includa solo i membri che si trovano nel primo set e non nel secondo set nel nuovo set combinato.
- Oppure – includi tutti i membri di entrambi i set nel nuovo set combinato.
- In Con, seleziona il set che desideri combinare con il primo set selezionato.
- Nel campo Nome Set, digitare un nome per il Set combinato oppure utilizzare il nome default di Alma.
- Select the Combine button. A confirmation message is displayed.
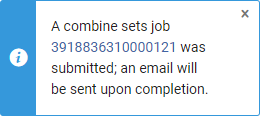
A job is run to combine the sets. After the job finishes, the new set is added to the list of sets (you must refresh the list to see the new set).
- Combined sets appear in the Related sets section (see Sections on the Manage Sets Page).
- The following badges are displayed on the combined sets:
- Combined set- The new combined set
- Used for combined sets- The original sets that were used to create the combined set
Combining Sets - Example
Di seguito è riportato un esempio di combinazione di set per creare un set come
X e Y
To create this set:
- Crei il set X e il set Y.
- Per il Set X, selezioni Combina Set nelle azioni di riga Lista.
- Combine set X with set Y:
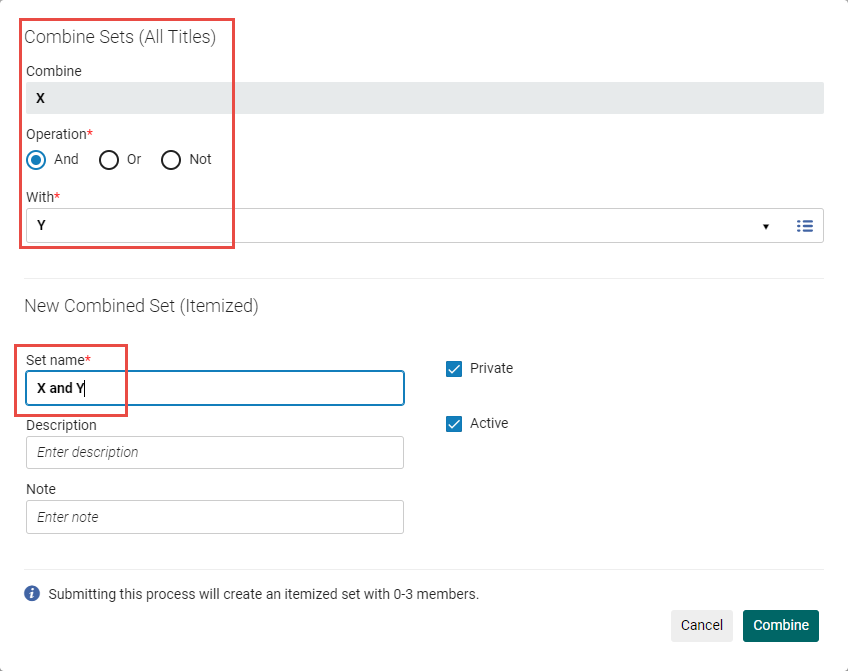
- Il nuovo Set combinato è ora disponibile.
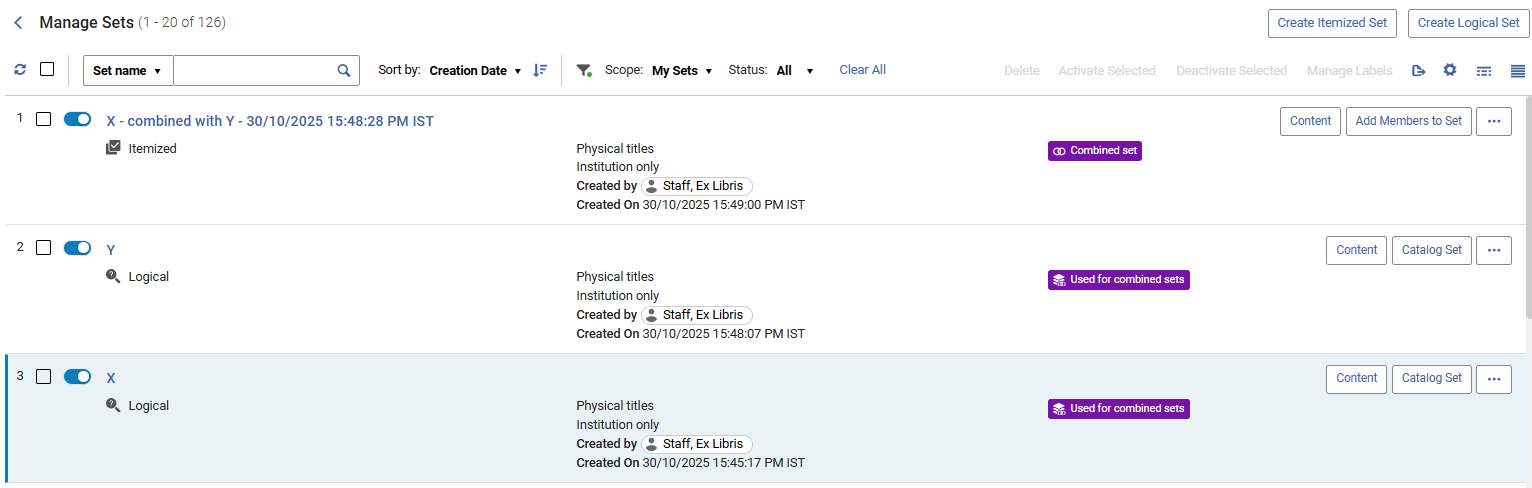
(New for February 2026) The new combined set receives an icon to indicate that it is a Combined set, and the sets used to create it are marked as Used for combined sets.
Creating a Titles Set from an Items, Portfolios, or Files Set
Un Set di Titoli è un insieme di record bibliografici, a differenza di un insieme di record di Inventory, come copie fisiche, portafogli elettronici o file digitali. È possibile creare un Set di Titoli da un set specificato di copie fisiche, portafogli elettronici o file digitali. Il nuovo Set include i Titoli delle copie del Set originale.
- I set di titoli possono essere creati solo dai tipi di contenuto di Gestione risorse.
- Per creare un set di titoli da un set logico, è necessario prima convertire il set in un set specificato.
To create title sets:
- On the Manage Sets page (Admin > Manage Jobs and Sets > Manage Sets), select Create title set in the row actions list for an itemized set of physical items, electronic portfolios, or digital files. The Create Titles Set (Itemized) page opens with information concerning the new title set - such as the date and time that the set was created - added to the set name.
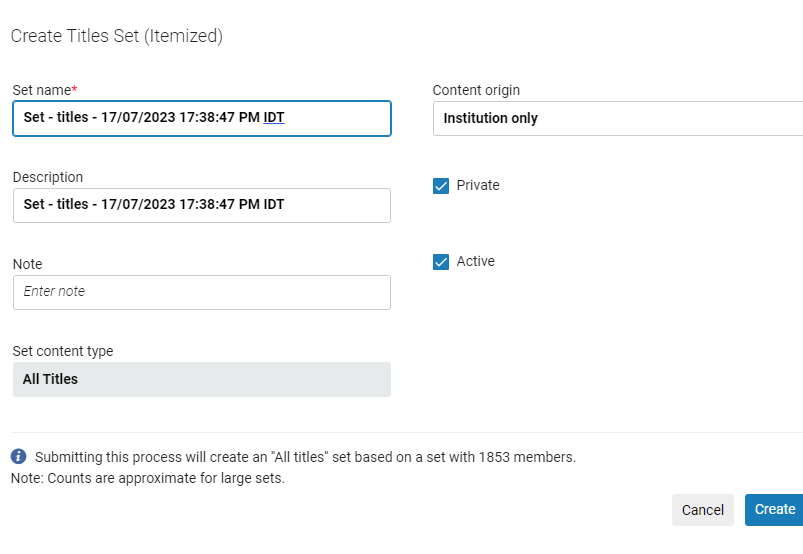
- Compili la Descrizione e il campo nota (facoltativo) e selezioni Crea. A confirmation message appears. The job runs and creates the title set.
Filtro set
- Il set di filtri è possibile solo per i tipi di contenuto di Gestione Risorse.
- Filtering sets is possible only for sets derived by Title searches (All Titles, Physical Titles, Electronic Titles, Digital Titles).
- L'utente può definire filtri in base alle proprie preferenze. Le ricerche filtrate sono permanenti e vengono salvate quando l'Utente visita nuovamente la pagina. Questo elimina la necessità per l'Utente di riselezionare manualmente le impostazioni del filtro definite di una pagina visualizzata.
You can filter existing sets to create new itemized sets. Il set di filtraggio è utile quando hai bisogno di un set basato su elementi di metadati che non sono Indici. È possibile perfezionare qualsiasi Set per includere solo i record che corrispondono al contenuto bibliografico record, indipendentemente dal fatto che gli attributi siano Indice o meno.
Questa funzionalità è implementata utilizzando regole di indicazione. Simili alle Regole di normalizzazione, le regole di indicazione utilizzano la logica flessibile di Drools per filtrare i set esistenti, sia pubblici che privati. Con la logica di Drools, è possibile filtrare un insieme per crearne uno nuovo in base a diverse caratteristiche, come mostrato nei seguenti esempi che possono includere campi non-indice:
- Escludendo i documenti governativi (dove il byte 28 del campo 008 è uguale a #, vuoto o u)
- record bibliografici che non contengono un campo MARC 074 o 086
- Limitare il record bibliografico alla stampa Rivista (dove il leader 06 tipo record = a oppure il leader 07 livello bibliografico = s)
Inoltre, puoi controllare la presenza di brevi record bibliografici o campi mancanti utilizzando la logica di Drools.
For information about filtering sets, see the Filtering Sets Using Drools Logic video (3:24 mins).
To filter existing sets using indication rules:
I primi punti seguenti descrivono come raggiungere la pagina dei filtri Set dai risultati di Ricerca. Another way to reach the Filter Set page is from the the Manage Sets page (Admin > Manage Jobs and Sets > Manage Sets): locate the main set that you want to refine, and select Filter Set in the row actions list.
- Creare la regola richiesta delle indicazioni e memorizzarla nella cartella Condivisa nell'Editor MD. See Creating Indication Rules.
- Search for the items to include in the set by any of the repository Title searches (All Titles, Physical Titles, Electronic Titles, Digital Titles).
- Nella schermata dei risultati della ricerca, selezioni la copia desiderata e clicchi su "Salva e filtra la ricerca". La pagina Dettagli Set si apre.
- Define your set (see Creating Logical Sets) and select "Save and Filter". A new page opens where you can create the filtered set while the main set is created in the background.
- Select Filter This Set to create an itemized filtered set. The Filter Set page is displayed.
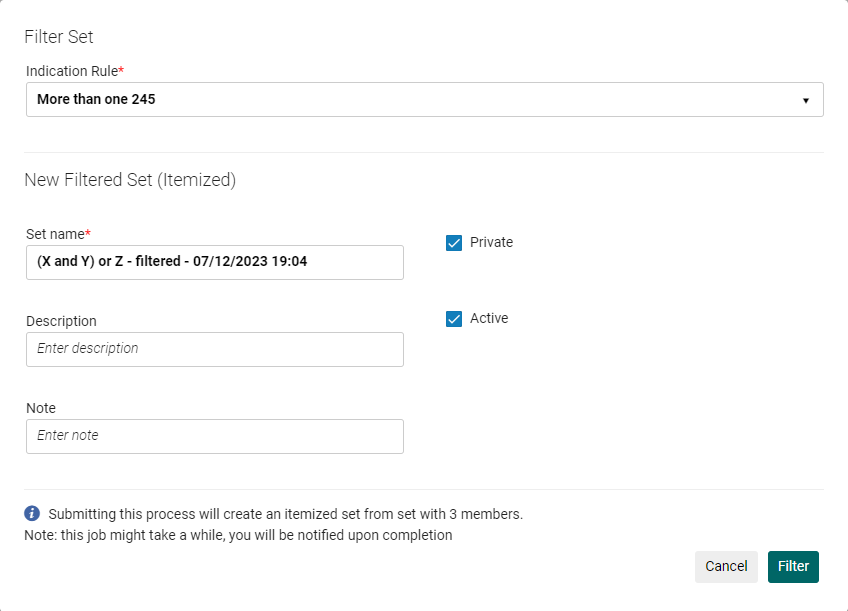
- Selezionare la regola di indicazione. Si noti che affinché la regola di indicazione appaia nel menu a discesa, essa deve essere locale e pubblica
- Inserisca un nuovo nome per il set oppure utilizzi quello generato automaticamente, completi le opzioni rimanenti in base alle Sue esigenze e selezioni Filtra. A confirmation message is displayed.
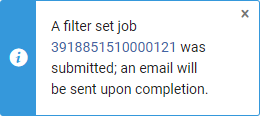
Il processo di impostazione del filtro per indicazione viene eseguito per elaborare la tua richiesta di filtraggio e crea un nuovo set specificato. Il processo di filtraggio esamina tutti i record nel Set principale e applica le regole di indicazione specificate. I record che non soddisfano le condizioni delle regole di indicazione vengono filtrati dal set. Quando il lavoro è completato, il sistema invia un'email all'Utente che ha avviato la richiesta.
- Selezioni "Conferma" nel messaggio di conferma.
- You can view progress or the job results for the Filter Set by Indication job on the Monitor Jobs page (see Viewing Running Jobs and Viewing Completed Jobs). Select Actions > Report to view the results. Il report mostra il numero di record elaborati e il numero di record creati nel nuovo set filtrato.
- Il nuovo set appare nella pagina Dettagli Set del set principale; selezioni il collegamento per aprirlo. È inoltre possibile selezionare una regola di indicazione da questa pagina per creare un altro set filtrato.
- Una sezione simile appare nella pagina Dettagli Set per il Set originale da cui è stato creato questo Set, elencando tutti i suoi Set filtrati.
- Il set originale appare nella sezione Set correlati per il nuovo set filtrato.
- Una volta completato il processo, i set nuovi e originali appaiono nella pagina Gestisci set. The new set appears with the Filtered set badge and the original set with the Used for filtered sets badge.
Saving Sets in the Network Zone
You can save a local set of bibliographic records in the Network Zone, in order to later make bulk changes to them using normalization rules. A set can only be built on the Institution Zone because the query uses search criteria from either localized fields in the bibliographic record or from the inventory (holdings, items, portfolio, etc.) Saving a local set to the Network allows you to apply the necessary normalization rules on the bib records.
This action runs a job that creates a set in the Network Zone containing only the records linked to the Network.
- Questa funzionalità è disponibile solo per le istituzioni che fanno parte di un consorzio.
- Questa funzionalità è disponibile solo per Bib e Titolo Set.
To save a local set in the Network Zone:
- In the Manage Set page, create a new set of one of the following types:Physical titles,All titles,Electronic titles. You can create either logical or itemized set.
- Seleziona Salva in rete nella Lista delle azioni di riga.
- Nella schermata che si apre, fornisca il nome del Set che verrà creato nella Network Zone (NZ). Segua la convenzione di denominazione visualizzata nel campo. The default name is '<original set name>_<member_institution> - date/time'. Prefixing the institution name to the set name will help you find the set in the NZ.

- Select Submit and then select Confirm in a confirmation message that opens. Alma sends a message saying that the job was created, and an email will be sent upon completion.
The Save Set in Network job is submitted and runs in the background in the IZ. The job is displayed in the member institution who initiated the action. Il report 'Salva Set nella rete' viene generato nell'istituzione membro.
Se il processo fallisce, non viene creato alcun set nell'NZ, anche se alcuni record sono stati elaborati.
