
Navegar por el listado de estanterías
Overview and procedure for item-level call number browse.
When using the browsing feature, Alma retains the settings for "Call Number Level", "Call Number Type", "Library", and "Location". The default value for Call Number Type, controlled by the customer parameter call_number_type, is applied initially for each user. Una vez que el usuario opta por un tipo de clasificación, ya no se tiene en cuenta el valor del parámetro de cliente.
The Browse Shelf Listing option does not appear in Alma for users with the "Physical Inventory Operator" role unless they also have at least one Cataloger role.
Using the Browse Shelf Listing
- Select Browse Shelf Listing(Resources > Cataloging > Browse Shelf Listing); or from within the Metadata Editor, select Search & Browse >Browse Shelf Listing. Se muestran las siguientes opciones:
- Nivel de clasificación
- Tipo de clasificación
- Código de barrasAparecen detalles adicionales al acceder al listado de estanterías desde un registro bibliográfico MARC21 o KORMARC. The Call Number editing field is automatically filled with the information from $a and $b in fields 050, 055, 060, 070, 080, 082, 084, and with the information from $h and $i in field 852. In cases where multiple instances of the same subfield are present, the first occurrence is utilized unless the cursor is positioned on a different occurrence, in which case that one is utilized.
- Biblioteca
- Localización
- Seleccionar una de las siguientes opciones de filtrado desde la lista desplegable del nivel de clasificación:
- Clasificación de existencias – Proporciona enlaces de registro a nivel de existencias en la lista de resultados. Esta es la opción por defecto.
- Clasificación del ejemplar: Proporciona enlaces de registros a nivel de ejemplares en la lista de resultados.
- Clasificación temporal – Proporciona enlaces de registro a nivel de ejemplares en la lista de resultados.
- Todo – Esta opción proporciona resultados combinados de todas las opciones de clasificación en la lista desplegable. En la lista de resultados, aparecen tanto los enlaces de registro a nivel de existencias como a nivel de ejemplares.
- Seleccionar el tipo de clasificación desde las opciones disponibles en la lista desplegable. El tipo de clasificación que se selecciona determina cómo se ordena y aparece (se normaliza) la información de clasificación en el listado de estanterías. La lista de opciones varía dependiendo de la lo que esté configurado para su sistema. Algunas posibles opciones incluyen:La clasificación/signatura se realiza sobre un valor normalizado. La normalización difiere según el tipo de clasificación/signatura. En general, existe una normalización genérica por defecto de la clasificación/signatura que elimina los espacios iniciales y finales, empaqueta los espacios, convierte todo a minúsculas y se completa con ceros a la izquierda hasta el 12. This is done for cases that aren't specifically defined to have their own normalization.
- No se proporcionó información - Esto se aplica a existencias donde el primer indicador del campo 852 es un espacio, está en blanco o introducido con una # en el Editor de metadatos. See Holdings with No Call Number Type for more information.
- Clasificación de la Biblioteca del Congreso
- Clasificación decimal de Dewey
- Clasificación de la Biblioteca Nacional de Medicina
- Supervisor de clasificación de documentos
- Número de control de estantes
- Título
- Colocado en estantes distintos
- Fuente especificada en el subcampo $2Si tiene registros de existencias con 852$$2, la lista también contendrá los valores específicos que existen en sus datos, lo que le permitirá filtrar según esos valores
- Otro esquema
- Número de adhesión
- De forma opcional, seleccionar una biblioteca de la lista desplegable de Biblioteca.
- Después de seleccionar una biblioteca, también se puede hacer la navegación por el listado de estanterías más granular seleccionando una ubicación desde dentro de la biblioteca.
- Introducir una clasificación completa o parcial alineada a la izquierda para el parámetro Clasificación.
- Select Go.
Trabajar con la Lista de resultados de Navegar por el listado de estanterías
- La entrada coincidente
- El resto de las entradas después de la entrada coincidente
El tipo de clasificación que se selecciona determina cómo se ordena y aparece (se normaliza) la información de clasificación. Las opciones de orden varían en función de lo que esté configurado para su sistema. Algunas posibles opciones incluyen:
- Fuente especificada en el subcampo $2Si tiene registros de existencias con 852$$2, la lista también contendrá los valores específicos que existen en sus datos, lo que le permitirá filtrar según esos valores.
- Source specified in subfield $2 – UDC This follows the standard identified in http://www.udcc.org/index.php/site/page?view=about_structure for the UDC (Universal Decimal Classification).
- Source specified in subfield $2 – ZTOZ This handles call numbers using the Tozzer call number standard where the 852 has a first indicator of 7 and $2 contains ZTOZ. The data indexed for this standard is 852 $h and $i. Contact Ex Libris to set the parameter for this call number standard.
- Source specified in subfield $2 – ZHYL This handles call numbers using the Harvard Yenching call number standard where the 852 has a first indicator of 7 and $2 contains ZHYL. The data indexed for this standard is 852 $h and $i. Contact Ex Libris to set the parameter for this call number standard.
- Source specified in subfield $2 – ZHCL This handles call numbers using the Widener call number standard where the 852 has a first indicator of 7 and $2 contains ZHCL. The data indexed for this standard is 852 $h, $i, and $c (in the order that they appear in the record). For Widener call numbers without a numeric suffix, they are treated as if they end in zeros. Contact Ex Libris to set the parameter for this call number standard.
See Location Information and Temporary Location Information in the Updating Item-Level Information section for more information. - Otro esquema
- Harvard This handles call numbers using the Harvard call number standard where the 852 has a first indicator of 8. The data indexed for this standard is 852 $h and $i. Contact Ex Libris to set the parameter for this call number standard.
- U.S. Geological Survey Library Classification System (USGS) This handles call numbers using the USGS call number standard where the 852 has a first indicator of 8. See https://pubs.usgs.gov/bul/b2010/b2010.pdf for more information. Contact Ex Libris to set the parameter for this call number standard.
- Código de barras
- Descripción
- Author - Author information is displayed in the browse results to help libraries that use this data for adding call number cutters.
- Library/Location - The format is determined by the configuration for Library/Location Display (Configuration > Resources > General > Library/Location Display).

Configuración de Mostrar biblioteca/ubicación - FormatoTodos los usuarios tienen privilegios de 'Solo vista'. Users with role permissions can edit Holdings and Item call numbers by clicking the link in the Level column of the browse results.Resultados de Navegar por el listado de estanterías
Holdings with No Call Number Type
In order for holdings records to appear in the Browse Shelf Listing when the No information provided call number type is selected, the first indicator of the 852 field needs to be a space, blank, or entered as a #. Se pueden utilizar los siguientes métodos para lograr el objetivo de un registro de existencias con un espacio en el primer indicador del 852:
- Setting the use_space_as_call_number_type customer parameter to true. See use_space_as_call_number_type for more information.
- Establecer el tipo de clasificación por defecto a nivel de la institución o ubicación.
- At the institution level, set the call_number_type customer parameter to #. See call_number_type for more information.
- At the location level, set the Call Number Type parameter to No information provided. In the Fulfillment configuration menu, set the Configuring location to the library (not institution) location that you want to configure and access Configuration > Fulfillment > Locations > Physical Locations. See Configuring Physical Locations for more information.

Configuración de Tipo de clasificación a nivel local
- Configure call number mapping (Configuration > Resources > General > Call Number Mapping) with a # for the 852 1st Ind parameter to create the 852 field with a space in the first indicator. See Adding a Call Number Mapping for more information.
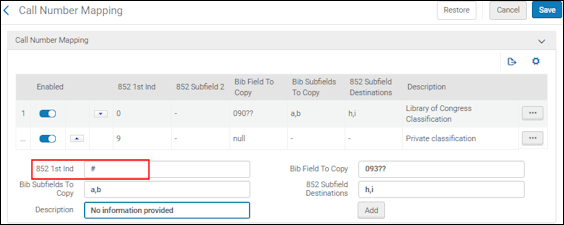
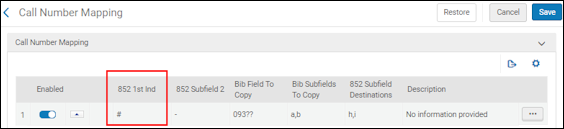
Mapeo de la signatura para el primer indicador 852
To browse the shelf listing for No information provided holdings, see Using the Browse Shelf Listing for more information.
Editing Holdings-Level Records
The Holdings or All link is only enabled for users with role permissions to edit (for instance, cataloger and so forth). All other users will have View Only privileges.

- Abrir Navegar por el listado de estanterías y completar los parámetros de navegación para que coincidan con sus requisitos de navegación. Specifically, you need to select Holdings call number or All for the Call Number Level parameter in order to get results with links to holdings records.
- In the Browse Shelf Listing results, select Holding for the holdings record that you want to edit (or view). El registro de existencias se abre en modo de pantalla dividida para que se pueda trabajar tanto con los resultados de Navegar por el listado de estanterías como con el registro de existencias (utilizando las herramientas del Editor de metadatos).
 Resultados de Navegar por el listado de estanterías y el Registro de existencias en modo de pantalla dividida
- When you are done with the holdings record, save any changes and select Edit > Split Editor(with the focus on the Browse Shelf Listing Results).
- Continuar el trabajo con los resultados de Navegar por el listado de estanterías
- When you are finished, select Exit.
Editing Item-Level Records

- Abrir Navegar por el listado de estanterías y completar los parámetros de navegación para que coincidan con sus requisitos de navegación. Specifically, you need to select Item call number,Temporary call number, or All for the Call Number Level parameter in order to get results with links to item records.
- In the Browse Shelf Listing results, select Temporary for the item record that you want to edit (or view). El registro de ejemplares se abre en el Editor de ejemplar físico.
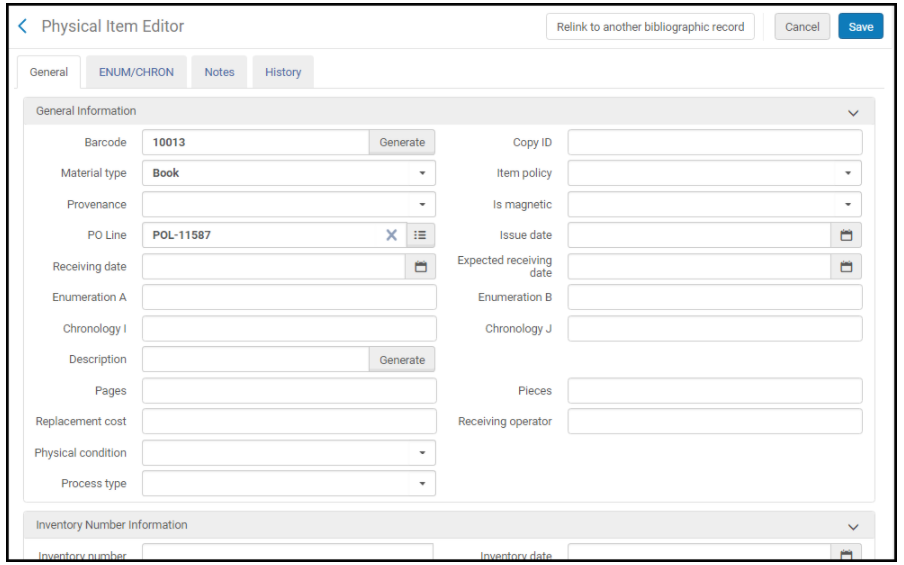
El registro a nivel de ejemplares se abrió en el Editor de ejemplar físico - When you are finished working the Physical Item Editor, select Save or Cancel. Se vuelve a Navegar por el listado de estanterías con la configuración de parámetros previamente seleccionada.
- Select Go to re-display your Browse Shelf Listing results and continue your work in the Browse Shelf Listing.
- When you are finished, select Back or select another function in Alma.
Page tags: article:topicproduct:almacontent:Documentationlang:englishCall numbercall number browsebrowse shelfshelf listbrowse call numbersbrowse shelf list
