
Exporting MARC Records
You can perform ad-hoc exports of bibliographic records directly in Leap to provide data to third-party vendors. The MARC Export feature allows you to set export criteria to determine which records to include and in what format, or you can export the entire database. When you export files, they will be downloaded via the browser and saved in your Downloads folder.
Note:
To use MARC Export feature you must have the cataloging permission Export bibliographic, item and authority records set to "Allow".
To export MARC Records using Leap
-
In the Leap header, Select Utilities > MARC Export.
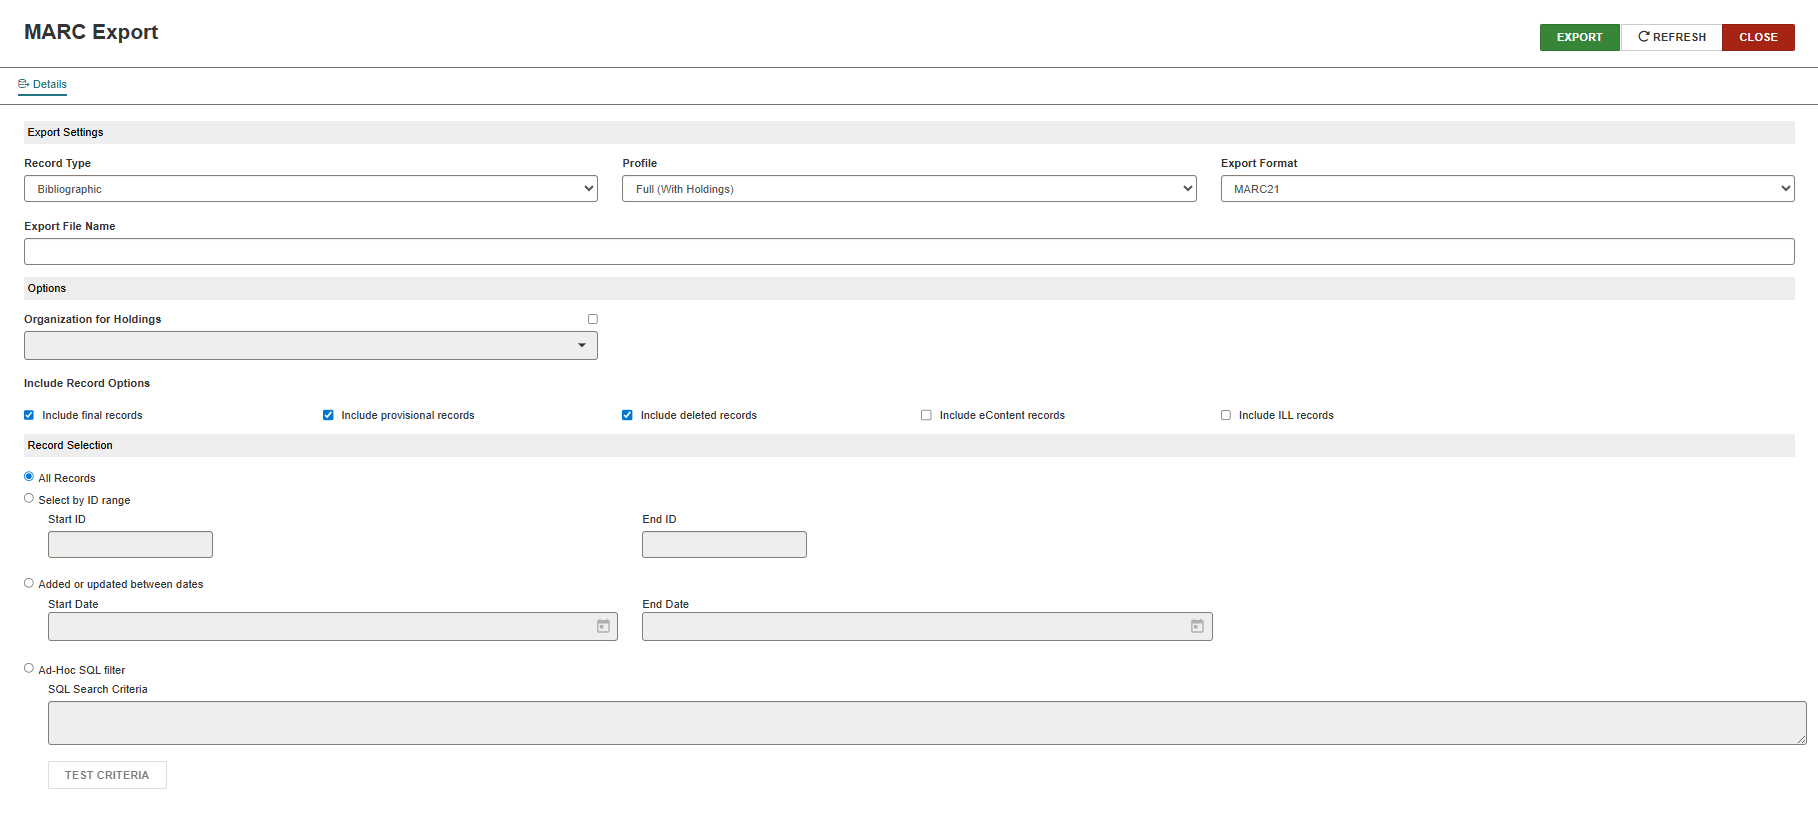
The MARC Export workform appears. The Details view displays the following sections for MARC Export configuration:
-
Export Settings – Where you select the record type, export format, and the name of the export file. You can also choose to include or exclude holdings.
-
Options – Enables you to select an organization for holdings, and what records to include (final, provisional, ILL, etc.).
-
Record selection – Where you choose whether to export all records that meet the criteria you set in Options and Export Settings, or to export only a selected range. You can also define an SQL search criteria.
-
-
In the Export Settings section, set the following:
-
Record Type – This version supports the export of bibliographic records.
-
Profile – In the dropdown list, select "Full (With Holdings)" or "Brief (No Holdings)". "Full (With Holdings)" is the default value.
-
Export Format - In the dropdown list, select one of the supported formats MARC21, MARCXML or JSON.
-
Export File Name – In the input field, enter the name for the export file.
-
-
In the Options section, set the following:
-
Organization for Holdings - If you want to restrict the holdings data being exported to specific organizations, select the checkbox and choose an organization from the dropdown list. You can choose more than one organization.
-
Include Record Options – Select the checkbox next to the record types you want to include. Available options are:
-
Include final records
-
Include provisional records
-
Include deleted records
-
Include eContent records
-
Include ILL records
-
-
-
In the Record Selection:
-
If you want to export all records that meet the criteria you set in Options and Export Settings, select All Records.
-
If you want to export a specific range of records, you can define the range by:
-
Record ID – Choose Select by ID range. In the Start ID field, enter the record ID that indicates the beginning value, and in the End ID field, input the record ID that indicates the end of the range.
-
Date when the record was added or updated – Select Added or updated between dates. In the Start Date field, select the start date, and in the End Date field, choose the date that marks the end of the range.
-
For a more specific range definition, you can use a custom SQL query to set the criteria. Select Ad-Hoc SQL filter. Enter your search query in the SQL Search Criteria box. You can test your query by clicking the TEST CRITERIA button, which performs a basic check of the SQL syntax. If the syntax is valid, a green success toast appears. If it's invalid, a yellow warning toast appears.
Note:
The SQL query expects "SELECT BibliographicRecordID FROM Polaris.Polaris.BibliographicRecords" as the starting point for queries.
-
-
-
Click the EXPORT button in the upper-right corner of the workform to generate the export file. The browser will start downloading the file based on the criteria you set in the workform. Once the download is complete, the export file will be saved in your downloads folder under the name you set in the workform.
Note:
Large download files and files with complex export criteria may take a few seconds longer to appear in the browser download.
