
Gestión de colecciones
Overview and instructions for managing collections.
Introducción
- Collection Inventory Operator – Create and edit sub-collections and move sub-collections between parent collections.
- Collection Inventory Operator Extended together with Collection Inventory Operator – Create, edit, and delete top level collections and promote a sub-collection to be a top-level collection. Crear, editar y eliminar una subcolección y mover subcolecciones entre colecciones matrices.
- Digital Inventory Operator – Add/remove titles to/from a collection and move a title between collections.
A collection(unrelated to an electronic collection; see Managing Electronic Collections) is an entity that aggregates bibliographic records that have a relationship of some kind. Una colección puede basarse en un tópico o tema, por ejemplo, una colección titulada “Los Beatles” (basada en la famosa banda de música rock) que mantiene registros de ejemplares físicos, incluyendo biografías y partituras, audio digital y video de actuaciones en directo y sesiones de grabaciones en estudio, así como cualquier número y tipo de canción y existencias de discos. Una colección tiene su propio registro bibliográfico. La colección puede incluir registros asociados con diferentes tipos de recursos (físicos, digitales y electrónicos).
Structurally, collections can be top-level collections or sub-collections. Las subcolecciones son descendientes de colecciones de alto nivel u otras subcolecciones. Una colección como “Los Beatles” podría tener subcolecciones basadas en la cronología, geografía, biografía de un miembro de la banda o cualquier otra categoría que la institución pueda encontrar útil. La colección de “Los Beatles” en sí podría ser una subcolección de una colección más grande del género de música pop de los años 60 o rock and roll.
Las colecciones se pueden usar en búsquedas (como facetas y como en las búsquedas por colecciones) y en otras areas del sistema como publicar. Se puede publicar todo tipo de recursos con los detalles de la colección, incluyendo las colecciones matriz y derivadas.
Collections are managed on the Top Level Collections page (Resources > Manage Inventory > Manage Collections). Collections appear in a list table (for more information about list tables, see List Tables). You can also search for collections using Alma's search feature; to manage the results, see Performing Actions on the Repository Search Results Page.
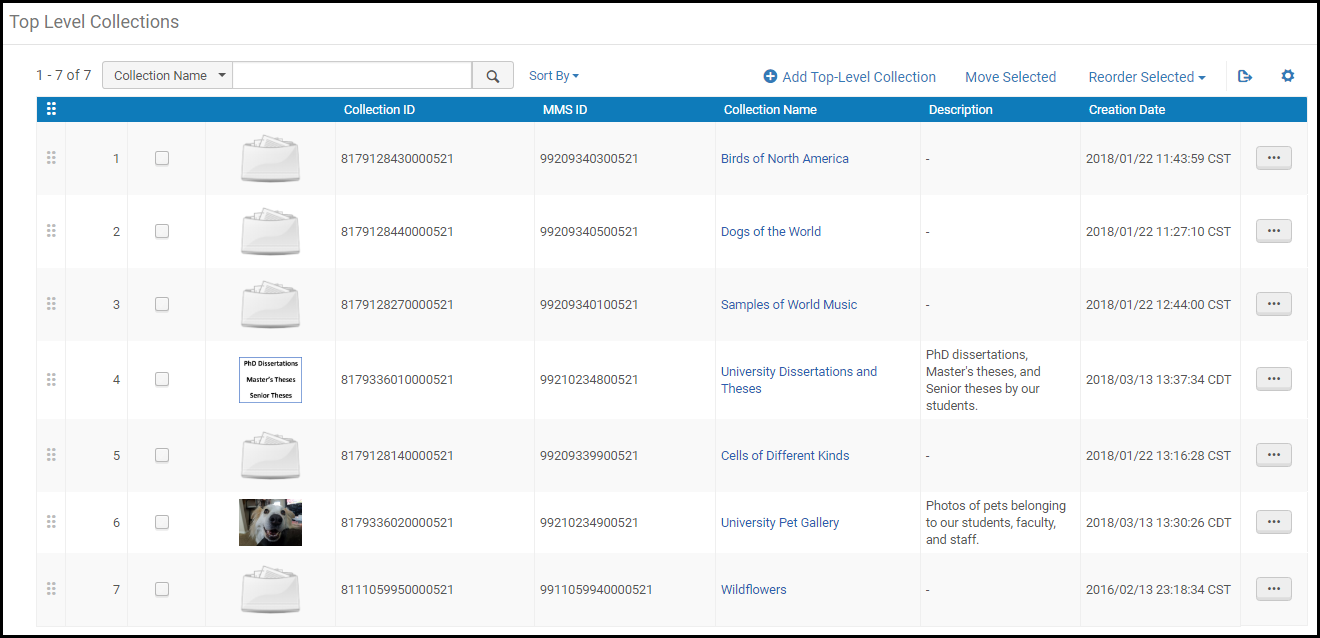
Working with Collections
Ya que las colecciones permiten agrupar registros de diferentes tipos (físicos, digitales y electrónicos) y desde diferentes fuentes (internas, externas, remotas), a menudo los sistemas de gestión de recursos digitales las usan para agregar los numerosos tipos de recursos en unidades jerárquicas organizadas. Como parte de esta tarea, las instituciones pueden:
- Añadir colecciones de nivel superior
- Crear, editar o borrar subcolecciones
- Añadir miniaturas a las colecciones
- Añadir ejemplares, conjuntos y objetos digitales remotos a las colecciones
- Integrar asignaciones de colecciones con perfiles de importación
Ordenar/reordenar colecciones de nivel superior
En general, las colecciones de nivel superior aparecen en el orden en el que se añaden a Alma. For display in Alma and Primo/Primo VE, you can either customize the order or select a pre-defined sort (Creation Date or Name). In addition, you can specify the sort direction (either ascending or descending) of the collections:
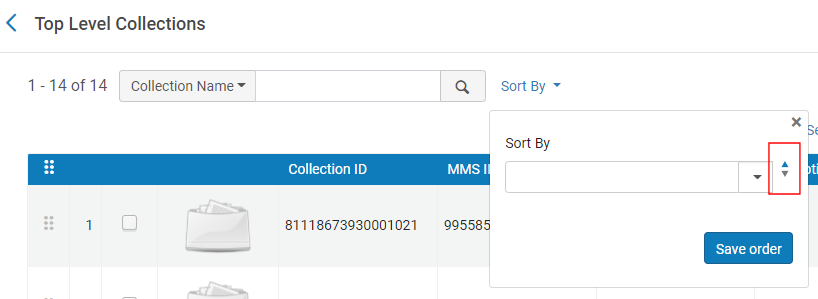
-
Desde la colección Lobby de Primo/Primo VE, los usuarios no pueden especificar el orden de clasificación de las colecciones de nivel superior y solo usarán el orden configurado en Alma.
-
Search and sort are possible only on the "primary" collection-name, i.e., the one that was saved under the General > Name field. Los nombres traducidos no se pueden utilizar.
-
Open the Top Level Collections page (Resources > Manage Inventory > Manage Collections).
-
Utilizar uno de los siguientes métodos para mover las colecciones al orden deseado:
- In the Sort By pane, select one of the following predefined sort routines:Creation Date or Name. As you make the selection, the collections are reordered but are not saved unless you select Save order.
- Select one or more collections and then select an option in the Reorder Selected drop-down pane to move the selected items before or after your selection.
- Arrastre y suelte los ejemplares a la posición que desee en la lista.
-
In the Sort By pane, select the sort direction (ascending or descending) and then select Save order. Guardar una rutina de orden en blanco muestra las colecciones de nivel superior a medida que aparecen en la lista.
Descargar la información de la colección a un fichero
Alma allows you to create an EAD (Encoded Archival Description) file that contains all collection hierarchy information, including the collection members—for example, the titles assigned to each of the collections in the tree. El número total de miembros de la colección debe ser inferior a 100 000. Si el número se supera, no se genera el fichero de descarga EAD.
-
Select Download EAD from the row actions list for a top-level collection,
-
View the collection (View from the row actions list) and select Download EAD in the General Details area.
During the download of the collection information, Alma might get stuck or log out before the status bar reaches 100%. The reason for this is that the EAD file format outputs the collections first, and then outputs the titles that belong to the collections. Therefore, the job might seem to get stuck at a mark before 100% - at this stage, it works on outputting the titles for the collections. For large collections with a big collection tree and many titles assigned to the sub-collections, XML generation can take several minutes, and in some cases a second attempt might be necessary to download the EAD successfully.
Ver una colección o subcolección en modo de solo lectura
Alma permite ver la configuración de una colección/subcolección sin ingresar al Editor de recursos de la colección.
-
For a top-level collection, select View from the row actions list for the collection.
-
For a sub-collection, after opening the top-level collection, select View for the collection on the parent's page.
General information about the collection appears in the General Details area. The collections sub-collections appear in the Sub-collections tab. The collections associated titles appear in the Title List tab.
Añadir una colección de alto nivel
Las colecciones de alto nivel son recursos gestionados que incluyen cualquier número de ejemplares de inventario agrupados juntos. Proporcionan niveles de organización y dirección para colecciones digitales y otros recursos.
- On the Top Level Collections page, select Add Top-Level Collection. Aparecerá la página de Añadir nueva colección.Añadir nueva colección
- Introducir los campos requeridos y opcionales en el formulario.
Añadir campos para nueva colección Campo Descripción Formato del registro El formato del registro del registro de colección. Este campo aparecerá solo si el sistema es compatible con múltiples formatos de registro. Póngase en contacto con la asistencia técnica de Ex Libris para habilitar esta función.Título Corresponde a 245 $a - Título. Required. Este título aparecerá en los resultados de búsqueda de Alma. Este título no tiene que ser único, pero se recomienda que sea el mismo que el Nombre de la colección.Suprimir desde descubrimiento Seleccionar para suprimir la colección de descubrimiento. You unsuppress an existing collection from the New Metadata Editor at Record Actions > Suppress from Discovery. See MD Editor Menu and Toolbar Options for more information.Nombre Nombre interno para la colección (en lugar del nombre del registro bibliográfico). Required. Este nombre aparecerá cuando se publique en Primo y en otras ubicaciones. No se admiten caracteres que no sean de texto, como los emojis. Este nombre debe ser único entre las colecciones de alto nivel.Descripción Una descripción de la colección. No se admiten caracteres que no sean de texto, como los emojis. Biblioteca La biblioteca donde se almacena la colección (seleccionar en las opciones desplegables). Required. Solo aparecerán las bibliotecas que estén disponibles de acuerdo con los permisos que tenga.Sistema externo Cuando se crea automáticamente una colección con la tarea de importación (conjunto OAI), este es el nombre del sistema externo ID externo Cuando se crea automáticamente la colección por la tarea de importación (conjunto OAI), este es el ID de la colección asignado al sistema remoto. Adicionalmente, los usuarios pueden almacenar IDs en este campo para poder usarlos posteriormente en los metadatos publicados, y Primo puede usarlo durante descubrimiento. Colección lógica Seleccione para crear una colección de títulos de un conjunto lógico. For more information, see Adding a Logical Collection. Cargar miniatura Seleccione una imagen en miniatura para la colección y su registro bibliográfico asociado. Las miniaturas definidas y gestionadas en la pestaña Descubrimiento ignoran esta imagen solo en el Lobby de colecciones y en la página de la colección en Primo y Primo VE. For more details, see Managing Images for the Collections Lobby. La imagen debe estar en formato jpg, png o gif y tener un tamaño máximo de 100K. Las dimensiones estándar de una miniatura son 165 x 165 píxeles. Se aceptan dimensiones más grandes y pequeñas de miniaturas, aunque podrían afectar la resolución de la imagen.Cambiar a la miniatura por defecto
Seleccione esta casilla para volver a la miniatura por defecto para el registro bibliográfico de la colección.
Colocar en/antes Select to have the collection placed at the top, bottom, or before an existing collection or sub-collection in the list, where Place at relates to the options of placing the collection at the "Top" or "Bottom" of the list, while Place before places the collection before the one selected in the drop-down list. Formularios Los formularios constan de una pantalla de campos para que se usen cuando se creen representaciones digitales. For more information, see Working with Forms. Formato del registro El formato del registro de los títulos para los cuales desea usar el formulario. Depósito Seleccionar un formulario que se utilizará para los depósitos del usuario en esta colección. Depósito mediado por el personal Seleccionar un formulario para que los depósitos mediados por el personal se use en esta colección. Añadir Representación Seleccionar un formulario para que se añadan representaciones a esta colección. - Select Save to save your work and move on to another task, or Save and continue to save the collection and open the Collection Resource Editor page, where you can enter further information for the new collection.
También se pueden añadir colecciones importando una fichero de descripción de fichero codificada (EAD) usando el perfil para importación de colecciones. For more information, see Managing Import Profiles.
Editar una colección
- If the collection is a top-level collection, select Edit from the row actions list for the collection on the Top Level Collections page. Aparecerá la página del Editor de recursos de la colección.
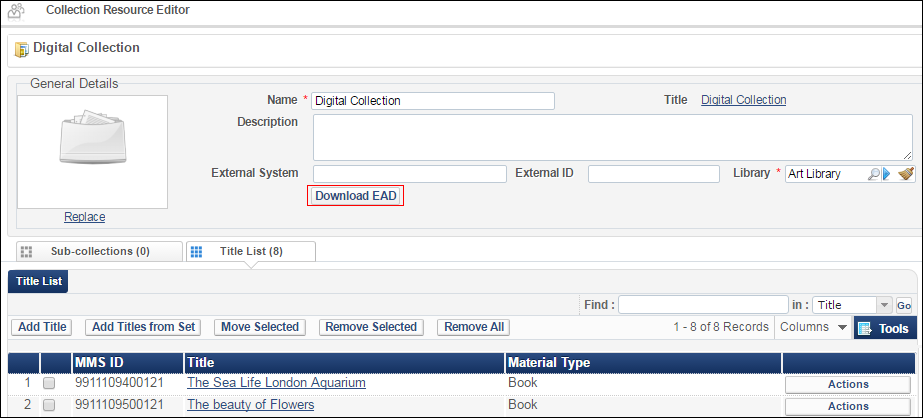 Editor de recursos de la colecciónThe Logical Collection checkbox is only displayed in new collections created after the August 2023 release.For a sub-collection, after opening the top-level collection for editing, select Edit from the row actions list for the collection on the parent's page. Se puede editar la información de una colección en la sección de Información general. To delete the current thumbnail, select the Use default thumbnail check box. To upload a new thumbnail, select the relevant thumbnail image in the Thumbnail upload field. For additional information on the fields of this page, see Adding a Top Level Collection.Aparecerá la siguiente sección de Formularios en la parte inferior de la página:
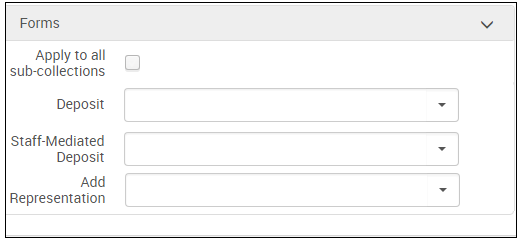
Sección de formularios Seleccionar un formulario para Depósitos, Depósitos mediados por el personal o Añadir representaciones. Los campos del formulario aparecerán cuando se añada una representación al registro bibliográfico en la colección. Select Apply to all sub-collections to have the form appear when adding a representation to a bibliographic record in a subcollection. For more information about forms, see Working with Forms. - Cuando se haya terminado, seleccionar:
- Save to save your work and return to the list of collections or
- Save and Continue to save your work and remain on the Collection Resource Editor page.
Añadir una subcolección
- Edit a collection (see above) and on the Sub-collections tab select Add Sub-collection. Aparecerá la página de Añadir nueva colección.
- Enter the required fields as described in Adding a Top Level Collection and select Save or Save and Continue.
Mover Colecciones y Subcolecciones
No puede mover subcolecciones a colecciones de bibliotecas diferentes.
-
- For top-level collections: from the Top Level Collections Page, select the collections you want to move and select Move Selected.
- For sub-collections: Edit a collection (see above) and on the Sub-collections tabs select the check boxes next to one or more sub-collections and select Move Selected.
Aparecerá la búsqueda de repositorio (solo para colecciones). - Search for the target collection, select it, and select Select. Se moverá la colección o subcolección a la colección seleccionada.
Si la colección padre de destino ya tiene una subcolección con el mismo nombre que la que se está moviendo, la colección que se esté moviendo recibirá un nombre único de marcador de posición. Después de mover la colección, editar la colección para cambiar el nombre.
Edit a collection (see above) and on the Sub-collections tab select Make Top-level from the row actions list for the sub-collection. La subcolección se convertirá en una colección de alto nivel.
Si ya existe una colección de alto nivel con el mismo nombre que la subcolección que se está promoviendo, a la colección que se esté promoviendo se le dará un nombre único de marcador de posición. Después de promover la colección, editar la colección para cambiar el nombre.
Ordenar/reordenar subcolecciones
In general, collections/sub-collections appear in the order in which they are added to a collection in Alma. For display in Alma and Primo/Primo VE, you can either customize the order or select a pre-defined sort (Creation Date or Name). In addition, you can specify the sort direction (either ascending or descending):
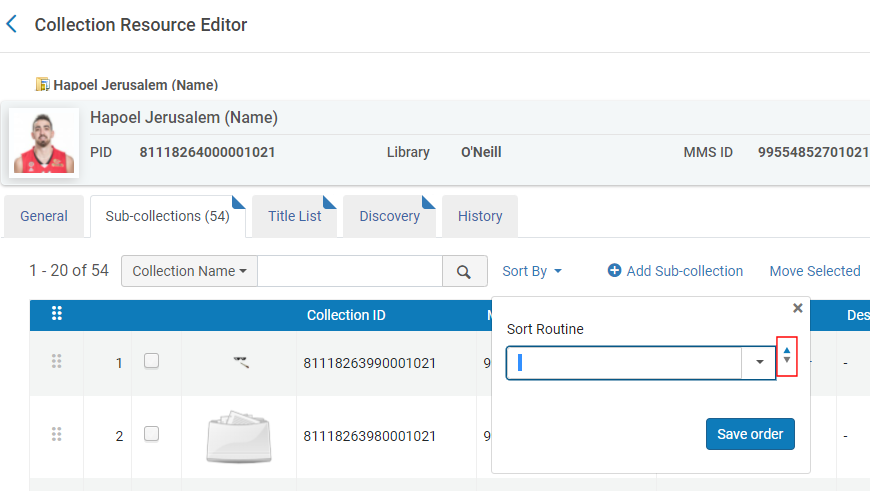
On the collection/sub-collection's page in Primo/Primo VE, the Relevance sort option uses Alma's default/custom order, and the Title sort option sorts by collection name. If the default sort in Alma is by Name, both the Relevance and Title options in Primo/Primo VE sort by collection name.
-
Editar una colección/subcolección con el Editor de recursos de la colección.
-
En la pestaña Subcolecciones, utilizar uno de los siguientes métodos para mover las colecciones al orden deseado:
- In the Sort By pane, select one of the following predefined sort routines:Creation Date or Name. As you make the selection, the collections are reordered but are not saved unless you select Save order.
- Select one or more collections and then select an option in the Reorder Selected drop-down pane to move the selected items before or after your selection.
- Arrastre y suelte los ejemplares a la posición que desee en la lista.
-
In the Sort By pane, select the sort direction (ascending or descending) and then select Save order. Guardar una rutina de orden en blanco muestra las colecciones de nivel superior a medida que aparecen en la lista.
-
Select Save.
Borrar colecciones
You cannot delete a collection if it has any associated titles. Para borrar la colección, primero eliminar cualquier título asociado.
Select Delete from the row actions list and select Confirm in the confirmation dialog box.
To delete multiple sub-collections at once, on the Sub-collections tab select the check boxes next to one or more collections, select Delete Selected, and select Confirm in the confirmation dialog box. Si se selecciona una colección que no se puede borrar, aparecerá un mensaje de advertencia en el cuadro de diálogo de confirmación. Al confirmar solo se eliminan las colecciones permitidas; las otras colecciones permanecen inalteradas.
Gestionar títulos para colecciones detalladas
Titles are managed on the Title List tab.
- Para añadir títulos individuales:
- Select Add Title. Aparecerá la búsqueda de repositorio (solo para todas las colecciones).
- Buscar títulos y seleccionar los títulos deseados.
- Select Add Titles and select Confirm in the confirmation dialog box. Los títulos se añaden a la colección.
Member institutions can add titles to their local collections from the Institution Zone as well as the Network Zone from Search Results list > Add to Collection and from Collection Resource Editor > Add Title. - Para agregar títlos por conjunto detallado:
- Select Add Titles from Set. Aparecerá la página de Gestión de conjuntos. (For information on creating itemized sets, see Managing Search Queries and Sets.)
- Seleccionar el conjunto para añadir.
- Select Add Titles, and select Confirm in the confirmation dialog box
- To remove individual titles, select the check boxes beside the titles to remove and select Remove Selected. Alternately, select Remove from the row actions list beside a title.
Select Confirm in the confirmation dialog box.
Se puede borrar un título de una colección solo si no contiene un inventario digital o si se ha asignado a más de una colección. Esto es para asegurarse de que todo el inventario digital está gestionado por una colección. - To remove all items, select Remove All and select Confirm in the confirmation dialog box.
- Para mover títulos a otra colección:
- Select the check boxes beside the titles to move and select Move Selected. Alternately, select Move from the row actions list beside a title. Aparecerá la búsqueda de repositorio (solo para colecciones).
- Buscar la colección de destino y seleccionarla.
- Select Select. Los títulos se añaden a la colección de destino.
- También se puede editar o ver un título usando la lista de acciones desplegables.
Configurar el Despliegue de Colecciones
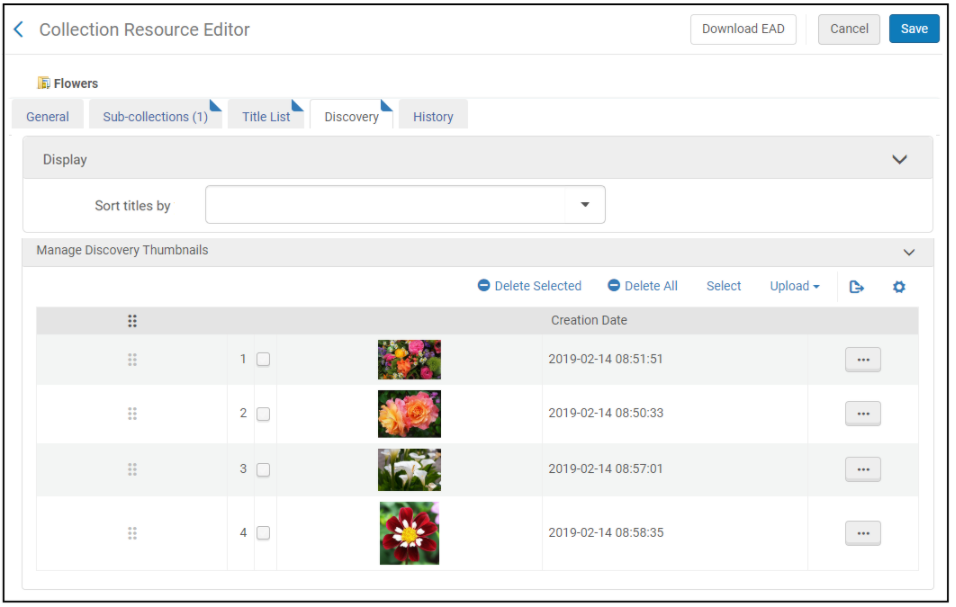
From the Discovery tab on the Collection Resource Editor page, you can configure the default sorting for titles and manage images for the collections lobby in Primo.
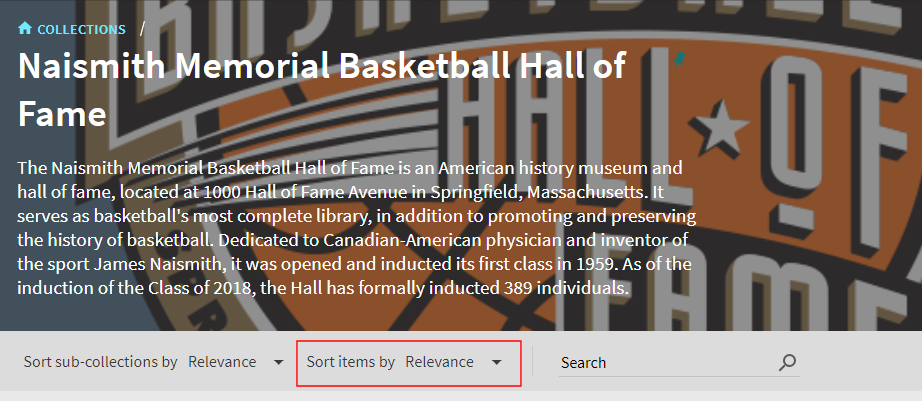
In addition, you can configure the display of the top title of the collection page, for instance, "Naismith Memorial Basketball Hall of Fame" using Primo Back Office with the following code table:default.nui.colldiscovery.lobby.toptitle > COLLECTIONS. For more information, see Collection Discovery Configuration and Labels.
Configuring the Default Sorting for Titles in Collections
La pestaña Descubrimiento en el Editor de recursos de la colección permite establecer el orden por defecto de los ejemplares de una colección en Primo/Primo VE.
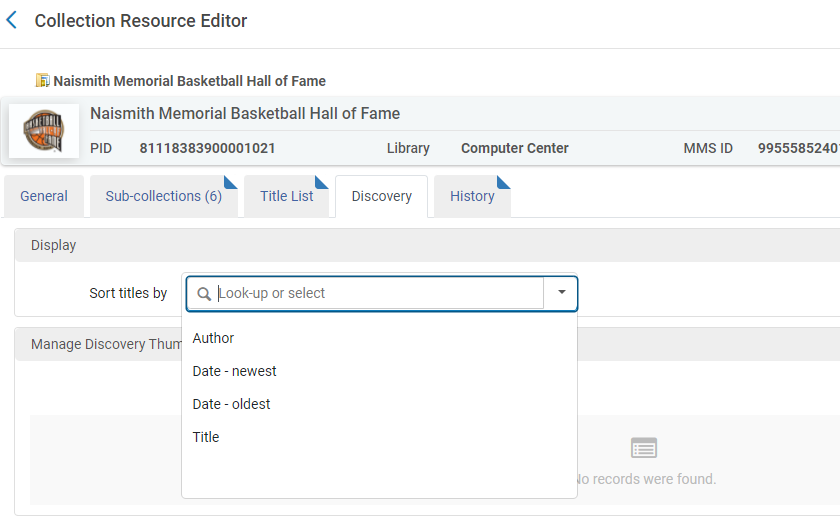
The sort options that appear in the Sort items by drop-down list in Primo and Primo VE are configured on the following pages:
-
For Primo VE, use the Brief Results tab on the View Configuration page (Configuration Menu > Discovery > Configure Views). For more information, see Defining a View.
-
For Primo, use the Brief Results tile in the View Wizard (Primo Home > Ongoing Configuration Wizards > Views Wizard). For more information, see Views Wizard.
-
Abrir una colección/subcolección en el Editor de recursos de la colección.
-
Seleccionar la pestaña Descubrimiento.
-
Select a sort option from the Sort Titles By drop-down list.
If no sort option is specified, Primo / Primo VE uses the first item in the list as the default sort.
For Primo only, the supported sort options are defined with the Collection Title Sorting Routine mapping table (Configuration Menu > Fulfillment > Discovery Interface Display Logic > Collection Title Sorting Routine). For more information, see Configuring the Collection Title Sorting Routine.
-
Select Save.
Gestionar imágenes para el colecciones Lobby
Desde la sección Gestionar Miniaturas de Descubrimiento, es posible definir hasta 20 imágenes que se pueden mostrar en el mosaico de cada colección y subcolección, en la página Descubrimiento de la Colección y en el banner de la página de cada una de estas. De las imágenes definidas para la colección, el sistema mostrará un máximo de cuatro imágenes en el mosaico de la colección.
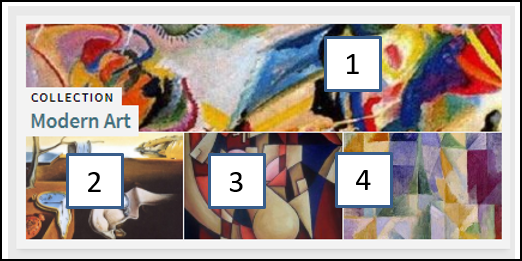
For more information about collection discovery, see Configuring Collection Discovery for Primo VE or Configuring Collection Discovery for Primo.
-
Select the Discovery tab. Aparecerá lo siguiente:
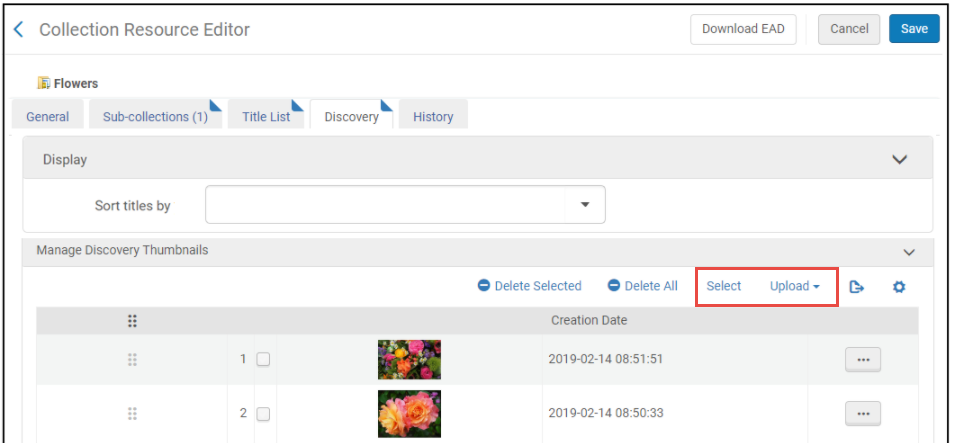 Editor de recursos de colección - Gestión de miniaturas de descubrimiento
-
Use las opciones siguientes para añadir imágenes a la lista Gestionar miniaturas de descubrimiento:
-
Select Select if you want to search for image files that are attached to the collection and display them in the collection's tile.
-
Select Upload if you want to browse for local image files and display them in the collection's tile.
-
Puede definir hasta 20 imágenes, pero el sistema mostrará un máximo de cuatro en el mosaico de la colección, comenzando desde la parte superior de la lista Gestionar miniaturas de descubrimiento.
-
El sistema usa la primera imagen de la lista Gestionar miniaturas de descubrimiento para el banner en la página de la colección.
-
Los ficheros de imágenes en miniatura de Descubrimiento deben estar en formato .jpg, .jpeg o .png, con un tamaño máximo de 500 KB.
-
-
Select Save.
-
Select View in Discovery to see how the collection's tile and banner appear in Primo VE.
Adding a Logical Collection
You can assign titles to collections automatically based on a logical query instead of adding them manually. To create a logical collection, select the Logical Collection checkbox when adding a collection. It is possible to add Network Zone titles to a digital collection in the Network Zone only through manual action, not in batch. For a video tutorial of this process, see:Logical Collections with Automatic Title Assignment.
Para añadir títulos desde un conjunto lógico a la colección:
- Edit the logical collection, and select the Titles List tab. Aparecerá lo siguiente:
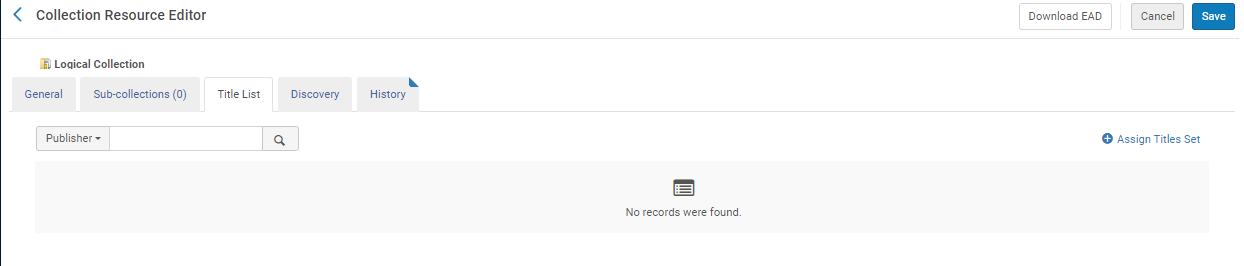 Pestaña de títulos de la colección lógica
- Select Assign Titles Set. Aparece la lista de conjuntos.
- Select a logical set and select Add Set Titles.
Solo se pueden usar conjuntos de títulos. Esto incluye conjuntos de Títulos digitales, Títulos físicos y Títulos electrónicos. Sin embargo, no se incluyen los portafolios electrónicos ni los ejemplares físicos.
- Select Update Collection From Set. The Update Collection from Set job runs and the titles of the set appear in the tab.
-
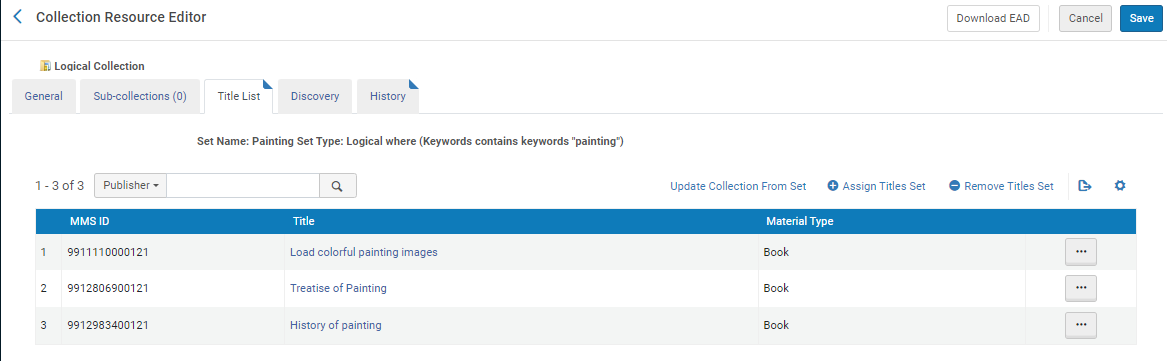 Colección lógica con títulos
- Click Save.
To remove the set from the collection, select Remove Titles Set.
- The Synchronize All Logical Collections job is a daily job that updates all logical collections according to their set queries and reindexes the database to make the collection searchable. For more information, see Synchronize All Logical Collections Job and Synchronize All Logical Collections.
- You can manually update a set of collections if you do not want to wait for the scheduled Synchronize All Logical Collections job to run by running the Update Logical Collections from Set job. For more information, see Update Logical Collections from Set.
Changing the Collection Type of a Collection
You can change the collection type of a collection from logical to fixed-list and from fixed-list to logical. You can do this by selecting or clearing the Logical Collection checkbox when editing a collection. Cuando una colección lógica se cambia a lista fija, los títulos de la colección se cambian a lista fija y no se actualizan. Cuando una colección de lista fija se convierte en una colección lógica, debe añadir un conjunto lógico a la colección. Una tarea actualiza los títulos de la colección según el conjunto.
Ver historial de gestión de la colección
Para ver un historial de acciones llevadas a cabo en una colección, seleccionar la etiqueta de Historial.
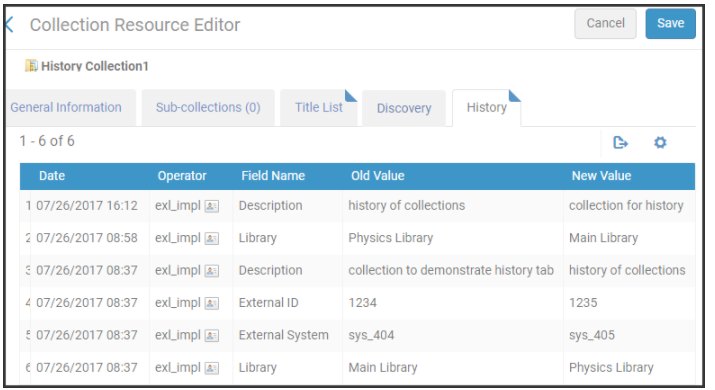
- No se incluye añadir ficheros a las colecciones en la pestaña de Historial.
- Para colecciones en el repositorio en el momento en que se lanzó(septiembre de 2017), se necesita un cambio adicional para mostrar el cambio en la pestaña de historial.
- La columna Operador aparece solo para gestores y administradores. See Configuring Users' Ability to View Operator Details.
Page tags: article:topicproduct:almacontent:Documentationlang:englishcreate collectionmanage collectionedit collectiondelete collection
