
Integrazione Convertitori XSL
Per definire i convertitori XSL è necessario il seguente ruolo:
- Amministratore di Sistema Generale
When importing users to Alma from SIS systems that use other data formats than Alma, you can convert data from the source system formats to the format required by Alma.
Currently, this is possible for the following integrations (see Student Information Systems):
- Importazione del SIS
- Sincronizzazione SIS
You can upload and manage XSLT converters from the Integration XSL Converters page (Configuration Menu > General > External Systems), as well as share converters in the Community Zone.
- Quando si carica un file XSL, non c'è un limite rigoroso di caratteri e l'intero contenuto viene elaborato.
- Quando si modifica un file XSL, l'XSL deve contenere al massimo 4096 caratteri per essere supportato.
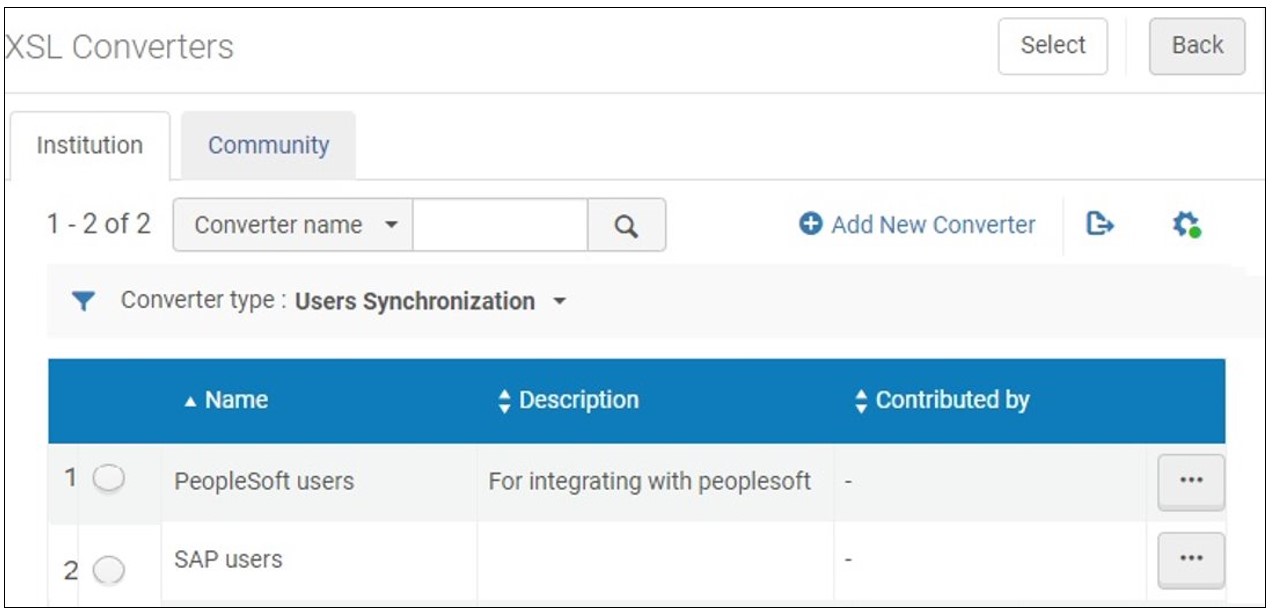
In questa pagina, può fare quanto segue:
- Upload XSLT converters
- Modifica i convertitori XSLT
- Convalidi i convertitori XSLT e visualizzi in anteprima i risultati su un file demo
- Condivida i convertitori XSLT tra le istituzioni
Once the XSLT converter has been defined and validated, you can apply it to Integration Profiles, see Student Information Systems.
Uploading XSLT Converters
- Open the Integration XSL Converters page (Configuration Menu > General > External Systems).
- Select Add New Converter. A dialog box opens.
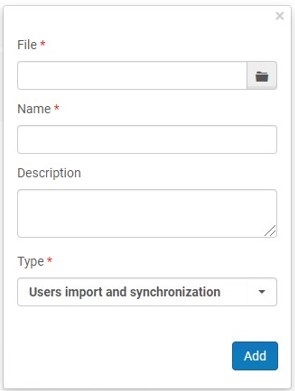
- Sfogli per caricare il file.
- Inserisci il nome del file. The file must have the *xsl suffix and must have a valid XML structure.
- Seleziona il tipo. Currently, the only type that is enabled is Users import and synchronization.
Modifica dei convertitori XSLT
- Open the Integration XSL Converters page (Alma Configuration > General > External Systems).
- Select a converter and click Edit in the row actions list. A screen opens where you can edit the converter.
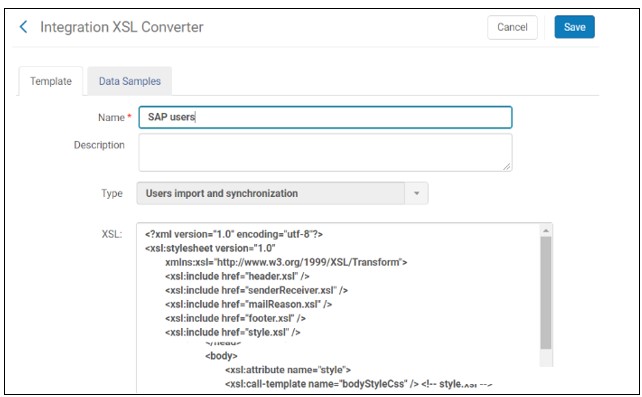
- On the Template tab, you can edit the name and description, and the raw XSL text.
- Select Save to save your changes.
Convalida dei convertitori XSLT
Può caricare un file di esempio per convalidare il convertitore rispetto all'XSD pertinente in base al tipo di convertitore.
You can open the XML file to modify and download it.
- Open the Integration XSL Converters page (Configuration Menu > General > External Systems).
- Select a converter and select Edit in the row actions list.
- Apri la tab scheda.
- Click Upload sample (XML), then browse for the data sample file and upload it.

- To modify the XML file and download it, select Edit in the row actions list, edit the file and select Download XML.
- To preview the resulting XML file, select Preview in the row actions list, select the particular converter type
- To delete the data sample file from the list, select Delete in the row actions list.
Contribuire i convertitori XSLT alla Community Zone
L'istituzione dedica molte ore alla creazione di convertitori XSLT. Per salva tempo e fatica, i bibliotecari possono contribuire questi convertitori alla Community Zone e copiare e utilizzare i convertitori che altre istituzioni hanno contribuito alla Community Zone. Una volta che il convertitore è stato copiato nell'istituzione, quest'ultima può apportare modifiche in Ordine per personalizzarlo in base alle proprie esigenze.
Contributed XSLT converters appear in the Community tab on the Integration XSL Converters page. I convertitori copiati appaiono nella istituzione tab.
The Aleph to Alma converter of integration type 'Users import and synchronization' was contributed to the Community Zone by Ex Libris.
- From the row actions, select Contribute for an XSLT converter on the Institution tab of the Integration XSL Converters page (Configuration Menu > General > External Systems). Si apre un messaggio di conferma.
- Modifica il nome e la descrizione nel messaggio e aggiungi un referente, se necessario. Then select Yes in the confirmation message. Upon confirmation, the converter is copied to the list of converters in the Community tab and can be copied by any institution.
- Open the Community tab on the Integration XSL Converters page (Configuration Menu > General > External Systems).
To view the XSLT converter, select View from the row actions. Vengono visualizzati i dettagli del profilo.
- Select Copy in the row actions list of the converter. Il convertitore viene copiato nella tua istituzione e il nuovo convertitore viene aperto per la modifica. The converter is copied and its status is Inactive by default.
- Modifica i dettagli del convertitore per soddisfare le tue esigenze.
- When you are done, select Save.
- Select the Institution tab to view the converter that you copied.
- Select Delete in the row actions list of the converter and select Confirm in the confirmation dialog box.
Il convertitore non è più disponibile per altre istituzioni. However, it is not deleted; you can continue using it in the Institution tab. Also, if another institution already copied this converter, the deletion of your converter has no effect on their local copy.
Page tags: article:topicproduct:almacontent:Documentationlang:english
