Setting Up Receipt Printing in ExpressCheck
Setting up receipt printing in Polaris ExpressCheck involves the following:
-
Installing receipt printing software and importing the certificate
-
(Optional) Reviewing existing checkout receipt options
Creating a Printer Certificate
Before installing and configuring the receipt printer software, you must create a printer certificate. Certificates are valid for three years.
Note:
If you are a hosted library, contact your Polaris Site Manager to complete this procedure.
To create a printer certificate
-
Connect to the desktop of the Windows server that is running the ExpressCheck web services.
-
Open a PowerShell window, and run it with administrator privileges.
-
Navigate to the following folder:
C:\Program Files\Polaris\8.0\ExpressCheckServices
-
Run the createPrinterCertificate.ps1 script by entering:
.\createPrinterCertificate.ps1 -dnsName "<certificate_name>"Replace <certificate_name> with the DNS name your library wants to use for the certificate. For example:
.\createPrinterCertificate.ps1 -dnsName "printer.polarislibrary.com"When run, this script creates two new files in the root of the \ExpressCheckServices folder:
-
printer-cert.pem
-
printer-key.pem
-
-
Copy the printer-cert.pem file to the AppData\Certificates folder.
-
Copy the printer-key.pem file to the AppData\Keys folder.
-
Make a second copy of these files to a backup location. The backup is needed if the ExpressCheck services API is re-installed or upgraded.
-
Delete the files from the root of the \ExpressCheckServices folder.
Installing Receipt Printing Software and Importing the Certificate
ExpressCheck uses third-party software called QZ Tray to manage access to your library's printers. After creating a printer certificate, install QZ Tray and import the certificates.
Important:
If you encounter problems setting up QZ Tray, contact our Polaris support team for assistance. We can help identify whether the issue is related to Leap or QZ Tray and provide guidance accordingly.
To install and configure QZ Tray
-
On the workstation running ExpressCheck, navigate to the following URL:
https://qz.io/download/
-
Download QZ Tray v2.2.4.
-
Once the download is complete, run the .exe file.
-
In the QZ Tray Setup dialog, select your installation options, and select Install.
The QZ Tray application installs on your workstation.
-
When the installation is complete, select Close.
The QZ Tray application should be running in the Windows system tray.
-
Open the Windows system tray, and right-click the QZ Tray icon.
-
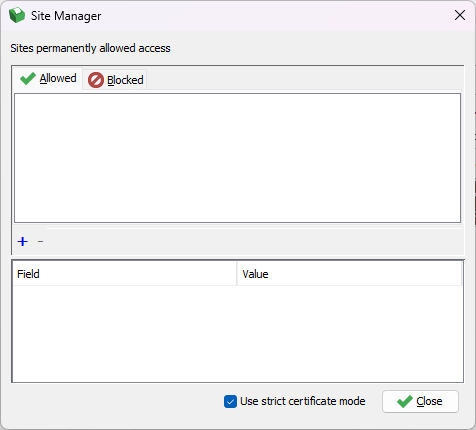
Select Advanced > Site Manager.
The Site Manager window opens.
-
On the Allowed tab, select the plus (+) icon, and select Browse.
A file explorer window opens.
-
Locate the printer-cert.pem file, select it, and select Open.
-
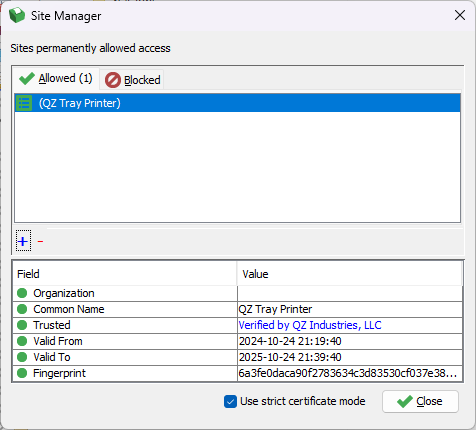
If the Unrecognized Certificate window appears, select Yes to continue.
If successful, the Site Manager window displays a message similar to the following:
-
Select Close.
Setting Receipt Printing Options in ExpressCheck
The Preferences screen in ExpressCheck allows you to set your receipt printing options. This screen appears automatically the first time you start the ExpressCheck application. However, you can access it at any time by pressing Ctrl+Alt+S.
To set receipt printing options
-
Start the ExpressCheck application, and sign in.
If you are starting ExpressCheck for the first time, the Preferences screen appears. Otherwise, the Welcome screen appears.
-
If the Welcome screen appears, press Ctrl+Alt+S to access the Preferences screen.
-
In the Settings section, select the Use Receipt Printer checkbox.
The receipt printing options become available and the configure options appear.
-
(Optional) Change the receipt printing options (these are enabled by default).
-
Print receipt on timeout — This option controls whether receipts print automatically when the patron's session times out.
-
Display print receipt button — This options controls whether a Print Receipt button appears in ExpressCheck.
-
-
In the Connect to host box, enter a host name, and select Connect.
ExpressCheck attempts to establish a connection to the QZ Tray software and displays a message "Connecting...". Once the connection is made, continue to the next step.
-
In the Receipt Printer Name field, select a printer from the list.
-
(Optional) If a printer is not appearing in the list, select Refresh Printers to refresh the list.
-
Select the following settings:
-
Receipt Printer Language — The language used by your receipt printer. Options include:
-
Generic
-
ESC/POS
-
HTML (the default value)
-
ZPL (used for Zebra compatible printers)
-
-
Auto Cut — A value that controls whether the printer automatically cuts receipts. This setting is enabled if you select ESC/POS or ZPL for the Receipt Printer Language; otherwise, it is not available. Options include:
-
None
-
Full cut (the default value)
-
Partial cut
-
-
Color — A value that controls whether receipts print in color or black and white. This setting is enabled if you select HTML for the Receipt Printer Language; otherwise, it is not available. Options include:
-
blackwhite
-
color (the default value)
-
grayscale
-
-
Interpolation — The method used for resizing images. This setting is enabled if you select HTML for the Receipt Printer Language; otherwise, it is not available. Options include:
-
bicubic (the default value)
-
bilinear
-
nearest-neighbor
-
-
Units — The unit of measurement to use with the value of the Margins setting. This setting is enabled if you select HTML for the Receipt Printer Language; otherwise, it is not available. Options include:
-
in (the default value)
-
cm
-
mm
-
-
Margins — The size of the margins. This value applies to all sides (top, bottom, left, and right) and can be a decimal number between 0 and 1. The default value is 0.0175. This setting is enabled if you select HTML for the Receipt Printer Language; otherwise, it is not available.
-
-
When you are finished, select Save.
Review Existing Checkout Receipt Options
After installing and configuring receipt printing in ExpressCheck, you might want to review existing settings that can affect checkout receipts. These include the following:
-
Checkout receipt information — The information included on the checkout receipt is determined by the Polaris Administration (staff client) settings for checkout receipts. You can set these fields with the Patron Services parameter Check-out: Receipt options. For details, see “Setting Up Circulation Receipts” in the Polaris staff client help.
-
Checkout receipt messages — The message that appears at the bottom of the receipt is the same message that appears on receipts generated from Leap. For details, see “Set receipt printer message text” in the Polaris staff client help. If you change the message, you must restart the ExpressCheck workstations to see the change.
-
Individual receipts — The Print individual receipt for each item option controls whether ExpressCheck prints a separate receipt for each item checked out. See the Finishing Tab section on Setting Account and Circulation Options for ExpressCheck.
-
Prompt for receipts — A “Print a Receipt?” prompt can help minimize paper receipts. See the Finishing Tab section on Setting Account and Circulation Options for ExpressCheck.
-
eReceipts — ExpressCheck also supports eReceipts (email and text message receipts). See the Finishing Tab section on Setting Account and Circulation Options for ExpressCheck.
