
Setting Up RFID Circulation in ExpressCheck
Polaris ExpressCheck supports item circulation using RFID technology. Setting up RFID in ExpressCheck involves the following:
Note:
Prior to completing this procedure, you must install Security Manager on your workstation and acquire an ExpressCheck RFID Polaris license. Contact your Polaris Site Manager for assistance.
Registering the Workstation
If you haven't done so already, register the workstation that you are connecting your RFID equipment to. Make sure the RFID: Use local security manager setting is set to Yes.
Configuring Security Manager
Polaris ExpressCheck uses Security Manager to enable RFID at the workstation level. You can configure Security Manager from the Preferences screen in ExpressCheck.
To configure Security Manager
-
Start the ExpressCheck application, and sign in.
If you are starting ExpressCheck for the first time, the Preferences screen appears. Otherwise, the Welcome screen appears.
-
If the Welcome screen appears, press Ctrl+Alt+S to access the Preferences screen.
-
In the Security Options section, select Use Security Manager.
-
Select Configure to expose the Security Manager settings.
-
In the Computer Name box, enter the host name of your workstation. The host name can be a maximum of 100 characters and can contain letters (both uppercase and lowercase), numbers, periods (.), and hyphens (-), but the value cannot start with a period. The default value is "COMPUTERNAME".
-
In the Port number box, enter 8076.
-
Select Test Security Manager to test the connection. ExpressCheck displays whether it connected successfully to Security Manager.
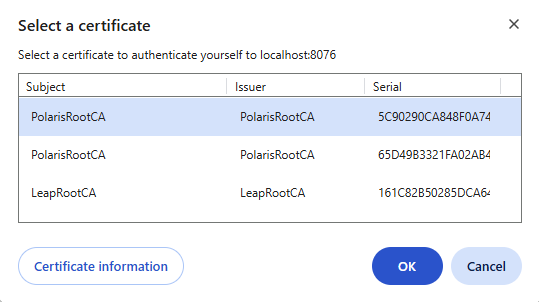
If you are testing Security Manager for the first time, ExpressCheck might prompt you to select a web certificate. For example:
-
If prompted, select a web certificate, and select OK.
When you have finished setting up the Security Manager, you can set the RFID options below.
Setting RFID Options in ExpressCheck
After configuring Security Manager, you can set the RFID options on the Preferences screen.
To set RFID options
-
From the Preferences screen, locate the Security Options section.
-
If you want to display a barcode scanner warning to patrons, select Display Barcode Scanner Warning. This option works as follows:
-
If Allow Barcode Scans for Item Checkouts is enabled, ExpressCheck alerts the patron about RFID security. The default message is:
This unit uses RFID to read item labels. Using the barcode scanner may not turn off security. Are you sure you want to continue using the barcode scanner?
The patron can select Yes to proceed with the checkout or No to cancel the transaction.
-
If Allow Barcode Scans for Item Checkouts is disabled, ExpressCheck informs the patron that only RFID scanners are supported for item checkout. The default message is:
This unit uses RFID to read item labels. Please reposition item on ExpressCheck tray. When you are ready select OK.
-
-
If you want to allow item checkout from a barcode scanner in addition to RFID, select Allow Barcode Scans for Item Checkouts.
-
To allow patrons to check out multiple items on the RFID tray simultaneously, select Allow Multiple RFID Items on Tray. If this option is not selected, patrons must check out items one at a time. ExpressCheck displays an error message if patrons place more than one item on the RFID tray.
-
When you are finished, select Save.
