
Bulk Change Patron Records
You can update multiple patron records at once in Leap if you have the Access patron record bulk change: Allow permission enabled in Polaris Administration (staff client). For more information about patron record permissions, search for "Circulation and Patron Services Workflow Permissions" in the Polaris staff client help.
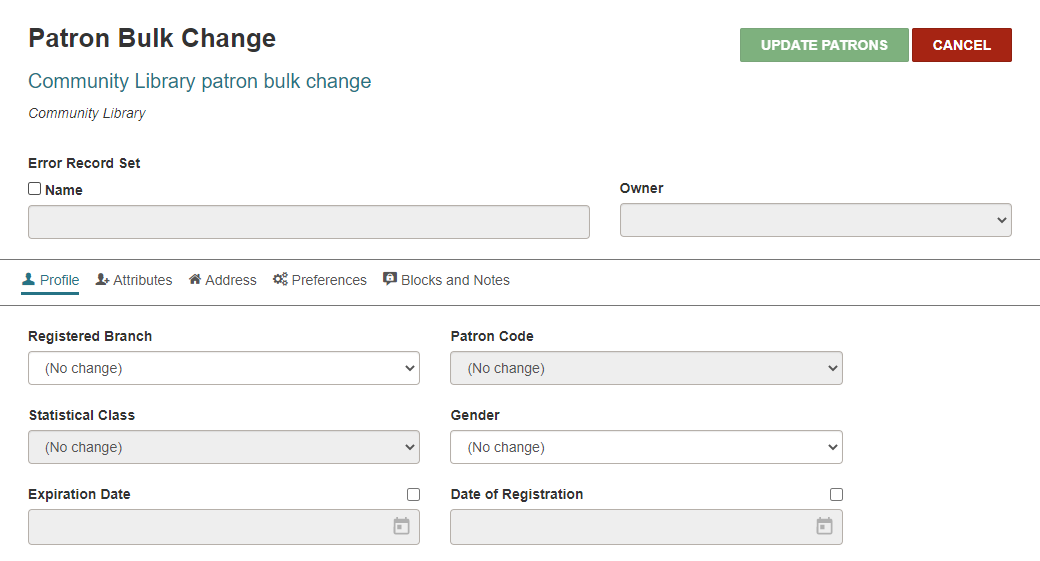
The tabs on the Patron Bulk Change workform align with the sections of the Patron Registration workform.
Note:
When you make bulk changes to free-text fields, Leap treats the text as a single unit. The entire text string can be deleted, replaced, or added, but you cannot delete, replace, or add parts of a text string.
To bulk change patron records
- Create or find the patron record set that contains the records you want to update. For more information, see Creating, Modifying, Deleting, and Undeleting Record Sets or Using the Find Tool.
- Open the record set in the Record Set workform.
-
Select ACTIONS > Bulk Change.
The Patron Bulk Change workform appears.
-
If you want to create an error record set, complete the steps below. If Leap cannot update a patron record during the bulk change process because of an error, it places the record in the error record set. You can review the error record set after the bulk change process is complete.
Note:
To create an error record set, you must have either the Patron record sets: Create or the Use 'own' patron record sets: Allow permission.-
Select the Error Record Set checkbox.
-
In the Name box, type a name for the error record set.
-
In the Owner list, select an organization or select your name.
Note:
The Owner list contains the organizations for which you have the Patron record sets: Create permission. If you have the Use 'own' patron record sets: Allow permission, your own name appears in the list.
-
-
Select one or more of the following tabs to make bulk changes to patron record information:
 Profile
Make bulk changes to one or more of the following profile fields:
-
Registered Branch
Note:
Only organizations for which you have the Hold Requests: Modify permission appear in the drop-down list. -
Patron Code
Note:
Leap enables the Patron Code field when you select a registered branch. -
Statistical Class
Note:
Leap enables the Statistical Class field when you select a registered branch. -
Gender
-
Expiration Date
-
Date of Registration
Attributes
The Attributes tab lists your library's user-defined fields (UDFs) for patron records. Do the following to make bulk changes to one or more UDFs:
-
Select the checkbox beside the UDF you want to change.
-
In the box below the UDF name, enter text or select an option from the list.
-
In the list to the right of the UDF name, select one of the following options:
-
Add When Empty - Adds the value you specified to all records in the record set that do not have a value set for the UDF.
-
Find and Delete - Finds the records in the record set with the UDF value you specified and clears the data from the UDF field. Records in the record set that have a different value for this UDF retain their UDF value.
-
Find and Replace - Finds the records in the record set with the UDF value you specified and replaces the value with the text you enter in the Change to box.
Note:
The Find and Replace option is only available for free-text UDFs. -
Overwrite All - Adds the value you specified to all records in the record set. If records already have a value set for the UDF, Leap overwrites the existing value with your new one.
-
Clear Field - Clears data from the UDF field for all records in the record set.
-
Address
Make bulk changes to one or more of the following address or notification fields:
-
Address Check Date
-
Notices Address
-
Notification Option
-
Additional TXT Notice
-
eReceipt Option
Note:
Bulk changes to notification fields could result in errors. For example, if you set the Notification Option to Email Address, Leap logs an error if the record set contains a patron record with no email address. If you chose to create an error record set, you can review errors after the bulk change process is complete.Preferences
Make bulk changes to one or more of the following preference fields:
-
Exclude from Notices and Reminders fields:
-
Overdue
-
Hold
-
Billing
-
Almost Overdue/Auto-Renew
-
Patron Record Expiration
-
Inactive Patron
-
-
Language
-
Maintain Reading History
-
Do Not Delete Record
-
Email Notices in Plain Text
-
Exclude from Collection Agency
Blocks and Notes
Make bulk changes to one or more block or note fields:
-
Library Assigned Blocks
Note:
Leap enables the Library Assigned Blocks field when you select a registered branch on the Profile tab.- Select the checkbox beside the Library Assigned Blocks label.
- In the box below the Library Assigned Blocks label, select an option from the list.
-
In the list to the right of the Library Assigned Blocks label, select one of the following options:
- Add - Adds the block you selected to all records in the record set.
- Delete - Removes the block you selected from all records in the record set.
-
Free Text Blocks
- Select the checkbox beside the Free Text Blocks label.
- In the box below the Free Text Blocks label, enter text.
-
In the list to the right of the Free Text Blocks label, select one of the following options:
- Add - Adds the free-text block you specified to all records in the record set.
- Delete - Removes the free-text block you specified from all records in the record set.
- Find and Replace - Finds the records in the record set with the free-text block you specified and replaces the existing text with the text you enter in the Change to box.
-
Blocking Notes
- Select the checkbox beside the Blocking Notes label.
- In the box below the Blocking Notes label, enter text.
-
In the list to the right of the Blocking Notes label, select one of the following options:
- Append - In all records in the record set, appends existing blocking note text with the text you specified.
- Prepend - In all records in the record set, prepends existing blocking note text with the text you specified.
- Clear - Clears existing blocking note text from all records in the record set.
-
Non-Blocking Notes
- Select the checkbox beside the Non-Blocking Notes label.
- In the box below the Non-Blocking Notes label, enter text.
-
In the list to the right of the Non-Blocking Notes label, select one of the following options:
- Append - In all records in the record set, appends existing non-blocking note text with the text you specified.
- Prepend - In all records in the record set, prepends existing non-blocking note text with the text you specified.
- Clear - Clears existing non-blocking note text from all records in the record set.
-
Dated Notes
- Select the checkbox beside the Dated Notes label.
- In the box below the Dated Notes label, enter text (up to 4,000 characters) .
-
In the list to the right of the Non-Blocking Notes label, select one of the following options:
-
Add - A new dated note with the entered text will be added to all patron records in the record set.
-
Delete - Dated notes with the exact text match will be deleted from all patron records.
-
-
Secure the Patron Record - Secures all records in the record set. For more information, search the Polaris staff client help for "Secure a patron record."
Note:
If Leap cannot secure a patron record (for example, because the patron has requests, checked out items, or claims), this is noted in the patron bulk change report. See View and Manage Patron Bulk Change Jobs.
-
-
Select UPDATE PATRONS.
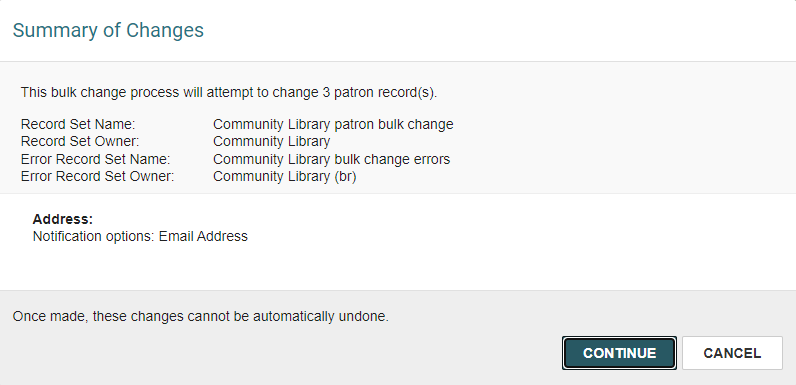
A Summary of Changes dialog appears.
-
Review the summary of changes.
-
Select CONTINUE.
Leap schedules the patron record bulk change to be processed and displays a confirmation message. The Polaris Jobs service handles processing the bulk change.
You can view and manage pending and completed patron bulk change jobs on the Background Processing page. For information, see View and Manage Patron Bulk Change Jobs.
If you chose to create an error record set, you can view it to review errors. Use the Find Tool to search for the error record set name you specified in step 4.
