
Target Services
To display all available services for a target, click the Services button  in the List of Targets. The List of Target Services window opens:
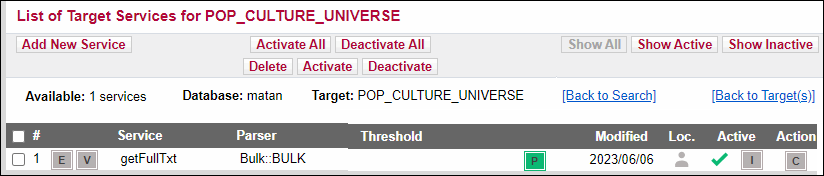
Each row of this table is structured in the following way:
-
 Check box – Select a check box next to a target to mark the target for deletion, activation, or deactivation.
 -
 Edit button – Click to edit the target service.
 -
 View button – Click to view the target service.
 - Parser – Displays the name of the target parser that creates the URLs needed when linking to a particular target service. For more information, see Target Parsers.
- Threshold – Displays the active threshold. In most cases, the global threshold is displayed, unless the local threshold field contains information specific to your institution’s digital environment.
-
 Portfolio button – Click to view the list of object portfolios of the target service. This button appears green if at least one getFullTxt portfolio has been activated for either DEFAULT or Institute/Group.
 - Modified – Displays the date on which the item was last modified. This date is updated when the item is changed by the customer, or by Ex Libris as part of the global KnowledgeBase update.
- Local – One of the following icons is displayed:
 Global – part of the global KnowledgeBase created and maintained by Ex Libris
 Localized – global item with a local threshold, and/or parse_param added by the customer for either default or institute or with a Authentication Note and/or a General Note added by the customer.
 Local – locally created by the customer
If the icon has a pencil, an internal description exists for the target service.
-

 Active/Inactive indicator – Click to toggle the activation status indicator for the item.
 - If institutes are defined in the instance, the Institution column appears. The Institute icon
 is displayed in yellow if institute settings exist for the target. (For more information about institutes, refer to the Institute Feature section of the SFX Advanced User's Guide.)
 -
 Copy button – Click to copy the service's data to a new service.
 -
 Linking Parameters button – Click to add and edit local information, such as user names and passwords. This button appears green if at least one L/P has been filled in for either DEFAULT or institute/Group.
The following activities are available for target services:
- Editing Target Services
- Viewing Target Services
- Viewing Target Service Linking Parameters
- Activating Target Services
- Deactivating Target Services
- Adding Target Services
- Deleting Target Services
- Configuring Institute Restrictions
Editing Target Services
You can edit target services in the List of Target Services.
-
Click the Edit button
next to the target service you want to edit. The Edit Target Service dialog box opens: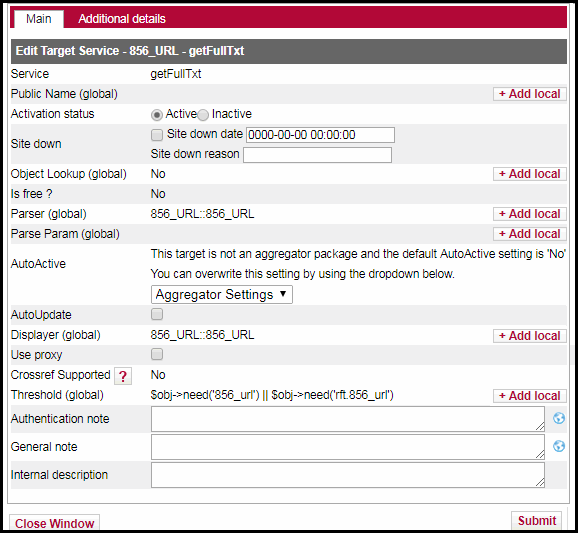 Edit Target Service
For the following services, the Autoload tab is displayed:
- BOOKS_AT_OVID_PURCHASE_AUTOLOAD-getFulltxt
- BOOKS_AT_OVID_SUBSCRIPTION_AUTOLOAD-getFulltxt
- ELSEVIER_SCIENCE_DIRECT_AUTOLOAD_BOOKS-getFulltxt
- ELSEVIER_SCIENCE_DIRECT_AUTOLOAD_JOURNALS-getFulltxt
- OVID_JOURNALS_AT_OVID_AUTOLOAD-getFulltxt
- SPRINGER_LINK_BOOKS_AUTOLOAD-getFulltxt
- SPRINGER_LINK_JOURNALS_AUTOLOAD-getFulltxt
- TAYLOR_AND_FRANCIS_EBOOKS_COMPLETE‐getFulltxt
- TAYLOR_FRANCIS_JOURNALS_AUTOHOLDINGS_COLLECTION-getFullTxt
- WILEY_ONLINE_LIBRARY_AUTOLOAD_BOOKS‐getFulltxt
- WILEY_ONLINE_LIBRARY_AUTOLOAD_JOURNALS‐getFulltxt
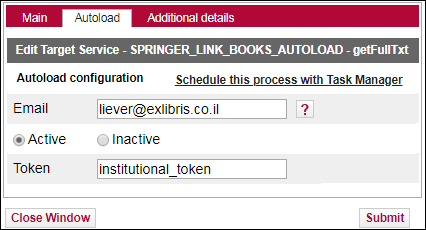 AutoloadMaking changes to this tab updates the corresponding UNIX configuration files in the SFX instance.
The following options are available:
- Email: Provide an email address to which to send notifications
- Active/Inactive: Select to activate/deactivate the KBART Autoload option
- Token: Enter authentication information (token, username and password) required by the provider.
Authentication information can be provided per institute if institutes have been configured in the instance.- Schedule this process with Task Manager: Click to schedule the autoload with Task Manager. (For more information concerning Task Manager, see the Task Manager section of the SFX System Administration Guide.)
The autoload can also be scheduled with the Server Admin Utility. -
Fill in the fields according to the following table:
Edit Target Services Field Description Service The available target service (not editable for global records) Public Name The name of the service in the SFX menu. Select Use default defined for this ServiceType to display the default name for the service type. Activation Status Indicates if the target service is active. If institutes have been defined in the instance, the Institute field is displayed, indicating the activation per institute. For more information about institutes, refer to the Institute Feature section of the SFX Advanced User's Guide. Site Down Indicates if the target service is temporarily down. This is indicated in the SFX menu by an icon and the words site down instead of the Go button and a link to the target window. This field is only displayed if the target is active.
The Site down date and Site down reason fields are used by the SFX Administrator to describe the site down date and reason. These fields are not displayed in the SFX menu and cannot be used to schedule any site down. These two fields are cleared when the status of the target service is changed from site down to site up.
Verde customers set this option in Verde – in KB Manager it is read-only.Object Lookup Select to have the target service displayed in the SFX menu only if the object requested is part of the object portfolio of that particular target service. Mainly used for getFulltxt services.
Object lookup is not used when objects do not need to be connected to a particular target service. In this case, the target service is displayed in the SFX menu screen regardless of the object from which you start. This is used for more general, search-oriented target services, such as getHolding or getWebSearch services.
Is free? Indicates if the service is free. Parser Contains the name of the target parser that creates the URLs needed when linking to a particular target service. For more information, see Target Parsers. Parse Param Contains information that is used by the target parser to create URLs. Fill in the parameters that apply to the whole target service—for example, the base URL. For more information, see Parse Param. AutoActive From the drop-down list, select one of the following to overwrite the default autoactive settings: - Aggregator Settings - Automatically activates the object if the target is an aggregator. If you select this option, the value INHERIT is stored in the SFX database.
- Yes - Automatically activates the object even if the target is not an aggregator.
- No - Does not automatically activate the object even if the target is an aggregator.
Displayer Specify a special display type for the target service. If the field is left blank, the default display is used. For more information, see Menu Configuration. AutoUpdate Select to automatically remove local overrides of target service and object portfolio parser and parse param information during the revision update. (For more information, see AutoUpdate.) Use Proxy Select if a proxy server needs to be used to connect to a particular target service. Crossref Supported Indicates if the SFX customer is a CrossRef library affiliate member and linking to the article level is available via CrossRef. Refer to the DOI/CROSSREF Setup section of the SFX Advanced User’s Guide for more information on CrossRef and the use of DOIs in SFX. Threshold Limitations on the availability of this target service. Authentication Note User authentication to be displayed in the SFX menu. For example, you can enter the user name and password needed to log on to the target. HTML tags can be used to make text italic or bold. For example: Authentication needed - login:bibuser – password:xxxxx To assign different local authentication notes per language defined in the instance, click the Globe icon. The globe icon appears gray if no local translations exist and appears yellow if local translations were added. General Note General information to be displayed in the SFX menu.HTML tags can be used to make text italic or bold. To assign different local authentication notes per language defined in the instance, click the Globe icon. The globe icon appears gray if no local translations exist and appears yellow if local translations were added. Internal Description Internal notes for a target. These are displayed only in the Admin Center interface. Some HTML/JS tags are not allowed in KBManager fields for security reasons (to prevent XSS). It is possible to disable XSS for specific fields, for example, if you want to embed license information in iframes in the SFX menu. For more information on disabling XSS, see the XSS - Cross-Site Scripting Security Breach section of the SFX System Administration Guide. -
To add a local public name:
-
Click +Add local. The Public Name (local) field appears with a globe icon:
 Add Public Local Name
The globe icon appears gray if no local translations exist and appears yellow if local translations were added.
-
To remove the local public name, click Clear local. Note that clicking this button also removes the language specific local public names you added (see the next step).
-
Enter a local public name. To assign different local public names per language, click the Globe icon. The languages that you have configured appear (see Show Language Drop-Down). For example:
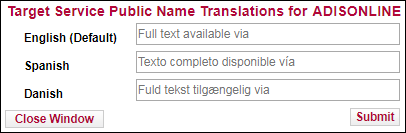 Public Local Name Translations
 -
Enter a public local name for each language. These override the local public name you entered on the previous page.
-
Click Submit.
-
-
To add other local values, click +Add local.
-
For additional details, click the Additional Details tab.
-
To confirm your changes, click Submit.
Viewing Target Services
You can view target services from the List of Target Services.
- Click the View button next to the target service you want to view. The View Target Service dialog box opens:
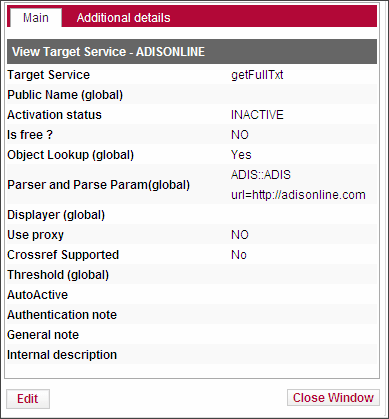
- To edit the target service, click Edit. For more information, see Editing Target Services.
- For additional details, click the Additional Details tab.
Viewing Target Service Linking Parameters
To view the linking parameters for a target, click the Linking Parameters button from the List of Target Services. The List of Linking Parameters dialog box for the target opens:
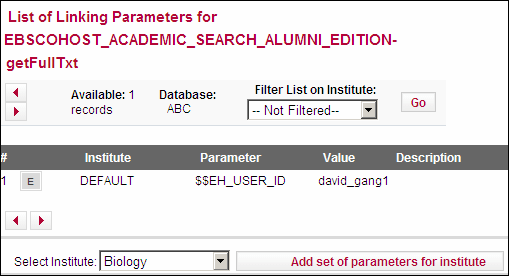
For a description of this dialog box and more information on linking parameters, see Linking Parameters.
Activating Target Services
You can activate target services if they are related to databases or full-text repositories to which linking is possible. This means:
- The target parser supports this service.
- Your institution has privileges to access the data in the database or full-text repository.
To activate a target service, click the gray arrow . The arrow becomes green . To activate all target services, click Activate All.
If the target is an aggregator, the following dialog box opens:

To also switch the activation of the target services’s object portfolios, click Yes.
Deactivating Target Services
To deactivate a target service, click the green arrow . The arrow becomes gray . To deactivate all target services, click Deactivate All.
Adding Target Services
You can add target services to the List of Target Services.
- Click Add New Service. The Add Target Service dialog box opens:
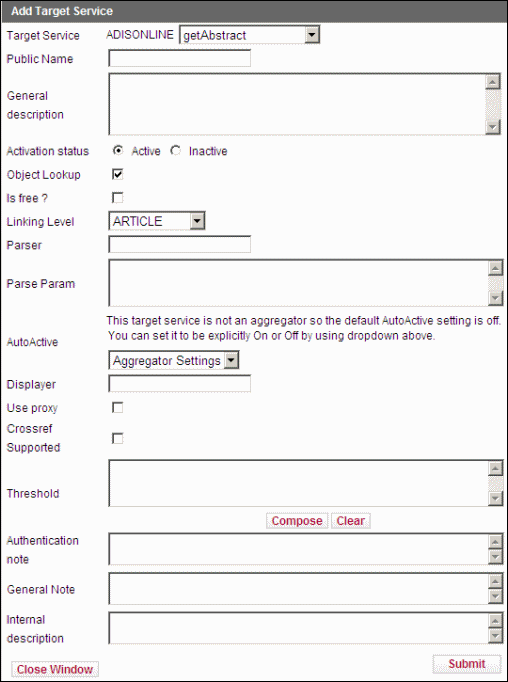
- Fill in the fields according toEdit Target Services. The Service and Parser fields are mandatory in order to add a new target service.
You can also add a new target service by clicking the Copy button next to the target service you want to copy. The Add Target Service dialog box opens, containing the target service’s data. The suffix _LCL is automatically added to the name of the original target service. Modify the information, if necessary.
- To confirm your changes, click Submit.
Deleting Target Services
You can delete target services from the List of Target Services.
- Select the check box next to the target service you want to delete.
- Click Delete.
The target service is deleted.
- Only locally created targets, target services, and object portfolios can be deleted. SFX prevents you from deleting targets, target services, and object portfolios provided by Ex Libris.
- There is no rollback in KBManager. Once you confirm the deletion, all target service data is lost, including the object portfolios connected to the deleted target service.
Configuring Institute Restrictions
It is possible to configure a specific target to appear in the SFX menu only for certain institutes (specific user communities that have been defined in SFX). More information about configuring institute restrictions and defining institutes can be found in the Institute Feature section of the SFX Advanced User’s Guide.
