
Adquisiciones Solicitadas por el usuario
Esta página describe cómo trabajar con Adquisiciones solicitadas por el usuario (PDA). For an in depth view of patron driven acquisitions workflow see Getting the Most from Alma - Patron Driven Acquisitions. For information on the overall purchasing workflow including the steps for creating orders in general, see Purchasing Workflow.
- Operador de compras
- Gerente de compras
Las Adquisiciones solicitadas por los usuarios (PDA) en Alma representan un acuerdo para que un proveedor envíe recursos electrónicos a una institución que puedan ser de interés para dicha institución. Los recursos se importan como un fichero de repositorio y son publicados en la capa de descubrimiento para que los usuarios puedan acceder. To publish to the discovery layer, the relevant setting must be configured on the Import Profile Details page (see Importing Records Using Profiles).
El acceso está controlado por el proveedor; cuando se excede un límite predefinido, se considera como si el ejemplar se hubiera sido comprado y se envía como parte de un EOD a Alma. Los pedidos (marcados como PDA) se cargan en Alma, y entonces el proveedor envía las facturas correspondientes. Al final del periodo definido de PDA, los recursos de PDA que no se compraron se pueden ser eliminados de Alma por la institución.
Patron Driven Acquisitions are managed on the Patron Driven Acquisitions page (Acquisitions > Advanced Tools > Patron Driven Acquisition (PDA)).
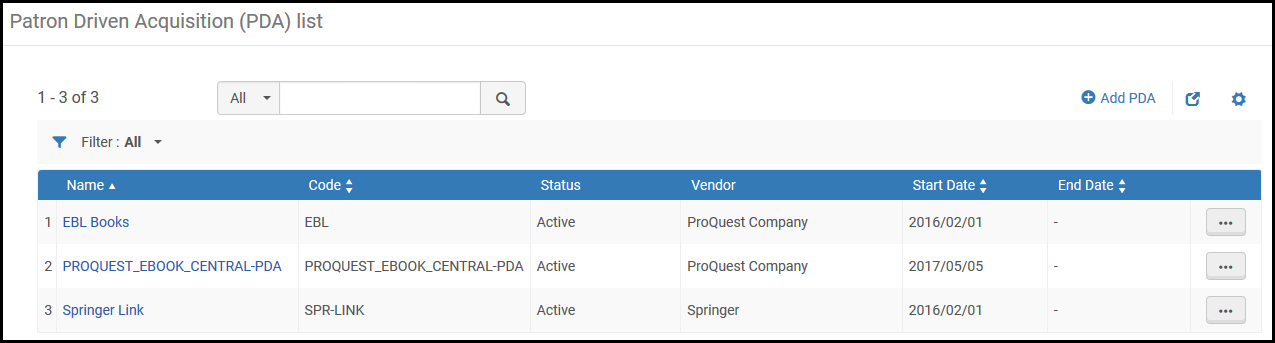
For a detailed presentation on PDA, see Acquisitions - Patron Driven Acquisitions (PDA) Demand Driven Acquisitions (DDA).pptx.
Los siguientes pasos describen el flujo de trabajo para trabajar con PDAs.
- Crear una PDA. The PDA must be activated to continue in the workflow (see To create a new PDA entry below).
- Manage profiles for the PDA (see To manage PDA profiles below). El perfil se tiene que activar para importar un fichero de repositorio.
- El proveedor envía un fichero de importación de repositorio que contiene todos los títulos que se asocian con la PDA. Import the file to Alma (see To import a repository below; also see Importing Records Using an Import Profile). Este paso crea registros bibliográficos nuevos y portafolios que están enlazados con el perfil de PDA. Los títulos se publican entonces en el sistema de descubrimiento. El proveedor controla el uso de estos títulos a través de los usuarios. Los títulos a los que se ha accedido más de un determinado número de veces (en atención al acuerdo de PDA) serán comprados por la biblioteca (paso siguiente).
- El proveedor envía un fichero de datos para el pedido incrustado (EOD) que contiene los títulos que la institución comprará. Import the file to Alma (see To import PDA orders below; also see Importing Records Using an Import Profile). Importar no crea un inventario. El proceso de coincidencia de Alma verifica que los ejemplares de inventario relacionados existen y se enlazan con la PDA, creando las líneas de orden de compra para estos pedidos (enlazado al inventario). Nótese que solo los registros bibliográficos enlazados a la PDA se tienen en cuenta durante el proceso de coincidencia.Las instituciones que no usen los ficheros EOD deben actualizar cada portafolio manualmente:
- Perform a repository search to locate the portfolio; see Searching in Alma.
- Select Order to create an order for the portfolio.
- El proveedor envía facturas (usando EDI, por ejemplo) para los títulos comprados. At the end of the defined PDA period, PDA resources that were not purchased can be removed from Alma by the institution (see To clean up a PDA entry below).En lugar de gestionar los costes para cada título, algunas instituciones pagan una cierta cantidad al proveedor, que informa a la institución de los títulos se han comprado. En estos casos, se puede añadir una nota en el portafolio indicando que el título se compró. Se puede añadir una nota a múltiples portafolios a la vez usando un fichero de lotes del cargador de portafolios.También se pueden llevar a cabo las siguientes acciones en la PDA, cuando sea necesario:
- Edit – See To edit a PDA entry.
- Duplicate – See To duplicate an existing PDA entry.
- Pause – See To pause a PDA program.
- Terminate – See To terminate a PDA entry.
- Cancel – See To cancel a PDA entry.
- On the Patron Driven Acquisition (PDA) List page (Acquisitions > Advanced Tools > Patron Driven Acquisition (PDA), select Add PDA. Aparecerá la página de Detalles de PDA.
- Completar los campos de la página. Se proporciona una descripción de los campos en la siguiente tabla.
Campos de la página de Detalles de PDA Campo Descripción Usar Zona de red Este campo aparece solo en una institución que sea miembro de una red colaborativa que implementa una Zona de red. For an explanation of this option, see Selecting Where to Create New Bibliographic Records. Nombre (requerido) Un nombre descriptivo para la entrada de la PDA. Código (requerido) Un código para la entrada de la PDA Estado (requerido) Seleccionar un estado para la PDA. Elegir entre: - Activas
- Cancelado
- Borrador
The default status is Draft. The status must be set to Active to enable continuing with the PDA workflow.Proveedor (obligatorio) Seleccionar el proveedor que está suministrando el recurso electrónico. Fecha de inicio (requerido) Seleccionar la fecha de comienzo para la PDA. Fecha de finalización Seleccionar la fecha de finalización para la PDA. Umbral de acceso El número de solicitudes de acceso realizadas para el recurso electrónico sobre el cual la institución acepta la compra del recurso. Este valor es solo informativo; el proveedor verifica el valor y procede según sea necesario. Umbral de presupuesto The maximum amount of money that the institution is willing to pay for e-resources after the Access threshold has been reached. Seleccionar también una divisa de la lista desplegable. This value is for information only; Alma does not prevent resources from being accessed, even if the Budget threshold has been reached.Porcentaje de alertas When the PDA usage exceeds the alert percentage of the budget threshold, the PDA Threshold Letter is sent to the contact person after the PDA - Alert PDA Reached Threshold job runs. The PDA - Alert PDA Reached Threshold job is set to automatically run once every day. Después de importar un fichero EOD, la tarea se ejecuta para determinar si se envía un correo electrónico de notificación por correo electrónico. For details on importing EOD files, see Importing Records Using an Import Profile.For information on the PDA Threshold Letter, see Configuring Alma Letters.For more information concerning the PDA alert, see the PDA Alerts video (4:33 mins).Se ha notificado al contacto Se selecciona este campo cuando el porcentaje de la alerta se haya excedido y se ha enviado un correo electrónico de notificación a la persona de contacto. Licencia Seleccionar una licencia o adenda para asociarla con la PDA. Nótese que este campo solo tiene fines informativos. Contacto Seleccionar un contacto para asociarlo con la PDA. - Select Save to store the information you entered and return to the Patron Driven Acquisition (PDA) List page.
- On the Patron Driven Acquisition (PDA) List page (Acquisitions > Advanced Tools > Patron Driven Acquisition (PDA)), select Edit in the row actions list or select the PDA name. The Summary tab of the PDA Details page appears.
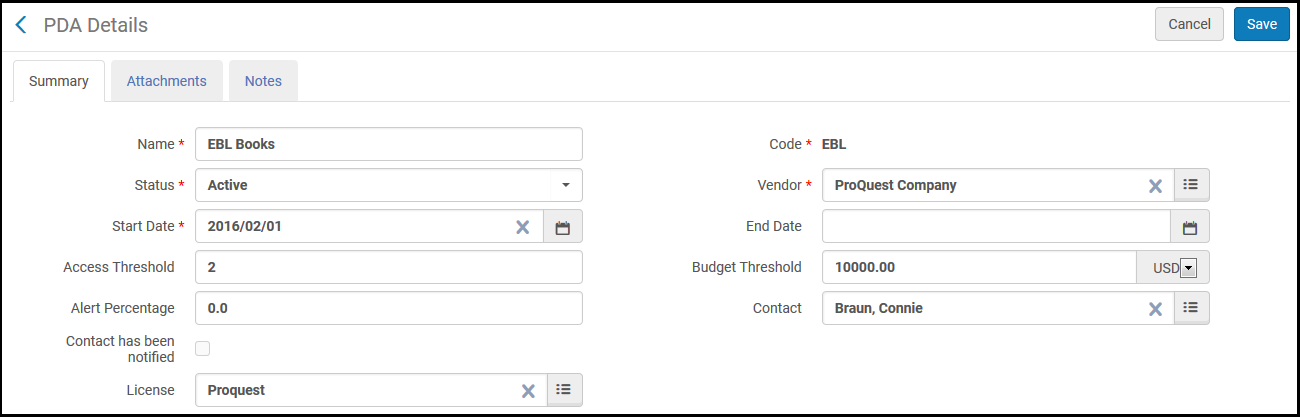
Etiqueta de Resumen de la Página de la Lista de Adquisiciones solicitadas por los usuarios (PDA) - Editar la información de la PDA cuando sea necesario. For a description of the fields on this page, see To create a new PDA entry.
- For information on the Attachments tab, see Attachments Tab.
- For information about the Notes tab, see Notes Tab.Select the relevant option in the drop-down at the top of the page (Activate Notes or Dismiss Notes) to either mark notes as active (unread) or to dismiss displayed notes. Notes received are automatically labeled as Active. Dismissed notes are excluded from the Activate Notes facet, but are still included with their respective requests (they are not deleted).
- Select Save to store the information you entered and return to the Patron Driven Acquisition (PDA) List page.
On the Patron Driven Acquisition (PDA) List page (Acquisitions > Advanced Tools > Patron Driven Acquisition (PDA)), select Manage PDA Profiles in the row actions list. Aparecerá la página Ejecutar importación, donde se pueden gestionar los perfiles asociados con la PDA. For details on profiles, see Importing Records Using Profiles.
Si se está trabajando con EBL, comprobar que se han configuran las siguientes propiedades en el perfil para importar:
- PO line currency – Note that only one currency is supported.
- Decimal point location – Set to 2.
- List price field – Set to 980b.
- Default PO line owner – Must be defined.
- Fund distribution field – Set to 981b (leave percent subfield empty).
- Default fund – Must be defined.
- Vendor invoice number field – Set to 980f in order to package all PO lines with the identical number in this field into one PO and create an invoice from this PO.
On the Patron Driven Acquisition (PDA) List page (Acquisitions > Advanced Tools > Patron Driven Acquisition (PDA)), select Import Repository in the row actions list. Aparecerá la página Iniciar nueva importación, cuando se seleccione uno o más ficheros de repositorio para importar. Select Submit to import the selected files. Los ejemplares de inventario se crean y publican en el sistema de descubrimiento. See Importing Records Using an Import Profile.
On the Patron Driven Acquisition (PDA) List page (Acquisitions > Advanced Tools > Patron Driven Acquisition (PDA)), select Import Orders in the row actions list. The Start New Import page appears, where you import an EOD of the PDA (see Importing Records Using an Import Profile). PO lines are then created, beginning the purchasing workflow (see Purchasing Workflow).
Cuando se importen pedidos de PDA, comprobar que los ficheros .mrc están codificados con caracteres MARC8.
- On the Patron Driven Acquisition (PDA) List page (Acquisitions > Advanced Tools > Patron Driven Acquisition (PDA)), select Duplicate in the row actions list. The Summary tab of the PDA Details page opens. See To edit a PDA entry.The fields contain the same values as the original PDA entry, except that the Name and Code fields are empty.
- Enter values for the Name and Code fields, and modify any other field values, as required.
- Select Save to store the information you entered and return to the Patron Driven Acquisition (PDA) List page.
Select Pause in the row actions list on the Patron Driven Acquisitions (PDA) List page (Acquisitions > Advanced Tools > Patron Driven Acquisition (PDA)) and select Confirm in the confirmation dialog box.
Alma pausará el programa PDA y:
- Suprimirá todos los registros bibliográficos que ya estuviesen cargados para este programa de PDA pero que no se hubiesen comprado todavía.
- Impide que se carguen registros bibliográficos en el programa de PDA.
Select Resume in the row actions list to resume the PDA program.
Select Terminate in the row actions list on the Patron Driven Acquisition (PDA) List page (Acquisitions > Advanced Tools > Patron Driven Acquisition (PDA)). Alma configura la fecha de finalización de la PDA a la fecha actual. Ya no se pueden importar los repositorios, aunque todavía se puedan importar EODs.
Select Cleanup in the row actions list on the Patron Driven Acquisition (PDA) List page (Acquisitions > Advanced Tools > Patron Driven Acquisition (PDA)) and select Confirm in the confirmation dialog box. Alma eliminará los ejemplares de inventario de la PDA que no tengan líneas de orden de compra asociadas con ellos.
- Para llevar a cabo una limpieza en una PDA, primero se debe finalizar la PDA.
- After cleanup is performed, the PDA status is set to Canceled.
On the Patron Driven Acquisition (PDA) List page (Acquisitions > Advanced Tools > Patron Driven Acquisition (PDA)), select Cancel in the row actions list. and select Confirm in the confirmation dialog box. Alma configura la fecha de finalización de la PDA con la fecha actual y elimina los ejemplares de inventario de la PDA que no tengan líneas de orden de compra asociadas con ellos. The PDA status is set to Canceled. PDA profiles in Canceled status can be removed by selecting Delete in the row actions list.
Page tags: article:topicproduct:almacontent:Documentationlang:englishpatron driven acquisitionPDAcreate patron driven acquisition
