
User Details Configuration
Configuring User Groups
- ユーザー管理者
- 総合システム管理者
ユーザーに割り当てるユーザーグループを定義できます。ユーザーグループとは、卒業生や教員などのタイプ別にユーザーをグループ化する方法です。After defining user groups, you can assign them to users when adding or editing users (see Adding Users and Editing Users).After adding user groups, you must specify the user record types that can be associated with each user group; see Mapping User Groups to User Record Types.
If you have configured Alma to do so, then after adding a new user with a user group, Alma automatically adds role profiles and/or user registration terms of service to the user (see Configuring Role Assignment Rules and Configuring User Registration Rules).
You configure user groups on the User Groups code table (Configuration Menu > User Management > User Details > User Groups).For more information about code tables, see Code Tables.For configuring user groups on the institution level see Configuring Alma.
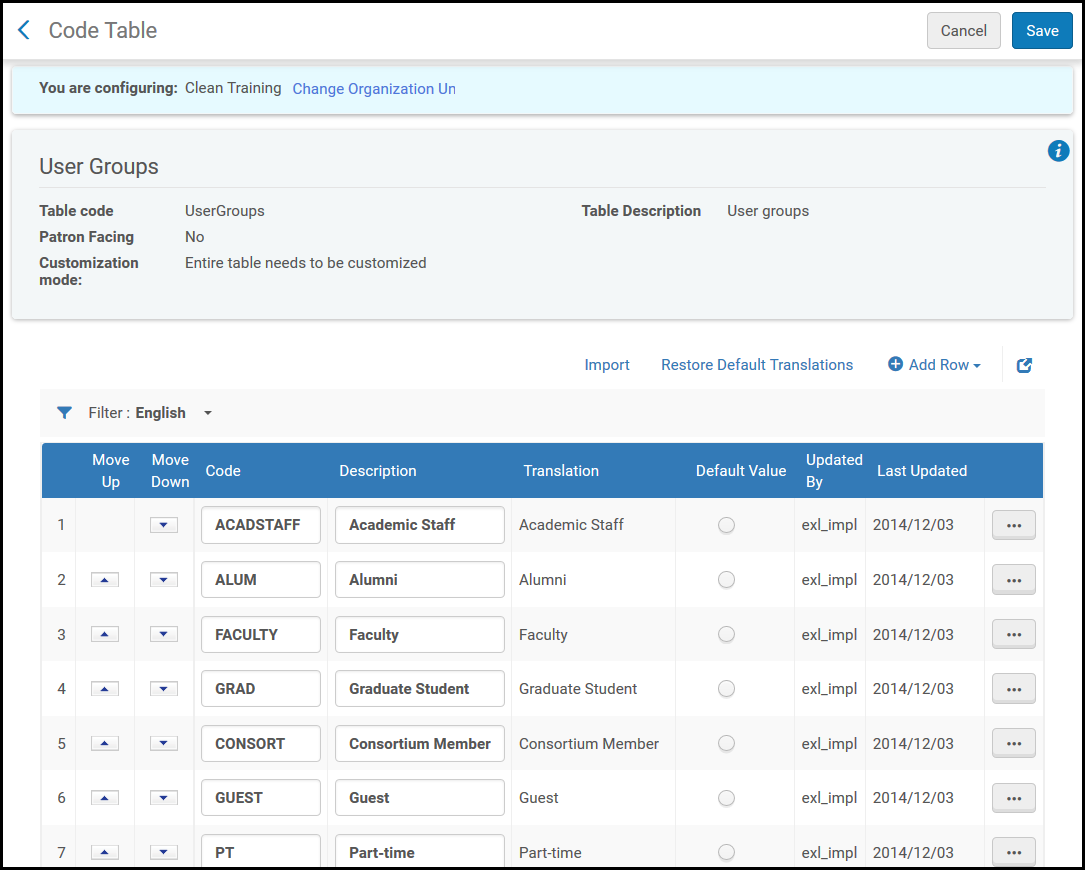
このページで、ユーザーグループを追加・編集・削除できます。
- ユーザーグループを削除するには、実際のグループを削除する前に、まずグループのユーザーレコードタイプへのマッピングを削除する必要があります。
- If your institution is using user groups as fulfillment parameter (e.g., in Fulfillment Unit Rules,Display Logic Rules, etc.), you will need to update the rules with the new user group in order for them to take effect for users in the group.
- ユーザーグループでは、レコードの並べ替えはサポートされていません。
- ユーザーグループコードには、英数字しか使えません。
- The Translation column is visible only when your institution has enabled languages (Configuration > General > General Configuration > Institution Languages).
Mapping User Groups to User Record Types
- ユーザー管理者
- 総合システム管理者
ユーザーグループをユーザーレコードタイプに関連付けることができます。When a user of a certain record type (Staff, Public, or Contact) is added or created (see Adding Users and Editing Users), only user groups associated with that record type may be selected for that user.
ユーザーグループにレコードタイプを割り当てる前に、ユーザーグループを作成する必要があります。See Configuring User Groups.
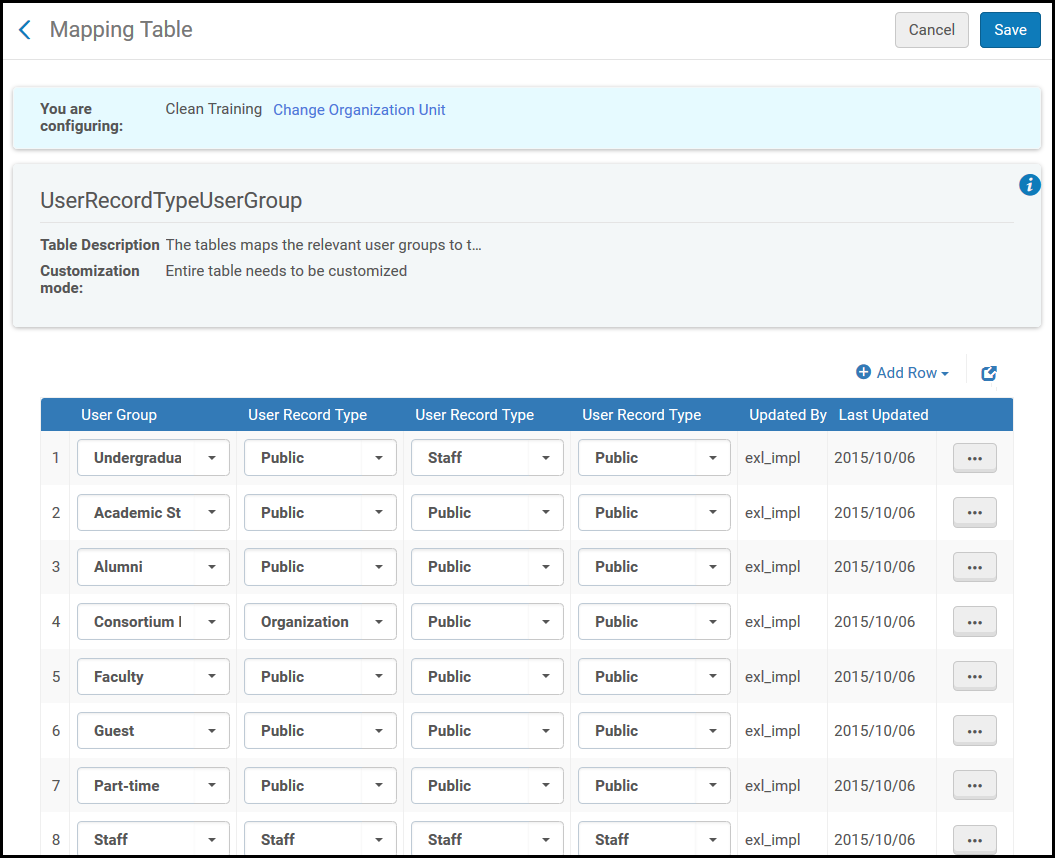
You configure the mapping from user groups to record types on the User Record Type User Group mapping table (Configuration > User Management > User Details > User Record Type/User Group).For more information about mapping tables, see Mapping Tables.
ユーザーグループからユーザーレコードタイプへのマッピングを追加・編集・削除できます。ユーザーグループごとに、最大3つのユーザーレコードタイプを選択します。どのドロップダウンリストでも、空の値を選択できます。同じ値を複数回使用しても効果はありません(1回使用するのと同じです)。
組織という値は使用しないでください(選択しても効果はありません)。
Configuring User Job Categories
- ユーザー管理者
- 総合システム管理者
ユーザーに割り当てるユーザージョブカテゴリを定義できます。ユーザージョブカテゴリとは、ユーザーが図書館で実行する機能であり、財務、貸出・返却受付などのタイプごとにユーザーをグループ化する方法です。After defining user job categories, you can assign them to users when adding or editing users (see Adding Users and Editing Users).After adding user job categories, you must specify the user record types that can be associated with each user job category; see Mapping Job Categories to User Record Types.
Almaをそのように設定している場合、ジョブカテゴリを持つ新しいユーザーを追加すると、Alma automatically adds role profiles to the user (see Configuring Role Assignment Rules).
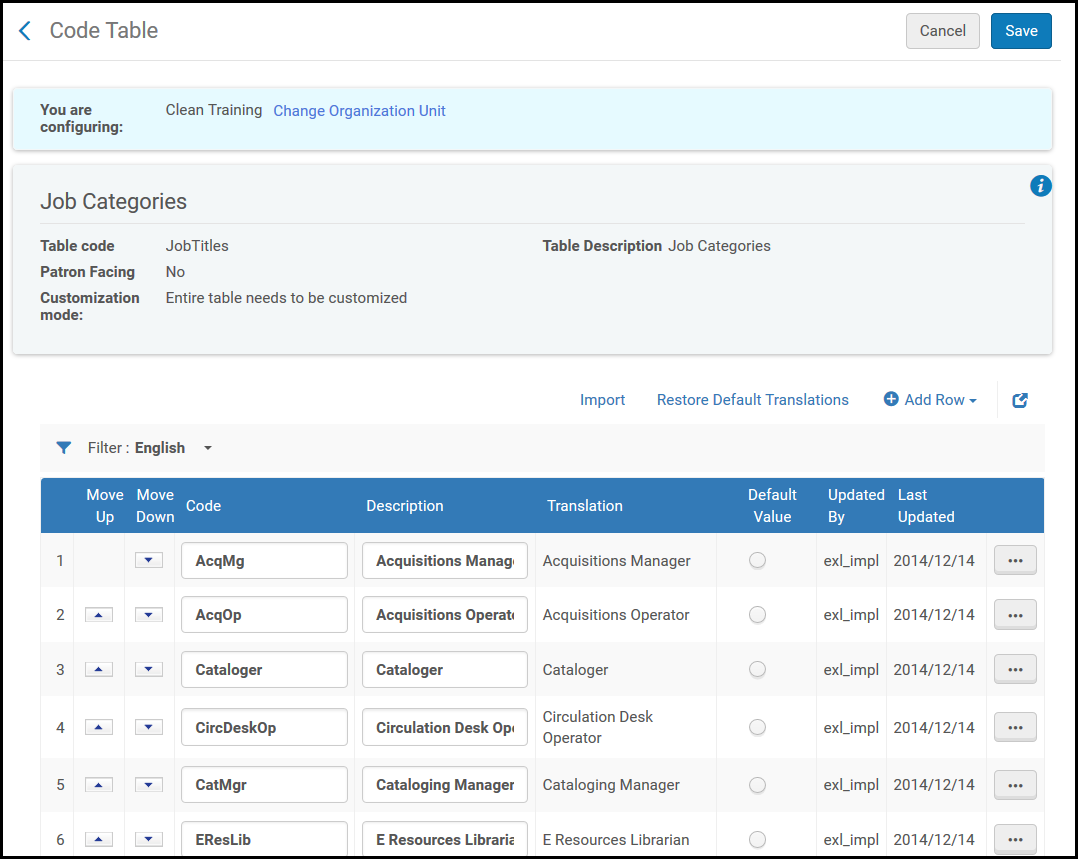
You configure user job categories on the Job Titles code table (Configuration Menu > User Management > User Details > Job Categories).For more information about code tables, see Code Tables.
ユーザーのジョブカテゴリを追加・編集・削除できます。ジョブカテゴリのドロップダウンボックスでジョブカテゴリの表示を並べ替えたり、デフォルトで選択されたジョブカテゴリを選ぶこともできます。
Mapping Job Categories to User Record Types
- ユーザー管理者
- 総合システム管理者
ジョブカテゴリをユーザーレコードタイプに関連付けることができます。When a user of a certain record type (Staff, Public, or Contact) is added or created (see Adding Users and Editing Users), only job categories associated with that record type may be selected for that user.
ジョブカテゴリにレコードタイプを割り当てる前に、ジョブカテゴリを作成する必要があります。See Configuring Job Categories.
You configure the mapping from job categories to user record types on the User Record Type Job Title mapping table (Configuration > User Management > User Details > User Record Type/Job Category).For more information about mapping tables, see Mapping Tables.
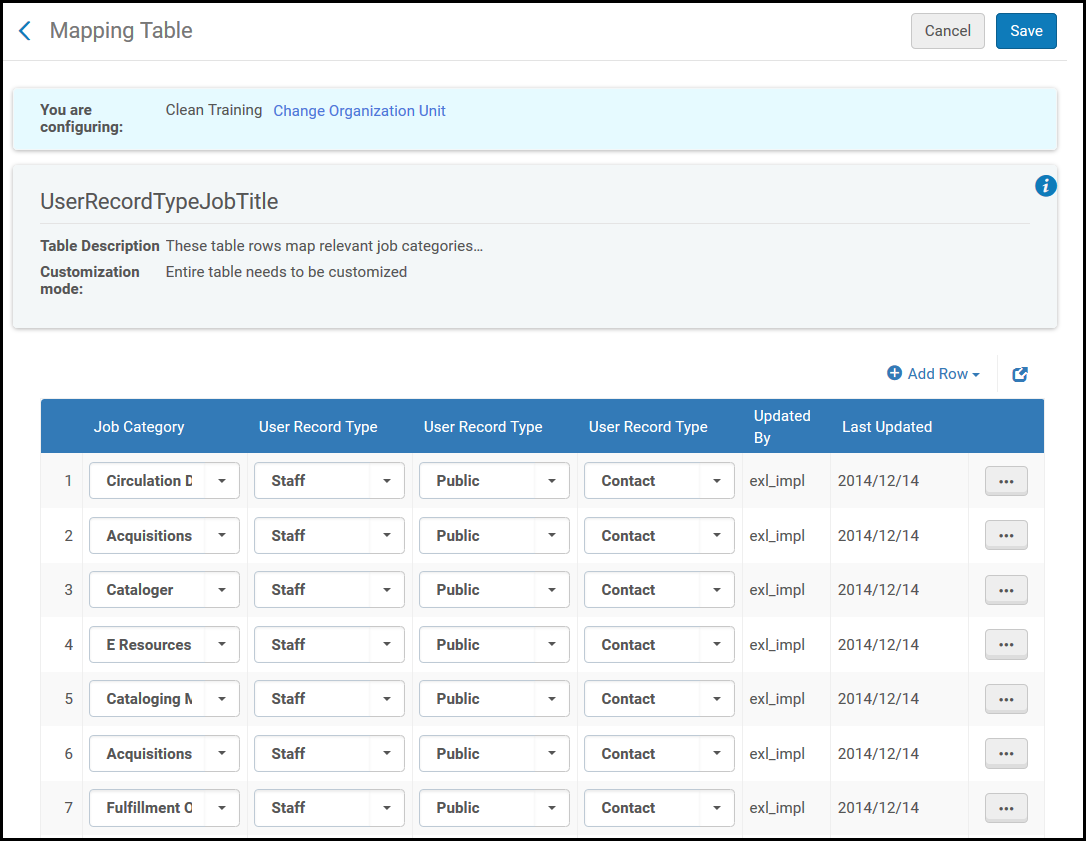
ジョブカテゴリからユーザーレコードタイプへのマッピングを追加・編集・削除できます。ジョブカテゴリごとに、最大3つのユーザーレコードタイプを選択します。どのドロップダウンリストでも、空の値を選択できます。同じ値を複数回使用しても効果はありません(1回使用するのと同じです)。
組織という値は使用しないでください(選択しても効果はありません)。
Configuring the Display of User Names
- ユーザー管理者
- 総合システム管理者
Almaでのユーザー名の表示方法を設定できます。名前はAlmaのホームページやユーザーメニューなどの場所に表示されます。
ユーザーレコードタイプごとに名前の表示を個別に設定します。各レコードタイプについて、次の文字列により、最初の表示名、2番目の表示名、3番目の表示名、および区切り文字として表示されるものを設定できます。
Possible values for display names include firstName, lastName,middleName,userName(primary identifier),jobDescription, or userTitle(honorific) .See Adding Users.デフォルトでは、ユーザーの名前がlastName, firstNameとして表示されます。
You configure user name display options on the Display User Name mapping table (Configuration > User Management > User Details > User Name Display).For more information about mapping tables, see Mapping Tables.
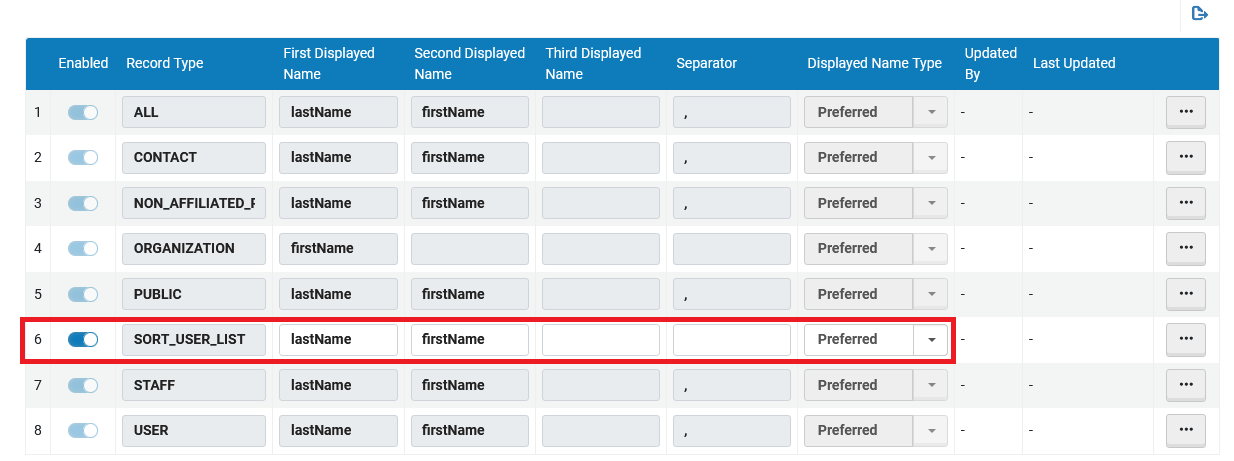
コンタクト、パブリック、スタッフのレコードタイプについて、ユーザー名の表示方法を編集できます。ある行を無効にした場合、そのレコードタイプには、デフォルトの表示名であるlastName, firstNameが使用されます。レコードタイプごとに、優先、主要、または両方の名前を表示するかどうかを選択できます。両方の名前を選択すると、主要な名前の後ろの括弧内に、優先する名前が表示されます。
You can also change the way names are used for sorting, for example, to sort by first+middle name and then by the last name.このテーブルのSORT_USER_LIST行を設定することにより、設定を行うことができます。
レコードタイプで「すべて」「組織」「ユーザー」の行には効果がありません。
Configuring Statistical Categories
- ユーザー管理者
- 一般システム管理者
統計カテゴリを使用して、レポートまたはフルフィルメント ユニット ルールで使用するために、ユーザー グループや教育レベルなどの個々のユーザーに関する情報をユーザー アカウントに関連付けることができます。
Analytics employs statistical categories to enable you to display or filter Analytics information about users by fields other than user group and job category (which are automatically available for statistical analysis).たとえば、地域や学位でユーザーを分類することもできます。
統計カテゴリをフルフィルメント ユニット ルールで使用して、さまざまなポリシーをさまざまなタイプのユーザーに割り当てることもできます。たとえば、大学院生に学部生よりも広範な貸出特権を与えるために使用できます。
このセクションでは、統計カテゴリを作成する方法について説明します。これは 3 ステップのプロセスです。
- Create statistical category types- Before creating categories, define the various category types.For example: Geographical Area or Academic Degree.See step 1 below.
- Create statistical categories- For each category type, create the categories for that type.たとえば、カテゴリタイプが「地域」の場合、ニューヨーク市、ボストン、パリといったカテゴリを作成できます(これらがユーザーの所在地である場合)。See step 2 below.
- Map categories to types- Assign each category to its category type.- See step 3 below.
Once the required statistical categories have been created, they can be assigned to users.When library-level statistics are activated for an institution, visibility of and access to statistical categories that are assigned to users is limited by the user's scope.それにもかかわらず、カテゴリ自体は機関レベルで定義されています。For additional information, see Managing User Statistics.
10 を超える異なるカテゴリ タイプを作成することは許可されていますが、Analytics で一度に使用できるのはそのうちの 10 だけです。For information about selecting the categories to make available, see step 4 below.
For information about using statistical categories in Analytics reports, see Users.For information about using them in fulfillment-unit rules, see Physical Fulfillment.
Creating Statistical Category Types (Step 1)
カテゴリタイプはいくつでも定義できます。ただし、アナリティックスで一度に使用できるのはそのうち10個だけです。
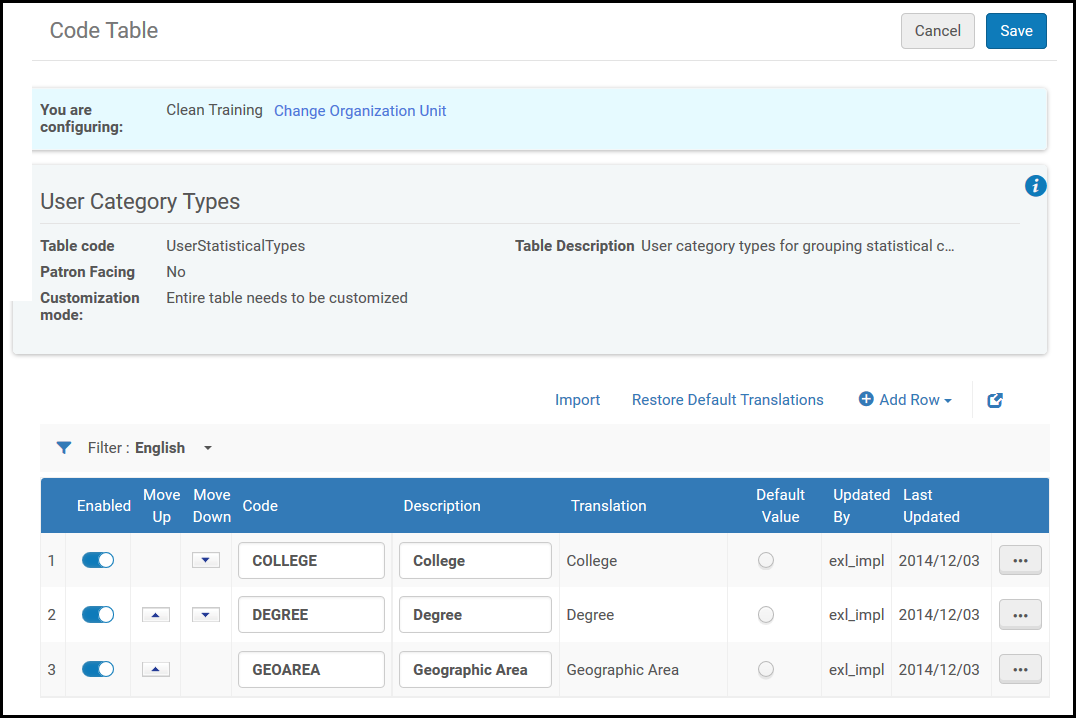
You define statistical category types on the User Category Types code table (Configuration menu > User Management > User Details > Category Types).For more information about code tables, see Code Tables.カテゴリタイプを追加・編集・削除できます。
Creating Statistical Categories (Step 2)
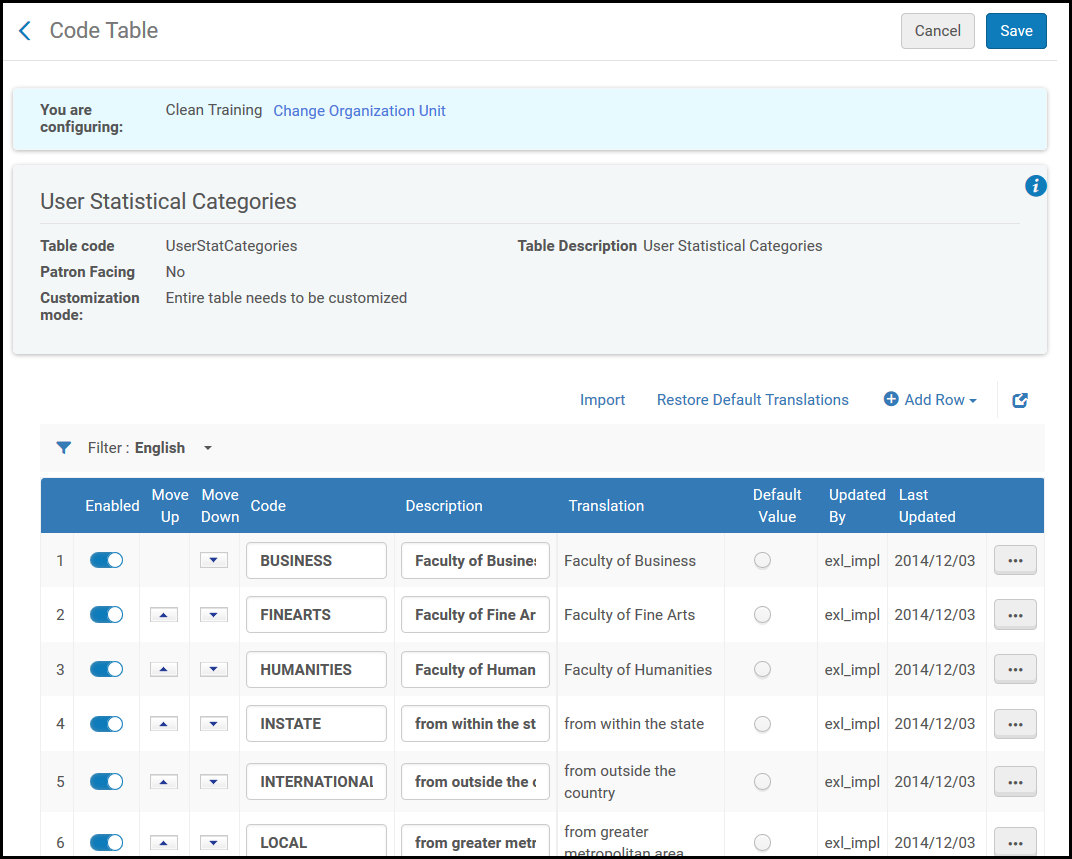
You define statistical categories on the User Statistical Categories code table (Configuration menu > User Management > User Details > Statistical Categories).For more information about code tables, see Code Tables.統計カテゴリを追加・編集・削除できます。
統計カテゴリ/タイプのリンクは、1つ以上の統計カテゴリと1つ以上のカテゴリタイプが定義されている場合にのみ、[ユーザー管理設定]ページに表示されます
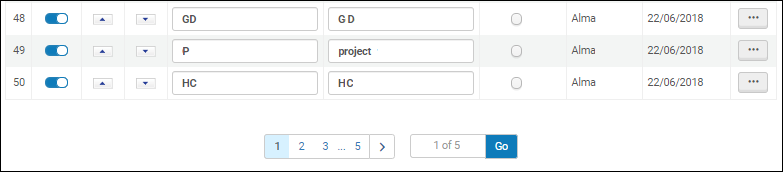
ユーザー統計カテゴリのコードテーブルは、複数のページに分かれて表示されます。50行を超えるユーザー統計カテゴリが設定されている場合、1ページごとに最大50行が表示されます。
Excel ファイルからカテゴリまたはタイプをインポートすると、既存のデータが上書きされます。For example if the existing row in Alma has the category code STAC_EXPECT_GRAD_TERM and the row in the Excel file has the code STAC_EXPECT_GRAD_TERM_1, then the row in Alma will be overwritten with STAC_EXPECT_GRAD_TERM_1.
Mapping Statistical Categories to Types (Step 3)
You map statistical categories to types on the Statistical Categories/Types mapping table (Configuration menu > User Management > User Details > Statistical Categories/Types).For more information about mapping tables, see Mapping Tables.マッピングを追加・編集・削除でき、有効にも無効にもできます。
A category can be mapped to only one type.
1000 を超えるタイプが統計カテゴリにマップされている場合、ユーザーはそれを編集できません。The drop down combo box will be read-only.マップされたタイプを編集するには、ユーザーは統計カテゴリをエクスポートし、エクスポートされた Excel に変更を適用してから、ファイルをインポートする必要があります。統計カテゴリのエクスポートおよびインポートの詳細については、以下を参照してください。
If there are more than 1000 statistical categories, see Statistical Category in the Advanced Search regarding the codes to use.
Additionally, you can use the export/import option to update multiple lines in one import action.
- マッピングテーブルで、エクスポートのアイコンを選択して、エクスポートを行うことができます。

- 必要に応じて、エクスポートされたExcelに行を追加します。The only columns relevant to Statistical Categories that you need to fill in are:
- 列A(有効)– [有効] 列に「はい」と入力します。正の値を指定しないとマッピングは有効にならないことに注意してください。
- Column B (Target Code Combo Code) – Fill in the Statistical Category codes that you want to add to the mapping.Verify that they havefirstbeen added to the Statistical Categories table using the User Management Configuration menu > User Details > Statistical Categories menu.
- 列D(Source1コンボコード) – 統計カテゴリがマッピングするべきカテゴリタイプコードを入力します。Verify that they havefirstbeen added to the Statistical Categories table using the User Management Configuration menu > User Details > Category Types menu.
The example below displays adding the Statistical Category code ‘USA' to the Category type Country (coded COU):

- When the Excel file is complete, select Import in the Mapping Table screen.
- ファイルをアップロードするように指示されます。
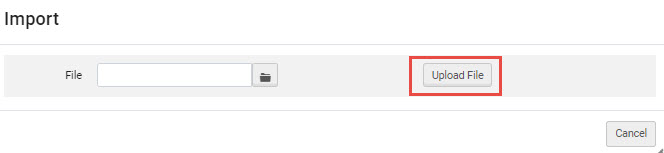 Excelファイルをマッピングテーブルにインポートします
- Excelファイルを参照します。ファイルをアップロードを選択します。
- 「これにより、既存するすべての行が置き換えられます。Are you sure?' confirmation message appears, select Confirm.
Selecting Statistical Category Types to Appear in Analytics (Step 4)
You can select up to ten statistical category types that you want to make available in Analytics.This is done on the Analytics User Statistics code table (Configuration menu > Analytics > General Configuration > Analytics > Analytics User Statistics).For more information about code tables, see Code Tables.説明の列で(最大)10個のタイプを選択します。各行は有効にも無効にもできます。
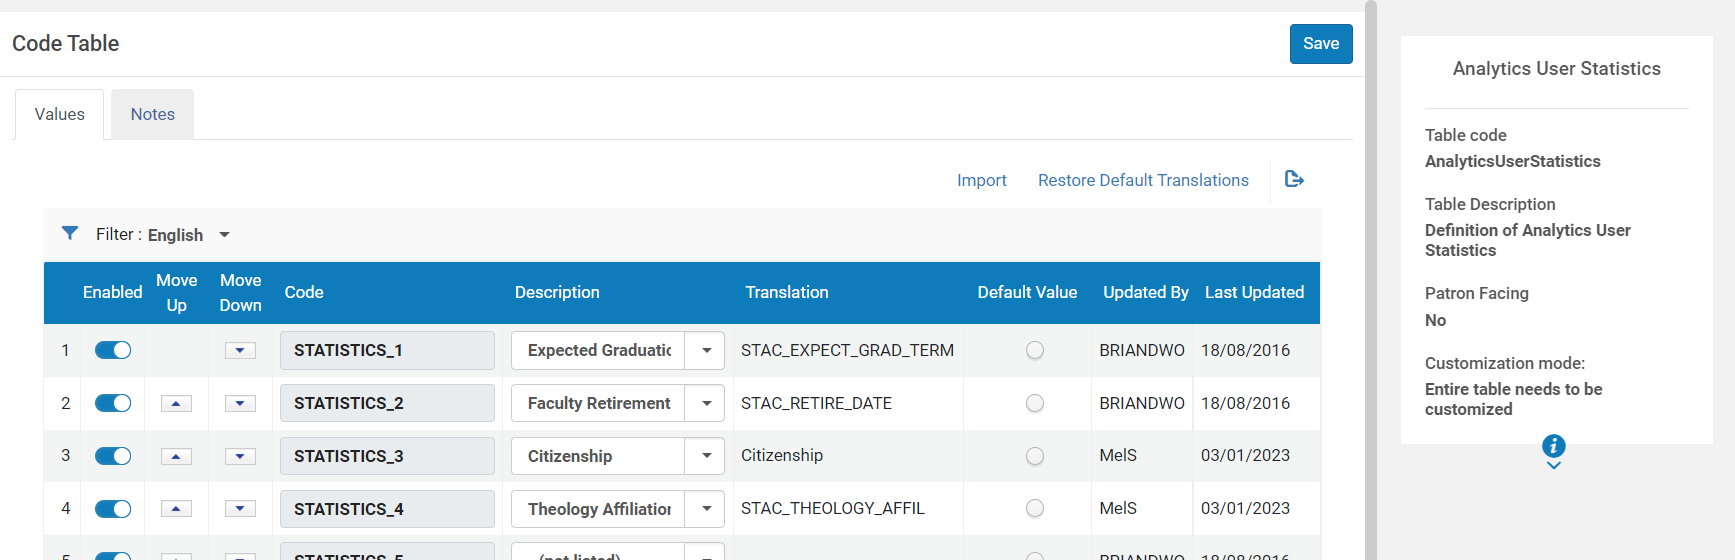
分析レポートには、特定のライブラリを範囲とする統計タイプは表示されません。機関全体の情報のみが表示されます。
Statistical Category in the Advanced Search
上級検索の[ユーザー > 統計カテゴリ]で統計カテゴリが1,000件を超える場合、ユーザーが最初の3文字を入力するとオートコンプリートのオプションが表示されます。統計カテゴリが1000未満の場合、管理可能なドロップダウンリストが表示されます。For details, see Searching in Alma.
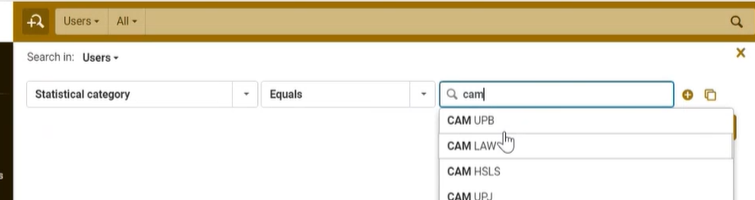
Therefore, when updating the Statistical Categories/Types mapping table (see Mapping Statistical Categories to Types (Step 3)) for more than 1000 categories, it is important to add codes that include at least 3 characters.
Configuring User Titles
- ユーザー管理者
- 総合システム管理者
Mr.、教授などのユーザータイトル(敬称)を設定できます。User titles are available when adding or editing users (see Adding Users and Editing Users).タイトルは、Almaのレターや印刷物でも使用できます。
You configure user titles on the User Titles code table (Configuration > User Management > User Details > User Titles).For more information about code tables, see Code Tables.
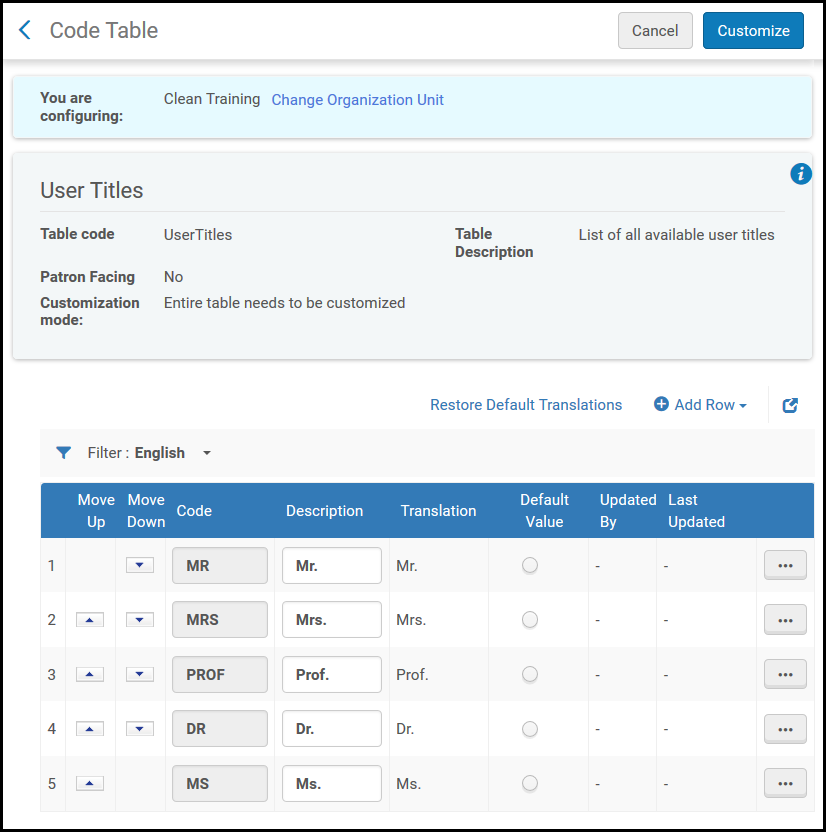
タイトルを追加・編集・削除できます。ドロップダウンリストに表示される順序と、デフォルトで選択されるタイトルを選択できます。
Configuring Library Notices Opt-In
- ユーザー管理者
- 一般システム管理者
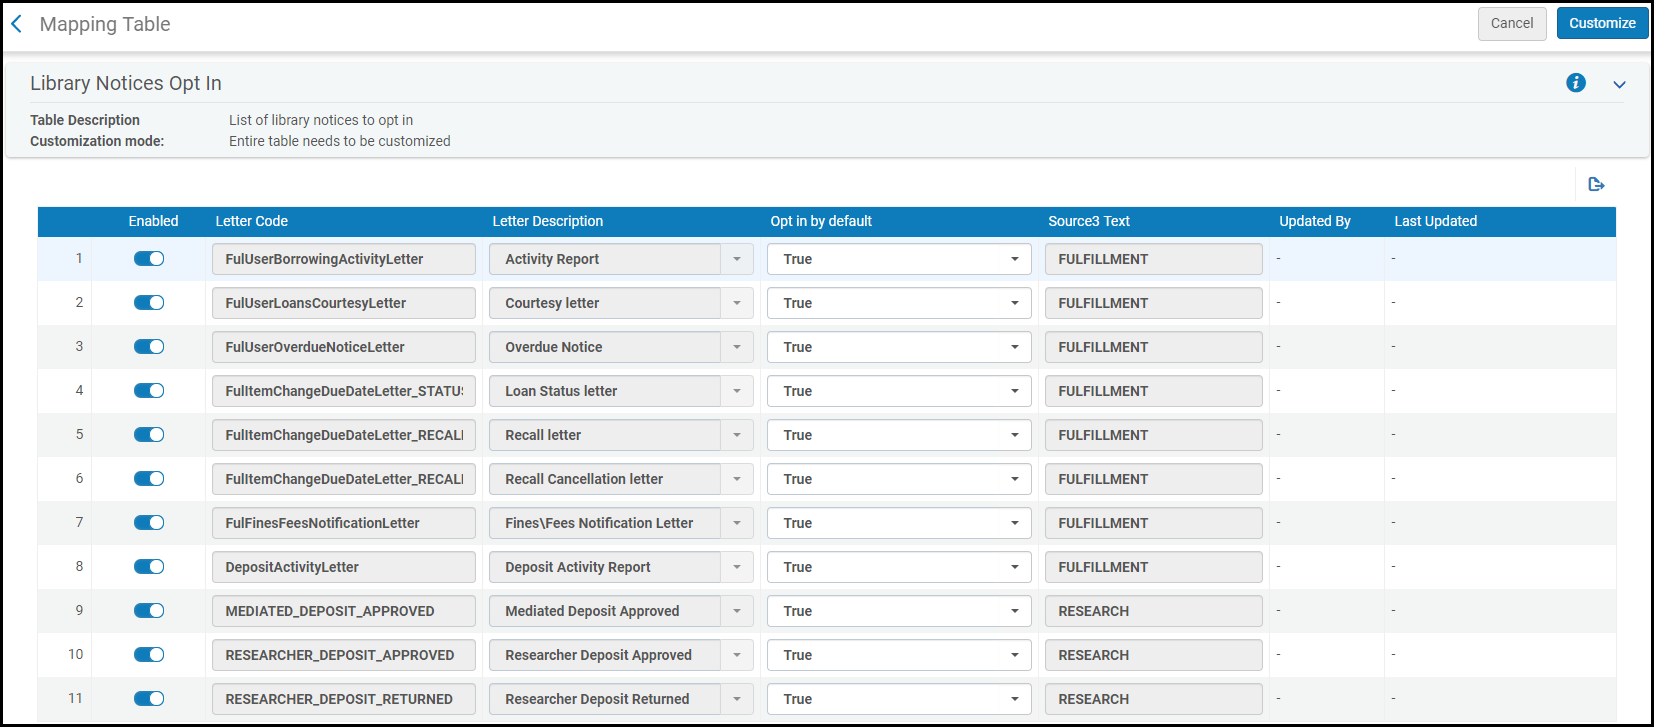
The Library Notices Opt In mapping table (Configuration > User Management > User Details > Library Notices Opt In) enables you to configure whether users can opt in/out of receiving each patron letter and whether each letter is sent by default or not to all users.For more information about mapping tables, see Mapping Tables.
For more information about Library Notices Opt-ins, see the Patron Opt Out for Selected Notices video (2:56).
次の通知からユーザーをオプトアウトする機能を有効/無効にすることができます。無効にすると、ユーザーにはユーザーレターの受信をオプトイン/オプトアウトするオプションが与えられません。For more information about the individual letters, see Configuring Letters Overview.
- アクティビティリポート – 取寄せアクティビティレター
- 返却期限通知レター – 返却期限通知レター
- Automatic Loans Renew Letter - Loan renew letter that is sent automatically (Configuration > Fulfillment > Fulfillment Jobs Configuration > Notify Automatic Renewals checkbox)
- 延滞通知 – 延滞通知レター
- 貸出ステータスレター – 期日変更について送信される貸出状態通知
- リコールレター – リコールについて送信される貸出状況通知
- リコールキャンセルレター – リコールのキャンセルについて送信される貸出状況通知
- 罰金\手数料通知レター – 罰金\手数料通知レター全文
- デポジットアクティビティリポート – デポジットアクティビティレター
- 研究者向けにマークされた残りのレターは、機関に実装されたEsploroにのみ関係します。
- [ソース3テキスト]列のテキストは変更しないでください。このフィールドは内部用であり、今後のリリースで削除される予定です。
Select True or False in the Opt in by default column to configure whether users are opted into/out of the letter by default.True means that users are opted in by default.
このテーブルに加えられた変更は、変更後に作成されたすべての新しいユーザーに自動で適用されます。既存のユーザーの場合、これらの変更は、テーブルをカスタマイズする前に選択されていたユーザーレターのリストが変更されていない場合にのみ適用されます。For more information, see Selected Patron Letters in the Adding Users section.
For patrons who do not want to receive certain library notifications, you can disable these notifications for individual patrons (see Selected Patron Letters in the Adding Users section) or for groups of patrons using SIS feeds or bulk user updates, according to library policies.If enabled in Primo/VE, patrons can opt in/out of receiving specific notices in My Library Card > Personal Details.
To customize the label names and translations for these letters see Configuring Display Labels for Library Notices Opt-In for Primo and Configuring Display Labels for Library Notices Opt-In for Primo VE
