
Managing Users
This page describes how to manage users including adding, editing, deleting and distributing users.For information on working with user roles (including user profiles) see Managing User Roles.
ユーザーを管理するには、次の役職のいずれかが必要です。
- ユーザーマネージャー
- ユーザー管理者
- 貸出・返却受付マネージャー
- 貸出・返却受付オペレータ
フルフィルメント サービス オペレータの役割を持つユーザーは、以下に説明するユーザー情報を閲覧できますが、編集することはできません。
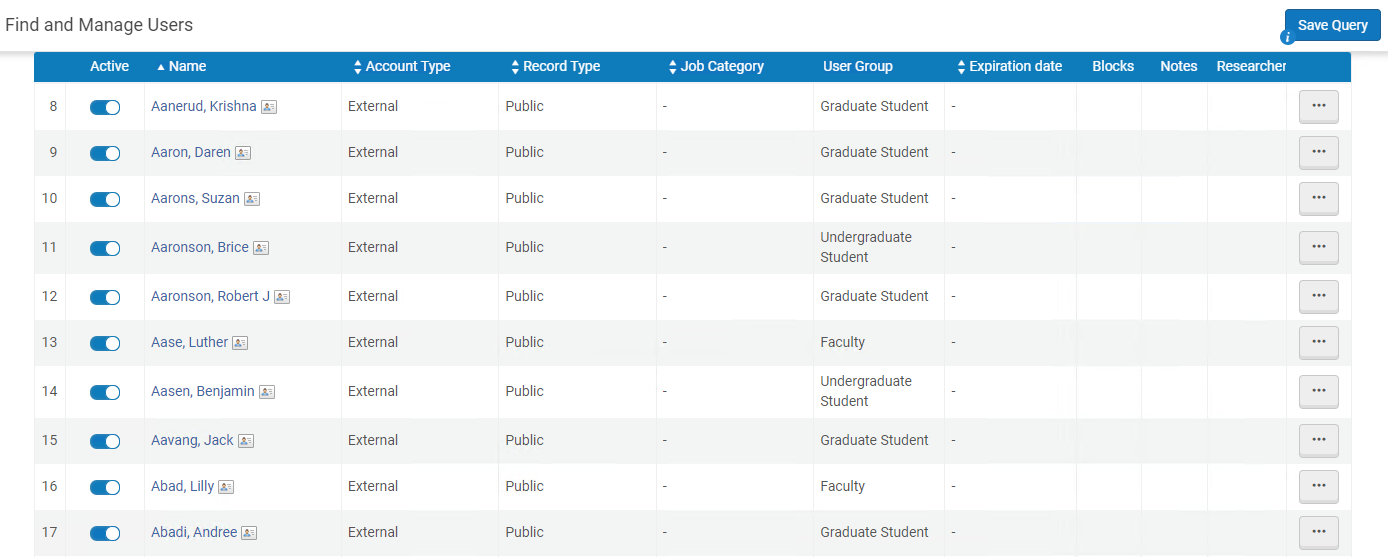
You manage users on the Find and Manage Users page (Admin > User Management > Manage Users).You can also access this page by searching for a user in the persistent search; see Searching in Alma.
For information on finding and editing existing users and adding new users, watch the Users in Alma video (4:33 min).
ユーザーレコードのタイプに応じてユーザーのリストを絞り込むには、タブを使用します(スタッフ、パブリック、コンタクト、およびすべて)。
- Eメールまたは識別子を検索する場合、文字列全体を入力する必要があります。部分一致は実行されません。
- For additional information on managing users in a collaborative network, see Centrally Managing Users in a Network Zone.
タブ内でアカウント、役割、およびステータスのフィルターを使用して、ユーザーリストをさらにフィルターします:
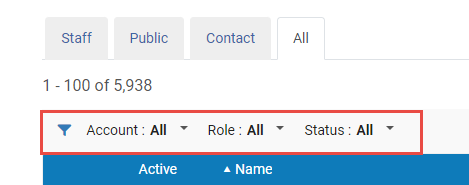
- Account filter - filter the user list to display only; a)External, b)Internal, c)Internal with external authentication, and d)All users.
- 役割フィルター - ユーザーリストをフィルターして、目録管理者などの特定の役割を持つユーザーのみを表示します。
- Status filter - filter the user list to display only users with the following statuses; a)All, b)Active and not expired, c)Not active or expired.
The following columns appear on this page.
| 列の名前 | 説明 |
|---|---|
| 有効 | 新しいユーザーは自動的に有効化されます。
Marking a user as not active is equivalent to blocking the patron account.例:
|
| 名前 | ユーザーの名前です。Select this link to open the User Details page (see Editing Users). |
| アカウント種別 |
|
| レコードタイプ([すべて]タブのみ) | ユーザーのタイプです。See Adding Users for more information about this field.
|
| ジョブカテゴリ | The user's job category; see Configuring Job Categories. |
| ユーザーグループ([コンタクト]タブにはありません) | The user's user group; see Configuring User Groups. |
| ステータス | Whether the user is Active or Inactive.For internal users, who are authenticated by Alma, this is a manual setting not tied to the expiration date.For more information about authentication, see Expiration Date below. |
| Expiration Date | Almaは、「認証」と「承認」とを区別します。「認証」とは、ユーザーが正当なユーザーかどうかを判断する行為であり、「承認」とは、ユーザーがシステムで何ができるかを判断する行為です。
Expiration date may impact the due date of the loan.The due date is shortened to the patron's expiry date.これは、extend_due_date_beyond_user_expiryのパラメータを使用して設定されます。If a patron is nearing her expiration date, the due date of the loan is automatically set as the expiration date, and cannot be changed manually.See also the knowledge articleIs it possible to change an item due date past the user expiration date in Alma? The User Registration Terms of Use (see Configuring Terms of Use) enable you to configure the User Renewal Period policy and other policies associated with how patrons are registered at the circulation desk.For more information, see Configuring Terms of Use. After you define the User Registration Terms of Use, assign the Terms of Use for each user group (see Configuring User Registration Rules). 過去の有効期限を設定することはできません。 |
| ブロック([コンタクト]タブにはありません) | ユーザーにブロックがあるかどうかを示します。 |
| メモ | ユーザーに関するメモがあるかどうかを示します。 |
You can do the following on the Find and Manage Users page:
- Adding Users
- Editing Users - This action is typically required immediately after adding a new user.
- Deleting Users - Only the User Manager or User Administrator Roles can delete users.
- Distributing Users
5回連続して誤ったパスワードを入力したユーザーは、Almaからロックアウトされます。ロックは30分後に自動的に解除されます。
その他のユーザー管理タスクには次のものがあります。
Adding Users
新しいユーザーは、[ユーザーの検索と管理]ページのどのタブからも追加できます。
- External users are synchronized with Alma using the User integration profile.
- When creating a patron by selecting Register New User on the Manage Patron Services page (see Registering Patrons), it is possible to register external users as well.
- すべてのプライマリ識別子と追加の識別子は、同じユーザーを含め、ユーザーに対して一意である必要があります。
- When adding new users from Find and Manage Users, the Role Assignment Rules are applied (see Configuring Role Assignment Rules).
To add a new user:
Note that Circulation desk managers and operators can only add users by using the Register New User option in the Manage Patron Services page (see Registering New Patrons).
- On the Find and Manage Users page (Admin > User Management > Manage Users), select Add User.
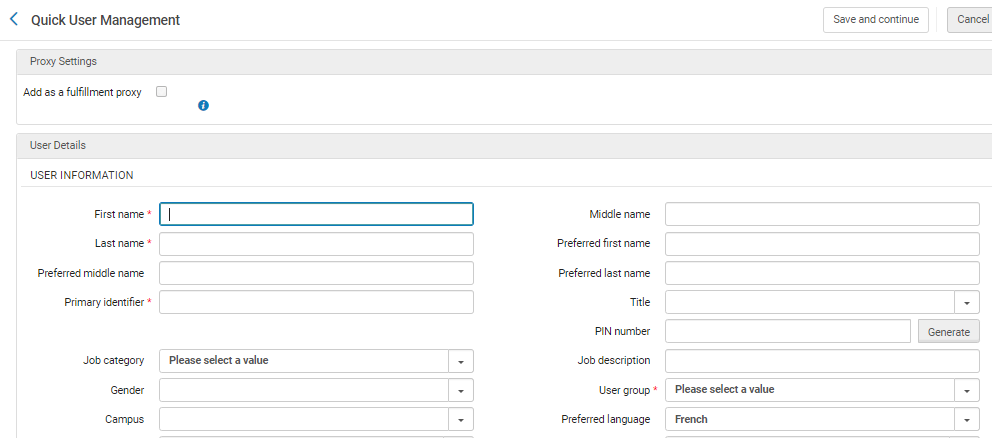
[クイックユーザー管理]ページが表示されます。
- On the All tab, you are prompted to select the record type (Staff,Public, or Contact).
コンタクトは、ベンダーのコンタクト専用ですので、使用しないでください。
- On any other tab, the record type is set according to the tab.
- On the All tab, you are prompted to select the record type (Staff,Public, or Contact).
- 次の情報を入力してください。The fields marked as mandatory in the following table are by default; an administrator can configure which fields are mandatory (see Configuring Patron Information).
An Authorized for resource sharing requesting checkbox is visible for institutions that use Rapido when new users are created.For more information, see Enabling Self Registration for Partners.
[クイックユーザー管理]ページのフィールド
セクション フィールド 説明 プロキシ設定 フルフィルメントプロキシとして追加 このオプションを選択すると、フルフィルメントプロキシとして新しいユーザーが作成されます。このユーザーによるすべてのリクエストとこのユーザーにチェックアウトされた貸出は、スポンサーユーザーに関連付けられます。 ローカルでない 他機関のユーザーを探す See Registering Patrons. ユーザー情報 To configure how user names appear in Alma, see Configuring the Display of User's Names
名 / ミドルネーム / 姓 姓と名は必須です。 Preferred first / middle / last names Preferred names replace the main first/middle/last names in all places that the name appears within Alma, for example, letters, Manage Patron Services, and the Active Hold Shelf. 名前を検索すると、通常の名前と優先する名前の両方が見つかります。たとえば、姓を検索すると、 姓として入力したものと優先する姓として入力したものの両方が見つかります。両方とも、姓として検索できます。
For information about using preferred names in system notifications and letters, see Working with Names in System Notifications and Letters.
優先する名前のフィールドは、名前に関する他のフィールドと同様に、内部ユーザーが編集できます。外部ユーザーの場合、優先する名前のフィールドは学生情報システムによってアップデートされますが、手動でもアップデートできます。詳細については、Ex Librisプログラム開発者ネットワークで提供される学生情報システムを参照してください。
プライマリ識別子(必須) プライマリユーザーIDです。その機関内でIDは一意でなければなりません。For details on identifiers, see https://developers.exlibrisgroup.com...user-management. プライマリ識別子は、特定のフォーマットでの入力が必要な場合があります。See the parameter primary_identifier_regex in Configuring Other Settings.
If you arrived at this page by selecting Register New User on the Patron Identification page, this field is pre-filled if you have configured user ID generation; see Configuring User ID Generation.事前に生成されたIDは変更できます。
タイトル ユーザーのタイトルです。These can be configured by an administrator; see Configuring User Titles. PIN番号 A four-digit number which serves as a password for the user to log on to the self-check machine (SIP2); see Configuring SIP2 Bin Configuration.PIN番号を生成するには、手動で番号を入力するか、[生成]を選択します。PIN番号は、PIN番号生成レターで送信されます。 PIN番号の生成は、pin_number_methodというパラメータが有効で、fourDigitに設定されている場合のみ可能です。For information, see Configuring Other Settings.
ジョブカテゴリ The user's job category.たとえば、受入オペレータ、目録者、マネージャーなどです。使用可能なジョブカテゴリは、選択したレコードタイプ(上記)によって異なります。To configure job categories, see Configuring Job Categories.To associate job categories with record types, see Mapping Job Categories to User Record Types.
If the job category is associated with role assignment rules (see Configuring Role Assignment Rules), then the role profiles associated with the job category are added to the user after you select Save.このように、ジョブカテゴリによって、一人のユーザーに複数の役職を一度に割り当てることができるため、ユーザーに対して個別に役職を設定する必要はありません。
ジョブの説明 A free text description of the user's responsibilities. Gender (Obsolete) ユーザーの性別です。 User group (not required for Contacts) The user's user group, such as Faculty, Patron, and so forth.使用可能なユーザーグループは、選択したレコードタイプ(上記)によって異なります。To configure user groups, see Configuring User Groups.To associate user groups with record types, see Mapping User Groups to User Record Types.
If the user group is associated with role assignment rules (see Configuring Role Assignment Rules), then the role profiles associated with the user group are added to the user after you select Save.このように、ユーザーグループによって、一人のユーザーに複数の役職を一度に割り当てることができるため、ユーザーに対して個別に役職を設定する必要はありません。
キャンパス ユーザーのキャンパスです。See Managing Campuses. ウェブサイトURL ユーザーのウェブサイト(ある場合)です。 優先言語 Eメールで使用する言語です。選択した言語でEメールを送信するには、機関の言語マッピングテーブルでその言語を有効にする必要があります。For details, see Configuring Institution Languages. ステータス(編集のみ) ユーザーのステータスです。アクティブか非アクティブかを示します。 ステータスの日付(編集のみ、読み取り専用) ユーザーのステータスが最後に変更された日付です。 生年月日 ユーザーの生年月日です。 有効期限 ユーザーがその機関を離任すると予想される日付です。For more information, see Expiration Date. 消去日 ユーザーが消去される日付です。See Purging Users.
過去の除外日を設定することはできません。
Last Patron Activity Date 選択したアクティビティが最後に実行された日付。この機能が有効になっている場合、次のアクティビティのいずれかが実行されると、このフィールドが更新されます。
- あらゆるタイプのリクエスト - 保留、予約、デジタル化、受入、リソースシェア
- アイテムの取寄せ(セルフチェックまたはAPIを含むすべてのワークフロー)
- アイテムの返却(セルフチェックまたはAPIを含むすべてのワークフロー)
- 貸出更新(自動更新を除く)、または更新要求(リソースシェアローンの場合)
- Primoからのユーザー情報のアップデート
次のアクティビティでは、このフィールドは更新されません。
- [ユーザーサービスの管理]ページの支払うボタンの使用
- AlmaまたはPrimoでのリクエストのキャンセル
- Primoから送信されたユーザー購入リクエスト
プライバシーの問題により、データは機能の有効化以降のみに収集されます。このオプションを無効にすると、このフィールドで収集されたすべてのデータがすべてのユーザーから削除されます。
To enable this option, select yes in the Record Last Patron Activity Date page.
ユーザー最終活動日についての動画(1分36秒)をご覧ください。リソース共有図書館 このユーザーによって開始されたリソースシェアリクエストを担当するリソースシェア図書館のことです。リソースシェア図書館として定義された図書館のみ、リストに表示されます。(To configure resource sharing libraries, see Configuring Parameters of a Resource Sharing Library.) You can select one or more resource sharing libraries in this multi-select field.
When multiple resource sharing libraries are selected, they appear in the For library field on the Primo Get it tab, according to the ill_item_creation_lib_code parameter (see Configuring Other Settings).
このフィールドに値が表示されない場合、ill_item_creation_lib_codeの値で指定されたデフォルトの図書館が使用されます。
既存のユーザーについてこのフィールドを変更する場合、フィールドの新しい値が、学生情報システムやユーザーAPIのアップデート中に上書きされることはありません。
購入リクエスト図書館 ユーザーによって開始された購入リクエストを担当する図書館のことです。このフィールドは複数選択式で1つ以上の図書館を選択できます。選択された図書館は、Primoの「Get it」タブの購入リクエストフォームに表示されます。 目録者レベル 目録者のレベルです。This field appears only if cataloging permissions are enabled for your institution; see Cataloging Privileges. Selected Patron Letters ユーザーに対する通知を有効にするか無効にするかの選択です。ユーザーに対して有効化または無効化したい各通知の横にあるチェックボックスを選択またはクリアしてください。For more information, see Configuring Library Notices Opt In. リサーチに関するレターは、機関でEsploroが有効な場合にのみ表示されます。See Managing Researchers in the Esploro documentation.
ソーシャルログイン招待レターを送信 See Social and Email Login. ユーザー管理情報(必須ではありません) ユーザーに機関のレコードあり([ユーザー識別]ページで[新規ユーザーの登録]を選択した後でのみ表示されます) See Registering Patrons. パスワード A user's password for Alma, Leganto, and/or Primo (see https://developers.exlibrisgroup.com...user-management).このパスワードは、Primoのアカウントで変更されない限り、AlmaとPrimoの両方で有効です。ここで入力した内容があなたに返信されることはありません。パスワードは注意して入力してください。内部ユーザーの場合、パスワードはオプションです。 パスワードの確認 パスワードを再入力して、入力が正しいことを確認します。 次回ログイン時のパスワード変更を必須にする 選択すると、そのユーザーは次回Almaにログインする際にパスワードを変更する必要があります(Almaのみに適用)。 多要素認証を有効にする このユーザーに多要素認証を追加します。This checkbox only displays if the mfa_for_alma_hep parameter is enabled (see User Settings).For more information on MFA see Ex Libris Identity Service. User Identifier (this section appears if Identifier 1 is selected as a mandatory field for this record type; see Managing User Identifiers) 識別子のタイプ(必須) ユーザー識別子のタイプを選択します。 値(必須) ユーザーの識別子です。 The following fields that appear on the Quick User Management page when adding a user appear in the Contact Information tab when editing a user. Eメールアドレス Eメールのタイプ(必須) Eメールアドレスを入力する必要があります。Eメールアドレスのタイプを選択してください。 - 代替(「スタッフ」または「パブリック」のみ)
- 請求(「コンタクト」のみ)
- オーダー(「コンタクト」のみ)
- 支払い(「コンタクト」のみ)
- 返却(「コンタクト」のみ)
- パーソナル
- 勤務先
- 学校(「パブリック」のみ)
Eメールアドレス(必須) ユーザーのEメールアドレスです。Eメールアドレスは、特定のフォーマットでの入力が必要な場合があります。See the parameter email_regex in Configuring Other Settings. 住所 住所タイプ 郵送先住所のタイプを選択してください。 - 請求(「コンタクト」のみ)
- オーダー(「コンタクト」のみ)
- 支払い(「コンタクト」のみ)
- 返却(「コンタクト」のみ)
- 自宅
- 勤務先
- 代替(「パブリック」のみ)
- 学校(「パブリック」のみ)
- 町名・番地など - 町名・番地などは、特定のフォーマットでの入力が必要な場合があります。See the parameters address_lineX_regex in Configuring Other Settings.
- 市町村
- 都道府県
- 郵便番号 - 郵便番号は、特定のフォーマットでの入力が必要な場合があります。See the parameters postal_code_regex in Configuring Other Settings.
- 国
電話番号 電話のタイプ 電話番号のタイプを選択してください。 - 自宅
- モバイル
- オフィス
- 請求用ファックス(「コンタクト」のみ)
- 請求用電話(「コンタクト」のみ)
- オーダー用ファックス(「コンタクト」のみ)
- 支払い用ファックス(「コンタクト」のみ)
- 支払い用電話(「コンタクト」のみ)
- 返却用ファックス(「コンタクト」のみ)
- 返却用電話(「コンタクト」のみ)
- オフィスのファックス(「スタッフ」または「パブリック」のみ)
電話番号 ユーザーの電話番号です。電話番号は、特定のフォーマットでの入力が必要な場合があります。See the parameter phone_regex in Configuring Other Settings. - 次のオプションから1つを選択します。いずれの場合も、次の各主題に関する説明に従って、ユーザーの詳細の設定を続けてください。
既存のユーザーと同じ名、姓、生年月日のユーザーを追加すると、警告メッセージが表示されます。
- [保存]または[保存して続行]を選択します。新規ユーザーが保存され、[ユーザーの検索と管理]ページに戻ります。Continue with editing the user; see Editing Users.
- [保存して続行]を選択します。ユーザーが保存され、ユーザーの編集を続けます。See Editing Users.
Editing Users
ユーザーを追加した直後、またはその他の理由から、ユーザーを編集します。You edit users on the Find and Manage Users page (Admin > User Management > Manage Users).
- 内部ユーザーの場合、すべてのユーザーレコードフィールドを編集できます。
- 外部ユーザーは、学生情報システム(Student Information System: SIS)などの外部システムで管理されます。外部ユーザーの場合:
- [ユーザー詳細]ページの[一般情報]タブで特定のフィールドのみを編集できます。
編集された一般情報フィールドへの変更は、その後のSIS更新によって上書きされません。You can select the original value option from the drop down of selectable values if you would like to revert a changed field and re-synchronize it with the value that is managed in the SIS system.このオプションは、フィールドがSISフィードによって提供された値から手動で変更された場合にのみ表示されます。Manually changing the field value to the value that is stored in the SIS has the same effect of re-synchronizing the field with future updates from the SIS.
- [コンタクト]タブでコンタクト情報は追加できますが、そこで情報を編集することはできません。
- [ユーザー詳細]ページの[一般情報]タブで特定のフィールドのみを編集できます。
- To edit users in bulk, see Editing/Messaging Users in Bulk.
Almaの内部ユーザーと外部ユーザーに関する詳細な説明については、https://developers.exlibrisgroup.com/alma/integrations/user-managementを参照してください。
To edit user information:
- On the Find and Manage Users page, select Edit in the row actions list or select the user's name.The User Details page appears.

- ユーザーにソーシャルアカウントがアッタッチされている場合に、そのユーザーのソーシャルログインを解除するには、[ソーシャルアカウントから切り離す]を選択します。
- To distribute the user in a Network Zone, see Centrally Managing Users in a Network Zone.
- 外部ユーザーの他のフィールドの編集を有効にするには、[更新用に開く]を選択し、[はい]を選択します。関連するフィールドを編集し、[保存]を選択します。ほとんどのフィールドに加えた変更は、学生情報システムが次に同期ジョブを実行すると失われることになります。However, Alma prompts you to determine whether the following fields will be overridden with the next SIS synchronization job:Title, PIN number, Job category, User group, Campus, Preferred language, Resource sharing libraries, Cataloger level, Selected patron letters.(この決定は内部で保持され、ユーザーレコードではいかなる方法でも外部化されません。)
-
内部ユーザーを外部ユーザーに変更したり、外部ユーザーを内部ユーザーに変更するには、[アカウントタイプの切り替え]を選択します。
アカウントを内部から外部に切り替える際、所有者はSIS_tempに設定されます。これは、次のユーザー同期ジョブをマークしてレコードをアップデートするために使用されるコードです。Only users with the User Manager or User Administrator roles can toggle accounts.
- [一般情報]タブで必要な情報を編集します。For information about most of the fields on this page, see Adding Users.
- ウェブサイトURL - ユーザーのウェブサイトです。
- Status- Whether the user is Active or Inactive.
- Status date- The date on which the user was registered or the date of the user's last status change.
Send Message- Select the type of message you'd like to send.
Operators with Can't edit restricted users configured are not able to send an Email to a user account defined as restricted for editing.For more information, see Restricting Users for Editing.
選択できるオプションは次の通りです(IDプロバイダオプションなど、その他すべてのオプションは将来使用するためのものです)。
General mail- This sends a general message.Select Compose to open the E-mail Message pop-up window, where you can write an email to send to the user with any questions, issues, or notifications.フィールドに入力し、[Eメールを送信]を選択してメッセージを送信します。(For more information on the letters, see Configuring Alma Letters.To configure the default From: address of this email, see the parameters disable_from_address and from_address in Configuring Other Settings.To send emails to users in bulk see Editing/Messaging Users in Bulk.)
The General mail letter does not appear in General > Letters > Letters Configuration, with no additional configuration changes options.The letter ILL Email to User needs to be activated for the General mail function to work.This letter is not customizable.
Patron personal information mail- This sends an email with an attached file containing the complete XML record of the data stored about the patron in their user accounts, including attachments.The message is sent to the patron's preferred email.The email letter itself is the Personal Information Letter.
In order to send a Personal Information Letter to a patron, the parameter Send Patron Information Letter must be enabled under Circulation Desk roles'.The parameter Send Patron Information Letter is activated for users with a Circulation Desk role by default.If it is not activated or you wish to deactivate it, open a ticket with Ex Libris support.
- Social Login Mail- This sends a letter containing information to activate login to Primo/Alma with a social network.このオプションは、ソーシャルネットワークに統合プロファイルが定義されている場合に表示されます。使用されるレターは、ソーシャルログイン招待レターです。For more information on this integration profile, see Configuring Integration Profiles.
- 作成者 - このユーザーを作成したスタッフ ユーザーまたはプロセス (SIS ジョブ、API など)。
- 更新者 - このユーザーを最後に更新したスタッフ ユーザーまたはプロセス (SIS ジョブ、API など)。
- Disable all login restrictions - Select to disable login restrictions by IP range.This checkbox may be automatically unchecked and read-only, depending on the options selected on the Login Restriction Configuration page.For more information, see Restricting Alma Logins by IP Range.
- Allow Ex Libris Simulated Login - Give permission to Ex Libris to simulate login for this user.This checkbox only appears when the allow_exl_to_login_as_staff_users option is enabled (see Configuring Other Settings for User Management).
User Roles - See Adding Roles to Users
The Created By and Updated By fields have been moved to an information box that is accessed by selecting the
 icon on the top right corner of the page.The information box also includes Created Date,Last Updated Date, and Last Updated by Job.The Last Updated Date is updated when making a change to the user's details in the General Information tab, and also when adding a note in the user's Notes tab or a block in the Blocks tab
ユーザーを編集する際には、次のフィールド/オプションが追加で表示されます。
- 次のタブで情報を編集します。
- Contact Information – See Managing User Contact Information.
- Identifiers(not available for Contact users) – See Managing User Identifiers.
- Notes – See Managing User Notes.
- Blocks(not available for Contact users) – See Blocking and Unblocking Users.
- Fines/Fees(available only for users with the Patron role) – See Managing User Fines and Fees.
- Statistics – See Managing User Statistics.
- Attachments – See Managing User Attachments.
- Proxy For – See Managing Proxy Users
- History- See Viewing Changes to the User Record.
- If the user has the Patron role, select Manage Fulfillment Activities to access the Patron Services page.Actions like loan, return, or pay a fine are not available when viewing Manage Fulfillment Activities via User Management.For details on patron services, see Managing Patron Services.[ユーザーサービス]ページを閉じ、[ユーザー詳細]ページに戻るには、[戻る]を選択します。
- To edit the user picture, see Managing User Pictures.
- If you made changes in the General Information tab, selecting Save is required to have the changes saved.その後、ユーザーの検索と管理ページに戻ります。Changes made to other tabs in the User Details screen are automatically saved in Alma.
- 他のタブに加えられた変更
- コンタクトユーザーについては、[識別子]タブと[ブロック]タブは使用できません。
- The Fines/Fees tab is available only if the user has been assigned the Patron role (see Managing User Roles).
- デメリット情報は、Ex Librisによって有効にされた場合に、貸出・返却受付オペレータ、貸出・返却受付オペレータ - 限定、貸出・返却受付オペレータ、フルフィルメントサービスオペレータ、フルフィルメントサービスマネージャー、フルフィルメント管理者の役職についてのみ表示されます。デメリット情報を有効にするには、Ex Librisサポートにお問い合わせください。For more information on demerits, see Configuring Demerits.
Managing User Contact Information
[ユーザー詳細]ページの[連絡先]タブで、住所、電話番号、Eメールアドレスなどのユーザー連絡先情報を追加・編集・複製・削除できます。(リソースシェアリクエストなどから)資料を受け取る際に住所が使用されます。レコードタイプが「コンタクト」の場合、1つ以上の電話番号を追加する必要があります。優先SMSとしてマークされた電話番号は、SMS通知を受信します。スタッフユーザーおよびパブリックユーザーについては、1つ以上のEメールアドレスを追加する必要があります。Email addresses are used for receiving Alma letters (see Configuring Alma Letters).
Alma can send emails to multiple recipients simultaneously - for example, emails addressed to under-aged patrons can also be sent to their legal guardians.To enable this, Alma supports a "CC address" email type for public and staff type users only.When an email is sent to the patron, it is sent to all of the CC addresses, in addition to the address that is marked as Preferred.Note that you can indicate an email address as both a CC address and a different type of address (Alternative, Personal or Work).However, other types of email address do not have any functional implication, thus indicating them as such is for information only.
- Users can also be configured to receive email notifications that are sent after a scheduled job runs.Almaユーザーや手動で入力したEメールアドレスに送信される通知を設定できます。For information, see Configuring Email Notifications for Scheduled Jobs.
利用者が Primo マイアカウントを通じて住所をアップデートすると、その変更は内部住所と優先住所にのみ適用されます。
- 優先アドレスが外部アドレスの場合、システムは新規内部アドレスを作成し、それを優先アドレスとして設定します。
- 優先アドレスがすでに内部アドレスである場合は、そのアドレスが単にアップデートされます。
1つのタイプのコンタクト情報が複数ある場合は、そのうち1つを優先されるものとして指定でき、それがデフォルトになります。場合により、Almaはデフォルトのコンタクトを自動的に使用します。ユーザーがAlmaからのレターを受信するには、1つのEメールアドレスを優先として設定する必要があります。On some pages, you can select a non-default contact.
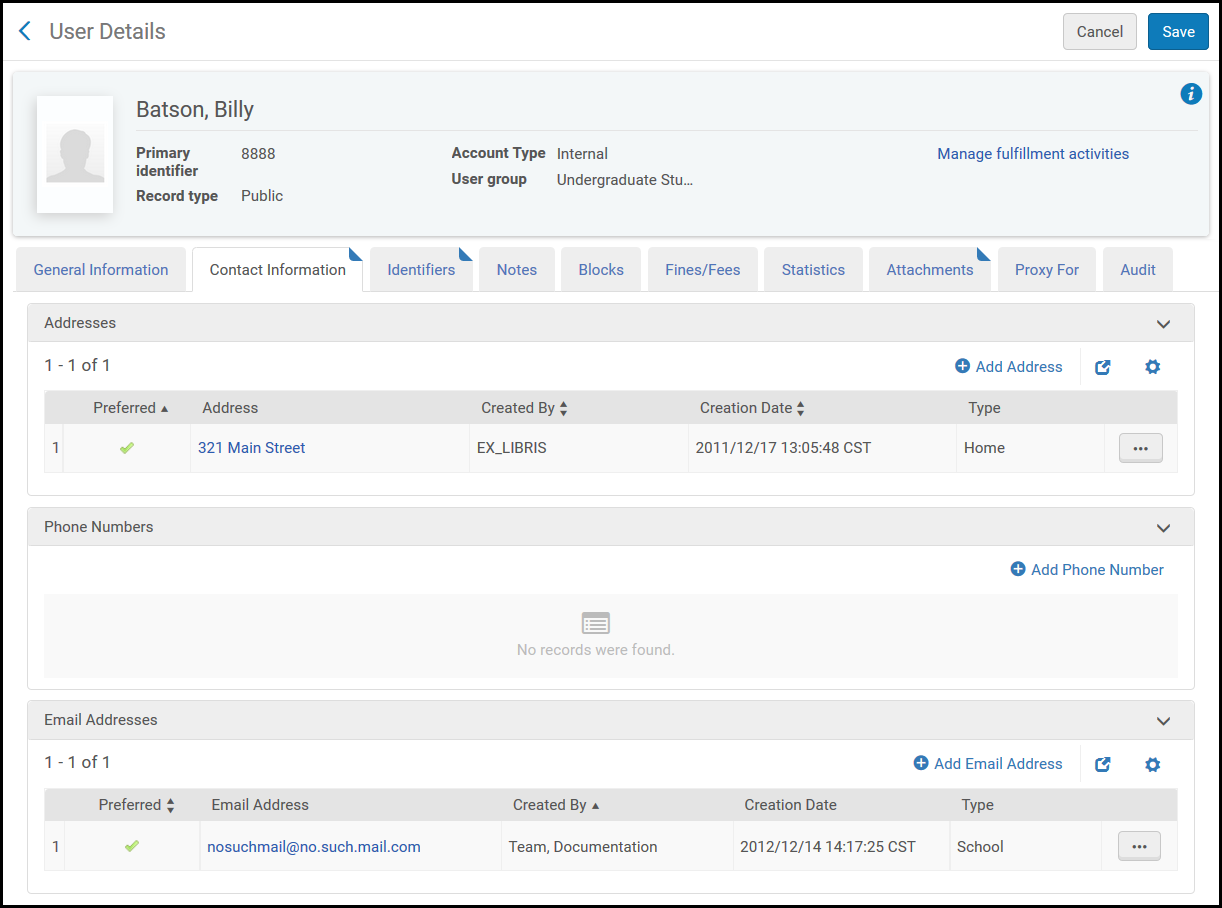
- In the Contact Information tab of the User Details page (Admin > User Management > Manage Users), select Add Address, Add Phone Number, or Add Email Address.該当するダイアログボックスが開きます。
- 必要に応じて、コンタクトの詳細を入力します。
Note that you can set the address, phone number, and email address as preferred in this step, as shown below:
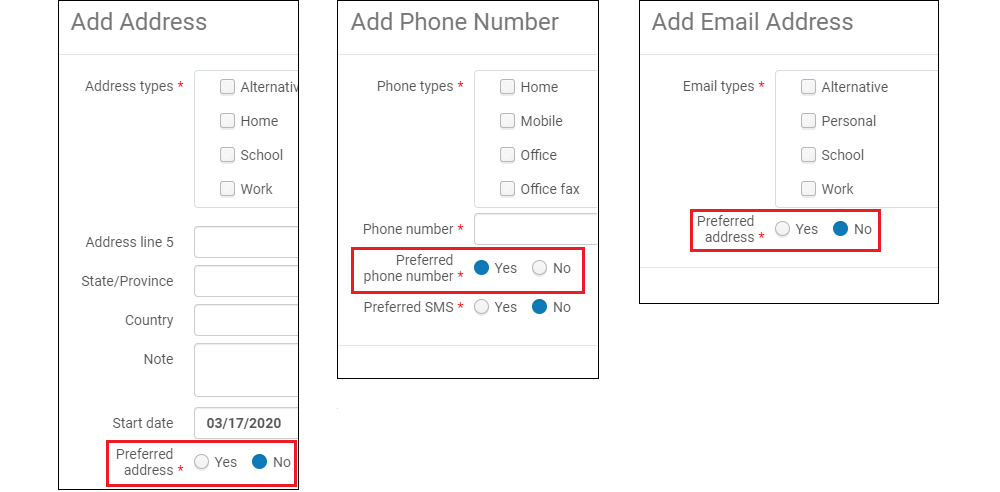
開始日と終了日は情報提供のみを目的としたものです。開始日はその住所が有効になる日付であり、終了日はそのアドレスが有効でなくなる日付です。
外部ユーザーを扱う場合、「外部として追加」チェックボックスが表示されます。このオプションを選択すると、コンタクト情報が外部データとして追加され、学生情報システムの同期中に上書きされます。このチェックボックスを選択しない場合、連絡先情報は内部データとして追加され、SIS同期時に上書きされません。詳細については、https://developers.exlibrisgroup.com/alma/integrations/user-management/sisを参照してください。Internal fields cannot be turned into external – they need to be removed instead.
- [コンタクト情報]タブに詳細を保存する方法は次の通りです。
- 詳細を保存し、エントリを追加するには、[追加]を選択します。
- アドレスの詳細を保存し、ダイアログボックスを終了するには、[追加して閉じる]を選択します。
外部データを保存すると、[外部データ]の列に、緑色のチェックマークが表示されます。
コンタクト情報を編集・複製・削除するには、その行のアクションリストで該当するアクションを選択します。
Managing User Identifiers (Tab)
コンタクトユーザーについては、[識別子]タブを使用できません。
プライマリ識別子に加えて、学生ID、バーコード、ソーシャルログインID、ユーザーの写真へのリンクなど、定義されたユーザー識別子のタイプを追加でユーザーに関連付けることができます。For more information about identifier types, see Managing User Identifiers.
2018年6月以前にAlmaを導入した機関の場合、識別子の大文字と小文字が区別されます。2018年6月以降にAlmaを導入した機関の場合、識別子の大文字と小文字は区別されません。識別子の大文字と小文字の区別に関する詳細については、Ex Libris Developer Networkの関連ブログの投稿を参照してください。
The table on the Identifiers tab of the User Details page (Admin > User Management > Manage Users; select Edit in the row actions list) functions like a mapping table.For more information, see Mapping Tables.識別子を追加・編集・複製・削除できます。また、識別子をアクティブにすることも、非アクティブにすることもできます。
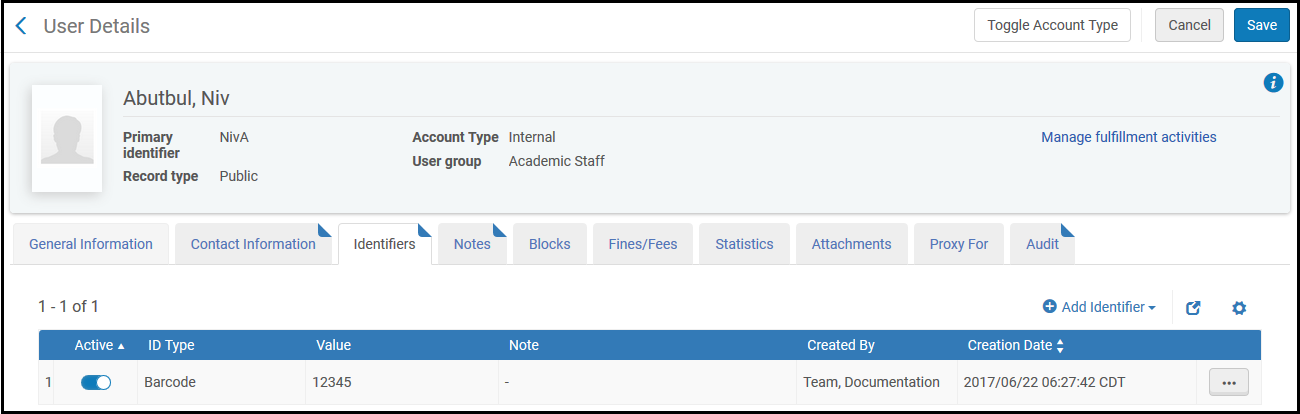
次のフィールドがあります。
- 識別子タイプ - 識別子のタイプです。Ex Librisは、機関をセットアップする際にタイプを作成・設定します。In addition to social media options, other options include barcode and institution ID (the ID assigned to the user from an SIS; see Student Information Systems).このリストは、スタッフユーザーとパブリックユーザーでは異なる場合があります。
- 値 - このユーザーの識別子の値です。
- メモ - 任意記入のメモです。
- すべてのプライマリ識別子と追加の識別子は、同じユーザーを含め、ユーザーに対して一意である必要があります。
- ソーシャルログイン(Twitter、Google、Facebook)に関連付けられたユーザー識別子は、当該ユーザーについて定義されていても、このタブには表示されません。They still exist: they can be used to log in using the social login page (see Social and Email Login), and you can search for the user using the identifier.
- 外部ユーザーを扱う場合、「外部として追加」チェックボックスが表示されます。学生情報システムの同期中に上書きされる外部データとして識別子を追加する場合に選択します。このオプションを選択しない場合、識別子は内部データとして追加され、学生情報システムの同期中に上書きされることはありません(後で生徒情報システムが同じ値を送信してきた場合は例外です。その識別子は外部データとしてマークされます)。詳細については、https://developers.exlibrisgroup.com/alma/integrations/user-management/sisを参照してください。
- 一部の識別子がEx Librisで定義されている場合、ユーザーがAlmaやPrimoにログインできるようにするには、機関全体でこれらの識別子が一意でなければなりません。
- 外部データを保存すると、[外部データ]の列に、緑色のチェックマークが表示されます。
- ユーザーが内部から外部に変更されると、すべての内部識別子が外部の識別子になります。
Managing User Notes
A user's Notes tab contains additional features that are not available in other Notes tabs in Alma (see Notes Tab).ユーザーの詳細には、内部メモまたは外部メモをアタッチできます。The notes entered for the various note types (for example, Address, Circulation, Library, Registrar) appear in the User Notes tab on the Patron Services page (see Patron Services Page – Loans Tab in Managing Patron Services), and in Primo on the Blocks & Messages page in the My Account tab.
The arbitrary order in which the notes appear in the User Notes tab on the Patron Services page cannot be controlled.
When library independence is activated for an institution, each note has an owner - either a specific library within the institution, or the entire institution.In this case, users can only see notes that are owned by the libraries that are either within these users' scopes (see Managing User Roles), or owned by the institution.Notes owned by libraries that are outside of a user's scope are not displayed in this tab, are not retrieved in searches, and are excluded from API calls.Library-level notes can only be activated in institutions in which library independence is turned on.For additional information about library independence, see Fulfillment Library Independence.
You manage user notes on the Notes tab of the User Details page (Admin > User Management > Manage Users; select Edit in the row actions list).メモは追加・編集・複製・削除できます。
For more information, see Notes and Blocks (2:10 min).
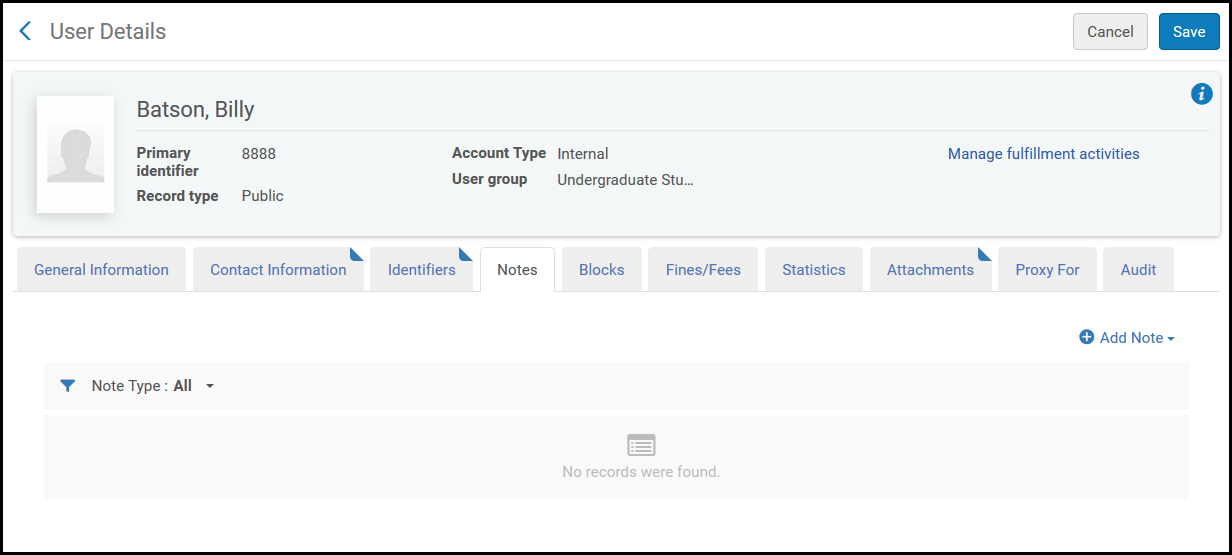
- [メモ]タブで、[メモを追加]を選択します。The Add Note dialog box appears.
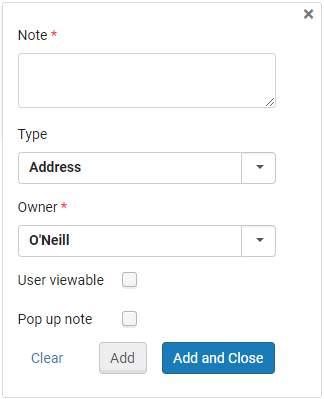
- Under Notes, enter the text of the note.
- Under Type, select a note type.Almaにおいて、メモのタイプは情報提供のみを目的としており、何らかの機能を果たしているわけではありません。メモタイプのリストは、すべての機関で標準化されています。
- 所有者からメモを所有する図書館を選択します。このメモを表示できるのは、役割がこの図書館に限定されているユーザーのみです。This option only appears if library independence is activated for the institution (see Fulfillment Library Independence).
- [ユーザーサービスの管理]ページにユーザーレコードが表示された際にメモをポップアップさせるには、[ポップアップ メモ] を選択します。
-
そのユーザーがメモを見られるようにするには、[ユーザー閲覧可]を選択します。
外部ユーザーを扱う場合、「外部として追加」チェックボックスが表示されます。このオプションを選択すると、メモが外部データとして追加され、学生情報システムの同期中に上書きされます。このオプションを選択しない場合、メモは内部データとして追加され、学生情報システムの同期中に上書きされることはありません。詳細については、https://developers.exlibrisgroup.com/alma/integrations/user-management/sisを参照してください。
- メモを保存します。
- メモの詳細を保存し、別のメモを追加するには、[追加]を選択します。
- メモの詳細を保存し、[メモを追加]ダイアログボックスを閉じるには、[追加して閉じる]を選択します。
外部データを保存すると、[外部データ]の列に、緑色のチェックマークが表示されます。
メモを編集・複製・削除するには、その行のアクションリストから、該当するオプションを選択します。また、[メモ]列にあるメモのテキストを選択して、メモを編集することもできます。
Blocking and Unblocking Users
コンタクトユーザーには、[ブロック]タブは使用できません。
You restrict users from using library services by adding user blocks.ブロックは、罰金や延滞があったり、図書返却の遅れを繰り返すユーザーに追加されます。ブロックされたユーザーは、図書館内のアイテムに取寄せ・更新などのアクションを実行できません。The block note is displayed in Primo if the patron is blocked from requesting by the block.The blocks that can be assigned to a user are configured on the User Block Definitions mapping table page (see Configuring User Block Descriptions and Definitions).
Note that items or users can also be blocked based on other conditions; see Configuring Block Preferences.
The table on the Blocks tab of the User Details page (Admin > User Management > Manage Users; select Edit in the row actions list) functions like a mapping table.For more information, see Mapping Tables.ユーザーブロックは追加・編集・複製・削除できます。また、ユーザーブロックをアクティブにすることも、非アクティブにすることもできます。
For more information, see Notes and Blocks (2:10 min).
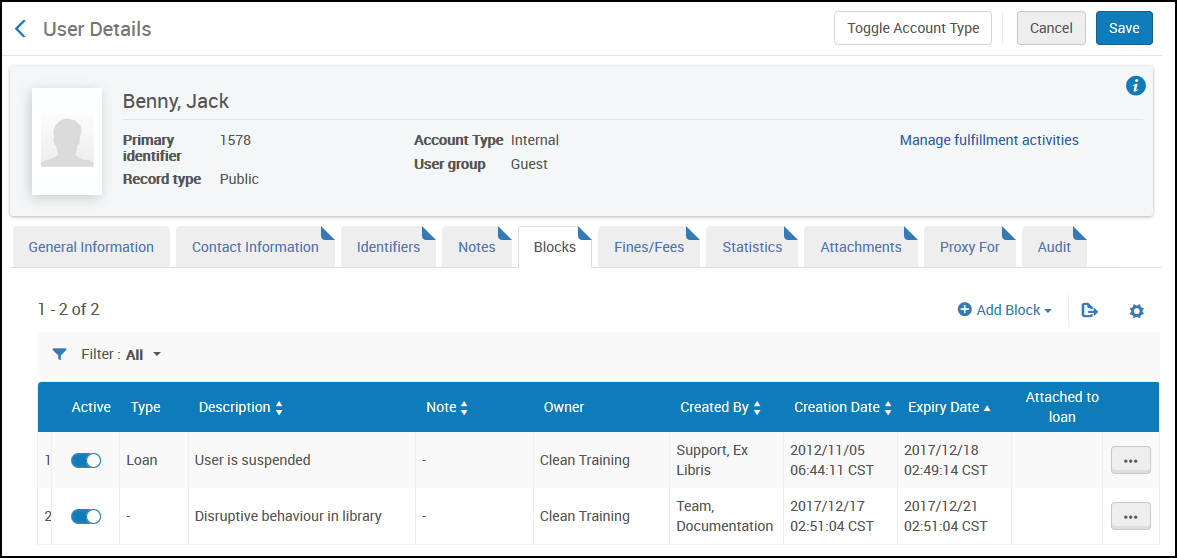
次のフィールドがあります。
- Block description- The block type.このリストは、Ex Librisが事前に設定しています。
- Expiry Date- An optional date when the block will be lifted.
- Owner- The library that owns the block.Only users with a role scoped to this library will be able to see this block.This option only appears if the library independence is activated for the institution (see Fulfillment Library Independence).
- Note- An optional note.
- External Block Owner - The name of the institution from which the block comes (see Configuring Consortial Blocks).デフォルトでは、このオプションは表示されません。In order to display it, select the gear icon next to the Add Block button and mark the checkbox next to External Block Owner.Note that this field is populated for blocks that have been copied from a target institution (another institution where the patron is a guest), but not for blocks that have been copied from a source institution (the patron's home institution).デフォルトではこのフィールドは表示されませんので、ご注意ください。To display it, mark it in the Customization menu (see New Layout).
- 外部ユーザーを扱う場合、「外部として追加」チェックボックスが表示されます。このオプションを選択すると、ブロックが外部データとして追加され、学生情報システムの同期中に上書きされます。このオプションを選択しない場合、ブロックは内部データとして追加され、学生情報システムの同期中に上書きされることはありません。詳細については、https://developers.exlibrisgroup.com/alma/integrations/user-management/sisを参照してください。
- If a user has an active block, a check mark appears in the Blocks column on the Manage Users page for that user.
- 外部データを保存すると、[外部データ]の列に、緑色のチェックマークが表示されます。
Managing User Fines and Fees
- The Fines/Fees tab is available only for users with the Patron role.
- The Circulation Desk UI also supports managing fines and fees with additional functionality.See Managing Fines and Fees.
You manage user fines and fees on the Fines/Fees tab of the User Details page (Admin > User Management > Manage Users; select Edit in the row actions list).
Users can select fines and fees across the full paginated fees list (among multiple pages) and waive them by selecting the Waive All option in the Fines/Fees tab.
選択した100を超える手数料を、1回のアクションで放棄することはできません。This limit can be configured with the waiving_fines_fees_limit parameter (see Configuring Other Settings).For waiving fines and fees (specifically or in bulk) on the Manage Patron Services page, see Managing Patron Services at a Circulation Desk.You can also use a dedicated job to waive fines and fees in bulk (see Waiving Fines and Fees Using a Job).
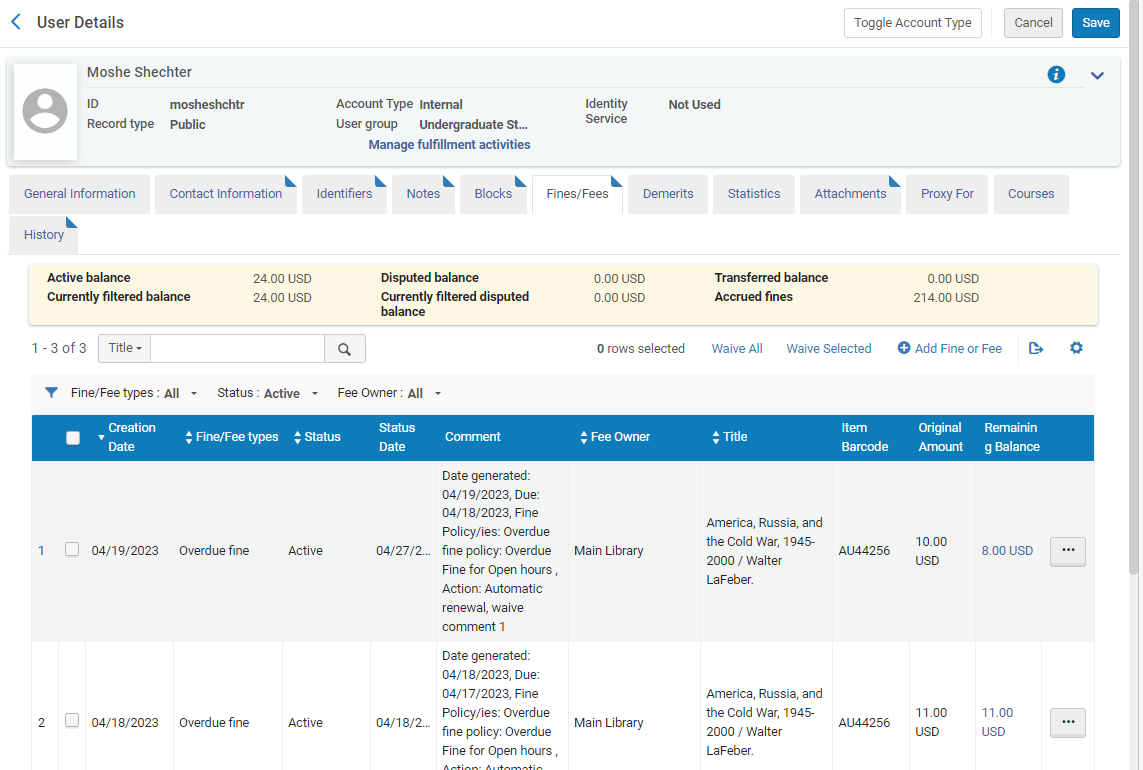
The Fines and Fees Summary area shows a summary of the user's balance, including:
- Active balance: The balance of fines and fees.This may include transferred balance depending on the allow_activity_on_transferred_finesfees parameter.See Configuring Other Settings (Fulfillment).
- Currently filtered balance: The balance of fines and fees that are currently filtered due to your selections in the filters.
- Disputed balance: The balance of disputed fines and fees.
- Currently filtered disputed balance: The balance of disputed fines and fees that are currently filtered due to your selections in the filters.
- Transferred balance: When bursar fees are set to Exported status, they appear as transferred balances.
- Accrued fines: Additional fines that may still be increasing, because the patron has not yet returned an overdue loan.Note that accrued fines are not included in the calculation of the debt limit that, if reached, would prevent the patron from borrowing additional items (see Patron Configurations).
延滞貸出が100件を超えていない場合に限り、累積罰金が計算されます。
The Fines and Fees Details area lists transaction details of the user's fines and fees.When the Status filter is set to Active(default), disputed, waived, transferred, and closed fees remain hidden.すべての手数料を表示するには、このフィルタで[すべて]を選択します。表示される罰金および手数料を特定の所有者のものに限定するには、手数料の所有者フィルタで図書館を選択します。
所有図書館による罰金および手数料のフィルタビデオ(1分05秒)をご覧ください。
詳細領域の上部にある列表示アイコンを選択することで、罰金および手数料の詳細表示をカスタマイズできます。デフォルトでは次の列が選択されています。
- 作成日
- 罰金/手数料タイプ
- ステータス
- ステータス日付
- コメント
- 手数料の所有者
- タイトル
- アイテムのバーコード
- 当初の金額
- 残高
表示できる追加の列は次の通りです。
- 当初のVAT
- 残りのVAT
- Bursar Transaction ID - see Configuring Bursar Transaction IDs.
- 放棄理由
罰金や手数料は、追加したり放棄したりすることができます。また、罰金や手数料が係争中であることを示したり、罰金や手数料をリポジトリのアイテムにリンクすることもできます。異議を申し立てられた罰金や手数料は、放棄したり回復したりできます。放棄された罰金や手数料は回復できません。罰金や手数料が支払われていない場合、放棄されていない場合、異議が申し立てられていない場合、またはBursarシステムにエクスポートされていない場合、その罰金や手数料はアクティブです。これらのアクションの1つを実行すると、そのステータスが変更されます。
To waive fines in bulk, see Waiving Fines in Bulk.To configure when and to whom notifications are sent about fines and fees, see Configuring Fines/Fees Notifications.
異議を申し立てられた手数料:
- Is not included in the user's Active Balance
- Primoの罰金リストには表示されません
- 未払金額に基づいてブロックを呼び出す場合は考慮されません。
たとえば:
- あるユーザーが、負債金額が100ドル以上の場合、アイテムを借りられません
- そのユーザーは、100ドルの負債があるものの、その金額中の20ドルに異議を申し立てています
- この場合、Almaはユーザーの負債を80ドルとみなし、ブロックは呼び出されません
To enable waiving a fine or fee (including a credit), you must ensure that the specific fine/fee is configured as waivable on the Fine Fee Type Definition mapping table (see Configuring Fines/Fees Behavior).罰金や手数料を支払うか放棄する際、その取引を作成するのは貸出・返却受付です(ページ上部の[現在:]フィールドに示されています)。このフィールドに貸出・返却受付が示されていない場合、取引の作成者は受付ではないと示されています。
会計統合プロファイルを使用するシステムが管理するユーザーの罰金および手数料について、定期的に機関としての会計をアップデートできます。For details, see Bursar Systems.
For more information assigning a fine/fee to a specific item, see the Link Fee to Inventory video (2:56 mins).
To add fines and fees:
If the fine or fee is listed as owned by Library on the Fine Fee Type Definition mapping table (see Configuring Fines/Fees Behavior), you must be at a circulation desk to add the fee.In order to register a Credit, select the Credit fee type and enter the amount as a positive sum.When you save it, the Credit fee appears in the Fines/Fees list with a negative amount.If you select the Credit fee type, the Comment field is mandatory.
- [罰金および手数料]タブで、[罰金または手数料を追加]を選択します。[罰金または手数料を追加]ダイアログボックスが表示されます。
- 罰金/手数料タイプを選択します。The types are those configured for manual creation on the Fine Fee Type Definition mapping table; see Configuring Fines/Fees Behavior.
- 所有図書館または所有機関を選択します。図書館は、料金タイプが「図書館範囲を許可する」として定義されている場合にのみ選択できます。
- Enter the amount of the fine or fee (The amount cannot be negative).
- 必要に応じて、[アイテムバーコード]フィールドで、手数料を付加するアイテムを参照します。
バーコードを追加すると、罰金/手数料はバーコードで指定されたアイテムに関連付けられます。アイテムとバーコードは、[ユーザー詳細]ページの[罰金および手数料]タブに表示されます。
- 必要に応じて、[コメント]フィールドに、罰金や手数料に関するコメントを入力します(任意)。
[クレジット]手数料タイプを選択した場合、[コメント]フィールドは必須です。
- 保存方法は次の通りです。
- 罰金や手数料の詳細を保存し、別の罰金や手数料を追加するには、[追加]を選択します。
- 罰金や手数料の詳細を保存し、[罰金または手数料を追加]ダイアログボックスを閉じるには、[追加して閉じる]を選択します。
ユーザーの有効残高は、追加された金額にアップデートされます。罰金/手数料がVATの対象になる場合、VATも金額に含まれます。(このページではVATの列はデフォルトで非表示になっています。To configure the VAT, see Configuring Fines/Fees Behavior.) For a Credit type fee, the amount is subtracted from the balance.その他すべての手数料タイプの金額は、残高に追加されます。
To link an existing fine/fee to a repository item:
- [ユーザー詳細]ページの[罰金および手数料]タブの対象の罰金/手数料を示した行のアクションリストで[アイテムへのリンク]を選択します。[アイテムへのリンク]ページが表示されます。
- [アイテムバーコード]フィールドで、手数料を付加するアイテムを参照します。
- [アイテムへのリンク]を選択します。それに応じて、[罰金および手数料の詳細]ページの[タイトル]と[アイテムバーコード]列の値がアップデートされます。
To view a loan's history:
[罰金および手数料]タブで、放棄する罰金/手数料を選択し、その行のアクションリストで[ローンの表示]を選択します。[ローン監査証跡]ページが表示されます。For more information, see Viewing Loan History.
To waive a fine or fee:
- [罰金および手数料]タブで、放棄する罰金/手数料を選択し、そのテーブルのアクションリストで[選択したものを放棄]を選択します。別の方法として、放棄する罰金/手数料を示した行のアクションリストで[放棄]を選択します。The Waiving Fine/Fee page appears.
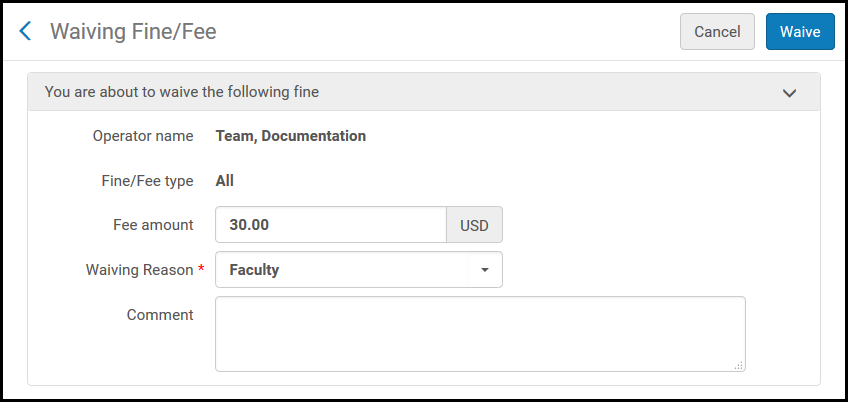
- [手数料額]フィールドに、放棄する手数料の金額を入力します。
- In Waiving reason select a reason for waiving the fee (this list is predefined by a system administrator; see Configuring Reasons for Waiving Fines/Fees).
- [コメント]フィールドに、罰金や手数料の放棄に関するテキスト/コメントを入力します。
- [放棄]を選択し、確認ダイアログボックスで[確認]を選択します。放棄される金額は、罰金や手数料の金額([当初の金額]列)から差し引かれます。[残高]列にある未払残高から、その分の金額が減ります。[罰金および手数料の概要]の[有効残高]と[係争中の残高]に表示される残高がアップデートされます。
罰金や手数料に関する取引を表示するには、[残高]列で金額のリンクを選択します。
紛失したアイテムについて放棄が行われても、残高 の額は減りません。この場合、放棄された金額はクレジットとして表示されます。
To dispute fines or fees:
- 異議を申し立てる罰金や手数料を示した行のアクションリストで[異議]を選択します。[罰金/手数料の異議申し立て]ページが表示されます。
- [コメント]フィールドに、その罰金/手数料への異議に関するテキスト/コメントを入力します。
- [異議]を選択し、確認ダイアログボックスで[確認]を選択します。[手数料および罰金の概要]領域の[有効残高]と[係争中の残高]に表示される残高がアップデートされます。
To restore fines or fees:
回復する係争中の罰金や手数料を示した行のアクションリストで[回復]を選択します(ステータスフィルタが[すべて]か[紛争中]になっていることを確認します)。[罰金または手数料の回復]ページが表示されます。
紛争中の罰金または手数料のみを回復できます。
- [コメント]フィールドに、罰金や手数料の回復に関するテキスト/コメントを入力します。
- [回復]を選択し、確認ダイアログボックスで[確認]を選択します。罰金や手数料の当初の金額([当初の金額]列)が回復され、[残高]列にある罰金や手数料の未払残高が調整されます。[手数料および罰金の概要]領域の[有効残高]と[係争中の残高]に表示される残高もアップデートされます。
Managing User Statistics
アナリティックスリポートでは、ユーザーグループやジョブカテゴリなどでユーザーを分類したりフィルタをかけられます。In addition to these categories, you can add additional statistical categories to the user specifically to use in Analytics reports or fulfillment-unit rules.An administrator must first configure statistical categories and category types, and then map statistical categories to category types, in the User Management configuration area (see Configuring Statistical Categories for Analytics).
You add statistical categories to the table on the Statistics tab of the User Details page (Admin > User Management > Manage Users; select Edit in the row actions).このテーブルは、マッピングテーブルのように機能します。For more information, see Mapping Tables.ユーザーのカテゴリを追加・編集・複製・削除できます。
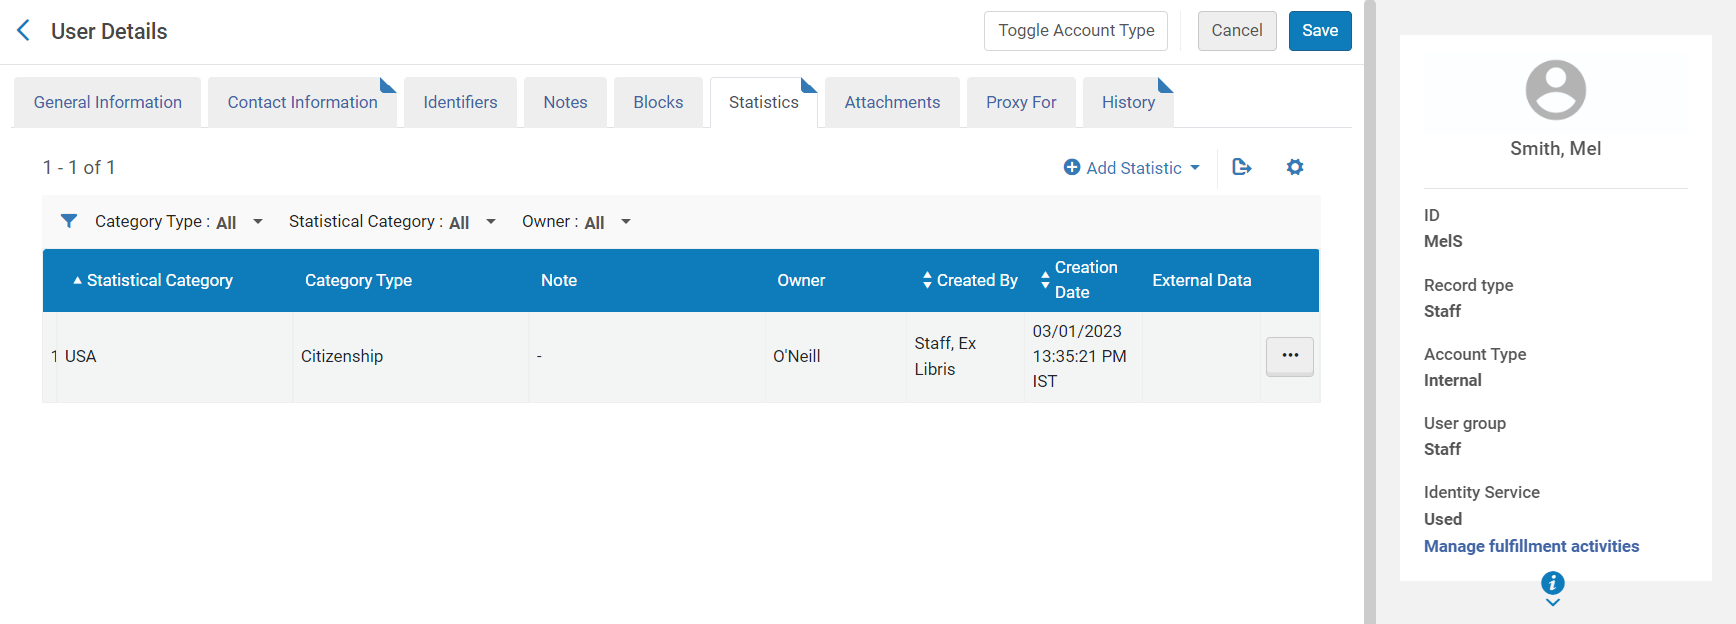
このタブのフィールドは次のとおりです。
- Category type - Category types are predefined by a system administrator in the Statistical Categories Types mapping table (see Creating Statistical Category Types).
- Statistical category - Statistical categories are predefined by a system administrator in the Statistical Categories context of User Management Configuration (see Configuring Statistical Categories).
- メモ - 必要に応じてメモを追加します。
- Owner - When library independence is activated for an institution, this field appears in the Statistics tab.In this case, users can only see statistical information that is owned by the libraries that are within these users' scopes (see Managing User Roles).Information that is outside of a user's scope is not displayed in this tab, is not retrieved in searches, and is excluded from API calls.図書館レベルの統計は、図書館の独立がオンになっている機関でのみ有効にできます。For additional information about library independence, see Fulfillment Library Independence.
- 外部ユーザーを扱う場合、「外部として追加」チェックボックスが表示されます。このオプションを選択すると、統計カテゴリが外部データとして追加され、学生情報システムの同期中に上書きされます。このオプションを選択しない場合、統計カテゴリは内部データとして追加され、学生情報システムの同期中に上書きされることはありません(後で学生情報システムが同じ値を送信してきた場合は例外です。その統計カテゴリは外部データとしてマークされます)。詳細については、https://developers.exlibrisgroup.com/alma/integrations/user-management/sisを参照してください。
- 外部データを保存すると、[外部データ]列に、緑色のチェックマークが表示されます。
Managing User Attachments
ユーザーへの添付ファイルを追加できます。You manage attachments on the Attachments tab of the User Details page (Admin > User Management > Manage Users; select Edit in the row actions list).For more information about this tab, see Attachments Tab.
Attachments added manually to this page are not sent to the user; they are simply appended to the user's record for reference.
Attachments sent to the user in a letter (see Configuring Alma Letters) also appear on this page.ユーザーがAlmaから送信された通知Eメールを受信していないと述べている場合、ユーザーの優先Eメールアドレスに添付ファイルを再送信できます。添付ファイルを再送信するには、その行のアクションリストで[通知を再送信]を選択します。Almaがその添付ファイルをユーザーに再送信します。これに使用されるレターは、再送信通知レターです。
When library independence is activated for an institution, the Owner field appears in the Attachments tab.In this case, users can only see attachments that are owned by the libraries that are within these users' scopes (see Managing User Roles).Information that is outside of a user's scope is not displayed in this tab.Library-level attachments can only be activated in institutions in which library independence is turned on.For additional information about library independence, see Fulfillment Library Independence.
Managing Proxy Users
ユーザーを、別のユーザーのプロキシユーザーとして定義できます。A proxy user can loan and return items on behalf of another user (see Selecting a Patron).You manage proxy users on the Proxy For tab of the User Details page (Admin > User Management > Manage Users; select Edit in the row actions list).
すべてのユーザーはプロキシユーザーになれますが、プロキシユーザーによるアクションの対象となるユーザーは、ユーザーの役職でなければなりません。プロキシユーザーの対象となるユーザーは追加・削除できます。
To add a proxy user:
- Open the Proxy For tab of the User Details page.[プロキシの追加]を選択します。
- [プロキシ]フィールドで、現在のユーザーをプロキシにするユーザーを入力または選択します。
- [ユーザーを追加]を選択します。プロキシの対象者が追加されます。これで当該のユーザーはこの対象者のプロキシになりました。
プロキシの対象者を削除するには、その行のアクションリストで[削除]を選択します。
A user record may be created as a Fulfillment Proxy at the time the new user record is created.Unlike the regular circulation proxy, the Fulfillment Proxy is a full proxy, for example not only are this patron's loans associated with the sponsor, but also the patron's requests and resource sharing requests.Emails that have to do with the request, such as hold shelf notifications and request reminders are also sent to both the proxy user and the sponsor user.The Fulfillment Proxy cannot be unlinked from the sponsor record and cannot place requests or check out items without the request or loan being associated with the sponsor record.さらに、フルフィルメントプロキシによって送信されたリクエストは、Primoのプロキシとスポンサーのマイアカウントの両方に一覧表示されます。
フルフィルメントプロキシユーザーはプロキシスポンサーに代わってローカルアイテムとAFNアイテムの両方をリクエストでき、フルフィルメントプロキシとプロキシスポンサーのユーザーはローカルアイテムの保留中の通知を受け取りますが、プロキシスポンサーのみがAFNアイテムの保留中の通知メールを受け取ります。フルフィルメントプロキシは、保留中のAFNアイテムのレターも受け取りません。
Viewing Changes to the User Record
Changes made to the user record are recorded in the History tab of the User Details page (Admin > User Management > Manage Users; select Edit in the row actions list).For more information, see History Tab.Almaのユーザーインターフェースで行われた変更の追跡に加えて、学生情報システム、API、リンクされたアカウントの更新、およびアップデート/ユーザー通知ジョブによって行われた変更も取得されます。
ユーザー履歴へのアクセスは、ユーザーの役割によって制限される場合があります。
特定のユーザーロールへのアクセスを制限する方法については、Ex Librisサポートにお問い合わせください。Changes to the Last patron activity date are not recorded in the user's History tab.For more information on the Last patron activity date, see Managing Users and Configuring Last Patron Activity Date.
履歴情報は、「すべて」、「過去7日間」、「先月」、または「昨年」でフィルタリングできます。デフォルトでは、情報は過去30日間でフィルタリングされます。
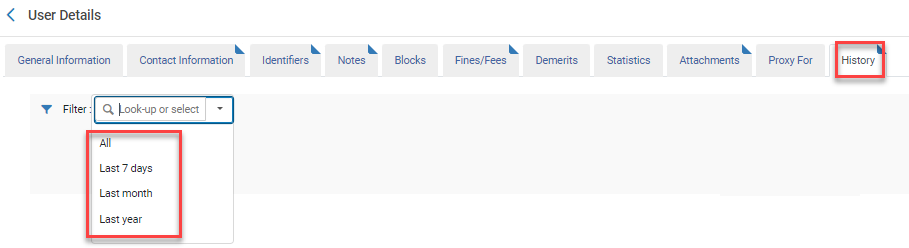
次のフィールドに関連する変更のみがユーザー履歴タブに表示されます。
- 一般タブ:
- ユーザー名
- 名
- 姓
- ミドルネーム
- ユーザータイトル
- PIN番号
- 役職
- キャンパスコード
- ユーザーグループ
- ユーザー言語
- 有効期限
- 消去日
- rs図書館コード
- 目録者レベル
- レコードタイプ
- パスワード
- 住所
- 電話
- ID
- notes
- ブロック
- 次のプロキシ
- 役職
The length of time that the user audit trail record is retained is determined by the user_audit_retention_period parameter.See Configuring Other Settings.毎週のジョブである保持付きのユーザー監査パージは、保持期間の値よりも古い履歴レコードを削除します。
Any updates to the user record update the created by/modified by fields.
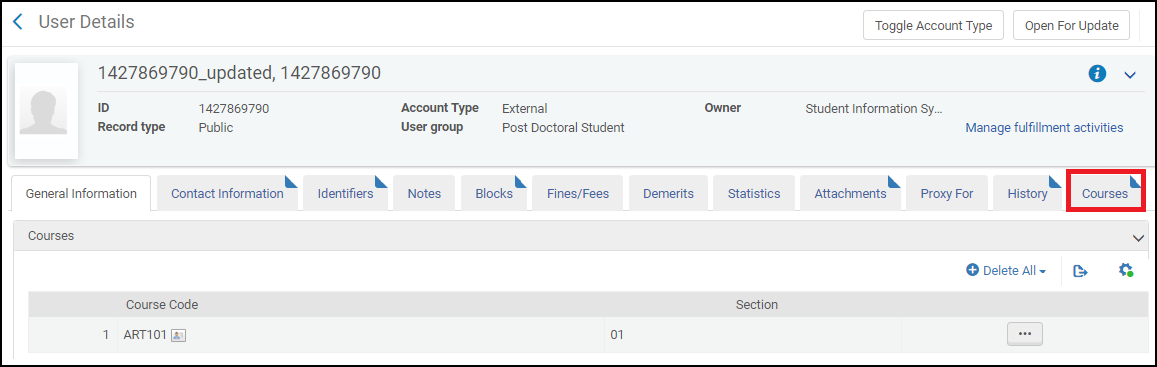
コースの管理
(Leganto only) The Courses tab allows you to view all courses to which a student has enrolled and to delete specific courses or all courses to which a student has enrolled.
For information on how to load user enrollment information, see Configuring Importing Course Enrollment Jobs.
Managing User Pictures
外部サーバーでユーザー画像を管理し、Almaの[ユーザー詳細]ページで表示できます。To do this, you must first configure the following parameters (see Configuring Other Settings):
When using a photo server (secured or not secured, i.e. https or HTTP), you must open access to campus staff member computers.
- photo_server_url- The URL to the location (directory) containing user pictures.URLはHTTPSを使用する必要があります。In order to use HTTPS, the certificate may not be self-signed and must be signed by a known certificate authority (the list of supported certificates can be found here).URLはスラッシュ(/)で終わる必要があります。For example,http://institution.edu/pictures/.
- photo_identifier_type- The user identifier to use as the user picture file name.Possible values are: USERNAME(the primary ID) or a code in the User Identifier Types code table (see Viewing User Identifiers).
- photo_suffix - ユーザー画像のファイルの拡張子として使用する拡張子です。For example,png.
The advised size (in pixels) for user photos to be properly uploaded to the Patron cards is 160*190.
You view a user's picture on the User Details page (Admin > User Management > Manage Users; select Edit in the row actions list).
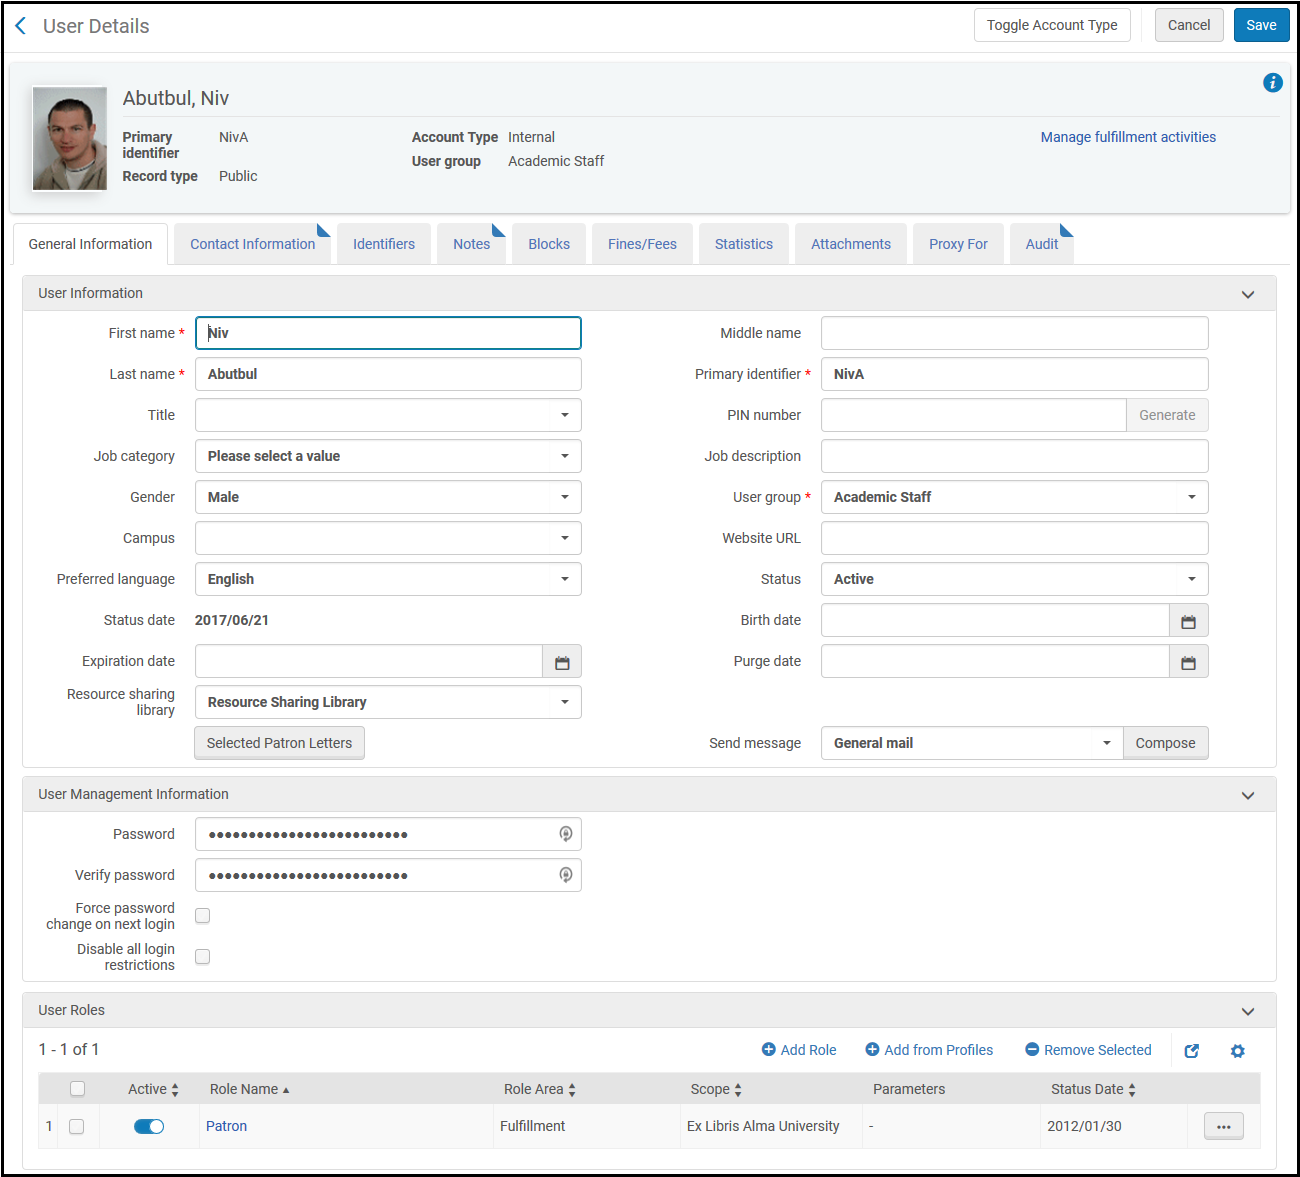
- photo_server_urlで定義されたディレクトリに、<user identifier>.<photo_suffix>という名前のユーザー画像(たとえば12345.png)をアップロードします。
- 各ユーザーに、ユーザー画像のファイル名と一致する識別子があることを確認してください。See Managing User Identifiers.
画像を編集・削除するには、photo_server_urlで画像を編集・削除します。Almaでのアクションは不要です。
For more information, see  How to configure the display of user pictures on the User Details and Patrons Services page in Alma.
Deleting Users
次の場合にユーザーを削除できます。
- ユーザーのアカウントに、未払残高がない。
- ユーザーに、延滞中の貸出がない。
- ユーザーに、注文明細・発注書・請求書が割り当てられていない。
- ユーザーに、ロックされた書誌レコードがない。
- ユーザーに、インポートプロファイルが割り当てられていない。
- They are not currently working in the MD Editor.
- They do not have active Purchase Requests (Purchase Requests with the following status are considered ‘not active' and do not prevent deleting a user: Rejected, Approved, Order Complete, To be Canceled, Failed, Cancelled).
- ユーザーレコードが、実行中のジョブによって現在ロックされていない。
- (Esploroが機関で有効になっている場合)そのユーザーにアセットや助成金が関連付けられている。
Note that the purge users job does not delete users with Resource Sharing requests that are on the Hold shelf (see Configuring User Deletion).
以下の手順を使用して削除されたユーザーは、完全に削除されます。統計データや報告可能なデータは保持されません。
スタッフユーザーまたはパブリックユーザーのみを削除してください。コンタクトユーザーはベンダー専用です。削除しないでください。
To delete users in bulk, see Purging Users
To delete a user:
- On the Find and Manage Users page (Admin > User Management > Manage Users), select Delete in the row actions list for the user you want to delete.確認ダイアログボックスが表示されます。
Find the user record you want to delete using the persistent search bar's ‘Users' option.
- そのユーザーを削除してよければ、[確認]を選択します。ユーザーが削除されます。
- If the user cannot be deleted, a message such as the following appears.
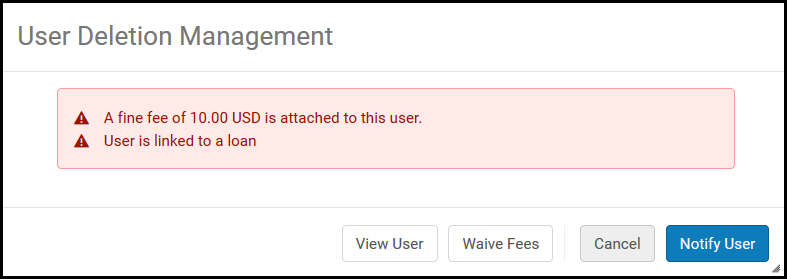
次のオプションから1つを選択します。
- キャンセル – ユーザーを削除しません。
- View User(appears only when fines/fees are attached to the user) – See Editing Users.
- Waive Fees – See Managing User Fines and Fees.新しい確認ダイアログボックスが表示され、そのユーザーの削除を確認できます。
- Notify User(appears only when fines/fees are attached to the user) – Send the User Deletion Letter informing the user that there is a balance due on the user's account.A copy of the email is added to the Attachments tab (see Managing User Attachments).For more information on configuring the letter, see Configuring Alma Letters.
ユーザーの配信
ネットワークゾーンを実装しているすべてのメンバー機関にユーザーを配信できます。For more information, see Distributing Users Across a Network Zone.For additional user sharing options in a fulfillment network, see Linking Users in Fulfillment Networks.
