
Configuring the SFX Menu
Advanced SFX Menu Template Configuration
SFX Menu Example

- The text describing the type of service, such as Full text available via X.
Changes can be made to this text by editing the services_public_name.config_file in your instance.
- The name of the target (displayed in bold).
You can change the name of a target by editing the target’s PUBLIC_NAME field in your instance of the KBManager.
Defining the Basic Group of Services
- The basic_grouping.config_ file overrides the order of services configured in the services_public_name.config_ file (for more information, see Defining the Order of Groups of Services and Text Describing Each Group) even if grouping is not used; therefore, it is important to define the order of services in the SFX menu in the basic_grouping.config_ file.
- The only service that cannot be configured in the basic_grouping.config_ file is the bX getRecommendation service. This service uses very specific display programs, and its display is controlled by the UNIX configuration file config/bx.config. More information about the configuration of the bX recommendation service can be found in the bX–SFX Configuration Guide.
- Telnet to the SFX server and log on as sfxlcl41.
- Enter cn.
- Enter vi basic_grouping.config_.
- You are prompted to break the symbolic link. Enter y.
- In the “basic_grouping” section, enter the target services.
|
Section "basic_grouping" getFullTxt getHolding EndSection |
- Save your changes.
Grouping Services on an SFX Menu Screen
- whether SFX services should be grouped on the SFX menu into Basic and Advanced services
- the option to allow users to collapse and expand these groups on the SFX menu
- Connect to the SFX server and log on as the instance user, such as sfxlcl41.
- Enter cn.
- Enter vi ctx_object.config.
- Go to the “html_menu” section.
|
Section "html_menu" debugging "1" log "$ENV{SFXCTRL_HOME}/logs/sfxmenu" timer "1" keep_log "1" debug_ip_range "*.*.*.*" grouping "Y" collapsible "Y" user_must_pick_single_object "1" template "$ENV{SFXCTRL_HOME}/templates/sfxmenu/sfxmenu.tmpl" EndSection |
- Set the grouping and collapsible options.
If grouping is set to Y, the services are grouped into Basic and Advanced services as defined in the basic_groupings.config_ file.
Setting grouping to Y also enables the option to make these groups collapsible on the SFX menu. Set the collapsible option to “Y” to make groups collapsible on the SFX menu.
If grouping is set to N, the target services display on the menu without a header or footer for Basic and Advanced services.
- Save the file.
Defining the Order of Groups of Services and Text Describing Each Group
- The names for the headings that display for each group of services.
- The order in which the groups of services display.
- When using the advanced menu, the order of services is configured in the services_public_name.config_ file. However, the services listed in the basic_grouping.config_ configuration file are displayed before any other services - even when grouping into basic and advanced sections is not used. SFX first displays the services listed in basic_grouping.config_ (using the order defined in services_public_name.config_) and afterwards displays the services not listed in basic_grouping.config_ (using the order defined in services_public_name.config_).
- The only service that cannot be configured in the services_public_name.config_ file is the bX getRecommendation service. This service uses very specific display programs, and its display is controlled by the UNIX configuration file config/bx.config. More information about the configuration of the bX recommendation service can be found in the bX–SFX Configuration Guide.
- Telnet to the SFX server and log on as sfxlcl41.
- Enter cn.
- Enter vi services_public_name.config_.
- You are prompted to break the symbolic link. Enter y.
- Go to the “group_names” section.
|
Section "group_names" getFullTxt "Full Text" getSelectedFullTxt "Full text" getDOI "Full text" getMessageNoFullTxt "Full text" getHolding "Holding information" getDocumentDelivery "ILL" getBookReview "Reviews" getAbstract "Abstract" getTOC "Table of contents" getAlikeRecord "Reviews" getAuthor "Author" getCitedAuthor "Author" getCitedReference "Reference" getReference "Reference" getCitedBook "Citation information" getCitedGenome "Citation information" getCitedRecord "Citation information" getCitedJournal "Citation information" getAuthorEmail "Author" getSubject "Subject" getWebService "Web Service" getWebSearch "Web Search" EndSection |
- Change the name or phrase in quotation marks to change the group name displayed in the SFX menu.
- Change the order of the service types to your preference.
The order of the list of service types displayed on the SFX menu is determined by the order of the service types as entered in the “group_names” section.
If the getFullTxt service is the first one entered in the “group_names” section, it is the first service that displays on the SFX menu if a FullTxt service is available for the link source.
- Save the file.
Defining the Text Describing Each Service
- Telnet to the SFX server and log on as sfxlcl41.
- Enter cn.
- Enter vi services_public_name.config_.
- Go to the “services” section.
|
Section "services" getFullTxt "Full text available via" getSelectedFullTxt "Full text available via" getDOI "Full text available via" getMessageNoFullTxt "No Full text available" getHolding "Holdings in" getDocumentDelivery "Request document via" getBookReview "Read the review or buy this book at" getAbstract "Abstract available in" getTOC "Table of contents from" getAlikeRecord "This record at" getAuthor "Other articles by this author? -- using" getCitedAuthor "Is this author cited? -- using" getCitedReference "Is this article cited? -- using" getCitedJournal "This journal in" getReference "References at" getCitedBook "This book in" getCitedGenome "Get sequence information from" getCitedRecord "This record in" getAuthorEmail "Find this author's email in" getSubject "Find this subject in" getWebService "Find related information in" getWebSearch "Find related information in" EndSection |
- Change the default text to your preferences.
- Save the file.
Defining the Order for Targets for the Same Service Type
- Telnet to the SFX server and log on as sfxlcl41.
- Enter cn.
- Enter vi sort_services.config_.
- Go to the “sort” section.
- Change the sort arrangement to match your preferences using the example below as a guide.
|
Section "sort" Type=LIST #getHolding services LOCAL_CATALOGUE_ENDEAVOR_VOYAGER LIBRARY_OF_CONGRESS #getFullTxt service SWETSWISE SPRINGER_LINK_JOURNALS EndSection |
In this “sort” example:
- You have activated the following getHolding target services:
- A link to your local OPAC
- A link to the Library of Congress
You want the local OPAC link to display first and the Library of Congress link to display second.
- You have activated full-text access to journals via SwetsWise and Springer. If more than one full-text link displays in the SFX menu, you want the link to the SwetsWise service to display first and the link to the Springer service to display second.
- Save your changes.
Force Targets to Display at the Bottom of a List of Services
- Telnet to the SFX server and log on as sfxlcl41.
- Enter cn.
- Enter vi bottom_list.config_.
- Go to the “bottom” section.
|
Section "bottom" Type=LIST LIBRARY_OF_CONGRESS EndSection |
- Specify the target to display at the bottom.
- Save the file.
Changing the Text Explaining a Particular Service

HTML Templates of the Advanced Menu Template
- banner.tmpl– This file is used to create the reference box at the top of SFX menu.
- sfxmenu.tmpl– This file points to the CSS style sheet and grouping templates.
- grouping_yes.tmpl– This file contains the layout instructions for menus when grouping is set to yes and points to the target_list.tmp file.
- grouping_no.tmpl– This file contains the layout instructions for menus when grouping is set to no and points to the target_list.tmp file.
- target_list.tmpl – This file contains Perl instructions to create service links and references target displayers.
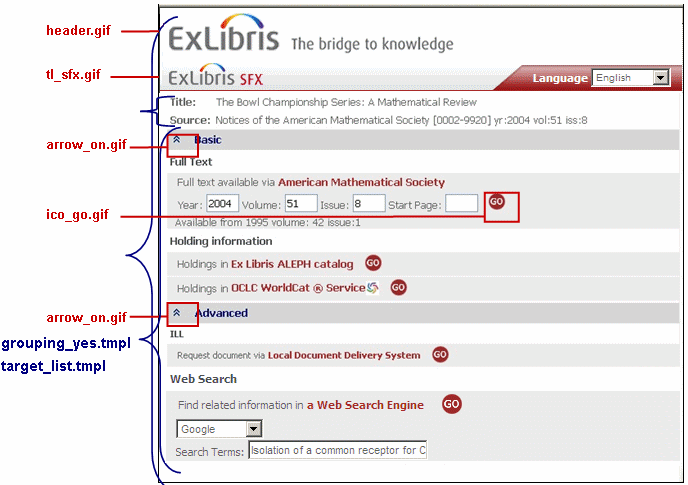
Changing Images in the SFX Menu
- tl_sfx.gif
- header.gif
- arrow_on.gif
- arrow_off.gif
- Create backups of the default images.
- Log on to your server as the instance user.
- Copy the following files from /exlibris/sfx_ver/sfx4_1/
/templates/img/sfxmenu :
- cp header.gif header-bak.gif
- cp tl_sfx.gif tl_sfx-bak.gif
- cp arrow_on.gif arrow_on-bak.gif
- cp arrow_off.gif narrow_off-bak.gif
- Create new images and save them with the same names as the ones you are replacing.
- FTP your new .gif files to /exlibris/sfx_ver/sfx4_1/
/templates/img/sfxmenu .
Changing the .tmpl Files that Constitute the SFX Menu
- Log on to your SFX server as the user of the instance where you want to make changes (such as the sfxlcl41 user) to make changes to the sfxlcl41 instance.
- Enter sx.
- Enter cd templates/sfxmenu.
- Enter cp xxxx.html xxxx-bak.html.
For example:
cp banner.tmpl banner-bak.tmpl
- banner.tmpl
- sfxmenu.tmpl
- grouping_yes.tmpl
- grouping_no.tmpl
- target_list.tmpl
- The referenced Cascading Style Sheets used when generating the menu html.
<LINK REL="stylesheet" TYPE="text/css" href="/<TMPL_VAR INSTANCE>/css/public/style.css">
- The image across the top of the SFX menu. By default, the header.gif file is used.
<IMG SRC="/<TMPL_VAR INSTANCE>/img/sfxmenu/header.gif" WIDTH="455" HEIGHT="48" BORDER="0" ALT="ExLibris Electronic Library">
- The SFX icon located at top of menu.
<IMG SRC="/<TMPL_VAR INSTANCE>/img/sfxmenu/tl_sfx.gif" WIDTH="103" HEIGHT="35" BORDER="0" ALT="SFX">>
- Enter vi sfxmenu.tmpl.
The system prompts you for the following:
[break symbolic link 'sfxmenu.tmpl' ?] [y/N]
- Enter y and the file is created as a local file.
- Make your changes to the sfxmenu.tmpl file.
The banner.tmpl fileallows you to change or specify the text used in the banner to display journal and article information.
- Save your changes.
- Enter vi banner.tmpl.
The system prompts you for the following:
[break symbolic link 'banner.html'?] [y/N]
- Enter y and the file is created as a local file.
- Make your changes to the banner.tmpl file.
The grouping_yes.tmpl file allows you to change or specify the text used to describe the Basic and Advanced service groupings when used in the SFX menu. A different name can be defined for collapsible menus.
|
<td class="GroupTitle" height="22" width="100%"> <TMPL_IF COLAPSIBLE_ENABLED><a href="javascript:toggleBasic();" class="GroupTitle">Basic</a> <TMPL_ELSE> Basic </TMPL_IF> |
|
<td class="GroupTitle" height="22" width="100%"> <TMPL_IF COLAPSIBLE_ENABLED><a href="javascript:toggleAdvanced();" class="GroupTitle">Advanced</a> <TMPL_ELSE /> Advanced </TMPL_IF> </TD> |
- Save your changes.
- Enter vi grouping_yes.tmpl.
The system prompts you for the following:
[break symbolic link 'grouping_yes.html' ?] [y/N]
- Enter y and the file is created as a local file.
- Make your changes to the grouping_yes.tmpl file.
The target_list.tmpl fileallows you to change or specify the button to go to a particular target. By default, the ico_go.gif image is used.
|
<img src="/<TMPL_VAR NAME='INSTANCE'>/img/sfxmenu/ico_go.gif" width="20" height="20" border="0" alt="GO" hspace="10" /> |
- Save your changes.
- Enter vi target_list.tmpl.
The system prompts you for the following:
[break symbolic link 'target_list.html'?] [y/N]
- Enter y and the file is created as a local file.
- Make your changes to the target_list.tmpl file.
Make target names clickable.
It is possible to make the name of each target and/or the text describing each target clickable. To do this, you need to edit the target name section of the target_list.tmpl file.
If you want the target name to be hyperlinked, add the lines as shown in the example below.
- Without hyperlinks in the service and target name:
|
<table border=0> <tr> <td nowrap width="1%" class="Label"><tmplvar name='SERVICE_NAME'> <span class="LabelHighlightInner"><tmplvar name='TARGET_NAME'></span> </td> |
- With hyperlinked target name:
|
<table border=0> <tr> <td nowrap width="1%" class="Label"><tmplvar name='SERVICE_NAME'> <TMPL_IF IS_LINKABLE> <a href="javascript:openWindow(this,'<TMPL_VAR NAME=FORM>');"> <span class="LabelHighlightInner"><tmplvar name='TARGET_NAME'></span></A> <tmpl_else> <span class="LabelHighlightInner"><tmplvar name='TARGET_NAME'> </TMPL_IF> </td> |
If you want both the target name and the text describing the target to be hyperlinked, add the lines shown in the example below:
- Without hyperlinks in the target name:.
|
<table border=0> <tr> <td nowrap width="1%" class="Label"> <tmplvar name='SERVICE_NAME'> <span class="LabelHighlightInner"> <tmplvar name='TARGET_NAME'></span> </td> |
- With hyperlinked service and target name:
|
<table border=0> <tr> <td nowrap width="1%" class="Label"> <TMPL_IF IS_LINKABLE> <a href="javascript:openWin(this);window.document.<TMPL_VAR FORM>.submit();"> <tmpl_var name='SERVICE_NAME'> </A> <tmpl_else> <tmpl_var name='SERVICE_NAME'> </tmplif> <TMPL_IF IS_LINKABLE> <a href="javascript:openWin(this);window.document.<TMPL_VAR FORM>.submit();"> <span class="LabelHighlightInner"><TMPL_VAR NAME='TARGET_NAME'></span> </A> <tmpl_else> <tmplvar name='TARGET_NAME'> </TMPL_IF> </td> |
- Enter cd /exlibris/sfx_ver/sfx4_1/sfxinstance/templates/css/public/.
- Enter vi style.css.
The system prompts you for the following:
[break symbolic link 'style..css'?] [y/N]
- Enter y and the file is created as a local file.
- Make your changes to the style.css file.
Creating Language-Specific Menu Templates
|
/exlibris/sfx_ver/sfx4_1/instance/templates/sfxmenu
banner.tmpl.es sfxmenu.tmpl.es target_list.tmpl.es error.tmpl.es grouping_yes.tmpl.es grouping_no.tmpl.es /exlibris/sfx_ver/sfx4_1/instance/config/services_public_name.config_.es |
- In the /sfx_ver/sfx4_1/
/config/map_languages.config_ configuration file, add a default_language section. - Specify the default language of your choice.
See the example below where the Dutch language templates are used as the default set.
|
Section "default_language" default Dutch EndSection
Section "map_languages" Dutch "du" Spanish "sp" EndSection |
- Save your changes.
- Create additional language-specific .tmpl files.
- Telnet to your SFX server and log on as sfxlcl41 (or the instance where you want to use the language-specific SFX menu).
- Enter sx.
- Enter cd templates/sfxmenu.
- Enter cp banner.tmpl banner.tmpl.<language extention>.
- For example, Enter cp banner.tmpl banner.tmpl.ger for German.
- Enter vi banner.tmpl.<language extention>.
- Make the changes you want, and save the changes by typing :wq.
- Repeat this process for additional menu templates.
When German is selected from the SFX menu, the SFX program uses the .tmpl files with the .ger extension. If it cannot find a .tmpl file with a .ger extension, it uses the default .tmpl files (without extensions).
- Specify the language name and its .tmpl extension that is to be used in the map_languages.config file.
- Telnet to the SFX server and log on as sfxlcl41 (or the instance where you want to use the language-specific SFX menu).
- Enter cn.
- Enter vi map_languages.config.
- Edit the “map_languages” section.
- Add the language name as it displays in the SFX menu drop-down list.
- Tab and add the extension of your choice. In the example below, “ger” is used for German.
|
Section "map_languages" Espanol "es" German "ger" Dutch "du" EndSection |
- Save your changes, and quit the file by typing :wq.
- Add a new language option to the drop-down navigation list of the SFX menu in /exlibris/sfx_ver/sfx4_1/instance/templates/sfxmenu/sfxmenu.tmpl.
- Telnet to the SFX server and log on as sfxlcl41 (or the instance where you want to use the language-specific SFX menu).
- Enter sx.
- Enter cd templates/sfxmenu.
- Enter vi sfxmenu.tmpl.
- Add the name that you defined in the map_language.config file to the following section of the sfxmenu.tmpl file.
|
Language <select name="language" onChange=set_user_profile()> <OPTION value="English"<TMPL_VAR NAME='English' ESCAPE='HTML'>>English</OPTION> <OPTION value="Espanol"<TMPL_VAR NAME='Espanol' ESCAPE='HTML'>>Espanol</OPTION> <OPTION value="German"<TMPL_VAR NAME='German' ESCAPE='HTML'>>German</OPTION> </SELECT> |
In this example, German was added.
Overview of SFX Menu-Related Features, Files, and Tools
| Where Found in SFX Admin | Function |
|---|---|
| Setup & Administration > Configuration: Menu Configuration | Display logic Suppressing a particular target when another specific one is present |
| KBManager: TARGET Public Name | Controls target display name on menu |
| KBManager: TARGET_SERVICE Public Name | Controls OVERRIDE default service wording See services_public_name.config_ below |
| Where Configuration Files for Instance - Shortcut: cn Found | Function |
|---|---|
| services_public_name.config_ | Text describing service and/or order of service - Text for “group name” - Regrouping of service on the menu |
| ctx_object.config | Specify grouping menu into Basic and Advanced sections Make headers for groups collapsible |
| basic_grouping.config_ | Basic services can be defined All other services fall into extended services |
| sort_services.config_ | Sorting Push to top of list (services of the same type) |
| bottom_list.config_ | Sorting Push to bottom of list (services of the same type) |
| Where Template Files - Shortcut:tm Found | Function |
|---|---|
|
/css/public/style.css
|
Central style sheet |
|
/img/sfxmenu
|
Storage of the images for banner, header, arrows, and so on |
|
/sfxmenu/sfxmenu.tmpl
|
Central file References all the images Can remove the language drop-down in the upper-right corner |
|
/sfxmenu/grouping_yes.tmpl
|
Change text describing “Basic” and “Advanced” sections |
|
/sfxmenu/target_list.tmpl
|
Can make the target names clickable hyperlinks |
Target Displayers


- When a TARGET_SERVICE uses the default parser, the DISPLAYER field in the KBManager is left blank.
- When a TARGET_SERVICE uses a special display parser, the name of the parser is filled in the DISPLAYER field of that particular TARGET_SERVICE.
- Telnet to the SFX server and log on as sfxlcl41.
- Enter tp.
- Enter cd ../TargetDisplayer/.
This is where you find the different target displayers.
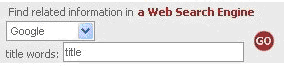
If you would like to prevent the year/volume/issue/startpage input boxes from displaying completely for a particular target service, you can apply a special NO_FILL_IN displayer.
- Click the E button on the target service level of the target of your choice.
- Go to the Displayer field (the next field under parse_param).
- Enter FT::NO_FILL_IN in the Displayer field.
- Save your changes.
Using a Special Displayer to Show Date Threshold Information in the SFX Menu
- OPACs
- An HTML list of electronic journals on a customer’s library pages
- The CitationLinker form
- A journal index, such as Ulrichs periodicals database

 Edit button to edit the source for which you want the availability information to be displayed in the SFX menu, and click the check box for the Show Availability option as in the following:
|
http://il-sfx07:3410/sst1_4?url_ver=Z39.88-2004&url_ctx_fmt=info%3Aofi%2Ffmt%3Akev%3Amtx%3Actx&ctx_ver=Z39.88-2004&ctx_enc=info%3Aofi%2Fenc%3AUTF-8&rfr_id=info%3Asid%2Fsfxit.com%3Akbmanager&sfx.ignore_date_threshold=1&rft.object_id=954925246074 |
Related Objects in XML, OpenURL, and Consortium API
- XML OpenURL
Only close relations are included in the XML responses. This happens only if the related object display is turned on for the SFX menu. There is no indication that these services originate from related objects.
- Consortia API
When retrieving additional services using consortia API, services from the related objects are displayed based on configuration both in the local and remote instance.
- If the related object display is turned on in the local instance only, only related services from the local instance are included in the SFX menu.
- If the related object display is turned on in both the local and remote instance, related services from both instances are included in the SFX menu.
SFX Window Behavior
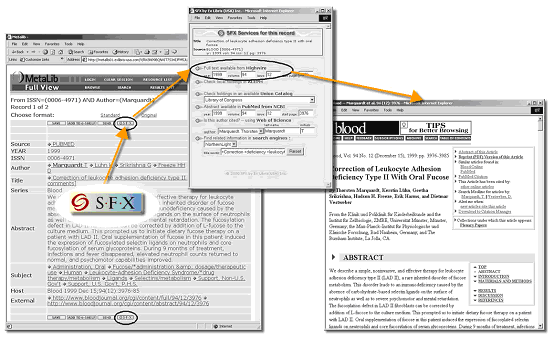
- Source window – the database from which you begin your search. If you click the SFX button in the top bar of the record, the SFX menu opens.
- SFX menu window – contains a list of available services. When you click one of the services, the target window opens.
- Target window – the service requested in the SFX menu. In the following example, the user requests a full-text service, so the target window displays the HighWire full-text version corresponding to the original abstract record.
Changing the Size of the Target Window
- Log on to the SFX server as the instance user.
- Navigate to the template directory:
cd /exlibris/sfx_ver/sfx4_1/
- Access the JavaScript files listed below. In both files, you need to change the current window size (marked in red) to the window size of your choice.
- main.js
|
function openWin(obj) var options = "toolbar=yes,location=yes,directories=yes,buttons=yes,status=yes"; options += ",menubar=yes,scrollbars=yes,resizable=yes,width=800,height=600";
function openWin_location var options = "toolbar=yes,location=yes,directories=yes,buttons=yes,status=yes"; options += ",menubar=yes,scrollbars=yes,resizable=yes,width=800,height=600"; |
- gbs.js
|
function openWindow(obj, form_name) var options = "toolbar=yes,location=yes,directories=yes,buttons=yes,status=yes"; options += ",menubar=yes,scrollbars=yes,resizable=yes,width=800,height=600"; |
- Save your changes.
Including COinS Representation in the SFX Menu
|
<span class="Z3988" title="ctx_ver=Z39.88-2004&url_ver=Z39.88-2004&ctx_enc=info%3Aofi%2Fenc%3AUTF-8&ctx_id=10_1&rft.auinit=S&rft.genre=article&rft.year=1997&rfr_id=info%3Asid%2Fopenly%3Aopenurlref&rft.aulast=Marlow&rft.atitle=A%20practical%20subtyping%20system%20for%20Erlang&rft.jtitle=Proceedings%20of%20the%20second%20ACM%20SIGPLAN%20international&rft.date=1997&rft_val_fmt=info:ofi/fmt:kev:mtx:journal"> </span> |
Setup
|
include_coins "Y" |
|
debugging "0" log "$ENV{SFXCTRL_HOME}/logs/sfxmenu" keep_log "0" debug_ip_range "*.*.*.*" grouping "Y" collapsible "Y" user_must_pick_single_object "1" template "$ENV{SFXCTRL_HOME}/templates/sfxmenu/sfxmenu.tmpl" verde_link "0" include_coins "Y" EndSection |
|
<span class="Z3988" title"[ctx obj]"> |
|
<base-URL>?id=pmid:15486829 |
Applications that Use COinS
- LibX
LibX is a browser plug-in for Firefox and Internet Explorer that provides direct access to your library’s resources. It includes a toolbar and a right-click context menu, and supports searches against the library catalog (OPAC) as well as against an OpenURL linking server. Information about LibX can be found at http://libx.org.
- OpenURL Referrer
This extension enables the browser to display OpenURL links on Web pages with CoinS embedded in the HTML source code. If COinS is turned on for the SFX menu, you see an SFX button in the menu banner.
The extension is available for both IE 6+7 and Firefox. Information can be found at http://openly.oclc.org/openurlref/.
- Zotero
Zotero is a library metadata utility extension for Firefox. Its purpose is to help you collect, manage, and cite your research sources. Information about Zotero can be found at http://zotero.org.
Configuring the SFX Menu Interface Language
Configuring the SFX Menu Language in the SFX Admin Center
Simplified Menu Template
- In the SFX Admin Center, click Set-up and Administration > Configuration > Menu Configuration > Menu Design. The following is displayed:
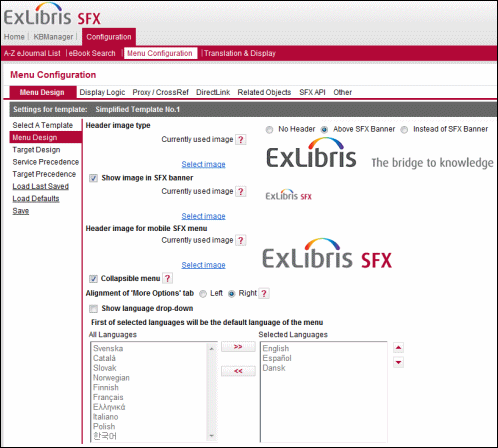
- Select Show language drop-down.
- Select the languages that you want to appear in the language drop-down from the All Languages pane and click the right arrow
 to move them to the Selected Languages pane. The first language in the Selected Languages pane is the default language.
Advanced Menu Template
Setting the SFX Menu Language in an External Application
- via the language user profile cookie set via an external application, the SFX menu, or the SFX A-Z language drop-down list.
- via the req.language OpenURL element
Setting the SFX Menu Language via a User Profile Cookie
Setting the SFX Menu Language via the req.language OpenURL Element
|
http://demo.exlibrisgroup.com:3210/demo?ctx_ver=Z39.88-2004&url_ver=Z39.88-2004&ctx_enc=UTF-8&rft.issn=0894-9867&rft.year=2011&rft_id=info%3Apmid%2F21812037&rft.atitle=Predicting%20pediatric%20posttraumatic%20stress%20disorder%20after%20road%20traffic%20accidents%3A%20the%20role%20of%20parental%20psychopathology.&rft.issue_start=4&rft.object_id=954925559531&rft.volume_start=24&rft.volume=24&rft.month=8&rft.genre=article&rft.issue=4&rft.doi=10.1002%2Fjts.20667&rft_val_fmt=info:ofi/fmt:kev:mtx:journal&req.language=spa |
SFX Menu for Mobile Devices
- Mobile SFX menu header images:
/exlibris/sfx_ver/sfx4_1/<instance>/templates/img/simplified_template1/mobile/default/
/exlibris/sfx_ver/sfx4_1/<instance>/templates/img/simplified_template1/mobile/custom/
- Do not change the images in this directory. Instead, use SFX Admin Center > Configuration > Menu configuration > Menu Design to upload and select the header images.
- A different header image is used for the CitationLinker and multi-object window. For this header image, upload the image in the location specified below.
- Location of other mobile SFX menu images (including service type icons):
/exlibris/sfx_ver/sfx4_1/<instance>/templates/img/mobile/
- CSS files for the mobile SFX menu:
- Global css files that should not be changed:
/exlibris/sfx_ver/sfx4_1/<instance>/templates/css/public/mobile/style.css
/exlibris/sfx_ver/sfx4_1/<instance>/templates/css/public/mobile/style_rtl.css [Hebrew css]
- Local CSS files that can be used to override the global CSS classes:
/exlibris/sfx_ver/sfx4_1/<instance>/templates/css/public/mobile/custom.css
/exlibris/sfx_ver/sfx4_1/<instance>/templates/css/public/mobile/custom_rtl.css [Hebrew css]
- Mobile SFX menu template files:
/exlibris/sfx_ver/sfx4_1/<instance>/templates/simplified_template1/mobile
- Mobile target displayers:
/exlibris/sfx_ver/sfx4_1/<instance>/templates/simplified_template1/services/mobile/
- Mobile version of the DirectLink banner and multi-object window templates and images:
- Images for multi-object window and DirectLink banner mobile version (including header image):
/exlibris/sfx_ver/sfx4_1/<instance>/templates/img/mobile/
- Header image name location and file name. (Note that this image is shared by the mobile versions of the CitationLinker, DirectLink banner, and multi-object window):
/exlibris/sfx_ver/sfx4_1/<instance>/templates/img/mobile/logo_sfx.png
Recommended image size: 213 pixels wide, 52 pixels high
- Images for multi-object window and DirectLink banner mobile version (including header image):
- Templates for the mobile version of the SFX menu – multi-object menu and DirectLink banner:
/exlibris/sfx_ver/sfx4_1/<instance>/templates/multiobject/mobile
- Templates and images for the CitationLinker mobile version:
- Images for the CitationLinker mobile version (including header images):
/exlibris/sfx_ver/sfx4_1/<instance>/templates/img/mobile/
- Citationlinker title image located on the left side of the screen:
/exlibris/sfx_ver/sfx4_1/<instance>/templates/img/mobile/logo_citation_linker.png
Recommended image size: 238 pixels width, 52 pixels height
- SFX logo image on the right side of the screen:
/exlibris/sfx_ver/sfx4_1/<instance>/templates/img/mobile/logo_sfx.png
Recommended image size: 213 pixels width, 52 pixels height
- Images for the CitationLinker mobile version (including header images):
- Templates for the CitationLinker mobile version:
/exlibris/sfx_ver/sfx4_1/<instance>/templates/citation/mobile
