
Procesamiento posterior a la recepción
This page gives instructions for processing materials, including updating expiration dates, creating print slips, un-receiving items, etc. For a high level overview of the receiving stage for physical items with links to details for closing PO lines, post receiving and processing claims see Receiving Material. For the full end to end purchasing workflow see Purchasing Workflow. For an overview of working with acquisitions in Alma, including links to relevant sections such as Infrastructure, Renewals, Invoicing, etc., see Introduction to Acquisitions.
- Operador de recepción
Materiales de procesamiento
Después de recibir el material físico, puede ser necesario realizar un trabajo sobre el material antes de que pase a estar disponible para la biblioteca. Además, una solicitud de orden de trabajo puede requerir que se realice un trabajo sobre el material antes de que se puedan hacer otras solicitudes para el mismo.
Puede ser necesario el siguiente trabajo adicional:
- Copy cataloging – Complete the cataloging of the new material
- Physical processing – Add a barcode to the material
- Temp storage – Move the material to temporary storage for a short period
- Digitization – If you are at a digitization department. For more information, see Digitization Processing.
Additional work process statuses may have been defined by your administrator; see Configuring Work Order Type Statuses. Procesar nuevo material u órdenes de trabajo en la página Ejemplares en proceso.
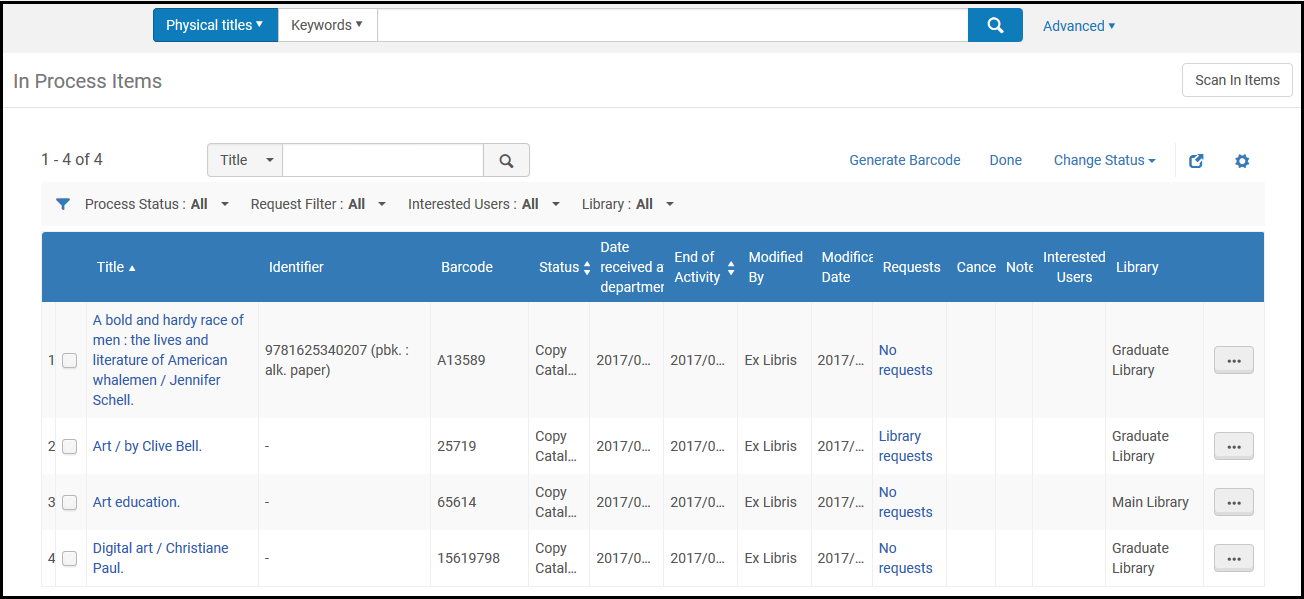
Se puede acceder a la página Ejemplares en proceso de cualquiera de las siguientes maneras:
- Fulfillment > Resource Requests > Manage In Process Items
- Fulfillment > Resource Requests > Scan In Items; select Manage In Process Items
- Acquisitions > Post-Receiving Processing > Receiving Department Items
- Select one of the following tasks in the Tasks List in the persistent menu (see Tasks in the Task List):
- Items - deposit
- Items - digitization
- Items - document deliveryLas tareas anteriores solo aparecen cuando se está en un departamento de digitalización.
- Items - in department
- Items - in department - requested by patron- Purchase requests (see Purchase Requests)Estas tareas solo aparecen cuando se está en un departamento que permite administrar ejemplares en proceso, además de la digitalización
The page is available only when you are working in a department that can manage work orders and you have the Work Order Operator or Receiving Operator privilege for that department, not from a resource sharing or out-of-the-box circulation department. If your circulation department was configured to manage work orders, you can navigate to the page only using the Manage In Process Items link on the Scan In Items page or the Receiving Department Items menu option.The filters, statuses, columns, and actions on this page vary, depending on your current department:
| Departamento | Filtros | Columnas | Factura pagada correctamente. |
|---|---|---|---|
| Digitalización |
Step(see Digital Inventory Profile Rules):
Request Type:
|
|
|
| Todos los demás departamentos (por ejemplo, Servicios Técnicos de Adquisiciones) |
Process Status: The options depend on the work order type; see Work Orders and Departments
Request Filter:
Interested Users(see interested users in Manually Creating a PO Line):
Library:
|
|
|
Realizar tareas y acciones
En un departamento de no digitalización, se pueden realizar las tareas/acciones indicadas a continuación. La disponibilidad de una tarea depende del estado del ejemplar y sus permisos de rol.
Row Actions/Tasks:
- Edit the inventory item (Edit Inventory Item) – This opens the Physical Item Editor. For more information, see Updating Item-Level Information.
- Add a note to a request in process (Edit) – See Adding a Note to a Work Order in Process.
- Update an item's expiration date (Update expiry) – See Updating an Expiration Date.
- Create a print slip (Print slip) – See Creating a Print Slip.
- Write the item's information to RFID (Write to RFID) – This option appears for locations with RFID and an active RFID connection as indicated by the connection icon (
 ). For additional information, see RFID Support.
- Un-receive an item (Un-Receive) – See Un-receiving an Item.
Button Actions/Tasks:
- Change an item's status – See Changing an Item's Status.
- Generate Barcode – See Generating Barcodes.
- Remove an item from the list (by marking it as Done) when all the work processes are complete – See Marking an Item as Done and Removing It.
The tasks available in a digitization department are described in Digitizing Items and Delivery of Digitized Items.
Cambiar el estado de un ejemplar
- Select the item's check box on the In Process Items page.
- Select the new status from the Change Status drop-down list in the table actions list.
- Select Change Status. The item's status is changed.
- Se puede cambiar el estado de varios ejemplares simultáneamente seleccionando varias casillas de verificación y luego modificando el estado del ejemplar, tal como se ha descrito anteriormente.
- You can also change the status of an item on the item's Request Management page (Edit in the row actions list by selecting a different status from the Status drop-down list and selecting Save.
Generar código de barras
La generación automática de códigos de barras se puede gestionar desde la página Ejemplares en proceso cuando el sistema esté configurado para la generación automática de códigos de barras. See Configuring Barcode Generation for more information.
Cuando se generan automáticamente códigos de barras para varios ejemplares, debe hacerse para una sola biblioteca cada la vez. Como resultado, cuando se seleccionan múltiples ejemplares/filas para generar un nuevo código de barras en la página Ejemplares en proceso, todos deben ser de la misma biblioteca. Esto se puede hacer fácilmente utilizando el filtro Biblioteca para mostrar la lista de ejemplares de una sola biblioteca para procesar. Si seleccionan ejemplares de diferentes bibliotecas, aparecerá un mensaje de error. También se recibirá un mensaje de error si se intenta generar un código de barras para uno o más ejemplares que tengan solicitudes o estén en préstamo.
- Seleccionar la casilla de verificación para una o más filas en la página Ejemplares en proceso para identificar los ejemplares para los que desea generar códigos de barras.
-
Select Generate Barcode.Alma comprueba la configuración de generación automática de códigos de barras para la biblioteca identificada en la/s fila/s que se está procesando. Si hay varias secuencias a nivel de biblioteca y/o institución que coinciden con la biblioteca en la/s fila/s que se está procesando, aparece un cuadro de diálogo con opciones de secuencia. Seleccionar una opción de secuencia.
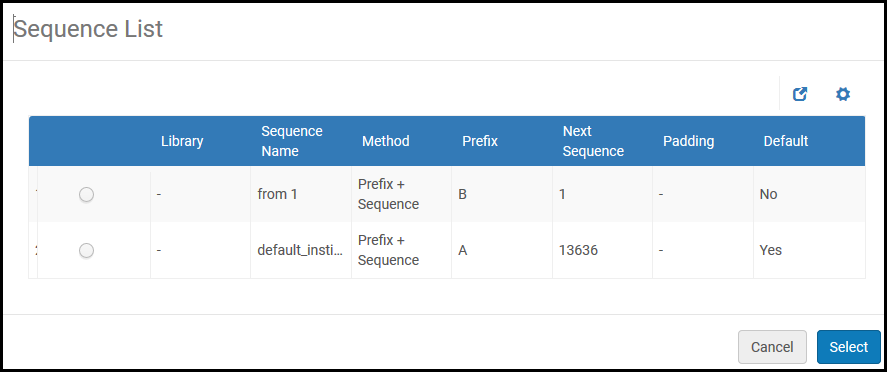
Lista de opciones de generación de código de barras a nivel institucional -
Select a sequence and select Select. El código de barras se genera y aparece en la columna Código de barras de la página Ejemplares en proceso.
Marcar un ejemplar como hecho y eliminarlo
Select one or more check boxes on the In Process Items page and select Done in the table actions list (or select Done in a row actions list). Los ejemplares se eliminarán de la página.
Adding a Note to a Work Order in Process
- Select Edit in a row actions list for the relevant item. Se abrirá la página Gestión de solicitudes.
- Select the Notes tab and enter a note in the Note field.
- Select Add. The note is displayed on the page.
- Select Save. A check mark appears in the Notes column of the Department Items page, indicating that the item contains a note/s. Al pasar el ratón por encima de la marca de verificación, se muestra la última nota que se añadió a esta orden de trabajo en proceso. If there are no process notes, then if a note was added to the work order request, it will appear (see Creating a Work Order Request). Puede añadir múltiples notas. Estas notas se aplican a los pasos de procesamiento de la orden de trabajo, no a la solicitud de orden de trabajo. These notes do not appear in the Note field for Alma Analytics Requests SA > Request Details.
To edit a note, select Edit in the row actions list and modify the note as required. Select Save to save your modification.
To delete a note, select Delete in the row actions list at the end of the note row. La nota se borrará.
Updating an Expiration Date
- Select Update expiry in the row actions list for the relevant item. Aparece la ventana emergente Actualizar fecha de caducidad.
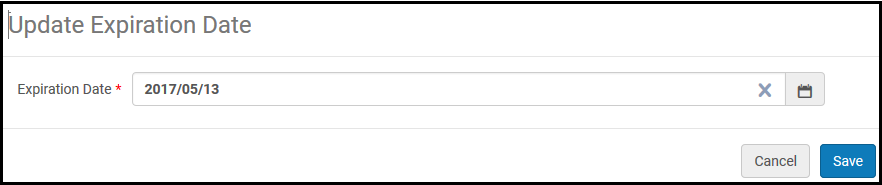
Ventana emergente actualizar de fecha de caducidad - Select the Expiration date.
- Select Save. Se cambia la fecha de caducidad.
Crear un comprobante impreso
Select Print slip in the row actions list for the relevant item. A message appears on the top of the page indicating whether the print slip was sent successfully by email (see Configuring Allowed Emails). Se debe definir una impresora para las adquisiciones o el departamento de recepción para que el comprobante impreso se envíe por correo electrónico. For details on configuring a printer for a department, see Adding a Department.
Un-Receiving an Item
For one time PO lines, select Un-Receive in the row actions list (in Acquisitions > Receiving and Invoicing > Receive) for the relevant item, and then select Confirm in the confirmation dialog box. El ejemplar no se ha recibido. El ejemplar se debe haber recibido en el panel de herramientas de Adquisiciones para que las opciones de No recibir estén disponibles.
To un-receive items for continuous PO lines, select Manage Items, and then select Un-Receive.
- El ejemplar debe haber sido recibido
- El ejemplar aún debe estar en el departamento de recepción
- No debe haber usuarios interesados relacionados con el ejemplar.
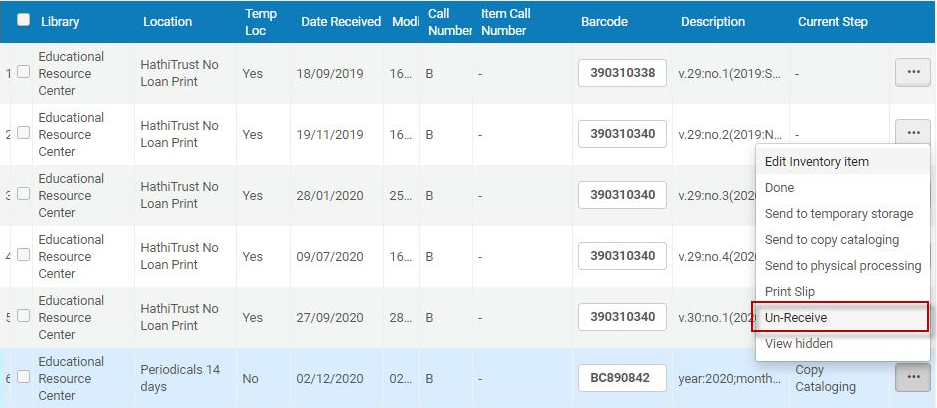
Escanear ejemplares
For information on scanning items, see Scanning Items.
Page tags: article:topicproduct:almacontent:Documentationlang:englishbarcodegenerate barcodepost-receivingmark item doneprocess materialprocess received materialunreceive
