
Waiving Fines in Bulk Using a Job
Definisca il parametro ed esegua il processo per rimuovere le multe in blocco.
- Gestore utenti
- Amministratore Utenti
For more information about managing user fines and fees on the User Details page, see Managing User Fines and Fees. Here, users can select fines and fees across the full fees list and waive them.
For waiving fines and fees on the Manage Patron Services page, see Managing Patron Services at a Circulation Desk.
È possibile annullare in blocco le multe e le commissioni dell'Utente eseguendo un processo. You run the job on the Bulk Fine Waiving page (Admin > User Management > Bulk Fine Waiving).
For information on waiving fines and fees, watch User Management Workflows (4:05).
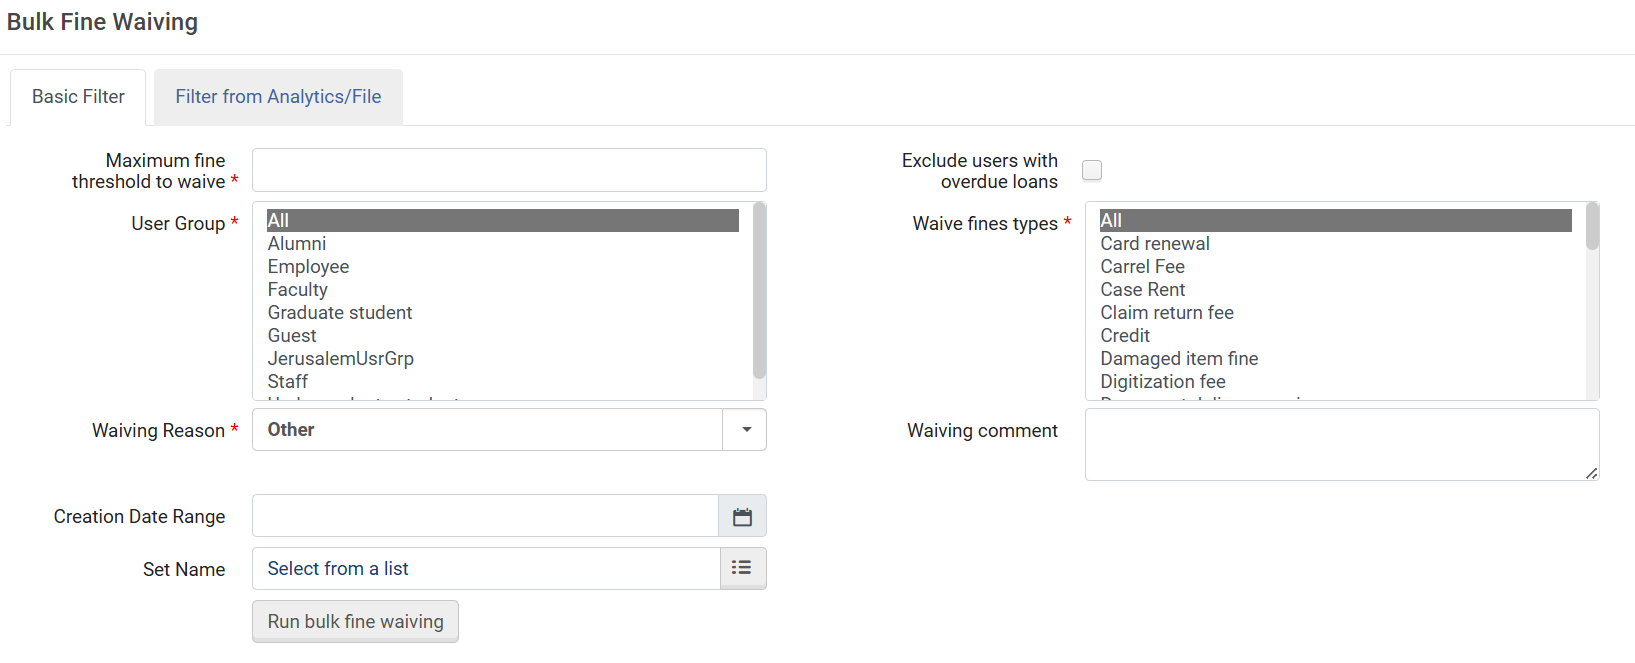
To waive user fines in bulk:
Basic Filter
In the Basic Filter tab, enter the following information:
- Soglia massima della sanzione da condonare – La sanzione massima da condonare. If the total amount of a user's fines is greater than the threshold, none of the user's fines are waived.
- For example: Since the total of the patron's fines exceeds the Maximum fine threshold to waive value, none of the fines are waived.
- Maximum fine threshold to waive= $120
- Il cliente ha multe di 10 $, 50 $ e 70 $.
- For example: Since the total of the patron's fines exceeds the Maximum fine threshold to waive value, none of the fines are waived.
- Escludere Utente con prestiti in ritardo – Se escludere Utente che hanno prestiti in ritardo.
- Gruppo Utente – specificare i gruppi Utente per i quali rinunciare alle sanzioni.
- Rinuncia ai tipi di multe – Specificare i tipi di multe da rinunciare.
- Motivo della rinuncia – Il motivo per cui si rinuncia alla multa. Ad esempio, potreste voler rinunciare alle multe maturate dalla vostra facoltà.
- Waiving comment – Add a comment as needed. Questo campo non è obbligatorio.
- Creation Date Range – The fines in the selected date range will be used for waiving, together with the other filtering options that were selected on the page. Questo campo è facoltativo.
- Set Name – Select the Pick-Up button and select a set of users. Le sanzioni per l'Utente del Set selezionato verranno utilizzate per la rinuncia, insieme alle altre opzioni di filtro selezionate nella pagina.
- When you have completed Select Run bulk fine waiving and select Confirm in the confirmation dialog box. Il processo viene eseguito e le informazioni sul processo appaiono sulla pagina. Selezioni Aggiorna per monitorare l'avanzamento del processo. Also see Viewing Running Jobs and Viewing Completed Jobs.
Filter from File
In the Filter from Analytics/File tab, select From File and enter the following information:
- File – Upload a file that contains the relevant fines. La dimensione massima del file è di 10 MB. The imported file must be a text file (.txt or .csv and the files must be encoded as UTF-8) or Excel file (.xls or .xlsx).
For the data to be read, it must have the FINE FEE ID Header at the top of the column. This header can also be with hyphens, i.e.,FINE-FEE-ID or with underscores, i.e.,FINE_FEE_ID. If the Excel file has more than one column, it looks for the first column of data that has a valid header type and uses that one. The ensuing cells of the Header column must contain the fine identifiers. Below is an example: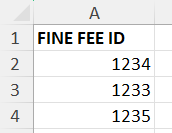 When uploading a .txt file, the first row must contain the FINE_FEE_ID header, and the ensuing rows must contain the fine identifiers (each separated by a carriage return, a commaor an apostrophe).
-
Se si esegue un'importazione con dati non validi, ogni cella non valida viene ignorata.
- Motivo della rinuncia – Il motivo per cui si rinuncia alla multa. Ad esempio, potreste voler rinunciare alle multe maturate dalla vostra facoltà.
- Waiving comment – Add a comment as needed. Questo campo non è obbligatorio.
- When you have completed Select Run bulk fine waiving and select Confirm in the confirmation dialog box. Il processo viene eseguito e le informazioni sul processo appaiono sulla pagina. Selezioni Aggiorna per monitorare l'avanzamento del processo. Also see Viewing Running Jobs and Viewing Completed Jobs.
Filter from Analytics
-
Questa funzionalità funziona solo con i report, non con le dashboard o le visualizzazioni dati.
-
Per il funzionamento di questa funzionalità, i report devono trovarsi in una cartella condivisa.
-
The Analytics report must contain a Header with a valid field for creating the report. In this case, the Header must be the Fine Fee ID.
In the Filter from Analytics/File tab, select From Analytics and enter the following information.
- Analytics folder – Select the folder.Recent reports – Reports that were recently used in the Bulk Fine Waiving screen (not recently-created reports in Analytics). Select the report from the Name field.My Reports – Reports to which you have permissions to access (see Analytics Object List). Selezionare il report dal campo Nome.
- Name – Enter a name for the report. I nomi Report non possono contenere caratteri speciali o viene visualizzato un messaggio di errore «Impossibile connettersi ad Analytics».
- When you have completed Select Run bulk fine waiving and select Confirm in the confirmation dialog box. Il processo viene eseguito e le informazioni sul processo appaiono sulla pagina. Selezioni Aggiorna per monitorare l'avanzamento del processo. Also see Viewing Running Jobs and Viewing Completed Jobs.
