
Managing Users
This page describes how to manage users including adding, editing, deleting and distributing users. For information on working with user roles (including user profiles) see Managing User Roles.
Per gestire gli utenti, devi avere uno dei seguenti ruoli:
- Gestore utenti
- Amministratore Utenti
- Responsabile Banco Circolazione
- Operatore banco circolazione
L'Utente con il ruolo di operatore del Servizio Servizi può visualizzare le informazioni dell'Utente descritte di seguito, ma non può modificarle.
You manage users on the Find and Manage Users page (Admin > User Management > Manage Users). You can also access this page by searching for a user in the persistent search; see Searching in Alma.
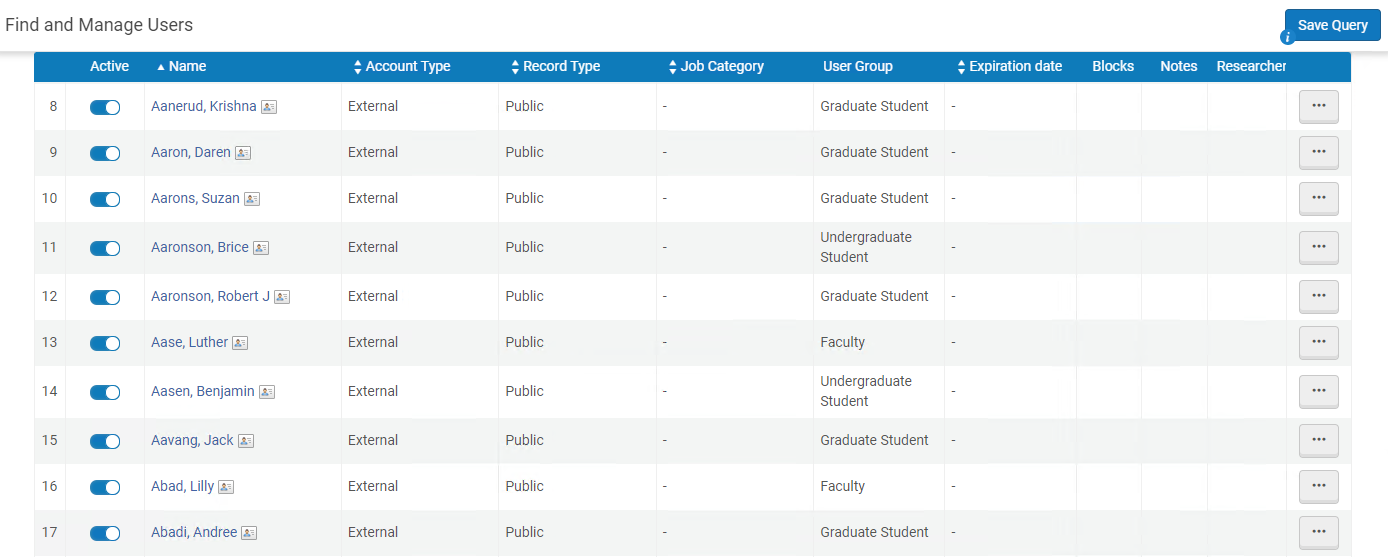
For information on finding and editing existing users and adding new users, watch the Users in Alma video (4:33 min).
Utilizzi la scheda (Personale, Pubblico, Contatto e Tutti) per filtrare la lista utenti in base al tipo di record utente.
- Quando si cerca email o identificativi, è necessario inserire l'intera stringa; non viene eseguita una corrispondenza parziale.
- For additional information on managing users in a collaborative network, see Centrally Managing Users in a Network Zone.
Utilizzare i filtri Account, Ruolo e Stato all'interno di un tab per filtrare ulteriormente la Lista degli Utenti:
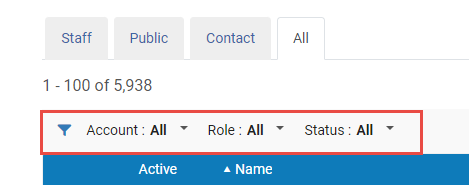
- Account filter - filter the user list to display only; a)External, b)Internal, c)Internal with external authentication, and d)All users.
- Filtro Ruolo - filtra l'Elenco Utenti per visualizzare solo gli Utenti con un Ruolo specifico, ad esempio. Amministratore catalogo e così via.
- Status filter - filter the user list to display only users with the following statuses; a)All, b)Active and not expired, c)Not active or expired.
The following columns appear on this page.
| Nome Colonna | Descrizione |
|---|---|
| Ricercabile | I nuovi utenti vengono attivati automaticamente.
Marking a user as not active is equivalent to blocking the patron account. Ad esempio:
|
| Nome | Il nome dell'Utente. Select this link to open the User Details page (see Editing Users). |
| Account Type |
|
| Tipo di record (solo tab Tutti) | Il tipo di utente. See Adding Users for more information about this field.
|
| Categoria Processo | The user's job category; see Configuring Job Categories. |
| Gruppo Utente (non nella scheda Contatti) | The user's user group; see Configuring User Groups. |
| Stato | Whether the user is Active or Inactive. For internal users, who are authenticated by Alma, this is a manual setting not tied to the expiration date. For more information about authentication, see Expiration Date below. |
| Expiration Date | Alma distingue tra autenticazione, che è l'atto di determinare se l'Utente è un Utente legittimo, e autorizzazione, che è l'atto di determinare cosa l'Utente può fare nel sistema:
Expiration date may impact the due date of the loan. The due date is shortened to the patron's expiry date. This can be configured using the extend_due_date_beyond_user_expiry parameter. If a patron is nearing her expiration date, the due date of the loan is automatically set as the expiration date, and cannot be changed manually. See also the knowledge articleIs it possible to change an item due date past the user expiration date in Alma? The User Registration Terms of Use (see Configuring Terms of Use) enable you to configure the User Renewal Period policy and other policies associated with how patrons are registered at the circulation desk. For more information, see Configuring Terms of Use. After you define the User Registration Terms of Use, assign the Terms of Use for each user group (see Configuring User Registration Rules). Non è possibile Set data di scadenza nel passato. |
| Blocchi (non nella tab Contatti) | Se ci sono blocchi sull'utente. |
| Note | Se ci sono note sull'Utente. |
You can do the following on the Find and Manage Users page:
- Adding Users
- Editing Users - This action is typically required immediately after adding a new user.
- Deleting Users - Only the User Manager or User Administrator Roles can delete users.
- Distributing Users
Gli utenti che hanno inserito la password in modo errato per cinque volte consecutive vengono bloccati in Alma e vengono sbloccati automaticamente dopo 30 minuti.
Ulteriori attività di Gestione utenti includono:
Adding Users
È possibile aggiungere un nuovo Utente da una qualsiasi delle schede della pagina Trova e Gestisci Utente.
- External users are synchronized with Alma using the User integration profile.
- When creating a patron by selecting Register New User on the Manage Patron Services page (see Registering Patrons), it is possible to register external users as well.
- Tutti gli identificativi primari e aggiuntivi devono essere univoci per gli Utenti, compreso lo stesso Utente.
- When adding new users from Find and Manage Users, the Role Assignment Rules are applied (see Configuring Role Assignment Rules).
To add a new user:
Note that Circulation desk managers and operators can only add users by using the Register New User option in the Manage Patron Services page (see Registering New Patrons).
- On the Find and Manage Users page (Admin > User Management > Manage Users), select Add User.
Viene visualizzata la pagina Gestione rapida Utente.
- On the All tab, you are prompted to select the record type (Staff,Public, or Contact).
Contatto è riservato ai contatti del Fornitore e non deve essere utilizzato.
- On any other tab, the record type is set according to the tab.
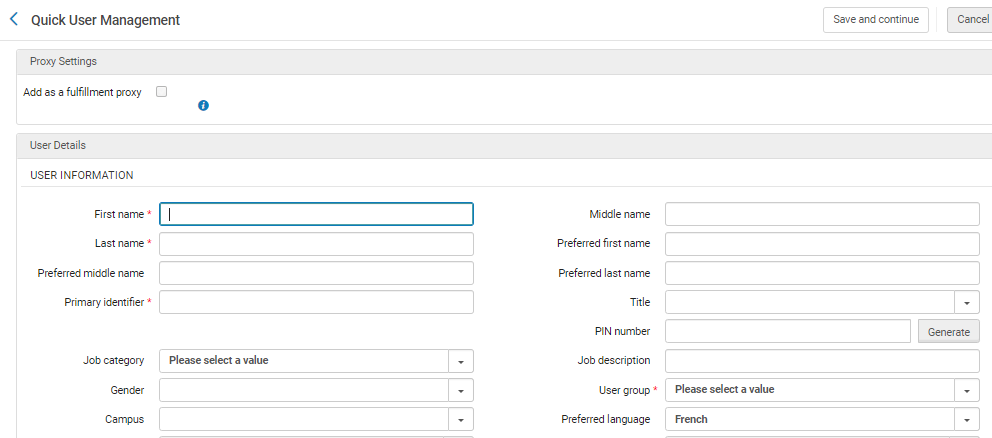
- On the All tab, you are prompted to select the record type (Staff,Public, or Contact).
- Inserisci le seguenti informazioni. The fields marked as mandatory in the following table are by default; an administrator can configure which fields are mandatory (see Configuring Patron Information).
An Authorized for resource sharing requesting checkbox is visible for institutions that use Rapido when new users are created. For more information, see Enabling Self Registration for Partners.
Quick User Management Page Fields
Sezione Campo Descrizione Impostazioni Proxy Aggiungi come servizi utente delegato Selezionando questa opzione verrà creato il nuovo utente come servizi utente delegato. Tutte le richieste di questo utente e i prestiti effettuati da questo utente saranno associati allo sponsor Utente Not local Trova utente in altra istituzione See Registering Patrons. User Information To configure how user names appear in Alma, see Configuring the Display of User's Names
First / middle / last name Il nome e il cognome sono obbligatori. Preferred first / middle / last names Preferred names replace the main first/middle/last names in all places that the name appears within Alma, for example, letters, Manage Patron Services, and the Active Hold Shelf. Una ricerca per nome trova sia le voci regolari che quelle preferite. Ad esempio, una ricerca per cognome trova sia i valori Cognome che Cognome preferito. Sono entrambi indicizzati sotto il cognome.
For information about using preferred names in system notifications and letters, see Working with Names in System Notifications and Letters.
I campi del nome preferito sono modificabili dagli utenti interni, come gli altri campi del nome. Per gli utenti esterni, i campi dei nomi preferiti vengono aggiornati dal sistema SIS e possono essere aggiornati manualmente. Per ulteriori informazioni, vedere i dettagli SIS forniti nella Ex Libris Developer Network.
Identificativo primario (obbligatorio) ID utente primario. L'ID deve essere univoco all'interno dell'istituzione. For details on identifiers, see https://developers.exlibrisgroup.com...user-management. Potrebbe essere necessario immettere un identificativo primario in un formato specifico. See the parameter primary_identifier_regex in Configuring Other Settings.
If you arrived at this page by selecting Register New User on the Patron Identification page, this field is pre-filled if you have configured user ID generation; see Configuring User ID Generation. Puoi modificare l'ID pre-generato.
titolo Un titolo utente. These can be configured by an administrator; see Configuring User Titles. Codice PIN A four-digit number which serves as a password for the user to log on to the self-check machine (SIP2); see Configuring SIP2 Bin Configuration. Inserisci manualmente un numero o seleziona genera per generare un numero PIN. Il codice PIN viene inviato nella comunicazione di Generazione del Codice PIN. La generazione del codice PIN è disponibile solo se il parametro pin_number_method è abilitato e impostato su fourDigit. For information, see Configuring Other Settings.
Categoria processo The user's job category. Ad esempio, operatore delle acquisizioni, catalogatore o manager. Le categorie del processo disponibili dipendono dal tipo di record selezionato (sopra). To configure job categories, see Configuring Job Categories. To associate job categories with record types, see Mapping Job Categories to User Record Types.
If the job category is associated with role assignment rules (see Configuring Role Assignment Rules), then the role profiles associated with the job category are added to the user after you select Save. In questo modo, la categoria del processo consente di assegnare più ruoli a un utente contemporaneamente, in modo da non dover configurare i ruoli individualmente per l'utente.
Descrizione Ruolo A free text description of the user's responsibilities. Gender (Obsolete) Il sesso dell'Utente. User group (not required for Contacts) The user's user group, such as Faculty, Patron, and so forth. I gruppi Utente disponibili dipendono dal tipo di record selezionato (sopra). To configure user groups, see Configuring User Groups. To associate user groups with record types, see Mapping User Groups to User Record Types.
If the user group is associated with role assignment rules (see Configuring Role Assignment Rules), then the role profiles associated with the user group are added to the user after you select Save. In questo modo, i gruppi Utente consentono di assegnare più Ruoli a un Utente contemporaneamente, in modo da non dover configurare i Ruoli individualmente per l'Utente.
Campus Il Campus dell'Utente. See Managing Campuses. URL sito web Il sito web dell'utente, se presente. Lingua preferita La lingua per le corrispondenze email. Per inviare le corrispondenze via email nella lingua selezionata, è necessario Abilita la lingua nella tavole di mappatura delle lingue dell'istituzione. For details, see Configuring Institution Languages. Stato (modifica solo) Lo stato dell'Utente, attivo o inattivo. Data di stato (solo modifica, sola lettura) La data dell'ultimo cambiamento di stato per l'utente. Data di nascita La data di nascita dell'Utente. Data di scadenza La data stimata in cui si prevede che l'utente lasci l'istituzione. For more information, see Expiration Date. Data di eliminazione La data in cui l'Utente sarà eliminato. See Purging Users.
Non è possibile Set Data di eliminazione nel passato.
Last Patron Activity Date L'ultima data in cui sono state eseguite le attività selezionate. Quando la funzionalità è abilitata, questo campo viene aggiornato quando vengono eseguite le seguenti attività:
- Effettuare una richiesta di qualsiasi tipo: attesa, Booking, digitalizzazione, Acquisizioni, Servizi interbibliotecari
- Prestito di una copia (tutti i flussi, incluso Self-Check / API)
- Restituzione di una copia (tutti i flussi, incluso il Self-Check / API)
- Rinnovo del prestito (eccetto rinnovo automatico) o richiesta di rinnovo (per Servizi interbibliotecari)
- Aggiornamento delle informazioni dell'Utente da Primo
Le seguenti attività non aggiornano questo campo:
- Utilizzo del pulsante Paga nella pagina Gestisci servizi utente
- Annullamento di una richiesta in Alma o Primo
- Richiesta d'acquisto del patron inviata da Primo
A causa di preoccupazioni sulla privacy, i dati saranno raccolti solo a partire dall'attivazione della funzione. Se l'opzione è disattivata, tutti i dati raccolti in questo campo verranno eliminati per tutti gli utenti.
To enable this option, select yes in the Record Last Patron Activity Date page.
Guardi il video dell'ultima data di attività del patrono (1:36 min).Biblioteca per la condivisione delle risorse Una biblioteca di condivisione risorse responsabile della richiesta di condivisione risorse avviata da questo utente. Solo le biblioteche definite come biblioteche di condivisione risorse appaiono nella Lista. (To configure resource sharing libraries, see Configuring Parameters of a Resource Sharing Library.) You can select one or more resource sharing libraries in this multi-select field.
When multiple resource sharing libraries are selected, they appear in the For library field on the Primo Get it tab, according to the ill_item_creation_lib_code parameter (see Configuring Other Settings).
Se in questo campo non appare alcun valore, viene utilizzata la biblioteca default specificata nel valore ill_item_creation_lib_code.
Quando si modifica questo campo per un Utente esistente, il nuovo valore del campo non viene ignorato durante un aggiornamento dell'API SIS/Utente.
Biblioteca richiesta di acquisto Una biblioteca responsabile delle Richieste d'acquisto presentate dall'Utente. È possibile selezionare una o più biblioteche in questo campo a selezione multipla. Quando le biblioteche vengono selezionate, appaiono nel modulo di richiesta di acquisto Primo nella tab Ottieni. Livello catalogatore Il livello del catalogatore. This field appears only if cataloging permissions are enabled for your institution; see Cataloging Privileges. Selected Patron Letters Acconsentire esplicitamente o rifiutare all'utente le notifiche. Seleziona o deseleziona le caselle di controllo accanto a ciascuna notifica che desidera abilitare o disabilitare per l'Utente. For more information, see Configuring Library Notices Opt In. Le comunicazioni di ricerca appaiono solo se la tua istituzione è abilitata per Esploro. See Managing Researchers in the Esploro documentation.
Invia lettera di invito per login social See Social and Email Login. Informazioni di gestione utente (non obbligatorie) L'utente ha un record istituzionale (appare solo dopo aver selezionare Registra nuovo Utente nella pagina di identificazione dell'utente) See Registering Patrons. Password A user's password for Alma, Leganto, and/or Primo (see https://developers.exlibrisgroup.com...user-management). As long as this password is not changed in the Primo account, it remains valid for both Alma and Primo. Any text you enter here is not echoed back to you, so enter the password carefully. Passwords are optional for internal users. Verifica password Reinserisci la password per assicurarti di averla digitata correttamente. Forza modifica password al prossimo accesso Quando selezionata, l'utente deve cambiare la password al prossimo accesso ad Alma (rilevante solo per Alma). Enable multi-factor authentication Aggiunga l'autenticazione a più fattori per questo utente. This checkbox only displays if the mfa_for_alma_hep parameter is enabled (see User Settings). For more information on MFA see Ex Libris Identity Service. User Identifier (this section appears if Identifier 1 is selected as a mandatory field for this record type; see Managing User Identifiers) identificativo Type (obbligatorio) Seleziona il tipo di identificativo utente. Valore (obbligatorio) L'identificativo utente. The following fields that appear on the Quick User Management page when adding a user appear in the Contact Information tab when editing a user. Indirizzi Email Tipi di email (obbligatori) È necessario inserire un indirizzo e-mail. Seleziona un tipo di indirizzo email: - Alternativa (solo per il personale/pubblico)
- Richiesta (solo contatto)
- Ordine (solo contatto)
- Pagamento (solo contatti)
- Restituzione (solo su contatto)
- Personale
- Lavoro
- Scuola (solo pubblico)
Indirizzo email (obbligatorio) L'indirizzo email dell'utente. Potrebbe essere richiesto di inserire un indirizzo email in un formato particolare. See the parameter email_regex in Configuring Other Settings. Indirizzi Tipi di indirizzo Seleziona un tipo di indirizzo di spedizione: - Richiesta (solo contatto)
- Ordine (solo contatto)
- Pagamento (solo contatti)
- Restituzione (solo su contatto)
- Abitazione
- Lavoro
- Alternativa (solo pubblico)
- Scuola (solo pubblico)
- Indirizzo della strada - Potrebbe essere necessario inserire un indirizzo di strada in un formato specifico. See the parameters address_lineX_regex in Configuring Other Settings.
- Città
- Stato/Provincia
- Codice postale - Potrebbe essere necessario inserire un codice postale in un formato specifico. See the parameters postal_code_regex in Configuring Other Settings.
- Nazione
Numeri di telefono Tipi di telefono Seleziona un tipo di numero di telefono: - Abitazione
- Cellulare
- Ufficio
- Fax per reclami (solo contatto)
- Telefono per solleciti (solo contatto)
- Fax per ordini (solo contatto)
- Fax per pagamenti (solo contatti)
- Pagamento telefonico (solo contatti)
- Fax di restituzione (solo contatto)
- Restituzione telefono (solo contatto)
- Fax dell'ufficio (solo per il personale/pubblico)
Numero di telefono Il numero di telefono dell'Utente. Potrebbe essere necessario inserire un numero di telefono in un formato specifico. See the parameter phone_regex in Configuring Other Settings. - Selezionare una delle opzioni seguenti: in entrambi i casi, continuare a configurare i dettagli utente come descritto in ciascuno degli argomenti seguenti.
Se aggiungi un Utente che ha lo stesso nome, cognome e data di nascita di un Utente esistente, verrà visualizzato un messaggio di avviso.
- Seleziona Salva o Salva e Continua. Il nuovo Utente è stato salvato e si restituzione alla pagina Cerca e gestisci utenti. Continue with editing the user; see Editing Users.
- Selezionare Salva e continua. L'Utente è stato salvato e Lei può continuare a modificare l'Utente. See Editing Users.
Editing Users
Modifica gli utenti immediatamente dopo averli aggiunti o per qualsiasi altro motivo. You edit users on the Find and Manage Users page (Admin > User Management > Manage Users).
- Per Utente interno, è possibile modificare tutti i campi del record utente.
- Gli utenti esterni sono gestiti in un sistema esterno, come il SIS (Sistema Informativo Studenti). Per utente esterno:
- È possibile modificare solo determinati campi nella tab Informazioni generali della pagina Dettagli utente.
Le modifiche apportate al campo Informazioni generali che vengono modificate non sono annullate dai successivi aggiornamenti del SIS. You can select the original value option from the drop down of selectable values if you would like to revert a changed field and re-synchronize it with the value that is managed in the SIS system. Questa opzione appare solo se il campo viene modificato manualmente rispetto al valore fornito dal feed SIS. Manually changing the field value to the value that is stored in the SIS has the same effect of re-synchronizing the field with future updates from the SIS.
- È possibile aggiungere le informazioni di contatto nella tab Informazioni di contatto, ma non è possibile modificarle lì.
- È possibile modificare solo determinati campi nella tab Informazioni generali della pagina Dettagli utente.
- To edit users in bulk, see Editing/Messaging Users in Bulk.
Per una spiegazione approfondita di interno e Utente esterno in Alma, vedere https://developers.exlibrisgroup.com/alma/integrations/user-management.
To edit user information:
- On the Find and Manage Users page, select Edit in the row actions list or select the user's name. The User Details page appears.

- Se il cliente ha un account social associato, selezioni Scollega da Social Account per dissociare l'accesso social dal cliente.
- To distribute the user in a Network Zone, see Centrally Managing Users in a Network Zone.
- Per abilitare la modifica di altri campi degli utenti esterni, selezionare Apri per aggiornamento, e selezionare Sì. Modifica i campi rilevanti e seleziona Salva. Nota che le modifiche apportate alla maggior parte dei campi andranno smarrite dopo il prossimo processo di sincronizzazione SIS. However, Alma prompts you to determine whether the following fields will be overridden with the next SIS synchronization job:Title, PIN number, Job category, User group, Campus, Preferred language, Resource sharing libraries, Cataloger level, Selected patron letters. Nota che questa determinazione viene mantenuta interna e non viene esternalizzata in alcun modo nel record utente.
-
Per modificare un Utente interno in un Utente esterno (e viceversa), selezioni Attiva/disattiva tipo di account.
Quando si passa da un account interno a uno esterno, il proprietario viene impostato su SIS_temp. Questo è un codice utilizzato per contrassegnare il prossimo lavoro di sincronizzazione Utente per aggiornare il record. Only users with the User Manager or User Administrator roles can toggle accounts.
- Modificate le informazioni richieste nella scheda Informazioni generali tab. For information about most of the fields on this page, see Adding Users.
- URL del sito web - Il sito web dell'Utente.
- Status- Whether the user is Active or Inactive.
- Status date- The date on which the user was registered or the date of the user's last status change.
Send Message- Select the type of message you'd like to send.
Operators with Can't edit restricted users configured are not able to send an Email to a user account defined as restricted for editing. For more information, see Restricting Users for Editing.
Le opzioni tra cui puoi scegliere sono (tutte le altre opzioni, come un'opzione del fornitore di identità, sono per uso futuro):
General mail- This sends a general message. Select Compose to open the E-mail Message pop-up window, where you can write an email to send to the user with any questions, issues, or notifications. Compili il campo e selezioni Invia e-mail per inviare il messaggio. (For more information on the letters, see Configuring Alma Letters. To configure the default From: address of this email, see the parameters disable_from_address and from_address in Configuring Other Settings. To send emails to users in bulk see Editing/Messaging Users in Bulk.)
The General mail letter does not appear in General > Letters > Letters Configuration, with no additional configuration changes options. The letter ILL Email to User needs to be activated for the General mail function to work. Questa comunicazione non è personalizzabile.
Patron personal information mail- This sends an email with an attached file containing the complete XML record of the data stored about the patron in their user accounts, including attachments. Il messaggio viene inviato all'indirizzo email preferito dell'utente. The email letter itself is the Personal Information Letter.
In order to send a Personal Information Letter to a patron, the parameter Send Patron Information Letter must be enabled under Circulation Desk roles'. The parameter Send Patron Information Letter is activated for users with a Circulation Desk role by default. If it is not activated or you wish to deactivate it, open a ticket with Ex Libris support.
- Social Login Mail- This sends a letter containing information to activate login to Primo/Alma with a social network. Questa opzione compare se è definito un profilo d'integrazione per un social network. La comunicazione utilizzata è quella di invito al Social Login. For more information on this integration profile, see Configuring Integration Profiles.
- Creato da: lo staff o il processo dell’utente (ad es. Lavoro SIS, API) che ha creato questo Utente.
- Aggiornato da - L'utente, il personale o il processo (ad esempio, processo SIS, API) che hanno aggiornato per ultimi questo utente.
- Disable all login restrictions - Select to disable login restrictions by IP range. Questa casella di controllo potrebbe essere deselezionata automaticamente e resa di sola lettura, a seconda delle opzioni selezionate nella pagina di configurazione delle restrizioni di accesso. For more information, see Restricting Alma Logins by IP Range.
- Allow Ex Libris Simulated Login - Give permission to Ex Libris to simulate login for this user. This checkbox only appears when the allow_exl_to_login_as_staff_users option is enabled (see Configuring Other Settings for User Management).
User Roles - See Adding Roles to Users
The Created By and Updated By fields have been moved to an information box that is accessed by selecting the
 icon on the top right corner of the page. The information box also includes Created Date,Last Updated Date, and Last Updated by Job. The Last Updated Date is updated when making a change to the user's details in the General Information tab, and also when adding a note in the user's Notes tab or a block in the Blocks tab
Quando si modifica un utente, vengono visualizzati i seguenti campi/opzioni aggiuntivi.
- Modifica le informazioni nei seguenti tab:
- Contact Information – See Managing User Contact Information.
- Identifiers(not available for Contact users) – See Managing User Identifiers.
- Notes – See Managing User Notes.
- Blocks(not available for Contact users) – See Blocking and Unblocking Users.
- Fines/Fees(available only for users with the Patron role) – See Managing User Fines and Fees.
- Statistics – See Managing User Statistics.
- Attachments – See Managing User Attachments.
- Proxy For – See Managing Proxy Users
- History- See Viewing Changes to the User Record.
- If the user has the Patron role, select Manage Fulfillment Activities to access the Patron Services page. Actions like loan, return, or pay a fine are not available when viewing Manage Fulfillment Activities via User Management. For details on patron services, see Managing Patron Services. Seleziona Indietro per chiudere la pagina dei Servizi per l'utente e la restituzione alla pagina dei Dettagli utente.
- To edit the user picture, see Managing User Pictures.
- If you made changes in the General Information tab, selecting Save is required to have the changes saved. Si viene quindi restituiti alla pagina Cerca e gestisci utenti. Changes made to other tabs in the User Details screen are automatically saved in Alma.
- Modifiche apportate ad un'altra scheda
- Le tab Identificatori e Blocchi non sono disponibile per gli Utente di contatto.
- The Fines/Fees tab is available only if the user has been assigned the Patron role (see Managing User Roles).
- Le informazioni sui demeriti appaiono solo se abilitate da Ex Libris e solo per i seguenti ruoli: operatore del banco di circolazione, operatore del banco di circolazione - limitato, responsabile del banco di circolazione, operatore dei servizi di fulfillment, responsabile dei servizi di fulfillment, amministratore dei servizi di fulfillment. Per abilitare le informazioni sui demeriti, contatta Ex Libris Support. For more information on demerits, see Configuring Demerits.
Managing User Contact Information
Puoi gestire le informazioni di contatto dell'utente, inclusi gli indirizzi, i numeri di telefono e gli indirizzi email, nella tab Contatti della pagina Dettagli utente . Gli Indirizzi vengono utilizzati per Ricevere materiale (ad esempio da una richiesta di Servizi interbibliotecari). Per i tipi di record contatto, è necessario aggiungere almeno un numero di telefono. I numeri di telefono contrassegnati come SMS preferito ricevono notifiche SMS. Per gli utenti del personale e l'Utnte pubblico, è necessario aggiungere almeno un indirizzo email. Email addresses are used for receiving Alma letters (see Configuring Alma Letters).
Alma can send emails to multiple recipients simultaneously - for example, emails addressed to under-aged patrons can also be sent to their legal guardians. To enable this, Alma supports a "CC address" email type for public and staff type users only. When an email is sent to the patron, it is sent to all of the CC addresses, in addition to the address that is marked as Preferred. Note that you can indicate an email address as both a CC address and a different type of address (Alternative, Personal or Work). However, other types of email address do not have any functional implication, thus indicating them as such is for information only.
- Users can also be configured to receive email notifications that are sent after a scheduled job runs. Puoi configurare le notifiche da inviare agli utenti di Alma e/o agli indirizzi email inseriti manualmente. For information, see Configuring Email Notifications for Scheduled Jobs.
Quando i clienti aggiornano il loro indirizzo tramite Primo My Account, la modifica si applica solo all'indirizzo interno e preferito:
- Se l'indirizzo preferito è esterno, il sistema creerà un nuovo indirizzo interno e lo imposterà come preferito.
- Se l'Indirizzo preferito è già interno, quell'Indirizzo verrà semplicemente aggiornato.
Se dispone di più informazioni di contatto dello stesso tipo, può designarne una come Preferita, rendendola default. In alcuni casi, Alma utilizza automaticamente il contatto default. Deve impostare un indirizzo email su Preferito in ordine affinché l'utente possa ricevere comunicazioni da Alma. On some pages, you can select a non-default contact.
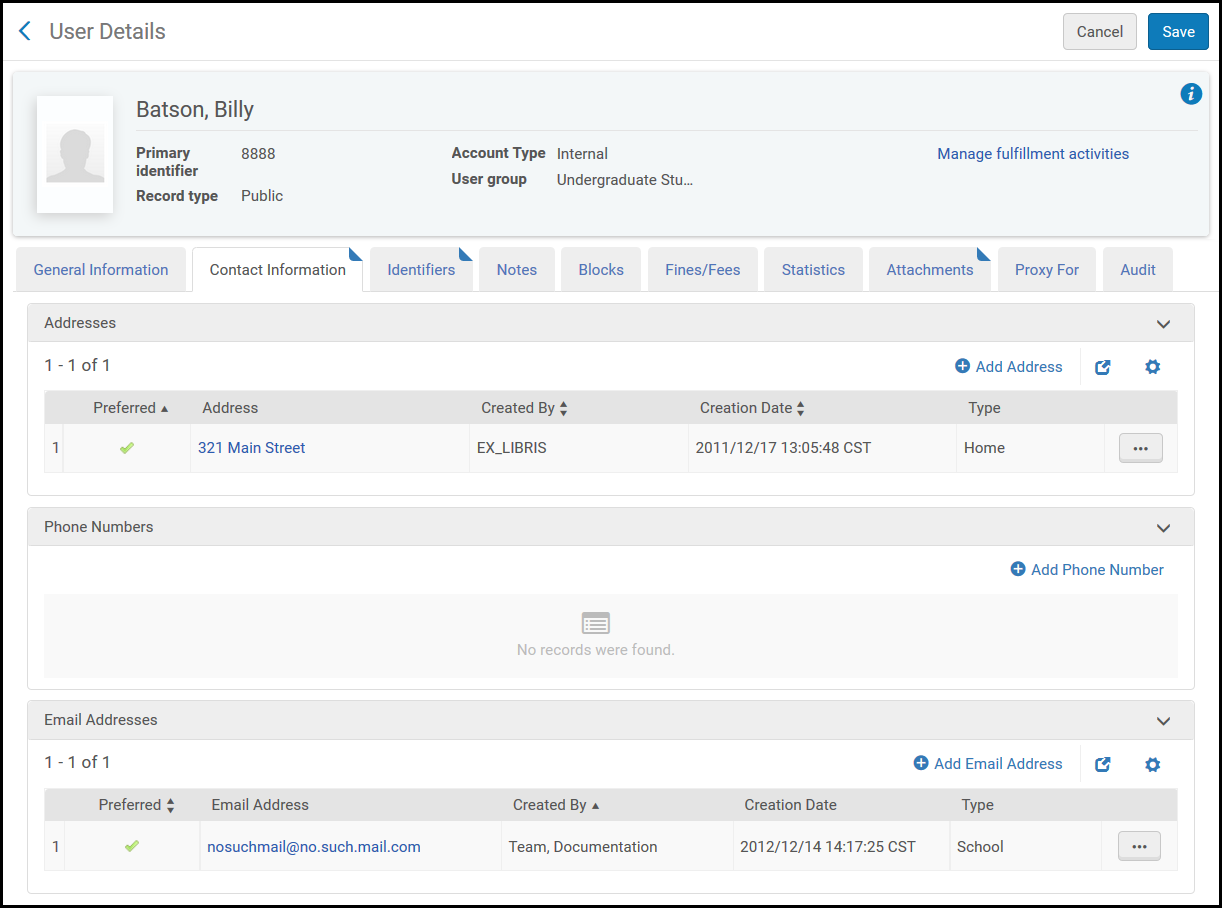
- In the Contact Information tab of the User Details page (Admin > User Management > Manage Users), select Add Address, Add Phone Number, or Add Email Address. Si apre la finestra di dialogo pertinente.
- Inserisci i dettagli di contatto, come richiesto.
Note that you can set the address, phone number, and email address as preferred in this step, as shown below:
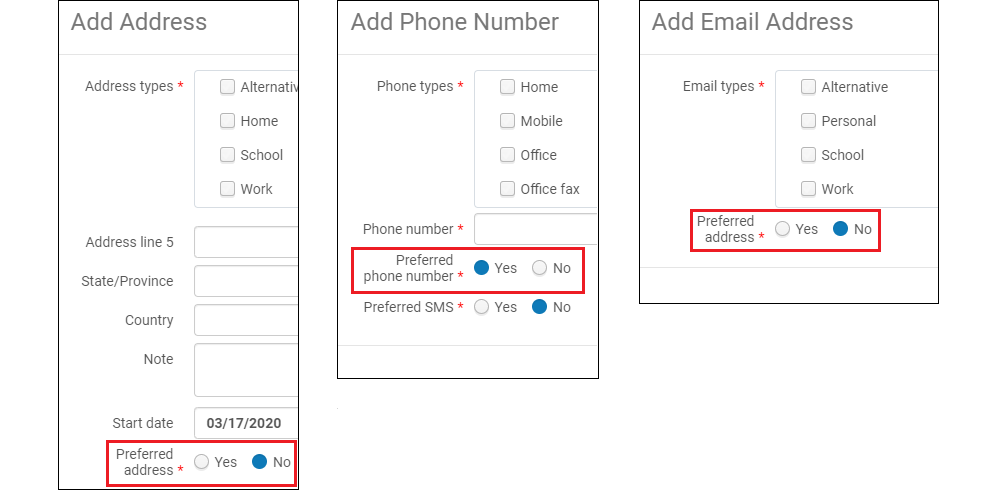
Nota che la data di inizio e la data di fine sono solo a scopo informativo. La data di inizio è la data a partire dalla quale l'indirizzo è rilevante e la data di fine è la data dopo la quale l'indirizzo non è più rilevante.
Quando si lavora con un Utente esterno, viene visualizzata la casella di controllo Aggiungi come esterno. Selezionare questa opzione per aggiungere le informazioni di contatto come dati esterni, che verranno sovrascritti durante la sincronizzazione SIS. Se non si seleziona questa casella di controllo, le informazioni di contatto vengono aggiunte come dati interni e non vengono sovrascritte durante la sincronizzazione del SIS. Per maggiori informazioni, vedere.https://developers.exlibrisgroup.com/alma/integrations/user-management/sis. Internal fields cannot be turned into external – they need to be removed instead.
- Salvi i dettagli nella scheda Informazioni di contatto tab come segue:
- Selezioni Aggiungi per salvare i dettagli e aggiungere ulteriori voci.
- Seleziona Aggiungi e chiudi per salva i dettagli dell'Indirizzo ed uscire dalla finestra di dialogo.
Quando si salvano dati esterni, nella colonna Dati Esterni appare un segno di spunta verde.
Per modificare, duplicare o eliminare le informazioni di contatto, selezionare l'azione pertinente nella lista delle azioni di riga.
Managing User Identifiers (Tab)
La tab Identificatori non è disponibile per gli Utenti contatto.
Oltre a un identificativo primario, è possibile associare qualsiasi altro tipo di identificativo utente definito a un utente, come un ID studente, un codice a barre, un ID di accesso social, un collegamento a una fotografia dell'utente e così via. For more information about identifier types, see Managing User Identifiers.
Per le istituzioni che erano attive in Alma prima di giugno 2018, gli identificativi aggiuntivi sono sensibili alle maiuscole e minuscole. Per le istituzioni che sono andate in funzione da giugno 2018 in poi, gli identificativi aggiuntivi non sono sensibili alle maiuscole. Per maggiori dettagli sulla sensibilità al maiuscolo/minuscolo degli identificativi, consulta il post dettagliato sul blog della rete di sviluppatori Ex Libris.
The table on the Identifiers tab of the User Details page (Admin > User Management > Manage Users; select Edit in the row actions list) functions like a mapping table. For more information, see Mapping Tables. È possibile aggiungere, modificare, duplicare ed eliminare l'identificativo. È possibile anche attivare o disattivare un identificativo.
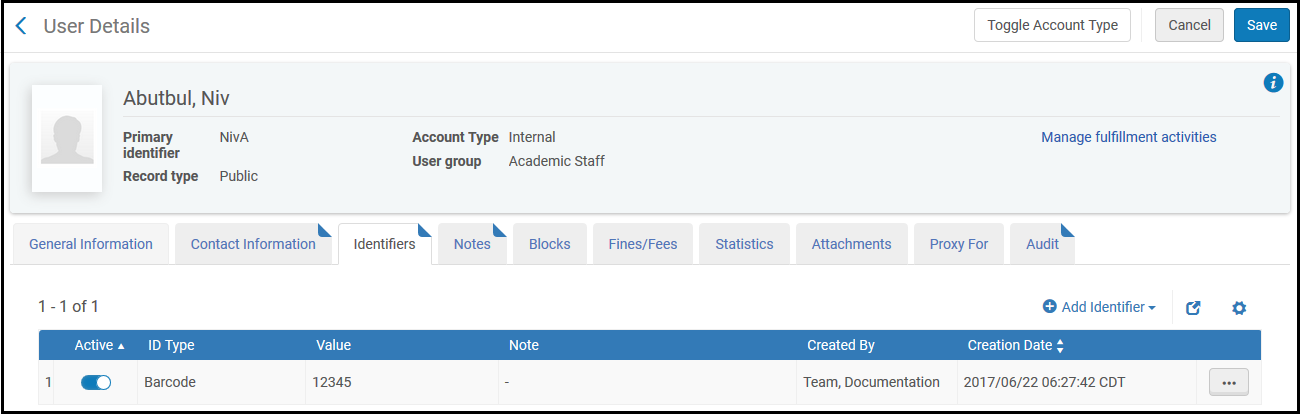
I campi sono:
- identificativo Type - Il tipo di identificativo. Ex Libris crea e configura i tipi durante la configurazione della Sua istituzione. In addition to social media options, other options include barcode and institution ID (the ID assigned to the user from an SIS; see Student Information Systems). Questa lista potrebbe essere diversa per il personale e per l'utente pubblico.
- Valore - Il valore dell'identificativo per questo utente.
- Nota - Nota facoltativa.
- Tutti gli identificativi primari e aggiuntivi devono essere univoci per gli Utenti, compreso lo stesso Utente.
- Gli Identificativi utente associati agli accessi social (Twitter, Google e Facebook) non compaiono in questa tab, anche se sono Definiti per l'Utente. They still exist: they can be used to log in using the social login page (see Social and Email Login), and you can search for the user using the identifier.
- Quando si lavora con un Utente esterno, viene visualizzata la casella di controllo Aggiungi come esterno. Selezionare per aggiungere l’identificativo come dato esterno che verrà sovrascritto durante la sincronizzazione SIS. Se non si seleziona questa opzione, l’identificativo viene aggiunto come dato interno e non viene sovrascritto durante la sincronizzazione SIS (a meno che lo stesso valore non venga inviato successivamente dal SIS, nel qual caso l’identificativo viene contrassegnato come esterno). Per maggiori informazioni, vedere https://developers.exlibrisgroup.com/alma/integrations/user-management/sis.
- Quando definiti da Ex Libris, alcuni identificativi devono essere univoci in tutta l'istituzione affinché l'Utente possa accedere ad Alma o Primo.
- Quando si salvano dati esterni, nella colonna Dati Esterni appare un segno di spunta verde.
- Quando un Utente viene cambiato da interno a esterno, tutti gli identificativi interni diventano esterni.
Managing User Notes
A user's Notes tab contains additional features that are not available in other Notes tabs in Alma (see Notes Tab). È possibile allegare note interne o esterne ai dettagli dell'Utente. The notes entered for the various note types (for example, Address, Circulation, Library, Registrar) appear in the User Notes tab on the Patron Services page (see Patron Services Page – Loans Tab in Managing Patron Services), and in Primo on the Blocks & Messages page in the My Account tab.
The arbitrary order in which the notes appear in the User Notes tab on the Patron Services page cannot be controlled.
When library independence is activated for an institution, each note has an owner - either a specific library within the institution, or the entire institution. In this case, users can only see notes that are owned by the libraries that are either within these users' scopes (see Managing User Roles), or owned by the institution. Notes owned by libraries that are outside of a user's scope are not displayed in this tab, are not retrieved in searches, and are excluded from API calls. Library-level notes can only be activated in institutions in which library independence is turned on. For additional information about library independence, see Fulfillment Library Independence.
You manage user notes on the Notes tab of the User Details page (Admin > User Management > Manage Users; select Edit in the row actions list). È possibile aggiungere, modificare, duplicare ed eliminare note.
For more information, see Notes and Blocks (2:10 min).
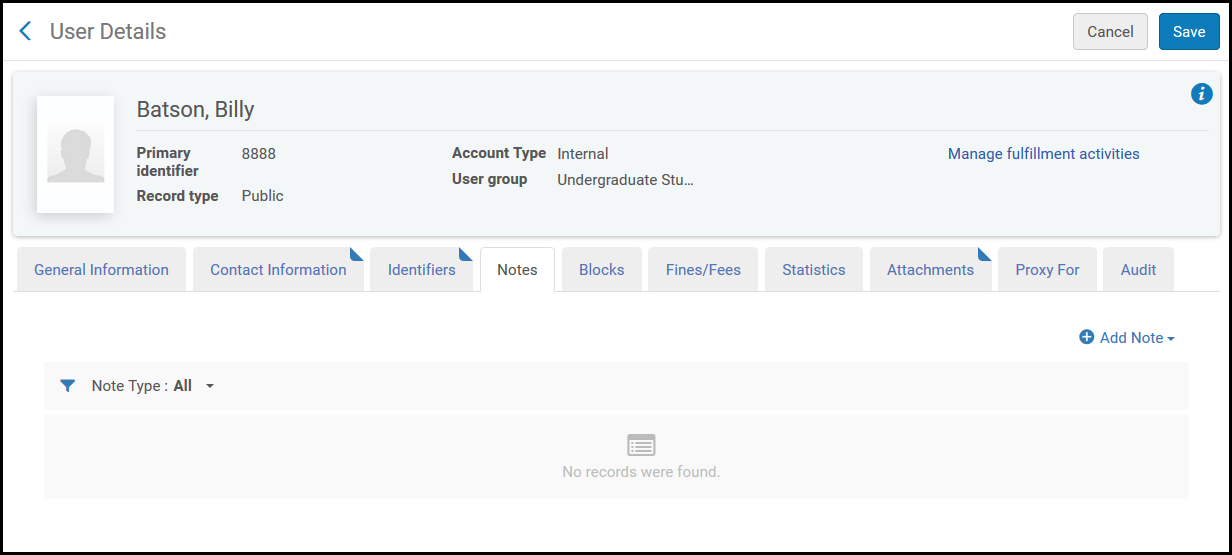
- Nella tab nota, seleziona Aggiungi nota. The Add Note dialog box appears.
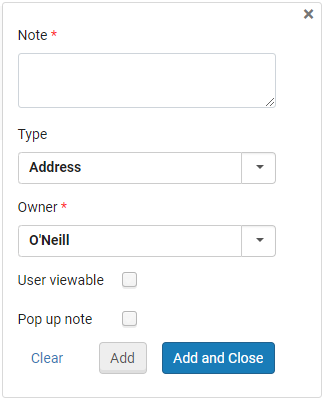
- Under Notes, enter the text of the note.
- Under Type, select a note type. I tipi di nota sono solo a scopo informativo e non hanno alcuna funzione in Alma. La lista dei tipi di nota è standard in tutte le istituzioni.
- Sotto Proprietario, seleziona la biblioteca che possiede la nota. Solo gli utenti il cui ruolo è nell'ambito di questa biblioteca potranno vedere questa nota. This option only appears if library independence is activated for the institution (see Fulfillment Library Independence).
- Selezioni Pop-up nota per far apparire la nota quando il record utente viene visualizzato nella pagina Gestisci servizi utente.
-
Seleziona Utente vista per Abilita all'Utente indicato di visualizzare la nota.
Quando si lavora con un Utente esterno, viene visualizzata la casella di controllo Aggiungi come esterno. Selezionare questa opzione per aggiungere la nota come dato esterno che verrà sovrascritto durante la sincronizzazione SIS. Se questa opzione non viene selezionata, la nota viene aggiunta come informazione interna e non viene sovrascritta durante la sincronizzazione SIS. Per maggiori informazioni, vedere https://developers.exlibrisgroup.com/alma/integrations/user-management/sis.
- Salvi la nota:
- Seleziona Aggiungi per salva i dettagli della nota e aggiungere note aggiuntive.
- Seleziona Aggiungi e chiudi per salva i dettagli della nota e chiudere la finestra di dialogo Aggiungi nota.
Quando si salvano dati esterni, nella colonna Dati Esterni appare un segno di spunta verde.
Per modificare, duplicare o eliminare una nota, seleziona l'opzione pertinente dall'elenco delle azioni della riga. Puoi anche selezionare il testo della nota nella colonna Nota per modificare la nota.
Blocking and Unblocking Users
La scheda tab non è disponibile per Contatto Utente.
You restrict users from using library services by adding user blocks. I blocchi vengono aggiunti per gli Utenti che hanno multe, prestiti in sospeso o restituzioni ripetute di Monografie in ritardo. A un Utente bloccato è impedito di eseguire azioni sugli elementi della biblioteca, come il prestito, il rinnovo e così via. The block note is displayed in Primo if the patron is blocked from requesting by the block. The blocks that can be assigned to a user are configured on the User Block Definitions mapping table page (see Configuring User Block Descriptions and Definitions).
Note that items or users can also be blocked based on other conditions; see Configuring Block Preferences.
The table on the Blocks tab of the User Details page (Admin > User Management > Manage Users; select Edit in the row actions list) functions like a mapping table. For more information, see Mapping Tables. È possibile aggiungere, modificare, duplicare ed eliminare i blocchi Utente. È anche possibile attivare o disattivare un blocco Utente.
For more information, see Notes and Blocks (2:10 min).
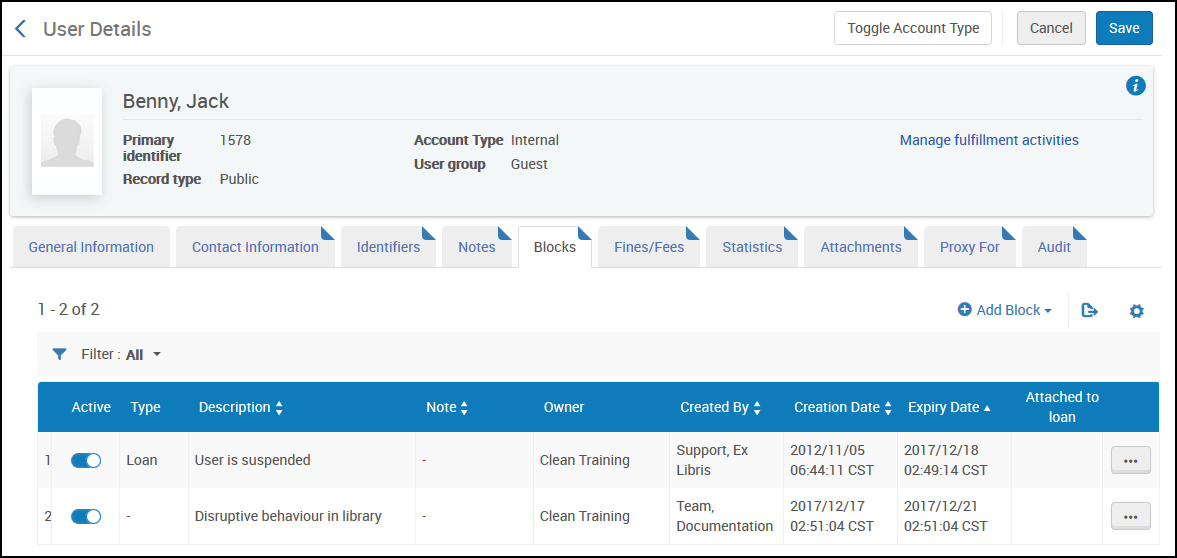
The fields are as follows:
- Block description- The block type. Questa Lista è preconfigurata da Ex Libris.
- Expiry Date- An optional date when the block will be lifted.
- Owner- The library that owns the block. Only users with a role scoped to this library will be able to see this block. This option only appears if the library independence is activated for the institution (see Fulfillment Library Independence).
- Note- An optional note.
- External Block Owner - The name of the institution from which the block comes (see Configuring Consortial Blocks). Per default questa opzione non viene visualizzata. In order to display it, select the gear icon next to the Add Block button and mark the checkbox next to External Block Owner. Si noti che questo campo è popolato per i blocchi copiati da un'istituzione target (un'altra istituzione in cui il patron è un ospite), ma non per i blocchi copiati da un'istituzione di origine (l'istituzione home del patrono). Nota che per default, questo campo non viene visualizzato. To display it, mark it in the Customization menu (see New Layout).
- Quando si lavora con un Utente esterno, viene visualizzata la casella di controllo Aggiungi come esterno. Selezionare questa opzione per aggiungere il blocco come dati esterni che verranno sovrascritti durante la sincronizzazione SIS. Se non si seleziona questa opzione, il blocco viene aggiunto come dato interno e non viene sovrascritto durante la sincronizzazione SIS. Per maggiori informazioni, vedere https://developers.exlibrisgroup.com/alma/integrations/user-management/sis.
- If a user has an active block, a check mark appears in the Blocks column on the Manage Users page for that user.
- Quando si salvano dati esterni, nella colonna Dati Esterni appare un segno di spunta verde.
Managing User Fines and Fees
- The Fines/Fees tab is available only for users with the Patron role.
- L'UI del Banco di circolazione supporta anche la gestione di multe e commissioni con funzionalità aggiuntive. See Managing Fines and Fees.
You manage user fines and fees on the Fines/Fees tab of the User Details page (Admin > User Management > Manage Users; select Edit in the row actions list).
Users can select fines and fees across the full paginated fees list (among multiple pages) and waive them by selecting the Waive All option in the Fines/Fees tab.
Non è possibile rinunciare a più di 100 commissioni selezionate in un'unica azione. This limit can be configured with the waiving_fines_fees_limit parameter (see Configuring Other Settings). For waiving fines and fees (specifically or in bulk) on the Manage Patron Services page, see Managing Patron Services at a Circulation Desk. You can also use a dedicated job to waive fines and fees in bulk (see Waiving Fines and Fees Using a Job).
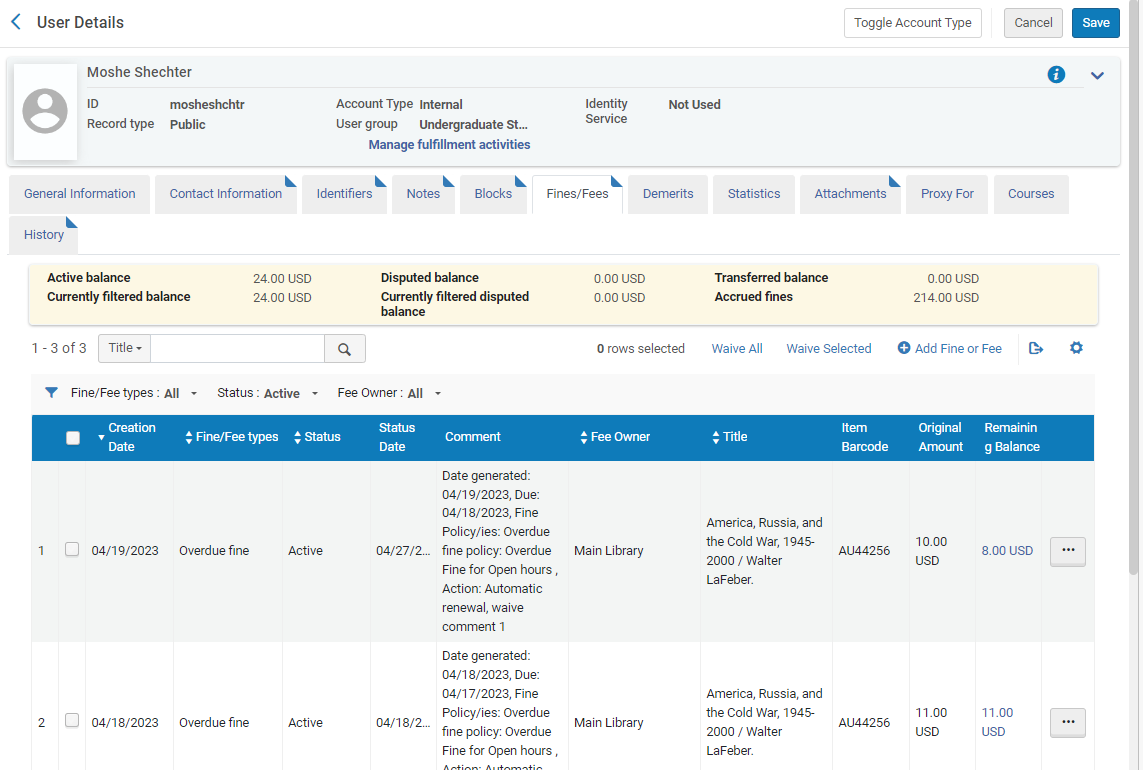
The Fines and Fees Summary area shows a summary of the user's balance, including:
- Active balance: The balance of fines and fees. This may include transferred balance depending on the allow_activity_on_transferred_finesfees parameter. See Configuring Other Settings (Fulfillment).
- Currently filtered balance: The balance of fines and fees that are currently filtered due to your selections in the filters.
- Disputed balance: The balance of disputed fines and fees.
- Currently filtered disputed balance: The balance of disputed fines and fees that are currently filtered due to your selections in the filters.
- Transferred balance: When bursar fees are set to Exported status, they appear as transferred balances.
- Accrued fines: Additional fines that may still be increasing, because the patron has not yet returned an overdue loan. Note that accrued fines are not included in the calculation of the debt limit that, if reached, would prevent the patron from borrowing additional items (see Patron Configurations).
Le sanzioni maturate vengono calcolate solo se l'utente non ha più di 100 prestiti scaduti.
The Fines and Fees Details area lists transaction details of the user's fines and fees. When the Status filter is set to Active(default), disputed, waived, transferred, and closed fees remain hidden. Per visualizzare tutte le commissioni, selezioni Tutte per questo filtro. Per limitare le multe/commissioni mostrate per un proprietario specifico, selezioni la biblioteca nel filtro Proprietario della multa.
Guarda il video Filtra multe e commissioni in base al possesso di una biblioteca (1:05 min).
È possibile personalizzare la vista dei dettagli di multe e commissioni selezionando l'icona di visualizzazione colonna sopra l'area dei dettagli. Le colonne selezionate di default sono:
- Data di creazione
- Tipo Multa/Tariffa
- Stato
- Data status
- Commento
- Proprietario del bene
- titolo
- Barcode della Copia
- Importo originale
- Saldo Residuo
Le colonne aggiuntive che possono essere visualizzate sono:
- IVA Originale
- IVA rimanente
- Bursar Transaction ID - see Configuring Bursar Transaction IDs.
- Motivi di rinuncia
Puoi aggiungere o rinunciare a una multa o a una commissione, indicare che una multa o una commissione è oggetto di contestazione e collegare la multa o la commissione a una copia dell'Archivio. Una multa o una tassa contestata può essere annullata o ripristinata. Una multa o una tassa esentata non può essere ripristinata. Quando una multa o una tassa non è stata pagata, annullata, contestata o esportata al Sistema contabile, è attiva. Eseguire una di queste azioni modifica il suo stato.
To waive fines in bulk, see Waiving Fines in Bulk. To configure when and to whom notifications are sent about fines and fees, see Configuring Fines/Fees Notifications.
Una tariffa contestata:
- Is not included in the user's Active Balance
- Non è visualizzato nella lista delle multe in Primo
- Non viene considerato quando si attiva un blocco in base all'importo dovuto.
Ad esempio:
- Un utente non può prendere in prestito articoli quando l'importo dovuto è pari o superiore a 100 $
- L'utente deve 100 $, ma ha contestato 20 $ di tale importo
- Alma considera l'utente come debitore di 80 $ e il blocco non viene attivato
To enable waiving a fine or fee (including a credit), you must ensure that the specific fine/fee is configured as waivable on the Fine Fee Type Definition mapping table (see Configuring Fines/Fees Behavior). Quando si paga o si rinuncia a una multa o a una tassa, il creatore della transazione è il banco di circolazione (indicato nel campo Attualmente a: nella parte superiore della pagina). Se in questo campo non è indicato alcun banco di circolazione, l'autore della transazione viene indicato come Non al banco.
È possibile aggiornare regolarmente il tesoriere istituzionale con le multe e commissioni Utente gestite dal sistema utilizzando un profilo d'integrazione. For details, see Bursar Systems.
For more information assigning a fine/fee to a specific item, see the Link Fee to Inventory video (2:56 mins).
To add fines and fees:
If the fine or fee is listed as owned by Library on the Fine Fee Type Definition mapping table (see Configuring Fines/Fees Behavior), you must be at a circulation desk to add the fee. In order to register a Credit, select the Credit fee type and enter the amount as a positive sum. When you save it, the Credit fee appears in the Fines/Fees list with a negative amount. If you select the Credit fee type, the Comment field is mandatory.
- Nella tab Multe/Commissioni, seleziona Aggiungi multa o commissione. Viene visualizzata la finestra di dialogo Aggiungi multa o tariffa.
- Selezionare il tipo di multa/tariffa. The types are those configured for manual creation on the Fine Fee Type Definition mapping table; see Configuring Fines/Fees Behavior.
- Select the owning library or institution. le biblioteche sono selezionabili solo se il tipo di tariffa è stato definito come “consenti un ambito biblioteca”.
- Enter the amount of the fine or fee (The amount cannot be negative).
- Nel campo copia barcode, cerchi la copia a cui desidera allegare la tariffa, come richiesto.
Quando si aggiunge un codice a barre, la multa/tariffa viene associata alla copia specificata dal codice a barre. La copia e il barcode appaiono nella tab Multe/Commissioni della pagina Dettagli Utente.
- Nel campo Commento, è possibile inserire facoltativamente un commento sulla multa o sulla tariffa, secondo necessità.
Se seleziona il tipo di commissione Credito, il campo Commento è obbligatorio.
- Salva come segue:
- Selezioni Aggiungi per salvare i dettagli della multa o della commissione e aggiungere ulteriori multe o commissioni.
- Seleziona Aggiungi e Chiudi per salva i dettagli della multa o della tariffa e chiudere la finestra di dialogo Aggiungi Multa o Tariffa.
Il saldo attivo del cliente viene aggiornato con l'importo aggiunto; se la multa/tassa è soggetta a IVA, l'IVA è inclusa nell'importo. (Per default , le colonne IVA sono nascoste nella pagina. To configure the VAT, see Configuring Fines/Fees Behavior.) For a Credit type fee, the amount is subtracted from the balance. Per tutti gli altri tipi di commissione, l'importo viene aggiunto al saldo.
To link an existing fine/fee to a repository item:
- Nella tab Multe e commissioni della pagina Dettagli Utente, seleziona Collega a copia nell'Lista delle azioni della riga per una multa/tariffa. Viene visualizzata la pagina Collega a copia.
- Nel campo del codice a barre della copia, cerchi la copia a cui desidera allegare la tariffa.
- Seleziona Link per copia. I valori delle colonne Titolo e Barcode copia nella pagina Dettagli multe e commissioni vengono aggiornati di conseguenza.
To view a loan's history:
Nella tab Multe/Commissioni, selezioni le multe/commissioni a cui desidera rinunciare e selezioni Visualizza prestito nella riga azioni Lista. Viene visualizzata la pagina di tracciamento del prestito. For more information, see Viewing Loan History.
To waive a fine or fee:
- Nella Multe/Commissioni tab, seleziona le multe/commissioni a cui desideri rinunciare e seleziona Rinuncia selezionate nell'elenco delle azioni della Lista. In alternativa, seleziona Rinuncia nella Lista delle azioni di riga per la multa/tariffa che desideri annullare. The Waiving Fine/Fee page appears.
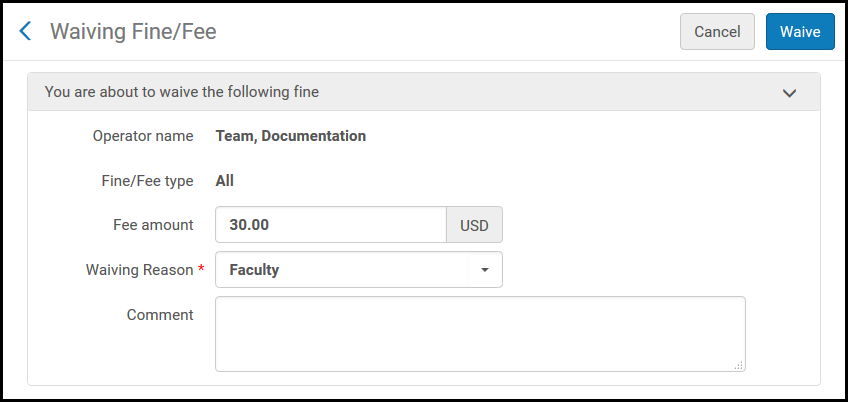
- Inserisci l'importo della commissione che desideri annullare nel campo Importo commissione.
- In Waiving reason select a reason for waiving the fee (this list is predefined by a system administrator; see Configuring Reasons for Waiving Fines/Fees).
- Inserisci un testo o un commento per rinunciare alla multa o alla tassa nel campo Commento.
- Selezionare Rinuncia. e selezioni Conferma nella finestra di dialogo di conferma. L'importo a cui si rinuncia viene detratto dall'importo della multa o della tassa (nella colonna Importo Originale), e il saldo dovuto per la multa o la tassa nella colonna Saldo Residuo viene ridotto. I saldi mostrati nell'area Riepilogo multe e commissioni per Saldo attivo e Saldo contestato sono aggiornati.
Per visualizzare la Transazione relativa a qualsiasi multa o commissione, selezioni il collegamento all'importo nella colonna Saldo residuo.
Se si rinuncia a una copia smarrita, non vi è alcuna riduzione nel valore del Saldo Residuo . Invece, l'importo rinunciato viene visualizzato come credito.
To dispute fines or fees:
- Seleziona Contesta nella Lista delle azioni di riga per la multa o la tassa che desideri contestare. Viene visualizzata la pagina Contestazione multa/commissione.
- Inserisci qualsiasi testo/commento per contestare la multa/commissione nel campo Commento.
- Seleziona Contesta e poi Conferma nella finestra di dialogo di conferma. I saldi mostrati nell'area Riepilogo Commissioni e Multe per il Saldo attivo e Saldo contestato sono aggiornati.
To restore fines or fees:
Seleziona Ripristina nella Lista delle azioni di riga per la multa o la tariffa contestata che desideri ripristinare (assicurati che il filtro Stato sia Set su Tutti o In contestazione). Viene visualizzata la pagina Ripristina una multa o una commissione.
Possono essere ripristinate solo le multe o le commissioni contestate.
- Inserisci un testo o un commento per ripristinare la multa o la tariffa nel campo Commento.
- Seleziona Ripristina e Conferma nella finestra di dialogo di conferma. L'importo originale della multa o della tassa (nella colonna Importo originale) viene ripristinato, e il saldo dovuto per la multa o la tassa nella colonna Saldo residuo viene rettificato. I saldi mostrati nell'area Riepilogo commissioni e multe per saldo attivo e saldo contestato vengono anch'essi aggiornati.
Managing User Statistics
I Report e statistiche possono suddividere o filtrare gli Utente in base al gruppo di Utente, alla categoria del processo e così via. In addition to these categories, you can add additional statistical categories to the user specifically to use in Analytics reports or fulfillment-unit rules. An administrator must first configure statistical categories and category types, and then map statistical categories to category types, in the User Management configuration area (see Configuring Statistical Categories for Analytics).
You add statistical categories to the table on the Statistics tab of the User Details page (Admin > User Management > Manage Users; select Edit in the row actions). Questa tabella funziona come una tavola di mappatura. For more information, see Mapping Tables. Puoi aggiungere, modificare, duplicare ed eliminare le categorie per l'Utente.
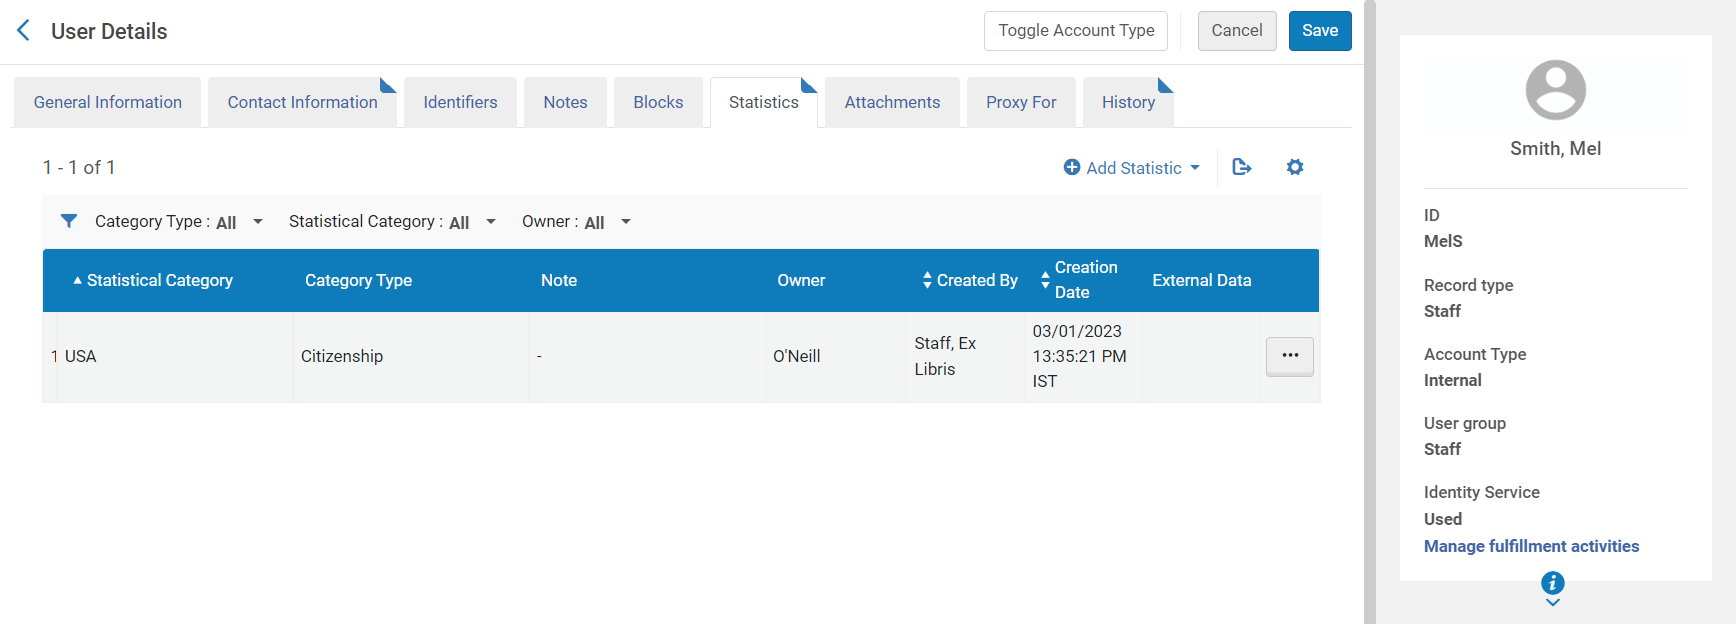
I campi in questa tab sono i seguenti:
- Category type - Category types are predefined by a system administrator in the Statistical Categories Types mapping table (see Creating Statistical Category Types).
- Statistical category - Statistical categories are predefined by a system administrator in the Statistical Categories context of User Management Configuration (see Configuring Statistical Categories).
- nota - Aggiunga una nota se necessario.
- Owner - When library independence is activated for an institution, this field appears in the Statistics tab. In this case, users can only see statistical information that is owned by the libraries that are within these users' scopes (see Managing User Roles). Information that is outside of a user's scope is not displayed in this tab, is not retrieved in searches, and is excluded from API calls. Le statistiche a livello di biblioteca possono essere attivate solo nelle istituzioni in cui l'indipendenza della biblioteca è attivata. For additional information about library independence, see Fulfillment Library Independence.
- Quando si lavora con un Utente esterno, viene visualizzata la casella di controllo Aggiungi come esterno. Selezionare questa opzione per aggiungere la categoria statistica come dati esterni che verranno sovrascritti durante la sincronizzazione SIS. Se non si seleziona questa opzione, la categoria statistica viene aggiunta come dato interno e non viene sovrascritta durante la sincronizzazione SIS (a meno che lo stesso valore non venga inviato successivamente dal SIS, nel qual caso la categoria statistica viene contrassegnata come esterna). Per maggiori informazioni, vedere https://developers.exlibrisgroup.com/alma/integrations/user-management/sis.
- Quando si salvano dati esterni, nella colonna Dati Esterni appare un segno di spunta verde.
Managing User Attachments
È possibile aggiungere allegati per un utente. You manage attachments on the Attachments tab of the User Details page (Admin > User Management > Manage Users; select Edit in the row actions list). For more information about this tab, see Attachments Tab.
Attachments added manually to this page are not sent to the user; they are simply appended to the user's record for reference.
Attachments sent to the user in a letter (see Configuring Alma Letters) also appear on this page. Se un utente dichiara di non aver ricevuto un'e email di notifica inviata da Alma, puoi inviare nuovamente l'allegato all'indirizzo email preferito dall'utente Indirizzo. Per reinviare un allegato, selezionare Reinvia notifica nelle azioni della riga Lista. Alma rinvii l'allegato all'Utente. La comunicazione utilizzata per questo è la comunicazione di notifica di reinvio.
When library independence is activated for an institution, the Owner field appears in the Attachments tab. In this case, users can only see attachments that are owned by the libraries that are within these users' scopes (see Managing User Roles). Le informazioni che esulano dall'ambito di un Utente non vengono visualizzate in questa tab. Gli allegati a livello di biblioteca possono essere attivati solo nelle istituzioni in cui è attivata l'indipendenza della biblioteca. For additional information about library independence, see Fulfillment Library Independence.
Managing Proxy Users
È possibile definire un utente come proxy per un altro utente. A proxy user can loan and return items on behalf of another user (see Selecting a Patron). You manage proxy users on the Proxy For tab of the User Details page (Admin > User Management > Manage Users; select Edit in the row actions list).
Qualsiasi Utente può essere un utente delegato, ma il target Utente per il quale il utente delegato esegue azioni deve avere il Ruolo utente. Puoi aggiungere e rimuovere utenti per i quali un Utente è un utente delegato.
To add a proxy user:
- Open the Proxy For tab of the User Details page. Selezionare Aggiungi utente delegato per.
- Nel utente delegato per campo, inserisci o seleziona l'utente per il quale desideri che l'Utente corrente funzioni come utente delegato.
- Seleziona Aggiungi Utente. L'utente è stato aggiunto; l'Utente è ora un utente delegato per questo utente.
Per rimuovere l'utente, seleziona Elimina nella Lista delle azioni della riga.
Un Record utente può essere creato come Servizi utente delegato al momento della creazione del nuovo Record utente. Unlike the regular circulation proxy, the Fulfillment Proxy is a full proxy, for example not only are this patron's loans associated with the sponsor, but also the patron's requests and resource sharing requests. Emails that have to do with the request, such as hold shelf notifications and request reminders are also sent to both the proxy user and the sponsor user. The Fulfillment Proxy cannot be unlinked from the sponsor record and cannot place requests or check out items without the request or loan being associated with the sponsor record. Inoltre, le richieste effettuate dal Servizi utente delegato sono elencate sia nell'account dell'utente delegato che in quello dello sponsor su Primo.
Mentre il Servizi utente delegato Utente può richiedere sia copie locali che AFN per conto dell'utente delegato Sponsor, e sia il Servizi utente delegato che l'utente delegato Sponsor Utente ricevono notifiche di scaffale in sospeso per le copie locali, solo l'utente delegato Sponsor riceve l'email di notifica di scaffale in attesa per le copie AFN. Il Servizio utente delegato NON riceve anche la comunicazione per la copia AFN in attesa.
Viewing Changes to the User Record
Changes made to the user record are recorded in the History tab of the User Details page (Admin > User Management > Manage Users; select Edit in the row actions list). For more information, see History Tab. Oltre a tenere traccia delle modifiche apportate nell'UI di Alma, vengono acquisite anche le modifiche apportate da SIS, API, aggiornamenti degli account collegati e dal processo di aggiornamento/notifica Utenti.
L'accesso allo storico di un Utente può essere limitato dai Ruoli utente.
Per informazioni su come limitare l'accesso a determinati ruoli utente, contattare l'assistenza Ex Libris. Changes to the Last patron activity date are not recorded in the user's History tab. For more information on the Last patron activity date, see Managing Users and Configuring Last Patron Activity Date.
Le informazioni storiche possono essere filtrate per Tutte, Ultimi 7 giorni, Ultimo mese o Ultimo anno. Per default, le informazioni sono filtrate per gli ultimi 30 giorni.
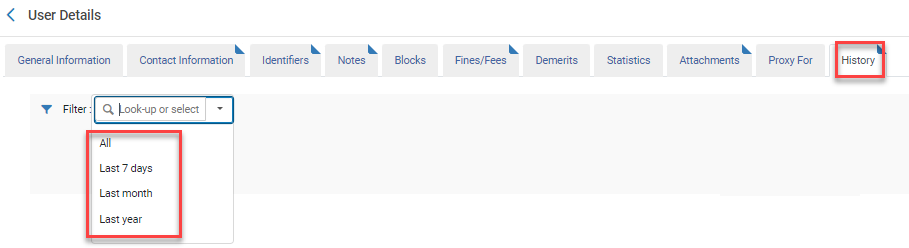
Nella tab Utente storico vengono visualizzate solo le modifiche relative al seguente campo:
- scheda generale:
- Nome utente
- nome di battesimo
- cognome
- Secondo nome
- titolo utente
- numero PIN
- Titolo del processo
- Codice Campus
- Gruppo utente
- lingua utente
- Data di Scadenza
- Data eliminazione
- codice RS biblioteca
- Livello di catalogazione
- Tipo di record
- password
- indirizzo
- Telefono
- identificativo
- notes
- blocchi
- Proxy abilitato per
- ruoli
The length of time that the user audit trail record is retained is determined by the user_audit_retention_period parameter. See Configuring Other Settings. Un processo settimanale, Eliminazione dell'Auditing Utente con conservazione, elimina i record storici più vecchi del valore del periodo di conservazione.
Any updates to the user record update the created by/modified by fields.
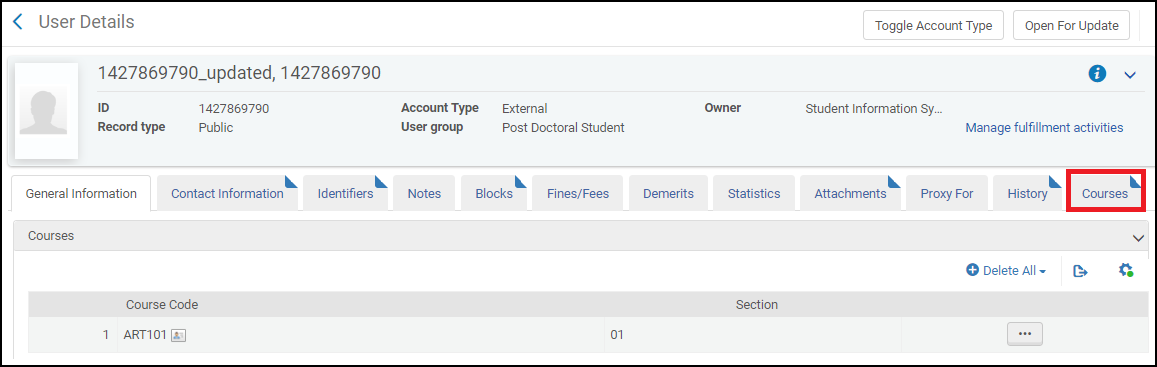
Gestione dei corsi
(Leganto only) The Courses tab allows you to view all courses to which a student has enrolled and to delete specific courses or all courses to which a student has enrolled.
For information on how to load user enrollment information, see Configuring Importing Course Enrollment Jobs.
Managing User Pictures
È possibile gestire le immagini degli utenti su un server esterno e farle apparire nella pagina dei dettagli utente in Alma. To do this, you must first configure the following parameters (see Configuring Other Settings):
When using a photo server (secured or not secured, i.e. https or HTTP), you must open access to campus staff member computers.
- photo_server_url- The URL to the location (directory) containing user pictures. L'URL deve utilizzare HTTPS. In order to use HTTPS, the certificate may not be self-signed and must be signed by a known certificate authority (the list of supported certificates can be found here). L'URL deve terminare con una barra (/). For example,http://institution.edu/pictures/.
- photo_identifier_type- The user identifier to use as the user picture file name. Possible values are: USERNAME(the primary ID) or a code in the User Identifier Types code table (see Viewing User Identifiers).
- photo_suffix - Il suffisso da utilizzare per il suffisso del file immagine Utente. For example,png.
The advised size (in pixels) for user photos to be properly uploaded to the Patron cards is 160*190.
You view a user's picture on the User Details page (Admin > User Management > Manage Users; select Edit in the row actions list).
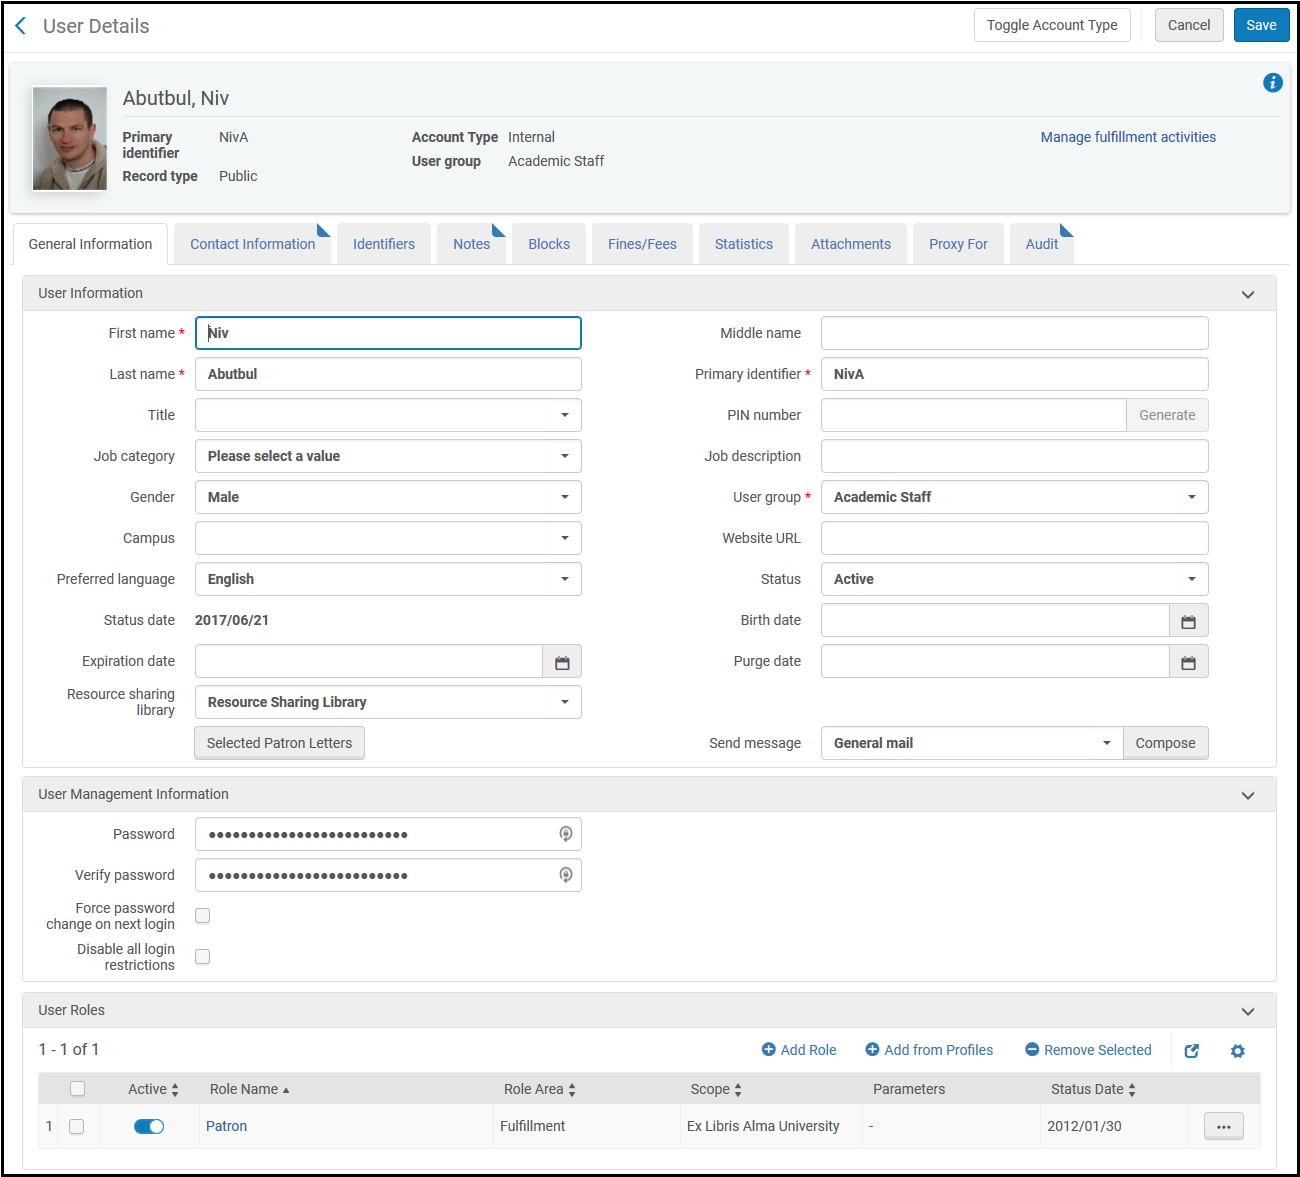
- Upload user pictures to the directory defined in photo_server_url with the name <user identifier>.<photo_suffix>, for example 12345.png.
- Assicurarsi che ogni Utente abbia un identificativo che corrisponda al nome del file immagine dell'Utente. See Managing User Identifiers.
Per modificare o rimuovere un’immagine, modifica o rimuovi l’immagine su photo_server_url. Non è richiesta alcuna azione in Alma.
For more information, see  How to configure the display of user pictures on the User Details and Patrons Services page in Alma.
Deleting Users
Può eliminare Utente se:
- Non hanno un saldo in sospeso sul loro conto.
- Non hanno prestiti in sospeso.
- Non hanno Linee d'ordine (POL), ordini d'acquisto o Fatture assegnate.
- Non hanno alcun record bibliografico bloccato.
- Non hanno alcun profilo di importazione assegnato.
- They are not currently working in the MD Editor.
- They do not have active Purchase Requests (Purchase Requests with the following status are considered ‘not active' and do not prevent deleting a user: Rejected, Approved, Order Complete, To be Canceled, Failed, Cancelled).
- Il record utente non è attualmente bloccato da un processo in esecuzione.
- (Se Esploro è abilitato per la tua istituzione) hanno risorse o sovvenzioni associate.
Note that the purge users job does not delete users with Resource Sharing requests that are on the Hold shelf (see Configuring User Deletion).
Quando un utente viene eliminato utilizzando la procedura seguente, viene eliminato completamente. Non vengono mantenuti dati statistici o segnalabili.
Elimina solo gli utenti Staff o Utente pubblico. Utenti di contatto sono riservati ai fornitori e non devono essere eliminati.
To delete users in bulk, see Purging Users
To delete a user:
- On the Find and Manage Users page (Admin > User Management > Manage Users), select Delete in the row actions list for the user you want to delete. Viene visualizzata una finestra di dialogo di conferma.
Find the user record you want to delete using the persistent search bar's ‘Users' option.
- Se l'Utente può essere eliminato, selezioni Conferma. L'Utente è stato eliminato.
- If the user cannot be deleted, a message such as the following appears.
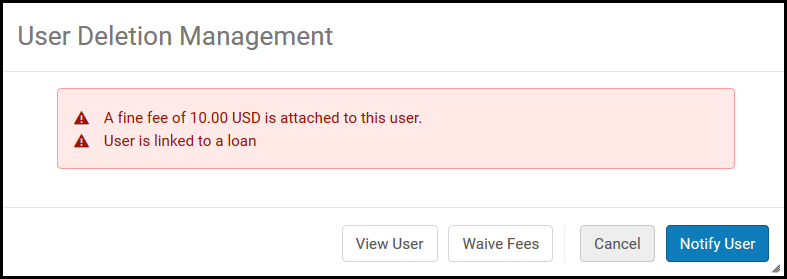
Scelga una delle seguenti opzioni:
- Annulla – Non eliminare l'utente.
- View User(appears only when fines/fees are attached to the user) – See Editing Users.
- Waive Fees – See Managing User Fines and Fees. Appare una nuova finestra di dialogo di conferma, in cui può confermare che desidera eliminare l'Utente.
- Notify User(appears only when fines/fees are attached to the user) – Send the User Deletion Letter informing the user that there is a balance due on the user's account. A copy of the email is added to the Attachments tab (see Managing User Attachments). For more information on configuring the letter, see Configuring Alma Letters.
Distribuisci utente
Può distribuire un Utente a tutte le istituzioni membro che implementano una Network Zone. For more information, see Distributing Users Across a Network Zone. For additional user sharing options in a fulfillment network, see Linking Users in Fulfillment Networks.
