
Setting Up and Using Pickup Areas
You can define a pickup area within a pickup location for staff members or patrons to use when selecting a location for picking up holds.
This topic covers the following:
-
Set Up Pickup Areas in Polaris Administration (staff client).
Set Up Pickup Areas
To set up Leap and PAC to use pickup areas, you must do the following:
-
Add your library's pickup areas to the Hold Pickup Areas policy table.
-
Enable pickup area at the system level.
-
Designate the default pickup area and display in PAC at the branch level.
Add Pickup Areas to the Policy Table
The Hold Pickup Areas policy table is empty by default. You can add Pickup Areas at the system level for all branches, then you can change the settings for Pickup Areas at the branch level.
To add pickup areas at the system level for all branches
-
Open Polaris Administration (staff client), and go to Administration > Explorer.
-
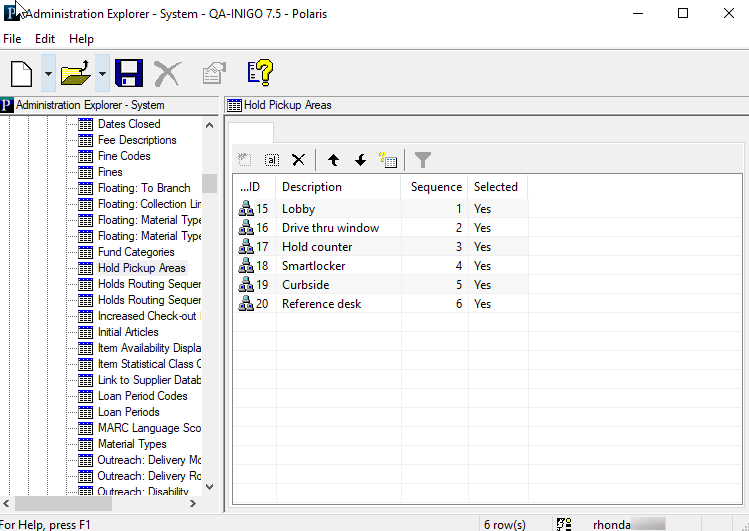
Select Policy Tables > Hold Pickup Areas.
The Hold Pickup Areas pane appears.
-
Select Insert
 .
.The Add Hold Pickup Areas dialog opens.
-
Enter the following:
-
Description — Enter the name to show in the pickup area dropdown lists in Leap and in PAC.
-
Sequence — Enter a number to define the display order for the added pickup area in dropdown lists for Leap and PAC.
-
Selected — Select Yes if the pickup area is valid for your branch, and you want this pickup area to appear in dropdown lists for pickup area in Leap and in PAC.
-
-
Select OK.
The pickup area row appears in the Hold Pickup Areas pane.
You can also change or delete existing pickup area entries using the icons at the top of the Hold Pickup Areas pane. For more information, search "Working with Tables" in Polaris staff client help.
Enable Pickup Area at the System Level
You must enable Pickup Area at the system level before you can designate the Default Pickup Area, which is the area that shows in the dropdown list for Leap and PAC by default.
To enable pickup area for all branches
-
Open Polaris Administration (staff client), and go to Administration > Explorer.
-
Select System > Parameters > Request > Holds Options.
-
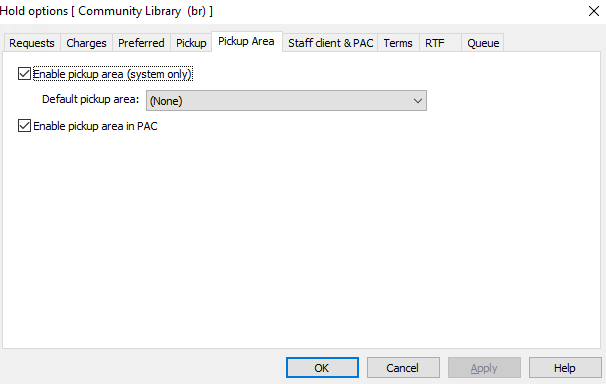
Select Pickup Area.
-
Select Enable pickup area (system only).
-
(Optional) To display a pickup area by default in Leap and PAC, select an option from the Default pickup area list.
This default applies to all branches until it's reset at the branch level.
-
(Optional) To display pickup area options in PAC, select Enable pickup area in PAC.
This selection applies to all branches until it's reset at the branch level.
-
Select OK.
The system displays Pickup Area as described in the Email and Print Pickup Areas section.
Designate Default Pickup Area and Display in PAC at the Branch Level
After you add and enable pickup areas at the system level, you can set the default pickup area and display in PAC options differently for each branch.
To set pickup-area options at the branch level
-
Open Polaris Administration (staff client), and go to Administration > Explorer.
-
Select Branch > Branch Name.
-
Select Parameters > Request > Holds Options.
-
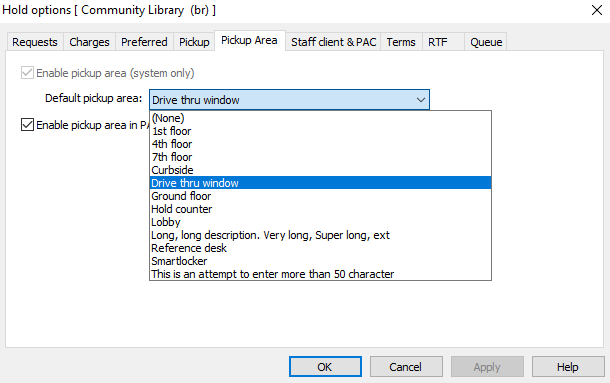
Select Pickup Area.
-
To display a pickup area by default in Leap and PAC, select an option from the Default pickup area list.
-
To display pickup area options in PAC, select Enable pickup area in PAC.
-
Select OK.
Leap and PAC display the pickup area list with the default option first.
Use Pickup Areas in Leap
When placing a hold in Leap or in PAC, staff members and patrons can select a pickup area within a pickup location. For example, when you select a pickup location, it is a library branch. If the branch offers multiple pickup areas—such as smart lockers, curbside, and holds counter—you can select one of those as well.
To select a pickup area in Leap
-
Go to the patron record workform.
-
Select Holds/Held.
-
Select New Hold.
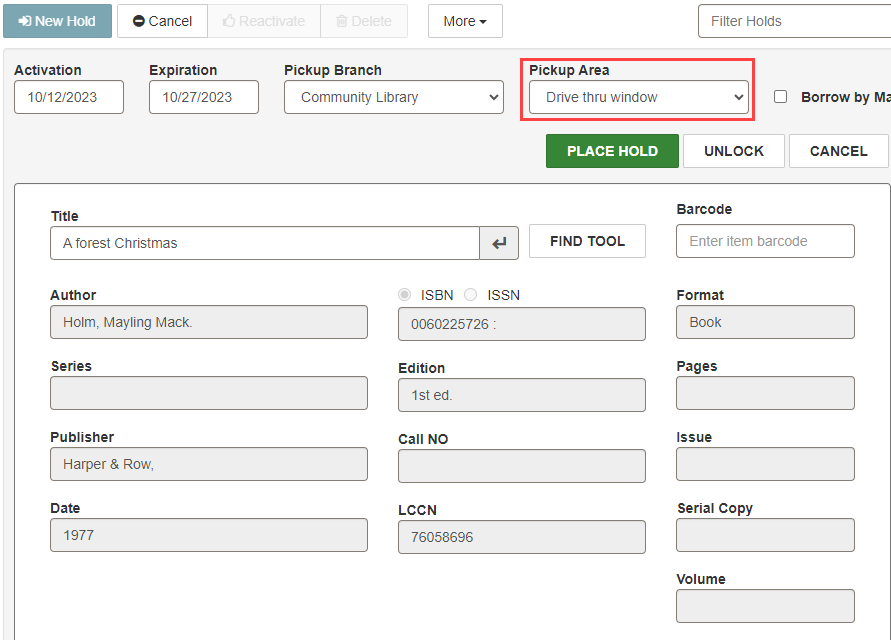
The new hold area includes Pickup Area.
-
Use the Find Tool to retrieve an item to place on hold.
-
Select a Pickup Branch.
-
Select a pickup area from the Pickup Area list.
-
Select PLACE HOLD.
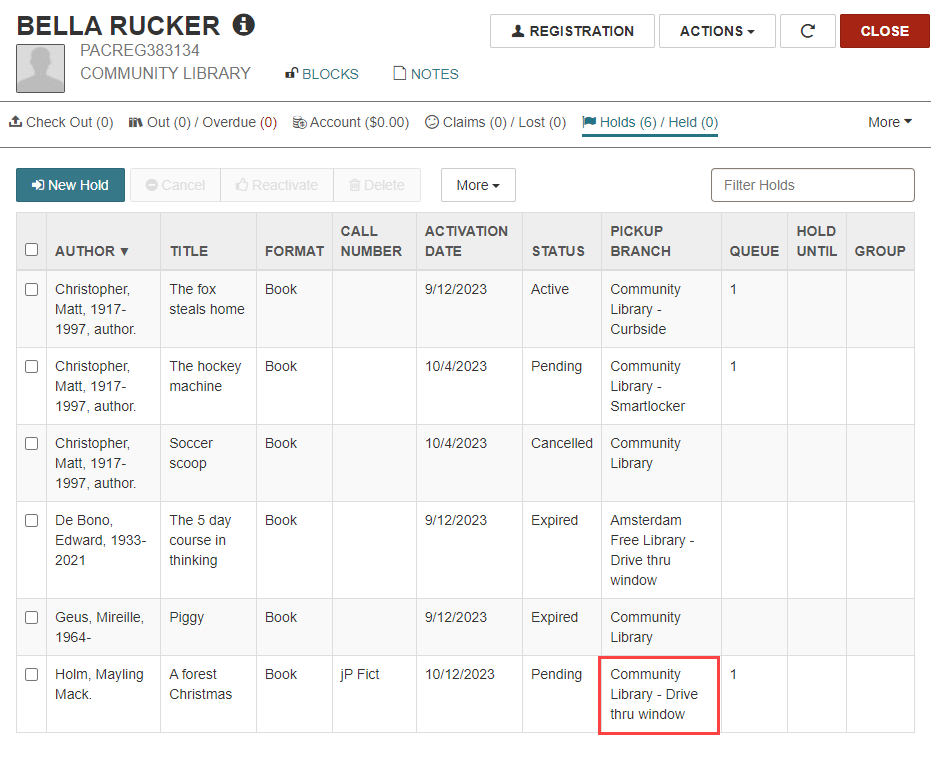
The pickup area appears beside Pickup Branch in the holds table.
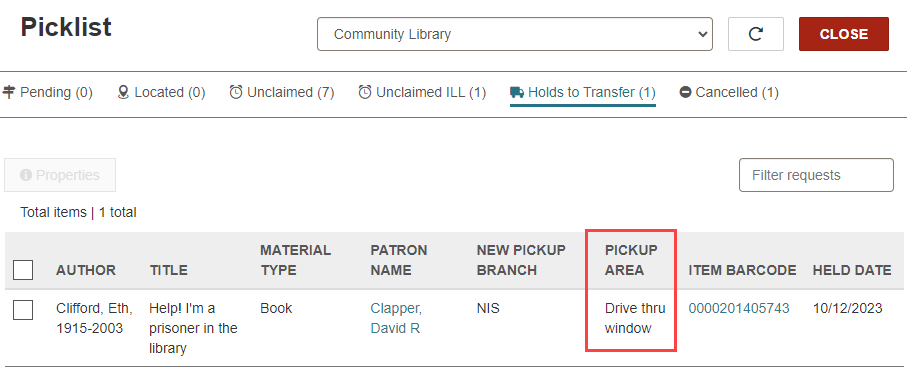
The Pickup Area appears in all views of the Picklist workform.
The Pickup Area also appears in the following locations:
-
ILL request view in the patron workform
-
ILL workform
-
Unclaimed ILL Picklist
-
Place a Request in PAC
-
Change a Request in PAC
-
Beside Pickup Library in Request list in PAC
-
ILL request form in PAC
-
Hold Requests create and view in MPAC
-
Requests in PAPI
For more information, search "PickupAreasGet" in the Polaris API Guide.
-
Email and Print Pickup Areas
Pickup areas can appear in the following:
-
hold call slips
-
hold slip
-
hold pickup slips
-
first and second default email hold notices
-
SIP extension at check in
See the table below for steps to display pickup areas in these places.
| To display pickup area here | Do this |
|---|---|
| Hold call slips (pickup area appears under the location pickup branch) | Enable Pickup Area at the system level. |
| First and second default email hold notices (pickup area appears after the held-till value) | Enable Pickup Area at the system level. |
| SIP extension - "PA[PickupAreaDescription]" (pickup area appears in the message returned at check in) |
Enable Pickup Area at the system level. Note: |
| Hold pickup slips (pickup area appears under the location for pickup branch) |
|
| Hold slip (pickup area appears under the location for pickup branch) |
|
Print the Pickup Area in Hold Notices
When you enable Pickup Area at the system level, printed hold notices display a customizable language string. This language string advises patrons to call the library or log in to PAC to see their pickup area.
To modify or translate the language string, update the following Notices string identifier in the Web Admin (Language Editor) Tool: NT_HOLD_PICKUPAREA_INSTRUCTIONS.
The string appears in the following types of printed hold notices:
-
Hold Requests Full Page Mailer
-
Hold Requests Half Page Mailer
-
Hold Requests Full Page Mailer Dot Matrix
-
Hold Requests Postcard
-
Hold Requests Z Fold Mailer
-
Hold Requests Z Fold Mailer Oversized
