
Widgets
Configurar widgets
- Administrador general del sistema
In addition to the pre-defined widgets (see Managing Widgets) and Analytics widgets ( see Working with Analytics Objects), Alma lets you link to other widgets to allow staff users to display them on their Alma home page.
Los widgets tienen un ancho de 497 pixeles y una altura máxima de 300 pixeles. Si el contenido que aparece en estos widgets excede de estas dimensiones, se agregan automáticamente barras de desplazamiento verticales y/u horizontales.
Los widgets no pueden crearse desde los tableros.
The Customized Widgets page (Configuration Menu > General > Widgets > Customized Widgets) enables you to configure additional widgets.
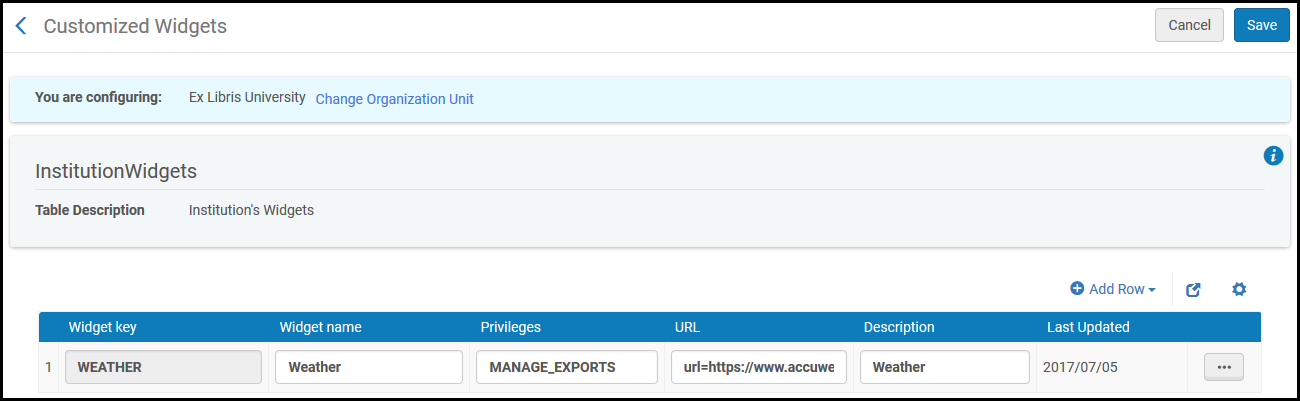
Los widgets predefinidos (como Búsqueda de descubrimiento y Tablero de Primo) no se pueden eliminar.
Para más información adicional sobre los widgets:
- For information about the Scheduled Jobs Status widget, see Viewing Scheduled Job Summary Status.
- For information about configuring notification in the Notification widget, see Configuring the Home Page Notification Widget.
- For information on the Primo dashboard and search box, see Adding Primo Search Box to the Alma Home Page. Esta configuración solo es aplicable para los entornos Alma-Primo.
- For information about the Discovery Search widget, see Configuring the Discovery Search Widget. Esta configuración es aplicable para los entornos de Primo VE solamente.
- To manage widgets on your home page, see Managing Widgets.
Añadir un widget
Los widgets que se añaden a nivel de institución se aplican a todas las bibliotecas dentro de la institución.
- On the Customized Widgets page (Configuration Menu > General > Widgets > Customized Widgets), select Add Row and enter a key and name for the new widget. El nombre del widget aparecerá sobre el widget. La clave del widget es un nombre permanente que no se puede editar.La clave del Widget no puede contener espacios. Use underscore ('_') instead of the space, if needed.
- Introducir lo siguiente:
- La URL debe ser HTTPS. Si introduce una URL que no es HTTPS, el widget no aparecerá en el panel de control.
- Se debe permitir la integración de la página web en un X-Frame. Tenga en cuenta que las páginas de la documentación de Ex Libris y del Intercambio de ideas no se pueden integrar en un X-Frame y, por lo tanto, no se pueden utilizar para los widgets.
- Privileges – Indicates the privileges necessary to add and view the widget. Dejar en blanco para todos los privilegios.
- URL – The URL of the Web page that was created to serve as the widget. (Do not add url= before the URL; Alma adds this.)
- Description – A description of the widget
- Select Add Row. El nuevo widget se guarda y aparece en la parte inferior de la lista de widgets definidos.
- Select Save to store the new widget details.
A user can add any widget defined here to the Alma home page; see Managing Widgets.
To delete a widget, select Delete in the row actions list.
Configuring the Homepage Notifications Widget
- Administrador general del sistema
El widget de notificaciones de la página de inicio muestra anuncios generales e información de su institución. Los usuarios pueden incluir o ignorar el widget desde su página de inicio, como cualquier otro widget.
You configure the notifications that appear in this widget on the Home page Notifications page (Configuration Menu > General > General Configuration > Homepage Notifications).
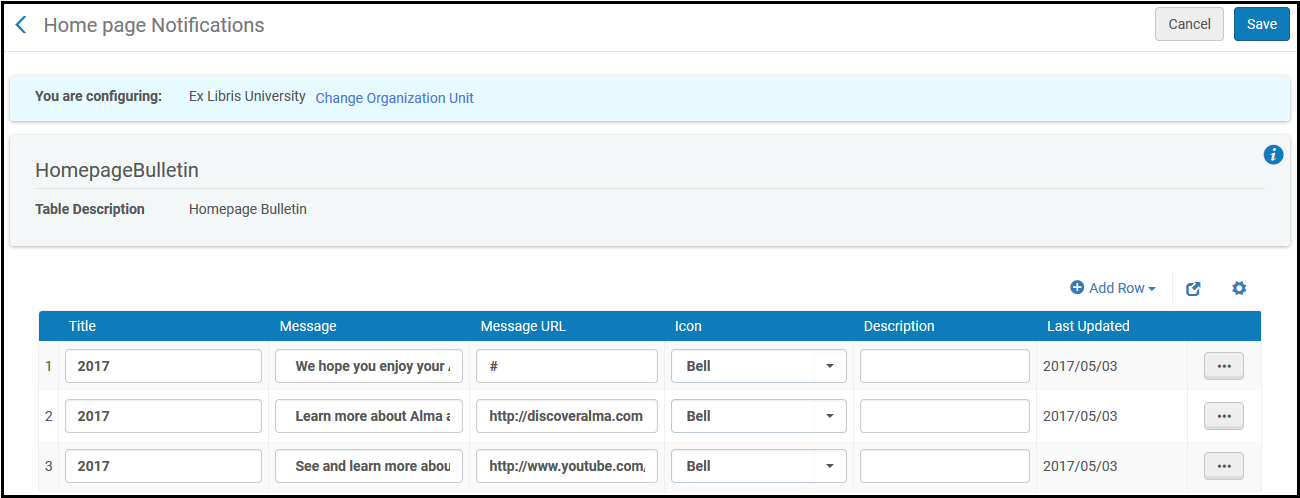
To configure the Notifications widget:
- On the Home page Notifications page, select Add Row and fill in the following fields:
- Icon- Select one of the icon types:
- Campana
- Calendario
- Marca de verificación
- Signo de exclamación
- Configuración
- Estrella
- Herramientas
- Title- A title for the notification.
- Message – The message that you want to appear in the Notifications widget
- Message URL – The URL to which you want the message to link
- Description – A description of the message (for internal use)
- Icon- Select one of the icon types:
- Select Add Row to add the message to the Notifications widget.
- Select Save to save your changes.
To delete a notification, select Delete in the row action list.
Las notificaciones del widget se ordenan por fecha de actualización (descendente).
