
Configuring the Institution and Its Libraries
Watch the Calendars video (6 min.).
Una institución contiene bibliotecas. Opcionalmente, se puede organizar su institución por campus, en cuyo caso asocial sus bibliotecas a los campus y luego restringe ciertos procesos y recursos según el campus. For more information, see Organizational Topologies. To manage campuses, see Configuring Campuses.
La infraestructura de la biblioteca incluye todas sus ubicaciones físicas y sistemas de soporte, lo que incluye las ubicaciones físicas de los recursos (por ejemplo, estanterías/estanterías de libros o almacenamiento remoto), los mostradores de circulación, las máquinas de autopréstamo y las impresoras.
Las bibliotecas dentro de una institución o campus pueden estar configuradas para tener relaciones que permitan a los usuarios verificar la entrada o salida de recursos en otra ubicación, enviar ejemplares para un lado y otro, o adquirir (comprar) ejemplares en nombre de otros. If a library is configured to do this for libraries at other institutions (and not only within the institution), it is known as a resource sharing library.
If you select ALL in the Library dropdown list when creating the relationship, this selection only applies at the time the relationship is created.
En algunos casos, se gestionan en Alma varias bibliotecas independientes como una sola institución. This may occur, for example, when a geographic or political region includes a number of small or medium-sized libraries that benefit from sharing Alma management staff, or when a university contains multiple colleges that do not provide full library access to members of other colleges. This configuration of an institution is called library independence. Cuando la independencia de la biblioteca se activa para una institución, parte de la información relacionada con bibliotecas individuales, como sanciones de usuarios y estadísticas, puede estar oculta a las demás bibliotecas incluidas en la institución. For additional information, see Fulfillment Library Independence.
Ex Libris trabaja ayuda a realizar la configuración inicial de la institución. Después de la configuración inicial, es posible que se necesite añadir o editar elementos a la infraestructura de su biblioteca, de la siguiente forma:
Nótese que puede configurar bibliotecas, campus o impresoras en cualquier orden, y asociar una entidad con otra a medida que las crea. Por ejemplo, se puede a) crear una biblioteca y después crear un campus y añadir la biblioteca al campus, o b) crear el campus y después crear la biblioteca y añadir el campus a la biblioteca.
- Configurar la información global acerca de su institución:
- Cambiar el nombre de la institución y descripción opcional. See Configuring General Institution Information.
- Añadir nuevas bibliotecas. See Adding a Library.
- Cambiar la información de contacto global para la institución, incluida dirección, números de teléfono y direcciones de correo electrónico. See Configuring Institution/Library Contact Information.
- Actualizar la información de calendario global para la institución, incluyendo horario de apertura y cierre, y los eventos programados que puedan afectar a dicho horario. See Configuring Institution/Library Open Hours.
- Configurar las impresoras de la institución. See Configuring Printers.
- Configure the institution's integration with self-check machines (see Self-Check Machines), LDAP, a bursar system, a student information system, and other external systems.
- Configurar para cada biblioteca:
- Su ubicación física por defecto para las adquisiciones.
- Su campus asociado.
- Its resolver proxy (see Resolver Proxies).
- Fulfillment information for the library: fulfillment services between the library and other libraries, whether the library is a resource sharing library, the library's circulation desks, and information for self-check machine bin sorting. See Configuring Library Fulfillment Infrastructure.
- Información de contacto global, incluida la dirección, números de teléfono y direcciones de correo electrónico. See Configuring Institution/Library Contact Information.
- Información del calendario local, incluido horario de apertura y cierre, y eventos programados que puedan afectar dicho horario. See Configuring Institution/Library Open Hours.
- The IP ranges of the library, for managing access to electronic resources; see Configuring Distributed Access to Electronic Resources.
- Ubicaciones físicas (estanterías y almacenamiento remoto), incluido el mostrador de circulación que sirve a esa ubicación. See Configuring Physical Locations and Configuring Remote Storage Facilities.
- Configure for each campus (see Configuring Campuses):
- Las bibliotecas asociadas a él.
- Its resolver proxy (see Resolver Proxies).
- The IP ranges of the campus, for managing access to electronic resources; see Configuring Distributed Access to Electronic Resources.
- Traducir nombres de campus a otros idiomas definidos en su institución.
- Si quiere permitir a los usuarios que retiren/devuelvan recursos entre instituciones y compartir la información de usuario, pida a Ex Libris que configure una red de servicios al usuario. See Fulfillment Networks.
- To manage multiple institutions, see Managing Multiple Institutions Using a Network Zone.
Si forma parte de la configuración de una Zona de Red, el administrador de la Zona de Red puede gestionar la configuración del Horario de apertura (calendario, resumen, contacto e IP) y distribuir la información del calendario a los miembros. This is done in the Consortia Central Configuration Dashboard in the Library Management section. For more information see Collaborative Network Sections and Configuration Options.
Configuring General Institution Information
- Administrador general del sistema
You manage general information about institutions and libraries on the pages at Configuration Menu > General > Libraries > Add a Library or Edit Library Information.
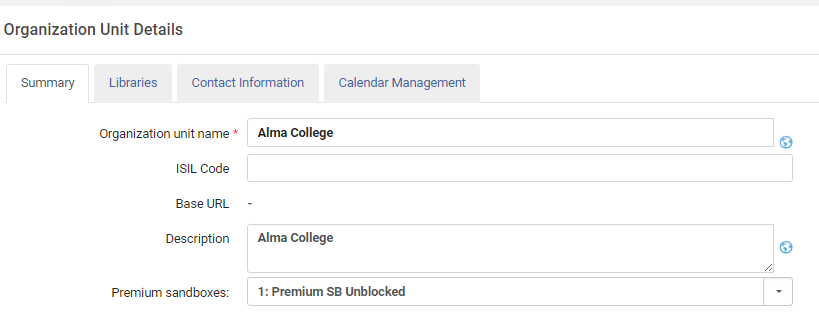
Ex Libris le asignará un código de cliente y un código de institución. Es posible configurar códigos de biblioteca propios.
La URL base es el nombre de dominio específico de la institución que le asigna Ex Libris. If you are not already using this domain name and want to start using it, see Configuring Alma and Primo to Use Your Institution-Specific Alma Domain. For general information on Alma domain names, see Your Alma Domain Names.
La página Detalles de la unidad de organización contiene las siguientes pestañas:
- Summary (Organization Unit Details (Institution) page) – The general details of the institution.
- Libraries (List of Libraries page) – The details of the libraries in the institution. See Adding a Library and Editing a Library.
- Contact Information(Organization Unit Contact Information page) – The contact information for the institution, including physical addresses, phone numbers, and email addresses. See Managing Institution/Library Contact Information.
- Calendar Management (Calendar Management page) – Configure the hours during which the institution is open or closed. See Managing Institution/Library Open Hours.
Se puede editar el nombre y la descripción de la institución.
To update this information in Primo, see Configuring the Primo Institution.
To edit the institution's general details:
-
From the Summary tab on the Organization Unit Details (Institution) page (Configuration Menu > General > Libraries > Add a Library or Edit Library Information):
- Modificar el nombre (obligatorio) y descripción (opcional) de la institución.
-
Enter your ISIL Code(optional). The ISIL code (International Standard Identifier for Libraries and Related Organizations) may be used to uniquely identify your location.
For example, if your institution is participating in SRU/SRW search requests and resource sharing, the ISIL code is used in the institution identifier tag that is sent in an SRU response (see Holdings Options (ISO 20775) on the SRU/SRW Search page for more information).
- Select Serves Other Institutions if this library will accept pickups/returns at their location for other institutions. This field only appears if you have set up a fulfillment network; see Requesting an Item for Pickup Anywhere in the Network.
- Select Save.
- On the Organization Units Relations Setup (Institution) page (Configuration Menu > General > Libraries > Relationships), add the libraries for which the institution handles acquisitions (rather than the library making its own purchases). For more information, see Adding Library Relationships.
Adding and Configuring Libraries
- Administrador general del sistema
You add libraries on the List of Libraries page (Configuration Menu > General > Libraries > Add a Library or Edit Library Information; select the Libraries tab).
Una biblioteca nueva hereda varias configuraciones de la institución, incluidos departamentos, información de calendario, políticas de términos de uso, la mayoría de los tipos de orden de trabajo, etc. The library is initially configured with a library-specific work order type for acquisitions (AcqWorkOrder) and a library-specific acquisitions work order department without any defined operators. La nueva biblioteca tiene una ubicación por defecto específica para la biblioteca, y ninguna impresora definida. Véase otras áreas de Servicios al usuario y Configuración general para configurar esta información.
Toda biblioteca que se añada a Alma también debe estar correctamente definida para la institución Primo. Alma permite exportar las bibliotecas a un fichero de forma que se puedan importar en Primo. For details, see Viewing and Exporting the Alma Libraries.
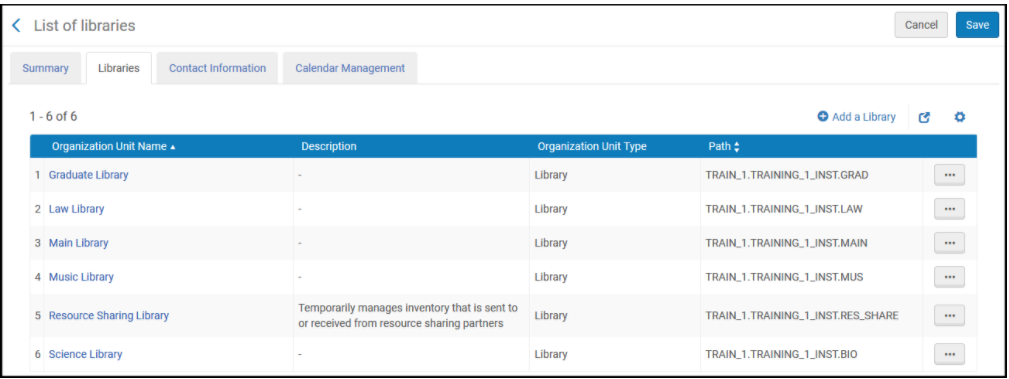
The organizational structure of the institution appears in the Path field in header and the organizational structure of each library appears in the Path column in the table. La ruta contiene el código de cliente, el código de la institución y el código de la biblioteca. For example, if your customer code is TRAIN_1, your institutional code is TRAIN_1_INST. If your library code is GRAD, the path is TRAIN_1.TRAIN_1_INST.GRAD.
Se puede añadir, editar o borrar una biblioteca en esta página. For information on editing library information, see Editing a Library.
To add a library:
- On the List of Libraries page, select Add a Library. Aparece la página Añadir una unidad de organización.
- Enter an Organization unit name,code, and (optionally)description for the library. For information on the other fields, see Editing a Library. Por ahora, ignorar estos campos.
- A library code must not contain special characters, such as quotes ('), nor blank spaces. Use alphanumeric characters, and use hyphens and underscores to fill in the blank spaces.
- Una vez que se establece el código de la biblioteca, no se puede editar. To change the library code, a new library with a new code will have to be created.
- Select Save. La biblioteca se ha guardado.
Deleting a Library
No puede eliminar una biblioteca si tiene unidades de servicios al usuario, ubicaciones, mostradores de circulación, unidades de servicio, solicitudes o ejemplares físicos asociados a ella, o si tiene órdenes de compra (PO) o líneas de orden de compra (POL) asociadas. To view related requests, see Viewing Related Requests.
To find the components associated with the library in order to delete them:
- To find the POs and PO lines, perform an advanced search for Order lines, select the PO line owner, and then search for workflows and PO statuses:
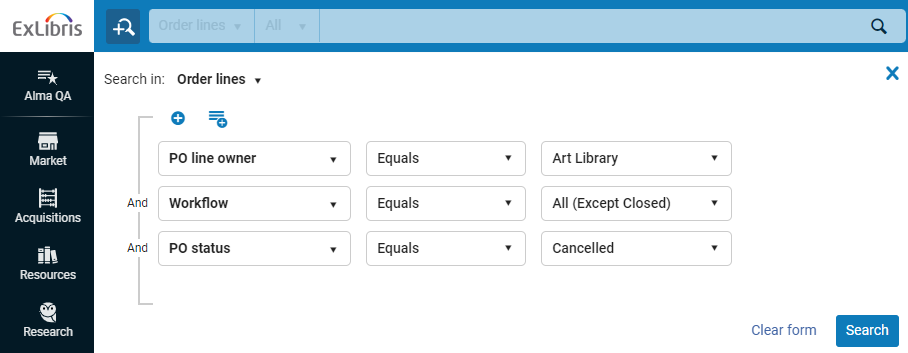 This enables you to see PO lines in whatever status you need to see them. This also enables you to see the POs with which these PO lines are associated (Alma does not have a specific search for POs).
- To find the circulation desks go to Configuration > Fulfillment > Circulation Desks.
- To find the fulfillment units make sure the "Configuring" scope is the library that is to be deleted, and go to Configuration > Fulfillment > Fulfillment Units. The fulfillment unit whose owner is Library should be removed.
- To find the service units (work order department) go to Configuration > General > Work Order Departments.
- To find the requests associated with a library or circulation desk see Viewing Related Requests.
- Para encontrar los ejemplares físicos asociados, puede ejecutar una búsqueda avanzada y filtrar por biblioteca. Alternativamente, puede crear informes analíticos en el área temática Ejemplares físicos.
If you still cannot find the associated items, contact Customer Support.
To delete a library:
- Once all the components associated with the library were deleted, select Delete in the row actions list for the library, and select Confirm in the confirmation dialog box.
If there are components associated with the specific library you are trying to delete, then an error message will display specifying which types of components (PO line, circulation desk, etc.) are still associated with the library.
Editing a Library
- Administrador general del sistema
- Administrador de servicios al usuario
Se puede editar una biblioteca en la página Detalles de la unidad de organización (biblioteca):
- As a General System Administrator:Configuration Menu > General > Libraries > Add a Library or Edit Library Information; select the Libraries tab and select Edit in the row actions list.
- As a Fulfillment Administrator (or General System Administrator):Configuration Menu >(ensure that the library is selected in the Configuring drop-down list)> Fulfillment > Library Management > Library Details.
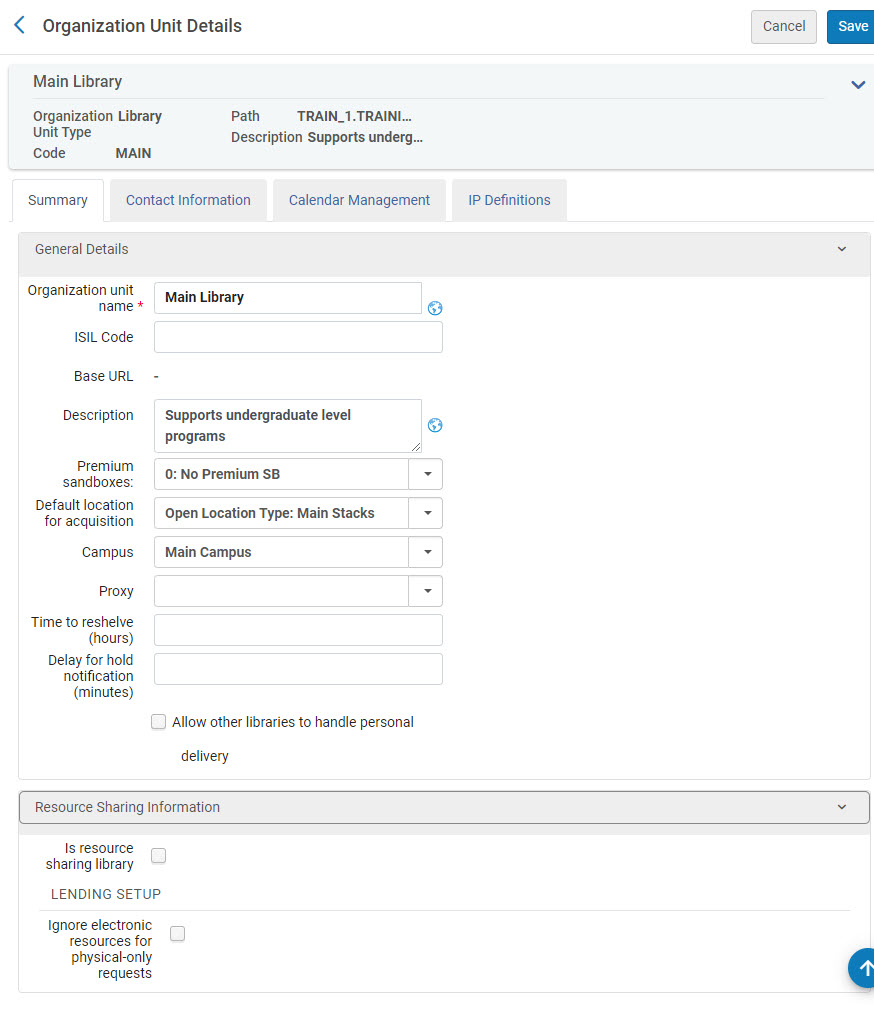
To edit a library:
- On the Organization Unit Details (Library) page, change the Organization unit name and Description of the library, if required.
- Select a Default location for acquisitions from the list of locations. Esta es la ubicación por defecto en que se crean los ejemplares/existencias cuando se crea una línea de orden de compra física para la biblioteca. Si esto no se ha definido, los ejemplares/existencias no se crearán automáticamente y deberán añadirse manualmente.
- Select the Campus to which to associate the library. See Managing Campuses.
- Select a default Proxy profile. See Resolver Proxies. Este proxy se utilizará si no se definió a nivel de servicio o portafolio. En este caso, si se definió un campus (véase campo anterior), el proxy seleccionado aquí aplica a este campus. Si no se definió un campo, el proxy seleccionado aquí aplica a toda la biblioteca.
- Enter the Time to reshelve (hours) which indicates the period of time (in hours or portions of hours, such as 10.5) that the item is considered as available, but shows as being reshelved in Alma and Primo so patrons and librarians know not to search for it on the shelf. Este parámetro a nivel de biblioteca puede ser anulado por un valor específico del mostrador de circulación.
Watch the Reshelving Items Time video (2:07 min).
- Enter the Delay for hold notification (minutes) to define how long Alma waits before sending a hold notification to a patron. El retraso puede ser de hasta de 3 dígitos, y 0 indica que no hay retraso. When the delay is complete, Alma checks to see if the request is still active and if so, sends the hold notification to the patron. Si el valor se rellena tanto para el mostrador de circulación como la biblioteca, se utiliza el valor del mostrador de circulación.
- Select Allow other libraries to handle personal delivery to allow other libraries to handle personal delivery for that library's items. Esto tendrá en cuenta la capacidad de la biblioteca de digitalización de gestionar la entrega personal (con un mostrador de circulación primario que admita la entrega personal).
For more information, see Supports personal delivery on the Configuring Circulation Desks page.
- To configure the library as a resource sharing library, see Configuring Parameters of a Resource Sharing Library.
- If your institution is configured to use Calculate on the Physical Item Editor page to create alternative and temporary item-level call numbers, the Disable Item Call Number Calculation field appears. Seleccionar este campo para restringir la coincidencia de prefijos a nivel de biblioteca. Seleccionar esto fuerza a que el cálculo de signatura se base en prefijos/configuraciones a nivel de institución. See Updating Item-Level Information for more information.
- Select Save when you are done.
Véase las otras secciones en esta página para opciones adicionales de configuración de biblioteca.
Viewing Related Requests
You can view the related requests for a library, i.e., requests where the library is their destination (pickup location or move request destination). This is useful for example when deleting a library where you first need to handle the related requests.
To view the related requests for a library:
- Navigate to Configuration > General > Add a Library or Edit Library Information.
- Seleccione la pestaña Bibliotecas.
- From the row actions menu for a library select Display related requests.
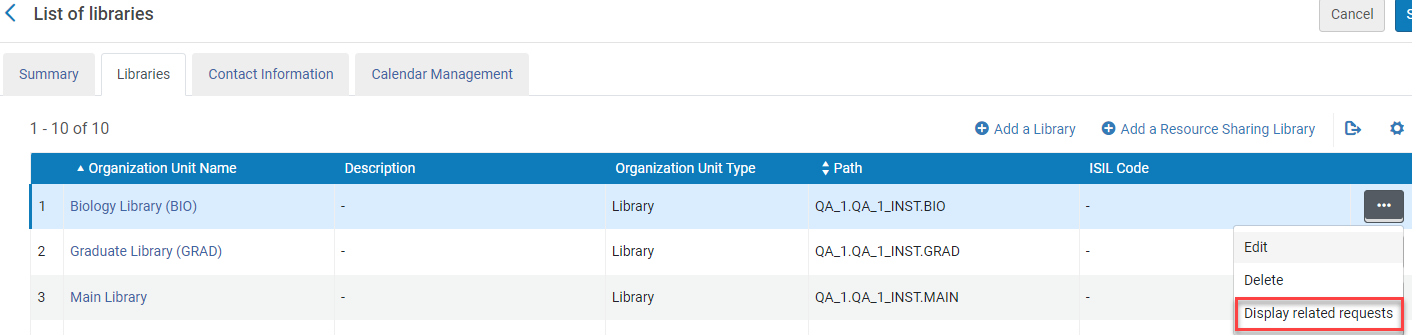
- Se muestra la lista de solicitudes relacionadas.
Configuring IP Ranges for a Library
- Administrador general del sistema
- Administrador de servicios al usuario
Se puede configurar los rangos de IP para una biblioteca en la página Definiciones de IP (biblioteca):
- As a General System Administrator:Configuration Menu > General > Libraries > Add a Library or Edit Library Information; select the Libraries tab, select Edit in the row actions list and select the IP Definitions tab.
- As a Fulfillment Administrator (or General System Administrator):Configuration Menu >(ensure that the library is selected in the Configuring drop-down list)> General > Library Management > Library Details; select the IP Definitions tab
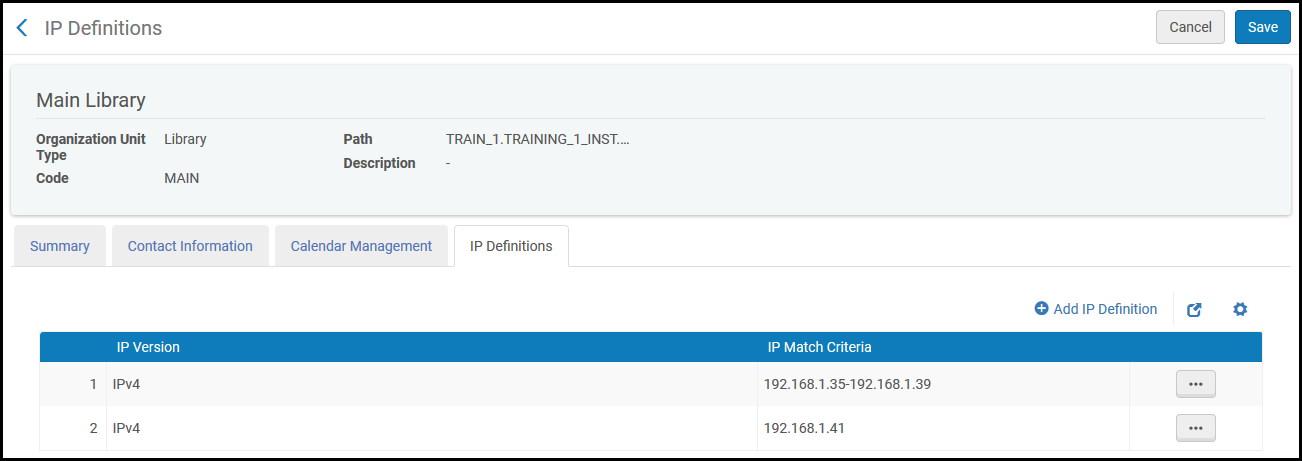
The IP ranges identify a patron's location when considering resource availability and when holdings by location in a Locations Ordering Profile (see Configuring the Order of Primo Search Results). If the library is associated with a campus, the IP ranges must fall within the IP ranges of the campus; see Editing a Campus.
See Configuring Distributed Access to Electronic Resources.
Si no se han definido los rangos de IP, aparecerá un mensaje de advertencia "La biblioteca no tiene definición de IP".
To add an IP address range to a library:
- On the IP Definitions page, select Add IP Definition. Entonces aparece el cuadro de diálogo Añadir definiciones de IP.
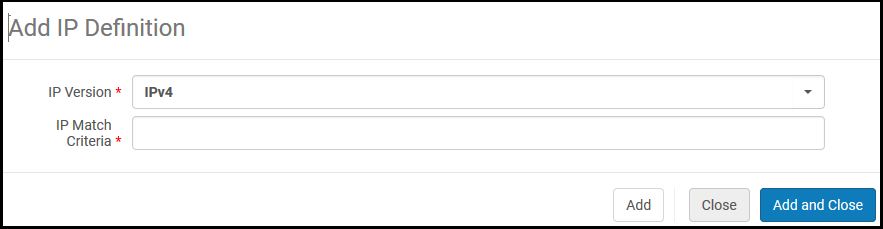
- Select an IP Version from the drop-down list and enter the matching IP address,IPv4 or IPv6.
- In IP Match Criteria, enter the IP range or a single IP address. For example, for an IPv4 range use decimal format A.B.C.D-A.B.C.D, such as 192.1.1.1-192.255.255.255. Un ejemplo de rango IPv6 podría ser 2610:0:50f2::1-2610:0:50f2:ffff:ffff:ffff:ffff:ffff.
- Select Add and Close. Se guarda el nuevo rango de IP.
You can configure groups with which library resources are associated; see Configuring Distributed Access to Electronic Resources. You can restrict resources by library or campus on the Electronic Service Editor page; see Adding a Local Electronic Collection.
Configuring Institution/Library Contact Information
- Administrador general del sistema (institución solamente)
Se puede configurar la información de contacto para una institución o biblioteca en la página Información de contacto de la unidad de organización:
- As a General System Administrator (institution):Configuration Menu > General > Libraries > Add a Library or Edit Library Information; select the Contact Information tab.
- As a General System Administrator (library):Configuration Menu > General > Libraries > Add a Library or Edit Library Information; select the Libraries tab, select Edit in the row actions list and select the Contact Information tab.
- As a General System Administrator (library):Configuration Menu >(ensure that the library is selected in the Configuring drop-down list)> Fulfillment > Library Management > Library Details; select the Contact Information tab.
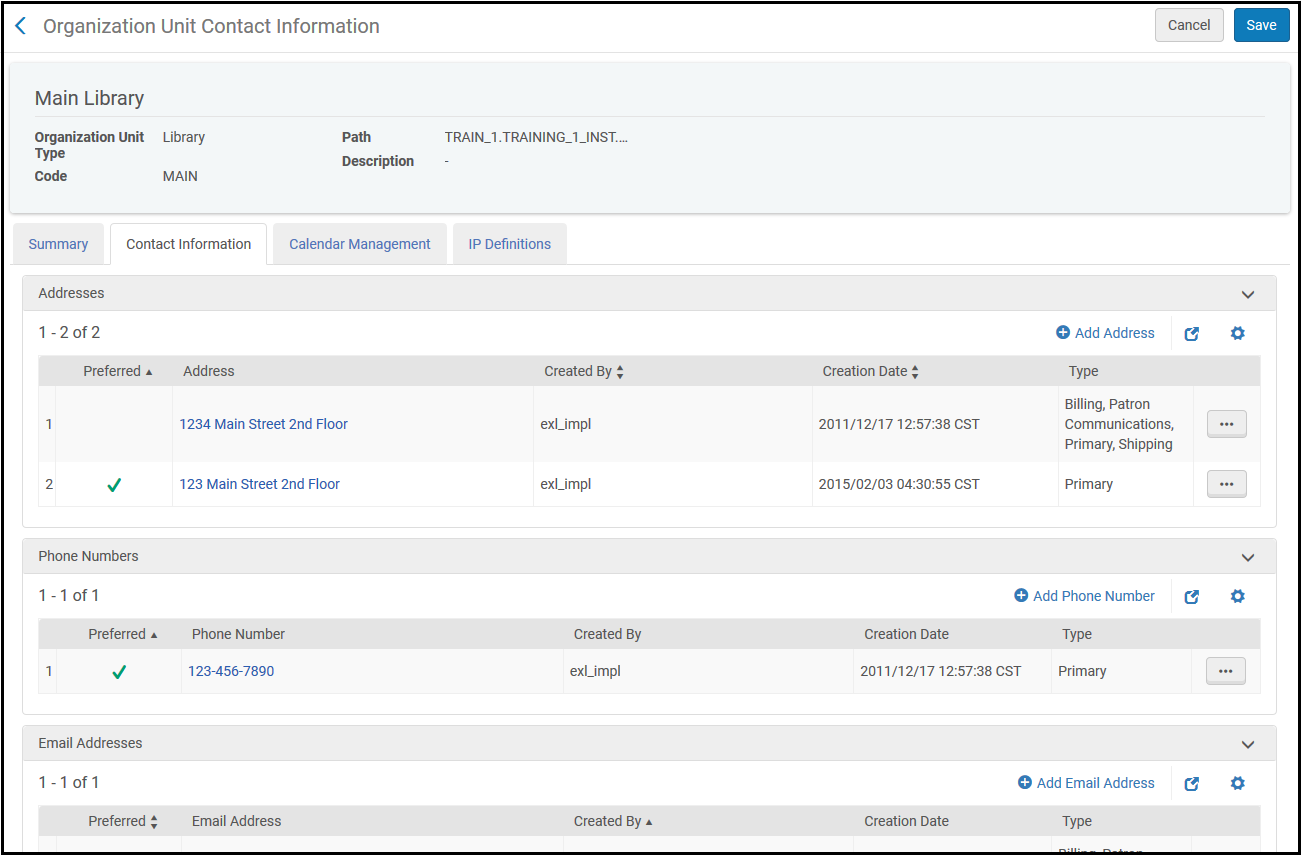
Se puede añadir, editar, duplicar o borrar las direcciones físicas, números de teléfono y direcciones de correo electrónico. The contact information for libraries and institutions is the same as it is for users (see Managing User Contact Information).
To add contact information for a library or institution:
- Select Add Address,Add Phone Number, or Add Email Address. Entonces aparece el correspondiente cuadro de diálogo Añadir.
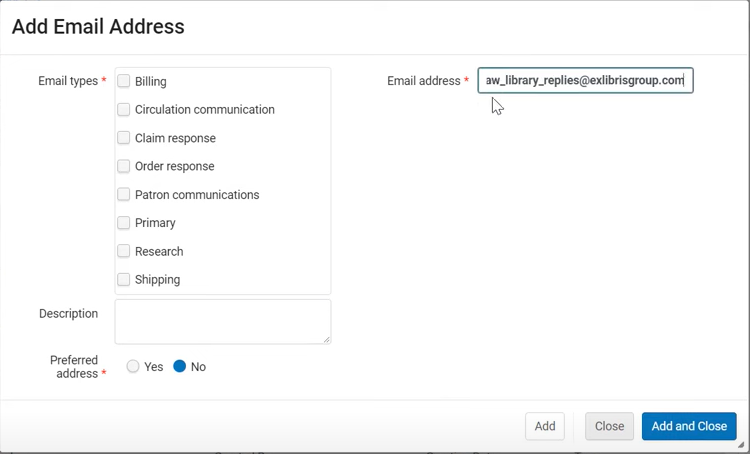
- Ingrese la información de contacto, según sea necesario. Los campos marcados como obligatorios deben rellenarse.
- Los campos de dirección y correo electrónico tienen únicamente fines informativos, salvo en los casos que se indican a continuación.
The Primary email address of the institution is used for Crossref authentication. Debe contener solo la dirección de correo electrónico, sin caracteres especiales como "<".
Address Type Description Envío Obligatorio para bibliotecas para compartir recursos habilitadas por ISO. Cuando se envía una solicitud ISO, esta incluye la dirección de envío como dirección a la que debería enviarse la solicitud. El prestador, cuando realiza un envío digitalmente, envía a esta dirección. El tipo de dirección de Envío también se usa al enviar una solicitud de préstamo de recursos compartidos a través de API BLDSS. Al enviar, Alma busca primero el tipo de dirección de Envío. Si no lo encuentra, se usa la dirección preferida. Respuesta al reclamo When a claim notification is sent to the vendor by email, if the organization unit (owning library) has a Claim Response email type, this email is used in the claim notification email's From address. For detailed information, see Communicating with Vendors. Respuesta de orden When a purchase order is sent to the vendor by email, if the organization unit (owning library) has an Order Response email type, this email is used in the order notification email's From address. For detailed information, see Communicating with Vendors. Investigación If you are using Esploro (see Esploro Overview), the address / phone / email type Research is available. Seleccione este tipo para que Esploro use esta entrada para la comunicación relacionada con Esploro. Si no se define, se usa la dirección marcada como preferida. Comunicación de circulación Seleccionar esta opción para habilitar una dirección "De" que será visible para todos los usuarios y a la que estos podrán responder. Si se selecciona, proporcione la dirección de correo electrónico deseada y la descripción.
For a list of affected letters for the Reply to functionality, see Patron Notifications.
Esto también permite a los usuarios indicar direcciones de correo electrónico "De" por separado para las diferentes bibliotecas de la institución. If the circulation communication email is not indicated for the library, the circulation communication email indicated for the institution is taken.
The library address is used only if the letter is a library letter (such as hold shelf notification) or an aggregated letter (such as Borrowing Activity Letter) that is split into library letters because of the separate_patron_notifications_by_library parameter being set to ‘true'. En cualquier otro caso, se usa la dirección de la institución (si existe). See also Configuring Fulfillment Jobs.
If this option is not selected, the 'From' address is based on the address "From" label configured for the specific letter.
Watch the Add a 'Reply' to Email Address for Library Specific Letters video (1:45 minutes).
- Los campos de dirección y correo electrónico tienen únicamente fines informativos, salvo en los casos que se indican a continuación.
- Select Save.
To edit information, select Edit in the row actions list and follow the procedure for adding information.
To delete information, select Edit in the row actions list and select Confirm in the confirmation dialog box.
Téngase en cuenta que editar o borrar información no tiene ningún efecto en las configuraciones de Alma que ya incluyen esa información.
Configuring Institution/Library Open Hours
- Administrador general del sistema
- Administrador de servicios al usuario (solo biblioteca)
Además, Ex Libris puede habilitar a las siguientes funciones que configuran la información de calendario para una biblioteca (póngase en contacto con la asistencia técnica de Ex Libris para habilitar esto).
- Gerente del mostrador de circulación
- Operador del mostrador de circulación
- Operador del mostrador de circulación limitado
- Operador de solicitudes
Se puede configurar las horas de apertura y cierre para una institución o biblioteca en la página Gestión de calendario:
- As a General System Administrator (institution):Configuration Menu > General > Libraries > Add a Library or Edit Library Information; select the Calendar Management tab.
- As a General System Administrator (library):Configuration Menu > General > Libraries > Add a Library or Edit Library Information; select the Libraries tab, select Edit in the row actions list and select the Calendar Management tab.
- As any of the roles listed above (library):Configuration Menu >(ensure that the library is selected in the Configuring drop-down list)> Fulfillment > Library Management > Opening Hours.
For some roles enabled by Ex Libris to configure calendar information, this operation can be found under Fulfillment > Advanced Tools > Opening Hours, and not via the Configuration Menu.
Note that the below areas in Alma (among others) may be influenced by the open hours (depending on the policies configured):
- Fechas de vencimiento
- Cálculos de multas
- Sanción al vencimiento
- Plazos de reserva
- Perfiles de préstamo perdido y vencido
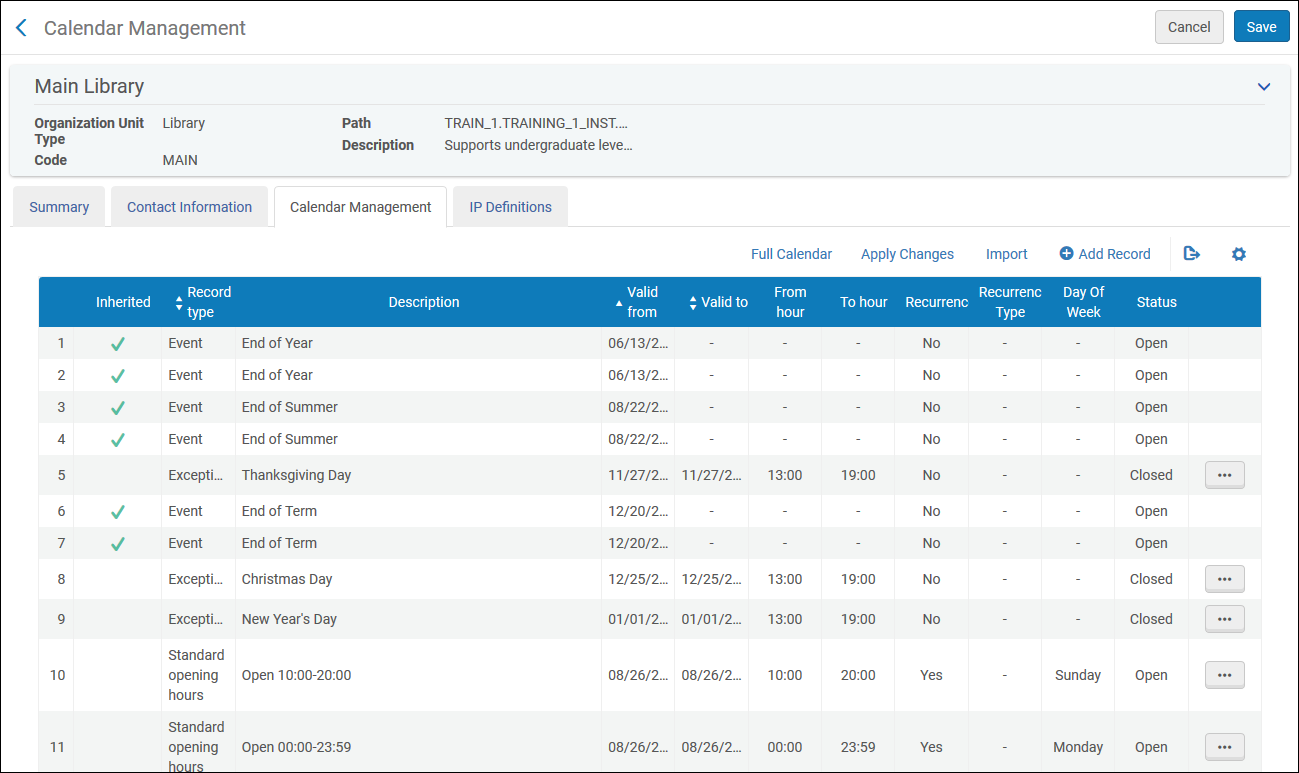
Las bibliotecas heredan eventos y excepciones de la institución. Las bibliotecas también heredan los horarios de apertura de las instituciones. Tenga en cuenta que Alma toma las horas de la biblioteca y de la institución y aplica la hora de apertura más temprana y la hora de cierre más tardía.
When you make changes on this page, the changes are applied when the Apply Calendar Changes job runs; see Viewing Running Jobs and Viewing Completed Jobs.
- Alma supports defining opening hours by date range, but does not allow scheduling future opening hours ahead of time, i.e., the changes take place from the moment the update is made. To make further changes in future, you will need to update Alma at the time when the adjustments are needed.
- El horario de apertura y cierre afecta a las fechas de vencimiento de préstamos. Las fechas de vencimiento no tienen que coincidir con el horario real en que la biblioteca está abierta o cerrada físicamente. Por ejemplo, se puede configurar el horario de cierre de la biblioteca (en lo que respecta a préstamos) en Alma para las 6:00 PM incluso si la biblioteca cierra físicamente más tarde.
- After changing calendar information, loan due back dates might change; see the Loans – Due Date Correction after Calendar Change job in Viewing Scheduled Jobs.
- If you configured overdue fine policies that take open days into account (Unit of measurement is either Open Days,Exact Open Days, or Open Hours), changing a library's open/closed hours may affect fines that accrue for overdue items.
- El último día que aparece en el Calendario completo siempre aparece en blanco y no muestra las horas durante las cuales está abierta la biblioteca.
To add calendar hours to a library or institution:
- On the Calendar Management page, select Add Record. Entonces aparece el cuadro de diálogo de Añadir registro. Todos los campos son obligatorios, a menos que se indique otra cosa.
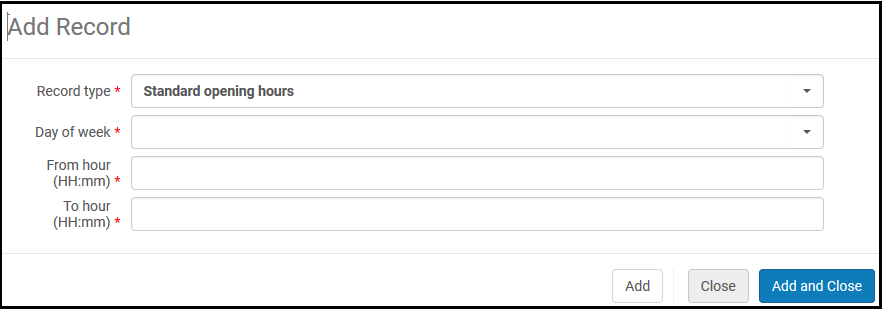
- In Record type, select the type of operating hours to add:
- Event – Special dates, such as the end of the year, the end of the semester, or an exhibition. Los eventos de la institución aparecen en los calendarios de biblioteca, pero no indican si la biblioteca está abierta o cerrada.
- Exception – Exceptions for open/closed dates and times, such as holidays.
- Standard Operating Hours – Regular dates and times during which the institution or library is open, based on a day of the week.
Solo se puede definir un horario de apertura normal para un periodo de tiempo dado. Para definir un horario de apertura alternativo para días específicos, como los festivos, se han de definir los registros de excepción. Por ejemplo, si la biblioteca normalmente abre los lunes en horario de 9:00 a 19:00, pero el primer lunes de julio hay un festivo nacional y la biblioteca solo abre de 12:00 a 17:00, definir dos registros de Excepción para ese día, uno para 9:00-12:00 y el otro para 17:00-19:00.
- Introducir los siguientes detalles:
- Evento:
- Si el evento se repite, y si es el caso, a) el tipo de recurrencia, semanal o anual; para la semanal, el día de la semana, y b) la fecha hasta la cual es válido el registro.
- El día de la semana – solo para eventos recurrentes (requerido)
- Una descripción
- La fecha y la hora (la hora es opcional)
- Excepción:
- Si la excepción es que la biblioteca está abierta o cerrada fuera del horario normal.
- El día de la semana (opcional)
- Una descripción (opcional)
- El periodo en el que será válida la excepción
- El horario al cual se aplica la excepción
- El horario de funcionamiento normal (indicando que la biblioteca está abierta):
- El día de la semana
- El horario
To extend the Valid To date for standard opening hours, edit the record and select Save without making any changes. The Valid To date is automatically set to the current date + 3 years. The Valid From date is automatically set to the current date.
- Evento:
- Select Add and Close.
- Select Apply Changes to apply your changes. Alma runs the Apply Calendar Changes job.
- Select Save to save all records.
En esta página, puede hacer lo siguiente con los registros:
- To edit a record, select Edit in the row actions list and follow the procedure for adding a record.
- To import calendars from an Excel spreadsheet, select Import. Select the file and Upload and Import Rows. You can also efficiently update library opening hours by exporting the Opening Hours calendar to an Excel sheet, making the changes, and then re-importing the file. Note that in this case, the export includes all lines, including the lines with information inherited from the institution, but when importing the Excel back, the inherited lines are ignored. De este modo, no se modifica la información heredada de la institución. Además, tenga en cuenta que al importar desde Excel se sobrescriben por completo las fechas existentes en el calendario.
For more information, see the Update Library Opening Hours via Excel Import video (3:20 mins).
Standard opening hours are automatically appliedfrom the current date (‘from' date) to the current date + 3 years (‘to' date), with the option to set exceptions solely for future dates; past dates cannot be updated, but future dates can be set.
- To view hours and events in calendar form, select Full Calendar. Entonces aparece un calendario. Seleccionar el calendario de miniatura a la izquierda para ver un día, semana o mes específico. Los eventos y horarios de cierre aparecen destacados en el calendario. Select Back to close the calendar.
- To delete a record, select Edit in the row actions list and select Confirm in the confirmation dialog box.
Configuring Campuses
- Administrador general del sistema
Las bibliotecas pueden asociarse con varios campus, lo que le permite gestionar ciertos servicios según el campus, en vez de por biblioteca individual.
Se define los rangos de IP para los campus de la misma forma que para las bibliotecas. This is used to identify the user's current location when considering resource availability and when configuring holdings by location in a Locations Ordering Profile (see Configuring the Order of Primo Search Results).
You can translate Campus names to the languages defined in your system. The translated campus names subsequently appear in Alma and in Primo VE, for example in the pickup locations list, in Get It Request Form, and more, if you choose to display Primo VE in the interface language to which campus names were translated.
You configure campuses on the Campus List page (Configuration Menu > General > Libraries > Define Campuses).
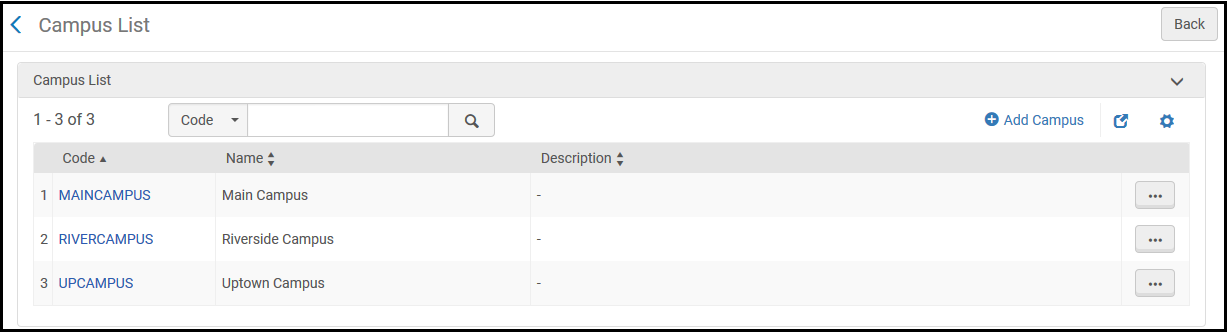
Adding a Campus
Después de añadir un campus, se puede editar el campus para asociarlo con bibliotecas o con un rango de IP. See Editing a Campus.
To add a new campus:
- On the Campus List page (Configuration Menu > General > Libraries > Define Campuses), select Add Campus. Entonces aparece el cuadro de diálogo Añadir campus.
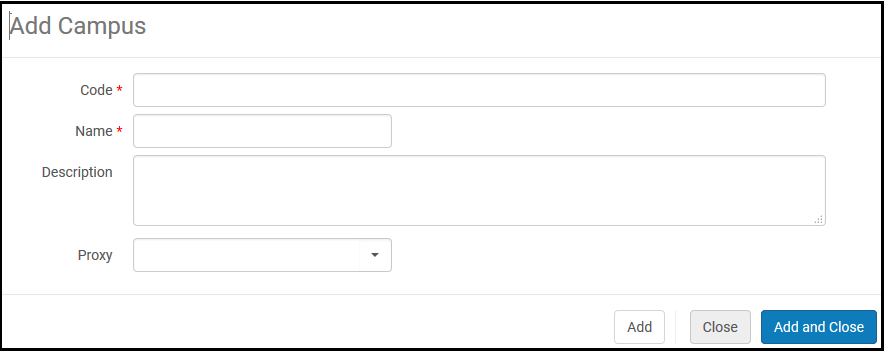
- In the Code field, enter a campus code.
- In the Name field, enter a campus name.
Un campus no puede tener caracteres especiales en el nombre, como por ejemplo comillas ('). Use caracteres alfanuméricos, guiones y guiones bajos.
- Optionally, in the Description field, enter a campus description.
- In the Proxy field, select a proxy (see Resolver Proxies).
- Select Add and Close to add the new campus.
Editing a Campus
Se pueden editar los detalles, las bibliotecas asociadas y el rango de IP de un campus.
To edit a campus:
- On the Campus List page (Configuration Menu > General > Libraries > Define Campuses), select Edit in the row actions list for the campus record. Entonces aparece la página Campus.
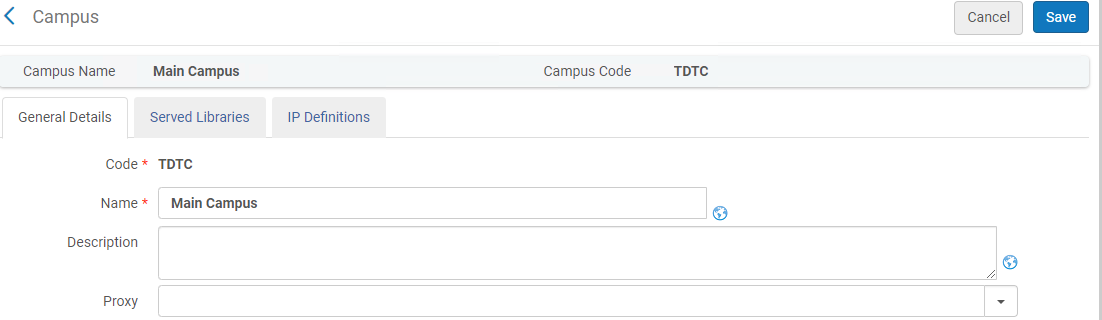
- In the General Details tab, edit the campus information, as required. For details on these fields, see Adding a Campus. To translate campus name and description to other languages, select the
 icon.
- In the Served Libraries tab (the Served Libraries page), attach or remove libraries to the campus.
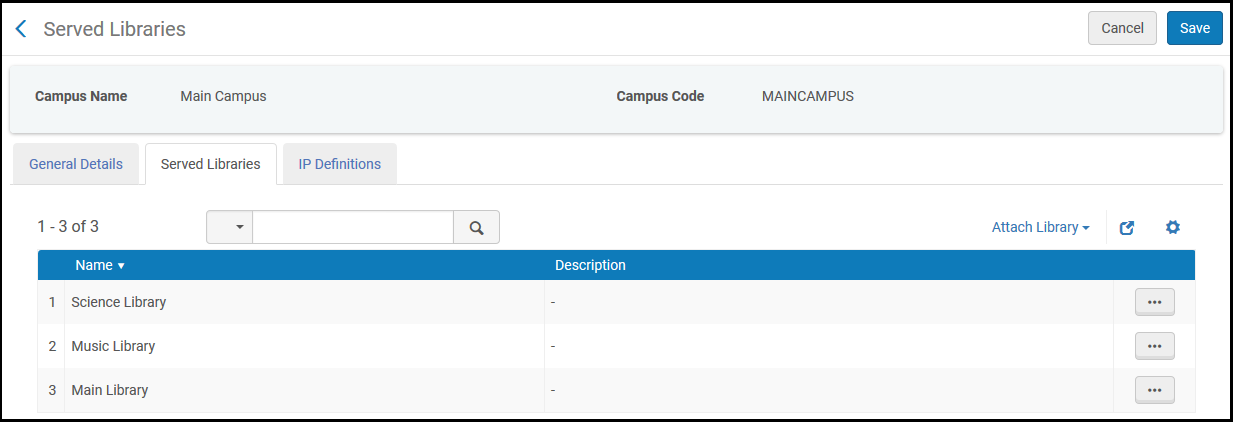
- To attach a library to the campus, select Attach Library, select a library, and select Attach. You can also attach a library to a campus when editing the library; see Editing a Library.
Una biblioteca puede estar asociada con un solo campus.
- To remove a library, select Remove in the row actions list and select Confirm in the confirmation dialog box.
- To attach a library to the campus, select Attach Library, select a library, and select Attach. You can also attach a library to a campus when editing the library; see Editing a Library.
- In the IP Definitions tab, configure the IP ranges that identify workstations associated with the campus. The IP range of a campus must include all libraries associated with the campus; see Configuring IP Definitions for a Library.
You can configure groups with which campus resources are associated; see Configuring Distributed Access to Electronic Resources. You can restrict resources by library or campus on the Electronic Service Editor page; see Adding a Local Electronic Collection.
- Select Save.
