
Basic Resource Sharing Configurations
- This page covers basic resource-sharing configuration: configuring the steps of borrowing and lending workflows for various partners, rota-assignment rules, locate profiles that define how you search a partner's catalog, queries that are sent to patrons, and the list borrowing-task statuses that are used in your institution.
- For an overview of the resource sharing basic terminology and configuration concepts, see Resource Sharing Topology.
- For links to all the main fulfillment documentation pages see Fulfillment, and for links to the main resource sharing online help pages, see Resource Sharing.
Configurar los recursos básicos compartidos requiere los siguientes elementos básicos que se describen en esta página:
- Biblioteca de recurso compartido
- Socios
- Perfiles de localización
- Plantillas de ruta
- Reglas de asignación de ruta
Para tareas de configuración adicionales relacionadas con recursos compartidos, véase:
- Configuring a Resource Sharing Copyright Declaration
- Configuring Resource Sharing Copyright Statuses
Configuring Resource Sharing Libraries
- Toda la actividad de recursos compartidos para préstamos y préstamos entrantes se gestiona en el contexto de una biblioteca de recursos compartidos.
- La biblioteca de recursos compartidos está en el alcance de los roles de gestor de servicios al usuario u operador asignados a los operadores que trabajan en el mostrador de recursos compartidos.
- Los usuarios se afilian con una o más bibliotecas de recursos compartidos.
- Las solicitudes de préstamos y préstamos entrantes siempre son propiedad de una sola biblioteca de recursos compartidos.
- Using the facets, you can filter the resource sharing task lists by the owning resource sharing library.
La biblioteca de recursos compartidos refleja el lugar físico y el método por el cual las operaciones de recursos compartidos se manejan en la institución. Puede ser una biblioteca exclusiva de recursos compartidos que refleja un solo recurso que maneja los recursos compartidos para todas las bibliotecas de esa institución. También puede ser una biblioteca de recursos compartidos por campus si las operaciones de recursos compartidos se manejan de forma separada en cada campus. También puede ser que cada biblioteca en la institución maneje sus propias solicitudes de recursos compartidos y, por lo tanto, cada biblioteca también está configurada para ser una biblioteca de recursos compartidos.
La biblioteca de recursos compartidos se configura como una biblioteca normal, pero tiene atributos adicionales relacionados a los recursos compartidos. Esto significa que, al ser una biblioteca, necesita estar configurada con ubicaciones que estén enlazadas a unidades de servicios al usuario, mostradores de circulación y relaciones con otras bibliotecas. For more information on setting up the resource sharing library as a library in the Alma set up see Configuring Parameters of a Resource Sharing Library.
La unidad de servicios al usuario de la biblioteca debe tener reglas del tipo Préstamo de recursos compartidos y Préstamos entrantes de recursos compartidos. For more information see Configuring Fulfillment Units.
Configuring Resource Sharing Partners
Los socios de recursos compartidos reflejan las bibliotecas o demás entidades de recursos compartidos con quienes usted gestiona las solicitudes de recursos compartidos. Los socios pueden reflejar prestatarios remotos que piden prestado de su biblioteca o prestatarios de préstamos entrantes para su biblioteca. For more information on the different types of resource sharing partners and on their configuration details see Resource Sharing Partners.
Configuring Locate Profiles
Para configurar perfiles de localización, se debe tener el siguiente rol:
- Administrador de servicios al usuario
Un perfil de localización define cómo buscar el catálogo de un socio de recursos compartidos. After configuring a locate profile, you associate the profile to a partner. For more information, see Locating Items.
You configure locate profiles on the Locate Profiles List page (Configuration Menu > Fulfillment > Resource Sharing > Locate Profiles).
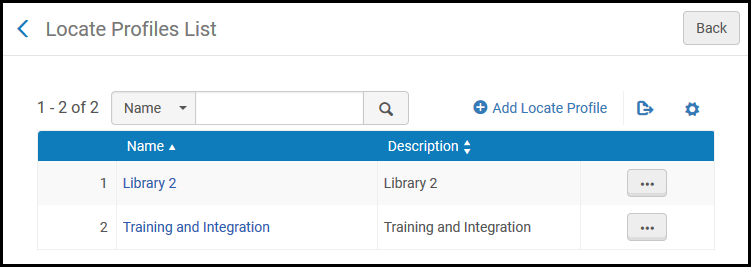
Los perfiles de localización solo pueden configurarse a nivel de institución. Select the required institution from the Configuring filter on the Fulfillment Configuration page.
Locate profiles that were distributed from a network are indicated by a check mark in the Shared column.
Se pueden efectuar las siguientes acciones en esta página:
- Add locate profiles (see Adding Locate Profiles)
- Edit locate profiles (select Edit from the row actions list; the fields appearing on the Locate Profile Parameters tab page depend on the type of locate profile selected)
- Duplicate locate profiles (select Duplicate from the row actions list and modify the relevant fields)
- Delete locate profiles (select Delete from the row actions list)
Adding Locate Profiles
Se puede añadir un perfil de localización a Alma.
-
On the Locate Profiles List page (Configuration Menu > Fulfillment > Resource Sharing > Locate Profiles), select Add Locate Profile. Aparece la página Detalles del perfil de localización.
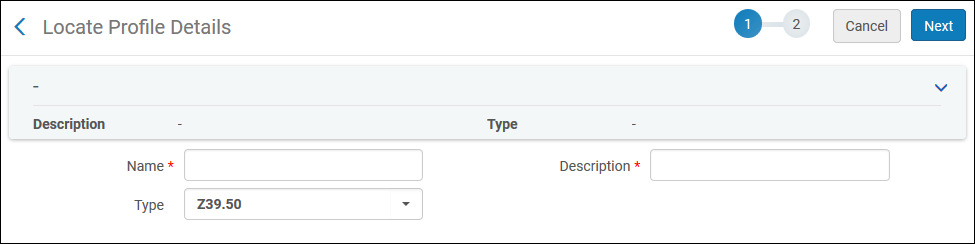
- Introducir un nombre y descripción para el perfil de localización en los campos relevantes.
- In the Type field, select the profile type. Seleccionar desde las siguientes opciones:
- Alma- The sharing institution also uses Alma.
- No Locate- The default partner is used and therefore no attempt is made to locate another partner.
- Z39.50- The Z39.50 communications protocol is used for searching remote catalogs. For details on the Z39.50 protocol, see https://developers.exlibrisgroup.com/alma/integrations/Z39.50
- BLDSS- The BLDSS API is used for searching the British Library catalogs. For more information, see British Library Document Supply Service (BLDSS).
- Fulfillment Network- The fulfillment network type is used for institutions that share the same fulfillment network. For more information, see Automated Fulfillment Network Requests (AFN).
-
Select Next. Aparece la segunda página del asistente. La página se diferencia en función del tipo de perfil, con los diferentes tipos de perfil descritos en los siguientes pasos.
If the No Locate profile type was selected, no additional parameters can be configured. Select Save to save the locate profile.
-
For an Alma profile type, configure the following fields:
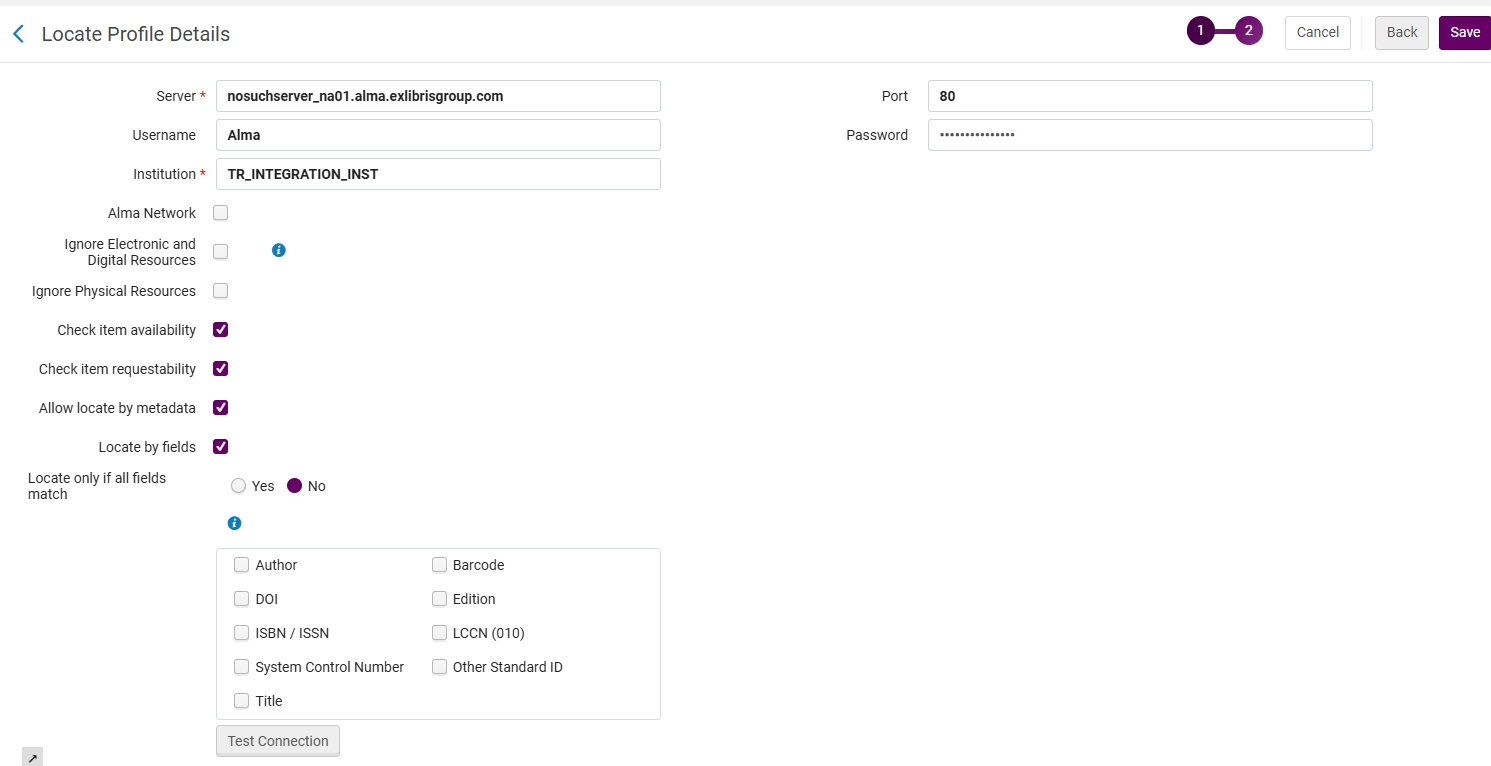
- In the Server field, enter the URL of the target Alma.
- In the Port field, enter the port number on which the external Alma system is located. También se puede dejar en blanco este campo.
- In the Username field, enter the username of the Z39.50 external interface in the target Alma system.
- In the Password field, enter the password of the Z39.50 external interface in the target Alma system. Los caracteres introducidos están encriptados.
-
In the Institution field, enter the institution in which the external Alma system is located.
The Institution field can be left blank (empty).
- For members of a Network Zone institution, select the Alma network check box to search against the Network Zone itself rather than each institution's local catalog. La selección de este campo también permite compartir este perfil de localización entre todos los miembros de la red. When checked, the Alma network code must be entered in the Institution field. When this check box is selected, the Check item availability and Check item requestability check boxes are deactivated.
- Select the Check item availability check box for the profile to check whether an item is available in the institution. An item is available if it's status is Item in Place.
-
Select the Check item requestability check box for the profile to check whether an item can be requested as part of a resource sharing request.
- You can select either the Alma network or Check item availability and Check item requestability check boxes, but not all three.
- Disponibilidad y solicitud se verifican solamente a nivel de institución.
- Select the Ignore Electronic and Digital Resources check box for the profile to check only for physical items. Cualquier socio que contenga solo ejemplares electrónicos y/o digitales es omitido en la ruta.
- Select the Ignore Physical Resources check box for the profile to check only for electronic and digital items. Selecting this field means that the locate process does not check physical resources and does not use the locate by,check item availability, or requestability fields.
- Select the Allow Locate by Metadata check box to successfully locate an item even when the request between partners that share a Network Zone was not placed from the shared Network Zone discovery system. In this case, the locate process will use the request's metadata to find a match in the partner's catalog.
Esta opción permite a los prestatarios que compartan una Zona de Red con los prestamistas crear solicitudes de recursos compartidos para registros que no se compartan en la Zona de Red. También permite que las solicitudes de reservas se conviertan en solicitudes de recursos compartidos, aunque el prestatario y el prestamista compartan una Zona de Red.
- Select the Locate by Fields check box to configure additional search fields when locating a resource for a borrowing request. La página se actualiza y muestra campos adicionales:
- Título
- Autor
- Error al recuperar datos del patrón de publicación.
Número de control del sistema
When placing a request based on a search result, the System Control Number is extracted from the 035 field, regardless of whether it has an OCLC prefix or not. Por lo tanto, en algunos casos puede haber múltiples coincidencias.
- Edición
- LCCN
- Seleccionar los campos por los cuales se quiere que se busquen los recursos en la institución remota. Alma uses these fields when the specified locate profile is used in a search by the resource sharing partner (that is, when selecting Locate Resource on the Resource Sharing Borrowing Requests page).
- Select Yes in the Locate only if all fields match field if you want the locate to be successful only when all selected fields match. If set to No, then:
- If the request has identifiers (such as ISBN, System Control Number, or LCCN) locate is successful if any of the selected identifier fields finds a match. Otros campos, como Título y Autor, no se utilizan para la coincidencia.
- If no identifier fields exist on the request, locate is only successful if all of the other selected fields match.
- Select Test Connection to check connectivity to the server. (Esto no comprueba los parámetros de autenticación.)
- For a Z39.50 profile type, configure the displayed fields, as follows:
- To add holdings to the search, select the Enrich with holdings check box. The holding field and subfield fields appear. Introducir los valores relevantes en los campos. En este campo+subcampo, se buscará el código de existencias del socio en el registro Bib que se recupera del recurso externo. For the holdings code, see Resource Sharing Partners.
- Select the Find resource field to search for a resource. Aparece la página de Configuración de recursos externos de búsqueda.
- Enter search criteria in the Find box to search for a resource, and select Go. Aparece la página de Configuración de recursos externos de búsqueda. Choose an entry and select Select to return to the Locate Profile Details page.
- In the Credentials field, enter any relevant credentials for the search. Note: The credentials format must be
user/password. - Select Test Connection to check connectivity to the server. (Esto no comprueba los parámetros de autenticación.)
- For a BLDSS profile type, configure the displayed fields, as follows:
- Select Succeed on possible match to force the locate process to succeed even if the British Library determines that there are a number of possible matches.
- Select Check availability to match only on British Library resources that are readily available. Se recomienda esta opción si se desea solicitar solamente un recurso BL solo si está disponible para suministro inmediato.
- The Locate By Fields option enables configuring what metadata will be used by the locate process. Este parámetro es opcional y puede dejarlo sin seleccionar. A continuación, el sistema utilizará sus valores predeterminados internos.
- For a Fulfillment Network profile type, configure the displayed fields, as follows:
- In the Server field, enter the URL of the target Alma.
- In the Port field, enter the port number on which the external Alma system is located. También se puede dejar en blanco este campo.
- In the Username field, enter the username of the external interface in the target Alma system.
- In the Password field, enter the password of the external interface in the target Alma system. Los caracteres introducidos están encriptados.
- In the Institution field, enter the institution in which the external Alma system is located.
- Select the Check item availability check box for the profile to check whether an item is available in the institution. An item is available if it's status is Item in Place.
- Select the Check item requestability check box for the profile to check whether an item can be requested as part of a resource sharing request.
- Select Test Connection to check connectivity to the server. (Esto no comprueba los parámetros de autenticación.)
Rota Templates
Las plantillas de ruta son un elemento opcional de la configuración. Puede usarlas para juntar grupos de registros de socios que desea asignar a sus solicitudes de prestatario como grupos de prestadores potenciales. Por ejemplo, puede juntar algunos de los registros de sus socios en una plantilla de ruta llamada "socios de suministro rápido. Puede asignar estos "socios de suministro rápido"' como socios de primera prioridad en sus solicitudes nuevas. For more information on rota templates see Configuring Rota Templates.
Configuring Rota Assignment Rules
Para configurar las reglas de asignación de ruta, debe tener el siguiente rol:
- Administrador de servicios al usuario
Las reglas de asignación de ruta son un elemento opcional de la configuración. You can use them to automatically assign rota templates to requests, based on different criteria. Por ejemplo, quizá tenga unas plantillas de ruta asignadas a solicitudes físicas y otras a solicitudes digitales.
You configure rota assignment rules on the Rota Assignment Rules List page (Configuration Menu > Fulfillment > Resource Sharing > Rota Assignment Rules). For more information about rules tables, see Rules Tables.
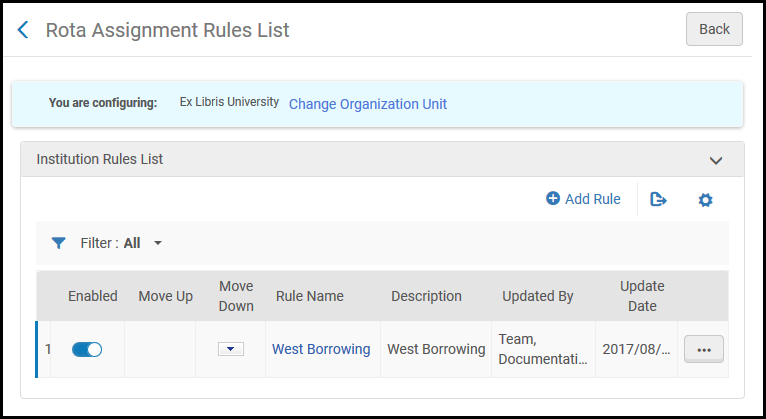
Las reglas de asignación de ruta se pueden configurar en la Zona de red, institución o nivel de biblioteca.
En una red colaborativa se pueden configurar plantillas de ruta en la Zona de red y distribuir los cambios a las instituciones miembro por un trabajo. For more information, see Configuring Fulfillment Information in the Network Zone.
To determine whether the network or local rota assignment rules are executed first, configure network_rota_assignment_rules_precedence(see Configuring Other Settings).
Se pueden efectuar las siguientes acciones en esta página:
- Configurar reglas de asignaciones de ruta para una institución
- Configurar reglas de asignaciones de ruta para una biblioteca
-
On the Rota Assignment Rules List page, select Add Rule. Aparece la página Reglas de asignación de ruta.
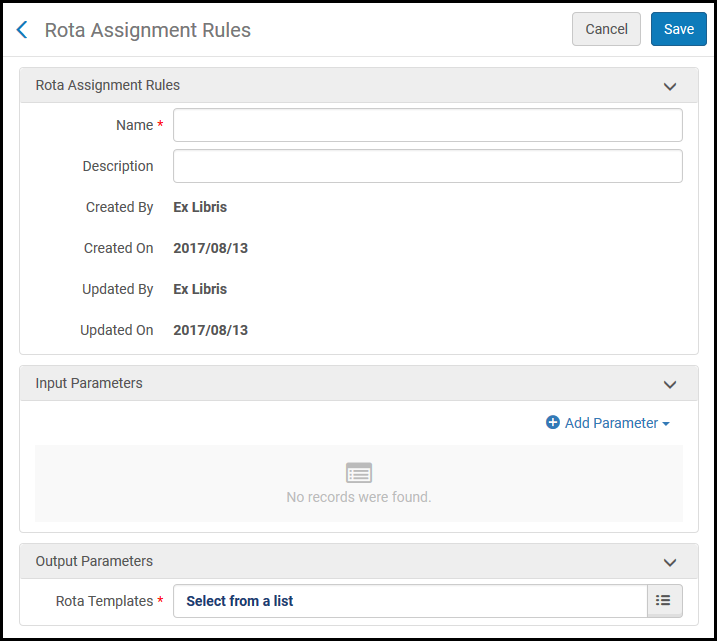
- In the Rota Assignment Rules section, enter a rule for the name in the Name field.
- Configure input parameters: these parameters specify the conditions (Name,Operator, and Value) for which the rota template specified by the output parameter is assigned to the request.
- Name: One of:
- Level of Service- Assigned when the request requires one of the selected levels of service
- Price- Assigned when the request's price is greater than, equal to, or less than the specified price
- Requested Format- Assigned when the request requires one of the specified request types
- Required in Number of Days- Assigned when the requested duration is greater than, equal to, or less than the specified number of days
- User Group- Assigned when the user making the request is in one of the specified user groups
- Operator- a comparison operator
- Value: These depend on the Name parameter:
- Level of Service- Select one (or more) levels of service (see Level of Service in Manually Adding a Borrowing Request).
- Price- Enter a price. Para valores inferiores a 1, introducir un 0 inicial. For example,0.44, not .44.
- Requested Format- Select one (or more) requested formats (see Requested Format in Manually Adding a Borrowing Request).
- Required in Number of Days- Enter a number of days.
- User Group- Select one (or more) predefined user groups.
- Name: One of:
- Configure output parameters in the relevant fields: Select the rota template that is applied when the conditions specified by the input parameters are met.
- Select Save. Las reglas configuradas aparecen en la página Lista de reglas de asignación de ruta.
Cuando se cumplen los parámetros de regla configurados para una solicitud de recursos compartidos, se invoca la plantilla de ruta especificada.
To attach a rota to a request according to the configured rules, select the Recalculate Rota Assignment link on the Resource Sharing Borrowing Requests page (see Manually Adding a Request).
Cuando se vuelven a calcular las asignaciones de ruta, si el primer socio en la lista está inactivo, el proceso de asignaciones continua buscando hasta encontrar un socio en estado activo.
-
On the Rota Assignment Rules List page, ensure that a library is selected in the Configuring filter at the top of the page. Rules configured on the library level appear in the Library Rules List section and rules configured on the institution level display in the Institution Rules List section.
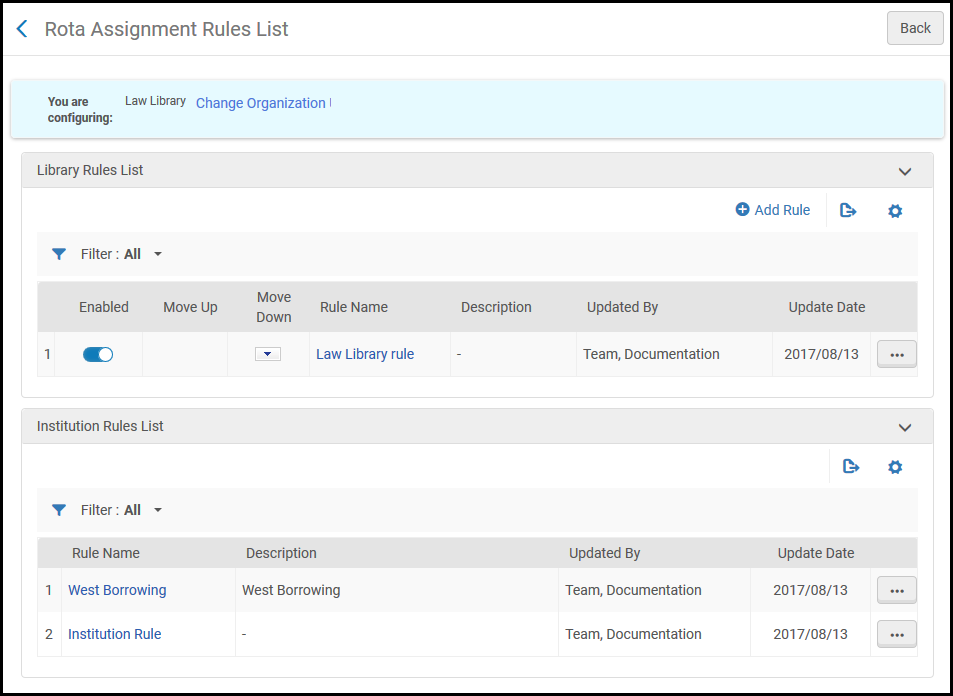
- To add a rule, select Add Rule and see the above steps for configuring a rule for an institution.
- Para copiar una regla de institución al nivel de biblioteca:
- In the Institution Rules List section, select Copy to Library. Aparece la página Reglas de asignación de ruta.
- Modify the rule parameters, as required, and select Save. La regla especificada aparece en la sección Lista de reglas de biblioteca.
If library rules are defined for a specific library, the institution's rules will not be applied for borrowing requests managed by this library (network rules, if exist, will be applied according to network_rota_assignment_rules_precedence, see Configuring Other Settings).
Configuring Workflow Profiles
Para configurar perfiles de flujo de trabajo, se debe tener uno de los siguientes roles:
- Administrador general del sistema
- Administrador de servicios al usuario
La siguiente información describe cómo configurar los perfiles de flujo de trabajo. For further information, including more details on the available steps per profile, see the Workflow Profiles presentation.
Los flujos de trabajo, definidos por los perfiles de flujo de trabajo, controlan las acciones que se pueden realizar en las listas de tareas de solicitud de pedir en préstamo o prestar para el socio definido. Se pueden configurar los pasos de flujos de trabajo de pedir en préstamo o prestar, disponibles al añadir un nuevo socio. (For information on configuring partners, refer to Resource Sharing Partners.) These steps correspond to additional statuses that can be assigned to requests, in addition to certain internally defined statuses that are always available.
Por ejemplo, un perfil de flujo de trabajo puede incluir que un usuario pueda cancelar una solicitud y/o renovar un ejemplar. Workflow profiles are available in the Borrowing workflow or Lending workflow drop-down list on the Resource Sharing Partner page.
You configure workflow profiles on the Workflow Profiles page (Configuration Menu > Fulfillment > Resource Sharing > Workflow Profiles).
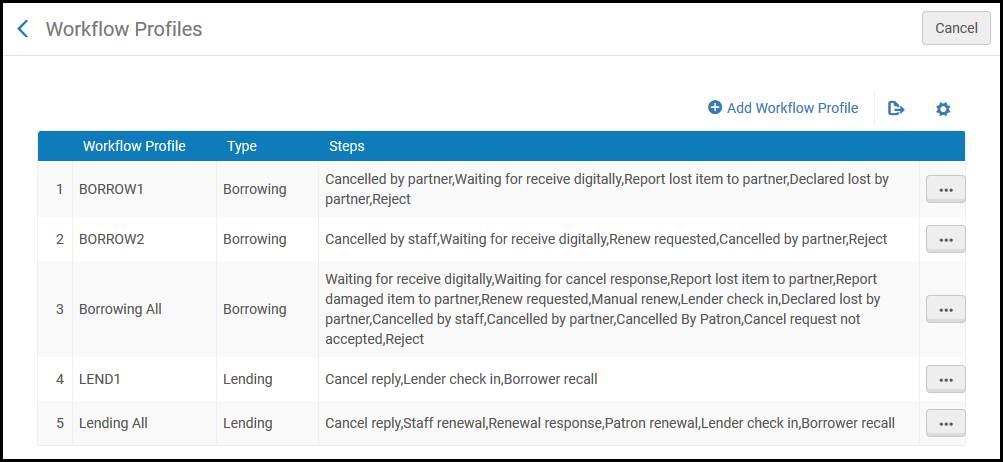
Solo se pueden configurar los perfiles de flujo de trabajo a nivel de institución. Select the required institution from the Configuring filter on the Fulfillment Configuration page.
Workflow profiles that were distributed from a network are indicated by a check mark in the Shared column.
Se pueden efectuar las siguientes acciones en esta página:
- Add workflow profiles (see Adding Workflow Profiles)
- Edit workflow profiles (select Edit from the row actions list)
- Delete workflow profiles (select Delete from the row actions list)
Si un flujo de trabajo está asociado con un socio de recursos compartidos, no se podrá borrar hasta que se borre primero el socio.
Adding Workflow Profiles
Los perfiles de flujo de trabajo que se añaden a nivel de institución se encuentran disponibles para todas las bibliotecas dentro de la institución.
-
On the Workflow Profiles page (Configuration Menu > Fulfillment > Resource Sharing > Workflow Profiles), select Add Workflow Profile. Aparece la casilla de diálogo Añadir perfil de flujo de trabajo.
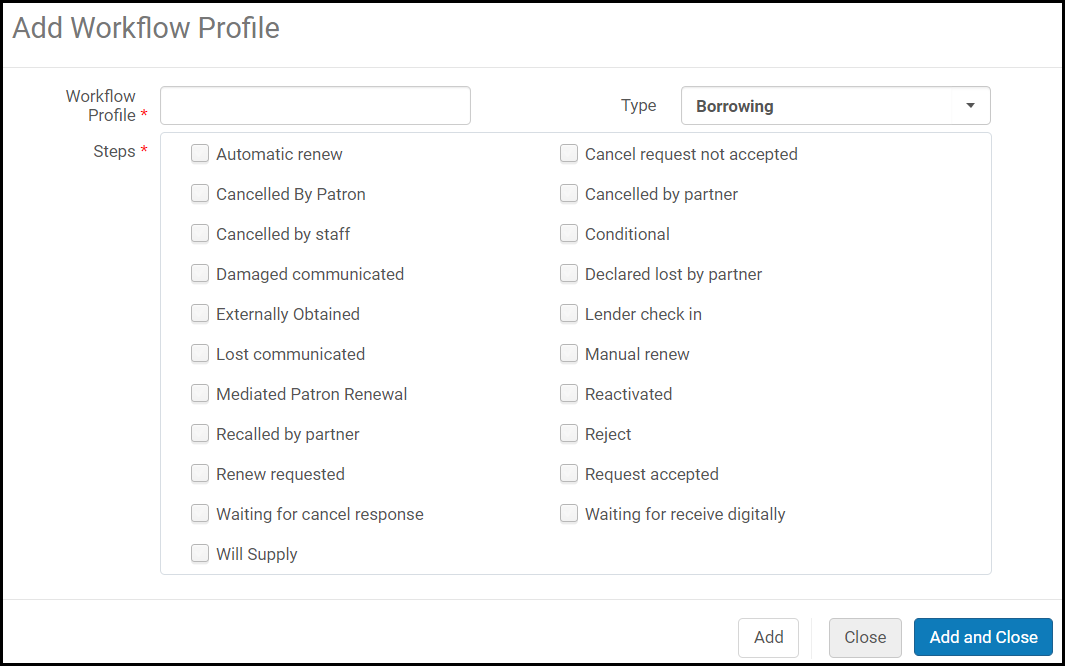
- Introducir un nombre para el perfil de flujo de trabajo.
-
From the Type drop-down list, select Borrowing or Lending.
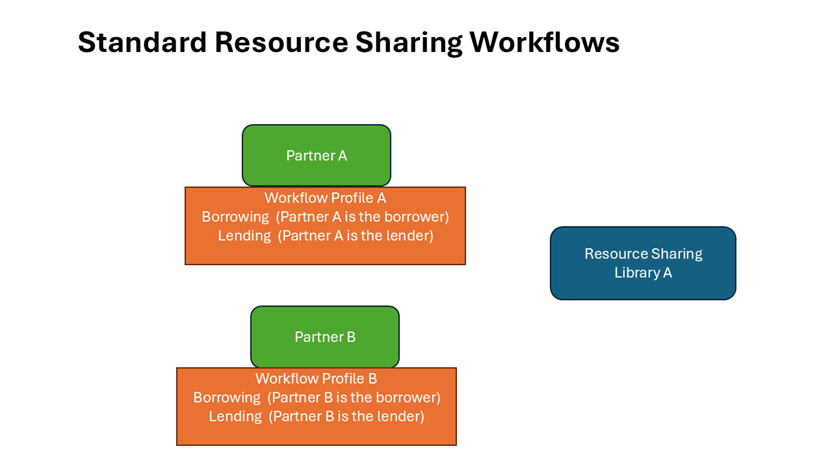
In general, borrowing and lending here refer to situations in which the partner (and not the resource sharing library) is the borrower or lender.
-
Seleccionar los pasos que desea agregar al perfil. Se puede seleccionar más de un paso. Estos pasos controlan las acciones que se pueden realizar en las solicitudes de pedir en préstamo o prestando de la lista de tareas para los socios asociados con el flujo de trabajo.
Los pasos disponibles dependen del tipo de perfil de flujo de trabajo seleccionado en el paso 3, y son descritos en la tabla siguiente tabla:
Pasos del Perfil de flujo de trabajo
Detalles dla reserva Paso Descripción Pedir en préstamo Renovación automática Permite renovar automáticamente las solicitudes recibidas por socios de petición en préstamo relacionados con el flujo de trabajo especificado.
A request whose profile contains this step is automatically renewed as per the requested due date, and the request's status updates to Renew Request Accepted.
En caso de rechazo, puede definir el texto de rechazo que se mostrará en la carta de Información completa de préstamo cuando se envíe al usuario. See Configuring Renew Reject Reasons for details.
La renovación automática es posible solo para socios ISO.
Cancelar recuperación Admite la cancelación automática de la devolución por parte del prestador. Se recomienda activar esta acción para los socios ISO de Alma o los socios de correo electrónico. Los socios ISO que no pertenecen a Alma no pueden completar automáticamente la cancelación de la devolución por parte del prestatario. Cancelar solicitud no aceptada Una solicitud de cancelación puede ser rechazada por el socio. Cancelado por el usuario Una solicitud puede ser cancelada por un usuario. Cancelado por el socio Una solicitud puede ser cancelada por el socio que está prestando y la notificación es recibida por el socio que ha pedido en préstamo. Cancelado por el personal Una solicitud puede ser cancelada por un miembro del personal. Condicional Support Conditional status and conditional replies. Daño comunicado El socio puede informar de un ejemplar dañado. When enabled, the Damaged row action is enabled for a borrowing request. See Managing Resource Sharing Borrowing Requests. Declarado como perdido por un socio Un ejemplar puede ser declarado perdido por el socio. Obtenido de forma externa Un ejemplar puede ser solicitado desde el servicio CCC GetItNow. Devolución del prestador
La solicitud entrante de préstamo que haya sido devuelta por el prestatario no se cerrará hasta que se haya registrado en la entidad prestamista.
Perdido comunicado Un socio puede declarar un ejemplar como perdido. Cuando está activo:
- Items noted as lost by the Loans – Overdue and Lost Item job do not generate fines based on a local Terms of Use. Instead, no fine is generated, the request's status changes to Lost Communicated, and a letter is sent to the lender.
- The Lost row action is enabled for a borrowing request. See Managing Resource Sharing Borrowing Requests.
Renovación manual Permite aprobar manualmente la renovación de la solicitud para socios prestatarios vinculados al perfil de flujo de trabajo especificado.
For details on system behavior when this option is selected, see the Renew and Renew Reply entries in Workflow Actions.
Renovación del usuario mediada Enable Mediated Patron Renewal to require operator review before renewals are transmitted to the lender. A mediated renewal will display the status of Mediated Patron Renewal while it is waiting for operator review. Once requests are sent to the lending institution, the request status is set to Renew Requested. Reactivado Support Reactivate Request action.
Para activar esta función, debe ponerse en contacto con el servicio de asistencia de Ex Libris.
Recuperado por el socio La solicitud puede ser recuperada por el socio.
The Recalled by Partner status places a recall on the item even if the Terms of Use prohibits recalls.
Rechazar Reject controls the display of the reject action in the task list of the borrowing request and in the rota tab. It is selected by default.
Al deseleccionar Rechazar se quita la acción de rechazar de la lista de tareas y la pestaña de ruta de la solicitud. Además, mientras está deseleccionada, la acción de rechazo en la lista desplegable de acciones en la parte superior de la lista de solicitud de préstamos no se ejecuta y mostrará un aviso.
Renovar solicitado Habilitar la solicitud de renovación de solicitudes de préstamo de recursos compartidos. Solicitud aceptada Un ejemplar solicitado puede ser aceptado por el socio. Esperando respuesta de cancelación Cuando se elige esta opción, si un lector cancela una solicitud, la solicitud no será cancelada de hecho hasta que el prestamista envíe una respuesta de cancelación. En espera de recibir digitalmente Esto determina cuando el lector puede cerrar una solicitud. Cuando se selecciona, se debe recibir una respuesta del prestatario antes de cerrar. Cuando no está seleccionada, el prestador puede cerrar la solicitud cuando se envía digitalmente. Se proporcionará Un socio puede cambiar el estado de la solicitud si no la ha enviado aún pero lo hará pronto. Se suministrará automáticamente When an internal 'ship digitally/physically' request is placed for a lending request (automatically OR manually), a 'Will Supply' message is automatically sent (and status changed accordingly) to reflect that. Prestar Prestatario solicita devolución La opción recuperar está oculta en las acciones de lista de solicitud de prestatario cuando está deshabilitado este paso. Cuando se habilita el paso, que es el predeterminado, se muestra la opción recuperar. Cancelar recuperación Admite la cancelación manual de la devolución por parte del prestatario. Cancelar respuesta No compatible actualmente Condicional Support Conditional status and conditional replies. Devolución del prestador Returned borrowing requests will not be considered completed until a check in message is received from the lender.
Esta opción no debiera ser seleccionada en flujo de trabajo de perfiles que son usados por socios agentes, pues causa que la solicitud espere la confirmación de un prestador.
Renovación del usuario Permite a un usuario solicitar la renovación de los ejemplares de recursos compartidos.
In addition to enabling this option, you must also ensure that the Is Renewable policy value in the relevant Terms of Use is set to Is Renewable(see Configuring Fulfillment Units, Policies, and Terms of Use).
Reactivado Support Reactivate Request action.
Para activar esta función, debe ponerse en contacto con el servicio de asistencia de Ex Libris.
Respuesta de renovación El prestatario que solicita renovación espera una respuesta del prestador antes de que se pueda llevar a cabo la renovación. When this step is enabled, the status of a request for which renewal was requested becomes Renew Requested. Renovación por parte del personal La renovación puede ser invocada por un miembro del personal. When this step is enabled, the Renew link appears on the Resource Sharing Borrowing Requests page. - Seleccionar uno de los siguientes:
- Add - Add the workflow profile but leave the dialog box open so that you can add additional workflow profiles.
- Add and Close - Add the workflow profile and close the dialog box.
Excluding Non-Workdays Days from Expiry Period
The Expiry Time (days) can be defined on the partner record (borrower side). A job runs (on the lender side) that deletes unhandled expired requests. To prevent lending requests from expiring during non-workdays, Alma now enables you to set days to exclude from the expiry period calculation (Configuration > Resource Sharing > Configuration > Resource Sharing Working Days).

