
General Configuration for Fulfillment
This page describes general configuration related to fulfillment including item policies, self check machine messages, printers, etc. For links to all the main fulfillment documentation pages see Fulfillment.
Configuring Item Policies
Para configurar políticas del ejemplar se debe tener uno de los siguientes roles:
- Administrador general del sistema
- Administrador de servicios al usuario
Las políticas de ejemplar crean reglas de excepción para las reglas de unidad de servicios al usuario, de forma que ejemplares específicos en una ubicación determinada circularán de forma diferente que los ejemplares típicos almacenados en esta ubicación. See Creating a Request.
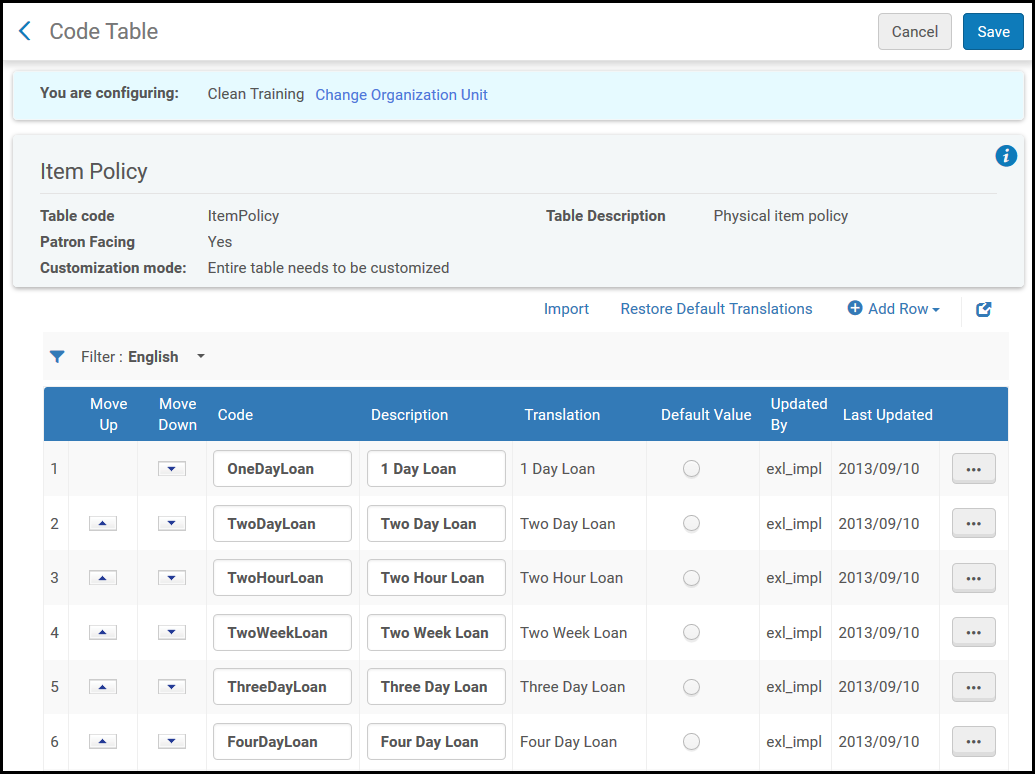
You configure item policies on the Item Policy Code Table page (Configuration Menu > Fulfillment > Physical Fulfillment > Item Policy). Se deben definir las políticas del ejemplar solo a nivel de institución; se desaconseja enérgicamente definir políticas de ejemplar a nivel de biblioteca.
Once you define item policies for a library at the library level, that library will no longer automatically inherit changes that are made to the item policies defined at the institution level.
Modifying an item policy may have implications for several functional areas in Alma. Verificar que se coordinan correctamente los cambios realizados.
En una red colaborativa, se pueden crear políticas en la Zona de red y después distribuirlas a las instituciones miembro. For more information, see Configuring Fulfillment Information in the Network Zone.
Ensure that you are within the context of the institution whose item policies you want to configure by selecting the required institution from the Configuring filter on the Fulfillment Configuration page.
Añadir un código y descripción del ejemplar. See Code Tables.
The Default value parameter is not supported in this table and should not be used. Similarly, the Move Up and Move Down buttons do not have an effect on the order in which the item policies are displayed in drop-down lists.
To configure an item policy so that all of the items associated with the policy are not available for resource sharing, see Configuring Item Policy Exceptions.
Configuring Self-Check Machine Messages
Para configurar los mensajes de autopréstamo se debe tener uno de los siguientes roles:
- Administrador general del sistema
- Administrador de servicios al usuario
Los mensajes para devolución, retirada y renovación de máquinas de autopréstamo se pueden modificar en la página de Mensajes de autopréstamo. It is accessed at (Configuration Menu > Fulfillment > Physical Fulfillment > Self Check Machines).
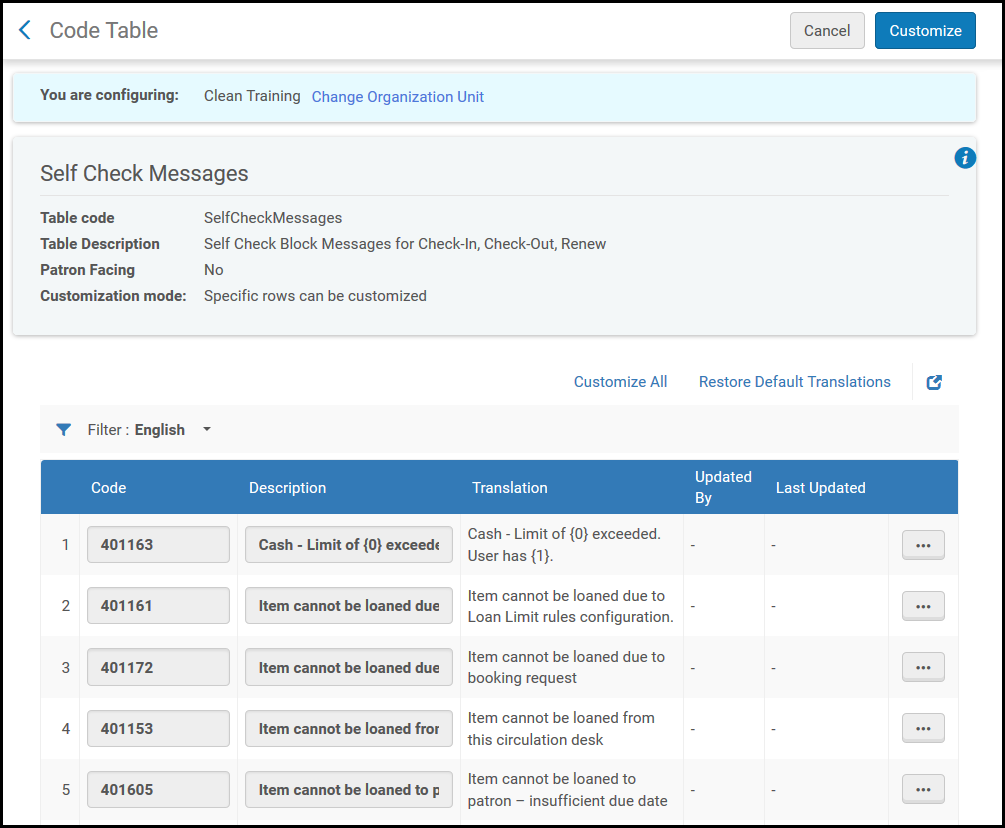
- On the Self-Check Messages page, select Customize from the row actions list of the message that you want to configure.
- Enter the new message in the Description field. Repetir estos dos pasos para todos los mensajes que se desea que se configuren.
- When you are done, select Customize to save your changes.
Configuring Scan In Alerts
Para configurar la alertas de digitalización, debe tener uno de los siguientes roles:
- Administrador general del sistema
- Administrador de servicios al usuario
You can configure how item alerts display in the Scan In Interface (Acquisitions > Post Receiving Processing > Scan In Items or Fulfillment > Resource Requests > Scan In Items). You can configure them to appear as pop-up messages, feedback messages, or to not appear at all.
| Tipo de alerta | Ejemplo |
|---|---|
| Emergente |
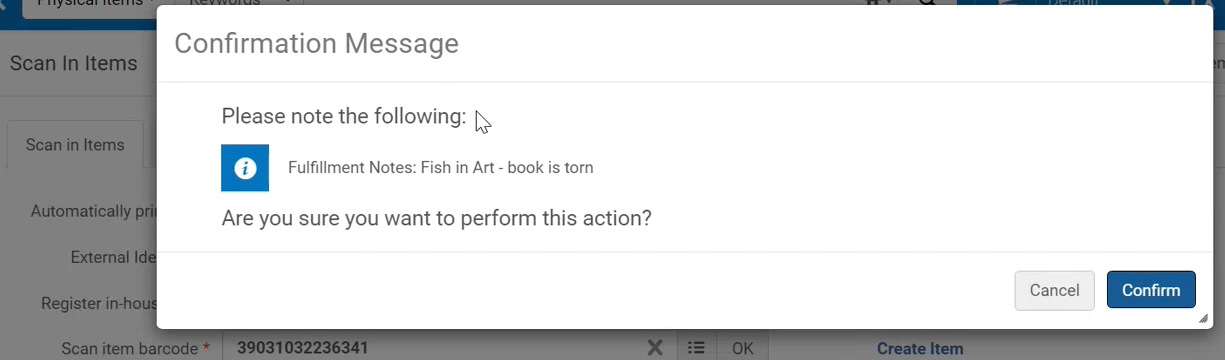
The message is shown as a pop-up and the operator must pause to make this selection before moving on to scan the next book. Cada mensaje emergente se puede configurar para que tenga el botón de "Confirmar" o no. For messages where it appears, the pop-up message appears before the scan-in is performed. Based on the contents of the message, the operator can decide not to continue with the scan-in (select Cancel in the message), or to continue with the scan (select Confirm). Para mensajes en los que no aparece "Confirmar", el mensaje emergente es solo informativo. No es posible configurar el contenido del mensaje emergente. |
| Comentarios |
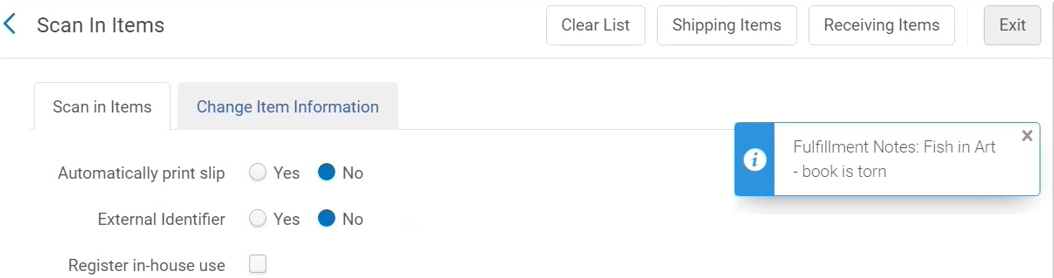
El mensaje de comentarios aparece después de haberse realizado la digitalización y solo tiene una función informativa. The operator does not have to pause to make any selection before moving on to scan the next item. It is not possible to configure the feedback message's content. |
| Ninguno | El usuario no recibe notificación de la nota - no se muestra ningún mensaje. |
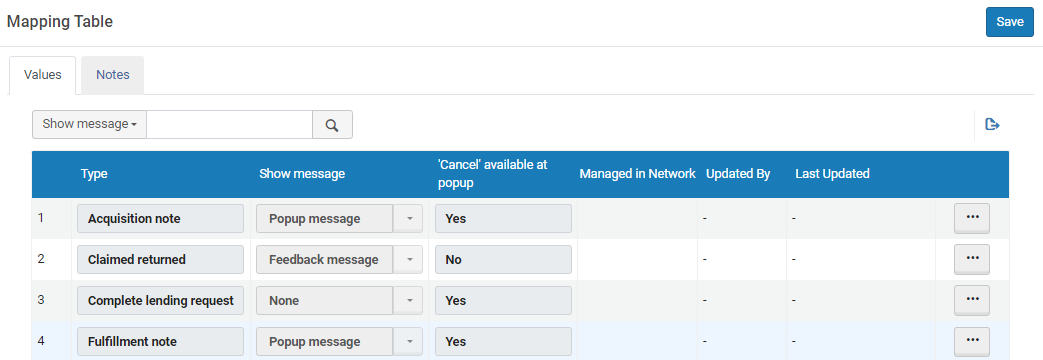
- On the Scan In Messages Configuration page (Configuration Menu > Fulfillment > Physical Fulfillment > Scan In Messages Configuration), select Customize from the row actions list of the message that you want to configure.
-
Seleccione la información según lo siguiente:
Columna Descripción Detalles dla reserva La lista de tipos de nota es una lista integrada.
Los tipos de nota son los siguientes:
- Acquisition note - The message is: Item has not been received by Acquisition Department.
- Claimed returned - The item was on loan and claimed returned.
- Solicitud de préstamo completa - El ejemplar participa en un flujo de trabajo de recursos compartidos, la digitalización completa la solicitud de préstamo.
- Fulfillment note - A fulfillment note exists on the item.
- Hold shelf processing - A request to put the item on the local hold shelf exists, but no message has yet been sent to the patron. This message appears if the circulation desk has been configured with the Has hold shelf processing option selected, and the Place directly on hold shelf option has been selected in the Scan In Items page.
- Internal note 1, 2, 3 - An internal note (general notes regarding the item visible only to library staff in Alma) exists on the item.
- Item has requests - This item was requested.
- Lost - The book was on loan and registered as lost in Alma.
- Magnetic material - The value of the Is magnetic field in the scanned-in item's record is Yes.
- Missing - The book was registered as missing in Alma.
- Se devolvió el préstamo vencido: el ejemplar se devolvió tarde y puede acarrear multas.
- Personal delivery - The scanned-in item is requested for personal delivery (such as home or office delivery).
- Colocar en el estante de reservas: se necesita colocar el ejemplar en el estante de reservas para que un usuario lo recoja.
- Nota pública: existe una nota pública (nota general sobre el ejemplar que es visible a los usuarios tanto en Primo como en Alma) sobre el ejemplar.
- Remote storage location - The item needs to be returned to its remote storage location.
- Nota de solicitud: este ejemplar se solicitó y el solicitante introdujo una nota en la solicitud.
- Ubicación temporal: el ejemplar no está actualmente en su ubicación permanente y necesita almacenarse en su ubicación temporal.
- Tránsito: es necesario que el ejemplar se envíe a un mostrador/una biblioteca diferente.
- Orden de trabajo: es necesario que el ejemplar vaya a una orden de trabajo.
Mostrar mensaje Seleccione si y cómo mostrar la nota.
- Si se deben mostrar varios mensajes emergentes del mismo tipo "Cancelar disponible en mensaje emergente", el sistema fusiona varios mensajes en una única ventana emergente.
- If a pop-up message and a feedback message of the same “Cancel available at popup” type are defined for the same item, both will be displayed as a pop-up message, in order for the feedback message not to get obscured by the pop-up and be missed by the operator. For example, if two messages are triggered for the same item, an Acquisition note and a Fulfillment note, but one is set to Popup message and the other is set to Feedback message, both messages will appear in a pop-up message, instead of a pop-up message and a feedback message.
'Cancelar' disponible en el elemento emergente Defines the phase during which a pop-up action is performed during the scan-in process. For Feedback Message or None, this is not applicable
- Yes- for actions that are done before the scan-in operation is performed and support cancelling the scan-in action..
- No- Messages that appear only after the scan-in operation is completed and do not offer a Cancel option.
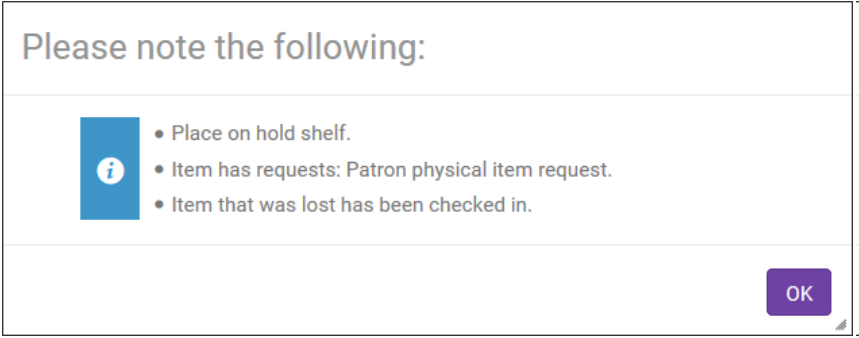
Messages where the Cancel available at popup=yes are displayed in a single pop-up window (for the same item) and all messages where Cancel available at popup=no are displayed in a separate window. Thus, the operator can potentially receive two sets of messages for a single item. Sin embargo, si se canceló un mensaje en el primer conjunto, no aparecerán más mensajes.
- Select Save to save your changes.
Configuring Printers
Para configurar impresoras, se debe tener uno de los siguientes roles:
- Administrador general del sistema
- Administrador de servicios al usuario
Alma está alojado en el entorno SaaS. Debido a consideraciones de seguridad y limitaciones técnicas, los entornos SaaS no permiten conexiones directas de impresoras de red o locales. En su lugar, la impresión en Alma funciona usando el correo electrónico o una cola de impresión. Printout queue is the preferred option though email printing is still supported (see Printouts Queue). Cada biblioteca/institución debe definir las direcciones de correo electrónico de sus impresoras locales en Alma, que enrutan los correos electrónicos que se originan en Alma orientados al personal (incluidos los comprobantes de solicitud y de tránsito) a la impresora apropiada. The printing queue method is the preferred method when printing to a physical printer.
For information on printing in Alma, watch Printing (3:22 min.).
You configure printers on the Printers page (Configuration Menu > Fulfillment > General > Printers).
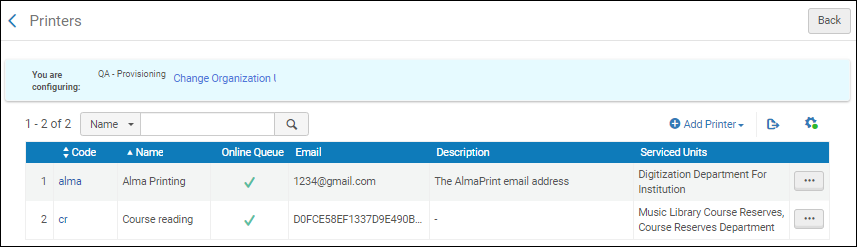
Ensure that you are within the context of the institution/library whose printers you want to configure by selecting the required institution/library from the Configuring filter on the Configuration page.
Para asociar una impresora con un mostrador de circulación, se debe configurar la impresora a nivel de biblioteca. Ensure that you have selected a library in the Configuring filter on the Configuration page. For general information on circulation desks see Managing Patron Services at a Circulation Desk.
Select the printer code or name headings to sort the list alphabetically –in ascending or descending order –by printer code or name.
Se pueden efectuar las siguientes acciones en esta página:
- Add a printer (see Adding a Printer)
- Edit a printer (see Editing Printer Information)
- Delete a printer (Select Delete from the row actions list)
Adding a Printer
Se puede añadir una impresora a la institución o a una biblioteca. Si se añade una impresora a la institución, también estará disponible para todas las bibliotecas dentro de la institución.
Para asociar una impresora con un mostrador de circulación, se debe configurar la impresora a nivel de biblioteca. Ensure that you have selected a library in the Configuring filter on the Configuration page.
Si se introduce una dirección de correo electrónico para una impresora, verificar que esté configurada en la tabla de mapeo Lista de correos electrónicos incluidos. For instructions, see Configuring Allowed Emails.
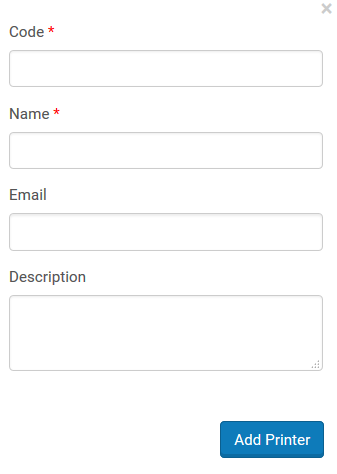
- On the Printers page (Configuration Menu > Fulfillment > General > Printers), select Add Printer.
-
In the Add Printer dialog box, enter a code and a name (both required). If you are not using the printouts queue or quick printing (see Printouts Queue), enter an email address for the printer. Opcionalmente, añadir también una descripción.
-
Select Add and Close to close the dialog box. La impresora definida se añade a la lista de impresoras en la página Impresoras.
Después de definir una impresora, se puede especificar a qué mostradores de circulación y unidades de servicio servirá la impresora. For details, see Editing Printer Information.
Editing Printer Information
Se pueden editar los detalles de cualquier impresora. Los detalles incluyen:
- Información general de la impresora
- Mostradores de circulación y unidades de servicio a los que sirve la impresora
- On the Printers page (Configuration Menu > Fulfillment > General > Printers), in the Code column, select the printer code link, or select Edit from the row actions list for the specific printer record whose information you want to update. The Edit Printer page opens.
- Under Edit Printer, edit the general printer details as required. When you want print routed to a queue in addition to an email address, select the Printout Queue option. See Printouts Queue for more information. When the Printout Queue option is selected, an additional column appears (Online Queue) in the list of printers with a check mark to indicate that the Online Queue option is selected..
- In the Served Circulation Desks List section, select a circulation desk that is served by the printer, and select Attach Circulation Desk. El mostrador de circulación seleccionado se añade a la lista de mostradores de circulación a los que servirá la impresora.
-
This section displays only when you are configuring a library (that is, you have selected a library in the Configuring filter on the Configuration page.
-
Repetir el paso anterior para todos los mostradores de circulación servidos por la impresora.
To remove a circulation desk from the list of circulation desks that are served by the printer, select Remove to the right of the circulation desk.
- In the Served Service Units List section, select the service unit that is served by the printer, and select Attach Service Unit. La unidad de servicio se añade a la lista de unidades de servicio a las que sirve la impresora.
-
Repetir el paso anterior para todas las unidades de servicio a las que sirve la impresora.
To remove a service unit from the list of service units that are served by the printer, select Remove to the right of the service unit to be removed.
- Select Save to store your changes to the printer information.
Configuring Article and Book Form Mandatory Fields
Para configurar los campos obligatorios en las solicitudes de recursos compartidos en Alma para formularios de artículos y libros, se debe tener alguna de las siguientes funciones:
- Administrador general del sistema
- Administrador de servicios al usuario
Se puede designar campos específicos como obligatorios cuando se configuren las solicitudes de recursos compartidos de Alma. También se pueden agrupar varios campos para que sea obligatorio completar al menos uno de los campos al enviar las solicitudes de recursos compartidos.
Los campos pueden asignarse como obligatorios para solicitudes realizadas para un artículo y/o libro.
Los campos obligatorios configurados también aparecen como obligatorios en los formularios de cita de lista de lectura, y al catalogar registros breves.
You configure mandatory fields for Alma resource sharing request forms on the ArticleFormMandatoryFields Mapping Table and BookFormMandatoryFields Mapping Table pages (Configuration Menu > Fulfillment > General, select Article Form Mandatory Fields or Book Form Mandatory Fields):
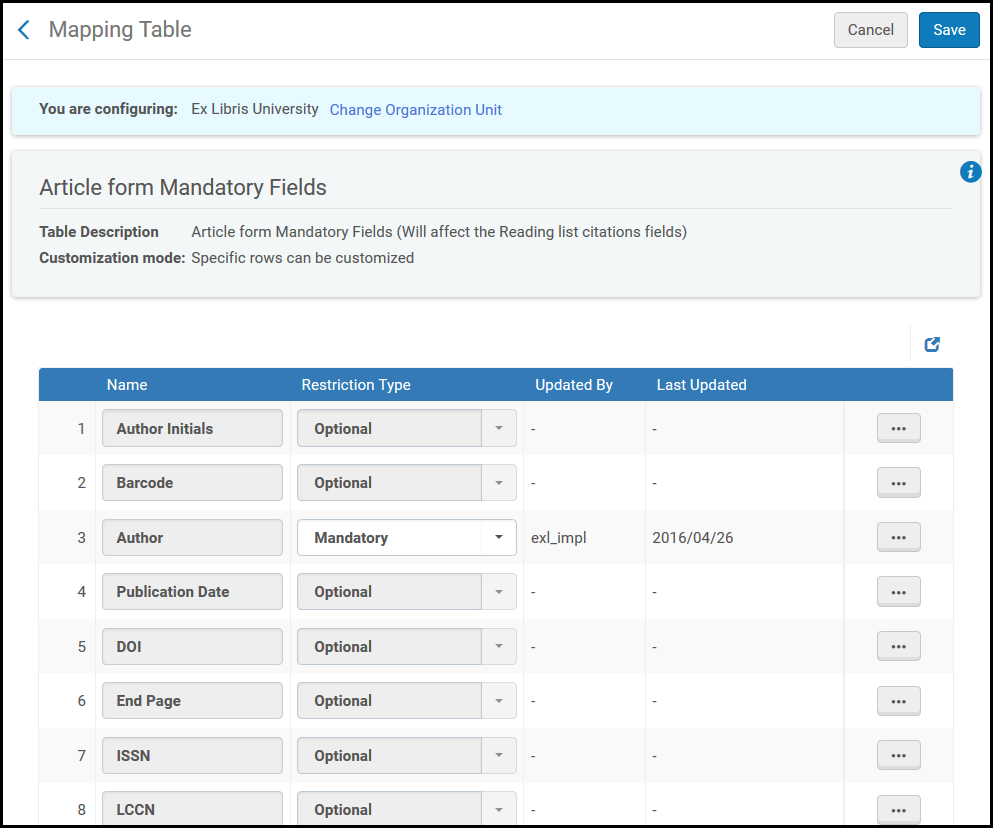
Ensure that you are within the context of the institution whose resource sharing library form mandatory fields you want to configure by selecting the required institution from the Configuring filter on the Configuration page.
Se pueden efectuar las siguientes acciones en esta página:
- Configure mandatory fields for resource sharing request forms (see To configure mandatory fields for resource sharing request forms:)
- Configure a group of fields in which at least one of the fields is mandatory when configuring a resource sharing request (see To configure a group in which one field is mandatory:)
- On the Mapping Table page for an article or a book (Configuration Menu > Fulfillment > General, select Article Form Mandatory Fields or Book Form Mandatory Fields), select Customize for the fields you want to be mandatory when configuring a resource sharing request.
-
In the Restriction Type column, select Mandatory.
To restore a field to its default value, select Restore.
- Select Save. Los campos indicados aparecen como obligatorios en la Solicitud de préstamo de recursos compartidos relevante o en la página Solicitud para tomar en préstamo recursos compartidos.
-
On the Mapping Table page for an article or a book (Configuration Menu > Fulfillment > General, select Article Form Mandatory Fields or Book Form Mandatory Fields), select Customize for the fields you want to arrange into a group.
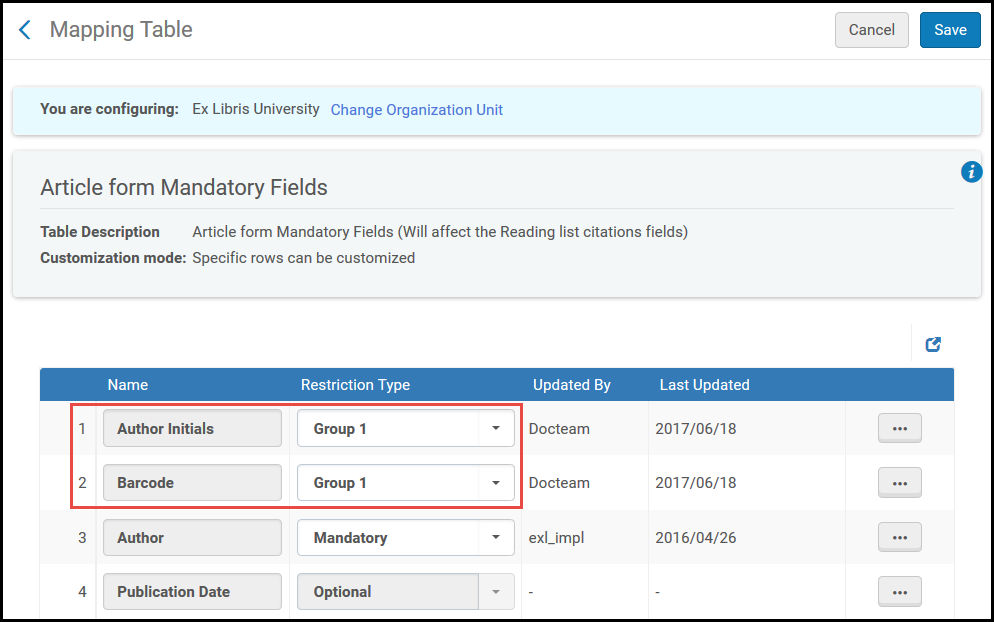
- In the Restriction Type column, select Group 1(or another group). Los campos indicados pertenecen al mismo grupo.To restore a field to its default value, select Restore.
- Select Save. Al menos uno de los campos indicados deben configurarse en la página correspondiente de Solicitud de préstamo de recursos compartidos o en la página correspondiente de Solicitud para tomar en préstamo recursos compartidos.
Los campos en grupos no se etiquetan con un asterisco rojo (como los campos obligatorios normales), pero si al menos uno de los campos en el grupo no tiene asignado un valor, aparece un mensaje de error.
