
Configurar impresoras
This page covers the configuration of printers in Alma. For links to all the main fulfillment documentation pages see Fulfillment.
Para configurar impresoras, se debe tener uno de los siguientes roles:
- Administrador general del sistema
- Administrador de servicios al usuario
Alma está alojado en el entorno SaaS. Debido a consideraciones de seguridad y limitaciones técnicas, los entornos SaaS no permiten conexiones directas de impresoras de red o locales. En su lugar, la impresión en Alma funciona usando el correo electrónico o una cola de impresión. Printout queue is the preferred option though email printing is still supported (see Printouts Queue). Cada biblioteca/institución debe definir las direcciones de correo electrónico de sus impresoras locales en Alma, que enrutan los correos electrónicos que se originan en Alma orientados al personal (incluidos los comprobantes de solicitud y de tránsito) a la impresora apropiada. The printing queue method is the preferred method when printing to a physical printer.
For information on printing in Alma, watch Printing (3:22 min.).
You configure printers on the Printers page (Configuration Menu > Fulfillment > General > Printers).
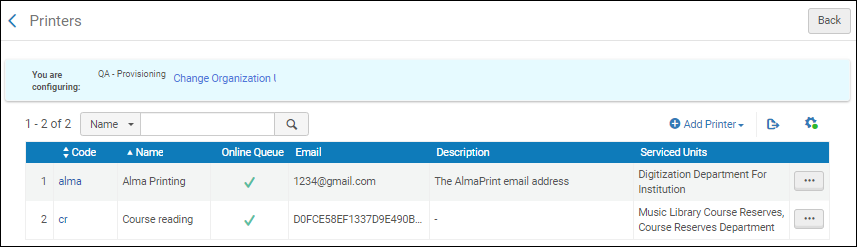
Ensure that you are within the context of the institution/library whose printers you want to configure by selecting the required institution/library from the Configuring filter on the Configuration page.
Para asociar una impresora con un mostrador de circulación, se debe configurar la impresora a nivel de biblioteca. Ensure that you have selected a library in the Configuring filter on the Configuration page.
Select the printer code or name headings to sort the list alphabetically –in ascending or descending order –by printer code or name.
Se pueden efectuar las siguientes acciones en esta página:
- Add a printer (see Adding a Printer)
- Edit a printer (see Editing Printer Information)
- Delete a printer (Select Delete from the row actions list)
Añadir una impresora
Se puede añadir una impresora a la institución o a una biblioteca. Si se añade una impresora a la institución, también estará disponible para todas las bibliotecas dentro de la institución.
Para asociar una impresora con un mostrador de circulación, se debe configurar la impresora a nivel de biblioteca. Ensure that you have selected a library in the Configuring filter on the Configuration page.
- On the Printers page (Configuration Menu > Fulfillment > General > Printers), select Add Printer.
-
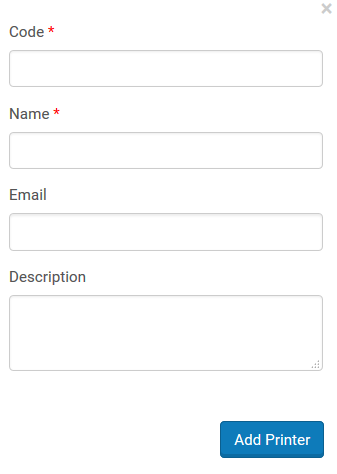
In the Add Printer dialog box, enter a code and a name (both required). If you are not using the printouts queue or quick printing (see Printouts Queue), enter an email address for the printer. Opcionalmente, añadir también una descripción.
-
Select Add and Close to close the dialog box. La impresora definida se añade a la lista de impresoras en la página Impresoras.
Después de definir una impresora, se puede especificar a qué mostradores de circulación y unidades de servicio servirá la impresora. For details, see Editing Printer Information.
Editar información de impresora
Se pueden editar los detalles de cualquier impresora. Los detalles incluyen:
- Información general de la impresora
- Mostradores de circulación y unidades de servicio a los que sirve la impresora
- On the Printers page (Configuration Menu > Fulfillment > General > Printers), in the Code column, select the printer code link, or select Edit from the row actions list for the specific printer record whose information you want to update. The Edit Printer page opens.
- Under Edit Printer, edit the general printer details as required. When you want print routed to a queue in addition to an email address, select the Printout Queue option. See Printouts Queue for more information. When the Printout Queue option is selected, an additional column appears (Online Queue) in the list of printers with a check mark to indicate that the Online Queue option is selected.
- In the Served Circulation Desks List section, select a circulation desk that is served by the printer, and select Attach Circulation Desk. El mostrador de circulación seleccionado se añade a la lista de mostradores de circulación a los que servirá la impresora.
- This section displays only when you are configuring a library (that is, you have selected a library in the Configuring filter on the Configuration page.
-
Repetir el paso anterior para todos los mostradores de circulación servidos por la impresora.
To remove a circulation desk from the list of circulation desks that are served by the printer, select Remove to the right of the circulation desk.
- In the Served Service Units List section, select the service unit that is served by the printer, and select Attach Service Unit. La unidad de servicio se añade a la lista de unidades de servicio a las que sirve la impresora.
-
Repetir el paso anterior para todas las unidades de servicio a las que sirve la impresora.
To remove a service unit from the list of service units that are served by the printer, select Remove to the right of the service unit to be removed.
- Select Save to store your changes to the printer information.
