
Getit
This page describes how to work with Getit including configuring the order of locations in Primo search results, filtering the library list for availability in Primo, configuring holding display labels, etc. For links to all the main fulfillment documentation pages see Fulfillment.
Configuring the Order of Locations in Primo Search Results
Para configurar el orden de los resultados de búsqueda de Primo, se debe tener uno de los siguientes roles:
- Administrador general del sistema
- Administrador de servicios al usuario
Alma determina la prioridad de visualización de las ubicaciones principalmente por disponibilidad. Except for serial holdings, holdings with the greatest number of available items appear first. In addition, Alma enables you to give preference to locations that match the IP address of the patron's IP address. Estas ubicaciones incluyen el campo AVA $$P. For more information, see the following topic: Discovery in Collaborative Networks.
El uso del campo AVA no es necesario para los entornos de Primo VE, pero la configuración de ordenación y prioridad en Alma es la misma tanto para Primo como para Primo VE. Además, Primo VE puede ignorar la configuración de ordenación personalizada de Alma. For more information, see Configuring the Get It Service for Primo VE.
De manera alternativa, puede configurar su propio orden de despliegue de ubicaciones en función de las consideraciones de su institución. Cuando se muestre una lista de ubicaciones en la pestaña GetIt, si el registro tiene múltiples existencias, se enumeran en el orden en el que la institución lo haya definido. En los casos en los que no están definidas las prioridades institucionales o no sean relevantes, se utiliza el orden alfabético.
Por defecto, las ubicaciones de las existencias aparecen en la primera página de Get It de Primo en función de uno o más de los siguientes criterios:
-
According to the holdings' locations and their proximity to the patron, according to the library IP address. Las ubicaciones en las bibliotecas más cercanas al usuario aparecen en la parte superior de la lista de existencias. Si se utilizan estos criterios, tendrán prioridad sobre la disponibilidad de las existencias.
-
According to the holdings' availability, in the order (by default):
- En ubicaciones temporales
- En ubicaciones permanentes
- En ubicaciones remotas
You can select a different order on the Locations Ordering Profile page (Configuration Menu > Fulfillment > Discovery Interface Display Logic > Locations Ordering Profile):
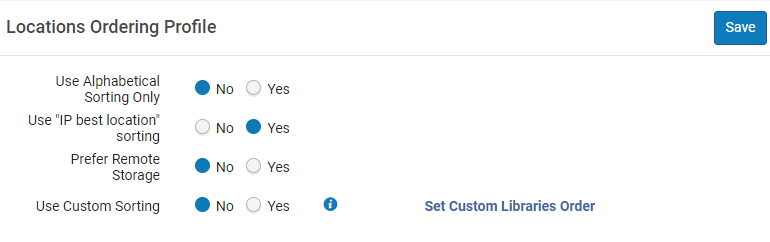
Solo se puede configurar este orden a nivel de la institución. Select the required institution from the Configuring filter on the Fulfillment Configuration page.
-
In the Use Alphabetical Sorting Only field, select Yes if you want to sort the holdings in Primo Get It alphabetically by the external name of the location, which is passed to Primo in the AVA $$c subfield during RTA. La lógica de ordenación alfabética está codificada.
When this field is set to Yes, all other ordering fields on this page are disabled.
-
In the Use "IP best location” sorting field, select Yes to configure the display of holdings by best location, which is determined by the location's priority in the AVA $$p subfield during RTA. IP addresses must be defined for the libraries.No indicates that holdings are displayed by availability and that for the display of holdings locations, IP addresses do not need to be defined.
Las direcciones IP se pueden configurar:
- On the library level (see Managing IP Definitions for a Library)
- On the campus level (see Editing a Campus)
-
In the Prefer remote storage field, select Yes to increase the priority of remote storage items when viewing results in Primo Get It, publishing to Primo, or the Primo RTA.
-
Para definir un orden personalizado:
-
In the Use Custom Sorting field, select Yes and then select the Set Custom Libraries Order link.
When this field is set to Yes, all other location ordering fields are removed from this page.
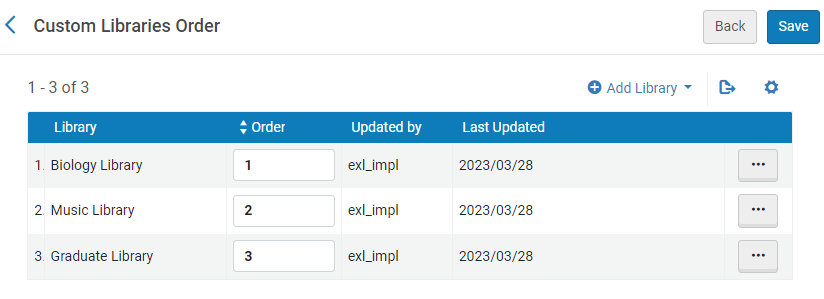
- On the Custom Libraries Order page that opens, select Add Library.
-
En el diálogo que se abre, indicar el orden para cada biblioteca deseada. Enter numeric values, where 1 is the library that appears first in the list of locations in the Get It tab.
-
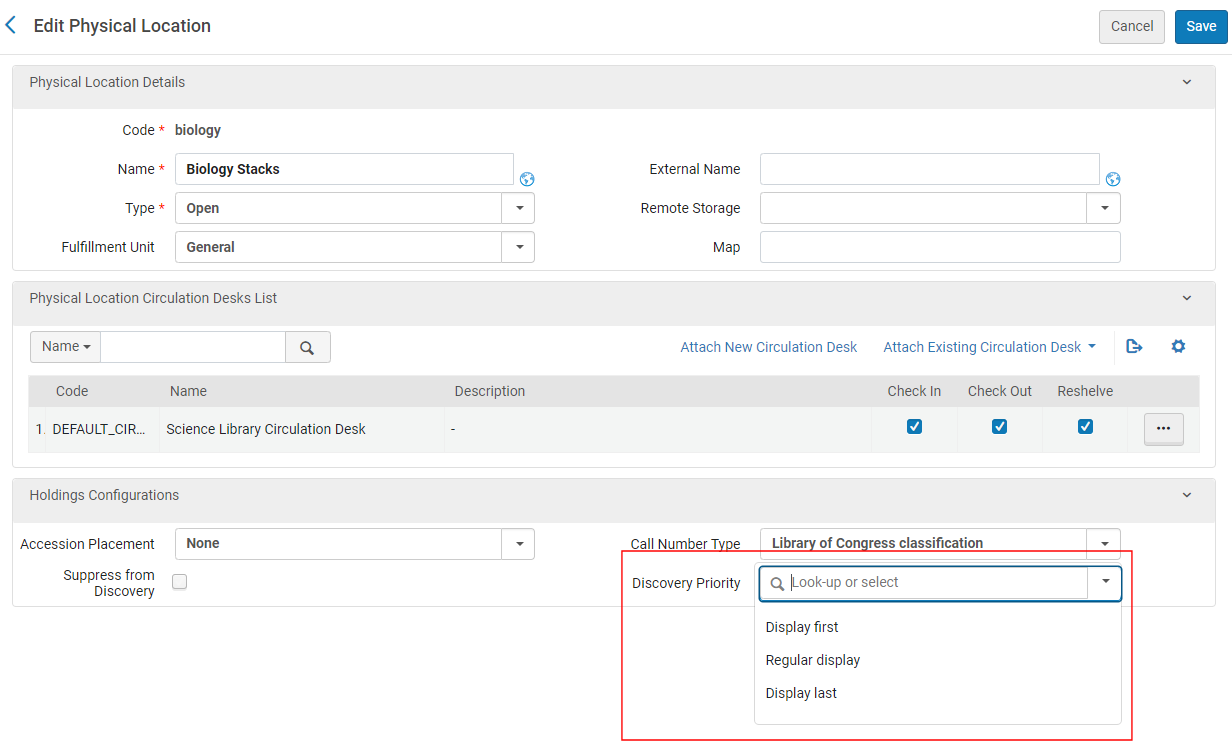
The priority of each location within the library can also be determined by configuring the Discovery Priority attribute of a location (Configuration Menu > General > Locations > Physical Locations) when the selected configuration scope is a library. All Display first locations of the same library are sorted before other locations of the same library, and all Regular display locations of the same library are sorted before Display last locations of the same library. Locations within the same Discovery Priority are sorted by availability. For more details, see Configuring Physical Locations.
-
- Select Save.
Filtering the Library List for Availability in Primo
- Esta sección se aplica solamente a los entornos de Alma-Primo. If you are working with Primo VE, see Configuring the Location Filter List for Get It.
- Esta funcionalidad no se aplica a los entornos de Alma-Summon.
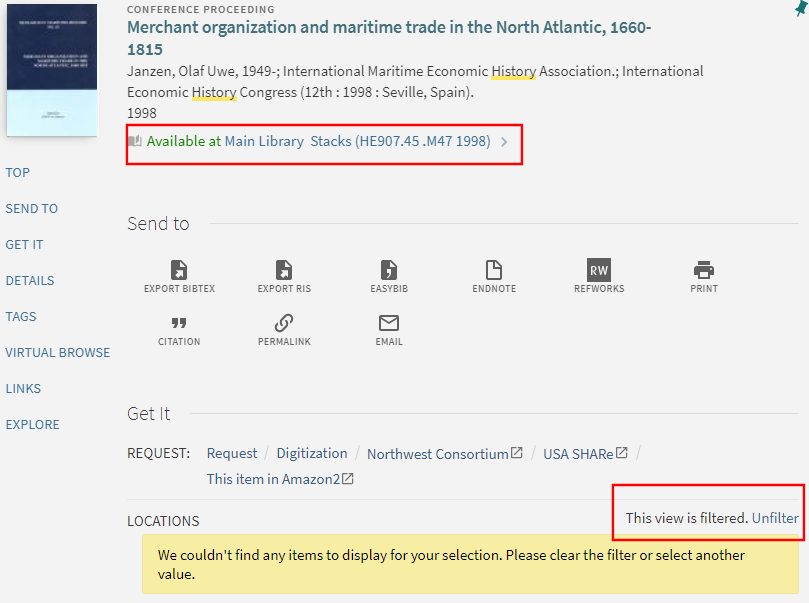
La página Vista de Primo mapeada a bibliotecas de Alma le permite filtrar la lista de bibliotecas que aparece inicialmente en Primo Get It, cuando se presenta información de disponibilidad de un ejemplar del inventario. Si las bibliotecas están configuradas, estas bibliotecas aparecen inicialmente para el ejemplar; el usuario puede ver todas las bibliotecas después de eliminar el filtro. Si no hay ninguna biblioteca configurada, todas las bibliotecas aparecen por defecto.
In the following example, the Main Library has available items, but it has been filtered from the list of locations because one or more libraries other than the Main Library were configured on the Primo View Mapped into Alma Libraries page. Users can view the Main Library's items by selecting Unfilter.
-
Open the Primo View Mapped into Alma Libraries page (Configuration Menu > Fulfillment > Discovery Interface Display Logic > Primo View to Libraries).
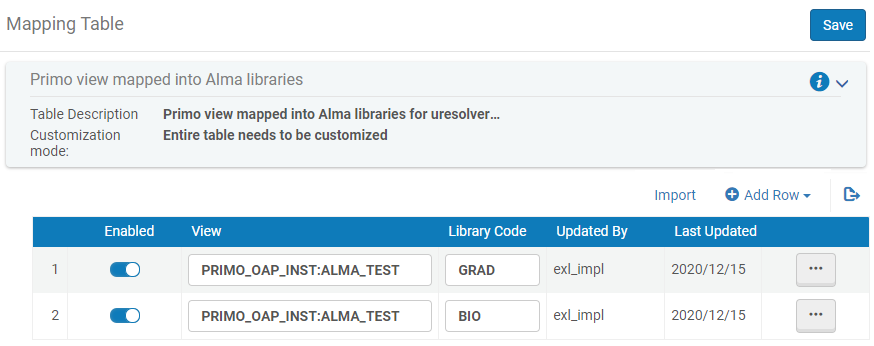
- Añadir una biblioteca a la lista:
- Select Add Row to open the dialog box .
- Especificar los siguientes campos:
- View – Specify the Primo/Primo VE view code.
- Library Code – Specify an Alma library code. To find library names and codes, see Adding/Editing Institution Libraries.
- Select Add Row in the dialog box to save the library to the default list.
- When you are done adding libraries, select Save or Customize(first time only) to save your changes to the list.
Configuring Holdings Display Labels
For Primo VE environments, see Configuring Holdings Display Fields for Primo VE.
Para configurar etiquetas de visualización de existencias, se debe tener uno de los siguientes roles:
- Administrador general del sistema
- Administrador de servicios al usuario
The Holdings Display Labels and Order code table configures the holdings fields that display in the Get It section of the record's full display, and enables you to perform the following actions:
- Habilitar/deshabilitar la visualización de los campos de existencias.
- Especificar el orden en que aparecen los campos de existencias en Obtenerlo.
- Personalizar y traducir las etiquetas de visualización para cada campo de existencias.
- Añadir nuevo campo de visualización.
Access the Holdings Display Labels page (Configuration Menu > Discovery > GetIt Configuration > Holdings Display Labels).
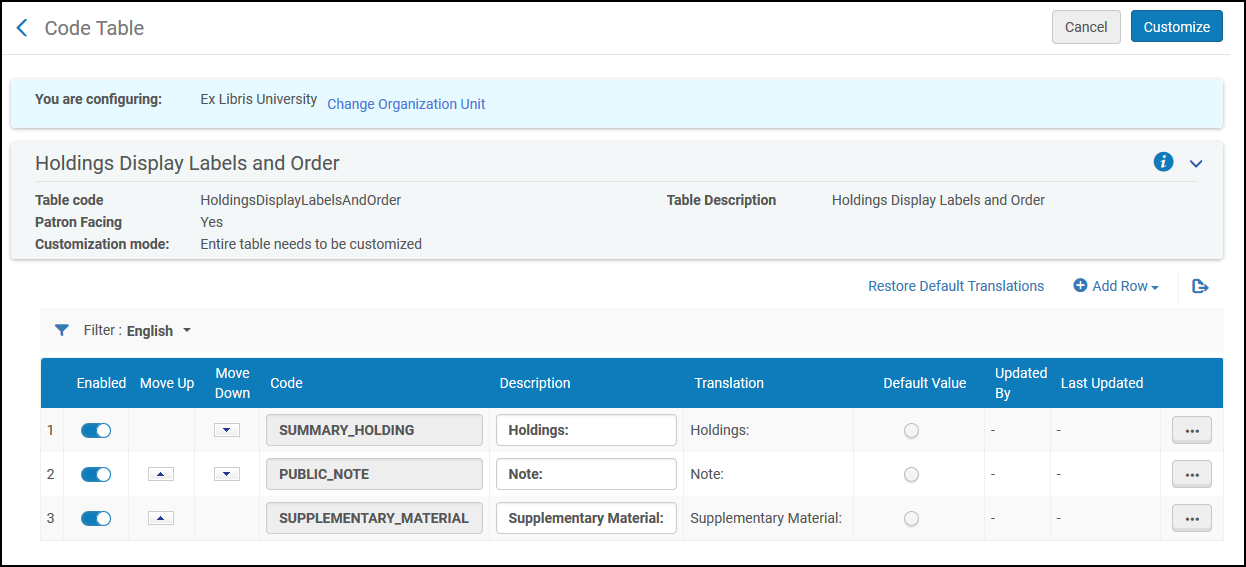
- Añadir una fila para la etiqueta de visualización, incluyendo el código, la descripción y si el código es el valor por defecto. Select Add Row.
- From the Filter drop-down, select the language for which you will enter a translation value.
- In the Translation field of the label, enter the value that will appear in the translation.
- If there are additional languages that will use a translation value, select the next language from the Filter drop-down and repeat step 3.
- Select Save.
Configuring Primo Holdings Display
For Primo VE environments, see Configuring Holdings Display Fields for Primo VE.
Para configurar la visualización de existencias de Primo, se debe tener uno de los siguientes roles:
- Administrador general del sistema
- Administrador de servicios al usuario
The Primo Customized Holding mapping table (Configuration Menu > Fulfillment > Discovery Interface Display Logic > Holdings Display Customization) enables you to map information from the source's holdings record to Primo for display in the following fields in the Get It section of the record's full details: Holdings, Supplementary Material, Note, Binding, Source of Acquisition, Ownership of Custodial History, and Indexes. Por ejemplo, se puede mapear MARC 866 a,z al campo de visualización de existencias.
To access this page, you must first set the uresolver_enable_getit_holding_configuration customer parameter to true.
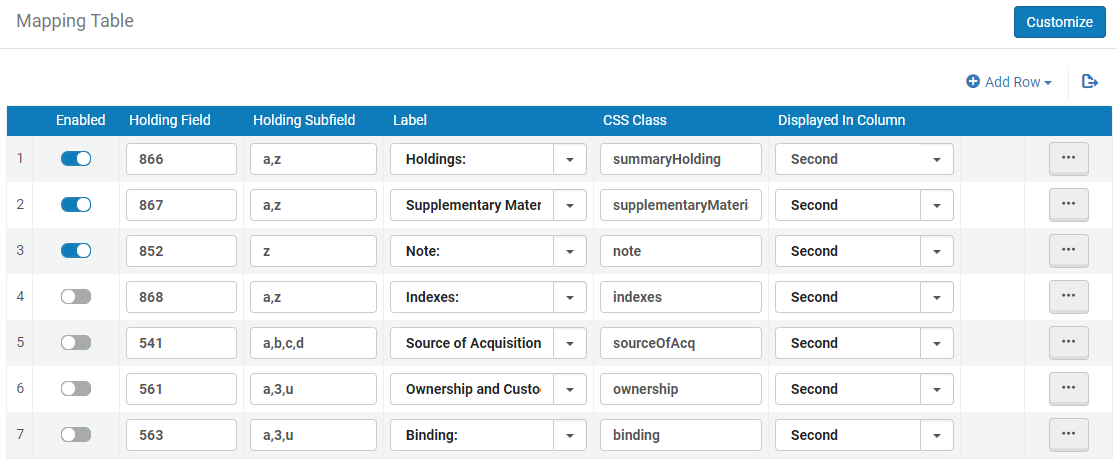
- Edit the Primo Customized Holding mapping table (Configuration Menu > Fulfillment > Discovery Interface Display Logic > Holdings Display Customization).
- Select Add Row.
- Especifique los siguientes campos en el cuadro de diálogo Añadir fila:
- Holding Field – The MARC holdings field that you want to map to Primo.
- Holding Subfield – The specific subfields of the holdings field that you want to map. Si quiere especificar más de un subcampo, sepárelos con una coma.
- Label – Select the display field to which you want to map the holdings field/subfield. The following display fields are supported in Primo: Holdings, Supplementary Material, Note, Indexes, Source of Acquisition, Ownership of Custodial History, and Binding.
- CSS Class – The CSS class defined in the CSS for your Primo view's skin. For more information, see Branding the Delivery Tabs.
- Displayed in Column – Specify the first or second display column.
- Select Add Row to save the row and to return to the mapping table.
- Asegúrese de que la nueva fila esté activa.
- If this is the first customization of this table, select Customize. Otherwise, select Save.
Display Logic Rules
Display Logic Rules can be used to configure Getit services such as Hold, Booking, and Resource Sharing. For more information, see Configuring Display Logic Rules.
Configuring Service Labels in the Discovery Interface
Las etiquetas de servicio para Getit se pueden configurar. For more information, see Configuring Service Labels in the Discovery Interface.
Using Standard Identifiers
With the Find GetIt services based on standard identifiers only parameter (Configuration Menu > Fulfillment > Discovery Interface Display Logic > Other Settings), the Primo/Primo VE Get It feature (that you select to request/discover local Alma physical holdings) uses the following strong standard identifiers:
- ISSN
- E-ISSN
- Encontrar
- E-ISBN
- LCCN
- CODEN
- Número Único OCLC
- Otro número de sistema
Por lo general, utilizar identificadores fuertes ofrece mejores resultados. For more details regarding the identifiers, see Commonly Used OpenURL Attributes for the URL Template. For the list of related MARC fields see MARC 21 Search Indexes.
By default, this option is not selected; the original logic for matching on title or title + author is used. Estos criterios de coincidencia más débiles pueden proporcionar resultados de Get It menos deseables. Note that some institutions would like to get more results, even at the cost of "noise". Siempre hay un equilibrio entre dar más datos y dar solo lo que es correcto. La comparación por datos sin identificadores proporciona más datos, pero puede ser menos precisa. Tenga en cuenta también que algunos recursos no tienen identificadores.
Note that when you select Get It from your Primo/Primo VE search results and the Find GetIt services based on standard identifiers only parameter is selected, holdings received from an OpenURL (in your Primo/Primo VE search results) are ignored when Alma processes the Get It request if those holdings do not include or match any of the strong standard identifiers shown above.
