
ViewIt
- Esta página describe la configuración de ViewIt, incluidas las reglas de lógica de despliegue, el orden de los servicios en línea, los enlaces directos, etc.
- For links to all the main fulfillment documentation pages, see Fulfillment.
ViewIt es el marco de Primo que permite a los usuarios acceder al inventario digital o electrónico de un resultado de búsqueda. It enables full-text links to electronic resources or digital files and utilizes the configurations described below on this page.
Configuring Display Logic Rules
Para configurar las Reglas de la visualización se debe tener uno de los siguientes roles:
- Administrador general del sistema
- Administrador de servicios al usuario
For a concise "How To" format of the topics covered on this page, see Defining Link Resolver Library Preferences.
Display logic rules are only applied when the Alma link resolver provides the links. CDI direct linking records are not generated by the Alma link resolver mechanism; therefore, Display logic rules are not applied for them.
Las Reglas de lógica de despliegue definen cuándo no deberían aparecer en Primo y Primo VE los siguientes servicios al usuario:
- Solicitud de reserva – Solicitar la reserva de un ejemplar en un momento específico.
- Servicio de DB - Enlace a la interfaz central de una base de datos de terceros.
- Digitalización – Solicitar tener un ejemplar o parte de él digitalizado para que pueda ser visualizado en un ordenador.
- Texto completo – Ver el texto completo de un ejemplar en linea
- Servicios electrónicos generales – Enlaces que pueden ser creados por una institución para cualquier propósito. For information about general electronic services (GES), see General Electronic Services.
-
Solicitud de reserva general – Solicitar tener un ejemplar retenido en un mostrador de circulación cuando el registro de existencias está vacío o solicitar un fascículo de una revista, sin importar si alguno de sus fascículos está catalogado. For more information on general hold requests, see Creating a General Hold Request.
-
Solicitud de reserva – Solicitar tener un ejemplar retenido en un mostrador de circulación.
-
Open Access – View open access full text (for example, hide open access if full text exists or hide full text if open access exists).
-
Solicitud de compra – Solicitar que se compre un ejemplar. For more information, see Purchase Requests.
-
Servicio de entrega de representación – Ver un ejemplar digital.
-
Solicitud de recursos compartidos – Solicitar recuperar un ejemplar desde otra institución cuando la institución del usuario no tiene el ejemplar.
-
Seleccionar texto completo – Enlace a un texto completo (el texto completo puede no estar disponible para todos los artículos de una revista).
- For more information about requests, see Requests in Alma.
- For information on how to customize the request forms, see the following pages: Customizing Primo Request Forms for Primo, Customizing Primo Resource Sharing Forms for Primo, Configuring Request Forms for Primo VE, and Configuring Resource Sharing Request Forms for Primo VE.
You configure display logic rules on the Discovery Interface Display Logic page (Configuration Menu > Fulfillment > Discovery Interface Display Logic > Display Logic Rules).
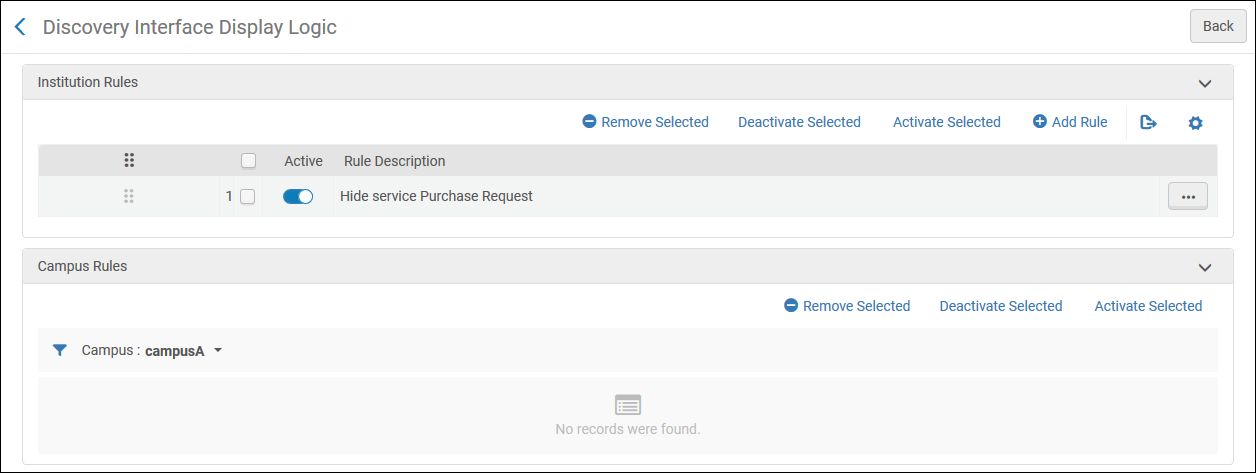
- Display logic rules can be configured at the network, institution, and campus levels (if campuses are defined in the system). For configuring campus-level display logic rules, see Defining Display Logic Rules at the Campus Level.
- A nivel de red (NZ), el acceso a la configuración de las Reglas lógicas de despliegue se realiza desde el Tablero de configuración central.
-
If display logic rules are configured in the network, the behavior is impacted by the
network_display_logic_distribution_members_behaviorandnetwork_display_logic_rules_precedencecustomer parameters. See Configuring Other Settings (Fulfillment). -
Se aplican todas las reglas aplicables y relevantes. Si una regla posterior (inferior) está en conflicto con una regla previa (superior), Alma aplica la primera regla.
Se pueden efectuar las siguientes acciones en esta página:
- Add a display logic rule (see Adding Display Logic Rules)
- Edit a display logic rule (select Edit from the row actions list)
- Duplicate a display logic rule (select Duplicate from the row actions list)
- Habilitar o deshabilitar una regla de visualización. Each row can be enabled or disabled individually with the Active slider. Or select a group of rules and select Deactivate Selected or Activate Selected from the actions.
- Delete a display logic rule (select Remove from the row actions list)
No se pueden editar los parámetros de una regla de lógica de visualización ya existente. Se puede borrar la regla y entonces añadir una nueva regla.
See the Configuring Services Displayed to Patron training session (3 min.).
For examples of working with discovery display logic, see Display Logic Rules Examples.
Las siguientes reglas de lógica de visualización están disponibles inmediatamente. Estas reglas están activas por defecto:
-
Hide service Representation Quick Access – hides the Quick Access section in Primo and Primo VE.
Para que el Acceso rápido esté disponible, se debe activar el Nuevo visor digital. For more information, see To configure the Digital Viewer.
- Hide service Representation Quick Access with Obtrusive Copyrights (Alma representations only) = true – hides representations with obtrusive copyrights from the Quick Access section in Primo and Primo VE.
- Hide service Representation Delivery Service with Usage Type = Auxiliary – hides representations with the usage type of Auxiliary from the Quick Access section in Primo and Primo VE.
Adding Display Logic Rules
Se pueden añadir nuevas reglas de la visualización. Las reglas se aplican a todas las bibliotecas de la institución. Por defecto, las nuevas reglas están habilitadas.
Representation-related services (such as Representation Quick Access) are applicable to Alma-D records only.
-
On the Discovery Interface Display Logic page (Configuration Menu > Fulfillment > Discovery Interface Display Logic > Display Logic Rules), select Add Rule. Aparece el cuadro de diálogo Añadir regla.
-
From the For user from groups drop-down list, select one or more groups to which to apply the rule. Si no selecciona un grupo, la regla se aplica a todos los grupos de usuarios.
-
In the hide service drop-down list, select the service(s) that the rule should hide. For some services (for example Full Text), the with and with value fields appear, enabling you to select additional options for this service. Los campos que aparecen dependen de su selección. Véase la siguiente tabla.
Añadir campos de reglas
ocultar servicio con Con valor Reserva anticipada, digitalización, solicitud de reserva general, solicitud de reserva N/A N/A Servicio de DB Colección electrónica Seleccionar uno o más nombres de la colección electrónica. Texto completo, texto completo seleccionado, solicitud de digitalización general Interfaz Seleccionar uno o más nombres de la interfaz o de la colección electrónica.
For Consortia members, Alma searches for electronic collections from the Member and the Network Zone.
Ambas interfaces, Zona de la Comunidad y local están disponibles.
Colección electrónica Servicio electrónico general Otro Seleccionar un servicio electrónico general.
Since rft.genre=unknown is a very general genre, we do notrecommend creating GES rules based on rft.genre=unknown. En su lugar, debería crear reglas para géneros específicos, como Artículo o Revista.
Acceso abierto
Note that this service appears when the
enable_open_access_services_from_unpaywall_apicustomer parameter is set totrue. See Open Access for more information.N/A
N/A
Solicitud de compra Disponibilidad por el campus Select true to hide the service if the physical resource cannot be requested for availability on the campus. Otherwise, select false. Disponibilidad por la institución Select true to hide the service if the physical resource cannot be requested for availability on the institution. Otherwise, select false. Propiedad del campus Select true to hide the service if the resource cannot be requested due to physical ownership by the institution. Otherwise, select false.
To enable self-ownership checks to be performed for serial titles, make sure to set the parameter check_self_ownership_serial to true. See also Configuring Other Settings (Fulfillment).
To block requesting resources owned by the institution in a non-physical format, set theif exists servicefield as follows:- Para recursos digitales: Servicio de entrega de representación
- Para recursos electrónicos: Texto completo
Propiedad de la institución Select true to hide the service if the resource cannot be requested due to physical ownership by the institution. Otherwise, select false.
To enable self-ownership checks to be performed for serial titles, make sure to set the parameter check_self_ownership_serial to true. See also Configuring Other Settings (Fulfillment).
To block requesting resources owned by the institution in a non-physical format, set theif exists servicefield as follows:- Para recursos digitales: Servicio de entrega de representación
- Para recursos electrónicos: Texto completo
Representation Delivery Service, Representation Quick Access Derechos de acceso Select true to hide the service if the resource has access rights configured. Otherwise, select false. Nota no pública Hide a representation in Primo, depending on the value of the Public Note field of the representation.
The following are examples of regular expressions with which you can configure the Display Logic Rules to hide representations when the expressions are in the Public Note field. Se puede usar un marcador para determinar si la expresión es sensible a las mayúsculas y minúsculas o no:
/Restricted Access/- Matches a public note containing the phrase Restricted Access, case sensitive./Restricted Access/i- Matches a public note containing the phrase Restricted Access, case insensitive./^(?!Open Access$)- Matches a public note that does not equal Open Access, case sensitive./^((?!Open Access).)*$/i- Matches a public note that does not contain the phrase Open Access, case insensitive.
Tipo de uso Select primary (master) to hide the service for representations with the usage type of primary (master) and select derivative to hide the service for representations with the usage type of derivative. Tipo de representación Select remote to hide the service for remote representations and select non-remote to hide the service for remote representations. Visor Select a viewer to hide the service if the resource is configured to be displayed by that viewer.
Para que el Acceso rápido esté disponible, se debe activar el Nuevo visor digital. For more information, see To configure the Digital Viewer.
Derechos de Autor Prominentes (solo Representación de Acceso Rápido) Oculte el servicio si el recurso está configurado con derechos de autor prominentes. Solicitud de recursos compartidos Disponibilidad por el campus Select true to hide the service if the resource is available on campus. Otherwise, select false. Disponibilidad por la institución Select true to hide the service if the resource is available at the institution. Otherwise, select false. Propiedad del campus Select true to hide the service if the resource is owned by the campus. Otherwise, select false. Propiedad de la institución Select true to hide the service if the resource is owned by the institution. Otherwise, select false. Sistema para compartir recurso Seleccionar un sistema para compartir recurso. Tipo de recursoSeleccione un tipo de recurso para el cual se ocultará el enlace de compartir recursos. For information on how to add resource types, see Configuring Resource Types for Primo VE.
The with value
kit, is only supported for Primo VE customers, not Primo customers. -
If you want hide a service, only in the case when another service already exists, in the If exists service multiple select drop-down list, select the other service(s).
For some services (for example Full Text), the with and with value fields appear, enabling you to select additional options for this service. Consultar la tabla superior para Información sobre los campos.
Para solicitudes de recursos compartidos, si un recurso tiene existencias sin ejemplares, no se considera de su propiedad. To hide resources that have holdings without items, hide the Resource Sharing Request service if the General Hold Request service exists.
- Seleccionar uno de los siguientes:
- Add – Add the rule but leave the dialog box open so that you can add additional rules.
- Add and Close – Add the rule and close the dialog box.
- If you define more than one rule, on the Discovery Interface Display Logic page, use the Move Up and Move Down arrows to set the order of the rules. Alma aplica las reglas habilitadas en el orden configurado.
Display Logic Rule Examples
La siguiente regla oculta el despliegue de EBSCOhost Consumer Health Complete, si la página del servicio incluye o despliega cualquier texto completo de EBSCOhost.
EBSCOhost es identificado como la interfaz, en este ejemplo.
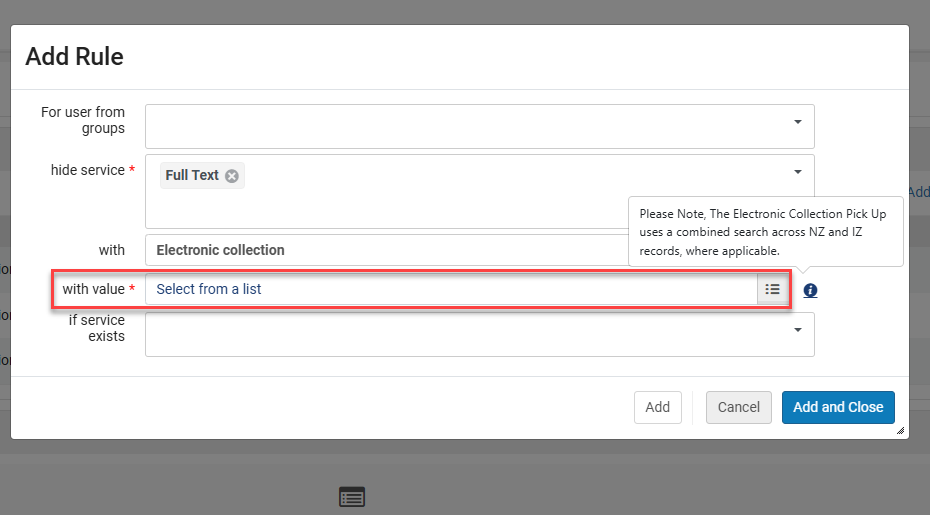
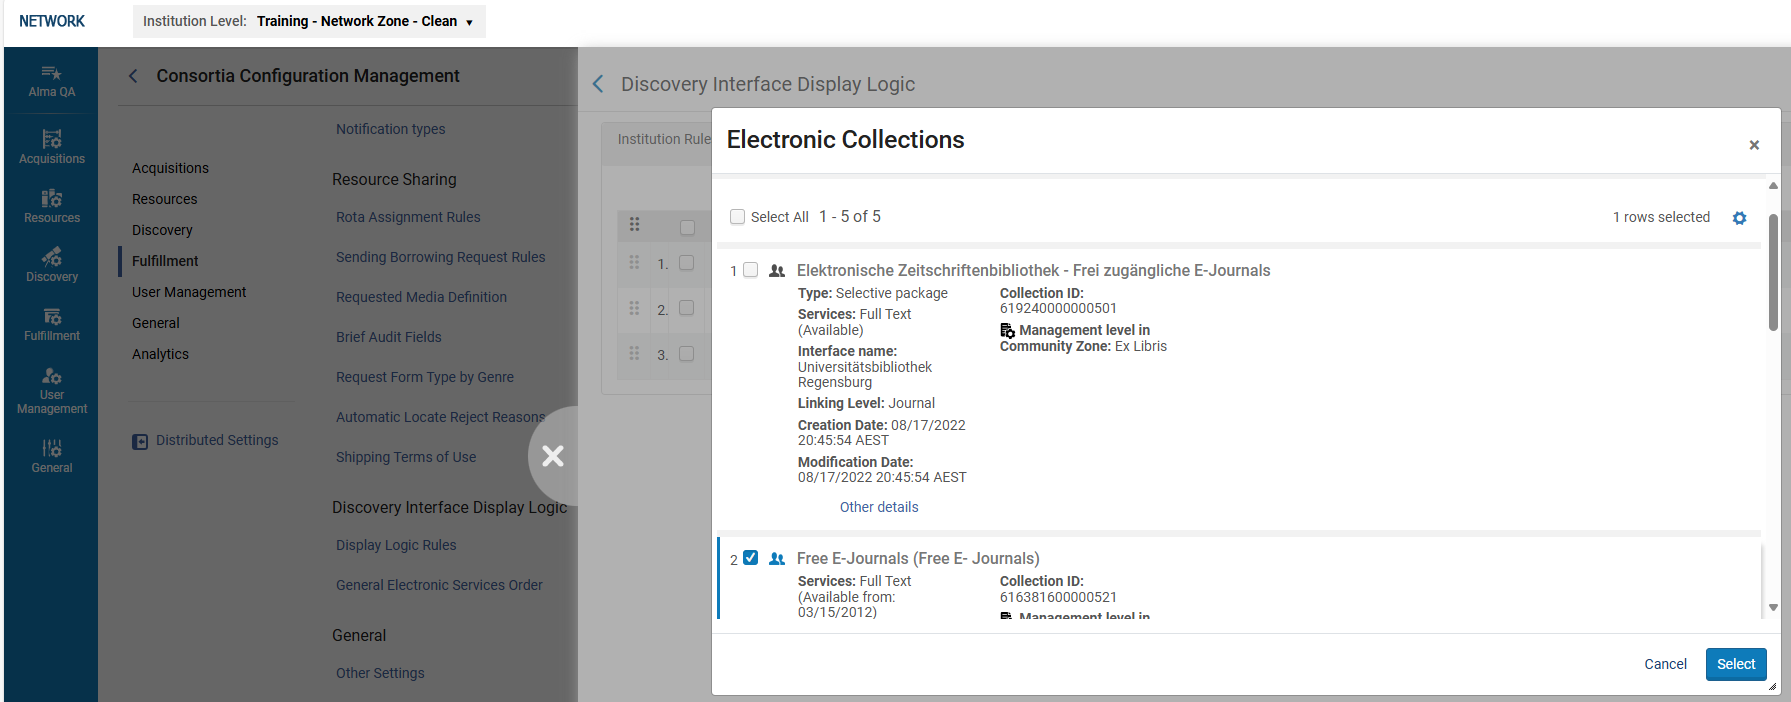
The following example shows the adding of a rule to a member configuration from the Network Zone.
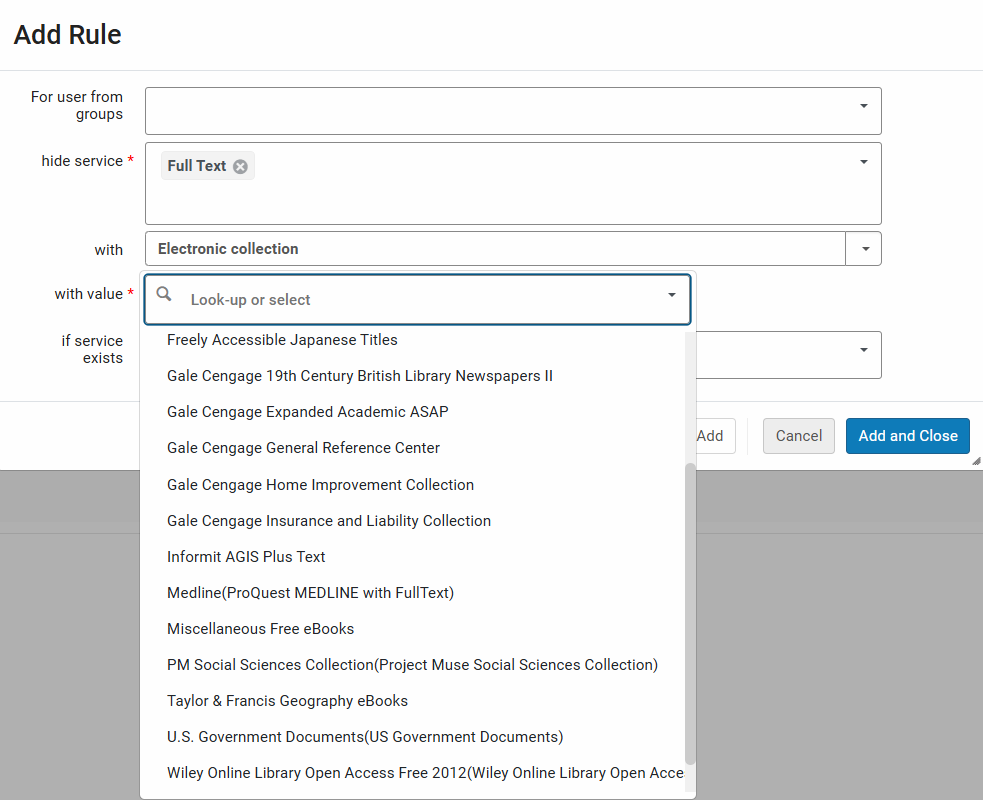
- En una configuración de red, el servicio de texto completo proporciona una lista de recursos electrónicos combinados de la red y de la institución local.
- A nivel de la Zona de Red, no se puede diferenciar entre recursos de la Zona de Red y la Zona de la Institución. Por lo tanto, al seleccionar el menú desplegable en el nivel de la Zona de Red para cambiar la configuración de los miembros, la lista es global.
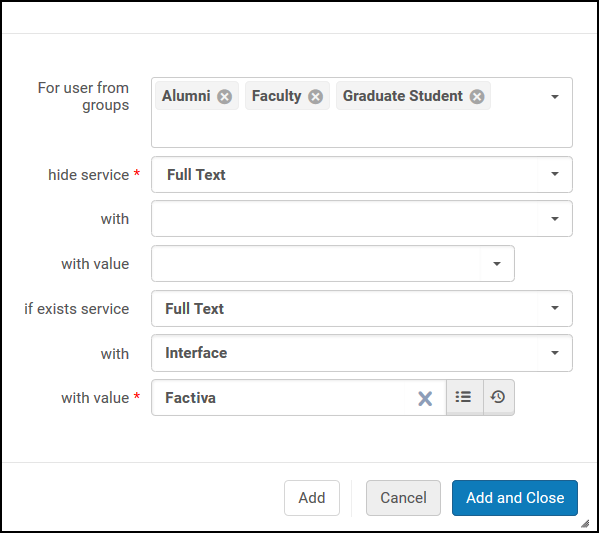
The following rule specifies that if full text is available from Factiva, hide the display of full text from all other packages and interfaces (which is indicated by the blank options associated with the hide service parameter).
Configuring the Order of Online Services
Para configurar el orden de los servicios en línea, se debe tener uno de los siguientes roles:
- Administrador general del sistema
- Administrador de servicios al usuario
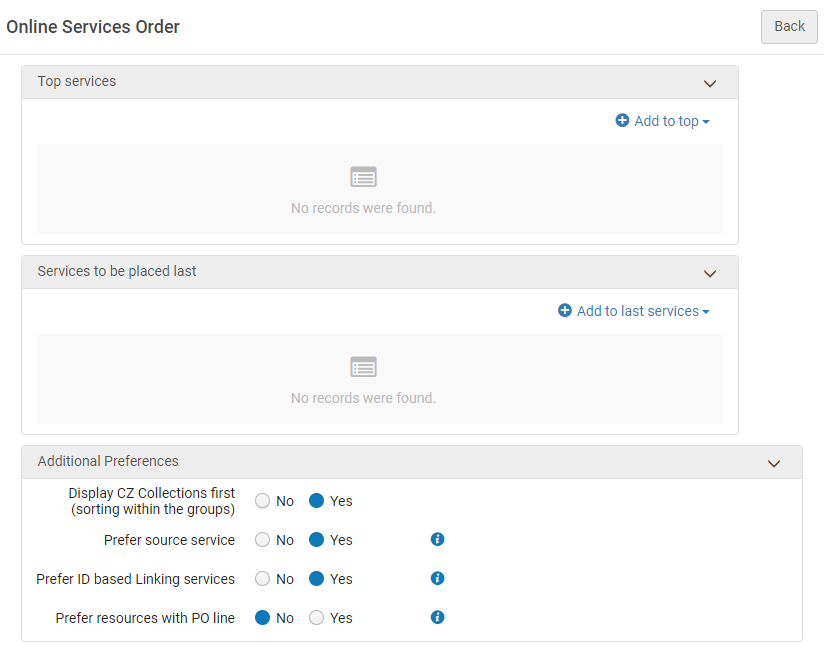
With the Online Services Order page (Configuration Menu > Fulfillment > Discovery Interface Display Logic > Online Services Order), you can configure the order of the services that appear in the services results list in View It. (See also How to Use Online Services to Control the Order of the Services in Primo).
Si forma parte de una Red con una Zona de Red, la gestión de la configuración de los Servicios en línea se puede realizar desde el Tablero de configuración central.
Por defecto (si no se añadieron servicios al grupo superior o inferior), todos los servicios se muestran alfabéticamente en la lista de resultados del servicio en la vista de Primo. Si los servicios se añaden en el grupo superior, siempre se mostrarán en la parte superior de la vista de Primo (antes de otros servicios). Los servicios que se añaden al grupo inferior siempre se mostrarán en la parte inferior de la vista de Primo (después de los otros servicios). Within the top group and bottom groups, services display in the order in which they are configured in the Online Services Order page.
Los servicios que no están configurados para mostrarse en el grupo superior o inferior se mostrarán en la vista de Primo después del grupo superior y antes del grupo inferior. Dentro de estos servicios (que no son parte del grupo superior o inferior), el orden de despliegue es alfabético.
The Display CZ Collections first,Prefer source service, and Prefer ID based Linking services(see Configuring Direct Linking and Direct Links) options also override both the default alphabetic sort order (for services that are not part of the top or bottom group) and override the order for the list of services in the Top services section. The top service defined can be used by Primo's direct linking option, from the search result record.
Alternatively, you can order the services in a specific sequence, using the Prefer resources with PO line option.
If all additional preferences are selected (set to Yes), then the services are displayed in View It in the order below:
- Services of collections/portfolios that have a linked PO Line (i.e., subscribed services or owned).
- Servicios enlazados basados en ID.
- Servicios de fuente
- Colecciones de la Zona de la Comunidad.
- Mejores servicios.
- Servicios inferiores.
Los niveles no especificados se ordenan de manera alfabética. For example if the first four options above were all set to No,and no items were added to the top or bottom list, then the sorting would be alphabetical.
- This page does not have a Save button. Cada selección que se hace aquí se guarda automáticamente en Alma.
- Los cambios al Nombre público de la colección electrónica (ignorar) requieren que se reconfigure la configuración de la orden de servicio en línea para la colección electrónica específica.
- En una institución independiente, solo se puede configurar el orden de los servicios en línea a nivel de la institución.
- Si forma parte de una Red con una Zona de Red, la gestión de la configuración de los Servicios en línea se puede realizar desde el Tablero de configuración central.
- (New for February 2026) The Member Administrator can select from a combined list of electronic resources activated at Network Zone and Institution Zone levels in the Online Services Order configuration. En el nivel de la Zona de Red, el operador (desde el tablero) puede actualizar la orden de estos servicios para la Red (solo recursos locales de la red) y para los miembros (lista combinada de recursos locales y de red). See also the note below.
-
Open the Online Services Order page (Configuration Menu > Fulfillment > Discovery Interface Display Logic > Online Services Order).
-
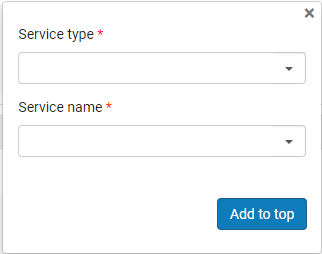
Select Add To Top to assign high priority to a service or select Add to Last Services to assign low priority to a service. Los servicios que se dejan sin asignar aparecerán a mitad de la lista. The Add Service dialog box opens:
Selections made in the Additional Preferences section take precedence over the services selected as top services.
-
In the Service type field, select one of the following service types:
The Service type "DB Service" is obsolete. Do not select it.
- Texto completo
- Texto completo seleccionado
-
In the Service name field, select the name for the selected service type. The Service value field appears. (New for February 2026) Search for and select a service value.
- Depending on the type of priority you are assigning to the service, select Add to top or Add to last services to save the service to the selected priority list.
- Select the arrows in the Move Up and Move Down columns to order the services in the Top Services and Services to be placed last lists.
-
In the Display CZ collections first field, select one of the following options:
You can also set this priority with the uresolver_display_cz_records_first parameter in the Customer Parameters mapping table. For more information, see Configuring Other Settings.
- Yes – The unspecified online resources that are not assigned to the top or bottom group are sorted alphabetically. Además, los recursos de Zona de la Comunidad se ordenan alfabéticamente y aparecen primeros en cada nivel.
- No – The unspecified online resources that are not assigned to the top or bottom group are sorted alphabetically. No se da prioridad a los recursos de Zona de la Comunidad.
- Set Prefer source service to Yes to improve the sorting relevance of online resources offered by the Services Page for OpenURLs coming from CDI. Esta opción otorga máxima prioridad a los servicios que coinciden con el origen de la OpenURL. Por ejemplo, si un usuario que busca en CDI descubre un artículo de Gale, y el resolvedor de enlaces de Alma puede ofrecer servicios de Gale y EBSCO, Alma colocará el servicio de Gale en la parte superior de los resultados, seguido por el resto de los servicios electrónicos, como se define en los ajustes de clasificación de esta página. Esta es la opción recomendada.
-
In the Prefer ID based Linking Services field, select one of the following options:
You can also set this priority with the uresolver_use_source_to_target_ordering parameter in the Customer Parameters mapping table. For more information, see Configuring Other Settings. Ojo: si se usa una URL estática, no se aplicará ninguna de las opciones.
Si un servicio se ha ocultado utilizando las reglas de lógica de despliegue, no aparece sea cual sea el valor seleccionado para esta opción.
- Yes – If a collection with a preferred ID is defined, it always appears first, regardless of other sort criteria. If more than one preferred collection is defined, the display preference for those collections is then based on the sort configuration as defined on the Online Services Order page. Currently, the following vendors use a preferred ID for linking: Cambridge University Press, Elsevier ScienceDirect, Erudit, Gale, Ingenta, Institute of Physics, JSTOR, Nurimedia, Proquest, Sage, Springer, Taylor&Francis, Thieme.
- No – No priority is given to vendors with a preferred ID.
- To prefer services of collections/portfolios that have a linked PO Line (i.e., subscribed services or owned), select Yes in the Prefer Resources with PO Line. Once enabled, services for portfolios that have a PO Line, either at the level of the collection or at the level of the portfolio itself, are displayed above all the other services. This preference overrides both the default alphabetic sorting order and the list of services listed in the Top Services section.
Configuring Direct Linking
Para configurar enlaces directos se debe tener una de las siguientes funciones:
- Administrador de servicios al usuario
- Administrador general del sistema
La configuración de enlaces directos permite a Alma omitir la página y menú de Servicios y enlazarse de inmediato a un servicio digital o electrónico (como un texto completo) cuando provenga de una fuente OpenURL habilitada. If the OpenURL context object contains multiple digital or electronic services, the OpenURL link resolver displays the first service in the list (if the Enable direct linking and Enable direct linking when multiple services are available options are enabled). You can configure the order of the services in the Online Services Order page (see Configuring Online Services Order).
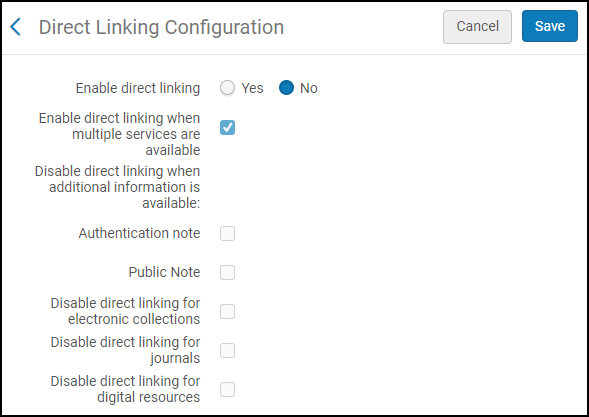
You configure direct linking on the Direct Linking Configuration page (Configuration Menu > Fulfillment > Discovery Interface Display Logic > Direct Linking). En esta página puede habilitar los enlaces directos y especificar situaciones en las que el enlace directo sea ignorado.
-
Solo puede configurar los enlaces directos a nivel de institución. Select the required institution from the Configuring filter on the Fulfillment Configuration page.
- Cuando se activa la vinculación directa, hay un problema al probar el acceso desde Alma. For more details, see Test Access for a portfolio in Alma opens a blank tab.
-
On the Direct Linking Configuration page (Configuration Menu > Fulfillment > Discovery Interface Display Logic > Direct Linking), select Yes from the Enable direct linking parameter to enable direct linking.
Selecting No indicates that the electronic service is not accessed directly from the search results in Primo, and users must select the service from a list provided by your link resolver (SFX or Alma).
Selecting Yes enables direct linking and the other configuration parameters.
-
Configurar los otros parámetros permite controlar los enlaces directos basándose en el registro. Consultar la tabla de abajo para una explicación de las opciones.
Opciones de configuración de enlace directo
Parámetro Descripción Permitir enlace directo cuando estén disponibles múltiples servicios
Permitir enlaces directos incluso cuando más de un servicio digital o electrónico está disponible para el registro.
Desactivar los enlaces directos cuando el servicio Acceso abierto está disponible
Select this option to disable direct linking when an Open Access Service is available. See Open Access for more information.
Deshabilitar enlace directo cuando hay información adicional disponible:
- Nota de autenticación
- Nota no pública
Deshabilitar enlaces directos incluso cuando hay información adicional disponible para el registro.
Authentication note
Deshabilitar enlaces directos cuando los servicios del registro contienen una nota de autenticación.
Public note
Deshabilite los enlaces directos cuando los servicios del registro contienen una nota pública.
Deshabilitar enlaces directos para colecciones electrónicas
Select this option to disable direct linking when the first service (result) in the View It service list is a match between the search in the discovery systemand the electronic collection's bib record. The electronic collection's level URL will appear first in the View It service list in two cases:
-
Es el único servicio disponible en la lista de servicios View It (resultado único en View It).
-
The electronic collection service result is configured to appear first in the View It service results list via the Online Services Order and Display Logic Rules configurations. See Configuring Online Services Order and Configuring Display Logic Rules for more information.
Deshabilitar el enlace directo para revistas
When Yes is selected for Enable direct linking and Disable direct linking for journals is selected, direct linking is disabled under the following conditions:
-
When the Electronic material type for a portfolio is set to Journal.
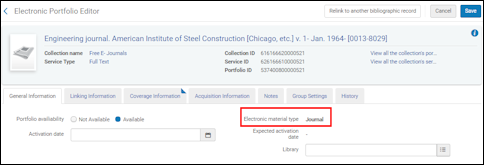 Tipo de material electrónico configurado en RevistaCualquier otra configuración de tipo de material electrónico no se tendrá en cuenta y se tratará como una revista.
-
Cuando Alma determina a partir de OpenURL que no hay ninguna indicación de atributos a nivel de artículo como los siguientes:
-
Indicación de página/s (rft.spage, rft.epage, rft.pages)
-
Doi (rft_id" source1="(info:doi/.*)|(doi:.*))
-
Pmid (rft_id" source1="(info:pmid/.*)|(pmid:.*)
Por ejemplo:
…&rft_id=pmid:28274348&…)
-
Oaid (rft_id" source1="(info:oai/.*)|(oai:arXiv:.*))
-
The setting for the Linking level parameter in the Electronic Service Editor is ignored, even when it is set to Journal.En relación con la deshabilitación de enlaces directos a revistas, se admiten los siguientes atributos de OpenURL:
-
Force_direct=true – This overrides any Alma configuration regarding direct linking and forces using direct linking.
-
Force_direct=false – This overrides any Alma configuration regarding direct linking and does not force using direct linking.
-
sfx.directlink=force – This is treated like Force_direct=true.
-
“disable_directlink=true&sfx.directlink=off” – This is treated like Force_direct=false.
Si se indican en OpenURL ambos atributos, enlace directo habilitado y deshabilitado, el atributo relacionado con deshabilitar los enlaces directos tiene prioridad.Deshabilitar el enlace directo para recursos digitales
Les permite a las instituciones habilitar un enlace directo para los recursos electrónicos, al tiempo que lo deshabilita sólo para los recursos digitales.
-
Select Save.
Configuring Service Labels in the Discovery Interface
- Administrador general del sistema
- Administrador de servicios al usuario
Esta sección se aplica únicamente a Primo. Para información sobre Primo VE y entornos de Alma-Summon, véase las páginas siguientes:
- Configuring Display Labels for Primo VE
- Configuring Display Labels for Alma-Summon
The Discovery Interface Labels Code Table page (Configuration Menu > Discovery > Display Configuration > Labels) contains predefined labels that appear in Primo. You cannot add or remove these labels, but you can edit the label's text to meet your requirements. For more information about code tables, see Code Tables.
¡Las etiquetas para reserva anticipada se crean en Alma!
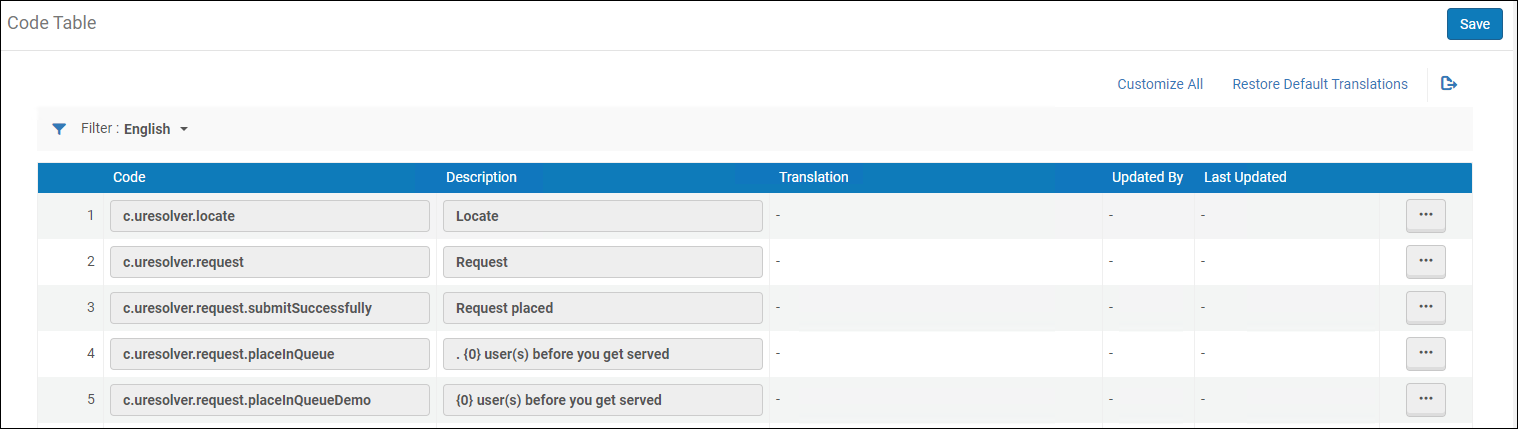
-
Las etiquetas solamente pueden configurarse a nivel de institución. Select the required institution from the Configuring filter on the Fulfillment Configuration page.
- For user-created license terms that appear in Primo, see Viewing User-Created License Terms that Appear in Primo.
- In addition to configuring labels, you can hide certain services, such as Request a different issue and Don't see what you need? Request anyway by configuring a display logic rule to hide a General Hold Request service. See Adding Display Logic Rules above.
In addition, you can add HTML code to these fields to change the display of labels. Por ejemplo, si se modifica el siguiente campo como se indica, el resultado se mostrará tal y como se visualiza en la figura de abajo.
-
c.uresolver.request.request_type=Request Type:<font color=red>ALL FIELDS REQUIRED!</font>
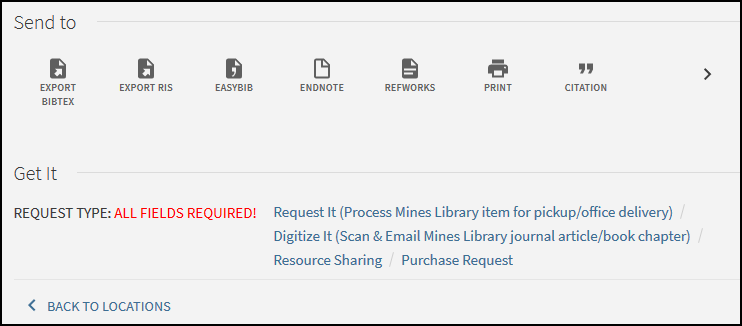
List of Commonly Used Labels
| Código de etiqueta | Valor por defecto | Ubicación en la interfaz |
|---|---|---|
| c.search.htmlCreator.unifiedDisplay |
{0} copy, {0} available, {0} requests Formatted as: {{copies_labels}}, {{available_labels}}, {{requests_labels}}. Todo el contenido entre llaves no se puede cambiar ni traducir porque representa otras etiquetas. Se puede agregar texto antes, después o entre cada par de llaves. O se puede eliminar una de las etiquetas. |
Las siguientes variables muestran el recuento en la lista de ejemplares:
|
| c.uresolver.locate | Localizar | Enlace a localizar ubicación en la biblioteca (mapa de ubicación). Aparece tanto en la lista de ejemplares (cuando solo hay una existencia) y en la lista de existencias (cuando hay más de una existencia). |
| c.uresolver.request | Solicitud | |
| c.uresolver.request.submitSuccessfully | Solicitud colocada | Esta etiqueta se muestra en Get It después de enviar una solicitud. |
| c.uresolver.request.placeInQueue |
For customers that went live before the August 2019 release, the default value is:Place in queue is {0}. For customers going live in August 2019 or later, the default value is:{0} user(s) before you get served. |
Esta etiqueta se muestra en Get It después de enviar una solicitud. |
| c.uresolver.request.placeInQueueDemo | Posición en la cola: {0} | This label displays the tentative place in the queue of a hold request, before the request is placed. It is displayed in Get It when the user selects the Calculate Queue button in the request form before placing the request. |
| c.uresolver.request.submitFailed | Error al colocar una solicitud en el recurso. Por favor, contactar con la biblioteca. | Esta etiqueta se muestra en Get It cuando falla el envío de una solicitud. |
| c.uresolver.request.title | Detalles del título que se ha solicitado: | Esta etiqueta se muestra en la parte superior de una digitalización o formulario de solicitud de reserva. |
| c.uresolver.request.notNeededAfter | No se necesita después de: | Esta etiqueta se muestra en el formulario de Solicitud de reserva. |
| c.uresolver.request.Partial.madatoty_comment | Por favor, añadir la parte a digitalizar | Mensaje de confirmación de digitalización parcial |
| c.uresolver.request.institution_dropdown_my_institution | Mi Institución | En la configuración de la red de servicios al usuario, la selección de lugar de recogida en el formulario de solicitud muestra la opción Mi Institución. |
| c.uresolver.request.institution_dropdown_other_institutions | Otras Instituciones | En la configuración de la red de servicios al usuario, la selección de lugar de recogida en el formulario de solicitud muestra una etiqueta, Otra institución, encima de opciones adicionales. |
| c.uresolver.request.comment | Comentario: | Está etiqueta está en el formulario de solicitud. |
| c.uresolver.request.manualDescription | Descripción manual: |
The Request a different issue link appears in Get It if the item has a description or the resource holding has a summary holdings field. Esto permite a los usuarios solicitar ejemplares que no hayan sido catalogados. After selecting the Request a different issue link, this label appears on the request form. |
| c.uresolver.request.submitRequest | Solicitud | This label displays for the Request button at the bottom of the Request form. |
| c.uresolver.request.refresh | Actualizar lista de servicios | Después de enviar una solicitud, aparece el enlace Actualizar lista de servicios en Get It. |
| c.search.htmlCreator.copy | copia | Displays the count of total copies and copies available (X copy, Y available) in the items list. |
| c.search.htmlCreator.copies | copias | Visualización de disponibilidad |
| c.search.htmlCreator.request | solicitud | Visualización de disponibilidad |
| c.uresolver.ServicesForThisTitle | Servicios para este título | |
| c.uresolver.GeneralElectronicServices | Servicios adicionales | Esta etiqueta aparece en View It cuando hay varios servicios electrónicos generales disponibles. |
| c.uresolver.ServicesForRelatedTitles | Servicios para títulos relacionados | Esta etiqueta aparece en View It cuando hay registros relacionados. |
| c.uresolver.availableOnline.full_text_prefix | Texto completo disponible en: | Esta etiqueta aparece en View It cuando hay servicios de texto completo disponibles. |
| c.uresolver.availableOnline.selected_full_text_prefix | El texto completo seleccionado está disponible en: | El prefijo para el enlace de un texto completo en Vew It. |
| c.uresolver.emptyList | No existe texto completo disponible | Esta etiqueta aparece en View It cuando no hay servicios de texto completo disponibles. |
| c.uresolver.error | Lo sentimos. Ha ocurrido un error mientras se recuperaban los servicios de este título. | Esta etiqueta aparece en Get It y View It si hubo un error de procesamiento. |
| c.uresolver.request.ill | Solicitud de recursos compartidos: | Esta etiqueta aparece en la parte superior del formulario de solicitud de recursos compartidos. |
| c.uresolver.request.ill.citationType.book | Libro | This label appears as an option for the Citation Type field on the Resource Sharing Request form. |
| c.uresolver.request.ill.citationType.article | Artículo | This label appears as an option for the Citation Type field on the Resource Sharing Request form. |
| c.uresolver.request.ill.format.physical | Físico | Esta etiqueta se encuentra en la pestaña Solicitud de recursos compartidos > Información de entrega > Formato > Físico. |
| c.uresolver.request.ill.format.digital | Digital | Esta etiqueta se encuentra en la pestaña Solicitud de recursos compartidos > Información de entrega > Formato > Digital. |
| c.uresolver.request.ill.format.physicalNonReturnable | Físico no retornable | Esta etiqueta se encuentra en la pestaña Solicitud de recursos compartidos > Información de entrega > Formato > Físico no retornable. |
| c.uresolver.request.ill.delivery.library | Entregar a biblioteca | Esta etiqueta se encuentra en la pestaña Solicitud de recursos compartidos > Lugar de entrega > Formato > Entregar a biblioteca. |
| c.uresolver.request.ill.delivery.alternative | Dirección alternativa | Esta etiqueta se encuentra en la pestaña Solicitud de recursos compartidos > Lugar de entrega > Dirección alternativa. |
| c.uresolver.request.ill.volume | Volumen: | Esta etiqueta se muestra en el formulario de solicitud de recursos compartidos tanto para artículos como para libros. |
| c.uresolver.request.ill.issue | Materia: |
Esta etiqueta se muestra en el formulario de solicitud de recursos compartidos para artículos. |
| c.uresolver.availableOnline.service_is_temporary_unavailable_due_to | Servicio temporalmente no disponible debido a | This label appears in View It when the service is temporarily unavailable and a Service unavailability reason has been defined in the Electronic Service Editor (see Service Unavailability Reason). |
|
c.uresolver.availableOnline.service_is_temporary_unavailable |
Service temporarily unavailable |
This label appears in View It when the service is temporarily unavailable and there is no Service unavailability reason defined in the Electronic Service Editor (see Service Unavailability Reason). |
| c.uresolver.getit2.request.request_options |
Request Options: |
Esta etiqueta aparece al lado de la lista de opciones de solicitud en Get It. |
| c.uresolver.getit2.request.monograph | Solicitud | This labels appears for the Request link in Get It. Si todos los ejemplares son monografías, el enlace se encontrará a la altura del título. |
| c.uresolver.getit2.request.serial | Solicitud |
This labels appears for the Request link in Get It. Si hay ejemplares de publicación seriada, el enlace se encontrará a la altura del ejemplar. |
| c.uresolver.getit2.request.noItems | ¿No ve lo que necesita? Solicitar de todas formas |
Está opción de solicitud aparece cuando el ejemplar no está disponible en esta ubicación. Seleccionar el enlace para crear una solicitud. The request that will be created is a General Request, see Creating a General Hold Request |
| c.uresolver.getit.related_title_display | El inventario de "{0}" relacionado aparece citado abajo | |
| c.uresolver.getit2.holding_list.location_map | Mapa de ubicación | Este es el título de la columna para los enlaces Localizar en la lista de existencias. |
|
c.uresolver.getit2.holding_list.related_holdings |
Related holdings |
Esta es la etiqueta que aparece con las existencias relacionadas. See the Enabling the Display of Related Records in Primo section for more information. |
| c.uresolver.getit2.ill_request.monograph | Solicitud de recursos compartidos | The Resource Sharing Request link displays in the request options at the title level when all items are monographs (without description) or there are no holdings. |
| c.uresolver.getit2.ill_request.serial | Solicitud de recursos compartidos | The Resource Sharing Request link displays in the request options at the title level when at least one of the items is serial (with description) or no items exist. |
| c.uresolver.getit2.digitization_request.monograph | Digitalización | The Digitization Request link displays in the request options at the title level when all items are monographs (without description) or there are no holdings. |
| c.uresolver.getit2.digitization_request.serial | Digitalización | La etiqueta se muestra en el servicio de digitalización de ejemplar reservado en Primo Obtenerlo. |
|
c.uresolver.getit2.display_related_holding_separately_from_original_record |
LOCATIONS FOR RELATED TITLES |
The label that appears above the list of related holdings if the Separately from the original record holdings option is selected. See the Enabling the Display of Related Records in Primo section for more information. |
|
c.uresolver.getit2.display_related_holding |
Alma-Primo:Related title:{0} ({1}) Primo VE:Related title:{0} |
Aparece en Get It para indicar que el título físico está relacionado con el registro. Solo para entornos de Alma-Primo, el tipo de relación se anexa al final del título. Por ejemplo: Related title:Art / (Contains)
|
| c.uresolver.getit2.item_list.pagination.records | Registros | |
| c.uresolver.getit2.item_list.type | Detalles dla reserva | The Type column is in the holding item in Primo Get It. |
| c.uresolver.getit2.item_list.policy | Política | The Policy column is in the item list in Primo Get It. |
| c.uresolver.getit2.item_list.status | Estado | The Status column is in the holding item in Primo Get It. |
| c.uresolver.getit2.item_list.empty | El ejemplar no existe. Por favor, consultar las opciones de solicitud arriba | La etiqueta está en la lista de ejemplares cuando hay una reserva sin ejemplares. |
| c.uresolver.getit2.request_different | Solicitar un fascículo diferente | The Request a different issue link will appear in Primo Get It if the item has a description or the resource holding has a summary holdings field. Esto habilitará la solicitud de ejemplares que pueden no haber sido catalogados. |
| c.uresolver.getit2.digitize_different | Digitalizar un fascículo diferente | The Digitize a different issue column is in the holding item in Primo Get It. |
| dlf.block.expiry | Configure with {0} to display the user's block expiry on the My Account page. For example, entering Expired on {0} in the label description will be displayed as Expired on 07/07/2017. | |
| dlf.onHoldShelf.until | hasta {0} | This label appears in the List of Requests in Primo's My Account. La primera parte del estado se basa en el estado y por eso no puede ser configurado. Only the text of until {0} is configurable. |
| c.uresolver.request.part_to_digitize | Parte a digitalizar: | La etiqueta se encuentra en la solicitud de digitalización en Primo Obtenerlo. |
| c.uresolver.getit2.holding_list.empty.top | Su búsqueda no coincidió con ningún recurso físico en la biblioteca | Cuando no hay existencias, esta es la primera fila en Get It de Primo. |
| c.uresolver.getit2.holding_list.empty.signed_in_user | Utilizar el/los enlace/s de abajo para solicitar el recurso desde otras bibliotecas | Cuando no hay existencias, esta es la primera fila en Primo Obtenerlo (si el usuario ha iniciado sesión). |
| c.uresolver.getit2.holding_list.empty.signed_in_user.no_services | No existen servicios disponibles | Cuando no hay existencias ni servicios, este es el mensaje que se muestra en Primo Obtenerlo (si el usuario ha iniciado sesión). |
| c.uresolver.getit2.holding_list.empty.bottom | ¿Tiene problemas? Por favor, contactar con el personal de ExLibris | Cuando no hay existencias, esta descripción se muestra en la parte inferior de Get It de Primo. |
| c.uresolver.getit2.holding_list.empty.guest_user | Para poder recibir opciones para solicitar recursos desde otras bibliotecas, por favor, iniciar sesión. | Cuando no hay existencias y el usuario no ha iniciado sesión, esto se muestra en Primo Obtenerlo. |
| c.uresolver.getit2.item_list.non_circulating | No se puede prestar | When item is not loanable (according to policy), the Policy under the item list will be Not loanable. |
| c.uresolver.getit2.item_list.circulating | Se puede prestar | When the item is loanable (according to policy), the Policy under the item list will be Loanable. |
| c.uresolver.getit2.item_list.alt_call_number_prefix | Información de ubicación adicional: | Un prefijo para la clasificación/signatura alternativa aparece junto a la descripción del ejemplar en la página ejemplares Obtenerlo, |
| c.uresolver.getit2.item_list.status.ITEM_NOT_IN_PLACE | El ejemplar no está en su lugar | Esto es un estado en la lista de ejemplares. |
| c.uresolver.getit2.item_list.status.ITEM_IN_PLACE | Ejemplar en su lugar | Esto es un estado en la lista de ejemplares. |
| c.uresolver.getit2.item_list.status.ACQ.with_expected_date | En orden hasta {0} | Esto es un estado en la lista de ejemplares (la fecha de caducidad está incluida). |
| c.uresolver.getit2.item_list.status.TRANSIT.with_expected_date | En tránsito hasta {0} | Esto es un estado en la lista de ejemplares (hora prevista de recepción incluida). |
| c.uresolver.getit2.item_list.status.NOPROCESS.with_no_expected_date | En estantería | Esto es un estado en la lista de ejemplares. |
| c.uresolver.getit2.item_list.status.WORK_ORDER_DEPARTMENT. with_expected_date | En proceso de {0} hasta {1} | Esto es un estado en la lista de ejemplares (la fecha de caducidad está incluida). |
| c.uresolver.getit2.item_list.status.WORK_ORDER_DEPARTMENT.with_no_expected_date | En proceso de {0} | Para mostrar esto, es necesario crear un Departamento de orden de trabajo y establecer el valor de 'Tiempo de trabajo (días)' en 999999. |
| c.uresolver.getit2.item_list.status.LOST_LOAN.with_expected_date | Perdido desde {0} | Esto es un estado en la lista de ejemplares. |
| c.uresolver.getit2.item_list.status.CLAIM_RETURNED_LOAN. with_expected_date | Reclamado devuelto. Vencimiento el {0} | Esto es un estado en la lista de ejemplares (la fecha de vencimiento está incluida). |
| c.uresolver.getit2.item_list.status.LOAN.with_expected_date | En préstamo hasta el {0} | Esto es un estado en la lista de ejemplares. |
| c.uresolver.getit2.item_list.status.OVERDUE.with_expected_date | En préstamo - vencimiento desde {0} | Esto es un estado en la lista de ejemplares. |
| c.uresolver.getit2.item_list.status.WORK_ORDER_DEPARTMENT. with_no_expected_date | En proceso de {0} | Esto es un estado en la lista de ejemplares. |
| c.uresolver.getit2.item_list.status.ILL.with_expected_date | En proceso ILL hasta {0} | Esto es un estado en la lista de ejemplares (cuando la solicitud de recursos compartidos tiene una fecha de vencimiento.) |
| c.uresolver.getit2.item_list.status.ILL.with_no_expected_date | En proceso ILL | Esto es un estado en la lista de ejemplares (cuando la solicitud de recursos compartidos no tiene fecha de vencimiento). |
| c.uresolver.getit2.item_list.status.TECHNICAL.with_no_expected_date | Técnico | Esto es un estado en la lista de ejemplares. |
|
c.uresolver.viewit.related_type_list.CONTAINS |
Related Records |
This is the label for the relation type Contains. Esta etiqueta aparece con registros relacionados de View It. See the Enabling the Display of Related Records in Primo section for more information. |
| c.uresolver.viewit.relatedTemplate | @TITLE (@RelationType) | Esto se muestra en View it. |
| c.uresolver.missingProvider | ver texto completo | Este es el enlace al texto completo en View It. |
Displaying License Information
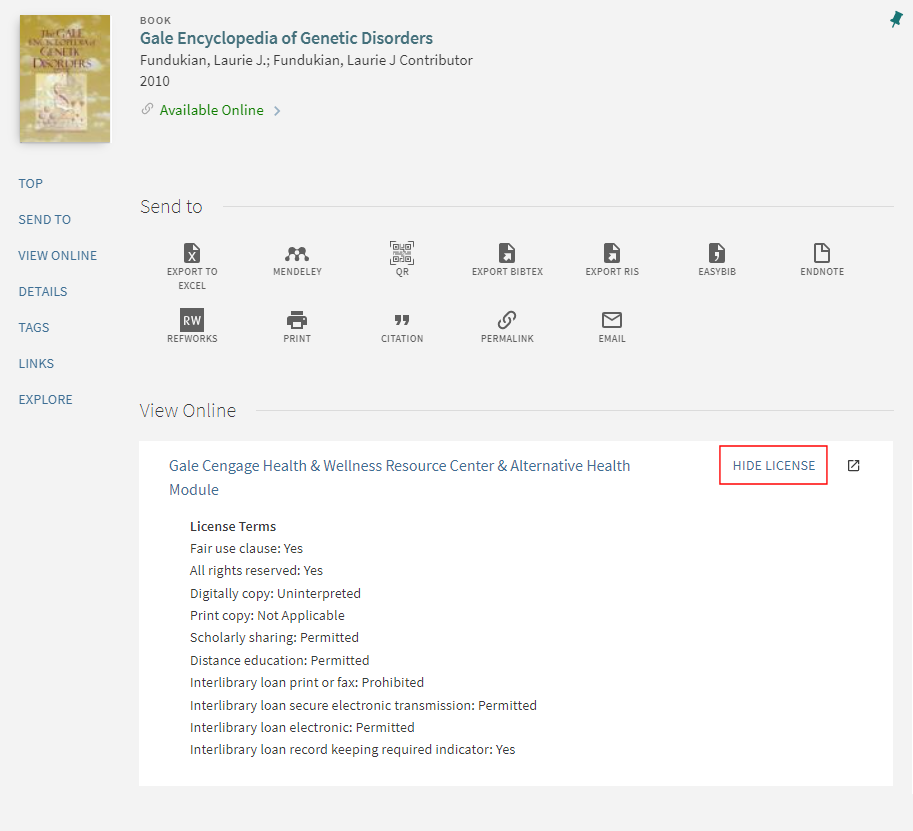
Alma enables you to display electronic resource license information in View It. Los términos de la licencia mostrados se pueden configurar en Alma, así como las etiquetas relativas a licencias que aparezcan en View It.
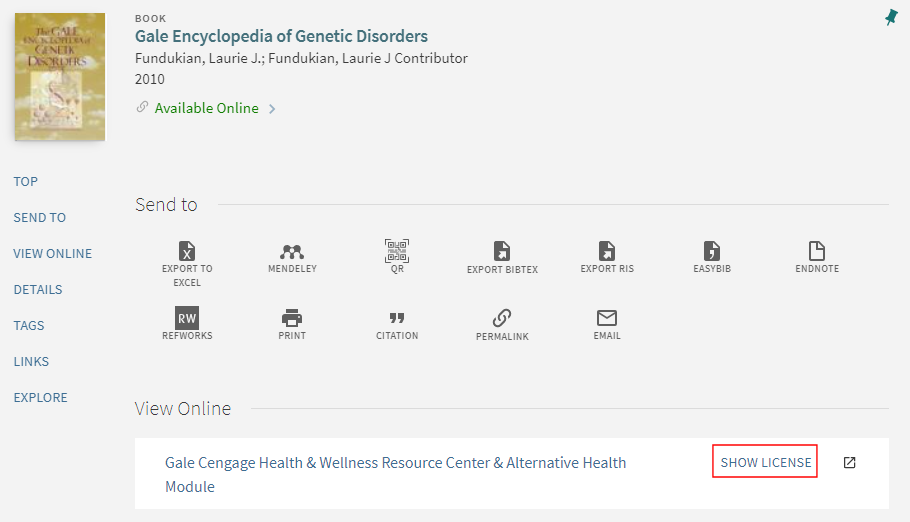
After the user selects the Show license link, the name of the link changes to Hide license, and the license information appears as configured in Alma:
For more information, view the Display License Information in View It video (5:02 mins).
Para configurar el despliegue de información relativa a licencias, son necesarios los siguientes roles:
- Administrador de adquisiciones
- Administrador de servicios al usuario
- Administrador general del sistema
-
Especifique los términos de licencia a mostrar en View It. For information on the Display to Public field, see Adding a License Term.
-
If needed, modify the license-related labels, which are defined by the codes that contain a c.uresolver.viewit.license prefix. For more information, see Configuring Labels for Primo or Configuring Labels for Primo VE.
-
Open the Other Settings page (Configuration Menu > Fulfillment > Discovery Interface Display Logic > Other Settings).
-
Select the Enable Display of License Information checkbox.
-
Select Save.
For more information on configuring the license terms in Alma, see Managing License Terms.
Displaying Access Model
To control the presentation of the access model to patrons in Primo, select the Enable Display of Access Model parameter (Configuration Menu > Fulfillment > Discovery Interface Display Logic > Other Settings). This displays the access model information in Primo, based on the access model indicated in the electronic portfolio (see Real-Time Ordering).
Esta opción está deshabilitada por defecto.
Configuring Provider Preferences for CDI Linking
Esta sección se aplica únicamente a Primo. For related information regarding Primo VE, see Configuring Central Index and Proxy Settings for Primo VE.
To configure provider preferences, you must have one of the following roles:
- Administrador general del sistema
- Administrador de servicios al usuario
The Central Index page allows you to configure which providers are given preference when displaying links from CDI in Primo's View It.
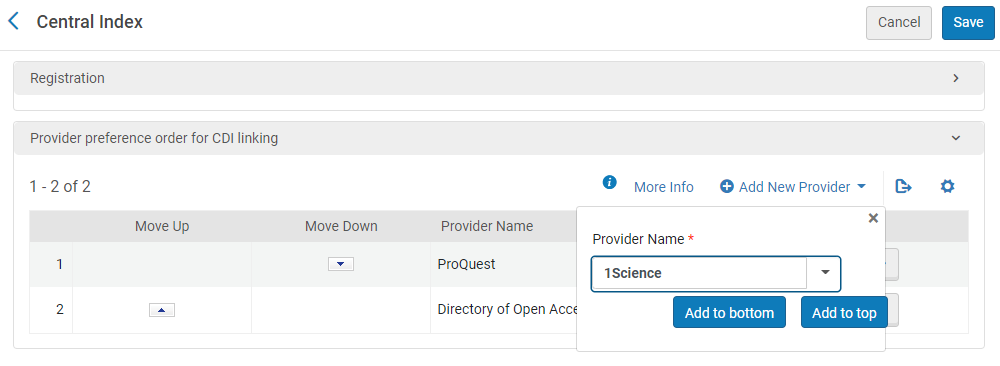
Estas preferencias se utilizan en las siguientes situaciones:
- When only a single link is returned from CDI, regardless of the setting of the Display All Links from CDI option.
- When the Display All Links from CDI option is enabled and multiple links are returned from CDI.
- When Quicklinks are returned from CDI.
The linking preferences apply to both general Link in Record links and Quicklinks and All links. Esta configuración tiene efecto inmediato y se utiliza cuando se devuelven resultados de búsqueda del CDI. For more information regarding link priority, see CDI and Linking to Electronic Full Text.
No necesita agregar la precedencia para todos los proveedores, pero los proveedores de esta lista tienen prioridad sobre los proveedores que no están incluidos en ella.
-
Open the Central Index page (Configuration Menu > Fulfillment > Discovery Interface Display Logic > Central Index).
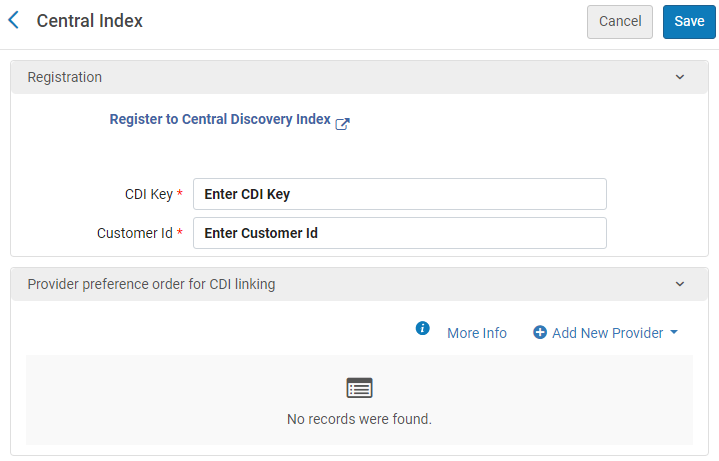
If instead you see a list of profiles from which to choose, see Configuring Provider Preferences for Multicampus Environments.
-
If you have not already done so, fill out the Registration section by entering the same CDI Key and Customer ID fields that you are using in Primo, which you can find in the PC Key and Customer ID fields in Primo's Institution Wizard (Primo Home > Ongoing Configuration Wizards > Institution Wizard).
After you save your CDI Key and Customer ID, the View my Profile link replaces the Registration link, enabling you to modify your customer and contact details, unsubscribe institutions, and configure your client applications. For more information, see My Profile for CDI.
- In the Provider preference order for CDI linking section, perform the following steps to give preference to providers' links returned from CDI searches.
- Select Add New Provider to open the Provider dialog box.
- In the Provider Name field, select the provider to which you want to give precedence. This drop-down includes all CDI providers that have Provider Coverage set to Yes in the CDI Collection List.
- Select either Add to bottom or Add to top to indicate whether the selected provider has more or less precedence than other providers that you have added to the list.
- Select the arrow in the Move Up/Move Down columns to adjust the new provider's precedence.
- Repita los pasos anteriores para proveedores adicionales.
- Select Save.
-
Open the List of Electronic Profiles page (Configuration Menu > Fulfillment > Discovery Interface Display Logic > Central Index).
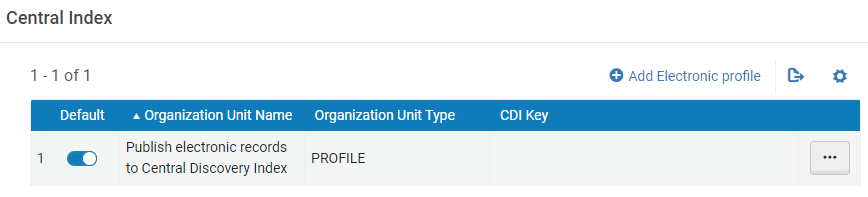
- Edit the profile for each campus/library that is configured as an institution in Primo. Initially, you must create a profile for each campus/library by selecting the Add Electronic profile option.
In the Registration section, enter the same CDI Key and Customer ID fields that you are using in Primo, which you can find in the PC Key and Customer ID fields in Primo's Institution Wizard (Primo Home > Ongoing Configuration Wizards > Institution Wizard).
After you save your CDI Key and Customer ID, the View my Profile link replaces the Registration link, enabling you to modify your customer and contact details, unsubscribe institutions, and configure your client applications. For more information, see My Profile for CDI.
In the Provider preference order for CDI linking section, perform the following steps to give preference to providers' links returned from CDI searches.
Select Add New Provider to open the Provider dialog box.
In the Provider Name field, select the provider to which you want to give precedence. This drop-down includes all CDI providers that have Provider Coverage set to Yes in the CDI Collection List.
Select either Add to bottom or Add to top to indicate whether the selected provider has more or less precedence than other providers that you have added to the list.
Select the arrow in the Move Up/Move Down columns to adjust the new provider's precedence.
Repita los pasos anteriores para proveedores adicionales.
-
Select Save.
