
メタデータエディターページの操作
MDエディタページの概要とすべてのオプションについての説明。
メタデータ(所蔵メタデータを除く)を操作するには、次のいずれかの役職が必要です。
- 目録編集者
- 目録マネージャー
- 目録管理者
所蔵メタデータを操作するには、次のいずれかの役職が必要です。
- 冊子目録オペレーター
- 冊子目録オペレーター限定
- Physical Inventory Operator Extended — Required to delete a holdings record.
- 購入管理者
- 購入オペレーター
- リポジトリマネージャー
Users with these roles can work with holdings metadata only within the scope defined for the role in the User Details page, see Managing User Roles.
To learn more about the Metadata Editor usability improvements, see Usability Improvements.
- For working with bibliographic and holdings records —Working with Records
- For working with record templates —Working with Record Templates
- For working with rules —Working with Rules
For an introduction of the Metadata Editor, watch Metadata Editor Overview(5:25).

メタデータエディターを開く
- Almaメインメニューからメタデータエディターを開きます([リソース] > [目録] > [メタデータエディター]を開く)。This opens a MD Editor with any records in-work and records that were pushed to it (see Pushed Records).
- Select Edit Record for a specific title in your search results.これにより、選択したレコードがすでに開いている状態でMDエディターが開きます。
メタデータエディターの色分けとカウンター
The tabs in the MD Editor are color-coded to provide additional information about the displayed entities.The tab color-coding is identical in the three functional areas Records, Templates and Rules.

| 色 | 説明 |
|---|---|
| Dark Blue __________ | ナビゲーションペインに現在表示されているレコードは、このタブからのものです。 |
| Light Blue __________ |
The record being edited in the Editing pane, and its pane is currently in focus (when the Editing pane is in split mode). If there is no light blue record, than the record being editing (marked in dark blue color) is the record currently focused, as well as belongs to the tab currently displayed in the Navigation Pane. |
| Grey __________ | The record is being edited in the Editing pane, but its pane is currently not in focus (when the Editing pane is in split mode). |
| 白 | There are no opened records under this tab in the Editing pane, and it is not currently selected to display in the Navigation pane. |
The counters by each tab indicate the number of records currently in the tab:
テンプレートエリアでは、カウンタはコミュニティゾーンレコードの数をカウントしません。カウンターは、[機関+ネットワークゾーン]テンプレートの合計を反映します。
Under each functional area, appear the tabs that represent different families of entities (for example, for records: Sets, DC, MARC21, UMIMARC and the other formats, Holdings, Authorities formats).To open a certain family, select the tab.The tab changes its color to blue to indicate that its items are currently displayed in the Navigation pane.To view entities belonging to another family, select the arrow and select the family from the list.
Search and Filter in the Navigation Pane
When you have a long list of entities in the Navigation Pane, enter search characters in the search box to locate matching entities, or use the filtering options to easily locate the entities with which you want to work.フィルターメニューを使用して、次の方法でエンティティを編成します:
- Show only Institution Zone records, the Network Zone (if applicable), the Community Zone, or show any combination of these.Note: If you filter a scope out, its folder is no longer displayed in the Navigation pane.
- 以下に従ってレコードをリストに配置します。
- Group by scope (Records only): by Institution Zone, Network Zone, or the Community Zone.
- エントリまたは更新の時刻ごとに、昇順または降順で並べ替えます。なお、利用できる特定のオプションは、エンティティの種類によって異なります。
- アルファベット順、昇順/降順。
When the default Record Scope is changed, a green dot is applied to the Filter Menu icon:
|
レコードのフィルターリスト
|
テンプレートのフィルタリスト
|
ルールのフィルタリスト
|


リストを更新する
As multiple users may be adding and deleting records in the draft records list simultaneously, you may find it helpful to refresh the list of records on which you are working from time to time.これを行うと、別のユーザーによって割り当てられたレコードを表示したり、レコードのロックが期限切れになった場合に他のユーザーによって編集されているレコードを削除したりできます。(レコードのロックは、メタデータエディターでレコードが使用されなかった1時間後に期限切れになります。)
This can be done using the Refresh List icon.
表示されたレコードを解除する
このオプションを使用して、リストに現在表示されているレコードのみを解除します。除外されたレコードは解除されません。

- タブ上部のフィルターボックスで、目的のレコードを検索します。The lists with the records matching your search appear.These may not be all the records of the list.
- Double-click the name of the desired list to expand the list, in order to display the matching records.
- Right-click the list and select Release displayed records in list.
- Select Yes in the confirmation message that appears.All the displayed records are released.表示されなかったレコードは解放されません。
エディタ分割モード
For times when you would like to view an additional record, you can open the editing area in split mode.エディタ分割モードアイコンを使用して、編集領域を2つに分割します。両方の編集領域が同じ編集機能を提供します。
エンティティ情報
ナビゲーション画面の特定のエンティティにカーソルを合わせて、作成日と最新の修正日、およびこれらのレコードを作成および最終修正したユーザーの名前を確認します。
Collapsing the Navigation Pane
The Navigation pane in the Metadata Editor can be collapsed to make more room for editing and viewing entities.これを行うには、開閉矢印を使用します。
When the Navigation pane is expanded, you can display it pinned, in which case it is displayed alongside the Editor pane, or unpinned, in which case it is displayed on top of the Editor pane.The pinned view is convenient when you want to constantly have both presented on screen; the unpinned view can be used when you only open the Navigation pane from time to time, since it enables a larger view of the Editor pane.

|

|

|
|
Open and pinned Navigation Pane
|
開いた状態で固定されていないナビゲーションバー
|
閉じた状態のナビゲーションバー
|
メタデータエディターの編集ペイン
メタデータエディターのナビゲーションペインは、レコード、テンプレート、およびルール領域で同じように機能します。For brevity, where the information is applicable to these three areas, then records, templates and rules are referred to by the common name 'Entities'.
The editing area of the Metadata Editor is where you can view and catalog entities.This area opens when you select Open Metadata Editor (Resources > Cataloging > Open Metadata Editor) or choose to open or edit a record from another function, such as the repository search results.
In the editing area, you can catalog various records, such as bibliographic, holdings, authority records, and record templates.レコードの各行には、次のものが含まれています。
- フィールドタグ
- インジケータ
- サブフィールド
- アイコン(フィールド番号の左側)
- 行アクション:
- Open Form Editor (see Open Form Editor)
- Field Information (see Field Information)
エリアヘッダーの編集
The editing area contains a header with entity information:
The color-coding of this area changes depending on how this area was opened, see Color-coding and Counters for details.
編集領域の上部に表示される情報は、開く/編集するために選択したエンティティのタイプによって異なります。
| レコード | テンプレート | ルール |
|---|---|---|
|
|
|
情報セクションには、次のアイコンも含まれています:
-
 for saving the record
-
 for viewing the creation / modification information of the record (when, by whom)
-
Xメタデータエディターを閉じる/終了Note that closing the MDE automatically saves your changes to the entity, leaving the entity available for further work in the MDE.In case of records, this minimizes the record to the records list (saving the changes to the draft copy), but does not release the record.
フィールド情報を見る
編集中のフィールドのボキャブラリ説明を表示するには、行の最後にある省略記号ボタンを選択して行アクションメニューを表示し、フィールド情報を選択します。

Field Information is controlled by the Help URL field.For more information, see Editing Fields.
The tab that opens contains field-sensitive data based on MD registry definitions.情報タブで提供される情報のソースについては、以下の表を参照してください。表内の言語は、ユーザーの優先言語を指すことに注意してください。
| レジストリ | 情報タブのリンク |
|---|---|
| 書誌事項レコード: | |
|
MARC 21 |
|
|
KORMARC |
|
|
UNIMARC |
|
|
CNMARC |
|
| 所蔵 | |
|
MARC 21 |
|
| 典拠レコード: | |
|
MARC 21 |
|
|
UNIMARC |
|
|
CNMARC |
|
|
GND |
|
Open Form Editor
For certain fields that contain detailed input, opting to use the Form Editor can make entering and editing content much easier.

- LDRや001-009などのMARC 21固定フィールド、または所蔵852フィールドなどの複雑なフィールド
- LDRや001-009などのKORMARC固定フィールド、または所蔵852フィールドなどの複雑なフィールド
- Note: You can customize the 852 field Sublocation or collection (b) and Shelving location (c) drop-down lists in the Metadata Editor form editor to display the location's code, name, or code + name.For details, see Customizing How Library and Location Appear.
- UNIMARC向け1XXフィールド:100、105、106、110、115、116、117、120、121、122、123、125、126、130、135、140、および141UNIMARCの場合、制御フィールドは特定のサブフィールドに固有であり、フォームの編集はそれらのサブフィールドでのみ使用することができます。これらの場合、フォーム編集はそれらのサブフィールドに対してのみ使用できます。たとえば、UNIMARCフィールド123では、コントロールフィールドは$d、$eおよび$fのみです。この場合、特定のサブフィールドにカーソルを置き、Ctrl+Fを押して編集フォームを開きます。
- CNMARC - 1XXコード化データフィールドの一部
- Position your cursor in the specific subfield and select Open Form Editor(Editing Actions menu) or use the shortcut (Ctrl+F).To close the Form Editor, select Close Form Editor(Editing Actions menu) or use keyboard key Esc.
アラート領域
メタデータエディタのナビゲーションペインは、レコード、テンプレート、およびルール領域で同じように機能します。For brevity, where the information is applicable to these three areas, then records, templates and rules are referred to by the common name 'Entities'.
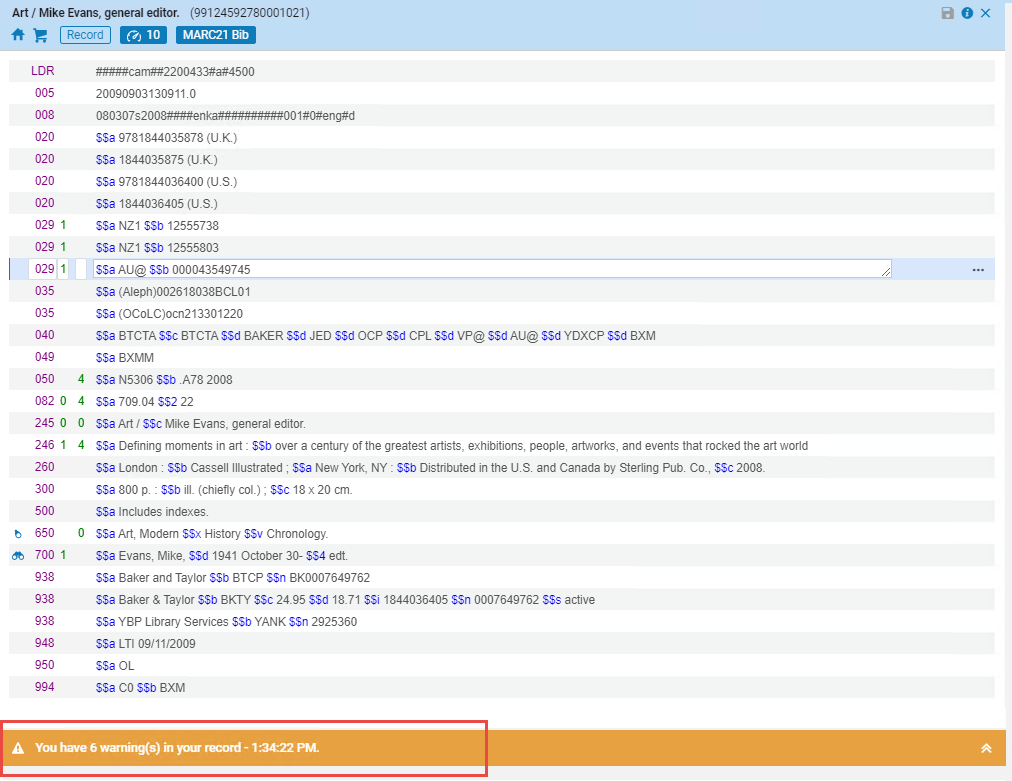
レコードを開いて編集すると、Almaは、レコードをチェックして、欠落している情報、無効な情報、重複したレコードなどのさまざまな特性がないか調べます。問題が見つかった場合は、アラートとして表示されます。Select the icon to view the issues that were found.
問題を修正してレコードを保存すると、アラートはアラート領域から削除されます。
キーボードキーによる編集ペインの移動
| アクション | 説明 |
|---|---|
| 上矢印 | レコード内のフィールドごとにカーソルを上に移動させます。 |
| 下向き矢印 | レコード内のフィールドごとにカーソルを下に移動します。 |
| 右矢印 | フィールド、サブフィールド、インジケータ、およびコンテンツ情報全体でカーソルを右方向に移動させることができます。 |
| 左矢印 | フィールド、サブフィールド、インジケータ、およびコンテンツ情報全体でカーソルを左方向に移動させることができます。 |
メニューキーボードショートカット
Users can easily and quickly access the menus in the new Metadata Editor using a keyboard only, to increase cataloging efficiency and ease of use.ショートカットにアクセスするには、Alt + 数字を使用して一番上の行のオプションに移動します。
| 最上行オプション | ショートカット |
|---|---|
| テンプレート | Alt+2 |
| ルール | Alt+3 |
| 保存 | Alt+4 |
| 新規 | Alt+5 |
| レコードアクション | Alt+6 |
| アクションの編集 | Alt+7 |
| 目録を追加 | Alt+8 |
| 関連データを表示 | Alt+9 |
| 検索と閲覧 | Alt+10 |
Metadata Editor Menu and Toolbar Options
次の表では、メタデータエディタのさまざまなメニューおよびツールバーオプションについて説明しています。
以下の表では、メタデータエディターのキーボードショートカットのリストを確認できます。
- メタデータエディタで前後(前のページと次のページ)に移動するには、 Alt + --> または <-- (右矢印または左矢印)を使用します。
- 画面左側のレコードにフォーカスするには、Alt+Shift+Bキーを使用します。
- 検索バーにフォーカスするには、Ctrl+Alt+Fキーを使用します。
- Shift+F2を押すと、Almaホームページに戻ります。
 Select the Menu name to quickly link to the specific menu's options, keyboard shortcuts, and descriptions.Save/New/Record Actions/Editing Actions/Add Inventory/View Related Data/Search & Browse/Additional
| アクション | キーボードショートカット | 説明 |
|---|---|---|
| 新規 | (Alt+N) | 選択に応じて、次のリストから空のレコードや機能を開きます(環境やインストール状況によって異なる場合があります)。
|
| テンプレート表示設定 | テンプレートの表示構成画面を開きます。ユーザーは、新規メニューで、どのテンプレートを表示するか、どのテンプレートを表示しないかを決めることができます。 | |
| 配置オプション(ネットワークゾーンコンソーシアムのメンバー機関にのみ関連) | 配置オプション画面を開きます。ユーザーは、新しいレコード、新しいテンプレート、新しいルールをデフォルトでメンバー機関に保存するか、ネットワークゾーンに保存するかを決定できます。 |
| アクション | キーボードショートカット | 説明 |
|---|---|---|
| Release Record | (Alt+Shift+R) | 変更を保存せずにレコードを解除します。レコードを解除すると、メタデータエディタの画面左側は使用できなくなります。 |
| 元のレコードを再読み込み |
リポジトリに保存されているレコードの最後のバージョンで、アクティブなレコードど再読み込み(上書き)します。この操作により、実行されてきた下書きの変更を破棄します。 In SBN Central Catalog integration, you can reload the latest version of bibliographic and authority records.他のすべての中央目録統合では、最新バージョンの書誌レコードのみをリロードできます。 The Reload Record from Central Catalog action is available when both criteria are met:
You can set Alma to automatically load the most recent version of the bibliographic records from the Central Catalog when opening a Central Catalog record for editing.To enable this, set the reload_record_from_central_catalog customer parameter to True (the default is False).この機能は、SBN統合には存在しません。 For details, see Retrieving the Latest Record Version from SBN. |
|
| 重複したレコード | レコードのコピーを作成します。 | |
| 新規レコードを派生させる | 関連する書誌レコードとデフォルトのテンプレートに基づいて、新しい書誌レコードを作成します。さらに、773または775フィールドでサポートされる関係も含まれます。For more information, see Deriving a New Bibliographic Record - MARC 21. | |
| 統合して結合する | 2つの書誌レコードを統合し、それらの2つの書誌レコードの目録を1つの書誌レコードの下に統合します。統合プロセスの結果、目録が残っていない書誌レコードを削除、非公開もしくは所蔵するオプションを選ぶことができます。See Merging Bibliographic Records for more information. | |
| 検証 | (Ctrl+U) | 書誌レコードで検証ルーチンを実行します。検証で生じた問題は、アラートタブに表示されます。検証ルーチンは、[リソース]の[メタデータ設定]で設定されます。See Editing Validation Routines for more information. |
|
一致を検索 |
(Ctrl+M) |
MARC書誌: ローカルレコードを編集するときは、まずローカル目録に現在のレコードと一致するものがあるかどうかを確認してください。コミュニティゾーンにリンクされているレコードを編集する場合、コミュニティゾーンに現在のレコードと一致するものがあるかどうかを確認します。To define the correct match profile to be used, you must configure the appropriate file key for serial_match_profile and non_serial_match_profile(see Configuring Other Settings (Resource Management)). MARC典拠: メタデータエディタで典拠レコードを編集している際、重複している典拠標目コンテンツを含むレコードを表示します。
典拠レコードの標目の一致 一致が見つかった場合、レコードを表示したり編集したりするオプションが表示されます。 Dublin Core / DCAP / ETD / MODS: 一致する書誌レコードを見つけます。 |
| メモを追加 | Add a personal note to a record. | |
|
別の目録者にレコードを割り当てる |
レコードを別の目録者に再度割り当てます。You can only assign it to catalogers who have the privilege to work with holdings in the scope of the record (Physical Inventory Manage privilege).For details on the scope of holdings records see the following presentation:Holdings record management on the library level. The record is displayed in bold in the list of open records in the Metadata Editor and a note is added under View Related Data > View Notes.新しい目録者にメールで送信するには、[Eメールとして送信]チェックボックスをオンにします。The Assign To Letter is sent.For more information, see Configuring Alma Letters. |
|
| 割り当てを解除する | 自分に割り当てられている書誌レコードのロックを解除して、他の誰かが作業できるようにします。 | |
| 別の目録作成者の解除レコード | 特定のユーザーに割り当てられているすべての書誌および所蔵レコードを解除します。以前の機能と同様に、解除されたレコードは割り当て解除状態になり、他のすべての目録者が処理できるようになります。
レコードの編集中は、編集を実行しているユーザーが使用中のため、レコードはロックされます。For details about locked records, see Locked Records While Working. |
|
| ディスカバリーから非表示 | (Alt+Shift+S) | レコードにタグを付けて、エンドユーザー検出システム(Primo、GoogleScholar、CDI、Z39.50、またはLibrariesAustraliaの所蔵のみ)の公開設定から除外/含めます。If a record has been suppressed, the Suppressed icon  appears next to the record in the left pane of the Metadata Editor and in the repository search results. コレクションレコードも非公開にすることができます。ただし、コレクション内のレコードは引き続き検出可能です。 For more information on the Z39.50 Server integration profile configuration, see Z39.50 Search. |
|
外部検索からの抑制 |
外部検索からの抑制タグを使用してレコードの検索を抑制するように設定されている SRU またはZ39.50統合プロファイルを使用して、外部システムによるレコードの検索を除外します。 Z39.50外部検索は、この設定とレコードの「検出からの抑制」管理タグの両方によって影響を受けます。SRU外部検索では、「外部検索からの抑制」のみを考慮に入れてください。 For more information on the Z39.50 Server integration profile configuration, see Z39.50 Search. For more information on the SRU/SRW Server integration profile configuration, see SRU/SRW Search. |
|
| 管理タグの設定 |
WorldCatにエクスポートする
OCLC同期に設定/解除するレコードにタグを付けます。 Select one of the following options to indicate how to handle the record:Don't Publish,Publish Holdings Only,Publish Bibliographic Record. The Publish Bibliographic Record option is the default setting in the following workflows:
OCLCにエクスポートされ、このエクスポートパラメーターを別の値に変更することによって非公開にされたレコードは、削除済みとして公開されます。 |
|
|
WorldCatへの強制エクスポート:
OCLCへの次のエクスポートで、書誌レコードにリンクされた所蔵レコードを含みます。 |
||
|
Libraries Australiaへのエクスポート:
Libraries Australiaとの同期を設定/解除するレコードをタグ付けます。 Select the radio button to indicate how to handle the record by either Don't Publish or Publish bib. 書誌レコード管理タグがオーストラリア図書館へエクスポートについて書誌を公開するに設定されている場合、所蔵レベルの非表示は、レコードがオーストラリア図書館に公開されているかどうかを決定する要因となります。
|
||
|
Libraries Australiaへの強制エクスポート:
Libraries Australiaへの次のエクスポートで、書誌レコードにリンクされた所蔵レコードを含みます。 |
||
|
目録から削除 |
This option is only displayed if you have a Community Zone linked bibliographic record! このオプションは、カタログ作成機能拡張ロールを持っている場合にのみ表示されます。 コミュニティゾーンから作成され、コミュニティゾーンにリンクされている書誌レコードは、教育機関によって削除される場合があります。 |
|
| レコードを削除する | (Ctrl+D) | このオプションは、拡大目録者の役職を持つユーザーに対して有効になります。コミュニティゾーンにリンクされている書誌レコードで作業している場合、このオプションはグレー表示されることに注意してください。
レコードの削除(Ctrl+D)機能は、次のものを削除します。
For information about deleting bibliographic records in bulk, see Deleting Sets of Bibliographic Records. |


| アクション | キーボードショートカット | 説明 | ||||||||||||||||||||||||
|---|---|---|---|---|---|---|---|---|---|---|---|---|---|---|---|---|---|---|---|---|---|---|---|---|---|---|
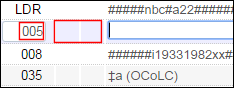
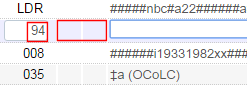
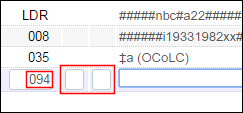
| フィールドを追加 | (F8) | 目録化する際にフィールド値を設定できる新しい空の行を追加します。
追加されるフィールドや行がLDR、005、008などのコントロールフィールドである場合、ファーストとセカンドインジケーターのスペースは表示されません。一部のフィールドではゼロを入力することで、ファーストインジケーターとセカンドインジケーターを3桁で表示する必要があるフィールドが存在します。以下の図を参照してください。
|
||||||||||||||||||||||||
| サブフィールドを追加 | (F9) | アクティブなフィールドでのインライン目録を許可するために、定義された区切り記号(たとえば、$$や‡)を使用して新しいサブフィールドを追加します。 | ||||||||||||||||||||||||
| フィールドを削除 | (Ctrl+F6) | このオプションを使用して、1つ以上のフィールド(行)を削除します。
削除する行を選択してフォーカス行にするか、Ctrlキーを押しながらクリックして複数の行を選択し、[フィールドの削除]またはCtrl+F6を選択します。 For more information, see the Delete Multiple Fields in the MD Editor video (1:00 min.) |
||||||||||||||||||||||||
| フォームエディタを開く | (Ctrl+F) | This is functional for MARC 21, KORMARC, UNIMARC, and CNMARC as described below.
これらのフィールドの1つがMDエディタのアクティブ行である場合、Ctrl+fを押して編集フォームを開き、Escを押してフォームを閉じます。 MDエディターフォームエディターの852フィールド[サブロケーションまたはコレクション(b)]および[配架場所(c)]ドロップダウンリストをカスタマイズして、ロケーションのコード、名前、またはコード+名前を表示することができます。For details, see Customizing How Library and Location Appear. |
||||||||||||||||||||||||
|
権限見出しを開く |
F3 |
このメニューオプションはのみユーザーが F3 機能 (ルックアップ機能) をサポートするフィールドにいるときに表示されます。
この機能を使用すると、特定の書誌見出しから典拠見出しを検索できます (F3 検索機能と同じ)。あるいは、ユーザーは F3 を選択してこの機能にアクセスすることもできます。For more information on the F3 lookup functionality, see Linking an Authority Record to a Bibliographic Record. |
||||||||||||||||||||||||
| フォームエディタを閉じる | (Esc) | コントロールフィールドエディターを終了し、標準エディタービューに戻ります。 | ||||||||||||||||||||||||
| フィールド情報 | (Alt+F) | 編集しているフィールドの語彙解説が表示されます。For more information, see View Field Information. | ||||||||||||||||||||||||
| カットフィールド | (Ctrl+Shift+X) | 選択したテキストを切り取ります。 | ||||||||||||||||||||||||
| フィールドをコピー | (Ctrl+Shift+C) | 選択したテキストをコピーします。複数のフィールドを同時にコピーするには、Ctrlキーを押しながら、コピーするすべてのフィールドを選択します。 | ||||||||||||||||||||||||
| フィールドを貼り付け | (Ctrl+Shift+V) | 先程カットまたはコピーしたテキストを貼り付けます。カーソルで指定した位置にフィールドが貼り付けられます。複数のフィールドを同時に貼り付けると、フィールドは数値のソート順に貼り付けられます。 | ||||||||||||||||||||||||
| レコードの強化 | (Ctrl+Alt+E) / (Ctrl+Alt+W) | 事前設定された正規化手順を実行します。正規化はメタデータレコードの修正または更新を目的としています。たとえば、レコードのフィールドの並べ替え、空のフィールドの削除、オーダー情報を含むフィールドの削除が可能です。For more information, see Working with Normalization Rules.
ネットワークゾーンレコードで作業する場合、この機能は共有フィールドにのみ適用され、ローカルフィールドには適用されません。If you want to run a normalization rule on a local field, you can do so using one of the Bib normalization jobs (see Running Manual Jobs on Defined Sets), which take into account only local fields. |
||||||||||||||||||||||||
|
削除、切り取り、貼り付けフィールドを元に戻す |
(Ctrl+Shift+Z) |
オペレーターは次のアクションで元に戻すことができます:
When applying the undo action to a selection of multiple fields (achieved by using ctrl+select), the action is applied individually to each field.たとえば、3つのフィールドが削除された場合、Ctrl+Shift+Zを使用すると、最初のフィールド、2番目のフィールドなど、各フィールドが連続して復元されます。 |
||||||||||||||||||||||||
|
Unicode文字を挿入する |
(Ctrl+Alt+P) |
Enables library staff to input special characters sets directly in the MD Editor using the virtual keyboard. The virtual keyboard can be accessed using the shortcut or from the Metadata Editor Editing Actions > Insert Unicode Characters action.
仮想キーボード
|
||||||||||||||||||||||||
| テンプレートから拡張 | (Ctrl+E) | 指定されたテンプレートを使用して、レコードのデータフィールドを展開します。レコードのタイプは、書誌、所蔵および典拠のいずれかです。
MDエディタで複数のパネルが開いている場合、テンプレートから展開機能がフォーカスされているパネルに適用されます。 See Expanding a Record from a Template and Working with Record Templates for more information. |
||||||||||||||||||||||||
| 著者番号を生成する | (F4) | 著者番号を生成
著者番号は、次のものに対して生成されます。
|
||||||||||||||||||||||||
| 代替グラフィック表記を追加 | (Alt+F1) |
このパラメータがFalseに設定されている場合、このオプションを使用すると、880リンケージを複雑にすることなく、ペアのフィールドを編集できます。たとえば、245フィールドが選択されている場合、このオプションを使用すると、入力に関連するスクリプトを選択することができます。指定されたスクリプトに入力するための追加の行がエディタで開かれます。
|
||||||||||||||||||||||||
| 方向特性文字の表示 | 目録化する際に、方向制御特性文字を表示するには、このオプションを選択します。これらの文字は、左から右へと書く言語と右から左へと書く言語の両方を持つテキストを目録化する際に、テキストの方向を制御するために使用されます。See below for an example of a right-to-left Hebrew title with the Latin C++ entered in left-to-right mode and the ⌈ and â–¼ directional symbols as part of the text.
方向制御特性文字 このメニューオプションを選択すると、テキストの方向の変化を表す記号がテキストに表示されます。文字の方向制御特性を表わすグラフィック表記については、以下の表を参照してください。[方向特性文字の表示]を選択したときに表示されるグラフィック表記の後に、方向を制御する非表示のUNICODE文字が続きます。 Note that if you want to copy/paste or cut/paste directional characters, you need to copy/cut both the hidden UNICODE directional character and the graphical representation that is prepended to it to successfully paste directional characters.
[方向特性文字の表示]を選択してシンボルを表示すると、このオプションの左側にチェックマークが表示されます。
選択された方向特性文字を表示 このオプションをもう一度選択すると、オフになります。これを行うとこのオプションの左側のチェックマークが表示されなくなります。 For additional information on cataloging in Hebrew, see Special Issues in Hebrew Cataloging. 新しいメタデータエディタが使用されていない場合、スラッシュキー「/」はフォーカスを永続検索バーに移動させません。この機能は現在、ユーザーが新しいメタデータエディターを使用する場合はサポートされていません。 |
|||||||||||||||||||||||||
| 文字の入力方向を追加 | 目録化するフィールド/サブフィールドのテキストを入力する方向を識別するには、このメニューアイテムから方向オプションのいずれかを選択します。もしくはこのメニューリストに表示されるキーボードショートカットを使用することができます。詳細については、上の表を参照してください。
メニューからこれらのオプションのいずれかを選択した際に、[方向特性文字の表示]を選択すると、入力を開始するまで方向記号が表示されないという問題があります。ただし、キーボードショートカットを使用して方向を変更すると、すぐに方向記号が表示されます。 |
|||||||||||||||||||||||||
| XML表示 | Ctrl+Alt+X | レコードをXMLファイルとして表示します。 |


| アクション | キーボードショートカット | 説明 |
|---|---|---|
| (MARC21) 所蔵の追加 | (Ctrl+Alt+H) | 現在の書誌レコードにリンクされている所蔵レコードを追加します。 |
| アイテムを追加 | (Alt+I) | 所蔵レコードにアイテムレコードを追加します。
このオプションを選択すると、[冊子エディタ]ページが開きます。See Updating Item-Level Information for more information. |
| テンプレートからアイテムを追加する | (Alt+L) | Add an item record to the holdings record by using a template (incorporating a pre-existing items details) to pre-fill fields such as notes, item policy, material type, temporary location, and so forth.The template will encompass all the item's details except for Barcode, Inventory number, Pattern information, Process type, At (request department), Item call number prefix/suffix, and Temporary call number prefix.
After this option is selected, the Use Item Template pop-up window is displayed enabling users to select the template the added item will be based on. Watch the Item Templates video (3:23 mins).
アイテムテンプレートの使用ポップアップウィンドウ |
| ポートフォリオを追加 | (Alt+O) | ポートフォリオを追加Opens the New Portfolio page with the Use existing title radio button selected and the Choose title field filled in and identified as a required field with a red asterisk.See the section Managing Local Portfolios for more information. |
| [表記を追加] | (Alt+R) | 表記を追加表記を書誌レコードに追加するために、[表記の詳細]ページを開きます(MARCレコードのみ)。For more information, see Adding a Representation. |

| アクション | キーボードショートカット | 説明 |
|---|---|---|
| 検索画面で表示する | (Ctrl+Alt+V) |
リポジトリ検索ページで、レコードを結果リスト形式で表示します。 For more information, see the MetaData Editor Hotkey to Search for Current Record (Ctrl+Alt+V) video (0:57 min.). |
| 目録の表示 | (Ctrl+I) | 書誌レコードにリンクされている次の目録を確認し、結果を分割エディターモードで表示します。
|
|
リンクされたデータを表示する |
MDエディタで書誌レコードを操作すると、レコードのリンクされたデータ情報が利用可能になります。リンクされたライブラリ データは、オンライン リポジトリでのタイトルの検索や、タイトルに関連する典拠レコードなど、タイトルに関連する外部リソースです。 For more information, see Using Linked Data While Working with Bibliographic Records. |
|
| メモを表示する | Display working copies of notes. | |
| オーダーを表示 | 注文明細ページで注文明細リスト形式でレコードを表示します(オーダーがある場合に限る)。 | |
| 関連する書誌レコードを表示する | [関連レコード]ジョブが実行されると、現在存在するレコードに対し、関連するものとして定義されたレコードがあるかどうかを確認します。For details on creating and viewing related records, see Configuring Related Records for Physical Inventory. | |
| バージョン情報を表示する | 以前のバージョンのレコードを表示および復元します。
以前のバージョンの表示と復元 Note that when the Restore Record Version privilege is disabled for your user role, the Restore option does not appear when you are editing bibliographic, holdings, and authority records and select the View Versions (View Related Data > View Versions) option.By default, the Restore Record Version privilege is enabled for the Cataloger, Catalog Manager, Catalog Administrator, and Cataloger Extended roles.When the Restore Record Version privilege is disabled, the role can still view past versions of a record.See Privileges Report for more information.Contact Support, if you want to have this privilege configured for one or more of these roles for your institution. バージョンカウンターは、レコードが初めて変更されてから開始されます。インポートまたはメタデータエディタでの手動によるレコードの作成は、バージョンとしてカウントされません。As a result, when you select View Related Data > View Versions for a new record, the system responds with the message No revisions were found.
バージョンの表示 - 新しいレコード After the first modification to the record, the version counter starts; and selecting View Related Data > View Versions opens the Metadata Editor in split screen mode with the Versions tab as shown in the figure below.
バージョンの表示 - 変更されたレコード In the figure above, the Version: 1 indicates that the record has had its first modification.その後は変更のたびにバージョン番号が増えていきます。 The Created By: label is followed by the:
|
|
| 元のレコードのバージョンを表示 | ネットワークゾーンに保存する前に、ローカルレコードの以前のバージョンを表示します。また、コミュニティゾーンレコ-ドに保存されたローカル変更を表示します。See Network-Managed Records in a Collaborative Network. | |
| アイテムを表示する | (Alt+T) | Enables quick access to the list of items linked to a bibliographic or holdings record while editing.When selected, all the items of the bibliographic or holdings record are displayed in the item list.
アイテムの表示オプション |


| アクション | キーボードショートカット | 説明 |
|---|---|---|
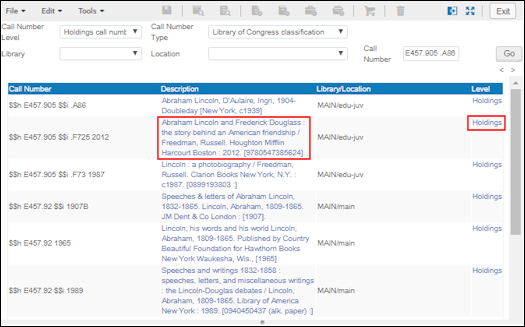
| シェルフリストを参照する | (Alt+C) | カーソルが請求番号フィールドを指している場合、次の追加オプションが表示され、請求番号の参照を行います。
この機能は、[リソース > 目録 > シェルフリストを参照する]からでも有効になります。For more detailed information, see Browsing the Shelf Listing. 請求番号の[説明]列のリンクを選択すると、書誌レコードがメタデータエディタで開かれ、編集できるようになります。When you select the Holdings link in the Level column for a call number, the holdings record opens in the Metadata Editor for editing.
Browse Shelf Listing Call Number Results List. この参照の動作方法を設定することはできません。 |
| 書誌事項の見出しを閲覧する | 書誌の標目をブラウズThis capability can also be accessed from Resources > Cataloging > Browse Bibliographic Headings.See Browsing Bibliographic Headings for more information. | |
| 外部リソースを検索 | 外部書誌データベースを検索し、関連レコードを表示、選択し、リポジトリにインポートします。このオプションは通常、目録のコピーワークフロー用に選択されます。See Searching External Resources for more information. |
| アクション | キーボードショートカット | 説明 |
|---|---|---|
| ネットワークで共有 | ローカルで作成したレコードをネットワークゾーンに共有します。See Network-Managed Records in a Collaborative Network. | |
|
レコードをセントラル目録に提供 |
(Ctrl+Alt+C) |
外部総合目録に変更を投稿します。[主要目録統合プロファイル]を設定した場合にのみ表示されます。See Integrating an Aleph Central Catalog. When working in a Network Zone, you can ensure that updates made by one of the members on a centrally-managed record are automatically saved in the Central Catalog record as well.これにより、「レコードを総合目録に提供する」オプションを使用する必要がなくなりました。To activate automatic saving in the Central Catalog, select the "Automatic contribute to central catalog" checkbox in the integration profile for Aleph Central Cataloging (Configuration > Integration profiles > Aleph system > Action tab). |
| 目録にコピーする | 共有したい書誌レコードを機関のローカルリポジトリ(機関ゾーン)にコピーします。コピーしたレコードは、コミュニティゾーンからのリンクが解除されている状態です。
その後の有効化操作では、コピーされた書誌レコードを機関ゾーンに再度コピーすることはできません。重複を防ぐために、Almaは元のシステムIDを識別しようとします。また、機関ゾーンの書誌レコードと一致する場合は、機関ゾーンの書誌レコードが使用されます。 This menu option also appears for a member of a network zone consortium when editing a record which is saved in the network zone.Copy to Catalog unlinks the record from the network zone and saves it in the member institution. |
|
| ネットワークゾーンで検証を実行する | ネットワークゾーンの検証ルールに従って、ローカル書誌レコードを検証します。See Copying and/or Linking Local and Network Zone Bibliographic Records. | |
| コレクションを表示 | 書誌レコードが割り当てられているコレクションを表示し、レコードのコレクションへの割り当てと割り当て解除を可能にします。For more information, see Viewing and Assigning Collections. | |
| MARC書誌: | ||
|
配架場所情報をマージ |
(Alt+Shift+L) |
This option is enabled only if a central catalog integration profile for SBN is defined.For details, see Sending Location Information and Updating the UNIMARC 899 Field in Alma. |
| レコードバージョンを総合目録に調整する | This option is enabled only if a central catalog integration profile for SBN is defined.For details, see Aligning Record Version with SBN. | |
| 注文明細を作成して終了 | (Ctrl+Alt+O) | アクティブなレコードの書誌情報に基づいて注文明細を作成します。(これには、目録オペレータの役職アクセス許可が必要です)。 |
| MARC典拠
MARC典拠オプションは、MARC 21、UNIMARC、GNDなどの典拠レコードで使用できます。 |
||
| 典拠レコードの配架場所の変更 | 典拠レコードを使用して下書きモードで作業しているときに、レコードの配架場所をコミュニティゾーン、ネットワークゾーン、または機関ゾーンに変更することができます。When you select Change Authority Placement, the options provided in the New Authority Record Placement dialog box vary depending on how your Metadata configuration is set for locally managed or community managed authority records (see Controlling the Display and Access of Global Authorities in the Metadata Editor).
After you have saved the authority record, the Change Authority Placement option is disabled.レコードの配架場所を変更することができなくなります。 |
|
|
参照形を表示する |
典拠レコードの5XXフィールドにフォーカスして、編集中の典拠レコードとリンクされた典拠レコードの両方のレコードを表示します。テキスト一致を使用するボキャブラリの場合、一致する典拠レコードが複数存在する場合があり、その際はすべての典拠レコードがリスト化されます。 |
|
| MARC 21所蔵 | ||
| 書誌レコードの表示/編集 | (Ctrl+Alt+B) | 書誌レコードを表示します。 |
| 書誌からの更新 | (Alt+U) | 以下のルールに従って、所蔵レコードの852フィールドに書誌レコードのフィールドを追加します。
上記のルールはすぐに利用可能な設定であり、請求番号マッピングページで定義されます。For more information, see Mapping Call Numbers to Holdings. 「書誌レコードからアップデート」 オプションを使用すると、インポート時の請求記号の正規化後に、所蔵レコード内のサブフィールドが再配置されます。 サブフィールドは、次の順序で並べ替えられます。
852のサブフィールドは、次の順序で並べ替えられます。
|
| 別の書誌レコードへ再リンクする | 所蔵レコードを別の書誌レコードに再リンクさせます。For more information, see Moving Holdings Between Physical Records (Relinking). | |
| 受入番号を生成する | 852フィールドの所蔵レコードの受入番号を生成します。See Configuring Accession Numbers for more information. | |
| 次に予測されるアイテムの情報 | See Prediction Patterns. | |
| 予測アイテムを開く | See Prediction Patterns. | |
| 目録の表示 | See Prediction Patterns. | |
| Dublin Core / DCAP / ETD / MODS | ||
| 目録の表示 | 書誌レコードにリンクされている次の目録を確認し、結果を分割エディターモードで表示します。
|
|
| 管理タグの設定: | ||
| 簡易レベル | 簡易レコードのレベルを表示します。See Viewing the Brief Record Level Set for a Bibliographic Record for more information. | |

| アクション | 説明 |
|---|---|
| 上矢印 | レコード内のフィールドごとにカーソルを上に移動させます。 |
| 下向き矢印 | レコード内のフィールドごとにカーソルを下に移動します。 |
| 右矢印 | フィールド、サブフィールド、インジケータ、およびコンテンツ情報全体でカーソルを右方向に移動させることができます。 |
| 左矢印 | フィールド、サブフィールド、インジケータ、およびコンテンツ情報全体でカーソルを左方向に移動させることができます。 |
| アクション | 説明 |
|---|---|
| 所蔵を追加
|
現在の書誌レコードにリンクされている所蔵レコードを追加します。 |
| レコードを保存
|
ここではリポジトリ内のレコードに加えられた変更が保存されますが、レコードは解除されません。レコードを解除するには、[レコードの解除]オプションを使用してください。 |
| 注文明細を作成して終了
|
注文明細を作成します。[注文明細の所有者とタイプ]ページを開き(注文明細を手動で作成する際の最初のステップ)、[メタデータエディタ]ページを終了し、アクティブレコードの書誌情報に基づいて注文明細を作成します。
See Manually Creating a PO Line for more information. (これには、目録オペレータの役職アクセス許可が必要です)。 |
| アイテムを追加
|
冊子を追加します。[冊子エディタ]に移動して、この所蔵レコードにアイテムを追加します。このアイコンは所蔵レコードに対してアクティブです。 |
| 目録の表示
|
アイテムレコードへのリンクを含む、書誌レコードにリンクされた目録レコードのリストを開きます。目録の内容に応じて、リストには所蔵(物的リソース)、表記(デジタルリソース)、ポートフォリオ(電子リソース)が含まれる場合があります。
書誌レコードは、冊子、デジタルまたは電子リソースにリンクすることができるため、リスト化された際にすべて表示されることがあります。 ポートフォリオは、メタデータエディターの目録セクションから直接削除できます。Select the more actions button (  ) and select Delete.
目録セクション - ポートフォリオを削除します。 |
| 書誌レコードを削除する
|
リポジトリから書誌レコードを削除します。このオプションは、拡大目録者の役職を持つユーザーのみが、書誌レコードに関連付けられた注文明細または目録が存在しない場合にのみ使用することができます。For information on deleting bibliographic records in bulk, see Deleting Sets of Bibliographic Records. |
| 書誌レコードの表示
|
MARC 21所蔵を操作する際に、関連する書誌レコードを表示するには、分割エディターモードを開きます。 |
| ポートフォリオを追加(Alt+O)
|
ポートフォリオを追加Opens the New Portfolio page with the Use existing title radio button selected and the Choose title field filled in and identified as a required field with a red asterisk.See the section Managing Local Portfolios for more information. |
Add Representation (Alt+R) |
表記を追加表記を書誌レコードに追加するために、[表記の詳細]ページを開きます(MARCレコードのみ)。For more information, see Adding a Representation. |
| エディタ分割モード
|
2つのレコードを並べて編集できるように開きます(ただし一度にアクティブになるのは片側だけです)。右側のパネルを選択し、レコードのリストからレコードを選択します。 |
| 全画面表示
|
ページ全体で主要編集画面を開きます。 |


MDエディタでレコードを保存
MDエディタには、下書きを手動で保存する前に変更が紛失しないようにする自動保存機能があります。自動保存は変更後30秒ごとに行われます。下書きレコードは、作業中のユーザーのみが編集でき、Webセッションの間、持続的に作用します。30日間変更がない場合、下書きレコードは削除されます。
リポジトリにレコードを保存すると、Almaは以前のバージョンを自動的にバックアップし、今後の参照のために保存します。開いているレコードをリポジトリで保存して解除した後でも、以前のバージョンは引き続き使用でき、リポジトリに復元することができます。以前のバージョンを復元すると、リポジトリ内の現在のバージョンが上書きされます。
レコードでの作業が終了したら、ファイルメニューからレコードを保存するか、Ctrl+Sを押します。変更されたレコードはリポジトリに保存されますが、リリースが明らかになるまでチェックアウトされたままになります([レコードアクション] > [レコードの解除])。
またはリポジトリから元のレコードをリロードすることもできます。これにより、現在の下書きがレコードの現在のバージョンに置き換えられ、行った変更は削除されます。レコードはチェックアウトされたままです。
レコード編集中でも、Ctrl+Alt+Sキーを押せば、レコードをチェックインせずに下書きとして保存することもできます。
See Cataloging Privileges for additional information regarding saving records when you have implemented cataloging permission levels.
保存時に正規化する
MDエディタでレコードを保存すると、次の正規化が処理されます。
- 035フィールドは(003フィールドが存在する場合)001および003フィールドから派生しています
- 新規レコードの場合、001値は元のシステムID(MMS ID)として保存されます
- 既存のレコードの場合、001フィールドはMMS IDで更新されます
- 008フィールドが存在する場合は更新されます
- 005フィールドが更新されます
- LDR(リーダー)フィールドの一部(主にレコードの長さ)が更新されます
- Any additional, custom normalize on save processes/tasks configured in MARC 21 Bib normalize on save or MARC 21 Holding normalize on save, for example, by your institution are processed (refer to Working with Normalization Processes for more information)
Personalized Quick Links to Favorite Actions
Users are able to create single-click shortcuts to their most commonly used actions in the Metadata Editor.最初のアクションには、専用のキーボード ショートカットもあります。
The Metadata Editor Quick Links have separate menus for records, templates, and rules (as the available actions differ).The Quick Links menu, located on the far right of the Metadata Editor menu bar, is according to the action menus displayed on screen.

各目録者は、独自のクイック リンクを追加、削除、または並べ替えることができます。
- Select the star (
 ) next to the action in the menu or use the new Ctrl+Q shortcut after navigating to it with the keyboard.
- クイックリンクまたはショートカットをドラッグアンドドロップするか、スペースキーと矢印キーを使用します。
 クイック リンクをドラッグ アンド ドロップしてリストを並べ替える
選択したクイック リンクをメタデータ エディタ メニューの下の独自のアクション行に表示するには (常にマウス クリックで使用できます)、クイック リンク メニューをピン留めするだけです (クイック リンクが追加されると使用可能になります)。

レコードクイックリンクメニューには、デフォルトテンプレート(「新規」メニューに表示されている場合)からアイテム、ポートフォリオ、表記、所蔵を追加するためのクイックリンクが用意されています。これらは、必要に応じて削除または再注文できます。
MDエディタでの発音区別記号と特殊文字の入力
目録化する際に、MDエディタにて発音区別符号、特殊文字、または非ラテン文字を入力する必要がある場合があります。
- From the Windows Start menu, select Start
 > Windows Accessories > Character Map.
- Select a font from the Font drop-down list.
- MDエディタに挿入する特殊文字を選択します。
- Select the Select button, and then select Copy.
- MDエディタに文字を貼り付けます。
For more information, see How to Input Special Characters in Alma.
UTF-8 special characters (with diacritics) may be represented in both the composed or decomposed version of the character in bibliographic or authority records.You have the option to configure your system with normalize on save always to save the composed version of special characters, to implement to avoid the use case where multiple records are changed due to their conversion to composed representation.Such records are marked for preferred-term correction (PTC) and cause heading updates (the only difference is the composed/decomposed nature of a special character).If you are interested in this method of handling UTF-8 special characters, please contact Ex Libris Support.
Using Non-Filing Markers/Indicators in MARC 21
MARC 21レコードの場合、Almaはファイリング以外のマーカーとインジケータに関連する次の機能をサポートしています。
-
非ファイリングマーカーを示すために山かっこ<< >>を使用する目録ルールがサポートされています。
たとえば、ヘブライ語のコンテンツを含むMARC 21レコードを目録化する場合に山かっこが使用されます。
- 240および245フィールドので感度インジケータは、並べ替え機能を指定するために使用されます。
非ファイリングマーカーとインジケータは、表示、並べ替え/参照、目録化にむけて、以下の表で説明する方法にて使用されます。
| コンポーネント | 説明 |
|---|---|
| 表示 | 山かっこ内にテキストがある場合、テキストが表示されるときにかっこが削除されます。 |
| 並べ替え/参照 | 並べ替えまたは参照の目的で、山かっこ内のテキストは無視されます。 |
| MDエディタ | MDエディタでは、目録レコードが入力される領域に山かっことかっこ内のテキストが表示されます。ただし、MDエディタでタイトルなどがテキスト表示される場合、山かっこは削除されます。 |
UNIMARCにおける非ファイリングマーカーの使用
UNIMARCレコードの場合、Almaはさまざまな地域で使用される山かっこ<< >>の目録ルールをサポートし、非ファイリングマーカーを活用していきます。たとえば、UNIMARCでは山かっこを使用して、フィールドの先頭(または中央)にilやleなどのファイリングしないテキストを指定することができます。
非ファイリングマーカーで山かっこを使用する場合には、Almaが表示、並べ替え/参照、目録を処理する方法を説明する上記セクションの表を参照してください。例については、以下の図を参照してください。


Using Non-Filing Markers/Indicators in KORMARC
KORMARCレコードを使用する場合、Almaリポジトリでの検索と標目の参照が拡張され、非ファイリング指針と文字を含むレコードを処理するロジックが含まれるようになります。並べ替えられた結果リストは、標目参照時に、非ファイリング文字を無視します。たとえば、a、an、theなどの冠詞は無視できます。
KORMARCでは、非ファイリング文字は、以下の表に示すように、$aの先頭にある非ファイリングテキストをかっこで囲み、ファーストまたはセカンドインジケーター位置でインジケーター値1を囲むことで識別されます。
| インジケータの位置 | KORMARCフィールド |
|---|---|
| 1 | 630、740 |
| 2 | 130、222、240、242、243、245、440、490、730、830 |
ファイリング以外の文字は並べ替え目的で無視されますが、システムは完全なエントリを表示します。例:
- Record: 245 0 1$$a(The) Journal of product innovation management.
- 並べ替え: Journal of product innovation management.
- 表示: The Journal of product innovation management.

Using the same KORMARC record example above, the result The Journal of product innovation management. is returned when any of the following searches have been specified:
- Keyword search contains the or journal
- Search phrase contains the journal of product or journal of product
- Search starting with contains the journal of product or journal of product
テンプレートからレコードを展開
MDエディタのレコードに[テンプレートから展開]オプションが適用されると、システムは次のプロセスを使用してレコードのデータフィールドを展開します。
ネットワークゾーンテンプレートは、GNDやBAREなどのコミュニティゾーンで管理される機関をカタログ化するときに機関で使用できます。
- テンプレートのインジケータに関係なく、システムはタグに従ってすべてのテンプレートのデータフィールドをグループ化し、出現順序を維持します。
- 各テンプレートグループに対して、システムは以下を実行します。
- インジケータに関係なく、システムは、テンプレートグループのタグに一致するレコードのすべてのデータフィールドをグループ化し、出現順序を維持します。
- 次に示すように、テンプレートのグループの最初のデータフィールドとレコードのグループの最初のデータフィールド間で次の比較を実行します。(各グループの次のデータフィールドなどが続きます)
- テンプレートのデータフィールドに、対応するレコードのデータフィールドにないサブフィールドが含まれている場合、サブフィールドは対応するレコードのデータフィールドに追加されます。
- レコードのグループに対応するデータフィールドがない場合、テンプレートのデータフィールド全体がレコードに追加されます。
例として、テンプレートのグループに次のデータフィールドが含まれている場合は次の通りです。
フィールド 1: 260 _3 $$a Boston $$c 1971 Field 2: 260 _3 $$a Boston $$c 1973
また、レコードのグループに一致するデータフィールドが1つだけ含まれている場合は次の通りです。
フィールド 1: 260 __ $$a New York
システムはテンプレートのグループの最初のデータフィールドのサブフィールドを、レコードのグループの最初の対応する(インジケータを無視した)データフィールドに追加しします。書誌レコードには2番目に一致するデータフィールドがないため、テンプレートのグループから完全な2番目のデータフィールドをレコードに追加します。
260 __ $$a New York $$c 1971 260 _3 $$a Boston $$c 1973
Learn more about expanding a record using a template in the Expand a Record Using a Template video (4:24 mins).
See Working with Record Templates for more information.
- MDエディタで展開するレコードを開きます。
- Select Edit > Expand from Template to display the Expand from Template dialog box.
 テンプレートオプションから展開
この例では、次のテンプレートが使用されます。
 展開テンプレートの例
- In the Expand from Template dialog box, select a template from the Choose Template drop-down list and select OK to expand the record.
 テンプレートダイアログボックスから展開
次の図は、新しい008および260フィールドと、展開された245および260フィールドを含む展開レコードを示しています。

 展開前後のレコード例
新規書誌レコードの派生 - MARC 21
MDエディタの[MARC 21書誌メニューの新規レコードの派生]ツールを使用すると、関連する書誌レコードとデフォルトテンプレートを使用して、次のいずれかのタイプの関連を含む新規レコードを作成できます。
- ホストアイテム(773) – 別の書誌レコードで記述されているジャーナルの特定の記事を参照する分析レコード。
- その他エディション(775) – 同じ書誌レコードの他のエディションを説明するレコード。
上記の各フィールドには、元の関連レコードから入力される次のサブフィールドが含まれています。
- t – 元の245.a(タイトル)。
- w – 各035フィールドの035.aサブフィールドまたは元のMMS IDを含む繰り返し可能なサブフィールド。
- x – 反復性のないISSN(022.aに存在する場合)。ツールは最初の出現のみを使用します。
- z – 反復可能なISBN(020.a / 020.eに存在する場合)。
- g – 関連する部分。これは必須のサブフィールドですが、手動で入力する必要があります。このツールには、フィールドにプレースホルダーが含まれています。
- p – 略称タイトル。これは必須のサブフィールドですが、手動で入力する必要があります。このツールには、フィールドにプレースホルダーが含まれています。
- q – 最初のページのリスト。これは必須のサブフィールドですが、手動で入力する必要があります。このツールには、フィールドにプレースホルダーが含まれています。
新しい所蔵レコードが保存されると、システムは空のサブフィールドを削除します。
さらに、このツールは元の関連レコードから次のフィールドを含み、デフォルトのテンプレートのフィールドに組み合わせます。
- 050、080、260 - 元の関連レコードからの最初の出現のみが含まれますが、デフォルトテンプレートからの他の出現も含まれます。
- 300.c - 元の関連レコードのa cサブフィールドを有する300フィールドのすべての出現が含まれます。ツールは、元の関連レコードからcサブフィールドのみコピーすることに注意してください。
- [MDエディタ]を開きます([リソース > 目録 > メタデータエディタを開く])。
- デフォルトのテンプレートを指定し、リンクしたい関連レコードを開きます。
- Select Record Actions > Derive New Record.
- Select Host Item(773) or Other Edition(775) from the Choose Record Type drop-down list and select OK.派生させたレコードが開きます。
 773または775フィールドを選択します
たとえば、次の図は、新規に派生させたレコードの入力に使用されたフィールドを示しています:
 元の関連レコード
次の図は、新規派生レコードの結果を示しています。ハイライトされていないフィールドは、デフォルトのテンプレートから取得されます。
 775フィールドおよびその他の派生フィールドを示す取得レコード
773または775タグの$wサブフィールドのレコード番号の前にかっこでMARCコードを挿入すると、Almaは関連レコードリンクを作成しません。この例は、775タグの上の図にあります: ...$$w (OCoLC)1819120601 ...Therefore, it is recommended not to use parenthesized MARC codes in $w subfields in 773 and 775 tags.
- Enter any additional fields and update the empty g,p, and q subfields in the 773 or 775 field.
- 変更を新しいレコードに保存します。
新しい書誌レコードの派生 - UNIMARC
AlmaがMARC 21に提供するサポートと同様に、Almaは関連および派生させたUNIMARC書誌レコードのサポートを提供します。UNIMARC 4XXフィールドの関連レコード情報は、以下の例に示すように、(MARC 21形式の77Xフィールドと同様に)Almaでその方法で維持され続けます。
- 410 0$1001CFI0053075$12001 $aSaggi$v200
- 410 0$1001RCA0545544$12001 $aScienza politica.Saggi
- 410 0$1001UBO3505978$12001 $aStoria e teoria politica
AlmaはレコードID(MMS ID)に001フィールドを使用し、以前のシステムIDは035フィールドに保持されるため、Alma関連のレコードロジックはUNIMARC 4XXフィールドに含まれる、以前のシステムIDの035フィールドをチェックします。The links between these records are created with the Alma MMS - Build Record Relations job (see Viewing All Scheduled Jobs) that is scheduled to run every day.MDエディタを使用したインポート、エクスポート、公開、目録のコピー、編集によるレコードの連続的な移動の間、Almaはこの形式、ロジック、処理を活用して書誌レコードを維持および管理し続けます。
Similar to the 773/775 Derive New Record function for MARC 21, Alma provides the same support for the UNIMARC 461 (Host Item) and 451 (Other Edition) fields.For more information, refer to Deriving a New Bibliographic Record - MARC 21.
- [MDエディタ]を開きます([リソース > 目録 > メタデータエディタを開く])。
- デフォルトのテンプレートを指定し、リンクする関連UNIMARC書誌レコードを開きます。
- Select Record Actions > Derive New Record.The Derive New Record dialog box opens.
 UNIMARCの新規レコードを派生ダイアログボックス
MDエディタ非編集モードのレコードの表示
The format of records that are displayed in the MD Editor in nonediting mode are formatted in the same manner as records that you edit in the MD Editor.この非編集モードの書式設定は、MDエディタ内の次の表示に影響します。
書誌レコード
From the editor's left side, select the Records tab and select MARC21 Bib.
From the editor's right side, select View Related Data, and then select:
- コレクションを表示
- 検索画面で表示する
- 目録の表示
- リンクされたデータを表示する
- メモを表示する
- オーダーを表示
- 関連する書誌レコードを表示する
- バージョン情報を表示する
- 元のレコードのバージョンを表示
- アイテムを表示する
所蔵レコード
From the editor's left side, select the Records tab and select Holdings.
From the editor's right side, select View Related Data > View items.
Viewing and Assigning Collections
To view and assign collections, you must have the Collection Inventory Operator role, and it must be scoped to the institution.
レコードが割り当てられているコレクションを表示し、コレクションへのレコードの割り当てと割り当て解除を行うことができます。
- Edit a record (MARC, Dublin Core, DCAP, ETD, or MODS) in the MD Editor and select View Related Data > View Collections.コレクションペインが表示されます。
- Select Add to Collection and select a collection to which you want to assign the digital record.コレクションがコレクションペインに表示されます。

To unassign a collection, select Remove.
1つのコレクションのみに割り当てられているデジタルレコードに割り当て解除リンクが表示されないように、デジタルレコードは少なくても1件のコレクションに割り当てる必要があります。
For more information on collections, see Managing Collections.
「外部プロセスが元のレコードを変更しました」コミュニティゾーンレコードを編集するときのメッセージ
When attempting to release Community Zone records from the Metadata Editor, you might get this message: "An external process has changed the original record.元のレコードを再読み込みすることをお勧めします。」
This message occurs when a record is open in the Metadata Editor (which means that it exists as draft), and while it is open, another process changes the record in the repository.「他のプロセス」は、例えば、API、セット上で正規化プロセスを実行するジョブ、または典拠が優先する用語修正ジョブなどです。As a result of the change made by this change, the record opened in draft mode in the Metadata Editor is now different from the record saved in the repository.
This message notifies you of the change and recommends reloading the record to get the most up-to-date version.To reload the record, select Record Actions > Reload Original Record.
Page tags: article:topicproduct:almacontent:Documentationlang:english
